Welcome back to the Event Lighting Channel. Welcome back to episode two of Thomas Koppers, showing his workflow. In the last episode, he was doing all the back-end stuff, all the setup stuff, all the things you need to do to set up his show file.
In this episode, he's going to show us exactly how it works when he touches the button—how all the faders work, how all the sequences get assigned, how he sorts everything into worlds, and how that actually works in a practical sense. So, I hope you're going to stick around for this second part of Thomas Koppers' programming session. By the way, if you know Thomas from the internet, he is in a lot of different internet forums out there, answering a lot of questions.
We have a Discord server as well on the Event Lighting Channel. If you're not a member yet, there's a link down there in the description where you can sign up and be a part of it. It’s totally free, and if you're lucky, you can get help from Thomas if you have any GrandMA3-related questions.
So, let's get back to Thomas and his show file here in the GrandMA3 Show Me Your Workflow series. Yeah, and before I go to my show view, which I think everyone is mostly interested in, one of my most important views is this view, which makes it empty. If I want to have something, I just can have an empty view and store whatever I want in this view.
And yeah, it's working; that's why I have an empty view—just to make the screen empty. So, jump now to my show view, and as all my other views, everything is already set up for me like I want. I have one color view, I have a position view, I have a basic view, I have a Smart View, I have an amster view, and I have the executive views.
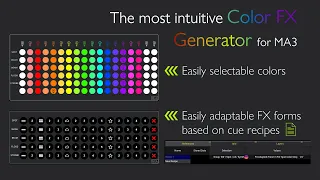
Basically, it does all that is written there in color—everything is inside which belongs to colors. As I said before, I'm working with worlds, so everyone else is using the color picker. You have ten different kinds of groups, so you have ten different kinds of rows that you are using, but I say, "Why do I need so many rows?
" Even if I have ten groups, I have only five rows. Every row is basically doing the same; every row has one sequence behind it, with colors from all ten groups. I can decide individually; I want now this first row to set that it’s for all colors.
So, if I change a color here, I will change now to another view. So, you see now—depends, I think, in the corner. Yeah.
And so if I change the color here, everything is going to white. If I say these two fixtures should not be integrated, it goes to. .
. because I didn't select it somewhere else. Let's say I do it here.
So now it's blue, and I can change it to red. So I will go here again to white, and you'll see everything will change to white again. So that's the question: is this something you will do during the show, or is this something you will do before the show to integrate maybe some floor package or anything?
That's during the show—just during the show. That’s live work in the show. I can decide which row should contain which fixtures, and mostly I'm using one row with all fixtures.
Then let's say this group should contain all the moving lights or only the first group of moving lights. Let's do it like they are individuals, so the first thing should do only the fixtures in the background. Yeah, this is a fixture background, which is group one.
Group two are the fixtures all in the ceiling, which is here. So I can just go to blue, and then I think, "Ah no, I want to have magenta. " For all the fixtures, I just press magenta, and as you can see, for sure there is at the moment going a swipe.
This is controlled by this button here; I can just control it. I can even turn it off, and then if I say I want it all in white, everything goes white immediately. I can change the fade time to everything, and I say, "Okay, let's do the fade," and it's fading.
Let's move into it. It makes no sense to have a fade timer—let's say a little fade time. And let's go from left to right, and yeah, it's going now from left to right with a short fade.
I can do it on a different side without a fade. What do we want to have? Unit of yellow?
So we do it from a different side. It's working really quick and easy, and it's fine. I'm sorry to interrupt, but I need guests on this show to make it happen.
So, if you are a GrandMA3 programmer, I would love to hear from you. You don't have to be skilled; you can be brand new—that's fine with me. You can be working with theater, you can be working with tours, you can do corporate—that doesn’t matter, as long as you want to be a guest on this show, and we can look into your show file the way we are doing today.
So please sign up for the list below, and I will be in touch with you. So, let’s continue. But what will I do if I have a fixture that doesn't have RGB or CMY?
I have a problem. If I want to have a color swipe with a fixture that has a color wheel, I can disable a group of fixtures by using this. So, for example, let’s do it.
Yeah, left-right is good. The group of these fixtures in the ceiling has a gobo and a color wheel. I just switch this group off, and if I go there, they just jump to.
. . This color, without any swipe, this is what this button is doing.
So, I can say individual in the show. I want now that some fixtures don't do a swipe. Let's say "JUMP" directly in; this is what they're doing.
Another point is, are these two groups which look individual? This is a so-called color bump. Um, here I selected now all groups; they should be in color red and do a strobe.
I never got to this color bump. It looks like this: everything is going red and is strobing. Okay, I want the strobe, let's say the stop, to do a swipe from left to right, and the same will go for the color.
So I can just type this, and it's going like this—it's really nice busking stuff, I would say. Yeah, and it's really, really versatile, and you can basically do anything. Yeah, and the biggest advantage now in MA3 really comes out here.
I will show the sequence—how it's built, or better, I should just say here again. Here, I have selected every one of my groups because it's world-based. It's color red, it's fade zero with a swipe from left to right, same with strobe with a swipe from left to right, and the sequence itself is done really simply.
Where is my sequence? It's just one cue which has group one with a preset of the color and a trick. The same is going; if I go down, I have the same group one with a preset for beam, which is a stop function within a matrix.
It's done really easy and quick, and because I use at the moment this delay function inside, which is the swipe as a delay from left to right, it has a duration of 0. 5 seconds. The star in front means the speed is double because the sequence is, of course, controlled by a rate master.
Why do I use a rate master in my show file? Um, maybe I should go back and explain what's the difference here between a rate master and a speed master. The speed master is a master which reacts to every effect or phase I use inside a sequence, and the rate master is controlling the timing in a sequence.
I said maybe before that in my show file I use 60 BPM as my standard speed. So, 60 BPM means I have 60 changes per minute, which every second is a change, and all my timings of my sequences are one second. So, if I have a show in a show with a speed of 120 beats per minute, I know that the rate is two times, and so it means 0.
5 seconds for the length of one beat. The speed of a speed master is 120 beats per minute, so the speed master will be at 120 beats per minute because every half second, a beat is coming. This is why I keep everything to one second, so all my basic timings in my whole show file I will just do it the quick way.
I set the speed to one, and if I show you the same group now, I think it was here and two. As you see it here, it's now one second. So, the base is one second.
And does it? I have to see if it's built like it should be. No, it doesn't do it.
The sequence is already stored with one second. Yeah, this is so everything, so even this timing is one second. Of course, the fade timing is not to one second; it's done to four seconds.
But if the rate master is going to 120 beats per minute, these four seconds are only two seconds long. Okay, and these two bumps are equal; I can only use them individually. So, I can say the one should have, let's say, I see here's a mistake—haha, because it should be a go-to.
Not wanting to step through; I want to have a go-to. Okay, I go, let's say from. .
. let's do it fancy. Let's do it now fancy.
Okay, it's different. I changed the color to blue because at the moment we are in white. Okay, and let's say this is.
. . here's the first one, and here's the second one.
So you see now that the strobe is coming from the completely different side, which is really a cool view. It looks really. .
. ah, fancy. And so I can just tap here from left to right, suck, and let's say I need the speed—let's make it quicker so that it makes more fun.
So you can see you go over and you do this, and you can do really the crazy stuff. It's going in the BPM speed you tap in, so it's really cool. Definitely an EDM show, that's for sure.
Yeah, I really must say that the show file I could not use in a classic show. Maybe for rock, it would work, but for classic, not. Yeah, and so the timing is over all show files.
So, the whole show file has this timing inside, so everything is based on one second at 60 BPM. Another point here is a color effect generator, which is laying on a fader, so it is defined by these three rows. I can have a two-step or three-step phaser.
Let's say I have a two-step phaser; I choose this one. I have a phase of zero to 360—no wings, no groups, nothing—and I can go in, and it's doing this two-color phaser. Then you can change the color by changing the reference, and I can change the color here to yellow.
It's doing yellow now; it's working. And I can say, "Okay, I want my. .
. " That's why it was set up like this; I want my special stuff. My.
. . I call it the French look.
Yeah, and yeah, so I'm right now thinking to put another thing inside, which makes it so that I can put a strobe on one. Of the steps, so you can really do cool things. Then, as well, yeah, so I can do a wing inside here.
So it's changing on the fly. That's very nice; it's very, very cleverly done. Yeah, so this is this.
I can just use a fader to do it halfway, or I can just use it as a button to jump into it. And yeah, this has an individual speed fader because I noticed that it doesn't correspond really nicely if I use the normal speed fade-off, which I use for dimmer effects. So this is basically the color view I have, and of course, I have here this lazy function like "show control player off" or "short control one, two, three, four," or "master.
" Mostly, it's standing in this position enough, correct? Because I have this here, yes. The position view is, um, yeah, it's just done really basic because I have position A, top position, and a low position.
I think I programmed only two. Let's say it's jumping in. No, it doesn't do so.
Let's do no. Oh, perfect. I have two rows: Cue A, Cue B, and I have a position fader; it's like this here, and I can change between two positions.
But I didn't set up the position. So maybe I just show you—I can just update one group and do the position like this, and this group should be like this. So, okay, and I store this position in the preset.
It should be up. Okay, and now this should work. Hold on, I need to start it again.
One, one. Two, two. And now I can fade between the two positions.
Okay, and the magic behind this is, and why I have two rows, let's see. At first, this doesn't do something different than "copy preset down" to preset of Cue 1. This does "copy preset up" to preset of Cue 2.
Nothing more, nothing less. And I have two rows because I have now a visual overview on which preset is using in which position. If the fader is down, I know that the top row is activated; if the fader is up, the lower row is activated.
Maybe I should change it; it makes more sense, but I'm used to this workflow. Yes, I must confuse different operators if they use my show file so that they don't understand why I'm doing something. Yeah, yeah, it's a little tricky, yeah.
And then, I have, besides this, only really four movements: Pan, Tilt, Circle, and eight—that's all. And as you see at the moment, let's activate the circle function, and you see nothing; that's [ __ ] —nothing happened. Okay, what happened?
Really easy and simple. I have a fader here to start this, and for the others as well. So nothing happens when this fader is not up.
Yeah, correct, correct. I have another fader here which I can control both at the same time, so it's a really nice, easy workflow. And yeah, I can change it here, and let's say I go to a pan tilt.
It, of course, jumped to this position, but this is a normal behavior. I think in circle it's best to see; I can change the wings to zero. It's doing a circle, and I can do it parallel.
Then it circles like it should do. I mean, all these operations you don't do when the effect is on; you change it once and then start the effect. So this is done really nicely, and I'm prepared for maybe future views.
I have a button called "Direction. " At the moment, it's empty because there is no direction. You can change direction by using the face a different side, but I don't use it for position right now.
And of course, here I have as well a fade time and the delay time, so I can have a swipe between everything what I want. So, but this I leave to 100 percent; I hate this. So this is all what it's doing here, and here is a special function which is like "Drp and Break.
" Let's say I do the drop, and it does similarly switch off the lamps, stop every move, stop every phaser. And if drop is coming, I go in again. Okay, I don't have this on this screen; I have this normally on my X keys.
Um, yeah, I will explain how my executors are set up after I show this, and this is just to control on the screen as well. So here I do the setting because I can say don't switch off the lamps completely, just at the break. Just go to 50 brightness.
This can also be done, and I can say for sure, let's do it with a fade time and how long this fade time will be. And I'm thinking about adding a delay time as well to it so that I can make a swipe over this whole view. And then I have this—how should I say?
—fly out here. I can say the flyer should work with Group one and two, which are the moving lights. You can see right now they can go from down to up, from up to down, from inside to outside, from outside to inside, from top outside to whatever, how I programmed these positions before.
I can say I do it with wings and so on and so on. And then the fly out, um, I do the master down, and then I can start the fly out, which is for sure not working because I didn't set up these positions. I'm sorry.
Okay, fair enough, uh, no, no. Maybe I can just show how quick it is done to program it. Yes, yeah!
So, um, I have this top position; I want to see something. Okay, I will start from this position, which is the down position. Though I should press so much, and I do the same there.
So, oh! And then I have this up position; I will store it to the up position. So it's done.
Just a question: Why do we have two for down? Too far because I'm too lazy to use a mirrored MATricks, but the real point behind it is: maybe I don't have this up-and-down position. I can have it in different sizes or different positions.
I can even make this looking equal. So now it should work. Let's say, oh, I do a group of two; I don't know if it's working.
Now I have to start this macro. At first, I have to start the macro first. Sorry, I will just start the macro, but it's done quick, and I'm finished.
Magic already happened. Choose my groups again; say this, say this, say this. Thank you!
And here we see it's going like it should be. And I say, okay, I want the phase from 0 to 90, and I want no wings, and it's working how it should be. Can you control the speed as well somewhere?
I can control the speed as well, of course—rotary knobs. Yeah, do you find the rotary option useful? I mean, you do, but I think there are so many rotary knobs on the console, and I'm like, I could find use for some of them, but not necessarily all of them.
Ah, I have it very useful. Yeah, maybe it's now a good time to speak about my executor, how I set them up. I should go to Wing one, and here I have normally set up because, again, I'm using all-time words for it.
So I have only five executors for dimmer instances, and I can say, oh, wait a second; I have to switch it after that so someone can see it better. So here, at the moment, the fixtures are working fine, and I have really a function for the rotating knobs here to scroll through this cue list. So I don't know what is on the first one; let's see.
Yeah, as you see, it's working really nice, and I use the fader and the first rotary knob for the first sequence or for one block of sequence, as you can see here. The second is belonging to this, which is just at the moment like full, or I can choose the sinus, and it's going to sinus over. So this is what it is doing.
Yeah, and I think here—ah, now here are some different lamps on, and all this is controlled by Worlds. I have in my basic views the selection of which group I want to have for which fader. So I have five faders, and I have five group sets, and here you can see group one and two at the moment is on the first fader.
I can also say different; I just set it up that on fader one is group one, on fader two is group two, and on fader three is group three and four. So if I go here now, I have only group one, only group two, and group three and four, and that you simply change by changing the selection in there to show us. I can just change it in this basic tab here by changing this selection in here.
So I do it like this, and now if I go back to the faders, I have all on, and the other thing as well. And now here, only this one, which makes me done it really quick. Yeah, so if I want to have—all, I can also say, I think it will not look good, but let's do it.
I will select all, and I have on my fourth and fifth fader all fixtures on, so everything is bright up now. Yeah, and of course everything is doing the changes as well. Yeah, so everything is incorporated into all the effects you can select.
Yeah, so this is how this is working. And then here comes normally all the five moving fades, but here it is individual for group one, group two, group three, group four, group five. But this will change.
I'm just working on it to have also the same with choosing it over Worlds, that I have different versions, and maybe on the faders, but this is something I'm working on. This is one of the things, as I talked to many of the programmers about on this show here, that all the show files, first of all, it's as personal as a fingerprint, and second of all, it's always evolving. Yeah, and then below this I have some buttons.
They are not set up at the moment, but you will see what this is doing in another way later. I have so-called busk things, which is the thing that I work most in. I can.
. . I will just show quick what this busking stuff is doing, and it's like this.
All these functions I have on these buttons below—oops, this was not what I wanted, or here I can do like this. This is sent on these buttons I have below, but it's a little bit different. So here I have everything that is on the left side, everything that is on the right side, everything that is outer in our center.
I have to change because this is my setup. I use it on a PC where I have a fader wing and the command ring with ten faders each. So on the other hand, I have then every odd, every even, every up, every down, and all, so I can just do it here.
Yeah, then on this second bank, I have this. . .
Oh, I better should switch on that we can see something, but we want to see something. I have the position fader, which is just basically—it's not a secret—it's as well done with recipes and as well with a MATricks. It's just doing the same group preset, a MATricks.
It's the same here, group preset, a MATricks; that's all simple. Oh yeah, I was here, and then I have a playback master. I have two playback masters, let's say I have.
. . One playback master for pan and tilt options, and one playback master for dimmer options.
Now I will start again: do it like this here, and this one should also do like this. So, now I have it on two faders. If I want to have a blackout, I have to move two faders down, which is really nasty if you are on a big show.
If you have five faders, then, ah, I have only five fingers, and I also need the movement stop. I just have this dimmer master, put it down, and everything is off. So how does that—how is that set up?
Is that just a group master? Is it doing something? This is, indeed, like it is labeled here.
It's a master. You have a playback master; it's just a playback master, which controls all the dimmers. So, these sequences have—oops, edit settings.
The sequences are assigned to a playback master, which is called Dimmer, so they are assigned to the playback master Dimmer. Everything that is inside this, or what is assigned to this playback master, can be controlled from this fader, and all of my buttons, which I use, which have intensity, are assigned to this playback master. Everything that is color, what is dimmer, I can push down, except for example, the front light; I will not put on a dimmer master, no.
And now maybe it comes this question, because a playback master—this, hold on! This makes me nervous! I'm not on the show—this playback master only works with intensity.
So, if I have a color, it changes nothing; if I have a position, it changes nothing. And now, maybe someone wants to ask, "But if it works only on intensity, why do you have a playback master for pan and tilt? " So, I will show it—oops, I have to go there again and start the second scene.
So, if I use this playback master, I can put it down. But as I said, a playback master only controls my intensity. Why does it control now this?
The magic behind this is that I have to go back to these two groups, because you see that the groups are still at 100 percent. Yes, these groups are calling, or these faders are really controlling the sequence, and the sequence contains the phase of the move. But behind this is a stomp fader.
This stomp fader just stomps all relative values, and a move, for example, is a circle with 20 relative values. The stomp just pulls down the relative values to zero, so it stops all the moves because it's zero percent relative now. So, just a question—so it's a stomp but on a temp fader, so you can adjust it the way you want.
Yeah, and the stomp is for sure as well a position information and can't be controlled from a playback master. But when you use a stomp, the stomp is when the fader is up, it is stopped. But what you want is that if the fader is up, then it's at 100 and not vice versa.
So, you need a so-called remove fader, and there I have a remove fader. This removed fader is just basically a dimmer channel or not a normal dimmer. I will show in patch—it is here, of the preset.
No, it was preset folder; it is an inverted dimmer channel. I can show this fixture; I created a dimmer, which is just different than on the other way. Normally, it is with zero percent.
Now can you see it here? No, you can't see it here. Yeah, here you can see it.
It goes from zero to 255 in DMX values, but the physical is going from one to zero, and the normal dimmer channel is going from zero to one. Because if you have the value upside down—yeah, this is what it's doing. So, I just created this to have, if I have the fader up, it's at zero percent because then I want adverse wiser.
And because this is a dimmer channel, a dimmer channel can be controlled from a playback master. That's the magic why I use a playback master here—yes, hours and hours on this show file. Yeah, I spent a lot of time because I have to reprogram everything I used in MA2, but the basic construct is really done in MA2, and it's doing nearly similar.
Yeah, and then, so just on the encoder, and that's it. And I have, of course, haze and strobe speed. Yeah, that's it.
And as you see, there is a lot of free space on all the executors and buttons, so it means you can do really compressed work with fewer buttons but with full functionality. Yeah, it's an amazing file! I would say it's just done a lot of brain work inside.
So I will go back to zero, and yeah, let's do what is—or let's say this is mostly the thing what you are doing in normal shows a normal way, and everyone programs it like it normally, and you have a straight workflow. You could even do, like, colors on faders; you can do gobos on faders—everything. And maybe someone will ask, "But here's only position, and it's only dimmer effects on faders and executors!
" What happened? What did you do? How do you get gobos?
How do you get presets for this? I have my so-called Smash and M steps, and this is basically—maybe I should say—I have, in my basic view, I can just switch on gobos and zooms, and all this I can switch it here. And I can do the zoom like, "Okay, let's do it all at 100.
" Is this possible to do as well? Works really fine, and no problem with doing it! So, but, yeah, this is just for lazy things.
And if I, for show start, if I leave the fixtures in such a position, but I have a so-called smash burst and M steps, this is basically doing as well—copy a preset on another one. This master preset is. .
. Stored in a sequence, and here I can say, for example, I want that only the fixtures here in the ceiling, not the ones in the background, should have the color red. Okay, I decide the world should be these fixtures, and it should be red.
I want to control the left and right sides individually. I say left and right, then I have these buttons here, and I can do left and right and tap it in the tempo I want. Now I think, okay, I want to be extra cool because I want that this color is coming with a delay.
I can say, okay, the color gets a swipe from left to right. So I go again to my buttons, and it's going with a swipe, so it's very cool. I have to stop it again.
Okay, now you say we'll switch it out again, and well, I have to think all the time there are buttons here. Now you think, okay, but if you leave the button away, it stays red. I don't want it to stay red because I want it to go to white again.
So I have a function inside here that says a two-hit step, and so I have now [__], and the next one in goes off automatically again. If I tap at a speed, it doesn't go off again; it just stays, and after a while, it goes off again. If I'm lazy as well, I can say, "Ah, I'm so tired of typing all the time; I want to have it as a chase.
" I'd go here and say, "Do a position delay, and the stop comes afterwards. " This is really cool; that is really cool. Yeah, it is.
Now I can say, okay, I have these pictures there, but I want the fixtures on the roof to do it. What will I do? I change the fixtures on the roof and say, okay, now you do it.
Now the fixtures on the roof are doing it, and of course, the speed is low, so I type a little bit faster, and it's going faster. But I must set the speed, and as you can see, the timing is done all in the correct way. Yeah, but maybe here it’s working now in the right way.
Let’s try it out. Now, it’s just a problem of the color. I don’t know why it’s a problem with the color; really interesting, even in red.
Yeah, I think the problem is there is an issue with the release. Oh, I’m on the wrong one. I want to have this thing.
Okay, so this is what I can do, and I have three individual settings with which I can do it. But right now, I have only the left and right selected, so I can't show it in all the other possibilities. Okay, I put it up in here, and I have another step forward.
Wait a second; I think I can show it here with some bursts. It should work now as well. Burst left and right should work.
Yeah, here you see it's working with the burst as well, but only left and right. The others are not programmed yet because the groups are empty. Yeah, I have the so-called m-steps, where you can see it on my x-keys four buttons below.
So, four buttons below, and here I can define, I want that on the left button, only the right fixtures are on. Okay, I want that group three is also with the right fixtures, and oh no, let’s do it with the left; who's the left one? That will get a little bit more confusing.
And here then the right one, and I want, let’s say, go -10. Yeah, and I want that the zoom is doing a zoom out to 50 percent. Yeah, and the position should come with a swipe.
The dimmer I don’t need because I can switch the dimmer off here if I want. Okay, no, it’s working. I never press the buttons; it’s working super.
Yes, it seems really simple, but behind it is kind of crazy. Yeah, and this, as I said before, is just copying one preset to another, changing one world to another. Okay, behind this here is as well a little bit of work in groups.
Basically, I have symmetrical groups; if I select this group, it creates another group with this position. It’s a little bit tricky to explain, but it’s working. Once you get into it, it’s working really simply.
Yeah, I think now I’m done with my eye. I wanted to explain about the fly-out, how I created it, and how this. Or maybe I should play a little bit more.
Yeah, playing a little bit more is cool because to show this, there is a little delay of the color of 1. 5 seconds, and the zoom after one second gives them a completely different look. So, if I do it like this, it looks really amazing because you can do so many cool things with the timing and verses delays.
It’s really great, but it’s just so crazy to see how many options you have on one button. I mean, the old-school way of programming, you would have stuff on faders, and these two faders—odd and even—are different fixtures. But here, you have so many options on the same button.
So, basically, you do your selection with one finger and do your steps with the other hand, which is really, really cool. And yeah, I can make this go release as well, so I can hold on to this button as long as I want, but it switches off after a specific time. Yeah, and I see that in group one, it’s a timing issue because I think it is assigned to it.
But anyway, group one. . .
"Is not really working like it should be. Oh no, it's working like it should! But anyway, group two is faster: 0.
6, 0. 6. Good question!
I have to find out why it's a little bit different. Yeah, but they can do a lot of things, and it's fun to play with. Yeah, so to my flyout: see, it's working super!
It's smooth, fine, super. Yeah, let's go and switch it off. Okay, if you have this MA standard template, the flyout is super; it's working, of course, like it should.
It's working fine; it's working smooth. Everything is good, but you can't change the positions; you have to do it yourself because you see you have absolute positions, relative positions, timed positions—ah, this sucks! I don't want that.
I wanted to create my own way. For me, this size is too big and not flexible enough, and it does not look like I want. So, I decided to create my own flyout, and basically, this creator is really simple.
I have a user variable with the flyout speed; I can change it individually here. If I want the flyout to be really, really slow, I put it to five or to ten—whatever. However, if I want the base speed to be really fast, I can put it to 60, but for a flyout, 60 BPM is too fast.
Then it does nothing else; I make a preview on, which is similar to blind, but it's in a different programmer. So you have the preview programmer and you have the ordinary programmer. And why I use the preview programmer is that if I have something active in the normal programmer, it will not be overwritten by this.
That's why I use the preview programmer: it clears everything. I select all my groups, which contain dimmer and position attributes. Let's say, yeah, demand position attributes.
Then, I call the preset for dimmer zero, enter preset, position flyout low. Next step, because you can just take the next step, it's a dimmer that should be 100, and the flyout position is high. And these two flyout positions are not supposed positions I program because I can program the positions however I want.
I think I must change a little bit in this macro that it's really universal then. But anyway, I just switch between two positions: this position, flyout low, and flyout high. And equal to what is in this position, I then use so I can exchange by copying one position to flyout low and the other position to flyout high.
The complete look of the flyout effect. And this is what I'm doing: I use one master preset for low and one for high. After that, I go back to step one and set the dimmer transition to zero, and the width of the dimmer should be 30 percent.
So, same for pan entered. And this is again a difference to this flyout in MA or the predefined flyout. It's a predefined flyout; it only works in tilt, but I want that it can come from the sides, which means I have different things, and only tilt is needed.
I need pan as well, so that's why pan and tilt also have the width of 30. And I set the speed for all to the flyout speed, which I define at the top. And now you can see why I use a variable for it, because I don't have to type this speed everywhere.
I just know that the speed is correct in every line I use here, because after this, I use the variable. Yeah, and then after this, I go to the next step, set the transition of the dimmer to 10. And again the speed, and I store a preset.
I really make this definitely a selective preset; this is why I have the slash selected, and I want to overwrite what is before in, because I don't need all this old crap. So if I have, for example, some of my preset fixtures inside there, because I used a different fixture type in the show before, I have a preset fixture inside, and I need to override this because if I merge it, I get a different amount of fixtures in and maybe a different position, which causes problems if I use MATricks over it later. Because the MATricks make a symmetrical view of all this, and after that, just clear all, switch the preview programmer off, and cook the sequence: flyout master.
This is the sequence which is laying on the fader, and that's it. Easy! And here in this show file, I just select a world: the world with group one, with group two, with group three, four, five, and six.
And why only six? Because I defined that only my first six groups should be able to do movement effects. I have to rethink; if I have ten fixtures which have movement effects, then I have to change something in my show file.
But right now, I seldom come up over five or six fixtures that have movement effects; those are those different fixture types. Yeah, so in the sequence, you can see I just have these six groups which belong to this preset. What I write before, it's preset 137 from an all pool, and as you can see here, it stores to the preset pool 134.
37. Yes, and that's it. This was a sneak view through my show file.
That is a very, very cool and very, very complex show file. I think it is really, really cool. I must say it is really cool.
I think it is because we've been talking for almost two hours about your show file, which I think really, that long? Yeah, no, well, since we started our call. So yeah, um, I really enjoyed looking at it.
I really enjoyed seeing all the different ways of doing it, and again, the difference in how people work, and the difference in how people think, and how you can actually use the console and its ability to change stuff in the program on the way and change references in effects. " And stuff like that. I think it's amazing.
Yeah, it's basically a lot of copy and paste. Like, let's say, yeah, but it has to—I mean, you have to think of it first, to think of what the options are. What can I use this for?
How can I make this easy on myself? Yeah, and if someone, for example, just asked, “Yeah, but how do you deal with it if there are different kinds of fixtures? ” I just created the groups.
Now, my question, after we have been through all this, is: What would you say to people who say that GrandMA3 is unstable and doesn't work? It's definitely wrong. Yeah, GrandMA3 is absolutely stable, and it is a software that has many more features than GrandMA2 has.
Even now, of course, still some things are missing, but the advantages of this software are massive, especially for building a show file. If you have a show file and start from this file, it is a massive speed improvement, definitely. So, I think the most important thing is that people should understand it is not GrandMA2.
Yeah, especially if you are used to special workflows with off-timing, for example. It behaves a little bit differently. One really big difference is that in GrandMA2, you use a sequence, assign it to an executor, and do all the settings in the executor.
Now, you do all the settings inside the sequence, and it doesn't matter on which executor you put the sequence; it's working. This is a huge difference to the workflow, which I was thinking in the beginning is tricky to do. It's not convenient, but after a while, I understand how cool this is, how cool it is to work.
Especially that you can—I call it now copying a sequence, which is basically not copying a sequence; it's assigning one sequence to another sequence. You can have ten instances of the same sequence, and you only have to change one sequence, and it changes all ten sequences you’re doing. Yeah, and you can have individual settings in all the sequences.
So, basically, all my color sequences are one sequence, which is just assigned to several other sequences. I only have to change if I want to change something. For example, I find a new cool feature in what I want to integrate.
I mean, at the moment, there is nothing new, and I would not have to know what else could be done, but in principle, I only have to change this one sequence, and it changes over all sequences. Every one of these individual sequences can have different settings; it can have a different timing. No, that's wrong—timing will be the same—but it can have all the completely different settings, like behavior, how to work with phasers, how to start and stop.
It can have different speed masters; all this can be different, but it's still the same sequence, and I can just do it with one click. Yeah, and the same is with recipes. It is such a massive improvement of the workflow to work with recipes.
It is definitely. But, Thomas, I want to thank you. I want to thank you for taking the time to do this.
I'm sure that a lot of people will find your workflow interesting, and it's definitely going to be a long video. I think it's going to be a two-part video, actually; we might break it in the middle or something. I really want to thank you, and I hope to see you somewhere in real life at some point.
Definitely in summer, I will be in Germany. If someone in the community wants to meet me at Parookaville or Time Lab, you will find me. Okay, I don't know at what time I'm on the stage then, but I will definitely be there.
That's all right. I'll see you later, Thomas. Okay, bye-bye.
Bye-bye. So that's it! That is how Thomas works with his show file.
I hope you got some value out of this. Be sure to give the video a like, and be sure to subscribe to Event Lighting if you want more of this kind of content. I hope you enjoyed it, and I hope you learned something.
I mean, there's definitely some gold in here; there's definitely something to learn from Thomas. I hope to see you in the next episode on the Event Lighting channel, and I hope you enjoyed this one. So see you next time.
Bye!