Hello everybody welcome back to another trading video today we are talking about Trend following uh trading model this is the trading model that I use on a day-to-day basis this is what I trade and this is what I found the most success with but before begin I want to remind you guys that this video is not a financial advice this is for educational purposes only please consult your personal financial advisor before making any Financial decisions so in this video I'm going to be talking about swing points how to identify swing points as well as unmitigated
areas uh sndd zones whatever you want to call it uh and how identify those and at the end we're going to go for some examples and executions so before we begin I want to mention uh one of my favorite quotes from uh Leonardo da Vinci uh Simplicity is the ultimate form of sophistication and I really try to live by this every every single day not only with trading but the everything in my life most people think that the more complex something is the better it is and really it's couldn't be farther from the truth just
because you going to attach and put on so many confluences and so many ideas into this one trade it does not mean that that trade is going to have a higher probability of success for example let's take something very simple steak all right how do you want your steak cook medium rare some salt and pepper and that's it the steak is not going to taste better because you're going to put a special sauce on it the steak is going to taste better because the quality of meat is better the higher quality of meat the better
your steak is going to taste and then also there's preparation and execution how can you cook that perfect steak how can you prepare that perfect steak it's not about adding a special sauce and special uh spices on the steak it's about the quality of meat and how you prepare it the same with sushi you you got all kinds of sushi restaurants you got uh all kinds making all kinds of sushi rolls but if you have a high quality of fish and you know it kept up in the right temperature and prepared at the right way
that's what tastes the best the fish is not going to taste better because you put special sauce on it if the fish is high quality you can eat it raw right all the sushi is raw fish so you will noce if fish is bad really it's all about the essentials and the fundamentals of the things the the same with trading we want to strip away everything to find the essential truth the fundamental truth that there is to the price action so let's keep this trading model as simple as possible so we can go on and
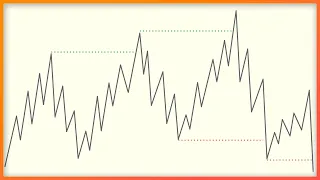
practice our execution because it's not about the concepts it's about execution of the concepts all right so let's start with swing points what is a swing point bullet swing point is established after price closes about the high and the better swing point is established after the price closes below the low and I'm highlighting the word closes because that's what is going to confirm and establish the swing point a price closing above a high closed above the high pull back into the swing wi and goes back out and I'm not talking about double tops okay that
we have this second High sweeping the first high this is not the part of this model we want to have a clean swing point and the swing point is confirmed after price closes above the high or below the low swing point is established the bullish swing point is going to be the last move down before price breaks higher and the bearish swing point is going to be the last move up before price breaks lower this is the fundamentals to this trading strategy without the swing point we're not going to execute the strategy so first of
all we need a high that's broken and a comeback into the area at least into the 50% and we look for a TR trade inside here if we don't see this formation the swing point if we don't see this we not taking any trades at least according to this trading strategy so I'm going to say this again it's not the tools you use to engage with price but where within the structure you are looking to engage and this is where the uh another concept of Simplicity comes in you know a lot of people think that
structure is not enough and I'm saying and also as I learned from Dave teachers okay the DT effects that structure is all you need and a lot of people going to be fighting about it a lot of people going to be arguing about it that there's more there's more to it than just structure but really structure is all you need structure provides narrative structure is what you see on the chart and hopefully in this video I'm going to prove it to you that structure is all you need but some of you not going to believe
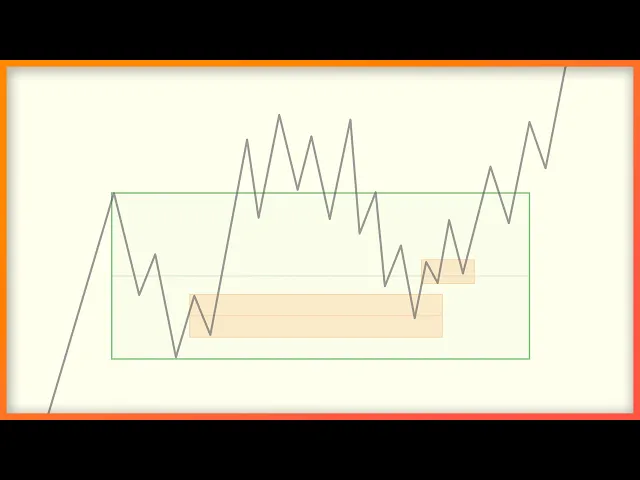
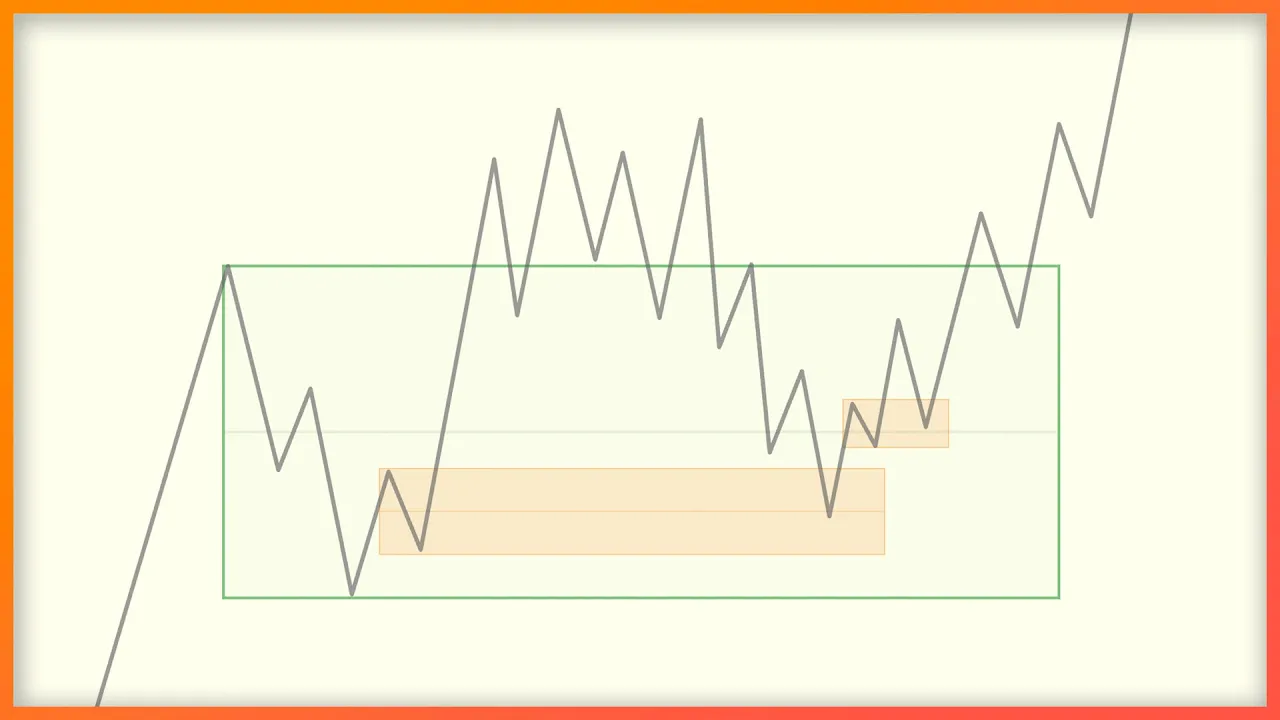
me until you going to take these Concepts and apply it on your own chart and see it happen every day that's going to come for back testing forward testing live executions and so on but yet again I'm here to give you the framework it's going to be up to you to master that framework and to execute that framework and this is a simple schematic what we are looking for if you open the chart this is you might see this type of price action right so we have a swing Point established in here we have the
last move down before price breaks higher we have a closure about and we anticipate a retracement Down into 50% or at least 50% when when we have a strong Trend sometimes price does not come back to 50% I understand that it happens you know price is not going to be always going to 50% but according to this trading model I want you guys to focus on 50% okay because really the 50% is all you need and you will stay out of a lot lot of bad trades if you just focus on taking trades at or
below 50% in the long trades and the short trades it's the opposite we want to short about 50% this is the first component of this trading strategy we want to have established swing point and only then we going to be looking for the trades at or below 50% and when the price gets gets there we're looking for the signature reversal pattern and this is where we anticipate to enter our trade to take it to at least to this Zone High which is the swing Point High from all the way up here this could be Target
also the new high could be Target or we can maybe just Target you know from here to here one to one this in itself is already uh winning strategy but also we can refine it by including unmitigated snds unmitigated zones and here in Orange I have highlighted unmitigated zones and here you can see where the price traded up and left without mitigating this portion of the price action ideally we want to find this little area of price action that was left un mitigated price moves away breaks lower retracements higher comes into the area that we
identify and inside this area we're going to be looking for the same thing but on a lower time frame you can also identify that on the same time frame just as I'm explaining on this schematic but it's most likely going to be on a lower time frame that you're going to see the same type of pattern where we make a swing higher we break below and we come back into a mitigated area that was left behind the same with the Longs we have this area that we trade away from and here as you may notice
I actually um drew it as we are tapping into this area this is where that uh pattern comes in where we have a first stop and then double bottom continuation this is one way of the how price action plays out sometimes so the same way we have our swing established we have our Zone established high probability Zone below 50% below or at 50% it's going to be high probability Zone that you want to identify ideally it's completely unmitigated Zone just like a in the short B here and when we get to this Zone we watch
for this pattern yet again it's it's every time it's the same pattern okay it's the same pattern and here inside of this pattern we want to look for the same thing for the unmitigated Zone that was left behind so we have price going down into the zone and we not taking trades until price comes out and makes a new high makes a flip and then we look for the areas Left Behind inside this little swing to take our entry here stop loss below the swing and we can take targets to the one to one may
Target this Zone high or Target a new high this is the whole model right here now the next step is to pair two time frames you want to have one high time frame like in here and also you want to follow the lower time frame so you can spot this reversal on the lower time frame now you need to be back testing and experimenting yourself what time frames do you like for example 15 minute time frame could be your high time frame and this is where you look to identify the swing points and then on
a lower time frame 1 minute you're watching for the price to after it breaks and establishes new high right you're watching for the price to come back down not sure why I drew this over here but let's assume this is a wake in here but anyway on the lower time frame we after we broke the high we look for the price to come back down into our unmitigated Zone and give us an entry inside the unmitigated zone so what is unmitigated area a mitigated area is a footprint of Institutions buying or selling so when we
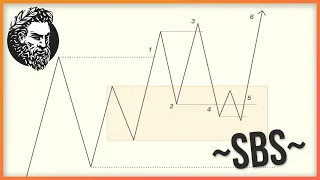
have have an area left behind that means there was a lot of strong buying in here and most likely these are institutions that buying it up but we still got to come back to feel those inefficiencies left behind and this is where we going to find our opportunity to enter here's another example schematic and I promise you I'm getting to some actual charts but here to reinforce the concepts we have the trigger the trigger is the swing Point established right and we broke above closed above it so this the first criteria met we have a
a swing Point established now we wait for the price to come back at least to 50 or below so as you can see here like this is around where the 50 is and the price dipped below that that low and provided some push But ultimately we still had this unmitigated Zone left behind so we can anticipate this little Trend to end and come back down for this final piece in here and then after it comes down in here we look for the reversal pattern and we enter in here this is the ultimate Target the new
swing High uh you can exit one to one one to one from this zone is is very good or you can exit at the SW swing Point High right here swing point in here established there's 50% there is a swing Point High there is a swing Point low so you can have a trade going from 50% to the swing Point High and you can have a stop loss below the swing Point low that's the simplest trading model you can have but you still got to back test this to find out um which zones fail which
zones hold and to train your eyes and to actually get used to reading the the market because a lot of people like I said instead of keeping it simple they add on so many confluences so many ideas into one trade that they end up with analysis paralysis and then any little thing can throw off their original idea off so that's why I like to keep it simple trigger entry Target trigger entry Target trigger entry Target trigger is the swing Point entry is unmitigated snd flip Target is the target new high here's another version of this
uh schematic so this is going to showcase the logic of the Swing point and uh how swing points really work a lot of the times you have the swing Point established and we we have a closure above and then what happens is that all of this price action in here that is not coming down to this unmitigated snd this is could be considered as inducement where the smart money inducing the retail to you know try take Longs and Longs again and then maybe shorts from here and this is all engineered liquidity and you're going to
see it um on a lot of Swing points like this where we have uh consolidation right at at the top of the range and then we have a dip and we have a quick move out after mitigating unmitigated area and in here we could be looking for our setup this is your classic accumulation manipulation and distribution and usually and PE people not really aware of this but when they're talking about the accumulation manipulation distribution usually it's all happening inside of the Swing point and that's why I keep telling you guys I keep talking about Market
structure is the most important thing Market structure is the narrative what's the narrative here we have established swing point so we bullish right we overall this is a bullish swing point now we need to find out where to buy okay because we can buy in the top of the range we can buy at the 50% we can buy at the bottom of the range but where do we buy so that's the next one so what is the narrative here we we went up we closed about it and we consolidating we consolidating right above our unmitigated
area and this is where we want to take a trade at so when we see the consolidation above our area we know that this could be a trap this could be inducement the smart money engineering the liquidity for the final manipulation down and up because the narrative is bullish so this is the high highest probability setup right here when we have inducement we have engineered liquidity we have a manipulation into unmitigated Zone and this unmitigated Zone should be responsible for something and usually it's going to be responsible for breaking some structure in here maybe like
overall structure all the way there sometimes we have this as an snd responsible that I talked about in my uh previous videos this could act as an area that will put a new high but overall this is part of the inducement still this would be snd responsible and this is would be move origin in a very bullish Market sometimes we don't come back to the below 50% sometimes we just bounce off of the snd responsible and that's fine you need to back test and find out for yourself which trades are you willing to take because
because I rather wait to 50% or below 50% because I know that we could run into some Shenanigans right on top of the range and I don't want to be caught in a ranging environment when I'm looking for the continuations right so again a lot of people going to run into the trouble because they might belonging here instead of waiting for this it's all about the rules and you got follow your own rules all right so let's uh take a look at some examples I uh found some random trades on uh NASDAQ we're going to
be using 15 minute as our high time frame and 1 minute as our lower time frame so number one we have our swing Point established we have the last move down before price breaks higher we have a closure about the swing point so now we anticipate price to come back to 50% of the Swing point and at the 50% we're going to be looking for our setup as far as a mitigated snd that we are looking for this is this candle in here this this whole candle is going to be unmitigated snd because this candle
in here closed the bow we went up right and now we coming back to test this snd also if you might notice there is this first step and if you follow me on Twitter you will understand me this is the first step that acts as a inducement going back to our schematic this is the first step in here that acts as an inducement and this is the the double bottom continuation that goes to make a new high okay and this is hard to see on 15 minute it's all going to depend what you're going to
choose to follow as your higher time frame and it's going to come from back testing you need to see these swing points form and you need to see what happens after the swing Point forms so here on one minute once we got into that 50% right we tapped exactly 50% and sometimes this crazy Precision like that we we tap 50% and what happened on one minute we have a flip right this is the flip we have high low higher high and we came back where we came back to the unmitigated area to unmitigated candle see
these two candles the last move down before price breaks higher is unmitigated it's never been tapped so we go tap the this scandle in here and we immediately shift higher so this is what we really looking for we're looking for the flip on the lower time frame and then the unmitigated area to get in and as you can see here this is was actually the only one un mitigated area sometimes you're going to have area on top of the range Which is less probability right right what did I say I said at least coming back
down into 50% so but when we don't have unmitigated areas at 50 or below this is going to be the most likely area that to support price because if we fail this area I would be anticipating going down below these mitigated areas these areas already been mitigated as you can see we break higher we tap back in break higher up back in but only this area was left unmitigated after breaking this high so this is exactly what we're looking for and then our Target could be the Zone high right which is the that's a small
Target here we could uh maybe hold it higher to this right this this is a Zone could act as a rejection and it did right the Zone act as a rejection so this could be your Target so we we take a trade from here to here bam done done for the day that's uh how many points is that you know there's 10 15 points in there and we don't have to hold to the ultimate Target this is the final Target which is a new high let's take a look at another example we have a bearish
swing in here so number one bearish swing is established right we broke below closed below the bearish swing on a 15-minute chart and now we anticipate a comeb back into the 50% and into un mitigated Zone which is right here and we we tapped and rejected immediately right this is that unmitigated zone right we we have a move up and shift lower without coming back and tapping the Zone we only came back and to the Zone after breaking the low so this swing point is confirmed so now this area in here is going to be
a high probability area for us to take a trade lower so again we're going to our one minute and what do we see we have low high lower low and continuation down the same thing is happening in here we have this swing point established after we break below the swing point and close there is a candle closure below we look for the come back into where 50% and come back into what unmitigated Zone that's left behind so really you see this zone is responsible for breaking a low and also was left unmitigated see there is
a imbalance there's a gap in there stop loss goes about here Target goes to one to one or we have Target Zone low right this whole Zone low this is another Target or the ultimate Target we make a new low and I really suggest you to start with uh one to ones and just try to get you know Five Point stop loss fiveo Target on on I'm talking about NASDAQ and Q that's what I'm trading I'm Trading Futures uh NASDAQ here's another example with inducement we have the swing Point that's left behind we went up
right closed above it and now we anticipate a pullback down at least to 50% right we trade higher we come back down this is trade in itself if you know what you're doing you can buy below these lows and take it higher but that's not what we're talking about here today this is not our trade because it haven't reached 50% so we weigh all of this and remember what I said this is inducement this is engineered liquidity this is accumulation we have final manipulation and we have expansion higher what happened in here we left this
area and mitigated you see this in here this is unmitigated move origin that we came back to and in here here is where we looking for our setup so what happened on 1 minute we dipped below 50% we tapped into a mitigated Zone in there and now we're looking for our flip so what happened here what is this it's a flip right tp1 one to one TP Zone High and the final TP could be the new high so yet again this is why I'm saying be careful of taking zones on top of the range because
they could be liquidated they could be swept just like we had it in here but ultimately you want to have stop loss below here below the swing low on one minute after breaking out so this is our trigger we have swing Point established we wait for the price to come back into our unmitigated Zone and we went higher and look look again right we price keeps break breaking higher comes back into a mitigated Zone you see all of these imbalances in here this is tells me that that's a gap price went higher this is institutional
sponsorship now they have to come back and mitigate this area because they they had so much buying in here that they left and filled orders in here Market comes back to fill these orders and we take our trade higher we are now entering into the bullish Trend so what happens again we have this swing Point established right we come back into unmitigated Zone in here right this this this last move down this whole thing and we trade higher and look what's happening on each swing as I said we have inducement manipulation the same thing here
happens inducement manipulation and we go go up the same thing on this swing happens inducement manipulation and we go up see even in here this little thing in here it's like an inducement manipulation and we go up in a bullish Trend they will manipulate the lows and in a bearish trend they will manipulate the highs so keep that in mind but this is essentially what we are looking for and it's all the same across all the time frame every time every day all day long all right guys let's do some back testing and I'm going
to show you how to uh anticipate and execute these trades so just to prove a point that market structure is all you need I'm going to be trading on 15sec chart as my high time frame and 1 second chart as my lower time frame and actually here you can see this is 12 tick chart uh which is about the same as 1 second chart and it's just um smoother candles and just easier to see than 1 second um but it it's still going to depend on volatility how this going to look but anyway we're just
going to go to uh whatever February 14 uh let's go after 10:30 after retail gets wrecked and uh maybe we can see some uh Better Price action 1042 that's fine let's see uh let let this update and uh quick we're going to try to find out where we are so uh currently we are in uh this uh swing in here and um I guess you can say we bullish I don't really hold the bias because I don't care which direction to trade if I see my setup I'm going to execute my setup which is established
swing point we have established swing point but this is a swing point on the high time frame there is different Trend inside of this which is downtrend you can see after closing about high time frame High here this is some high time frame swing point in here so after closing about this High We Are bullish but I'm not going to be just entering any bullish trades unless there is a flip right so if we're looking for our unmitigated zones maybe we can bounce um there is a mitigated Zone in here maybe we can Bounce from
uh this little Zone this everything else in here looks like mitigated there is unmitigated um little thing in here but I'm not going to be taking bullish trades until we have a flip right we are in a big swing so I want to be focusing on a smaller swing I'm going to be F and I don't really care what's to the left in there right I just know maybe we can bounce from these areas in here but ultimately I'm going to be focusing on the downtrend until we flip bullish so uh let's mark out some
um unmitigated zones and uh you can pay attention here um from the top when we reversed it provided nice short setups so uh first of all this is an mitigated Zone on top of here it also tapped right into that UNM ated candle right at the move origin over there as long as we keep breaking lows if it's going to keep giving us these nice um setups in here that's that are short right so now the latest swing we are right now in this uh short swing this bearish swing and uh there is this uh
High candle in here that we can uh Target as a unmitigated candle and let let me see what's uh here on the one second and as you can see we have this move up and a sharp move down leaving this whole thing in here this whole area unmitigated so I'll be anticipating a come back maybe to this area and maybe a short out of uh this area all right so uh and you also you can see in here right this is looks like it's coming back up this is looks like uh flipping but uh I'm
not going to be entering those because that's not part of my rules I'm I'm going to be waiting for a mitigated area and waiting for the flip so we're just going to wait until this price action unfolds and see where what we do when we touch our area on top right and you can see this is um this is a bullish area we can um Bounce from this wasn't mitigated right so uh that's that that's an area that's a proba look at see bam going higher so see ultimately it's going to that zone but I'm
not going to take this trade because it's not part of my rules and I want to show you guys that discipline is the best thing oh look at this goes up goes down I'm going to show this going to show this unmitigated uh thing in there let's see if it works let's see we're going to put our stop about here very tight stop oh immediately goes lower look at this from our and who there it is Bam quick I love this it just goes quick straight to the five points and I get it it probably
going to go lower to break this low uh but look at this Precision this is unbelievable wow it actually rejected from this little thing in here right but what I was waiting for I was waiting for this to happen I was waiting for this to happen right target filled this is all you need but where you looking for this that's what's important where are you going to be looking for this you know know it kind of look like this in here but it's haven't reached our identified zone right so that's why see when we Mark
out the candle that last candle as on it tapped into it immediately shift lower and and a new low there's way more than five points but I don't care I just won my five points and I could be done for the day right I could be done for the day right now but uh we're going to keep looking for another trade let's see one more trade and and then I'll be done for the day let's see maybe we can find a bullish trade but we we're going to be um waiting for the right and we
have this so this on Top This fractal tap into that Zone on top so this would be a high probability maybe short out of this let's see if this happens but uh let let it play out we have the a Zone below but yet again we are bearish so I'm not just going to be taking this random Zone because we are bearish it could flip in here but I'm not taking it here again I'm not going to take it because that's not part of my rules I'm I'm waiting for this to come back all the
way up here and see I guess you could take it but it's it's there's not a clean setup in here and I want a clean setup so uh we keep going and um breaking down this is uh really I need a deeper mitigation of the Swing right I want to see it trade all the way back up here and then maybe have another opportunity to short if not if not I'm not going to argue with price I'm going to anticipate what I'm uh looking for see fake flip comes into unmitigated area in here I'm not
taking it but it still works you know I'm just trying to filter out lower probability trades and only take the highest probability that I see so and uh how to learn by practice practice practice practice and identifying the right zones and the right zones the highest probability zones going to be the um the ones that uh unmitigated so uh this looks uh don't like how it looks this could be inducement so again we still have that zone about uh that I'm looking uh for price to get traded to if not not we we we're going
to relax but this looks like maybe we could be flipping in here or something but yet again I'm not going to place any bullish traes until we have a clear flip but we could be coming for these lows in here all right that's fine let's see if we can uh Reach This Zone in here maybe take another short yeah I'm going to delete this zone now cuz we we did get a bounce from it yeah we did but like I said I'm not going to be taking cuz it's against the trend now this this looks
like a flip in here right this whole thing looks like a big flip right let me see what happens here what happens inside the [Music] Zone um looks like we shifted but I don't really like it that much don't really like it all right looks like we are actually did flip right it came into the Zone we flipped let's see if we can get a trade in here it's probably too late it's probably too late I'm not going to stress it going to remove the trade it's um not liking what's going on in here see
it's flipp let's see what uh where else it's might be skipping this area oh maybe it's going to flip bullish so see again I'm anticipating flipping bullish because um we are inside the bullish swing on a higher time frame so I'm I'm following 15 seconds so let's see what happens in here this this all looks um like a range to me cuz see this was swing this wasn't mitigated it bounced from there uh let's see where it's going no if it's going actually yeah this this could be so we had um this all of this
was inducement you know I I couldn't really um I didn't like what I see so that's why I didn't short it let's see where we end up are we going to break lows or not let's see you know oh that's a switch that's a flip okay that's a flip so so let's uh take a look so first of all we broke about this right so so there is a bullish flip in this and look at this what's going to happen in here right I'm going to set a buy limit on this snd responsible right is
that a flip that's a flip let's see oh man come on come on let's see if this works out all right I want to track oh going to wait there it is there it is I'm just going to put this to break even oh and we got a Target so what did we do in here we identified that this was a flip right so if we want to truck the candles the flip happened here because see this candle broke this low and these little candles in here they are part of this big candle see they
sweeping this big candle so so this is not part of structure and then after we broke down below and broke back up this in here is a bullish flip is heav this is very early bullish flip if you can't see this stay out and wait for more flips but what happened we came into here left this unmitigated broke out higher and it came back where to snd responsible so see this is what we see on one second on one second guys okay this is 1 second chart look at this comes into snd responsible the unmitigated
Zone and shifts out of it so we get stop below here Target Five Points entry at snd responsible amazing stuff this is two trades I took right patiently waiting for what I want to see and executing on my one thing that I know repeats every single time okay so now I'm thinking maybe we flipping bullish right I had a nice success look at this zoom in if we don't reject in in here this is zooming out amazing look this is another swing in here could be established let me see if it's um closing about closed
B we're going to look below right in here this is where I want to see price to come back to see this whole thing in here this is unmitigated right and even come back down here this is unmitigated so let's see if price is going to come back down this is below 50% right and let's see what happens oh let's see let's see up up okay okay can we have a flip H nope nope oh wow okay all righty so this was a small flip in here right this was a small flip but we couldn't
make a bigger flip right so we can see this bullish flip on the lower time frame so that that's why I was so confident into taking this bullish flip is because we established and this this is this is a swing on one second I see okay only one second we had this swing up close about it had an inducement about it and then came back into a mitigated area made a flip and and shift higher but then reversed completely and there is no flips see after It reversed in here no flips so I was looking
for the flips right but no flips so we we go break lower so now we back to the bearish because we couldn't break about this one you know in here it's really hard to justify that this is a flip it's really hard to see but there is a small flip there is a small bullish flip in here if you can't see this stay out and keep waiting for your high probability areas there is another short could be coming out of this let's see and uh really I want to see maybe like go back all the
way up here let's see we closed below right let me see it closed below so we are currently in this swing in here and I mean I don't really know oh this swing in here sorry there it is I don't really know if we're going lower or higher see that's fine I don't really care about left I want to see what's going on on the right I want to follow price instead of think where it's going so currently this is just going down right going down I I don't know what what to do in here
I want to see a come back at least uh you know at least to this fractal you know I I want to come back higher really but let's see what's what's going to happen I I don't care about anything in here really not really unless we start maybe closing about these candles that would be like a smaller flip for me but uh really the the the highest probability is going to be shorts from these areas in here just going to let it Price play out see what's what's going to happen we haven't touched that zone
above I'm not going to be interesting in any of this uh I want to see a Zone touch yeah I'm not interested mm well this is flipping bullish like I said that there are small small bullish flips in there and you can see in here this is was a flip right we we came back all the way up here and came to test uh this area in here I really missed it I guess but I'm not going to be interested like I said unless we come in look at this and I I missed this to
already by talking it okay yeah did I miss it um but we haven't touched right we haven't touched those areas and I don't really don't really care guys you know I got clapped so many times by taking stupid trades not following rules that I I don't want to be clapped again and again you know I want a high probability trades I'm going to take maybe one to three trades a day and I'm done you know I'm done I don't need to sit in front of the screen after taking one or two trades because uh I'll
let the copier do the heavy lifting right I'll let the copier you know copy the same trade the same highest probability trade that I can find across all of my accounts that I have so it's really about taking the best trades and trying to identify the best trade you you can and I just don't understand why would you want to try to look for it on higher time frame where here like I'm showing you here you this is 15 second chart I mean yeah it's kind of sped up or whatever it says it's it's the
same but uh it feels sped up to me we've been here only for like 10 minutes you know and I took two trades and got 10 points so it's it's not not about you know trying to find the best setup on high temp it's about trying to find the quickest setup you can at least in my opinion I I rather take you know these two scalps three sculps whatever and I'm done for the day honestly like if I'm feeling like passing a challenge or whatever I'm I'll be trading uh all day long and try to
pass a challenge with just these quick scalps or I might take like a high leverage trade and pass it in one two sculps you know but it's all about the the trading setup so we keep trading lower you know we keep trading lower there's nothing to see to the left um let me see what's uh one second doing hold up yeah we we getting some kind of shenanigans here kind of close the bow here but uh no flip on on this time frame so 15 second let let me see what the hell is going on
in here this might be printing a reversal or something but yet again our short if we going to go up it's going to come from here you know that's where our hyper probability short is look comes comes down lower okay that's fine that's the whole zone I'm going to just reduce it to un mitigated area it's right there is really um I would like to take a trade from here because this um on one second you can see this is a kind of inducement let's see what we do all right we top into another area
identified to the left which we really don't care about uh this is a very heavy downtrend it just keeps downtrending um we tried to flip it in here we couldn't so keep keep downtrending that's fine let's keep downtrending I don't care about that area really because I'm focused on the shorts and uh yeah we have that Wick we also yeah we also have this but this is getting tight see how it's getting tight I think this is going to get ready to flip you know we might be able to to do a flip roon in
here I'm really watching 15sec chart you know because I'm not really interested in this price action right I I'm not interested in this I want a clear swing I want a clear swings I I I I see this is like don't like that this could be a flip in here this could be bullish flip if we can close about that candle but we not closing about that candle so let's see what's happening in here one second and yet yet again this is 20 minutes in we could be done we could be done two trades I'm
done um really again if if we come back out of this I I want to see maybe coming into this area and like I said I want to take trades above 50% I don't want to take trades below 50% so this is just keep selling off you know we are back at the lows and see that's why I keep trying to tell you follow the trend trend is your friend so if it dumping and there is no bullish flip like what are you trying to do maybe long this this these areas in here you know
ain't going to work bro not going to work boom ah this looks like a flip I'm not going to trust this this is very in okay yeah I don't like it don't like it don't like it so yeah just sold off yeah see it's it's too tight it's too tight there is no swings in here you know I I don't I'm not interested really like give me some bullish swings at least and maybe we can talk about it now let's speed this up because um it's not getting swings I want to see a bullish swing
okay this looks promising let's see a closure about here all right let's assume we have a closure there well let me see one One X so there is the bullish so finally we we we having some signs of bullish price action so what we're going to do we're going to anticipate a retracement uh Down Below in here this is around 50% or whatnot right so let's see okay looks like a flip looks like a flip and no flip oh oh okay well no flip all [Music] right messy messy oh that's flip that's a flip right
that's a flip ain't it flipped I I would like to see it come back to at least here I don't know if it will come back all the way there there it is we're going to put um our stop in here okay stops to break even just going to Trail it a little bit oh oh up and there it is Bam yeah so we identified the Zone yeah I I get it it it went down lower that's fine we still anticipate the flip and see there was the flip there is your flip we we had
a high we had a low high high comes down into what unmitigated area bam and this is our trade This Is How We Roll see we flipped bullish we look for the bullish stuff and we take our profit at Five Points or we we take it at this high right target to filled right but uh it's up to you how you're going to trade this that was it three trades uh you can be done for the day you can be done for the week depending on your strategy but it's really all about taking the best
set the best setups you can find it's all about refining the best setup and taking the same thing over and over and over and over again and you're going to have you know trades that might look like your setup but keep in mind your rules need to be followed because the only way to lose is to not follow the rules there I I promise you there is no concept that's going to work 100% of the time the this is as close as it gets to working 100% of the time I promise you I I learned
almost every Concepts uh there is this is the best that's working for me and that's why I'm making these videos so you can take advantage of this information too all right guys well hopefully this video was uh insightful and helpful uh answered some questions if you have more questions uh leave them uh down in the comments below I will try to answer them in uh my new videos also you can ask me questions on my Twitter uh on my ex account whatever you call it now uh it's uh at stoic ta so um you can
ask me questions there but uh thanks for watching and I will see you in the next video take care