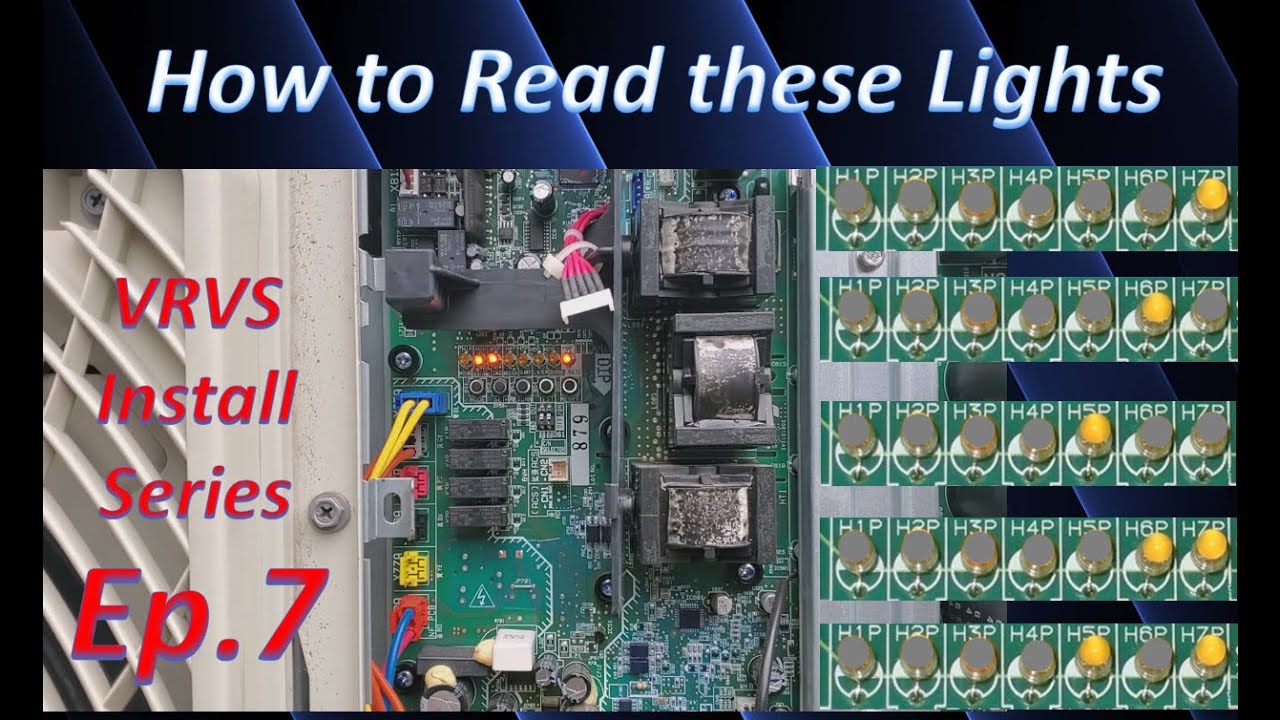
hi everyone i'm dana and welcome back to inverter always in today's video we're going to be talking about the buttons on a daikin vrvs outdoor unit this is going to be episode 8 part of our diken vrvs install series very very good information to know when you are the person who's powering up and firing off and commissioning a daikon vrvs system in the last video we talked all about the binary the leds all those lights on the outdoor unit what they mean and how to understand them in this video we're going to be building off
of that where now we're going to be getting into the menus we're going to be talking about how to navigate the menus differentiate between which menu you're in and the next couple of videos that we do honestly are going to build off of that last video where you need to know what the light values mean so if you haven't already i highly recommend checking out that video i put a card up in the corner now for you guys so you can go check that out take some notes practice a little bit it isn't too complicated
once you get the hang of it and then come back to this video and and so on and so forth with the rest of the series just depending on when you're tuning in it's a lot of information to get through you guys but i think once we talk about it should make more sense especially if this is your first time doing a vrvs this is going to be very helpful i hope for you guys out there who maybe don't quite understand what all these lights and buttons do and what their functions are so you guys
if you enjoyed today's video please click the like button below and if you haven't already please consider subscribing i anticipate you guys are gonna have questions if you do don't hesitate put your questions in the comments below i read all of your comments i always do my best to respond to your comments as well and as i've said throughout this series there are no bad questions you guys it's very common if you have a question you might think oh this is a stupid question i guarantee somebody else is thinking the same thing i always tell
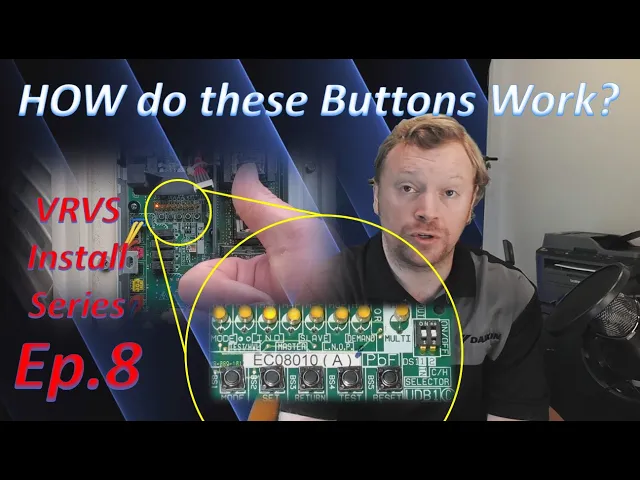
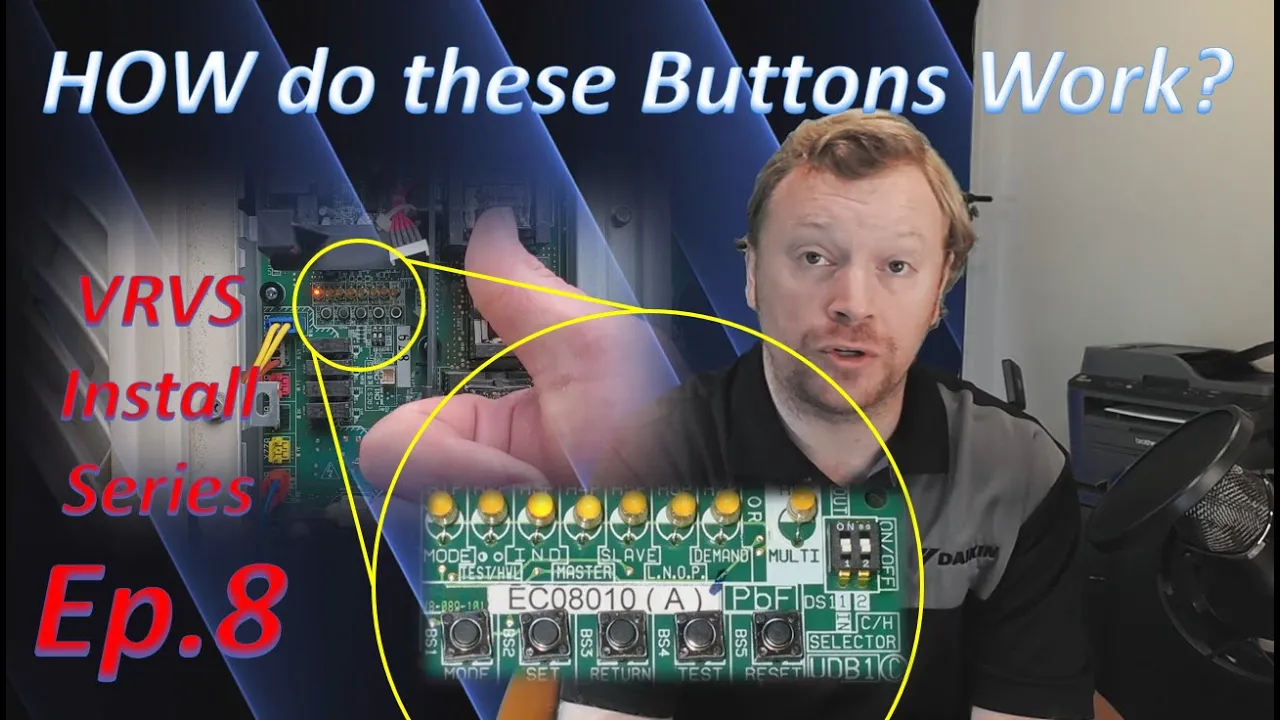
my guys when i'm actually doing a class in person guys we're one big happy family here we're all trying to learn the same thing we're trying to absorb as much as possible you guys are all my sponges today so don't hesitate to ask questions okay all right there's a lot of information to get into here you guys so let's jump right in [Music] all right you guys so if you look at the leds or i should say if you look under the leds on your vrvs outdoor unit you're going to notice that you have five
buttons to to utilize during the startup process and you can actually use some of these buttons for service and troubleshooting later when there are issues but for today we're really just going to focus on explaining what these buttons are what they do what their purpose is and how to use them in a general perspective okay so the first button that i want to talk to you guys about is the mode button it is the button all the way to the left it's right underneath the h1 and h2p lights and it says right underneath the button
mode so the mode button is utilized for really just uh two purposes it gets you into a menu so that you can verify information within the system or so that you can change information within the system and then it is also your escape button and so typically what i'll tell guys in class is you mode in and you mode out you mode into the menu you press the mode button to back out of the menu go back to the main screen you know you're at a main screen because the h3p light will be the only
light on out of all those leds which we're not going to talk too much about the lighting system in today's video i'll explain what lights turn on when you're in the menus but we're really going to be diving into uh power up initialization the main screen status counting into units in the next video so kind of just put a pin in that for now i am going to give you guys a little bit of a light breakdown but really only as it pertains to what happens when you press these buttons so h3p is your main
screen so when you press the mode button one time h1p will blink you're going to press the mode button one time when you want to verify information you're not changing anything so i often use the example once you've powered up all the equipment and the outdoor unit has automatically addressed all of its indoor units the mode button is used in what we call monitor mode mode one you press the mode button one time to verify the communication between the outdoor and the indoor units which we're going to do here in the next couple of videos
the way that you know you're in monitor mode is because h1p will blink in the last video we talked about h1p having a value of zero when we went through and we discussed what all the different values number values of all the lights were h1p had a value of zero the reason it has no value is because that light is specifically used to tell us what menu we are in when we have nothing on h1p means we're not in a menu we're in the main screen h3p should be on when h1p is blinking that is
monitor mode we are going into the monitor menu to verify some piece of information what piece of information we don't know yet we don't really care all we're focused on is that h1p light so let's say i go in i verify some piece of information and now i'm done i press the mode button one more time to escape back to h3p and if you happen to be standing in front of a unit right now you can sit there and hit the mode button over and over and over and it basically goes back and forth from
h3p solid to h1p blinking and then you escape it goes back to h3p solid unless you have an error in the system actively alarming then h2p is also on which we'll talk about in in a different section of this series but mode in mode out so let's say now i wanted to make a change let's say i don't need to verify any information i need to turn on a setting i need to change a setting in the outdoor unit some parameter to make it behave differently or do something for service related items such as i
need to open all the valves in the whole system because as we discussed in an earlier video of this series the electrician landed line voltage to my indoor unit before i finished purging with nitrogen and now i have a closed valve i need to open up that valve well there is a setting in the outdoor unit that does this if i need to change a setting i need to go into what's called service mode service mode is mode 2. the way you get into service mode again from h3p solid you always have to start at
the main screen press and hold the mode button what you want to do is press and hold the mode button until the light changes if you watched the nav controller series i'll put a card up in the corner now for you guys uh we talk about this in great detail anytime you need to get into menus you're pressing and holding a button until something changes and there's no difference here press and hold mode until h1p is a solid on light that's how you know you're in the service mode mode 2. if you don't hold mode
down long enough and you let go and h1p starts blinking well that means you're in the monitor mode and you didn't hold it down long enough it treats it like a button press so simply press mode again to escape back to h3p and then this time press and hold it until h1p is solid and now you're in service mode so let's talk about the next button the next button is called set if you go through any of the literature or if you actually sit in on a class you'll often hear an instructor myself or someone
else say you want to go to mode 2 setting 21 setting 21 is kind of a hint what button do you press you press the set button the set button is simply going to toggle through all the different settings within a particular menu so for example let's say i need to count how many indoor units are physically communicating with my outdoor unit i need to go to a particular menu and then within that menu i need to go to a particular setting so that setting happens to be setting number five so for example if i
was going to verify my communications correct i would press the mode button one time when the screen was at h3p that's my main screen my home screen i press mode one time so the h1p blinks i confirm h1p is blinking that tells me yes i am in monitor mode and now i press that set button five times because i need to get to setting five and here's where understanding the binary is really important because when i press set five times i need to look at the board and i need to verify did the correct leds
turn on to indicate that the board accepted all five of my presses when we get into some later videos you're going to be pressing the set button 20 times 21 times 37 times you're gonna be pressing it a lot and if you're sitting there just mashing it the board may not accept all of those button presses or what happens very often at least to me is my phone will ring while i'm going into a setting now setting 5 is an easy thing to verify that's not very many presses but 37 that's a lot of presses
so understanding the lights if i got to take a call hey kevin yep great sorry okay bye click i need to be able to go back to the board and see okay these are the lights that are on this is how many times the board accepted my button press so that way i know where i'm at oh i only pressed it 16 times i needed to press at 37 so i still have 21 more presses to go happens all the time so here if we're simply going into setting five we press it five times we
can verify the leds five and seven are both on because they have a value of four and one again we talked about this in the last video i know i pressed it the correct number of times so now i need to go into that setting to verify the information i need to hit enter there's a button the next button over called return return is bs3 and it's right underneath h5p on the board it says return right underneath the button that's my enter button so i'm going to hit return after i've pressed set five times and
now the information for setting five will be displayed on those lights so setting five again just for our example was how many indoor units are communicating with the outdoor unit if i installed six indoor units same example we used in the last video then i should have a binary value of six displayed on my lights which is five and six h5p and h6p a value of four and a value of two both of those lights should be on so i'm going to quickly verify yes i see five and six are on now h1p is still
going to be blinking so don't freak out about that and that's telling you hey you're still in monitor mode it's going to be blinking the whole time i am in that menu so technically you'll have h1p blinking with five and six on telling you hey you have six communicating indoor units after you verify that information whether that information matches what you physically installed or if it doesn't match what you installed doesn't matter to escape you simply press the mode button one time now here's where we are going to kind of push pause because when you
have a correct number of indoor units matching the led sequence you're good to go you can go on to the next step if for some reason let's say i installed six but i only saw h5p turn on well that means that the outdoor unit actually only sees it's only communicating with four of the six indoor units so now what how do i know well shoot i'm missing two but which two daikin has a really cool troubleshooting feature called forced fan and we're going to be doing forced fan in a different video a video that's dedicated
pretty much just to force fans so that way those of you who need it can just jump right to it but it's a pretty neat feature and you do it all from this outdoor board and then all you got to do is walk around the site and see well which units are not operating their fans and those are the units that aren't communicating with the outdoor unit but again we'll talk more about that in another video so we understand what the mode button does we understand what the set button does and we understand what the
return button does now i want to do an example where we're going to go into the service mode mode 2 and we're actually going to change information because the set button once i hit return and i go into a setting that's in service mode the set button is also going to toggle through all of your options so you use set to get to the setting you need you hit return to enter go into that setting and then you hit set to toggle through all the different options now many of the settings might only have an
on off type of option so you're not really toggling between much on or off but some settings have multiple options number of degrees outside that the heat pump is going to lock out at things like that so it's not always going to be an on off type of thing but setting does two things so if i need to change a setting let's say i need to turn on a feature let's just use force fan for an example since i've already introduced it to you guys i need to make sure i'm at h3p my main screen
go into service mode by holding the mode button down until h1p is solid now i'm going to press set five times because in the service menu forced fan is setting five so in the last example we did setting five but that was in monitor mode h1p was blinking so same setting number there's a reason it's the same setting number is because you use these two things all the time to make it easy to remember but this time h1p is solid so we're in the service mode service menu we're going to change something we're going to
turn on forced fan so you hit set five times verify that you've pressed the correct number of times because h5 and h7 are both on hit return to go into that setting and now the led that's displayed is the current option on or off 7p is blinking because that is off that is the default now you use the set button to turn it on you toggle from on to off or off to on seven moves to six six is on seven is off so you hit set once to go from seven to six a value
of one to a value of two and then you hit return because you need to save that setting here's where everybody misses one crucial step when you're changing settings on the outdoor unit you have to not only save but then you need to activate the setting so after you've moved it from seven to six and six is blinking when you hit return the first time the blinking h6p goes to a solid h6p now you hit return one more time that activates that setting and it goes back to the beginning of service mode so now h1p
is solid and it's the only light on you leave the outdoor unit alone and then you go do your troubleshooting inside to see which fans aren't running and we'll continue that particular troubleshooting example in the video we do on forced fan on but for today i just wanted to explain how to use mode set and return and then of course whenever you're all done you hit mode to escape now knowing that you press mode to escape is going to be very important because sometimes you're going to be pressing the set button many more times than
just five you're going to be pressing it 20 times 21 times 37 times a lot of times if you lose track if you accidentally get button happy we call uh we call you guys button pushers if you're a button pusher you need to be careful go slow and if you make a mistake or if you think you made a mistake just stop what you're doing and press the mode button to escape so that you don't accidentally change a setting that you don't know what you're changing because it will directly impact how the system is behaving
or performing so it's extremely important in all of this that you you know follow instructions and just like in the nav controller video where we talk about doing field settings when you're changing these settings you should always be going from paper to the board from the paper to the thermostat so you're not accidentally changing something you didn't intentionally want to change so now we really only have two more buttons to discuss we have the test button and we have the reset button and these are very very easy buttons you only use them once usually and
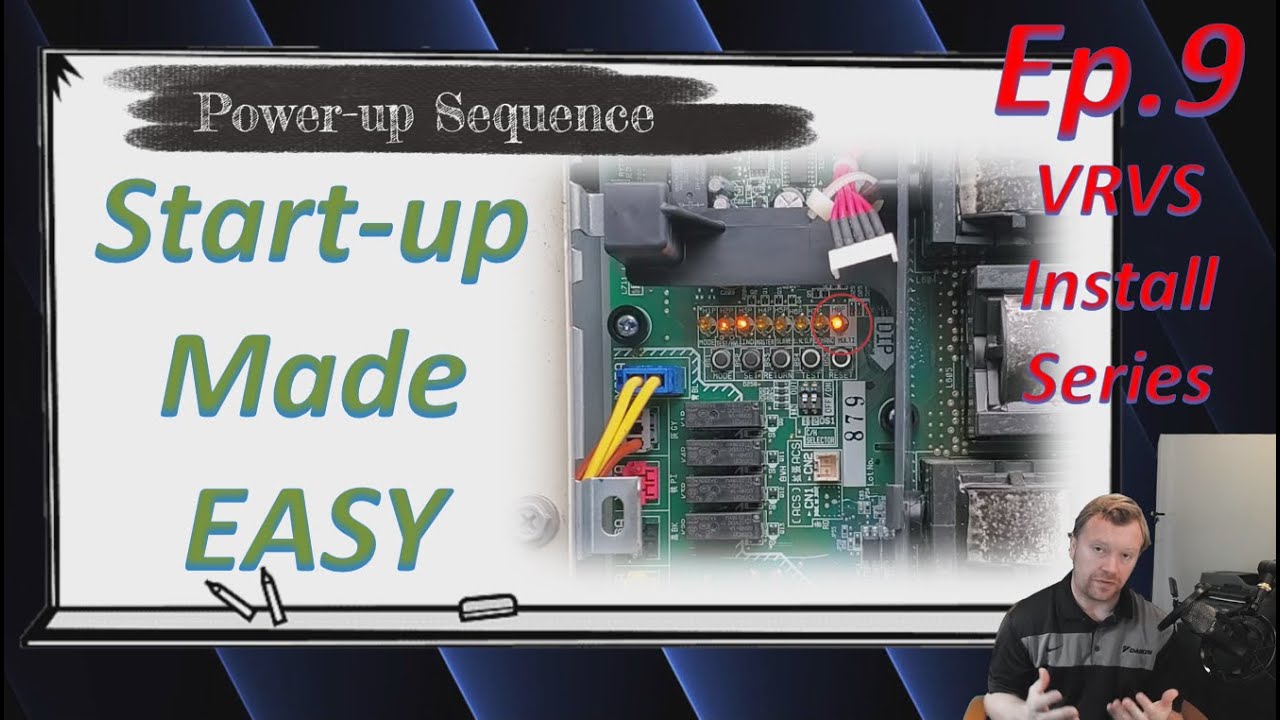
then you never need them again so the primary focus of this video is all on the mode set and return buttons but the test button is used for a one-time initial fire off test it's a self-diagnostic if you will it does not test the equipment to verify best performance or anything like that it is only going to test the system to see can i physically operate based on the installed conditions so the way that you're going to start the test make sure the h3p light is the only light on you want to be at the
main screen just like always but then you also want to make sure that the nav controllers are off if you have any controllers that are on they're going to be an alarm they're going to be giving you a u3 and anytime you get a u3 that's a clear indication hey you didn't run the test so what you're going to want to do is turn off the navs so the system is not an alarm verify h3p is the only light on at the outdoor board and then you're going to press and hold the test button how
long do you press this button until the lights change instead of h3p being on now 2 and 7 are going to be turned on one of them will be blinking one of them will be a solid on light so the last button we need to talk about is the reset button the reset button is basically used for one thing and one thing only and it is to reset the outdoor units addressing system so when you power up the outdoor unit it's going to automatically address all the indoor units that it sees the first time it's
powered up then every time after that it's going to look for that same number of indoor units think of it like a mother who has a lot of children if all of a sudden one day she doesn't see all of her children she's going to freak out she's not going to operate she wants to know hey i'm missing a kid where in the heck is that kid so the system kind of works the same way and in some literature you'll actually see that they actually use that same reference the mother and its children resetting the
outdoor unit anytime you are adding equipment or removing equipment is a absolute requirement so the way that you would do this and again we'll have a full breakdown in a separate video this is just to give you an introduction to these buttons but when you power up the outdoor unit you press and hold reset for 20 seconds and then you let go and then you wait for the system to initialize like it would any other day of the week but you have to do this anytime you are adding equipment so in an earlier example where
we had missing uh we were missing two indoor units we had to go do for fan on we found the two window units that were missing we came back to the outdoor unit and now we have to reboot the system and we have to press and hold reset for 20 seconds when we power the outer unit back up to tell it hey i want you to go out and re-address go look for all the indoor units all over again because i just added a few more indoor units same thing if you ever need to remove
an indoor unit from a system you would do the same thing anytime you're adding or removing otherwise what you're going to get is a communication error or a uh error there's a few different error codes that could populate depending on what stat you're looking at and if you're looking at the outdoor unit versus the android unit but regardless you're going to get a communication error code so you need to reset the addresses so that's what that button does it has absolutely no other purpose than to just reset the addressing so that's going to be about
it for today you guys i know it's a lot of information to get through i hope this information has been helpful these last two videos are really going to build into the next several videos so in the next video we're going to be talking about powering up the equipment getting through the initialization process how to make sure everything went smoothly and then we'll be talking about counting indoor units and then forced fan on and then we'll talk about test operations so we've got a lot of content still in the pipeline you guys if you have
any questions at all about today's video or last week's video about the lights don't hesitate put them in the comments below i read through all of your guys's comments i appreciate all of your engagement i love the interaction and there is no bad questions as i've said throughout this series if you guys are thinking about something chances are somebody else is thinking about it too and we are all here to learn so there are no bad questions don't hesitate put them in the comments below and i'll do my best to respond to all of you
if you enjoyed today's video please click the like button below really helps out my channel and if you haven't already please consider subscribing thank you so much for watching inverter always you guys i hope you all have an awesome day [Music] you