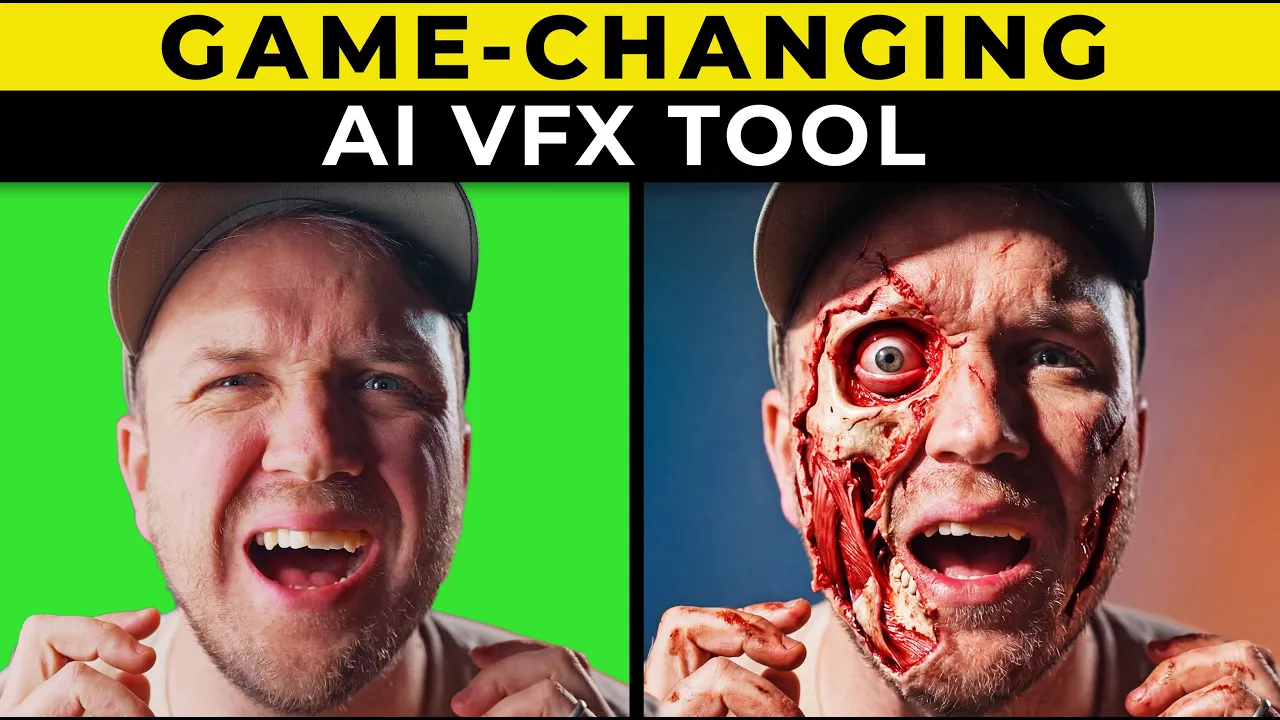
In this video, I want to show you this incredible AI VFX tool that can change [music] everything from lighting to environment and so much more. Plus, I'll be sharing my top tips on [music] how to get some insane results. Okay, let's get into it.
So, we'll be looking at Switch X by Bull AI in this video. Bull have been around for a while, and they focus on changing lighting within your videos, but it wasn't until I started using their Switch X model where I was really blown away. I've been doing hundreds of tests to really push it to its limits, and I've had some wild results.
Its main function is relighting and changing backgrounds, but there is so much more that you can do with it, which I'll show you later in this video. So, on Bbell AI, I'm just on their showcase page, and I'll just give you a quick glimpse of what you can do with it. So, relighting scenes.
As you can see here, we have the original video and then they've added this reference image and it creates this really unique spotlight effect on the video. One of the big reasons I think Switch X is so good is that it retains the original performance and facial capture of the original footage. Whereas some other software you can get really good results, but sometimes the face won't be right and the lip-s syncing will be off.
But this absolutely nails it. All of the examples are really incredible and super inspiring. So, it uses Nano Banana to create a reference image of the look that you want the video to be in, and it absolutely nails it.
This pretty much gives you unlimited options after you've filmed your footage. So, you can change it to whatever lighting you want. You can change elements in the background, and the results look incredibly clean.
and scenes like this where you can film day for night so you can get all of that clarity from the daytime then change the lighting in Switch X to make it look like you filmed at night and it is incredible for VFX. So we'll start off with something simple like changing the lighting. So you upload the video into here.
At the moment of recording the max amount you can do is 240 frames which is 10 seconds if you shoot at 24 frames pers. When you upload the video it will automatically detect the main object. So, in this case, it's masked out myself.
And what you can do is actually go into edit mask. And as you can see, it's highlighted me in red. If you do want to edit any of this, then you can either use the point select tool, which will allow you to click on any object and it will kind of highlight that whole thing, or you can use the paintbrush one, where you can select objects like so.
Or you can erase them and change the brush size. So, I'll show you why this is handy later on when doing moving camera work, but for now, I'm happy with just selecting myself. And with Phil, it keeps your entire original scene exactly as it is, applying only the new lighting and styles.
So, this is perfect if you just want to change the lighting, but keep everything else the same. And it's really nice that we have the option to upload your own custom video mask as well. People actually have a video going a bit more in depth on the masking, so I've left a link to that video as well.
if you do want to check it out. And now we want to create the reference image. So when you click on this, it will take you to a editing page.
Now this will create the look that will be carried over for the whole video. Now we have Nano Banana Pro or Flux 2 Pro, but I prefer Nano Banana Pro. If we come down here, we have some options to change background and it gives you a little template, relight, color grade, and recolor.
Or you can type in a custom prompt. So I'll write in my own one. So I've created a few different lighting setups for this video.
So, for this first one, I used this prompt in Nano Banana. I said, "Relight the scene with cinematic rays, and it gave me this image with some rays coming out of the light behind me. " Now, you can spend a bit of time in the prompt to really dial in the look, but I just wanted to do this for a test.
Once you've locked in the image, then you can add in the prompt for the overall description of the video. What I like to do is use the autopilot and suggest function in Switch X, as this will look at your video and give you a prompt based on what's happening. And once it's created that prompt, you can edit it further if you need to.
And down here we have resolutions of 720p and 1080p. So this is a 7-second video, and at the 720p resolution, it's going to cost me 21 credits. But if I switch it to 1080p, it will cost 70 credits.
So sometimes if I don't want to dedicate a load of credits if I'm not sure how it's going to turn out is I'll probably cut down a clip to maybe 2 or 3 seconds and then use a 720p version on it just so I can see how it's going to turn out but without using tons of credits. And then I'll extend the video to maybe 10 seconds and do a 1080p output for the best resolution. And this is how the video came out.
I think that this looks really good. You can see the kind of mist coming off the light rays and even the light changes as I walk through it. So yeah, it's very very impressive considering the difference from the original footage.
What's cool is once your video is finished, you can see all the different assets it used to create that video. So we have the output, the source, the alpha, and the reference image. So what you can actually do is click on download, and you can download these individually, which can be really handy.
You can get incredibly creative with how you change your lighting. It works so well. I could definitely see this being used in professional work.
Now, let's have a look at changing the background. With changing the backgrounds, I find it's a hybrid approach of changing the lighting and the background together. And I find this is where it opens up so many possibilities.
When you go to creator, it even gives you the option of change background here. And they give you one of their preset prompts. So, I actually did use this preset prompt of changing the background and lighting to a cinematic Korean castle at dawn.
And this is the image it gave me. So, I ran it through Switch X and here's the video. I think that looks great.
it actually feels like I'm in the environment. And I do have a tip if you've got a moving camera and you want to match the movement as sometimes I found if you have a moving camera sometimes it can only move the character and not the background properly. So a hack I found to get around that is to use the editing mask.
So come here and as you can see I've selected myself but I've also selected a top part of the video so that when the original footage of the background moves it knows to move that new background that you've created. While it's not a perfect approach as you can clearly see there's some of my garage coming through the top of that video. What you can do is just crop into that video to get rid of it.
So, what you can do is when you're filming, you can maybe do a bit more of a wider shot than you're used to, so that when you bring it into Switch X, you can select, say, a top part of the video to help with the camera movement tracking and then crop in afterwards. This is a technique I've used over and over again, and it definitely does help. I've also got another technique that is similar to this, but I'll show you that shortly.
So, let's have a look at some other examples where I've changed the background. So, this source video is me in the park with a shocked expression. And then in Nano Banana, I gave it the prompt of change the background and lighting to a cinematic mountaintop at golden hour.
And I love the image that it created. And the final video is pretty awesome. It actually feels like I'm on top of a mountain.
I was a really, really happy with how this came out. And what I like about Switch X is that it kind of nails the perspective in the shots. Like if you look at those different mountains and the rocks near me, you can see there's a separation in layers behind me with the different amount of movements as you go further back into the image.
If someone sent me a video like this, I would just assume that they're on a mountain. It's that believable. It absolutely nails the lighting and shadows on the character as well.
I'll show you some footage that makes sense with this shot very soon, but I just love the lighting in the shot. It's got that really nice sunlight coming through the trees and just a really natural movement as well. You can even see the sun behind the tree start to come out as I walk past it.
I think it handles lighting incredibly well. So, now let's have a look at VFX style shots you can create with Switch X. I wanted to see if I could change props using Switch X, and I've had some amazing results.
Now, this first one isn't necessarily changing the prop, but I want to show it as it's creating a really cool light effect from my prop. So, this original footage, I'm kind of embarrassingly pretending to wave around a kind of sword and I'm just holding this kind of LED light stick. Then, I created this reference image and I wanted it to have this really anamorphic lens light to it.
And I really love this kind of lens flaring coming off the light stick. And this is the video it created. I absolutely love this shot to be honest.
The light effect has stayed consistent with the prop and I think it just looks really cool. And the background is moving realistically as well and it actually shifts in and out of focus like the real life footage that I shot. And here's some other shots of me with that light stick but holding different objects and in different environments.
So in this one I changed it to a baseball bat and I'm in a stadium. Now, the lighting doesn't look the most realistic in this one, but I'm still really happy with how it turned out. And this one here, where I changed it to a fishing rod, and you can actually see the fishing line dangling from it as well.
And this one is pretty awesome. Now, I actually made this as an intro for another video I've created, and I wanted to create a video of me holding a big video camera with a movie set behind me. So, in the original video, it's just me holding a cardboard box and then using Nano Banana, I said change the cardboard box into a film camera and change the background to a field with a film crew in it and add a fire in as well as I wanted to see how well Switch X animated that fire and the people.
And I was blown away with the final result. So, as you can see, there is movement with the people and the fire animation looks pretty realistic. And the cardboard box has been turned into a camera, which looks incredibly realistic with really nice shadows and lighting coming off it as well.
So yeah, this really started to show me what can be done using this tool as I'm just filming in this kind of shoddy garage, but it's actually made me look like I'm walking through a field with an actual film camera. But in reality, I'm just holding this white cardboard box. And here's another shot, which I was really impressed with as it's handled the perspective on the camera really well.
You can have so much fun with it. I will be doing another video about Switch X with more in-depth tests. So, make sure to subscribe to my channel if you don't want to miss it.
Now, this is another one of my favorite shots. It's just of me walking around my garage with a drill pretending to be a spy. And then I created this reference image.
And the final video comes out like this. I think this looks awesome. It's got the background moving perfectly.
The winter lighting looks great. And there's even subtle bits of snow falling as well. Then I wanted to see if I could push it even further with putting me inside of a mech suit.
So in this original video, it's just me holding that light stick again, but pretending to kind of move a joystick back and forth. Luckily, no one was watching me do this as I looked pretty stupid. Then I created this awesome reference image of me sitting inside of this big yellow mech.
And here's the video. Now, it's by no means perfect, but I'm still pretty happy with how it turned out. As you can see, the joystick is kind of floating and my hand comes through the bar there.
But I could easily refine this and get it looking really good. I just wanted to show you as I think this is a really cool thing that you can do with the software. And yeah, I hope it opens up some doors for you to really push it to its limits and try really weird and wacky things.
And just to note, this is what the alpha looked like. So, you can see where I've erased kind of my body parts so that the pole in front of it would come through. And yeah, you kind of have to do a bit of editing on the alpha channel to get these results looking pretty good.
And here's another mech test where I've got this video of me pretending to be wearing some kind of exoskeleton suit. And I created this image in Nano Banana. And here's the final video.
I'm actually really impressed with how this one came out. It does feel like I'm wearing some kind of exoskeleton armor. It looks a bit wacky, but I'm really happy with how this one turned out.
And I even used this older video of me with my tube on my arm, pretending it's an arm cannon, then creating a reference image like this. And the output looks pretty sweet. It's got that really nice smoke coming out the front.
And here's some other VFX tests that I've done. So, with this video of me, I wanted it to make look like I was walking through water. So, I did loads of tests and I got some really interesting results.
So, for this one, I actually created myself in night armor, standing in dirty water in my garden. But because I left the alpha channel all on myself, most of the night armor didn't come out in the final output. But I still got an interesting result.
I was blown away by the interaction with the water. You can see I'm walking through it. There's ripples, and even when I put my hand down, it creates an interaction and splash from it.
So, this was a really interesting test. Now, to get the effect of me walking through water, I did have to erase my legs from the mask. Otherwise, if you don't erase them, then it will still keep your whole legs in the shot and not look like they're going into the water.
So, I did loads more tests and this is me walking through snow. And again, I am just blown away with the physics simulation. As you can see, my legs are moving the snow in a realistic way.
And I even touch the snow and move it slightly. Yeah, I'm incredibly impressed with how these have turned out. If you look from the original footage to this one, it is just incredible what you can do with it.
And in this one, me walking through a pile of rubbish. And it even moves the objects out of the way. I really like this one.
It's even added that green goo onto my t-shirt. Hopefully those eggs don't pop in the background in a lake with really nice reflections on the lake and ripples. And again, the lighting makes me feel like I'm actually part of that environment, which is something that's really hard to do.
And this one here, I'm in a swamp and there's a pretty close call with that crocodile. Then I did a test of me sitting down and I wanted to put me in some different locations. So here's me sitting on a log in a river.
And for this one, I wanted to be really high up and I put myself on a steel beam on a construction site. It looks so good. I also went on a bit of a train journey on this one.
This one's a really good example of how well it works with moving backgrounds. And I'm sitting on the Iron Giant shoulder in this one, chilling out in an onen. I really like the lighting and the steam effects in this one.
This one's pretty cool as I've actually changed my outfit as well as I'm waiting in the Gryffindor chamber. So for this reference image, as you can see, I'm wearing a different costume. Then for the outfit, all I did was make sure to just keep my head and my legs in the shot so that it kept the outfit in between.
Now, it does work better on this one, maybe because I'm just sitting and not doing much, but I'm really happy with the results. You can even have fun with different styles as well. And as you can see, it's added that style into the final output.
So, I haven't done too much testing with this, but I will be doing a lot more as you can get some really cool effects. And from that video of me sitting on that iron ger from before, I actually wanted to test if I could walk across a beam. So, I actually filmed myself walking outside in this footage here.
So, as you can see, I'm using those tiles as a kind of walkway, and I created this reference image, and the final video turned out pretty good. Now, there is a bit of sliding on the feet there, but I'm still blown away with how it's turned out. I think you can have a lot of fun doing these kind of visual effects with this tool.
Do not try this at home, okay? This is very, very dangerous. Now, here's a really interesting test I did where I was dragging my bin across my garden, and I wanted to see if I could turn it into something else that I was dragging.
Now, this first one is a bit gory, as I created this reference image of me dragging a bloodied orc, as I just wanted to see how well it would work. And the final output looks pretty good, like it's actually creating the blood stain as I drag it across. the physics and the weight to the body look correct.
Yeah, I was really impressed with how this turned out. Then I wanted to take it a step further and add some different elements into the shot and a different object that I'm pulling. So for this first one, I created this reference image of me pulling a car through muddy water in my garden.
And this is the video. I'm pretty amazed with how it's handled this to be honest. I know there's a lot of water kicking up from the car, but I think it looks really good.
I made sure to mask out my feet and my hand where it interacts. I'm really happy with the how it's handling all the water simulation. And yeah, the way the wheels are still moving, it's really impressive.
And here's another version where I'm carrying a smaller car. And again, it looks great. These are just opening up so many ideas for me to keep testing these weird and wacky things.
But yeah, it's a lot of fun to do. Now, this one is really cool. So, I created this reference image of me turning the bin into a red sack full of presents, but with thick snow everywhere, and the result is pretty awesome.
Wo! This is extremely heavy. Now, just watch as I'm moving the bag and walking through the snow.
It's actually creating a pathway, moving the snow out the way. I can see this being incredibly useful for VFX artists if they're doing scenes with snow where there's no actual snow there. And it seems to be handling the dispersion of the snow in a pretty realistic way.
So yeah, this was really impressive. You can also play around with impainting VFX shots as well. So I've got this video of me just moving my face around.
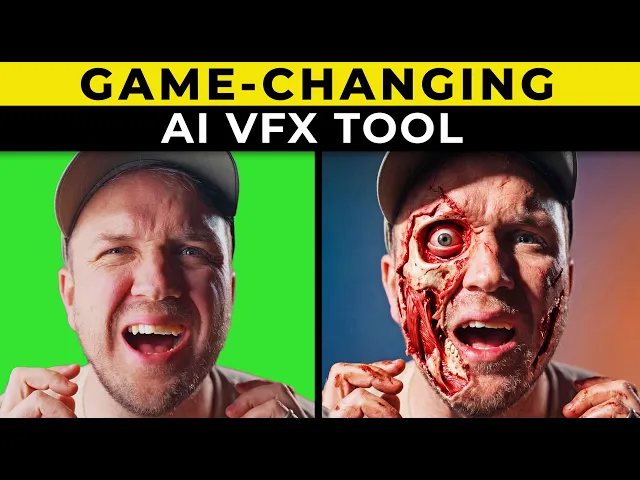
And a trigger warning here. This next shot is pretty gross as I wanted to see if I could reveal muscle and bone underneath my skin. So, I created this very graphic shot and this is the alpha for it.
So, you can see I've masked out parts where the effect is coming through on my face, but I've only selected the parts of the face which I want to keep from the original recording. And here's the output. I think this is a really cool effect.
Now, it's not perfect with the way the bones are moving, but it's still really interesting, and I could see it working really well if you want to add wounds onto characters or just add subtle impainting effects as well. Now, I wanted to see how well a light source interacts with the environment. So, in this footage of me, I'm just holding this light and I'm pretending to light up my face.
Then, I use this reference image of turning the lighting to nighttime and make it look like I'm holding a flashlight. And the final video is pretty interesting. It seems to light up my face where I point it.
It's not perfect by any means, but it's still a really interesting test. And here's another version. Then I wanted to take it a step further and in this video here I've got me pointing the pretend flashlight at a wall and I wanted to create a video where it looked like I was inside of a dark cave.
So I've got this reference image and this is the video it created. I think this looks incredible. It's managed to get the lighting on the cave wall perfectly and the shadows are really good.
Now here's another version where I point it around a bit more. Yeah, this is pretty mind-blowing. Then I wanted to add another shot to this, but in the same environment.
So, this is a way of continuing the story. Because we only get these 10-second blocks, you can use Nano Banana to create another shot that looks like the same environment, but just break up your shots into different scenes. So, I've got this video of me walking through my corridor, holding the light stick, pretending to kind of look around on the walls.
Then, using the reference from the other cave image, I made it look like I was in the same cave, and it nailed the image. But for this one, I actually had to mask some of the bookshelf that was in the corridor just so that it got the backwards momentum of me walking through the cave. Otherwise, you can see in this video here, I'm not walking backwards through the cave.
I'm just kind of standing still. And the video looks great, but as you can see, the shelf is in the shot as well, which I actually do think looks pretty cool and can open up a lot of creative possibilities with future videos. But let's say I want to remove that shelf from the shot, but still keep me moving through the environment.
Then what you can do is download this video, re-upload it. So uploading that video with the cave and the shelf on the video using this reference image again, but this time when doing the mask, I just select myself and a bit of the cave wall that doesn't have the shelf on it. And now in the final video, it gets rid of that shelf and it still has that movement of me going back through the cave.
I hope that's not too confusing. If it is, then send me a message and I'll be happy to explain it further. I think this shot looks absolutely stunning.
The way the light is interacting with the walls is perfect, I think. And when it's tied in with that other shot, and I've added a bit of cave echo to the sound and some sound effects, you get a shot like this. So, this is a lighting test.
Is the flashlight working? Okay. Is it illuminating the wall there?
Is it illuminating the floor? I'm really happy with how that turned out and it's just opened so many possibilities for me making short series with really cool effects that you can shoot everything at home pretty much. And yeah, it's just really cool.
And here's a short montage of some other awesome shots that I've created. Heat. Heat.
So, what are your thoughts on Switch X? I am absolutely loving it. I think it is a game-changing tool and I can see this as an evolving tool that professional studios will use.
Now, like I said, I will be making more videos that will go in depth using this tool. So, make sure to subscribe if you don't want to miss it, as I've got so many more ideas that I want to cover. Please leave a comment down below if there's something that you want me to test in a future video.
I've left a link to Bull Switch X down below if you want to test it out. I would highly recommend it if this is something that interests you. It's a really incredible tool to play around with.
Thank you so much for watching. My name is Jack and I will see you in the next one.