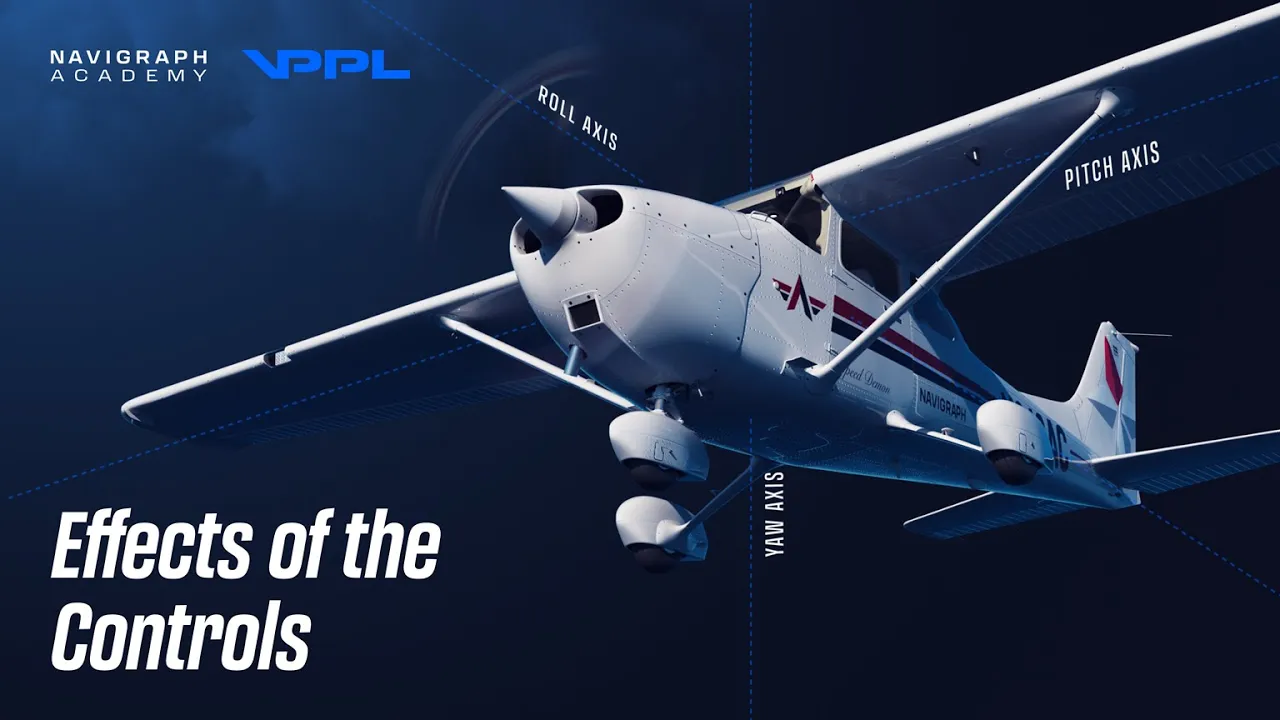
The freedom to fly starts with the freedom to move in all dimensions. A plane is a wonderful invention, capable of allowing the pilot to traverse the atmosphere with detailed control over all three axes of movement. Welcome aboard the Navigraph Academy where you will learn to maneuver, navigate and fly, just like in real life!
Today, you will learn everything you need to know about controlling a plane. We will look at the controls one by one: the elevator, the ailerons and the rudder. They move the aircraft around each of the three axes.
And in doing so, they make us go where we want to go. Once we are familiar with the control inputs and the primary intended reactions of the aircraft, we will move into the secondary, unintended side effects. And at the end of the lesson, we'll be ready to jump into the simulator, practice these effects as they happen in real time, together with Jason.
Let us begin with the elevator. On the Cessna, the elevator is part of the horizontal stabilizer and it is connected to the control yoke via cables. The primary effect of the elevator is to make the nose either rise or lower, and moving the control device forwards or backwards causes the elevator to angle up or down.
Note how the elevator directs the airflow around the stabilizer. When we move the control device to pitch down, the elevator also moves down. This results in an upwards aerodynamic force.
If we move the control device to pitch up, the elevator moves up, resulting in a downwards aerodynamic force. These elevator movements cause a rotational force, in result, causing the aircraft to pitch around the pitch axis. Thus, the primary effect of the elevator is to raise.
. . or lower our nose.
As a consequence of pitching up or down, the aircraft will move with or against the force of gravity. So if we pitch up, the airspeed will start to decrease and vice versa, if we pitch down, the airspeed will tend to increase. This causes airspeed changes and this constitutes the secondary effect of the elevator.
Pitching may seem like a simple thing, but it is so easy to do wrong. It is important to raise or lower the nose carefully, especially if you have a control device which has a small range of movement, or no spring force. Too much force could easily overstress the airframe.
In the plane. I will ask you to look outside the window and slowly push the control device forward. Our nose will lower.
Then we will do the opposite by pulling the control device aft and watch our nose raise again. It will be very important to give smooth and small inputs. To hold the nose at a new pitch attitude, you will realize that you have to hold a control device aft.
the force of the air flow, impinging on the elevator causes the elevator to try to move back into neutral position. And because of this, a constant back pressure needs to be kept to maintain the higher nose attitude. Now, when most control devices such as joysticks and yokes, this is simulated with a spring force which will induce the feeling of a resistance.
The further you move the pitch control input away from neutral. We will return to this fact later on the climb and descent session. But for now, in summary, the elevator primary effect causes the aircraft to pitch around the pitch axis, pointing the nose either up or down, and the secondary effect causes changes to our airspeed.
Our next control surface to cover is the ailerons. There are actually two ailerons on the Cessna, one on each wing. They are both connected by a linkage mechanism.
And with the help of the linkage mechanism, both surfaces actually move together, ensuring that when one moves up, the other moves in the other direction, downwards. And when we shift our control device to either the left or the right, one of the ailerons is deflected upwards and the other one is deflected downwards. In this view, you can see that if we perform a control input to the right, the left aileron is deflected downwards and the right is deflected upwards.
On the downward moving aileron, the airflow is directed downwards and this creates a lifting force on this wing. And if we move to the underside of the plane the upward moving aileron now has the opposite effect. This is spoils and reduces the lifting force of the right wing.
And note that the right wing is still actually generating a positive lift force, it's just less than the left wing, because wings are designed to naturally create lift and the upward moving aileron only reduces the total lift on that side. But the difference in lift will create a rotation, and this is about the roll axis. And we call this rolling the aircraft In the plane, I will demonstrate some rolls for you, just like you can see here, again it is very important to be smooth on the controls.
If you find that your plane overreacts when you add small inputs, you should consider recalibrating your control sensitivities. Andy would be happy to help you with this in our Control Setup video. The roll axis has a pronounced secondary effect, and this effect has actually been at the very core of piloting even since the dawn of aviation.
So it is vital that you understand the causes of this secondary effect so that you can accurately counteract it once in the plane. So let me explain how this works. The up going wing is exhibiting an increased lifting force, and this is thanks to the downward angle of the aileron.
And lift is great in this scenario. It does lift our wing. It does roll our plane.
However, it also comes with a pronounced side effect because lift causes resistance and drag, and this is called lift induced drag or simply sometimes called induced drag. Now, looking at the aircraft from above, an increased lift force on this side of the plane also creates extra drag on that side. And since this drag is localized to this side of the plane, we will have a yawing motion as a result.
This pushes the notes in the opposite direction of the bank, and also in the opposite direction of the turn. This unintended yaw movement is called adverse yaw, and it is the secondary effect of the aileron, and it is also undesirable. Remember we did not intend for the aircraft to yaw, we simply wanted it to roll.
And due to the adverse effect, the aircraft is now in a sideslip, meaning it is not flying straight into or nose onto the wind. This is an uncoordinated flight state. And in order for the roll to be coordinated, we have to counter the yawing motion.
So the aircraft once again aligns and straightens out into the relative airflow. This is done with the rudder, and the rudder is the third and final controlled surface of the aircraft that we will cover. On the Cessna, it sits at the very back of the vertical stabilizer.
The rudder can either move left or right. For example, if we apply the rudder input to the right, the rudder surface would also move to the right, deflecting airflow in that direction. Now this in turn generates a force that pushes the aft of the plane left.
Remembering that the aircraft moves about the center of gravity, which it's about, here we see that the tail moves to the left and then the nose moves to the right. Thus, when we use our ailerons and encounter adverse yaw, we must also use a rudder input to maintain stable flight. So in our example, entering a right turn, the adverse yaw caused the airplane to yaw to the left.
We therefore need to use right rudder to once again align the plane with the relative wind. And we are now maintaining coordinated flight. Note here what Martin said: in a right turn, we must use right rudder to compensate for adverse yaw.
Hey, it's Andy here! Just a word on the use of the rudder and simulators. So in a real Cessna, you would use the rudder pedals to move the rudder.
Depending on your home setup, you may have similar rudders, a twistable joystick or some other control axes bound to the rudder inputs. Coordinating turns is actually a pretty delicate and precise activity that requires fine inputs, so we only recommend doing this manually if you own a pair of rudder pedals. In all other cases, we just suggest that you turn using the auto rudder and turn it on within the assistance settings.
In Microsoft Flight Simulator. That way, the sim will keep your turns coordinated automatically. It's also good to know that many airliners, such as the Boeing 737 and the Airbus A320, use a yaw damper, which basically acts as an auto rudder.
If you use the auto rudder setting. You should consider this part of the lesson as good to know you can still make use of the rudder to yaw the aircraft, but there is no need to specifically counter adverse yaw when rolling. Let's go through how we coordinate our turns.
When we fly, we will start with a right roll. The first thing you'll want to do is look outside. Find a visual landmark in front of you.
As we add right aileron input, we simultaneously add our right rudder input. If you add enough rudder to counter the adverse yaw, your visual landmark is going to appear to stand still in the windscreen. If the landmark is staying fixed in a place as we roll, we know we're countering the roll.
A fixed landmark indicates that the aircraft nose is not yawing either direction. If the landmarks move to either direction like this, we cover straight and level flight. On the next entry, try to alter your rudder versus aileron inputs to match.
This should prevent the landmark from moving. It helps if your aileron and rudder inputs are smooth, simultaneous and relatively large. Smaller inputs can make it difficult to coordinate properly.
A good approximation is to add aileron that equals about one third to half of the total range of control input. As soon as you start applying aileron input, the adverse yaw occurs. Once you move your aileron control back to neutral, the adverse yaw will stop.
This means rudder inputs are tied to aileron inputs, not the bank angle. Whenever you neutralize the ailerons, also remove the rudder input. Even if you have a bank angle, if you reverse aileron input, for example to resume wing's level attitude, you're going to have to reverse the rudder input as well.
After we got our first taste of the adverse yaw effect, let us try a few wing rockings. These are excellent maneuvers to practice aileron and rudder coordination. Wing rockings work like this.
Now pay attention to my yoke and rudder. At this bank angle, I reverse the roll and roll back the other way. My landmark should again remain fixed.
Remember, as soon as I reverse the aileron input, I have to reverse the rudder input. Continue the roll in the other direction. Once we reach the same bank angle in the other direction, we reverse again.
Right aileron. Right rudder again. My landmark should appear fixed.
We continue doing this for some time, dipping right and left, practicing aileron and rudder coordination as we do it. In no time you'll be a master of the aileron rudder coordination. Let's discuss the rudder in a little bit more detail.
The rudder sits at the back of the vertical fin, and it is connected to rubber pedals by a control cables, and pushing the pedals to the left or right causes to rudder to move in the same direction as the pedals. We have already established that the primary effect of the rudder causes a yawing motion. This movement occurs around the yaw axis, sometimes also called the vertical axis.
However, the rudder also has a secondary effect and you must be familiar with this one as well. If we press and hold the rudder input the airplane will yaw Looking at the airplane from above, we discover that as we add our yaw input, the outer wing travels forward. This increases the speed of the airflow on this wing.
Meanwhile, on the inner wing, the opposite is happening. Since airflow speed is directly linked to the lifting force, the difference in velocity between the left wing and the right wing now creates a difference in lift over the two wings. This generates a rolling motion in the same direction as the yaw input.
Now causing the outer wing to rise. The roll tendency is the secondary effect of the rudder. When we fly our session, let us finish the day by seeing this in action.
Now keep an eye on my rudder pedals, as I press the rudder smoothly all the way to about a half deflection. You can see the yaw, and then we can see the aircraft start to roll. To counter the roll tendency created by the yaw input, we must use ailerons to remain wings level.
Note that this rolling effect is quite small on the Cessna, but it's important that you understand the principle and get an intuitive feeling of the effect. This will help later when we'll start practicing turns as well as landings. And we have now covered all the primary flight controls.
Let us summarize what we have learned. We have three control surfaces that move the aircraft around the three axis. These are: the elevator moving the aircraft around the pitch axis.
The primary effect of the elevator is to move us in pitch. The elevator's secondary effect is an airspeed change. Then we have the ailerons moving the aircraft around the roll axis.
The primary effect of the ailerons is to roll the aircraft. The ailerons suffer from the secondary effect called adverse yaw, and this must be countered with rudder input. And finally we have the rudder, moving the aircraft around the yaw axis.
The primary effect of the rudder is to move us in yaw. And the secondary effect is a roll tendency, which must be countered by us as aileron inputs. I look forward to seeing you in the plane!
Get your gear in order and find us at the Navigraph Academy website. There you will find a recap of what we have discussed here, as well as an easy way to try these exercises yourself right inside Microsoft Flight Simulator. Let's go flying!


![[EN DIRECTO] Seguimiento diario de la Misión Artemis II a la Luna](https://i.ytimg.com/vi/BIXw0yNG_2I/mqdefault.jpg)

![✅Como Descargar Advanced Systemcare Full (PRO) [2026]](https://i.ytimg.com/vi/X8zPJVsHF5I/mqdefault.jpg)


![[MSFS2024] De Ibiza a Barcelona | LEIB - LEBL | A320Fenix | IVAO](https://i.ytimg.com/vi/UbfYyjZuoIg/mqdefault.jpg)