Welcome everybody. Today we're going to go through "How To Build Python Data Pipelines With Snowpark." This is going to be really exciting. We're going to do a virtual hands-on lab and walk through it so you'll get experience building these pipelines yourself. So what I'm going to do is, we're going to spend a few minutes going through some slides to set some context. So I'm going to go through and explain Snowpark Python, just enough to get us going, talk about the hands-on lab, and then we'll actually get into the hands-on lab. We'll spend the bulk of
our time there. So that's our plan. So Snowpark Python, there are lots of features in Snowflake for doing data engineering. And you can see those here on the slide. I'm not going to go through all of these details. What we're going to focus on really today is Snowpark, and you can see that here in the top right part of the screen. We're going to focus on Snowpark. We'll actually see in this virtual hands-on lab, you're actually going to see some of these other features coming into play as well. But in terms of introduction, I'm just
going to cover Snowpark and then we're going to jump into it. So I think it's really helpful when we start with Snowpark to start with this slide and to look at it from two different levels, so two different layers. Snowpark includes a client side and a server side piece. And really Snowpark is an umbrella term that incorporates a couple different features, so it's also helpful to keep that straight as we go through this. So we'll actually start with the server side piece. So we look at the bottom. As you probably know with Snowflake, Snowflake has
supported SQL as a language and JavaScript as a language for a long time. What's new with Snowpark, what Snowpark introduced is the ability to run Python, Java, and Scala natively in Snowflake. And that's what this represents on the server side, which means Python code is actually running inside of Snowflake. On the client side, we've also had different ways to connect and issue SQL queries, but what Snowpark introduces is a client side library or API for Python, which includes the data frame capability and I'm going to go through this in a little more detail, and we
have that for Java and Scala as well. So you have the client-side piece and the server-side piece And I'll show you the two of them together here in a second. But that's really kind of the scope and we're going to focus on Python in particular today. So why Snowpark? Why did we go through all this effort? And really there's a couple reasons. One of the primary reasons is we wanted to simplify the data platform architecture for our customers. So in order to run Python and Java and Scala code previously that would either be done in
Spark or in another kind of external compute service. By now having that run natively in Snowflake, we can eliminate the need for customers to have to maintain That existing infrastructure and also we can run that code in a more performant way, because it's closer to the data and hosted in our infrastructure. This allows you to build these data pipelines without having to worry about the hassle of managing Spark clusters and the rest. And then on the last point with acting with confidence, we really spent a lot of time to make this secure. So the Python,
Java and Scala code run natively inside of Snowflake in a sandboxed environment, which means it's very secure. It'll meet all of your InfoSec security requirements. And we wanted to be able to Provide consistent security as you set up role-based access control with Snowflake and detailed security policies. We wanted to make sure that whatever language you used, you had the same governance. That's really foundational to what we've done. So that's really the kind of the high level. It is really important to understand when we start talking about building pipelines with Snowflake and with Snowpark, how the
Python code gets stored in Snowflake and executed. And that's really what you see here in front of you. So we have the client API, which I mentioned and this provides primarily the data frame API. So in Python, if you want to run a query against Snowflake, You can certainly use the SQL function and issue a SQL query. But more times than not, what customers want to do is actually express that query in a data frame syntax, so the client API has that. And then the actual Python code that's running inside of Snowflake though on the
server side can be broken down into really these four Snowflake objects. So the user-defined function or UDF takes arguments to the function and returns a scaler value, so the idea is you're passing in a row at a time or in bulk from a table and you're doing something on each row, Acting on each row. This could be in the machine learning context, this could be like scoring a record, it could be used for a lot of purposes, but the idea is it's kind of on each row and it returns a scaler value. And then vectorized
UDFs are the same idea but able to be parallelized better. So we can put that into one bucket. The UDTFs, user-defined table function, that's different in the sense that you can still pass some arguments, but here now you've actually got, you're not operating on a single row at a time. You're able to return a table of data, Not just a scale or value. And then stored procedures, this is our primary focus for today is stored procedures. This is where you're going to host any arbitrary Python code and have it execute. So conceptually you can think
about this as the code you would have in a Notebook potentially. In a Spark-based solution, you can run that inside of a stored procedure in Snowflake, and that's how you would capture the code and then execute it as well. So you'll see as we get into this, that's our primary object we're looking at. I already mentioned the benefits of Snowflake all up of using Snowpark, But particularly of using our virtual warehouses. So our virtual warehouses and our SQL query engine is incredibly fast, faster than Spark. And you can take advantage of that. You can actually
run these existing code that you had from Python natively in our warehouses. And they're offered with near-zero maintenance, they instantly turn on and resize, they're available like I mentioned with security, there's no way to get around security. Depending on how you set up the cluster, you always get the exact same governance and security. And regardless of what language you use. So really important capability on our warehouses that just make the process easier. And I don't know if you've ever seen the movie Inception, I think it's a fun movie, but sometimes, and it's like the levels
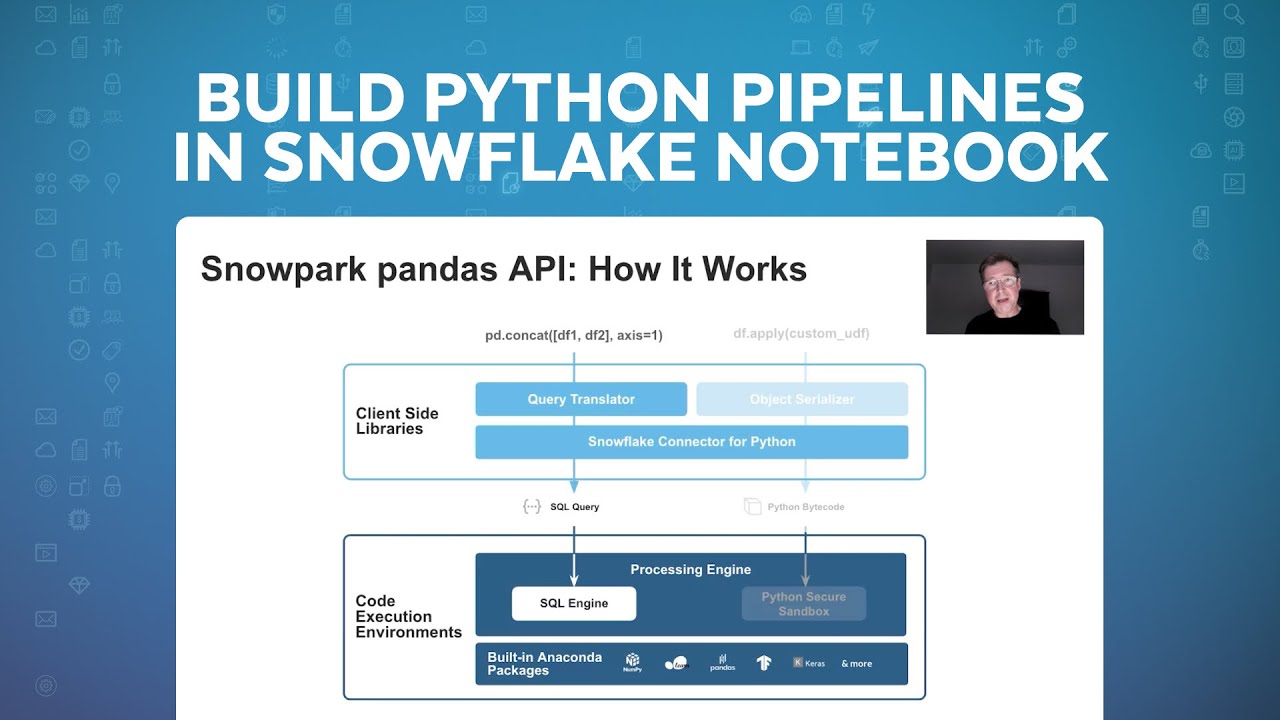
of a dream, if you remember the movie. This gets a little bit like that when we start layering on these different components. So I'm going to start actually here with the data frame query, a frame expression. So in Python you might have a simple data frame filter that you're applying, and what happens is, if you look here, this is the client API, and then this is the server side down here. So the idea is that data frame expression, The Snowpark Client API translates that actually into a SQL query, and that SQL query then gets issued
to Snowflake using our existing pipeline connector and run in Snowflake in our SQL engine. So really at the end of the day, all of those data frame expressions translated to SQL run inside of Snowflake as a SQL query. And that's where we get such great performance. That's where customers that are migrating from Spark to Snowflake really see the differences, that these expressions that could potentially take a while in Spark are running much faster in Snowflake. And that also translates, because of our pricing model, into being lower cost because we charge per second with the 60-second
minimum. So you can run these, and the clusters can turn off when you're done, and you end up paying less for the same amount of work. That's the data frame side. Now when we have actual code like Python code that we're defining, so in this case it's a user-defined function, what happens is the client library serializes that when you want to deploy it through the client library, it serializes the code and deploys it to Snowflake and actually deploys it as a user-defined function, and the same is true for user-defined table functions and for stored procedures.
And so when you execute some code in that UDF, it actually runs inside of Snowflake in our Python Secured sandbox, so those are the two paths. Now the thing where it's kind of like Inception, like I mentioned is if you're, say you have a stored procedure that you're running that has a data frame query in it, what happens is that Python code actually runs here in the secure sandbox and the data from expression when you do a collect or you do some other activity along those lines, it actually issues a SQL query to the SQL
engine. But this all happens inside of Snowflake, so you can essentially use the Client API inside of Snowflake as well and you're going to see that All today. So hopefully it'll make sense as we go through it, what's happening and if you keep this picture in mind, you'll be able to keep track of what's happening kind of inside of Snowflake. All right, so just quick overview of Snowpark Python. And now I just want to quickly introduce the Hands On Lab and then we're going to jump in and actually start going through the lab. So the
first thing, if you haven't seen it already, are our Snowflake Quickstarts, and this is quickstarts.snowflake.com And everything we're going through today, this virtual Hands On Lab can be found in this Quickstart titled Data Engineering Pipelines with Snowpark Python. And if I flip over to the actual webpage here, so this is the quickstart.snowflake.com website and I'll just search for pipeline. This is the Quickstart and if you haven't used these before, they're step-by-step guides, so we're going to actually go through step-by-step through this. So open this up and get ready and this is what We're going to
actually use to go through the Quickstart together. So keep track of that.. This shows and this is actually in the documentation, you'll see us on the first page of the Virtual Hands On Lab and in the Quickstart. But this is what everything we're going to do in this Hands On Lab and this is actually a pretty meaty Hands On Lab. There's lots of content here, this will show you a lot of features to build, you know a robust pipeline. So quickly, I'm just going to run through what we're going to do and then as we
go through, I'll refer back to this So that we can kind of just keep track of where we are in this process. So the first step we're going to do is set up the environment, so we're going to create some roles and warehouses and different things for the databases, for the Hands On Lab. Then we're going to take data essentially that's out in S3 and this is in a public S3 bucket that everybody has access to and we're going to take some, it's made up point of sale and customer data, and we're going to ingest
that into a set of tables in our database And we'll use some schema inference for that and I'll talk about it as we go through it. Then we're actually going to get access to weather data through our Snowflake share and this is really exciting, like one of the things that Snowflake really changes in the data engineering space is the ability to no longer have to do an ETL process to get all of your data into your database to start using it. You can actually share data between Snowflake accounts and using our Marketplace pull in data
sets that are available there without having to do ETL, So really important. So we're going to do that part, then we're going to create a view against all of these point of sale tables and flatten it out and create a stream on that, which is our change data capture mechanism. And then the real bulk of it, a lot of this first part is set up, but now we're going to build the pipelines. So starting in step kind of five through the end, we're going to be building the pipeline, so first we're going to create some
user-defined functions, one in Python and one in SQL. We're going to then create a pipeline to build this Orders table, so this will be the first table we build. We'll take data from that stream and we'll process it, we'll use a stored procedure, a Pythons stored procedure to process that. And then the next step is we're actually going to build this daily city metrics table and that will be built by combining data from the orders table and from the weather data, so we want to see how weather influences sales. And then we'll again use a
stored procedure to build that out. And then we're going to orchestrate both of these stored procedures with a task, which in Snowflake Is our orchestration feature. So we'll have that for orchestrating, we'll run the whole pipeline through incrementally and then we're going to deploy this pipeline with Snowpark through a CICD process with GitHub actions. So like I said, there's a lot here, so take your time as we go through this, but we'll introduce you to really like a complete end-to-end data engineering pipeline with Python. All right and I'll highlight these as we go through it.
I won't read this entire list, but you're going to see a lot of benefits of Snowflake for data engineering, Benefits over working with a file-based data lake and Spark and some other approaches, we can do this in Snowflake and really make your job as a data engineer easier and help you get more done. And we've introduced some cool things like our visual pseudo code extension and a new command line tool to help both in the development and the deployment of these different objects. So exciting stuff, we're going to go through it. Last thing I'll mention,
you're going to see this as we go through it, the data that we're using is all around a fictional food truck company and we're calling that Tasty Bytes. And you'll see this going forward, if you had seen the Snowflake Citi Bike demos and data before, this is kind of our new version of that, so we'll jump into that. All right, so Hands On Lab, let's get right into the lab. All right, so let's jump into the Hands On lab. So I've actually got everything here opened up in Visual Studio Code, so as you go through
the Quickstart, there's instructions for getting set up and that will include cloning this repository. So I've got that at this point done, Let's actually go back to the step by step here. So in the Quickstart setup, there's actually two spots here to be aware of. So on the overview page, there's a number of things you're going to have to set up ahead of time. Things like getting a Snowflake account, installing Miniconda, the Snowflake SQL command line tool, making sure you have Git installed. Some of this you may have installed already, for an editor I recommend
Visual Studio Code and that's what we're going to use in this lab and also we're going to show the extension for Snowflake Now that we have. You could do this with a different editor if you're so inclined and familiar and then you're going to need a GitHub account as well. So all those, like I said, you may have a bunch of those already done, but go through and make sure those are all installed. And then on the setup part, and actually once you have all those things done, really the steps are just forking the repository,
so there's a link here to the Quickstart repository. You're going to want to fork it 'cause we're actually Going to create a pipeline and you're going to push code to it and against your own copy of it. So get that forked and then we need to set up some credentials, so what you'll see as we go through, and I explain it in the instructions here, but we're actually going to leverage the SnowSQL config file. This will all probably change as we standardize across all these command line tools. But for now, the way that you'll see
as we get into the SnowCLI tool, it's going to depend on this config file. So if you don't already have it already, if you've used SnowSQL in the past, you might already Have this and be fine. But in this case you're going to want to go into your SnowSQL config file and make sure you have a dev connection set up with these settings obviously replacing your account and username and password with your information. And then you're going to want to create an Anaconda environment, which we have a script to help you with that. So just
essentially running the commands below, we'll create the environment that we'll use for this that has the right libraries and everything. Okay, so that's the setup and now we'll flip over and I'll kind of start walking through the steps. So starting here in step three, I'll pick it up and I'll kind of focus here on the visual studio code side. So the first thing to point out as we get in here, open up the script, you'll see the scripts are named with in a kind of numeric order, so it starts with 01 and goes all the
way to 11, you'll notice they don't tie exactly to the steps here. So step three, which is set up Snowflake in the Quickstart is actually script number one. So they're offset a little bit, but this is where you want to start. So there's a couple instructions if you haven't used Snowpark Python before, you have to accept some Anaconda terms and conditions, there's steps for that. And then what we're going to do is run through and we're going to create all of the objects you need, so you need to have a Snowflake account with account admin.
I'm just going to go through and create the database, the roles, grant all the permissions we need, and what I'll do is actually run it. So over here on the left you can see this Snowflake extension. And this is in the steps to set up this is mentioned. I'm already logged in with my demo account and what I'm going to do is actually first I'm going to run the tear down script so we get rid of everything and then I'm going to run, that's fine. And then I'm going to run the setup script. So this
is our new extension and you can see at this point we'll I have other items here, but what we're going to actually do is run this particular script and you can do that the whole script by clicking up in the right corner, the execute all statements command and this will run all of these SQL queries And you can see they're issuing down here. And what it's doing is going through and creating a warehouse database, it's creating some schemas for us where we're going to stick our objects. It's creating a a stage that references this public
S3 bucket I mentioned and then it's actually going to create one of our UDFs, the SQL based UDF is going to create that for us as well. So once those are all created, we can actually, if we flip back now over to our extension, you'll see I'm using the role which we created a role here for the Hands On lab. And now I've got this database which is the Hands On Lab database and it's basically empty at this point other than, you know a few objects, the stage and that UDF, but we got everything set
up and ready to go. This Snowflake extension is exciting. This is new, it's still in preview, but it lets you connect to Snowflake, you can store a number of different connections, it lets you browse the Snowflake. So we'll actually kind of get rid of this now that we're connected or hide it, lets you browse a database even gets into things like you can even browse stages Now directly. So I can look at the files in the stage, if I have access, I can even upload and download files from the stage. And then I've got a
query history as well, which will let me look back at queries that were run and see the result and statistics about the query. So I mentioned still in preview, but it's being consistently updated and actively added to and it gets better every day, every time I come in here there's new things that I have to look at as well. So we got everything set up. Now we're ready To start actually doing our work. So I'm going to flip back for a second and actually go back here to this overview slide. So we did step one,
now we're going to load data from the S3 bucket into these point of sale tables and the customer table, so we're going to do that step now. So if I flip back, what this load raw, I'm actually going to come down here and do a terminal and I'm going to start this process. So Python, I'm going to run it just here in the command lines. I'm not going to flip back every time to the Quickstart, But this is documented in the Quickstart directly, we're just directly run the script here to do our setup. And while
this is running, I'll explain what's happening here. So what we're doing is and I just need to take care of multifactor authentication here on my phone, so just gimme one second, there we go. I'll do that a few times during the demo here. So we're loading data and it's telling us as it goes through. So the key thing to point here though is we're doing this in Python and we're doing this with using the Snowpark API. So we have an array of tables and some other attributes that we're keeping track of and what we're doing
is we're actually going through and you can see that we're building the path to the stage to where the actual files are and then we're doing using the Python data frame API here we're actually reading, opening up a data frame to those set of Parquet files in question. And then we're running this copy into table command, which in Snowflake will do a copy into command and load the data into Snowflake. But this is also using schema inference, So it's actually reading the schema of the Parquet files and then when it writes to the table, we're
going to have columns defined that came from the schema inference, so that's pretty powerful. So we're running the copy command and we're loading it into Snowflake tables and this gives us, Snowflake actually has the original table format, so before Delta and Iceberg and Hudi. Years before Snowflake hasn't created the first table format and it's way more mature than the other formats, so now that data's in Snowflake in our table format, you get all those advantages and don't have to manage A raw file-based data lake, which is really also a significant advantage for data engineers. So
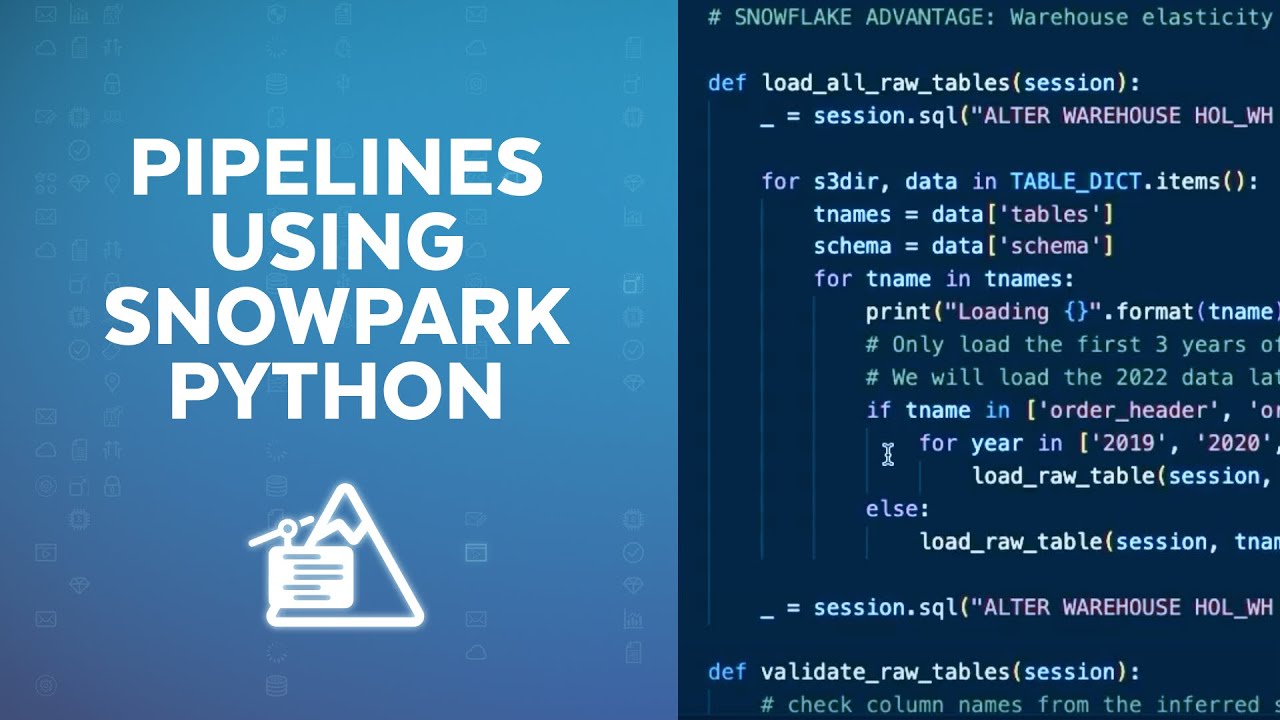
you can see we've covered quite a few things here. Copy is done in an optimal way. And then the load all. So what this is doing, this is for each table, It'll go through and do this, but what we'll do is just do it in a loop, so we loop through all of the tables in our arrays and we call that load raw table command appropriately. Another thing to point out here, you're going to see this actually throughout the Hands On Lab is we issue this alter warehouse command Before we actually do the loading. So
what we're doing is taking our warehouse, which we created as a extra small and we're resizing it, we're increasing it to an extra large, we're doing all the data loading and then we're shrinking it back down. This is actually a pattern you're going to see that is very common with Snowflake. Because our warehouses can scale instantly and because we build per second, if you scale up, run your query scale back down, you can do things in a fraction of the time and pay the same amount of money, Which is really exciting. So you got to
think differently.What might take, you know an hour to run can now run in 15 minutes and you don't pay any difference for that because we're just using this increased size while we need it. So we have that going. And then there's a few checks that will happen here. So the main function that runs when we call the script it's getting the Snowpark details and it's calling this load all raw tables. So it's almost finished. We're loading the last Couple years of data, we're actually only going to load three years of data to start with, so
2019, 2021. And then what we're going to do is at the end of this we're actually going to load the last year of data 2022 and show how this whole pipeline works incrementally, which is really an exciting feature. So we'll let this finish up here, but the thing to point out is that what we're doing is, this whole script is running on the client side, it's actually running on my laptop right now, but it's connecting to Snowflake with, let me go back at the top here, you know using the Snowpark API, it's actually connecting to
Snowflake And issuing these queries. And if we flip over, while we are waiting here, if we flip over to Snowflake, this is my Snowflake account, I'll flip to the activity and you can actually see the command running here, so it's actually issuing a copy into command. So it's loading that data from those Parquet files and actually creating, if you look down here when it creates the table. So as it creates these tables you can see it's creating them with the appropriate columns and this is all from using leveraging the the new schema inference feature In
Snowflake, so we're able to read that from Parquet and create those tables. And then like I said, running the copy command for each year of data, it runs that and each year of data is made up a bunch of files and so you'll see that if you browse what's in the S3 bucket. Oops, so let's go back to Visual Studio Code. So it's almost finished, almost got all that data loaded and then we'll move on to the next step here. So while that's finishing, let's look at the next step, which is I think a really
exciting step. We're actually going to, so that process to load the data. This is a one time process if you were going to operationalize it, there'd be additional things to consider, but you'd have to keep this refreshed, you have to run this on a regular basis every day if you got new data. But an even easier way than creating ETL processes is to use data sharing and our Data Marketplace. So what we're going to do now is actually do that, we're going to look at getting weather data from the Marketplace. So our script completed successfully,
we've got all of our point of sale and customer data loaded. And now we're going to move on to step three. So script number three. But if we look at the actual Quickstart, this is actually now going to be step five in here, so keep the mapping straight. Again, the numbers are a little different but what we're going to do is go through and we're actually going to add some data. So in the Snowsight UI, data in the Marketplace can be found under the Marketplace section. And these are all data sets that are either publicly
available or available through a subscription Like paying for access to the data. There's lots of free data sets and you can filter it down by free versus pay, but this allows customers to monetize their data and open up new revenue channels as well. So what we're going to do is we're actually going to look for a data set here that has the term Frostbyte in the name. And this is actually from our friends at Weather Source. They've created a customized data set for us to use for these demos with Frostbyte. But this is an example,
this is for real weather data from Weather Source, it's available for free. The listing overview page here will show Examples of usage of the data and it gives you even some like specific, you know what tables to look at, some specific queries to get started and all that. So very helpful. And I'm going to show you how powerful this is. So to get access to this data, I click on the get, let me go back here and what we're going to do is we're going to do a couple particular things here, so we're going to
use a particular name. So make sure you are using the correct name here. We're going to use this Frostbyte Weather Source name, so under options we're going to have the database named that. And then we're going to grant access to our Hands On Lab role. So two changes you got to make. Make sure you got those selected. It's listed here in the script or in the back on the Hands On Lab. So what we're going to do now is run... once we have those things set up as... click get. And that's it. We now have
a database created. And if I go to the data tab here, we now have a database created, and it's called Frostbyte Weather Source. And this is what we just created. And so in this on point ID, there's a series of views that are available and this is the data that you can browse it through here, But now it's available to the share. So that was it, we didn't have to create any ETL jobs and now every time Frostbyte updates this data, immediately we have access to it in our share. And to join this data to
our own is just as performant as if we loaded into our own account, so very powerful capability there. So now we've got the data, let's flip back to our VS Code. So that's really it for step three, super simple. We can run a query against the data just to make sure it looks good and you can see right away I get some results back, I'm just looking at the top A hundred postal codes, but you can see how easy it is to work with data from the share. So very powerful, this is just something has
completely changed through data sharing, what's possible in terms of sharing data sets between different customers and different entities. So the next step, step four if we flip back here, step four, we're going to be creating a view, this is really cool, we can create a view that joins together these various tables and then we're going to create a stream on that view. So a stream is, like I mentioned is Snowflake's change Data capture mechanism, and we can even create streams on views, so very powerful capability and let's go through that together. So again, this script
we're going to run locally. Oops, sorry about that. So if we go down the bottom when we run this script, we're essentially going to get our Snowpark session and let's actually just kick it off here. So again, we're in the terminal, we've got our Anaconda session activated and we're ready to run these scripts. So we're going to run the 04 script And I have to again do my MFA just one second. There we go. Okay, that's running. And what it's going to do, it's already finished, but this is going to create the view and then
create the stream and again, all this is running locally on my computer. This are really just one time scripts, these wouldn't be what you operationalize directly, but I want to show you what we're doing here. So we're going to create this view, but instead of using SQL, we're going to use data frame, the data frame expression. So to do that we have a bunch of tables that we're pulling columns from, so we create data frames for each of the individual point of sale tables that we want and I think there's six or seven of them
and there's a few ways to do it. There's an alternative way here, but what we're going to do then is join 'em together. So these next set of statements essentially will join together the various data frames and have the right, you know join columns and all that. And then the final step here is we're going to do on the final data frame is we're going to create a replace view And this is the point of sale flatten view. So this will create the view. And then on that view, the next step was we create a
stream. And so the syntax here, again, the stream is our change data capture mechanism, it looks like a table and returns just essentially the new records since you last ran. And what this will do then is we'll create this point of sale flattened view stream, so has the same name but with an underscore stream on our view. And then the show initial rows will allow us to take what data's already in the view And process it initially. So pretty powerful, now we've got a view and a stream and we'll by querying this stream now we'll
know when anything's changed in this flattened view, so very powerful capability there. Okay, so we got that set up. Next step is actually the last of our kind of setup steps is we want to create a Fahrenheit to Celsius user-defined function, we want to create a Python UDF for this. So we have a SQL I showed earlier, but in this case we actually want a Python UDF and we're going to actually make some changes to it as well. So now step five in the scripts and then if you remember this is, if we go back
to the top here, we're actually on step seven in the Quickstart. So starting here on step seven, let's go back to Visual Studio Code. You'll notice a couple things I want to point out here. And let's open the script up. It's actually in a folder now. So up until now you've seen just a single script that we've been working with. When it comes to Snowpark objects. This is related actually to our command line tool, Which I'm going to show you now. But this allows you, it creates additional files and metadata in here that will allow
our command line tool to help with the development lifecycle and the deployment of these Snowpark objects. So inside of this project we've got the app.py file, which is our main script. And I'm actually going to show you a couple things here. So these scripts are set up so you can do local debugging and then also deploy them to Snowflake and this is important 'cause if you think about the whole development life cycle, that's what you need to do. You need to test out the scripts, make sure the code is right and then you want to
eventually deploy that thing into the various environments. So what's going to happen with this script, as you can tell, this is a very simple, it's just hard coded the formula to convert and this is all going to run locally. So with no connection to Snowflake at this point. So if I go into the folder here, now if I run again Python for this time, app.py, it'll give me an error because I have to specify an argument. What I'm essentially specifying is what's going to be passed into the function here, which is the Fahrenheit temperature, So
let's put like 50 degrees. Well you can see locally that returns 10 Celsius. So I've got it all debugged and ready to go. I can run it locally and like I said in this case it's not actually connecting to Snowflake at all, it's just running code locally. Now when I want to deploy this, what I can do through the SnowCLI tool is run the command Snow. So we've got a few commands or a few tools. We've got the SnowSQL command, which if you've used before, is a way to run interactive queries against Snowflake. And that's
been around for a long time. It's a great command line tool. The new Snow command line tool is really more for the developer experience at this point. We do plan to merge these two so that we have one command line tool with all these different capabilities. But we're working towards that, but we're not there today for that, so right now there's two command line tools. And the SnowCLI tool is also in preview, so just keep that in mind as you're looking at this. Now the way I do this is with the Snow command. I can
do a Snow function create and what this will do-- And I need to again do multifactor authentication-- what this is actually doing is you, you can see the output here, it's going through and it takes everything in this folder and zips it up. So it takes our requirements text, our configuration file, our actual code, and it zips it up. And then deploys it to Snowflake. And in Snowflake it creates a user-defined function, so you can see actually the path here, it copies that zip file into a stage and then creates a function around it. And
I can actually show you one useful tip for working with Snowflake is in debugging Is always look at the query history. So under activity I can see every query that's been run and what happened here, if you look at it closely is I actually ran this, the Snow command line tool actually did this for me. So first of all, I did a put, so it zipped that file up and then put it into a stage and it created a stage for that initially and then ran this create or replace function. So all the work of
dealing with package management, multiple files, if you had multiple files you were leveraging but you had your own little library, a Python module you wanted to leverage, All of that gets handled for you and then it ultimately creates a function for us to leverage. So very powerful, the command line tool and you'll see later on we're actually going to use that in a DevOps pipeline to deploy these. So the same tool, the same thing doing locally to develop is the same thing that will run in your CSD pipeline and that's also important, so you have
the same code path essentially and deployment path. Alright, so flip back. So we've created a UDF, this is really simple and we're actually going to come back in a subsequent step And update this and actually use a third party Python package to show you how that works. So we'll do that in a little bit, but for now we're going to move on from that. We can also test it, so just to show you that really quick, if in the app Tamil file, this is some of our metadata for like the name that it gets created
with for example. So to test this, what I can do is, it's again the Snow function command and I would run and execute and then I give it the, and this is all in the guide, so you give it the name of the function and then the argument and again, I need to do Multifactor authentication. And what this is going to do is actually just execute our command. And so you can see we've got the same result, but this is actually now from this Python code it's actually now running inside of Snowflake as opposed to
before. If you look back up here, when I ran this app, when I ran these lines here, it ran locally on my laptop. So sometimes this gets like that a little bit like Inception, like we talked about earlier, you got to keep track of where you're at. So now the UDF running inside of Snowflake. Pretty cool, so let's just test it out. All right, the next step we want to do is now we're really building the first pipeline. So under the orders area we're going to build this orders table from the stream, we're going to
pull data from the stream and merge it into our orders table, so we're going to build this Python stored procedure to do that work. Okay, so in our scripts, this is step number six, oops. And then in, sorry, in our scripts that step number six in the actual guide we're on step number eight. So just so you know where you're at, you oreint yourself. So let's take a look at the code. If we go into step six, it looks an awful lot like step five. From the files, if you take a look, so you can
see the names. There's the script name is app py, it's really all the same. The only difference here is this local connection script. So obviously the code is different though. And this Python script now is what's going to be deployed as a stored procedure. So I mentioned that the way to think about this conceptually is that a stored procedure when it comes to Snowpark and building these pipelines, what you would've put In a Notebook and scheduled will be in a stored procedure and scheduled. And this can be arbitrary Python code. We've got some functions defined,
we're importing some libraries, whatever you want to specify here. And I'll show you, I'll go to the bottom here. We also have a local mode and actually what I'm going to do here is run this first, I'm going to kick it off 'cause this takes a little bit to run 'cause it's processing all of those data sets that we had originally. So again, I run it with Python app.py, I'm running it locally, oops wrong folder, I got to go into step six and then run the script. All right, so this is going to start kicking
off, I got to do multifactor authentication again, there we go. Now while this is running, let me walk you through what's happening. This is really important to get this part straight. So this bit of code in all of our projects, this local block is for local debugging. So when this actually gets deployed into Snowflake and run as a stored procedure, this bit of code won't be executed. But what we need to do locally is we need to reference Some helper functions so that we can load the Snowpark session and then we need to call our
main function, which was what the stored procedure would call. So what the main session, and you can see this takes a Snowpark session parameter. So when this is deployed as a historic procedure, Snowflake handles it for you and passes you a session. But when we run locally, we got to create that session ourself. So that's what's happening there. So what we're going to do is essentially we're going to create the orders table and the orders stream if they don't exist, So we're going to first test to see if it exists if not, we're going to
create them. And then we're going to incrementally process the data by running a merge command to take the change data and do an upsert operation into the target table. So let's just go through those in order. Start at the top. We're importing our Snowpark capabilities, and I want to show you kind of the range of things you can do here. So if you look at what's happened, we can do the session.SQL just like you would in kind of a Spark data frame. So we can like that's PySpark, we can do the same thing, so we're
running a simple check to look for information schema and we're essentially getting the results back here and seeing if our table exists. So this will return true if it exists, if it doesn't exist then we will create it, so we create the table and add a column to it and then create the view. That's the kind of setup part. The merge part, and again this is the same pattern, if you look at the outside, we've got the alter warehouse command. So we're going to get increase the size of our warehouse 'cause we have a lot
of data to process and we want to do this fast and so we wrap our logic here with this alter warehouse command. And then the core logic, we have two data frames. The source, which is a view on the stream, which is a essentially the, sorry, the stream on the view and you can see in our name in convention and we've got our final target table and we build the merge command. So we basically and we have an updated timestamp column which we want to set, so we add that into our metadata and then right
here is the actual work. So we do a merge into the source or from the source into the target and specify what to do in the various cases. And this ultimately generates a Snowflake, you know, query. So if we go out and we look at the query history, let's refresh top right corner. You can actually see here we ran it took a minute 12 to process the merge command and you can see the results, we inserted 340 million records into the table. So nothing was updated this time or it was all new records, but you
can see Snowflake, we generated this merge command from the data frame expression. So pretty cool and then we resized the warehouse Around that and always fun to watch. I always like to point out, you know look how fast we resized from an extra small to an extra large. It took 1.3 seconds, usually it's faster than that, usually it's sub-second. And then when we went back down it was just a fraction of a second, 154 milliseconds. So that's how fast we can resize and it applies to both starting and stopping, but also resizing clusters. All right,
so we've got now data, we've created our first pipeline, we want to deploy this pipeline. So we do the same thing we did before. We'll use a Snow command line tool. So now it's Snow procedure. Before we were using the Snow function, so we're going to run Snow procedure create, and again I have to approve my MFA. Same thing, It's zipping up all of our code, It's creating a stage if it doesn't exist, deploying that file to the stage and then creating the procedure. So really just a really powerful time-saving tool. And like you'll see
later, this will also run in our CI/CD pipeline. So that's the command, we can then test it, We rerun it locally, but since it runs incrementally we can test this. So let's do execute and what we're going to do is actually execute this in Snowflake now. So again, I just get the name here from our config file. This is what it gets deployed as. And I'm going to run this command now from the command line tool, but it's going to essentially issue a command here to run this, so there it goes, MFA. And since there's
no new data, this will return very quickly. So we process the order again, if we go back And look at our query history, you'll see that we did those same things, we did the altrr warehouse. But the merge command now took just two seconds to execute, and process zero rows as you'd expect, because there's no new records in that stream. So really powerful, so now we've got an incremental processing-- think of all the things we've combined here-- we're now processing data incrementally in Snowflake from a view on six tables, joining six tables together and we're
executing Python code natively in Snowflake. When I run this store procedure, all of this code Is being executed. Just my raw Python code that's connecting and issuing that and I've got a great way to work locally and deploy it at the same time, you know in a very nice life cycle, so that's really powerful. Okay, so that's really the first big one. Now let's go back and look at the next one, so we're going to be now on step nine in our Quickstart, but if you remember right, we're in step seven, so it's essentially two
off at the moment. But we're going to now create another table and another stored procedure to basically populate This table, which is going to join together the orders and the weather.And you'll see we created another stream. So streams are just our way to do incremental processing, so now we want to only find change records in our orders table. So we use the order stream and we pull from that instead, so we just handle incremental data. Okay, so let's jump in to step seven and what I'm going to do again is I will kick the script
off now and we'll run it first locally. So when I run this script, which we'll do with Python app.py, and once I do MFA, this will start running And like I did before, I'll explain what's happening. So again, we have our development block for local debugging. So again, this gets the Snowpark session and we're just going to call the main method. So what we're doing here is we're looking at if the table exists as daily city metrics, and if not we create it, so same pattern as before. And now we're going to run that merge
daily city metrics command, so very similar in structure. We start off with the table exists, which does that SQL query again. Now creating the structure, we wanted to show A best practice here. You know one of the best practices in data engineering, especially when it comes to analytic tables, is to define the schema ahead of time. You know schema evolution is a great capability, but it has to be used in the right places. You don't want to allow every table, especially in your goal layer or your analytics layer to be constantly the schema change whenever
new data comes in from the source, you want to control that, especially when you get into like dimensional modeling and these techniques. So that's what we're going to essentially allow here is we're going to create it still in Python, still using a data frame syntax, but we're going to define explicitly the columns of our table. Create a data frame from that schema and then we're going to do a session, oh this right here, this whole command, we'll create the data frame and we'll overwrite the table, so we'll create a new table with this schema. That
way we're in charge of what the schema has, so that's important. And then in the merge command we're going to do our same wrapper. So we have our alter table to resize at the bottom, a little more code in here, but at the bottom we're going to shrink it back down, so you see the same bookends that we've had before. And what we're doing inside of this script, this one's a little more complicated, but we're actually for performance, we're actually just listing out, actually just as a quick thing here, we're listing out the top five
distinct dates here from the the stream. So we want to make sure the stream has some data, which it does, we can see we have 340 million records To process, so this is just kind of a debugging statement at the moment. But what we're going to do now is create the orders table. We're going to aggregate, we're going to group the data. So when we join these two things together, we want to be at the right grain. So we essentially, this is your standard data frame expression. We're grouping by the order date, the primary, city,
country, aggregating summing up the price, adding a column and notice here we're calling built-in function. So zero if null, and then you'll see later we'll call The UDFs as well. But we're going through building our query and then if we go down here a little further, we're getting the weather, create a data frame for weather and for countries. Join this together. And then we're aggregating the weather data, so we're doing group buys on it, so this is all the standard. And here's where we get the UDFs, so now we're calling this Fahrenheit to Celsius UDF
is that Python UDF we deployed. And this analytics inch to millimeter is actually A SQL stored UDF, so we have multiple languages involved here in the same query. That's another really powerful feature within Snowflake. So whether that's Java, Scala, SQL, JavaScript, Python, all those languages, we can have UDFs and we can access those now just as normal objects inside of our query. And then at the end we are generating our merge or are joining together everything and doing a merge command. So this is actually fairly complex what's all happening here to join this all together,
aggregate it, join it together, And then create a merge command from it. And that all ran inside of Snowflake. It's successfully processed now. So if we flip out here to our query history and refresh, you'll see the merge command here took three minutes and 28 seconds, but it generated this big merge command to go through and process that whole bit and we inserted 25,000 rows. So we aggregated the data here so we're not going to have the same number of rows from our base table and we joined it to weather data. So I mean so
much happened there and I think for all Of this code, you know after you get through the Hands On Lab here, go back and look at this and really understand what what we're doing and how powerful this is. This all ran locally on my computer, but I want to deploy this. So everybody's familiar now with the process Snow procedure create and I'll again accept the MFA and again, we're deploying this stored procedure to Snowflake. So all this code that you see in the script is all being packaged up with any requirements, any other packages That
I needed and created in Snowflake. And again, I can execute this procedure, I just need the correct name for it in Snowflake, I can execute this. And again, you can copy and paste this all from the Quickstart. Okay, so this will again run quickly because this is incremental, so there's no new records to process, so this will be a very quick operation to return. So it's already processed and again, if we go out to prove it to you, again here's our merge command, this time it took 1.4 seconds and process zero records You can see
at the bottom. So this is really important, I mean incremental pipelines are like, is absolutely a best practice in data engineering. Anytime you do a full reload, eventually it stops scaling and completely breaks down, that happens every time. So you got to build things incrementally, and with streams in Snowflake, you're able to do that with ease. All right, so that's the seventh step, we've now kind of got everything deployed. Now we're going to talk about, let's flip back over here, we're going to talk about orchestration. So how do you schedule these now stored procedures to
run these pipelines? We are going to schedule this with a user, with a task, sorry and you'll see those two tasks down here. We're going to create one, the same name, it'll be orders, update task and daily city metrics update task and those are the related to the names of the stored procedures so there's a nice correlation and I will show you how this works. So we're going to be here on step eight in the script, so script number eight. And what we're going to do, I think I can just execute this all as is.
So let me again, top right, I can execute The whole SQL script, so we're bouncing around a little bit like we're doing this stuff in SQL, we did some stuff in Python locally and then we have our stored procedures. So intentionally here to show you how you can flip around and do things whatever way makes the most sense. But what we've done here is we're creating some tasks, so one for each stored procedure. And you can see the core part of the task is this call statement, so we're executing the stored procedure, we're choosing which
warehouse to use our hands on lab warehouse when it runs. And then this part is really interesting, this win clause. What we're telling the task in Snowflake is we only want this task to run when this stream-- If you remember, we created a stream called POS Flattened V Stream-- we're only we're going to run when it has data. And the reason you do this is because if you don't have this win clause, Snowflake will run the stored procedure however often you define it. I don't have a schedule defined here at the moment, but usually you
define a schedule and it would run on that schedule and use the warehouse. With this clause here-- if the stream has no data-- Then it won't even start the warehouse and I won't be charged anything for this task execution to run if there's nothing to do. So really powerful, so I can basically, you know great for cost savings, I can have these tasks running often, but only pay when there's actual data to process. And then the next task, you can see I have this after clause, so I'm essentially chaining them together, and you can create
a true DAG structure within Snowflake, a Directed Acyclic Graph. So we're able to go through here--this will actually Run after then the orders task--. So that's the dependency; you have to do the orders table first and then the daily city metrics table. So that's the two tasks and then what I did is I altered the task and resumed the task. And I want to execute this whole thing immediately just for a trial run, so I did that. And what we have in Snowsight, which is really powerful, I'll actually show you here in the CLI first,
we've got our two tables defined, and we can actually look at everything in Snowflake is accessible through SQL, which is really important. So all the metadata that I have, task history, query history, I can query that metadata, create alerting processes, create reports, dashboards around this data. And see, with my task history, I can see the tasks. And in this case we skipped it 'cause we had no data, so that's what we'd expect. But you can also look at other dates or other metadata here you can explore as well, so I put a few of these
in the script so you can actually go through and look, there's no scheduled task runs at this point. Okay, so we've got data, we've got our tasks ready, now we're going to do some incremental processing. So the next step is and it shows up down here with this little circle, but it's essentially going to run the whole pipelines now incrementally. Okay, so step nine, what we're doing and I'm going to kick it off first and then I'll talk about what's happening. All right, so what's happening here is we're actually going to load the remaining point
of sale data. So again, I did this initially in Python, if you remember. Now I'm doing it in SQL Just again to show the variet., I could do it the same way as I did before. I'm resizing my warehouse and then I'm running the copy command, which is what we did through the data frame API before. And you can see I'm just specifying the data that's in this 2022 folder. We didn't load that yet, we waited. And so we want to be able to do that now, so I've got the new data loading here and
then what I'm doing after that is I'm going to execute my task again. Okay, this will do a manual run. So what we should see is we should see when this finishes is a task, it'll kick off the two pipelines, the orders and then it'll kick off the daily city metrics and we'll be able to see that in the history. So finished. Looks like it finished loading one year of data. Here, and again, I can see from the Snowflake extension now, I can also track where I'm at. So I finished this command. This is just
like, you know we have in our API or our Snowsight UI. We can see this query took 57 seconds to run, it loaded data from each of these files, So there's a bunch of files in this folder for 2022, Parquet files, and we were able to load that data into Snowflake. AAnd now it's doing the second one. And this should be finished in approximately the same amount of time, so it should be almost done. And then we'll kick off the task and I'll show you how that works. And I'll also show you on the Snowsight
side how we can monitor this. So there's a few ways within Snowflake to actually see what's happening.So under our data tab, we'll have the Hands On Lab database. In here we've got-- our tasks are going to be here under harmonized. So we've got two tasks. And one of the things we've really been working on lately is making the task, the orchestration experience, more enterprise ready. So we now have a task graph which shows that visually, and again I said this could be a DAG structure. So this shows visually how the tasks all relate to each
other, which is really cool. We even have a run history where you can see which for this tas--and now we'll see here in a second, actually I need to execute it-- Okay, so this part's finished. So the task should be running here and again, we can see this by looking at some metadata. So here we go, this is executing as we speak. So it's calling that first stored procedure, which was to populate the orders table and that's currently executing. And once this finishes then we're going to be able to start seeing some of that task
metadata as well and so we can query this to kind of get a sense for where we're at. So these are helpful, like I said, these are helpful queries That you can leverage to see where you're at in the process. So again, we'll check where we're at and see what if our tasks have completed and we'll see now that they both have completed, so that's great. Now in order to view the query history, a couple things you have to do and this is actually called out in the Quickstart. But in order to see the queries
that the task executes, you have to do a couple things, you have to remove the filter on your username because they don't run As under your username and then you have to change this filter to show queries executed by user tasks. This is an important, you won't see results until you remove the filter. Add one here on the execute tasks and then I just need to switch and make sure you're set up here for the Hands On Lab role. And now what you're going to see is all of the querries that ran. So here's our
alter warehouse, here was our merge command. So this is the second query for daily city metrics, but you can see we got 9,000 new records. And then the one before that, if we go down to the previous merge command, got to have sharp eyes to find the command, here it is. You can see that we have another 353,000 or million records we put in. All right, so that worked and then to show you how that works for monitoring, we were looking earlier and we didn't have anything to show up 'cause the tasks hadn't executed. So
if I come in here and I look at, again, harmonized, under my tasks, I can now see under the run history, the tasks that executed. So it shows me my whole history, which is nice. I've only run, you know it's skipped the first time and then it's run the second time and I can see that for each task. And this is really powerful to see the history over time, you'll see when they fail or succeed or skipped. So you can really start to visualize and look at how your tasks are executing and then we also
have under the activity a task history, which is really powerful. This shows across your whole account all the task execution. So while we were looking at one task at a time, this is going to show it across the whole account. And this is going to show a few things. It depends, there's a delay, a slight delay to get the data in here at times. But you can see we've already actually got our recent task history data in here and now I could see all of them together in one spot. So really powerful, This is some
of the new capabilities in the Snowflake, in the Snowsight UI for managing tasks that really provide enterprise observability and monitoring capabilities. Alright, so now we've seen the entire pipeline Run incrementally. The last step, let's flip back to our overall diagram. The last step is we're going to deploy this now through a DevOps pipeline using GitHub actions. So this is great, this is going to show you sort of the end-to-end lifecycle. We've built it, tested it locally and now we want to promote it into say test and then prod. So what we're going to do if
we flip back to VS code is for this step we're actually-- and if we open up the CICD pipeline, step 10 here, or script number 10-- we're actually going to go make changes to our UDF. So if you remember originally with our UDF, we just had a hard-coded function, but I want to actually show you now how to leverage a third-party package as part of this. So we're going to kind of kill two birds with one stone here. So the idea is we're going to add a new method, uh package, so we're going to import
from SciPy this convert temperature function, then we're going to change the return statement here to actually leverage that. So instead of having a hard-coded function, we're going to leverage a third-party library. So this is really simple, but I'm showing, Especially with the UDF, imagine this is not some trivial example. Imagine this is a data science model that you want to, in the UDF context, you want to do model inference on. That could be done here ,or just a third-party transformation library that you want to leverage. You can do that and you can also leverage these
in a stored procedure as well. But here we're going to change this UDF. The last thing we got to do is in our requirements text. We also want to add SciPy as a requirement so that it'll deploy correctly. All right, so we got everything figured out now. We know the changes, want to test it locally like we always do. So we run Python app.py and say 50 and we get back 10, so we can see now that this works correctly. So we want to deploy it. Before we deploy it though, we want to make sure
our pipeline is set up correctly. So let's flip back here and look at step 12. This is where you're going to want to follow through a couple steps on here. So we've made the changes, we have tested it locally And now we want to actually push it to our forked GitHub repository. So the first thing we're going to do out in GitHub, you're working from your fork repository, you go into the settings, tab, and down under secrets and variables there's action secrets. And I've already set mine up ahead of time here. But you're going to
want to set up each of these six environment variables, essentially report repository secrets, and everything is outlined here in the documentation. So you would recourse like we did before, Replace my account username and password with your real values as you create these and then these three will use our default names. So get that set up first and then what we're going to do, that's really important to do first, because what we want to do is actually now run this repository or run the CSD pipeline. So to do that what we're going to do is flip
back to VS Code, and you're going to, in here under the source control integration, we're going to actually commit these changes. So like always we review the contents of the script Of our changes, we just change those two lines. We look at our requirements text. iI's what we'd expect. And now what we're going to do is call this give a name. So UDF change, commit it locally. And now in order to push this to our fork repository, which will actually invoke the pipeline, we have to sync the changes. So we did that. Now what's happened
is now that we've pushed that change to our fork repositories, that pipeline's kicked off. So while that's running and I'll show you here, if we go back to the GitHub, under our project, if we go to actions, we'll actually see that This is running now. So we have our pipeline running. And just to walk you through what's going to happen if we look at under our GitHub actions folder here, our workflows folder. So it's GitHub workflows. This is what's going to run, and this is a YAML-- most modern CSD tools have a YAML-based pipeline definition,
like GitHub actions and it's pretty easy to translate these between CSD tools. But what we do--pretty simple--is we go through and we check out the repository. So this is your fork repository. We make sure Python 3.8 available, we install any required packages and then this step. What we're doing is configuring this SnowCLI command line tool by creating that SnowSQL config file. So just like we did before locally where we created that config file, we're actually going to now use those secrets that we defined in GitHub actions or in GitHub, and we're going to create a
config file. And what that will allow us to do then is when we run the actual SnowSQL I command, it'll have the correct connection details. And then lastly, we're going to run this deploy Snowpark apps Script, which is just a helper script. It's in here in repository, and it essentially loops through every directory in your repository and finds any folder that is a Snowpark application folder. That means that it has the app Tomo file in it. So once it finds that, you can see we have essentially three of those, it will loop through them and
it will call the appropriate Snow. It'll either be a function create or the procedure create. So that's just what we did locally. You could even run this script locally if you wanted, but let's flip over to GitHub actions and see what happened. So this is now finished and if we look at the output from this, you'll see those same steps mentioned. The deploy apps is what we want to look at. And this should look to you just like when we ran it from the command line, because essentially what it's doing, it's running the SnowCLI command
just like we did. And you can see here it's deploying each of the three objects. So it actually deployed the stored procedures as well as that UDF change. So there's the two stored procedures. And then finally Our Fahrenheit to Celsius UDF that now you can see in the package list now references SciPy. So because we've specified it, all that is taken care of for us by the SnowCLI tool. So very powerful. This is now deployed into (indistinct) production environment and ready to run these production pipelines. All right, so that is a lot. As we went
through all this, there's also a tear down script that you can run OSA step 11, which will go ahead and delete the few objects that you've created in Snowflake. And just to recap, if you look back at everything We've gone through, we've now completed all of the different steps here, even through deploying through a DevOps pipeline. So hopefully this is helpful. You can go back of course and go through this at your own pace if you missed a step. But everything is documented in here, and there's additional commentary that I've added that will help you
as well that I may not have mentioned as we went through. I look forward to hearing things you come up with. This is gives you the building blocks, so now you know how you can do Python, build Python Data pipelines with Snowflake, I'm excited to see what you all come up with. Thanks.