in my last video I did a comparison between two paid web-based talking avatars tools did versus hey Jim I gave a sneak peek at this talking avatars learn more about AI with AI controversy. com and mentioned that I would drop a video on how to make them this is that video the tool is called sad talker and it's my personal favorite I'll admit did produce better results but sad talker produces just as good results for absolutely free and since I don't get paid to make these videos and I'm just starting out I'll stick with the free versions so let's install sad talker locally all of the links will be in the description below and if you feel the video is going to fast for you feel free to pause or rewind if needed step one download and install python 3. 10.
6 to make things easier just press Ctrl F and in the search box type 3. 10. 6 there we go now download the windows installer 64-bit when you install it be sure to check the option add python to path step two download and install git this process is as simple as downloading the 64-bit git just install it as you would any other install file step 3.
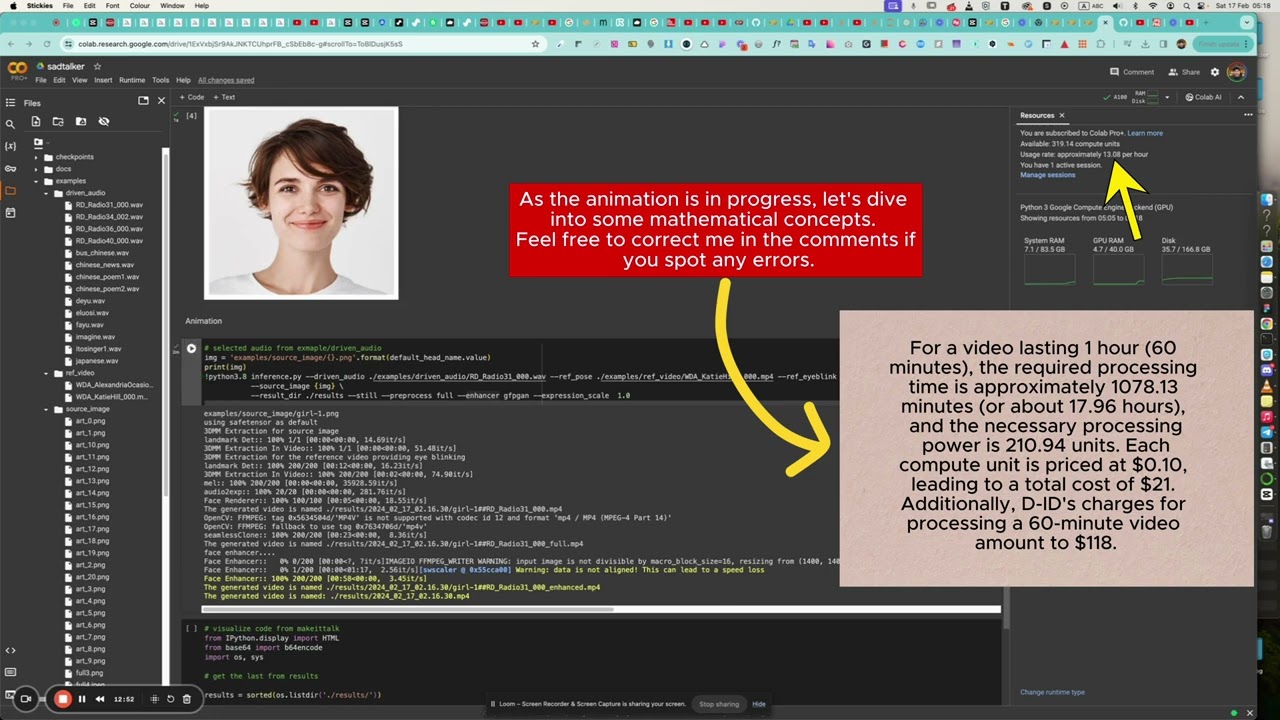
you'll need to install ffmpeg to do this we will need another installer called chocolatey but don't worry it's super easy to install and makes life moving forward much easier when installing other packages like ffmpeg hey real quick it takes me a lot of time and energy to make these videos so please hit that like button and subscribe so I can continue to make content for you 97 of you watch my channel but aren't subscribed so hit that subscribe button for more AI related content okay back to the video so go to the chocolatey website and scroll down till you see now run the following command copy the command by pressing the paste button now in Windows click on the search box in your taskbar if you don't have the search box simply right click on a blank area of your taskbar and select search then show search box in the windows search box type Powershell right-click on Powershell and select run as administrator accept the user account control by clicking yes then you'll have a blue command window remember how you copied the data from chocolaty website now all you have to do is right click inside of Powershell to paste the command hit enter and let it install when it's done test to make sure it's installed by typing choco it should look something like this perfect now let's install ffmpig simply type choco install ffmpig hyphen full then hit enter and wait for it to install when prompted hit a to accept all then it will finish the install once that's done type clear to clear the window and type ffmpeg to double check that it is installed step four open File Explorer and select the drive you want to install sat talker in for me I'll be installing it on my f Drve so I'll go into F drive and in the address bar I'll type CMD press enter now type git clone and paste this URL in hit enter and let it install perfect we now have sad talker installed but hold on we are not quite done yet we will have to install the checkpoints and other requirements step five go into your set talker folder for me it is an F colon backslash set talker now create a folder in the root directory of your sat talker folder and name it checkpoints great now head over to the satalker GitHub page and type Control Plus f in the search box type in download training models you will see this now right click on the main checkpoints link and open it in a new tab next right click on the gfp gone offline patch link and open it in a new tab download those two zip files into your checkpoints folder once they are downloaded go into your checkpoints folder and you'll see the two zip files Begin by locating the file settalker. zip perform or right click on it then choose the extract all option from the drop down menu upon doing this you will notice an address path that reads this here you are required to erase the last instance of sad talker From the Path leaving you with this after adjusting the path proceed by clicking extract the same process is to be repeated for the gfp gone zip file after you select extract all you'll see the default address path in this case remove the initial mention of gfp gone in the path once you've made this change confirm by clicking on extract double check the gfp gone folder and you should see a folder called weights now you can delete the two zip files step 6. go into your set talker folder and double-click on web ui.
bet give it some time to install once it's done it should look like this now select the URL in the command prompt which should be 127. 0. 0.
1 colon 7860. and copy the link by right-clicking now paste it into your web browser if you want dark mode just like my screen just add this line of code and paste it next to the URL like this now you're done now all we need to do is create a talking photo I already have my avatar and voice file so I'll use that click here to add your Source image click here to add your audio click generate here are my results learn more about AI with AI controversy. com not bad however I prefer to use these settings 512 full mode gfp gone face enhancer click generate here are my results learn more about AI with AI controversy.
com nice now let's take a look at them side by side with the default setting and the settings we just went over to see the difference learn more about AI with AI controversy.