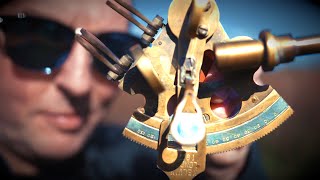
if you watch the first video you already know the principles behind this accident and be able to label all the different parts if you haven't already seen it advertised going back and watching it first this video we're going to move on and examine errors of a sextant and methods of correction there are actually many different errors possible on a sextant we can split them into two different groups correctable and non correctable one error collimation actually used to be correctable but on modern sextants it's more usual for it to be non correctable nowadays let's start by
looking at the non correctable errors we'll just go through quickly as you can't correct for them anyway centering error this is when the pivot point of the index arm is not perfectly aligned with the center of the instrument prismatic error is when the two planes of the mirrors or glass planes are not parallel to each other shade air is the same thing but it's for the shades and it it causes a slight deflection in the ray of light as it passes through the glass pane graduation error is to do with inaccuracies in the graduations of
the scale the Vernie a or the micrometer drum Worman rack is effectively the wearing of the cogs that control the fine movement of the index arm and collimation error this is that one that was correctable on oldest extant is caused when the axis of the telescope is not perfectly perpendicular to the plane of the instrument nowadays a telescope is normally rigidly fixed to the frame so it's not actually possible to correct and finally we've got instrument error this is actually just total of all the non correctable errors that we've already discussed it gives the user
an easy way to apply all those manufacturing errors to their readings sextants come with a calibration card which gives this instrument error in theory the errors should be negligible but you can see from this example card that as the sextant reaches its extreme setting you do need to take account of the instrument error now we can move on to the correctable errors for the correctable errors you need to correct them in the right order first you've got the error of perpendicularity this describes the error caused when the index mirror is not perpendicular to the plane
of the instrument to check for perpendicularity error you set the index on partway say 30 40 degrees and then you look straight across the plane of the instrument so that you can see the ark both directly and reflected in the index mirror you're looking for the real and reflected arcs to appear continuous and flat as you can see this mirror is set perfectly and that's just because it's a computer-generated model as I introduce some perpendicularity error you can see the change in the view the arc no longer appears continuous is a visible step between the
two to correct this error you just use the adjustment screw one useful tip for the adjustment screws in my method of Correction is that you'll always be adjusting the screw that is at the top of the mirror in relation to the way you are holding the sextant as you have to hold this accident on its side to see this error the screw on the side of the index mirror appears on top so that's the one that you adjust all you need to do is turn it one way or the other until the real and reflected
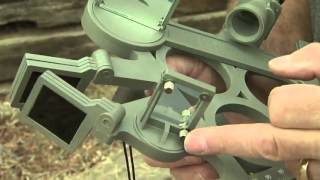
views of the arc appear in a straight line once they do you know that the index mirror is perpendicular to the plane of the instrument and is correct next we're going to move on to side error this is similar to the last error that we looked at but it's for the horizon mirror instead so side error is when the horizon mirror is not perpendicular to the plane of the instrument you can spot side error when the instrument is set at zero and you look at an object in the distance if the real object and the
reflected object are separated side error is present you'll notice the correction screws on the horizon mirror and not the same as those on the index mirror the screws on the horizon mirror actually correct for both side error and index error we're going to need to correct for both at the same time so what's index error then index error is when the index mirror and the horizon mirror are not parallel to each other when the instrument is set at zero if you set the instrument to zero and look through the telescope at the horizon you can
spot any index error if there's a step in the horizon index error is present this is why index error and side I need to be corrected together if you have a sextant with both errors present images in the telescope will be displaced both horizontally and vertically the horizontal displacement is due to the side error and the vertical displacement is due to the index error now everyone is their own way of correcting for these for me the simplest way is to just use the horizon my reasoning is that for almost all sites you're going to need
the horizon anyway so it should be visible and it's obvious and easy to find so I start by setting the instrument to zero I want everything to be lined up perfectly when the instrument is set to zero then you can just look down the telescope's straight at the horizon you remember we already did this to check for index error it doesn't really matter at this point if index error is present or not because as we adjust for side error we're going to change the index error anyway at this angle you can't tell about side error
so it's not possible to tell if there is a horizontal displacement you could rotate the sextant by 90 degrees which would effectively give you a vertical line to tell you about side error but that's not actually necessary all you need to do is to tilt your head slightly and any side error will show itself with the real and reflected horizons moving apart obviously if you've got a lot of index error to start with it's harder so you may have to tilt your head over to 90 degrees so that all of the error that's visible is
side error and none of it is index error normally a 45-degree head tilt will be plenty from this position you just adjust the screw that is furthest from the frame I tilt my head to the right so this screw is now on top just turn it one way or the other until the horizon forms and continuous line again as you bring the sextant back to its normal angle the horizons may separate again if they do this is now due to the index error again you adjust the screw that is on the top this time it
is the one that is nearest the frame turn one way or the other until the horizon is again continuous then you return to your tilted head position to check whether you've introduced more site error if so you can correct for that again now you repeat this process a few times until you've eliminated both side error and index error you may get to a point where you can't eliminate both if you find that you're just going back and forth between the two positions you've taken out as much error as it's possible to remove from here just
make sure your side arrow is eliminated then any residual index error will have to be removed mathematically you effectively measure that final little bit of index error by using the micrometer drum to make the horizon continuous then any measurement you take will need to have that index error applied to them if the error is measured on the arc you label it on the arc and it needs to be subtracted from all the measurements to make them true likewise if the error is off the arc you label it such and it needs to be added to
all measurements to make them true so theoretically you've now got a sextant with all errors eliminated and are ready to start taking sites in the next video I'm going to show you how