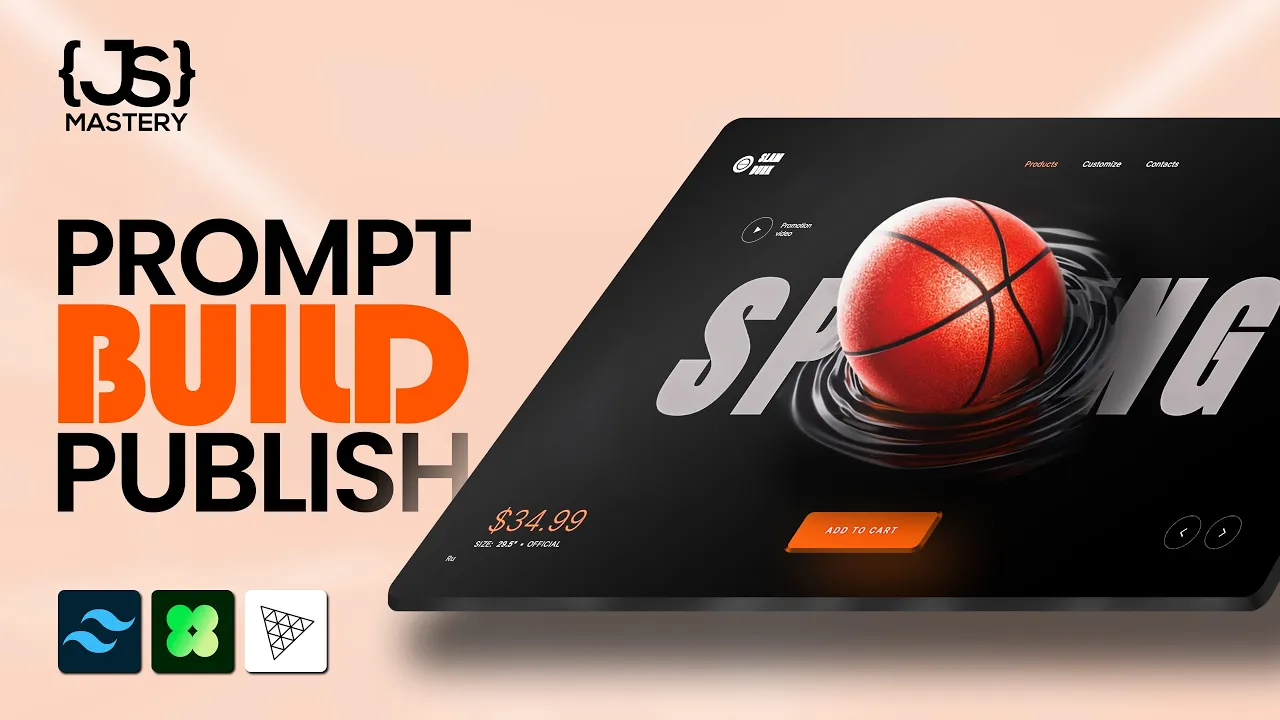
Check this out. A basketball you can almost feel through the screen. Scroll driven animations that move the 3D model through sections like a cinematic sequence.
Click add to cart and the ball jumps across the page and lands into the icon with hover effects and sound effects. It's a full product showcase. And this whole thing was vibe coded entirely using AI.
One developer, no team and no agency, just one person and an AI agent having a very long conversation. Now, here's where it gets interesting. The developer goes by the bugdev on X.
No real name, no portfolio, and no credentials. They showed up out of nowhere, started posting these AI built projects, and within weeks, the creator of 3JS himself noticed their work. five client projects followed and even a job offer.
But what nobody online knows yet is that the bug dev is actually a member of our team. I sent them on an incognito mission to answer one question. Can the work speak entirely for itself with zero reputation behind it?
It did. So today I'm going to rip this entire project apart. every feature, every decision, and most importantly, the exact process we used to vibe code this with AI, so that by the end, you'll have a system you can use to build projects like this for yourself and your clients.
Now, before we go deeper into this project, let me clarify something important. What you're seeing here isn't AI magically building a website. This is a process.
Right now, most developers experimenting with AI are still using it like autocomplete. They paste a screenshot, they type build this and hope it works. Sometimes it does, but most of the time the result is messy.
What we're doing here is different. We're using a structured workflow for agentic development, a system for working with AI instead of randomly prompting it. And I've been documenting this entire process while building projects like this one.
And because so many people have been asking how this actually works behind the scenes, I'm turning it into a full course on agentic development. It covers the exact workflow we are using here. The master prompting system, specdriven development, context engineering, and how to actually build production projects with AI.
So if you want to learn this properly, join the weight list in the description. But first, let me break down exactly how this project was built. Text stack includes React 19, 3JS through React 3 fiber for the 3D and Gap for scroll animations, all vibecoded through Gemini and Google AI Studio.
When you first land on the site, it looks like a clean product page. Then you scroll and as you scroll, the basketball physically moves, rotates, and morphs into different stages. And if you keep scrolling, you'll transition into aerodynamics with ball repositions, camera angle shifts, and text floats perfectly synced with the 3D model.
The ball isn't decoration, it's telling a story. First, there's the physics section, then podium, and then the product showcase. And the hard part wasn't even the scrolling itself.
It was keeping the 3D ball and the flat 2D text perfectly aligned on every screen size. Phone, laptop, 4K monitor. Gemini even built a custom React hook that constantly recalculates the 3D scene dimensions to match the website layout.
If you zoom in on the basketball, can you see that texture? That pebbled leather surface, the seam line, and the subtle bump that makes it look like you could reach through the screen and feel the grip. How did we get to that?
Well, I went to Gemini and prompted, "Generate a procedural leather texture with pebbled surface using noise. It should feel like a realistic 3D basketball. " The first output wasn't even close.
four or five rounds of iteration. Make the bumps smaller, seams are too thick, or surface looks too uniform, so add more variation. Each time AI adjusted, and each time we got closer to reality, then a performance problem.
Generating high resolution noise was killing the frame rate. Too much math per frame. So, back to Gemini, I said, "This is slow.
Fix it. " And one conversation later, Gemini found redundant calculations and suggested dynamic resolution scaling. Could you as a developer figured this out manually?
Sure. Over weeks of reading shader documentation, AI compressed it into a single afternoon. And same approach went for audio.
Implement a cool sound effect. When the user clicks add to cart, the browser will produce a sound using the web audio API with no audio files downloaded. It just works in real time.
But the cart animation was super difficult. See, this 3D ball lives inside a canvas with its own coordinate system with depth and perspective. The cart icon lives in a regular HTML, two different worlds entirely.
To make the ball fly into the cart, you need to translate the 3D position to 2D screen coordinates, calculate a curved flight path, animate along that curve while shrinking the ball, and make all of it work across all screen sizes. One bad calculation and the ball flies into the wrong corner, which happened multiple times. I was yelling at Gemini, arc is too flat, or it's overshooting on mobile.
But each round we get closer until it worked. Notice the pattern here. It's never one prompt.
It's a conversation. Specific feedback, targeted corrections build toward the result. That's the process.
Now, the process I'm about to show you is the part that most people never see. On X or LinkedIn, you'll mostly see the result of a cool demo, a finished website, or maybe a viral post. What you rarely see is the workflow behind it, the prompts, the iteration loops, and the way you structure context so that AI actually understands what you want.
This is exactly the system we've been developing internally while building projects like this one. And it's the core of the AI course we're working on right now. Most people use AI at maybe 30% of its potential.
Open up a chatbot, type build this, paste a screenshot, and pray. Sometimes it works and most of the times you get mediocre output and blame the tool. The gap between average AI output and what you saw isn't the tool.
It's the process around the tool. So, as I promised, let me teach you my system so that you can fully replicate it on your own websites. It has seven steps.
So, let's start with the first one. Research before your prompt. Most people skip this.
Before writing a single prompt, we studied references. Car configurators, awards sites, and 3D product experiences. Not just that looks cool, but we broke each one of them down.
What's the layout structure? What's the spacing rhythm? How is typography organized?
Are animations decorative or functional? And how does the responsiveness work? And here's the kicker.
We used AI to do the analysis, feed a reference design into Gemini and ask it to extract the entire design system, colors, spacing, typography, and even animation patterns, all before building anything. Step two is to define goals before you open up the tool. AI performs better with constraints, worse with vague instructions, regresses when asked to fix broad problems, and improves when given scoped instructions.
Your job is to reduce ambiguity before you start prompting. For this project, goals were locked before any prompting started. Immersive 3D e-commerce, scroll-driven storytelling, real-time customization, every visual and sound generated from code, clear constraints, no room for AI to wander around.
And step three is to build a master prompt. This is the biggest differentiator. The master prompt is a structured document that tells AI exactly how to behave for the entire project.
I spent so much time tweaking this master prompt, so much in fact that I decided to turn it into a SAS application. We've been testing it internally and essentially it allows you to go from something like this to something much more animated and creative like this. The only difference being the master prompt that literally takes you seconds to generate.
So you can head over to the dashboard, click new prompt, and simply upload your design reference. It can be an image or a video in case it has animations. And then click analyze design.
And it'll analyze your design, which can take a moment or a couple depending on the complexity of your reference. And you'll immediately be redirected to a new prompt page where you can preview or edit this master prompt that was created for you. What I like to do here is just scroll to the bottom and save the prompt, which will then move it over into your prompt library where you can check it out in more detail.
See the reference image you uploaded and then use this prompt in whichever builder you prefer to use. I prefer Codeex or Claude Code for more backend heavy tasks and then Gemini and Google AI Studio for these very creative landing pages. But for now, I just want to go over the prompt with you.
The master prompt starts with establishing authority. We tell it to act as an expert front-end engineer and creative UI developer. And then we give it a goal, which is to recreate the website shown in the attached screenshot with pixel perfect accuracy.
Then step two is to lock the reference. We tell it to not redesign, not simplify, and not reinterpret any element. The reference image is the only source of truth.
follow all instructions below with extreme precision. This is so that it doesn't try to do something on its own rather that it tries to properly and accurately recreate the attached design. Then we have some general rules such as that all important design elements like layout, typography, color and spacing must match the screenshot exactly and if there are any images, it can source them from free image sites like these.
But what matters even more is extracting the design system. Here I'm talking about typography, different fonts that it can find on the website and font sizes for every different type of text on the website. Of course, next to text we have the color palette.
So it was also able to extract the primary colors, the accents, the secondary colors, buttons, and more. And then there's the layout structure where we give it some guidelines to know where to place elements. And then we go further into the section breakdown.
Basically here we're telling it rebuild the layout exactly as shown. Preserve the section order alignment and container widths and proportions of all the different sections. Don't make any creative alterations.
If there is specific imagery such as the basketball here, we're telling it to use a hyperrealistic isolated basketball image. But again, this is something that I significantly tweaked later on through the conversation with AI after I used this initial prompt where first I thought, yeah, it can be an image, but then later on we transitioned it to pure math so that the ball isn't even an image, but rather a 3D element that moves on the screen. The master prompt is great to start with, but then as you'll see with the further steps of my entire process, you still have to speak with it to get to the final output.
Here you can also see some animations and if you fed it a video it will be able to generate these in a much more detail and have a whole section on it. Responsive behavior performance and now this is what matters visual accuracy. We tell it that all font sizes, weights and letter spacing must match the screenshot.
All spacing, alignments and proportions must be pixel perfect and all colors must match the screenshot exactly. So do not simplify or omit elements. Basically don't invent things.
Don't modify things. Don't skip the details. Do not try to improve the design.
That's what AIs love to do, improve. But not often do we actually need those improvements. And finally, we tell it to return the final implementation.
All instructions above must be followed with extreme precision. You can generate this master prompt yourself if you pass the reference design into any kind of an AI chat interface. But again, I did that so much that I decided to turn it into a SAS so that I can create it more easily.
Either way works. The next step is to then copy that master prompt, go to your preferred website builder and paste it into your preferred website builder. But don't forget to also pass in the reference design itself.
Then run it and see what it's going to come up with. Go ahead and experiment with a couple of different websites to see just how different these master prompts will get. You'll understand that they all follow the same structure but are a bit different depending on the reference design.
And then that brings us to the step four of our process and that is to iterate surgically. I'll explain what I mean by that. But at this point, you'll already have a greatl looking landing page.
It'll be significantly better than what you would have gotten if you just pasted the screenshot and told it, "Hey, build this website. " But even the best master prompt won't produce perfection on the first try, which is completely normal. The mistake here is giving vague feedback.
If you tell it that the layout feels off, it'll create even more chaos. But if you tell it hero container should be max width of 1200 pixels and centered, it'll get it fixed in one round. Like just compare these two approaches.
If you tell it something looks wrong with the scroll, it's not going to be good. But if you tell it scroll should transition from hero section to the second section where the ball size increases, appears in half, rolls over to section two, and then in section three reduces to normal size, and sits centered. That's much more specific and measurable and targeted.
And this is super important. Whenever you ask it to make some changes, always end with fix only these items. Do not change anything else.
Without that line at the end, AI will try to be helpful and fix things you don't ask about. That's how regression happens. It'll break more things that it will fix.
So, go ahead and exchange a couple of messages with your AI. Try to do it surgically, pointing to specific things that need to be fixed and improved. Be specific and let me know how far you can get.
But another super important piece of advice is the step five of the process, which is one problem at a time. I never asked AI to build me a 3D e-commerce website. That prompt will give you a shitty website.
Instead, focus on isolated problems. Each one is a separate conversation. For example, generate a 3D ball using custom geometry and color maps in 3JS.
This is much more specific. or write a shader that creates a nebula effect. Scroll the 3D ball from hero section down with smooth gap animations.
Or synthesize a click sound using the web audio API. That way, you're isolating each problem. You're not just asking AI to hold an entire project in its head.
You're giving it one job at a time and verifying each one works before moving to the next. So, give it a shot and try to solve a couple of problems. one problem at a time and then continue with step six and that is to understand what you ship.
See AI wrote code that we couldn't have written from scratch. Shader math, procedural noise functions, coordinate system translations, but I made sure to understand what the code does before shipping it. If you blindly paste AI output without understanding it, the first time something breaks, you're stuck.
You don't need to be able to write a shader from memory, but you do need to know what each piece does and why it's there. Let AI write the first draft, but you own the final version. And step seven is to just build in public.
This is the lesson from that incognito mission that we did. We didn't wait until everything was perfect. We shared the process, the iterations, the wins and failures.
And that openness is what caught Mr Doo's attention. Not a polished portfolio, not credentials, but just the work and honesty found its audience. You don't need a perfect portfolio to start.
You need to start. Share that messy middle part because that's where interesting stuff actually happens. If you follow all these seven steps, you should get very, very far in, well, very creative, award-winning websites.
Iteration is the key. So follow the process a couple of times with a couple of different websites that you like and that you wanted to build for years but just didn't have the time to and go ahead and build them this weekend. But if you'll actually be able to do this, and I promise you that you will because we did it, that brings us to a very important question.
Is front end dead? Well, front end as we knew it at least. The model where you grind for years mastering one narrow skill set and that carries your whole career.
Well, that model is changing fast because AI compresses years of specialized learning into weak hands. You just watch the proof. But developers aren't useless.
Not even close. AI wrote the shaders. But AI didn't decide that a basketball should fly into a shopping cart.
AI didn't think, "What if e-commerce felt like a video game? " AI didn't look at these boring product pages and decide to fix them. That was vision, taste, or a sense of what should exist.
The skill isn't writing code anymore. The skill is knowing what to build, why build it, and being able to describe it clearly enough so that AI can execute. The vision and the taste is what you need to be able to stay relevant.
And this incognito mission also proved something else. You don't need a big name. You don't need a following.
We showed up anonymously, built incredible things with a clear process, shared them openly, and the work spoke louder than any resume could. People noticed not because of credentials, but because of the work. So this is why learning this properly matters.
AI isn't replacing developers. It's changing the role of what we do. So instead of spending most of your time writing syntax, you spend more time designing systems, defining constraints, and directing the implementation, the developer becomes the architect, and the AI becomes the execution layer.
And that shift is happening right now. That's exactly why I'm building this AI course to teach developers how to actually operate in this new model. Again, if you want to be notified when it launches, the wait list is in the description.
But yeah, this was how we built Slam Dunk 3D, a 3D basketball website where the browser builds its own textures, creates its own sounds, and runs its own shaders. The whole thing is under 3 megabytes. One developer, one AI agent, and a result that can actually speak for itself.
So, if you have a vision and a process, whether you're a senior developer or someone who picked up coding last month, AI just handed you a serious upgrade. Go follow the bugdev on X to watch the journey continue. There we'll share our biggest successes.
And if you're more into the exact workflow behind these projects, join the AI course weight list below. But more importantly, go build something, experiment, break things, and share the process. Because right now, we are in a moment where one developer, one AI agent, and one good idea can produce work that used to take entire teams.