Hello traders and welcome to another episode of smart risk. Identifying inducements is one of the most challenging and key steps in market structure analysis that every trader encounters. Inducement zones are a hidden weapon used by institutional players to manipulate market sentiment and they can turn a promising trade into a nightmare.
Hence, recognizing valid inducements becomes a critical skill as it enables traders to distinguish authentic order blocks in the market, steering them away from potential traps, and enhancing overall trade decision-making. Today, in this advanced episode, we'll unravel the secrets behind the inducement zones, understand how they work, and most importantly, equip you with the knowledge to protect yourself from potential losses. So traders, if that's something you're interested in, please give this video a thumbs up to show your support and subscribe to our channel if you are new.
See you after intro. [Music] Welcome back traders. So let's get started.
Now let's start with the basics of price behavior in the market from the market structure perspective. Price movement comprises three primary submovements. Impulse, corrective, and continuation.
Each of these submovements is already composed of internal candlestick formations. Now, let's get into the details of each one. Impulse movements are characterized by strong directional price moves in the prevailing trend.
During an impulse, the price advances decisively, often forming significant bullish or bearish trends. This phase is typically fueled by strong market sentiment and a dominant force either buyers or sellers. For example, consider a bullish series of candles as illustrated.
We see that the price has formed a series of minor candlestick-based impulse and corrective movements driving upward until it reaches a swing high. It's crucial to view these bullish internal structures as a unified bullish impulse leg. The rationale behind this is that the price hasn't taken out or effectively swept the liquidity of any previous minor and internal lows at this point.
Nevertheless, considering the candlestick perspective, this internal move is identified as our impulse move. Subsequently, we have a valid pullback as the price has broken and closed below the latest bullish candle, marking a red bearish candle known as a minor correction. Additionally, we see another impulsive move termed as the minor continuation.
It's clear that price has followed similar patterns until it reaches the swing high and forms a deep correction in this example. Now, let's move on to the corrective movement. Corrective movement in essence is a counter trend or retracement phase that temporarily opposes the main price direction.
Therefore, from the market structure perspective, in the bullish scenario, a corrective movement occurs when the price breaks below the internal pullback or internal low or when the price effectively sweeps its liquidity with a candle shadow. In this case, we see a correction represented by these three red candles indicating that the price has broken out and swept the liquidity of the previous pullback's lowest point. Subsequently, we see that the price has pushed to the upside and eventually has broken out the latest swing high.
Hence, we consider that as a continuation movement in a parallel scenario occurring in the second candle series. Once again, we see that the price has created a series of minor candlestick based impulses and corrective movements toward the upside until it entered into a temporary pause, retraced back down with these three red candles. Since the price has not broken the lowest point of any internal pullback or internal lows or it has not swept the liquidity below them in this sequence, we cannot consider it as a valid corrective movement either.
So we should consider this price action scenario as a single impulsive movement without a correction. These concepts are applicable to bearish markets as well. It's important to note that these principles can be applied across various time frames and any price actionbased chart.
Please make sure that you watch the video attentively until the end. In the second section of the video, we will explore various inducement types, price actions associated with inducements that you might encounter in the market. Now, let's proceed to the next topic and discuss how to identify a valid inducement in terms of candlestick patterns.
We'll explore the criteria and rules that need to be considered for this analysis. But before we continue, if you're curious about how we stay updated on financial news and fundamental analysis, well, we rely on Fast Bull, one of the best trading websites with various useful trading tools. This site provides one of the most accurate and detailed economic calendar, a tool we use every day before starting our technical analysis.
247 economic live streaming also allows us to stay informed about the latest trading world's news and fundamental analysis. So, if you want to benefit from multiple trading tools that can significantly improve your trading, make sure to check the link in the description. In the bullish scenario, a candlestick based inducement occurs when the price breaks below or effectively sweeps the liquidity of the lowest point of the bearish candle representing the most recent valid pullback.
For example, in the given illustration, we see that the price has created successive minor and internal impulse and corrective movements before entering the retracement phase and experiencing a temporary downward movement with these three red candles. The price has broken and closed below the latest internal pullback indicating a valid inducement and confirming the upper high as our valid major high. Similarly, in a bearish scenario, a valid inducement occurs when the price breaks above or effectively sweeps the liquidity above the most recent internal pullback, confirming a new major low and already a new break of structure, if the price breaks and closes below the newly confirmed major low.
It's crucial to note that for having a confirmed inducement, the price must break and close above or below the most recent major high or major low and form a valid break of structure. If you look at the bullish diagram, you can see that the price has broken out and closed above the latest major high indicating valid inducements and also a valid break of structure. Here we have identified a valid break of structure.
Now after the break of structure, where is the potential inducement area? We can see that the price created an internal pullback before it broke and closed above the recent major high. So in this case, the lowest point of this red bearish candle becomes an inducement and we are expecting the market to retrace back down, take out and sweep the liquidity below it and confirm this high as the new major high.
After mitigating the extreme demand zone, it should reverse and continue in its upward direction. Also creating a new break of structure by breaking and closing above the most recent higher high. Before delving into the next topic, it's essential to consider some crucial points when identifying candlestick based inducement on your price chart.
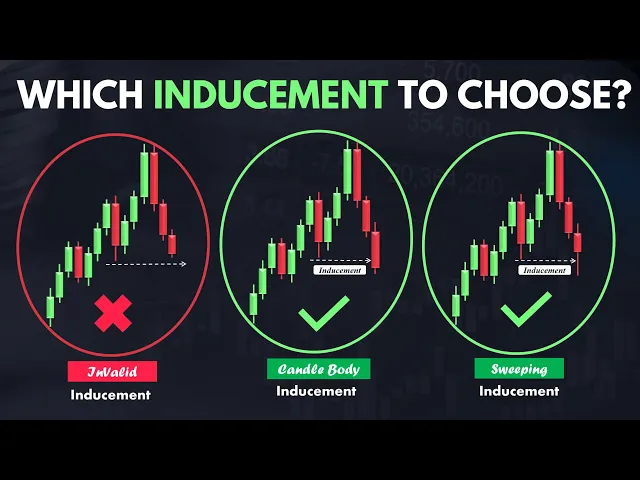
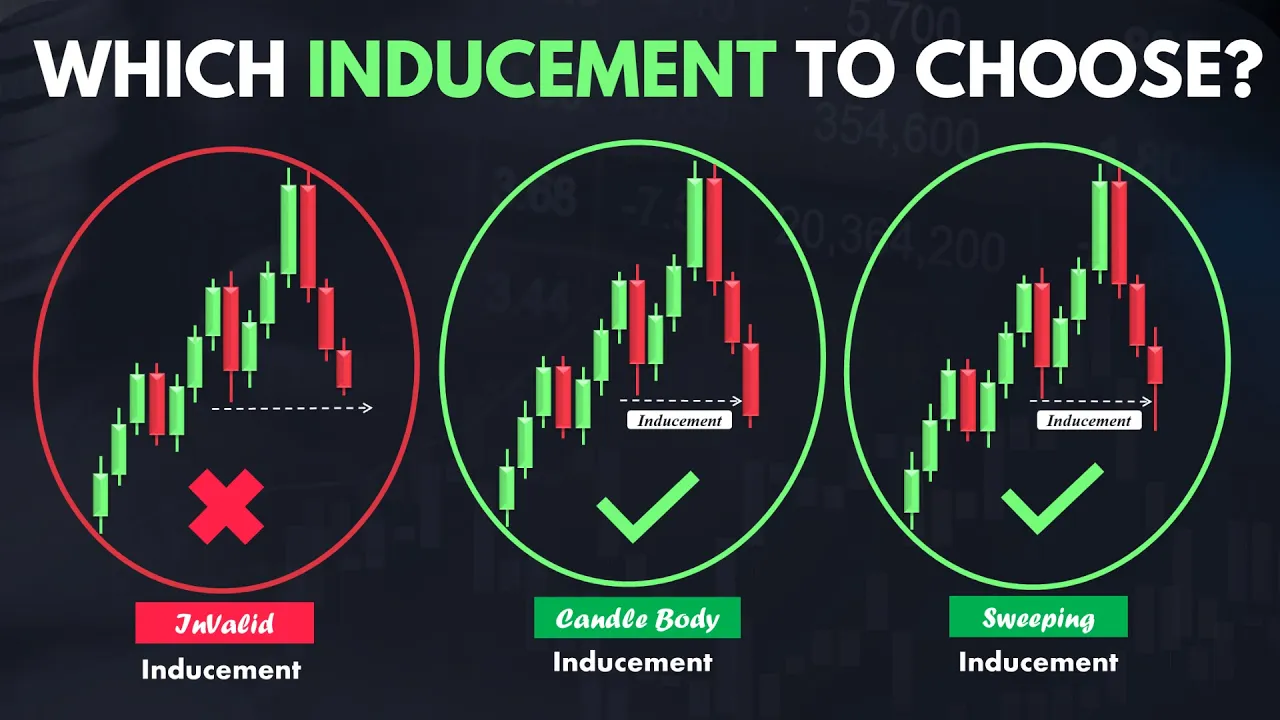
To identify a valid inducement, as mentioned earlier, the price must take out the lowest point of the bearish candle, signifying the most recent valid internal pullback. This can happen either with the body closing below or with a wick that sweeps liquidity below the candle and then retraces within the range of the lowest point of the latest pullback as illustrated in diagrams one and two. In contrast, as depicted in the third diagram, the price did not succeed in surpassing the lowest point of the latest internal pullback either with a body closing below or effectively sweeping the liquidity below it with a wick.
Consequently, we cannot regard it as a valid inducement. Rather, it signifies a single impulsive movement. Now, let's understand the importance of considering inducement in our trading strategy and why it's crucial to identify and highlight inducement areas on our price charts.
To illustrate this concept, let's suppose we have bullish structures like these that simulate price movement. As you can see, the price is currently in an uptrend and has generated successive minor and internal impulse and corrective movements before entering the retracement phase, experiencing a temporary downward movement with these three red candles. It's clear that the price has taken below the latest internal pullback, indicating an inducement and confirming a major high in this example.
As the selling pressure weakens and bullish momentum resumes, the price is likely to continue its primary upward direction. In continuation, we see that the price made attempts to push higher but failed to break the recent higher high. Instead, it formed an internal high followed by a minor internal pullback to the downside with this red candle.
However, with increasing bullish momentum, the price made a strong upward impulse move breaking the previous structure resistance and creating a new swing high. as a result now have a break of structure to the upside and a demand zone associated with the break of structure located at the extreme which has the potential to reverse the price. However, it is important to note that there is another nearby zone that has not been mitigated yet creating a potential source of confusion for traders in determining which zone to trade.
However, there are some crucial points to consider. As we discussed earlier, the upper order block serves as an inducement zone because it's the most recent pullback created before the break of structure and we always anticipate the price to break below it. Therefore, we should not regard that zone as a potential trading opportunity.
Another critical point is that for a valid break of structure, we must wait for the price to form an inducement. Without the emergence of an inducement, we have no valid break of structure and consequently no valid order block for trading. In this case, the upper order block serves as an inducement.
So, we must not consider it a valid demand zone as we always expect the price to take out that zone. The extreme order block is considered valid and safe for trading only when we have a confirmed break of structure. To achieve this, we need the price to form an inducement by taking out the upper order block.
Only then are we allowed to regard the extreme order block as our point of interest for entering the market by opening a long position. Now let's proceed to the real chart and integrate all the concepts we've explored in this video. We'll examine how to effectively identify valid inducements in the market.
Here we are looking at the Euro Dollar 15inut time frame. As you can see market's overall momentum is bearish. In this scenario, the price has formed internal bearish impulses and pullbacks until it entered a temporary pause and started to push upward.
We see that the price pushed upward, taking out the most recent pullback and indicating a valid inducement. With the emergence of a valid inducement, we now have a confirmed major low. Additionally, there is a valid break of structure as the price has broken out and closed below the major low.
And the recent break of structure confirms this lower high as the most recent major high. Now let's identify the next potential inducement zone linked to the recent impulsive movement. As mentioned earlier, candlestick based inducement happens when the price breaks below or effectively sweeps the liquidity of the lowest point of the bearish candle representing the most recent valid pullback.
Next, we need to locate the latest internal pullback within the impulsive movement that led to the recent break of structure. As you can see, this candle represents the latest internal pullback. Our expectation here is that the price will push higher, take out the highest point of the candle, form an inducement, and then continue with the bearish momentum.
Now, let's see what unfolds next. As you can see, the price pushed higher but couldn't surpass the high of the latest internal structure, failing to form an inducement, and is now attempting to move to the downside. Therefore, this lower low is not confirmed yet and we cannot consider it as a major low.
Let's continue and see how the price action unfolds. Now, we see that the price has pushed to the downside breaking out and closing below this structure. However, this does not constitute a valid break of structure because the price couldn't form a valid inducement before breaking this structure and this structure is not a valid major low.
Therefore, we cannot consider this break of structure as valid. So this price movement acts like a single impulse movement. Now we see that the price has created internal pullbacks within its recent bearish impulse movement.
As it is obvious from this candle, it signifies the latest internal pullback. Our anticipation here is for the price to rise higher, surpass the highest point of the candle, create an inducement, and subsequently resume its bearish momentum. Additionally, examining the upper internal pullback, we can pinpoint this order block, which holds a higher probability compared to the lower order block that we view as an inducement rather than a valid order block.
In this scenario, our approach is to patiently wait for the price to push higher, surpass the latest internal pullback, sweep the liquidity of the inducement's order block, validate this lower low as the new major low, and subsequently confirm a valid break of structure. Given that the price has successfully executed a valid break of structure, we can pinpoint a supply zone associated with it. We believe this zone holds a high potential to prompt a reversal when the price approaches it.
It's crucial to note that without a valid break of structure, we cannot pinpoint a valid order block. Our next step involves waiting for the price to push back up again and tap into our identified supply zone. Now, let's see what is going to happen next.
As you can see, price pushed higher, swept the liquidity above the latest internal pullback, generated an inducement, and after mitigating our valid order block situated at the extreme, the price reversed its direction and proceeded with even greater bearish momentum and eventually formed a new break of structure. That's it, traders. Thank you for watching this video.
I hope you found it informative and useful. Don't forget to hit the subscribe button and turn on notifications to stay updated on our latest videos. We value your feedback and suggestions, so please leave your comments below and let us know what topics you'd like us to cover in our future videos.
We appreciate your support and look forward to seeing you in the next episode.