If you're a front-end engineer, everybody tells you get to senior, but no one tells you how. We've analyzed over 300 senior front-end engineers, different backgrounds, different frameworks, and one pattern came up: every single one of them has mastered these 15 core front-end mental models. Most developers can't even explain five.
That's why they get stuck at mid-level for years and keep failing technical interviews. But master all 15, and you'll easily move up into the top 10% front end engineers and of course, get to senior. Number one, the critical rendering path.
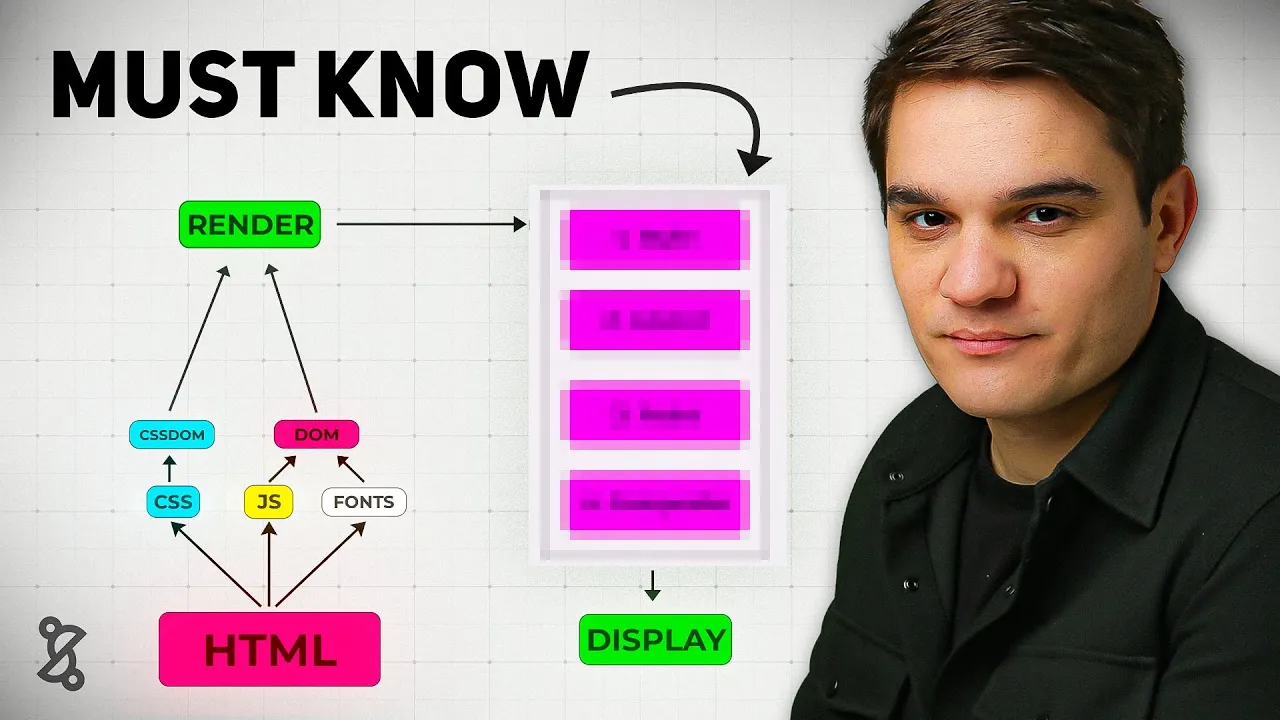
The critical rendering path is the steps the browser needs to do in order to go from HTML, CSS, and JavaScript to pixels on the screen. It all starts on the server where we get our HTML file, and so the browser will get this markup file and starts reading it, and it will probably find some links to more CSS and JavaScript assets, maybe some fonts, and based on those files, it will go ahead and download those, parse them, and start building in the case of the CSS, the CSS. That would be the reflection of the DOM, but with CSS, basically building all the CSS you'll need to render the DOM, and with the JavaScript that it will find in the hat section of the HTML document, it will build the DOM, and so it has to do all this to build the render tree, and once it has the render tree, it can start the rendering process, now the rendering process has four steps, we need to first style, then layout, then paint, and finally, composite to finally display pixels on the screen, and all this has to happen until the users sees is something, and that's what we call the first contentful paint, which is our first milestone in the rendering process.
Now, if this sounds like a lot, don't get scared. By the end of this video, you will master this because a lot of the concepts that we'll introduce later on, they always relate back to this main mental model. Now, let's get a little deeper.
Whenever the browser receives a document like this one, it will start reading it top to bottom, so it will go to each node slowly, little by little and interpret it. Whenever it finds a resource like a CSS file or JavaScript file, it needs to go to that server, download it, and render it, and finally, we get to the body where the actual things are and render our first H1. The resources at the top, we call them render blocking because in most cases, they need to be downloaded, parsed, and interpreted before we can move on, and the element at the bottom, that would be our first contextual paint, that H1, it's actually our first element, and here goes the first senior developer tip: whenever you are explaining something, don't jump straight to framework talk like oh react view or next, instead you want to focus on the underlying principles like the browser mechanics and use frameworks as an example of an implementation.
Now, let's move on to number two, the core web vital. The core web vitals are basically empirical metrics that measure how fast the page loads and how fast it responds to user input, and there's mainly three of them. We have the largest contentful paint, the interaction to next paint, and the cumulative layout shift.
These two, the LCP and the CLS are basically measured during the initial render. The impaction to next paint, it's actually measured while you rerender, so it basically tells you how fast the page will rerender after the user clicked on a button. For example, you can think of those as performance benchmarks.
A good analogy would be Formula 1 cars that you can actually classify and benchmark based on their top speed, their agility, their downforce, their IO dynamics, and you can have empirical metrics that basically measure all those, and that's how you can classify. And so in the case of a website or a web application, you can actually benchmark your application against the average in the industry and figure out how well you're doing. Now I just run this analysis on our website and although we have a very good CLS, our LCP for example is pretty bad, so I probably have to go ahead and improve that.
Now how do the core web vitals relate to our first mental model which was the critical rendering path? Now remember the critical rendering path where all those steps that need to happen before we have that first pixel on the screen, but once that happens we keep rendering and so as a browser keeps finding HTML markup it will keep rendering those incrementally all the way to the bottom of the page, and along that process it will render the largest contentful paint. That means it will display one of the largest elements that's being calculated on the website, and that's the first core web metric.
Now in general this would probably be an image because if you're working with e-commerce websites or SAS websites then probably be an image or a piece of text but it's mostly images. Finally during this whole process as you render your web page there will be changes in the layout. You might have CSS coming in that changes everything or new elements that are being rendered and that will generate layout shift.
So what the browser will do is to take screenshots of the web page and then try to measure and make sure that there's no big shifts and that would be your cumulative layout shift metric. And finally once the page is rendered you might have the user clicking or typing on something which usually in modern frameworks creates a state update. From that state update, you'll have a rerendering of your component framework and what we call the reconciliation process which will finally trigger a browser rder.
The time we spend basically from that user interaction to doing the state update and finally the reconciliation, it's the impaction to next print. So as you see a bit of a different metric, but this basically measures that when you go to the website and you start clicking around, it keeps being fast. It's not only about loading speed, it's also about responsiveness to user input.
Now before we move on, I'm going to introduce myself. I'm Bogdan from the senior dev. I started the senior dev with my brother the five years ago and we basically help JavaScript developers get to the senior level with the right mental models with a proven road map with feedback on what you're doing so you know you're doing the right things and with a global community.
We've already worked with over 350 mentees and if you want to know more exactly about how this works, check the link to the free training and the road map in the description. Moving on to concept number three, HTTP caching. Well, before we start talking about HTTP caching, we need to talk about caching in general.
And caching is a pattern based on a current mental model which is memorization. And you'll see memorization at every layer in any kind of application. You can have memorization at code level.
You can have caching at database level but at the end of the day it's always the same pattern. So basically memorization it's reusing the output of an operation for future queries if you get the same input. And so this is probably the most accurate description of it.
Whereas you see the security guard is pretty much applying the same treatment. Probably not good from a security perspective but is literally reusing the behavior. Now moving on to caching especially at file level it would be reusing the same file for a predefined amount of time, does the TTL and so if the user tries to request that file again we will give them the cached version we will reuse it so we don't need to go to the server and then download that which usually takes longer and the TTL as I mentioned is that time that we should consider the cached asset fresh you will see TTL settings at DNS caching level in your CDN and so now you know basically what it means now back to HTTP caching we usually have a browser and the browser has a cache and then we have a server.
And so it all starts with a request for a specific file like let's say we need our bundle or we need to fetch a CSS file. We will send that request to the server. We say I need this file because there's nothing in the cache.
We cannot really use an older version. And finally the server has that file and it will send it over to us. But as it sends it over, it's also gets stored in a cache if it has the correct cache control policy.
So in our next request, we will actually go to the cache, get the file from there and use it. So we don't need to go all the way back to the server again. And finally, that's what we call the TTL is the time we are allowed to do that because at some point the asset will expire.
At some point they will say, hey, you know what? Go check if there's a new version. And when that happens, we will go and check, hey, is there a new version?
And if there is a new version on the server, then we finally make that request. That's what we call a cache invalidation request, and it's basically managed with the E tag header. If you go to any request you're making, you'll probably find a cache control and a e tech header and then we would get the new version and then again that will be stored in the browser cache for whatever the TTL was specified.
Now the way this is done in the browser is that it's all done with the request and responses. I invite you to go to any website you like and in this case I chose Walmart. I've basically went to the developer tools, chose a CSS file they have and we can see the cache control policy where they set that max age to 3 million milliseconds.
But basically that means after that time we will need to go and check the e tag again with the server and figure out if our cache is still fresh and if not we'll need to download the new asset. You can find this in pretty much every website. Now, we don't usually have to set the caching policies ourselves because it's usually the CDN that will do it for us.
And a CDN is basically an infrastructure piece where you can put your static assets and it will push them to different edge locations. So, whenever the user will try to access that resource, they get it from the edge location that is closer to them. So, we are more efficient just because we are closer to the user.
But it also usually applies direct caching policy and it applies direct compression policy. So it comes with a lot of optimizations out of the box. It's probably the best thing you can do from a performance point of view for a web application in the first one.
Basically the CDN will become our server. So whenever new static assets are published, so imagine you recompile your application, you release a new version and you have that JavaScript bundle and the CSS files, they would go to the CDN and the users will get them from the CDN. And so basically it's used to distribute static assets to those edge locations across the globe for very fast access and out of the box it gives you all these implementations like an efficient cache policy and compression which is done through content negotiation and that's our next key mental model: content negotiation.
So basically content negotiation is the process in which the client speaks to the server and whenever it needs a file it will send out some headers usually is the accept headers and in the accept headers it will mention that there's different encodings for that resource. So it will basically say I want the JavaScript file but you can give it to me compressed and the two most popular algorithms for compressions are juzip and broadly with broadly being actually the most efficient one. So it will basically mention hey you can give me this as a gzip or a BR which stands for Bradley and then the server will look at that request.
It will look at the metadata the request headers and figure out if I have a more optimized version of the asset like a jersey or a broadly then I'll give it to you. In this case, we will send over the Jzzip version, and of course, we need to add to our response headers the content encoding JZIP. So then the browser knows, okay, I have a CSS file, but it's being compressed, so I need to decompress it really fast.
The reason why this works is because it's cheaper to decompress things than to download them in the initial version. So that's the maths behind it. It's cheaper to download very fast a smaller version, a compressed version, and decompress it then download the original.
Now, content negotiation, it's one of the core mental models for the full second. If you want to know even more of them, then go ahead and take the free 10-minute tangle assessment where we'll basically help you figure out where you are in the seniority scale. And a lot of the questions you'll find there are actually real questions from interviews.
So, it also gives you an idea of where do you stand technically in the market. Now before we move on, our second senior developer tip is that senior front end developers are expected to have very good fundamentals of the data layer too. Things like HTTP, GraphQL, REST APIs or even websockets.
So make sure you invest time into those two so they don't become a blind spot because it's extremely hard to get a senior frontend position without knowing at least the fundamentals of HTTP, TCP, HTTPS and REST APIs in GraphQL. Let's move on to our fifth mental model which is lazy loading. Basically the opposite of lazy loading it's eager loading where we load everything at once.
But again those things would be very heavy. In this example I have images and we load the four images on the spot. A better way would be to implement laz loading where we only load assets where they are needed.
When the user does something and they actually need that specific image then we give it to them especially if it's not needed in the initial renderer. So as you see here, those two images are loaded when the user will scroll rather than loading them on the initial render. That's a lot more efficient.
Now, can we lazy load JavaScript? And the answer is yes. But to do so, we need to rely on dynamic imports.
And so traditionally in your code, you probably use static imports like this one. This kind of import, it's evaluated by the module bundler at build time. So whenever we run our build before we deploy the application that will be interpreted and it will be all added in a single bundle.
It will be included in the main bundle and then ship to the browser and then the browser will execute that as soon as it gets it. Basically it becomes one of those critical assets that blocks rendering. The strategy for us to make loading more efficient is to move all those things that are not needed to when they are needed.
Basically we import a JavaScript script at runtime. Just after the user did something, we go and fetch that document and we execute it versus a additional static import that was done when we build the app. And that's how it looks in the code.
We have that click event and whenever that will run, it will actually run on a synchronous function to download that model JavaScript. The JavaScript will need to open the model and then finally will open the model with the function it got. Basically again it needs to go to the server and get that chunk that leftover part that part of JavaScript will be fetched and executed at runtime.
So there is less initial JavaScript that we need to run. Now dynamic imports are one of those core fundamentals in JavaScript, and if you want to find out more, check out the JavaScript interview cheat sheet at the bottom where we basically put together 25 of the most common questions and make sure you review that before your next interview. Moving on to the next concept, let's talk about bundle splitting.
So bundle splitting is basically lazy loading applied to our JavaScript bundle. Traditionally we would have a lot of source code in different files or modules and all that would go into our module bundler. In this case I chose Webpack but it could be V or any other module bundler.
Basically this module bundle would put all together in a single production file. That was the big advantage and that's why we basically use module bundles to put everything together because it would be impossible to include all our files into the head section of the HTML file. Now the problem with that production bundle is that it's being used on every single page and so everybody gets all this JavaScript in the beginning and as you saw this all this has to be parsed and interpreted before we show anything to the user.
So you'll have a lot of performance problems if you just keep everything together. And with bundle splitting we are able to split our bundle into smaller subsets that are being used on different paths. So basically we take all our dependencies and we put it in our commonJS or vendor.
js and then we split all the other paths into login home dashboard. So when users go and load the dashboard they don't need all the JavaScript needed in the login section or settings. This optimization it's one of the easiest to set up if you're using for example a Webpack and a React router and it's how most applications work today.
And there comes my third senior developer tip which is you always want to think in systems, components and relationships rather than memorizing. And I hope what you got so far in the video is that we start with a mental model but then it's related to everything else. The critical rendering path it's related to things we do with our module bundler and it's definitely related with our core web vitals and that's the way you want to learn.
Never rely on memorization. When you go to interviews and you get nervous or they ask you a question in a different format, you want to remember it. So always try to think okay how does this new concept relates to the whole system and how do they work together.
It's a lot easier to remember things like that and also a lot more fun to learn. Now let's talk about our concept number seven which is critical CSS. We saw what the critical rendering path is but what is a critical CSS?
Now remember that in our HTML file we had some render blocking resources. Those ones they really block the render. So they all need to be downloaded, parsed and interpreted.
And CSS was made render blocking by design. So basically browser developers, they said, well, you know what? Before we'll actually go and interpret our DOM nodes and actually show something, we want to have all the CSS together because you never know which CSS class or property will actually affect that first element.
So we really need to compute all the CSS before we move on. And that's the problem with CSS in big applications that if you have a lot of CSS, it will take a lot of time to just put all that together before we even show anything to the user. And so instead of doing that with critical CSS, we'll focus on the above default CSS.
And that's basically the CSS responsible for showing that first section to the user, whatever it's in the viewport. And as you see here, it depends if they are on a desktop or if they are on mobile, it will be different. And so that's what we call the critical CSS.
Now you might ask yourself, how do I extract my critical CSS from my application? Well, you usually have all your CSS spread around your bundle either in JavaScript or in CSS files and all that will go into the module bundler. Module bundlers like Webpack have plugins that will pre-render the application on a given viewport and inside it's using a headless browser like puppeteer and it will basically virtualize it.
it will fake render the application on the device you said and then it will basically calculate which CSS specifiers actually used and extract those. And so what Webpack will do after that is to separate your CSS into a critical CSS, the one that really has to be there that affects the above the fold elements and the rest of your CSS. The critical one will be inlined.
So there's no extra request. You get it in the HTML markup. And the be beautiful thing about that is that it's extremely fast to read that and built the CSS on more critical rendering pad.
The other part of the CSS will be actually added as a link in the CDN but probably out of the header. So it doesn't block the rest of the render. That's probably the most efficient way to handle CSS at scale.
Now as you see this idea is very simple but it usually requires very sophisticated tooling and a lot of testing to usually get it right. big retail companies, e-commerce companies like Walmart or Amazon will use those because they do have very big websites with a lot of CSS and they really want to load very fast because it's very sensitive for their users. Now, congratulations on making it this far.
If you like the video, if you found it useful, like and subscribe so more people get it and also you don't miss on any of our future content. If you have any suggestions for us, drop it in the comments. Me and the garage are wash, we read all comments personally, even the nasty ones.
So like and subscribe to get more of this in your feed. Now moving on to number eight, we will talk about essential state, which is a bit different from everything we've been talking about until now because we moved from performance to data modeling. And so basically the essential state is the minimum data representation in order to achieve a given user interface.
And so senior front-end developers, they look at the UIs differently. in the same way an automotive engineer will look at a car. Now, when I look at a car, I see all these details.
I see kind of the exterior, the surface of it. Because to be honest, I'm not an automo engineer. But when a car engineer looks at a car, they see it in a totally different way and they see the inside.
They see the systems inside. They can basically abstract it away. They forget about the details and focus on the core things, the core mechanics inside that car.
And it's basically the same with the UI where a senior developer will basically see something like Netflix, right? And a civilian will look at it like, "Oh, this looks nice. " Whereas a senior front-end developer will look at it and see all the component structure and the state.
They will kind of have this X-ray vision and that's what you want to achieve. How would that look for this kind of UI? So, what's the essential state in the UI in this picture?
Let's assume all the calculations for the prices are done on the front. Well, if you superficially look at the UI, you'll think, well, we have some state with the product info there. We probably have to fetch that from the database, like the product data, and then we'll have the price.
Then there's this discounted price that we also have to keep that in state. Then there's a kind of the discount text. Maybe we can put together the discount price and discount text, but that's two two different things.
And then there's the subtotal. There's the shipping cost and the taxes. And finally, the total.
A new would say, well, that's that's that's all state. Let me put it all in state. But someone with a lot of experience will look at a UI and try to compact that into only the essential state.
And basically if we reflect on this UI, we realize that we just need the product info which usually would contain the price. Then we need a discount rate and the shipping cost and maybe the tax rate to paint everything else. So pretty much everything else should be able to be calculated based on that.
And so as a senior front end engineer, you just want to condense and use as little state as possible to render the UI. state is not usually a good thing because it can cause genders. You need to test the UI differently.
So the more deterministic it is and the least state you have the better and as a senior developer t the first thing a senior front end developer sees when they look at the UI is the essential state that the first that's the first thing they look for and that's why they're much faster than somebody that's a junior mid-level that that gets distracted by all the other details. Let's move on with number nine the reducer pattern. Now let's give you the whole user state and render cycle.
So usually we have a user action then we have some old state we compute some new state and that would trigger like a rerender of the component framework and finally of the browser and the UI. The problem with this cycle is that sometimes you might have very complex UIs like this one. This is an accounting software from into it and as you see there is a lot going on and the problem when you have all this data around is that you might have global settings that affect the whole view and that's when things get very complicated and so basically let's imagine the user would click on that privacy button at the top and that actually affects five or six different components and we need to really change our view in the traditional way you would kind of look at your component tree and then compute some new state right you have the old state at all these levels and then you have call effects that allow you to update that state and you go somehow one by one and try to update that state all happening when they click on that button and finally all that will trigger renderers and you get your new componentry.
The problem with this is that number one it's extremely tedious and number two if you want to do this well you'll have to lift a lot of state to make sure that it's at the level where you need it and then do a lot of prop drilling to make sure it gets the exact UI element. Now instead of doing that you can use the reducer pattern which most state libraries include nowadays. So basically you have a user action that goes into a reducer function and the reducer function it's a pure function that takes the old state and can compute the new state based on that and so different components then are connected to the new state and would update based on the one calculation you make.
So we go from thousands of changes to a single calculation that is deterministic, can be tested and it has no side effect. And finally we rerender. And so a simple reducer would basically look like this: It's a very simple function that will take a state and an action and create a new version of the state.
And keep in mind that the reason why this works is because those functions are pure functions. That means they are immutable, dimministic. They have no side effects, and that's what allows us to have this predictability in the UI at scale.
And here's a big difference between mid-level devs that will talk a lot about tushan or redux or use red user when you talk to them about state that's the language they will use and senior folks where they will be more focused on the patterns they kind of ignore libraries because they know that libraries change over time and there's this mental models that actually libraries implement that are the most important and the beautiful thing is that once you have those mental models it's extremely easy to learn a new library you just jump on it and you know okay is it using the reducer pattern okay immutability How do they handle state? How do they handle abs dates? How do they implement pop sub?
How do they implement observer pattern? And once you know those things, it's extremely easy almost instantaneous to learn the library. Okay, moving on to concept number 10, windowing.
And so basically windowing or list visualization has been introduced to solve that one vital we didn't talked about, which is the impaction to next paint because usually this is caused by slow rerendering. And so Google tells us that the limit should be around 200 millconds. So you'd be able to start painting again after user clicked on something at the latest after 200 millisecond.
I would go farther and say that 100 millisecond it's already very high. Now for your typical C application you don't need to worry. But imagine you have an application where you render a lot of items at the same time like one of those social media feeds or for example Pinterest where you can scroll and scroll and scroll and you get all these items render in the browser.
What will basically happen is that you'll end up with too many elements on screen and I do not recall the exact limit but I think if you go after the thousand HTML elements even the browser starts to suffer and there's too much state which lives on memory and that puts too much pressure on the CPU and memory and your application will start to become slow even if the user is not doing anything complex. there's too many things rendered in the browser. But as we see a lot of those things are not really visible and so windowing or list visualization would be being able to mount and unmount elements as they are called outside the viewport and avoid having too many DOM elements at the same time.
We basically use this whenever you use any kind of feed system. So if you go into a system design interview for the front end and they tell you we are going to build a social media website or a news feed you know you have to use windowing or list visualization to make sure that you keep your imp metric healthy. So basically that core web vital is in an acceptable interval.
So we only mount the elements that are in the viewport and we keep mounting and unmounting them in the case of react. So we render only those elements and we mount and dismount. Of course, there's a tolerance.
So, we it's usually one or two more elements that are outside of viewport. We have time when they scroll to kind of keep rendering. In order to do so, we use the intersection observer for stability because you can do that with the scroll position, but it was very hard back in the days when we didn't have intersection observer.
So, basically, even if you move, you keep rerunning. And the intersection observer, it's a native DOM API to detect when an element it's inside a port view or when it's outside. And so basically this would be a very basic code snippet where I use the observer.
And so you can add intersection observer to your components and then mount or unmount children depending on if they are in the view or not. But in most cases you'll probably use a library like react visualize. Make sure you check that out and they make it a lot easier.
So you don't need to yourself go in and implement the intersection observer. Keep in mind we are seeing the intersection observer as a quite common interview question. So make sure you review and you at least know when it's useful.
Okay, now let's move on with concept number 11, serverside rendering. Now why do we need serverside rendering? Well, the main reason is because in modern applications, the HTML we ship to the client, it's usually just an empty div called the root where we'll actually render on the client the application.
So basically the browser will download our JS bundle and then it will download React and React DOM and then execute this render app. So basically in the FCP in that first contentful paint we literally only show an empty div and then it takes a while until we actually make the first meaningful paint which means when we actually show content to the user that is relevant is not an empty screen. Traditionally you'd go from the server get the HTML and then the client will do that initial render where the user doesn't see much and you'll have that the white screen of that basically the the whole screen will be empty and finally the react application will run some effects start data fetching to the data layer to the rest API and then rerender and finally they get to see the full website and so the main problem here is what they call the white screen of that the VSSOD where you just look at a completely blank screen especially if the user has a slower device that takes takes a while to interpret JavaScript or a very slow network that will take a while.
So to feel like, okay, maybe this website is just broken. To solve this, let's go back in time and instead of rendering on the client, we go back to rendering on the server. And so basically on our server, whenever the client tries to get our web page, we will do the initial render on the server.
we will actually run React or whatever framework you're using to render on the server and then we will do the data fetching from the server to the database and then get that data and finally pre-render our full HTML. So we move this rendering effort to the server and then finally we send it to the client and so the beautiful thing about this is that after the initial render the user will actually see a static page they will see the web page rendered. However, the problem is if they try to interact with it it's still kind of dead.
This is plain pre-rendered HTML. Uh the interactivity is not there. So if they start clicking around, they might go into some rage clicking, and that's where rehydration comes into place.
Rehydration is our next mental model: Rehydration is getting that server Android HTML and getting your client side 5x3 vual building that putting them together. So you start having interactivity. So basically we still need to go ahead download our bundle, parse it and then run the hydrate command on the client and finally after that happens the users will actually have an interactive website that they can click around and it will actually do stuff.
Now a very common problem with rehydration is the fact that you will get hydration errors and there's different causes of this. If you want me to make a video where I go much deeper into serverside rendering, let me know in the comments. Okay, now let's move on to one of the latest rendering strategies in the front end, which is partial pre-rendering.
And with partial pre-rendering, we'll actually use static rendering. So, we'll try to render as much as we can on the server, but inside a web page, we might have places that are actually dynamic where we actually need to render things on the client. And so your framework will basically decide based on whatever interactions you gave it, which things will be pre-rendered and super fast and which things will be pre-rendered but need to be hydrated on the client.
And so this is one of the most complex way to render websites, but it's very useful whenever you have things like a very fast e-commerce websites and you really need blazing fast performance. So keep this in mind. Again, it's a combination of everything we've seen and it's all based on optimizing that critical rendering path and make making things appear and be interactive as fast as we can.
But it also adds a lot of complexity to your development process and it's usually handled by a framework like Nex. js or NXT. Again, it's very complex so be aware of that.
And so partial pre-rendering will be applying different rendering strategies on the same page to minimize client side rendering and preserve interactivity. Okay. Okay, now moving on to concept number 14, serverside components.
With serverside components, rather than shipping our full component tree, all the JavaScript needed to render this whole thing to the client, we actually look at our componentry and try to find out only the elements that need interactivity. So, are they listening to any user events? Do they need to react to it?
Are they going to be changing state? And if they don't, then we ship what we call a Zo JavaScript. So those components that we enter on the server, we will only ship the markup and we'll ship no JavaScript for those components which makes our final bundle even smaller.
So this is done at framework level and by default a lot of frameworks like Nex. js will try to render everything on the server unless you specify this is a clientside component. If it's a client side component then the JavaScript needed for this component will actually be extracted and actually shipped to the client and this will be rehydrated.
The beautiful thing about this is that it makes that whole rehydration process faster. So we mentioned that serverside rendering makes the initial rendering very fast and client side components will make rehydration fast. So you also have interactivity as soon as you possibly can.
And so basically serverside components will render all the non-interactive components on the server and they will ship only my op so zero. js and no hydration for components that are not interactive. Finally, our last concept it's micro front ends and this is a topic by itself.
If you want me to make a video specifically on microrends, let us know. Uh but basically microrends will be breaking this UI into different applications. So if you look at the Walmart website for example, I would be able to break this into all those different pieces.
We see the the very top search bar, then we have a categories and then we have the deals and then finally uh some featured products, right? All those could be independent applications but then we have a shell. So basically with micro fronts we will break this apart into four different applications.
So we have the top bar that would be one application with the independent team working on that. Then we have the bottom part and then we have the deals micro front end which would be another application. They can even use different frameworks if they want.
And finally the featured product one. Now to make sure all those things use the same CSS and we have visual consistency we will have a shell and the shell will basically take care of kind of the global state like imagine the location the language settings is it mode all the teaming and the authentification. So basically the shell will inject that state into the children microrends and all those different teams will work in parallel and the beauty of this is that you have so many front-end developers working on the same application and you can go much faster.
So with microrends we actually scale the development we scale the development speed we then make things faster actually it will be slightly slower because all those things load at runtime. So it will take a bit slower sometimes to load and so shared functions like state and CSS will go to the shell. But then we have our independent business domains where you'll have your deals microser as we see and then they have a BFF for back end for front end and then they might have different microservices and this is basically like a a small company inside the company because they have their own product manager and they can release features independently.