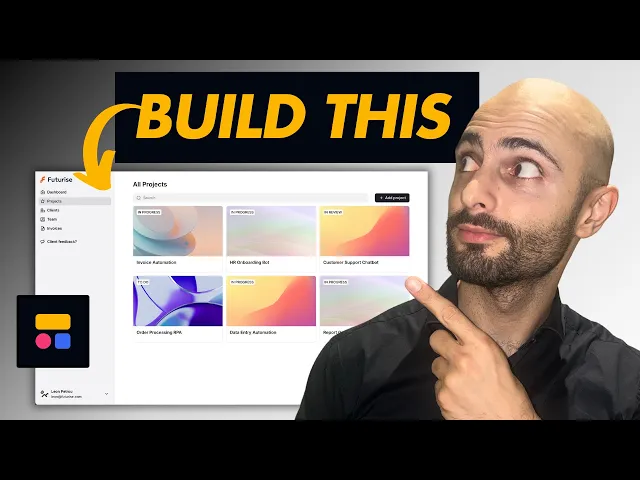
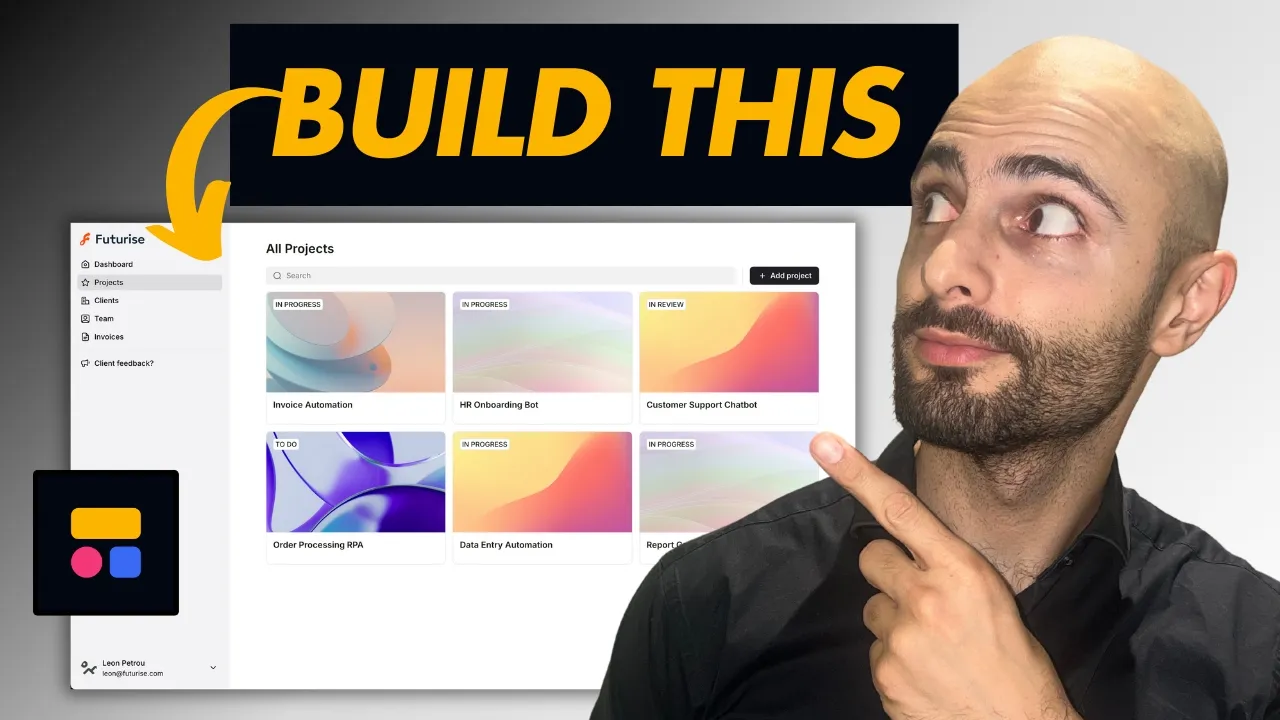
If you're a service-based business whether you're a consultancy agency or Dev house you've probably fallen into the Trap of managing your projects with some messy spreadsheets with your project details task details invoice details and maybe even just communicating back and forth with your clients via email sending Google Drive links and everything's just all over the place what you need is a client portal And that's basically taking all this messy spreadsheet data and converting it into this beautiful leek client portal where you can manage your projects clients team invoices and a whole lot more just through
one online client portal that means anyone in your team can log into the client portal they can manage their tasks and projects and your clients can also log in if you ever need them to submit any attachments or any details you can request it through the Client portal and basically your entire engagement with your clients happens in one simple and beautiful user interface that that is just a breeze for both your team and your clients so in this video I'm going to be showing you how to build this client portal step by step using my
favorite no code tool which is softer you just need to go to softer. once you create an account you can then click this button to either start from scratch or you can start from A template where you can see there's a whole bunch of stuff you can create portals internal tools dashboards crms Etc in this tutorial I'm going to be showing you how to set up the client portal template all right most of the heavy liftings already been done for you so you can just click preview and then you can click this button which says
use template next it's going to ask you where is your data stored so you can see I've already previously connected my Google Sheets uh but you can always click add another data source and then you can see all the options it gives you you can connect to your air table tables notion Google sheet smart twet and there's a whole bunch of other options even SQL and you can use your own data to create these applications so your data will be the back end and then software will be used to build the front end which in
our case is the client portal so I'm just going to select Google Sheets click continue I'll then sign in with my account click continue approve the permissions so this is what you call softare Studio and this is where you build out your client portal so I'm just going to rename it so it's currently called client portal software template I'm going to call that futurize portal so futurize is my company name and we are going to be using dummy data so all of this isn't my real data so this is just dummy data that I set
up Just to make it easy for you to actually build this out and follow along so I'd highly recommend you do that in the description of this video I will include both this template that we are using as well as a link to this Google Sheets file that you can go and copy paste I highly recommend that you build along with this video because it'll really fast track your learning and then you can go go ahead and build your own client portal for your company so just To get familiar with the user interface you can
see at the top you can toggle between desktop tablet and mobile to see what your portal will look like on different devices so it already handles the responsiveness for you so you don't need to set that up if you uh have ever built a website you know what a headache it is to go and build in responsive settings so that it looks good on mobile but with softer it's all handled for you then on the left hand side you can see Here are all the pages that come with this template stuff like the projects the
tasks invoices team members clients and I'm going to be showing you how we're going to set up all these things all these Pages then there's the theme this is where you can uh customize fonts and colors and stuff like that then we have the users over here this is where you handle who has access to your application and that's referring to both yourself as the admin your employees Your clients as well as Freelancers if you hire Freelancers with within your company then there's the general settings so I'll start here and I'll come to general settings
uh we already gave it a application name futurez portal we can rename the subdomain um so it's Serene I'll just call it futurize do softare doapp you can also publish this to your own custom domain so for example portal. fuze.com it will basically be a fully wide labeled Solution and it'll look like you built that product completely from scratch without any brand in from softer all right next I'm going to remove this default logo and I'll replace it with mine so I'll select my logo add that then you can also add a square logo as
well as a favon which is basically just a smaller version of your square logo and if you're wondering what a favon is it's that icon uh that shows up uh in the tab over there you can also Remove The softare Branding if you want I think you'd have to be on the pro plan to do that so you can just disable that and it'll hide any software branding I'll leave it on for now if you want to preview what your app looks like you can just click this preview button it should then open in a
new tab and you'll then be able to see what your project portal looks like I'll just zoom in a bit so it's easier to see and then you can use this left pane to navigate between tasks And projects and all that and then what's really cool is at the top left you can click this little drop down and you can choose if you want to preview as either a client or as individual person that you uploaded under your users so for example if you want to see uh the admin view you can select this Olivia
Brown so let's click Olivia Brown okay and because we're in admin mode now we should be able to see all the projects and um the details about all the clients Etc all right and what's really cool about software is you can assign permissions to uh different roles so for example you might not want your employees to see something but you as the admin need to see it or maybe you only want your clients to see something and you don't want your employees to see something or whatever the case is all of those permissions can be
handled under the visibility settings in softer and I'll also show you all of that when Building out your client portal the first thing you want to do is you want to go to users and what I usually like to do is I just want to delete everything that comes in the template so you can select everything then click the little bin uh it's going to prompt you to type in delete 15 users for so I'll just copy paste that click delete all right I'm also going to delete these great so now we have a blank
slate we have no users and you might have seen In my Google sheet I have a sheet here called user details where I include a whole bunch of fields which includes the person ID the person name photo role company email website and phone number you can see under the person ID um for C1 C2 C3 C4 those are the clients and that c is basically saying this is the client so these are the contact people at that company and this is the company name all right then we have uh these which start with an e
those are the Employees all right and those all work at this company which is futurized which is my company and then we have the ones starting with f which are the Freelancers and those are the companies that the Freelancers work for back in softer you want to come here and click sync with data source and you want to choose your Google Sheets so uh they're both the same in my case to connect your documents uh we want to connect futurized dumy data but you can see it's Not showing there so you can just click this
little refresh icon if it's not showing and there it is futurized dy data then within here you want to select the sheet our users are in the user details sheet so if you're wondering where that's coming from that's over here it says user details in that sheet and then we can either choose selected rows I want to select all of them we can also then map some Fields so like the email all right we can map the email we Can also map the person's name um and then the Avatar uh let's maybe just choose their
role for that and then click save and sync and now you can see it has synced all of our users into our database I should just warn you if you ever do come here and delete any users it will delete that data directly from the Google sheet you need to be careful when even in preview mode if you delete anything it's going to be deleting your actual data next what you want to do is You want to user groups so for example Ethan we know Ethan is an employee I would probably set myself as an
admin Ethan we can come here and we can select this drop down and choose the group and we choose employee and click save so we have um Aiden George and Ethan as the employees so I'm just going to go set all of those up here then for myself I'm going to set myself as an admin then we can set Olivia shayen and sopia as free fre Launces there you go and then the rest of them are all clients so I'll just go and set those great so now all of our user groups have been assigned
then we have user groups so you can see here are four main groups admin clients employee and freelancer if you like you can delete these um or edit them all right to use freelancer you're going to need to have the Pro Plan and then the default groups are logged in users and logged out users uh so that's basically Just for permissions because you don't want to give a logged out user permissions to view certain things but you don't really need to worry too much about that cuz the template handles all of those permissions for you
next for authentication you want this to be enabled where you allow users to log in with an email and password all right you do have other options like magic links and single sign on and Google signin uh but in general you just want to use an Email and password you can also control who gets invited to use the app by setting it to disabled uh which means only you can invite somebody to actually sign up or you can set it to open if you want to allow anyone to sign up but since it's an internal
tool between your clients and your employees You' want to set this to disabled let me show you how to actually invite someone to create an account so if you want to invite your clients and your team members to Actually use the client portal you can do that directly here in the user section where you can select the individuals and then you can click this invite button but you actually first need to publish the application so I'm just going to do that I'll come click publish there's my subdomain I'm going to click publish all right and
then it gives us the option to send invites to all 11 users since these are madeup email Addresses uh I'm just going to say I'll do it later but you could just click Send now so I'll click I'll do it later great and I'm just going to send an invite to myself just so you can see what it looks like so now click invite send so now I'm going to go to my Leon at futurize inbox so here is the email just sent me you've been invited to futurize portal all right click on this link
to log in so if you click here the user will then be able to set their Password all right and after they click confirm they'll then be able to login with the email address and password great so it's super simple to do uh I'll close that if you're wondering where that's all handled it's actually here in the pages if you scroll down to the utility Pages you can see there's a login page a forgot password page a reset password page uh Etc now that the back end is sorted out let's go and start building out
the front end so I'm Going to go to pages and I'll start right at the top at dashboard all right we're not going to include all of these I'm going to delete some of them but I will just keep the most important ones and the most commonly used ones and once you know how to set one or two of them up you'll get the gist of it and you'll be able to create any page in software so here's the dashboard page so you can see it includes a whole bunch of stuff like my projects active
projects Outstanding top TKS Milestones unpaid invoices what I'm going to do is I'm just going to hide all of these all right you can also delete them by clicking delete but I might want to use them later so I'm just going to hide them which means it won't be visible to anyone and the only thing I'm going to keep on my dashboard is basically this welcome message okay so you can see it says welcome back and then it has a variable over there which is the logged In user's name so what will happen is uh
let me show you in the dashboard if I come here it's it's going to greet the user by name welcome back Ethan so let me show you how to set that up so you want to make sure you clicked on this block then on the panel on the right hand side under Source you want to select your source which is Google Sheets okay you can also connect multiple different data sources within one client portal so in this project We're only going to be using Google Sheets but just know that you can actually come here click
add another source and also use data from Air table and Google sheet simultaneously or from multiple of these in one application so it just depends where your data is stored so documents I'm going to choose futurized dumy data and then the sheet I'm going to go and select user details and now what we want to do is we want to also create a conditional filter Okay and on here we want to have an if condition and only if the person ID all right remember we have the person IDs over here so only if the person
ID is and you can choose a whole bunch of different conditions for example is is not contains is any of Etc right I'm going to say is and then over here I'm going to select the logged in users so now it's going to check which user is Currently logged in and it's going to pull their person ID so it's going to basically only pull in the data where the person ID is equal to the logged in user's person ID and that's the name it'll show there so let's go test this out I'll click on preview
and let's go see it's opening up a new tab and there you go welcome back Sarah and that's because I'm currently previewing as Sarah at vero.com let's go check out Mike Johnson the client Welcome back Mike there you go so we can also add other details over here so for example let's say we want to include the company's logo over here all right or the person's picture uh we can come back here and then we can go to content and uh we can scroll down and here list item Fields under top section you can enable
that and you can see it prepopulates some stuff for us but I'm just going to delete all of these we Don't want any of the other stuff we just want the photo and you can see it's already mapped to the photographs so it did that for us without us having to connect it so it is quite smart in that sense and and now if we come back here click refresh it should include our cup of Starbucks coffee there you go and if we go to say one of our employees like Aiden it should show his
photo there you go and you can also customize this how you like if you come here you can change This instead of saying this is your private portal you can say uh this is your private futurize portal great stuff so now that our dashboard page is set up let's go and set set up our client's page you can see it's currently got this dummy data that uh comes with a template we want to remove this and put our actual client data which we have in our Google sheet in these four rows over here clients 1
through four so I'm going to come here go to Pages then you want To go to clients and this is the client page all right so you want to click on this block and then under the source uh you want to select your document choose futurized Dy data then in the sheet we want to go to uh user details great and you can see now it's showing all the users but you can see it's combining both the employees as you can see by the photos and the logos which is the companies we want to only
Show the clients we only want to show the ones with the logos so how do we do that if you're following along you can try pause the video create a condition and see if you can get that working otherwise I'll just show you so you can click add condition and then we can select a field and the field we want to select is the person ID and the check we want to we want to do a contains right and then we want to check if it contains a custom value which is the letter c I'll
click add so what are we actually doing in this condition all right we basically uh we looking through all of these different values in the person ID column and only if the value contains the letter c which means it's a clients only then return that row of data so if we used e it would have showed all the employees if we chose f it would have returned all the freelances so if we come back here and I Click refresh let's go check if this worked and there you go it's now showing all of our CL
ients you can see there's still a bit more work to be done cuz it says heading one company and Starbucks let's go and fix this let's by The Heading one we wanted to write the company name over there and below that we wanted to write the contact person at that company uh so if we come here we can go then to content and then we can scroll down the Photo is already set all right it's configured for us you can see it's mapped to the photograph which is the photo field C coming over here this
is just stock footage I got from pixels.com okay then for heading one we want to map that to the company name so I'll click company right and for the text below it we want instead of it being the company again we want it to be the person name all right and instead of it being just plain text let me just show you what This looks like if I refresh this so you can see that has the word Starbucks the word company and then it has Mike Johnson which is the contact person at that company so
let's say we want to actually show that as a tag instead of just text we can choose tag over here and now it will look a little bit better instead of it just being plain text it'll have the tag Mike Johnson sily Etc okay cool you can see there's Also some uh placeholders for the tags at the top there what do we want to add there maybe the website uh we can see the URL of the company right there okay let's say we want to see the other details corresponding to each of these clients if
you click into it you'll see it opens up this panel on the right hand side which is the client details and you can also come and customize this over here so that I can show more details about The clients before I get to that I first want to show you how the permissions work so back in soft the studio uh if I come to the pages and on the clients here I can click this little symbol here and then under visibility you can see this is the permission applied to the entire page and that is
basically saying only logged in users can see it and only the admin which I said to be myself and the employees are able to see um all the clients so that means that your client Uh or one of these individual clients when they logged into their portal they won't be able to see who your other clients are so that's also important for permissions um in fact it won't even show the clients so for example if I sign in as a client over here and I click okay uh me just go back home and I choose
a client like Mike Johnson you can see it doesn't even show the clients over here there's no panel for clients And that can set over here if you click this left bar scroll down here there's clients over there you can click that icon again and this is the same permissions that I showed you now on the page level permissions within software you can go a level down which is the Block Level permissions So within this block you can come to visibility and you can then assign permissions From the Block Level so you can see it's
currently all users that's not the case Cuz a page permissions blocking the clients from seeing it you can also go a level up and within the users you can come here to data restriction and you can select global data restrictions all right so that will apply to the whole application um instead of just at the page level or at the Block Level coming back to our client page if I click into this block and I come to actions over here there is a little setting here that when there's a click on the item so if
One of these items are clicked it then navigates to the client Details page right so this was also built in within the templat which is another page over here which is the client details and you can see it opens in a model so remember when we clicked on a client earlier opened that panel on the right hand side that's what you call a model uh you can also set it to open in a new tab or you can open it in the same tab I'll just leave it as the default okay and let's Go to
our client details and edit this page you can see it's currently got the default stuff so I'm just going to remove this out the the bottom uh I'm going to hide this okay and I'm only going to set these two right so what have we got here if we click here we can see it's the same thing however uh the reason there's two of them is because there's different permissions assigned to each block so if I click on the top one and I go to visibility we can see This is what the admin is able
to see about this client if I click on this block and go to visibility this is what all all logged in users are able to see regarding this client right we can also see what are the page level permissions if you logged in you can see the client details let's add a level of restriction so instead of saying all logged in users are able to see uh the client details we only want the employees to be able to see these Client details it's only the employees will be able to see the client details um I
can also just add admin over here and then we don't actually need to have two blocks so I'm going to have employee and admin I'll click save and I'll come and delete this top block delete yes great so now we only have one so now within this block we can go and connect our data source so I'm going to go choose our futurized dummy data and then within here once again We're going to user details great and then you don't need to set any conditional here because uh we already set it previously when you're clicking
on one of the items in the clients it's going to take you to the client Details page and that setting basically sends the data from that item you clicked to this page all right then you can go to content and you can select what of the client details you want to display here So I usually just like to delete everything that is currently showing and then click add field and then just enable everything then what I'm going to do is is I'm just going to make the text of the company name bigger so instead of
it being a text type I'm going to set it to H1 heading so now it's bigger for the website we want to click that and we want that to be clickable so we want that to be a URL uh for the email it's Already set to email so it detected that for us person ID you can set that to a tag person name we'll just leave that as text phone number we'll leave that as text roll maybe we'll just drag this up so that we know the role is referring to Mike Johnson over there then
his phone number and then there's the website might be better maybe to put the phone number and the email address next to each other just seems like uh it's the website email and Phone maybe I'll put the company then I'll put the person name uh over there and then the roll and then the email the phone the person I person ID is probably the least important so I'll put it right at the bottom maybe I won't even show the person ID actually no it's fine I'll keep it there for now cool and now if we
come and view how this works I'm going to click refresh all right remember if you want to see the uh client details You need to click this drop down uh and then we need to be an employee because we only assigned permissions to employees and admin to see the client details so if I come to clients and then I click on Vesper there is our our client details showing nicely in that right panel awesome stuff so that worked just as we wanted it to what you can also do is you can set it to be
able to edit this data over here you can see currently it's static and if you want to Change something here you don't want to go back to the master data and come and change the details over here they provide you the functionality to do that and that is under actions over here so if I click on actions you can see there is a button called edit so if I click this I'm then able to click edit record within here I'm just going to uh Delete all these fields and then I'll click add field and I'll
enable all these fields that we want to be able to edit all right if there's something you don't want to be able to edit for example there maybe the person ID you can leave that disabled so that it never changes you can also then apply the permissions to this specific button so if I click here let's see who can view it so c l only a client can see it remember we don't want the client to be able to edit their own data so I'm going to delete this and I'm going to Only choose uh
employ or maybe not even employees let's say only the admin can actually change the details of the clients uh or actually no it's fine let's go admin and employees so let's say an employee finds out maybe their phone number changed or the email address changed or the contact person changes uh they'll be able to come click this edit button and change that so let me Demo this to you if I come here and I click refresh we're currently previewing As an employee which means we should be able to edit so if I come to Vesper
uh now there is an edit button I can click that and you can see now I can come in here and I can type whatever I want okay in all these fields so let's say the phone number changes I can then click save so now the number ends in triple 5 and that would then also update our Master data over here so if I come to Sarah from vper you can see the number Now ends in triple 5 which means the update was made directly to the Google sheet for us all right now that we
have set up the client let's go ahead and set up the team all right so you can imagine it's a very similar process what I would recommend is pause the video and go and try this out for yourself all right uh it would be a nice practice activity since you've already uh seen how I did the client setup so it's very similar uh but if not I will run through it quickly To show you how to set all of this up okay so you want to click on the team block uh futurize Dy data for
the document and then choose our user details we then going to have to apply a conditional filter where we want to uh filter the person ID to contain the letter e for employee click add Okay cool so now if we come over here click refresh uh I'm then going to go and Click on the team so the employees and the um client should be able to see the team great that looks good what I'd also recommend is I would want these images to avoid having this white margin at the top and the bottom we want
to actually fill the entire Square so you can actually go and change that setting you can click on the Block go to content then you can click on photo and then you can click on this little Paintbrush and then the cover media click this drop down and the image fit instead of it being contained it must be cover all right and then you can see it removed of all those white margins let me just show you contain versus cover right looks much cleaner much more professional and then you can even change the aspect ratio so
instead of having these big squares I'm going to have maybe a midsized rectangle great that looks good then I'm Just going to delete these two Fields the cover tag I'll keep that for now I'm only going to include the person name for the team member and then for the tag I'm going to assign the uh maybe their person ID and then I'll also add their role just below their name name make the person's name bigger can click on person name then over here by the uh HTML type we want to go to H1 cool and
you can see it's also got Like the little title roll over there if you want to remove that you can just click on roll and remove the label like that it'll look a little bit more professional let's go see what this looks like we refresh this should be a big Improvement now there you go much better next thing is you can see there's also a search bar if I scroll down here you can see you can choose what you want to search by so you can search by the company the person ID the person name
so if you want to search by their role you wouldn't ever really search by their phone number or photo or website or email so I guess uh it's probably fine to leave it at that cuz those are the only Fields you'd search by so let me show you how that works if I come here and I want to search for the RPA developers in this case the team's small so you don't need to search but if you go RPA it's only going to show Aiden Smith over here all Right next within the team if I
come to actions over here you can see there's a button where you can add a teammate right and that's only restricted to the admin to be able to uh add new employees so to configure that you just click add template and then you come add record and then I'm just going to delete all of these those are the default ones it comes with I'm going to click add field and then I'm going to enable all of these Cool so this is how I would then add a new team member if I come here to refresh
the employees aren't going to have access so because I'm currently signed in as an employee you can see there's no button to add a team member but if I come to myself who has admin permissions just going to click don't show again okay you can see because I'm an admin I can click add team member and I can come and populate all these fields then click add and it'll add in a new Team member and it'll add it over here as a new row so I can just demo that for you quickly I'm just going
to type in some uh garbage data click add oh the reason it's not showing is because remember we are filtering this team member to have e so if I come here just going to make sure that this is actually like e something e00 0 4 right it would be something like that then I come back here uh it should show Sometimes for refresh it's probably not going to work I think what you have to do is you need come back to softer go to the source click this refresh button on the documents it should then
pull in the new data now if we come here and refresh the page and you can see there is our new teammate all right and you click into it and we should be able to see um all the details all right the reason it's not showing the details for the team member is because we haven't Actually set that up up yet so that's what we'll do now but I don't want this here so I actually want to delete this I'm going to click delete you show you about to delete this template I'm going to say
delete okay and let's see what happens great it deleted it and that's because we have an action over here where it's set to delete a record so that's where that functionality was handled so you can see if one of these tiles on the team is clicked it's going To navigate to the person profile page okay and it's going to open in a model like we just saw if I come back to Pages we want to go to person profile and this is where you can set up a whole lot of details so you can see
there's some repetition here and that's because this one is visible to the admin and the employees I'm assuming so it's this one then this one is visible to uh the client only okay uh this basically means that You only want to show your client certain information so for example maybe you don't want to show your client Cent um maybe the employees phone numbers you only want to share the email addresses whereas within the internal team you want to share everything with each other for example skills phone email Etc so let me show you how we
set this up I'll click on the first one uh Source documents futurized D data sheet uh user Details okay you don't need to set any conditional filters here then under content so for the heading we can map it to the person's name so that's team member's name and in the sections below that just going to delete all of these and then add field and enable everything you can see you can also edit these details over here so that would be in the action settings over here you can see there's edits for what the admin can
edit and there's edit Settings for what the employee can edit so let's do that quickly edit record delete all of these enable everything so this means the admin's able to edit everything okay and then for the employee the employee then should only be able to edit certain Fields such as maybe email address um person name well I don't see why you change the name but maybe there's a spelling error phone number r Mean websites cool so let's go test this out if I come here refresh okay you can click on here and then you can
click this edit button and you can then edit all those fields right and that as the admin if I go to an employee like Aiden Aiden is not able to edit his data over there what you can also do is you can show which projects currently busy on and the way we do that is by using Our project details so you can see within projects we have this tab which shows which team members are working within that project all right so it actually includes the project manager's name and the team members so what you would
do is within project over here you would select the dumy data and now instead of choosing user detail like we would before we're going to choose project details and it's going to show all the Projects by default when it come to conditional filters and only if within here there was the team field where is team I'm just going to search team there it is if the team contains and then we're going to have not the logged in user because you you able to click on any of the team members to see what projects they're working
on so going to choose the current record so that's the selected uh team member that that it's on that page so it's the Current records person ID okay so that's basically saying uh whichever current record is on this page over here if it's included in this value then return that project else excluded so that's basically what's happening over here we probably also want to add another condition here where not only if it's a team member that's in that list but we also want the project managers to see the project managers working on it so I'm
going to Click add condition I'm going to say instead of and it must be an any which means it's all right so this or this must be true when showing a project so if the project manager is the current records project manager or person name right it'll then also include those projects uh best practice what should have been done is the project ma manager ID should have been included in the team all right but in this case because it's not we have to Do it like that okay so now if we come here refresh this
and then click within a team member we can see all of Aiden's details we can edit his details and there are his two projects HR onboarding bot and data entry Automation and it's always good to just do a sanity check HR and data entry we come here Aiden if we look over here Aiden is e001 so if we come here to project details you can see Aiden's in two rows E001 is in the HR onboarding and e001 is in the data entry that worked perfectly cool so the other thing you would just need to do
is apply the same setup to these two blocks over here I'm not going to repeat it or it's just going to be a waste of time uh but you would know how to go ahead and set that up the only difference is that this is for what the client can edit or what the client can see all right so maybe you would just show less details about that team member To that client okay so for example you might exclude the ID because that's like an internal data item which the client doesn't really care about now
that we've set up the person profile details we can move on and let's now go set up our projects right this should be very familiar since we just set up the projects on this page here so we can see there's two blocks the first block is for the client and employee visibility and the other project is for the admin So the admin is not going to have any conditions this is going to show all the projects and this one's only going to show the projects that that specific client or employee is working on okay so
to do that we can click on the first block select our dumy data and then within the sheet we want to choose our project details then you want to add some filters okay so some conditional filters so only if the company is the logged in Users in this case the login user would be a a client so only if the company is the login user's company company should it show that project okay can add another condition or if the project manager we're looking at our project details if the project manager is the logged in users
name or and this one's important is if the team the team member's user ID that's logged in is included inside the cell team Contains the logged in users person ID then we can go to the content and just clean this up a bit because this is Project we can come here and map that to the project name cool we can maybe add the project manager just below that and then for the tag maybe we can put the status so let's go check this out I'm going to click refresh so who are we now we're currently
Aiden which is an employee I'm going to go to Projects and we can see there is aidence to project so we know that's working cuz we checked that earlier the tag over there it shouldn't be showing that let's go see what's wrong we probably haven't mapped it okay so we have to map that to Let's map that to the status okay and then we can remove the status from this item field over here so I'll delete that come back here refresh that should look good now that looks great awesome so if we Click into these
projects should show us all the project details so so there's all the project details it's currently all empty let's go and populate that so to see where to do that you want to come to actions and it's going to tell you that it's the project Details page okay cuz that's what opens when that one of these items are clicked also by the way we just need to set this up quickly so just make sure you set up this is for the admin uh project details uh you know The quicker way to actually do this is
to actually delete this duplicate this then within here go and remove all these conditions and then change the visibility to have only the admin have access that's a much quicker way so now if I refresh it's always good to just actually test and make sure it's doing what you want it to be doing so I'm just going to go to my admin view projects and cuz I'm the admin I should be able to see all of them six Projects and just to double check yep there's six projects uh also I noticed that this user is
still over here so I'm just going to come and delete this row okay we don't need that that was just for testing earlier all right so next step is we now want to go and set up the project details so I'll come here go to Pages uh project details okay there's a whole lot of stuff to set up here at the bottom so I'm just going to hide this and I'm only Going to keep it simple and show the basic details so I'm going to connect our data project details you don't need to create any
conditions under content can come here and delete all of these add Fields enable all of these exclude the ones you don't want uh but based on what I've seen I think it's fine to include all of them actually I see I included all of these in the top section over here whereas I actually want to include all of those over here In the below section uh so I'm actually going to come back here and add all the fields there because this is where it includes all the details and I'm only going to exclude in the
bottom I'm going to exclude the project name and the project description and in the top section I'm only I'm going to delete everything and only keep the project name project description And uh what else maybe I'll also just add the status of the project as a tag cuz that always looks good and then I'll make this header one make this maybe what header three so there you go so now it's got the the header invoice automation so that's the name of the the project the uh descrip description of the project which it's getting pulled in
from uh if I come here it's the description field over there then it's got all the fields Populated over there that looks good then we can set the actions if I come to actions we can either edit or delete so the delete one's already configured so we only need to uh come here to edit edit record you want to make sure you delete all of these the default stuff click add field and allow editing there's any anything you don't want to be able to edit within the project just disable that and remember the permissions on
here is the admin so only The admin is able to actually edit uh the project details cool so that looks good let's go check if this is working refresh cool there's our project details looks good can click edit and I can come here and edit anything uh if I to change the status uh so notice that the status here is just text in progress if we want this to be a drop down you can do that so to do that you'd come to edit and by edit record you'd come to status and then Instead of
it being text you would choose dropdown and then within the dropdown you can choose the options or you can enter the options so we know these are the options here in progress and review to do and done so we can write too enter in progress in review and done you can also enable this if you allow multiple Selections in this case we don't want to allow that because you only want to choose one status at a time and cool you can label it whatever you Want we'll leave it as status and now if we come
back and I refresh this that status isn't going to be text anymore edit scroll down and you can see now it's a drop down where I can choose okay now it's actually done click save project updated if I come to projects uh you can see it's been set to done there you go uh let's also just make sure that editing is only available um at the admin level so if I come here and I go To say Aiden who's an employee he shouldn't have permission so you can see the edit button's not there and that's
because on the edit button we have a visibility setting over here where only the admin can edit that project detail great all right so now that we have set up the projects uh I'm also going to set up the tasks all right so you can see if I come here to client we can see by default that there is a my task sections and this is where the Clients can execute tasks that have been assigned to them uh so what I'm going to set up here is I'm going to have I want to be able
to have a can ban over here where there are tasks assigned to the users or to the clients and then I also want you can see currently if I go to employee there's no my tasks over there so I want to enable permissions where the employees can also um manage the project and their tasks from this client portal almost like a project management Tool so if I come here I'm going to go to pages and I'm going to go to my tasks let's go see if there's any page level settings uh no so it's currently
set to every one so that means the issue must be here on the my tasks so if I scroll down my tasks I click that setting there so you can see it's only set to the client and the Freelancers so I'm also going to add um the employee and maybe even the admin I mean can do that uh so one selected user group is disabled all Right that's fine that's because it's on the trial plan over here uh if you're on the professional plan which I actually am I am subscribed but for some reason it
still shows the trial days left even though I'm subscribed to the professional plan um but anyway that's how you said that uh that means now the employees if I refresh this should be able to see the my tasks here let's see if that worked yes great so now there's my tasks next we want to actually uh set The data to show all our tasks and inside here we have all our task details with the task name task description um who the task is assigned to Etc so if I come back here go to my tasks
select our document choose task details and then we want to add a condition and only if the assigned to IDs contains the logged in users person ID and that is going to only show whether it's an employee or whether it's a Client or the admin it's only going to show their respective task that have been assigned to them all right so let's check that out there are all of Aiden's tasks okay it's a little bit messy we're going to need to clean that up if I come to content uh I'm going to clean all this
up and we just want the task name and we want that task name to be a header okay we want to remove the label of the Task name and then what other fields do we want to include uh maybe task names maybe the status can include the status and the status we want to include that as a tag and then maybe also something that's important is a due date of that task all right I will include the label for due dates I think that's important I'll remove the the label for the status and for the
task Name maybe H2 all right let's go check this out if I refresh this awesome there's our tasks okay if we want to change the styling of the statuses to be a little bit more uh colorful let's go do that so I'm going to come here within the status I'm going to click on this little pinkt brush so let's go change this and make it maybe a nice orange make it a little bit thicker maybe the text let's also come Change the text that same color orange paste that in there you go cool that looks
good so you can see here under actions we have drag and drop enabled which means uh a user should be able to come here and once they've completed a task like maybe now it's in progress instead of to do they can just move it like that so I'm going to show you a really slick example of how you can send a task to a client for them to do for you and it'll then Add that to their task list so to do that we want to add a button let's add a top bar button uh
and it's going to add a record okay and the record we want to add we want to add a new ask and we can come here to add fields and you can enable all all of these and these are all the different fields that are required for a task okay we can you can reorder them maybe the task name goes the top just for a clearer thought process when Populating it assigned two names should actually be excluded and that's because that's a formula that uh happens directly inside of sheets all right so I'm going to
exclude assigned to names and we're only going to assign directly to the IDS attachments uh we don't need that cuz that's something a user would upload or a client would upload due date that's important project ID that's important project name that's important status that's important call the status We' probably also want this to be a drop-down and we also want our options to be the same as before so I'll populate those you want to click enter after typing each one and then it adds in that new Option tag okay and let's see who has control
so we want this currently anyone can go and add a record or a new task uh we don't want clients to be able to do that so we only want admins and employees to be able to Actually add a new task or else that button shouldn't be visible cool so that looks good let's go preview refresh Aiden is an employee so it means that add task button should be there yes add record uh instead of add record let's go give it a better name under actions add record I'm going to call it add [Music] task
refresh great so there's our add task button and there's now our uh add new Record we can also go change that wording if we want but we can come and create a new task over here so let me show you how this works let's call it send me your logo we're going to assign it to c001 and also the person who's busy populating this which is a Aiden Aiden also wants to see the status of what's going on with that task so let's also assign it to Aiden where's Aiden E001 me add a semicolon the
due date you can say we need this by Tuesday and the status is too okay so I'm going to click add okay so we can see now there's a new task added which is attach your logo uh it should what we should have done is maybe written client's task or something like that so that the employee knows that this is for the client to do so if we come here and we go to Mike let me just search for Mike Johnson at Starbucks I come Here you can see there is the attach your logo so
you can see it's been assigned to him now to do and you can click on that and on this panel on the right hand side he'd be able to then attach his logo all right so you can see there's a comment section over here I'm going to going to show you how to set all of that up in the next step okay so there's two things we're going to do now we're going to first I'm I'm going to show you how to set up the task Details Page which is similar to the other details page
so we'll go through that quickly second I'm going to show you how you can upload an attachments if you are a client and how you can download that attachments if you are an employee then I'm going to show you how to set up the comment section so that within the task the team can go into that specific task and you can speak to each other and you can collaborate within that comment section okay so let's start off with if You click on this uh it should open that side panel with all the task details okay
so if I come to action scroll down you can see it goes to the task Details page so if I go to Pages task details here's the task details I'm going to click this going to choose our damy data choose task details as our sheet okay you don't need to set a filter then come to content then in the top section uh I'll only include the tag which is the Status of the project and then for the heading I'll map that to the task name and description TOS description yeah something like that we come here
to section one let's just delete all of these default fields and add in all of these other fields cool stuff all right if we come to actions you can see we have the option to edit a record so once again you want to do the same thing delete all those fields add fields and check the fields That you want to be able to edit great then you click the update button it says the record has been successfully updated let's just change that to task just for better user experience update task that looks good so let's
go test this out just make sure it's working so if I come here then the task you can click on it and then it should show all the details of the task cool there's the name edit should be able to edit the task over There you'll notice there's a there's an attachment field over here that shouldn't be required that should be optional uh so let's go and come to attachments and disable this required field so that's because only a client will upload attachment now I'm going to add a button here for the clients to be
able to add an attachment and I'll also add a button that's only visible to the employees for them to be able to download that attachment so let's start With the uploading of the attachment that in softare studio can come to actions and let's go create a new action so you want to click add item button what we want to do is we want to actually update a record because we're uploading an attachment so we want to go to edit record and the record we want to edit is the attachment and in this case we'll keep
it required we can maybe just choose an icon so let's go with a paperclip icon For an attachment and the label is um add add attachment we also want to add a permission over here where this button should only be visible by clients so only a client should be able to add an attachment so if we come back here and refresh this So currently Mark at Starbucks is a client so if we click on attach your logo there is add attachment can click that and then let me just think I might Have done something wrong
oh I see the issue so basically we have um the attachments and it's currently set to a URL but it needs to be a file okay so if I close this now when you come back here and the clients try to add something so they come add an attachment now there's this upload file button and then they can add their logo but anyway let me go and show you how to set it up for the uh employee to go and download it uh so if I come back here so we're going to add Another action
which is going to download a file and it's going to be download attachment as the name okay and this should only be visible by by logged in users who are either the admin or the employee then for the icon we can set that to maybe this download button so now if we come here and I refresh that and we go to preview as an employee like Aiden Smith and I go to attach your Logo you would be able to then click this download attachment button and then download that file let me go and first configure
this leave a comment uh maybe it'll solve that error that we're getting on this page so for the source we going to go choose our dumy data and this time we want to choose comments for the sheet all right you'll notice I created a separate sheet called comment with a task ID commenter comment And date uh and then we can map all of those so the comment ID the commenter um this is a comment field and then comment this is the date and then how many comments per page we can leave these as the default
let's go and test this out so I'll click refresh let's go to this task over here as an employee and let's go write a comment so Aiden is going to say please remember to send logo comment and there it has now added the comments cool so That seemed to work and let's go try upload that uh logo now see if it's going to work add attachment upload let's choose this open AI operator there you go cool and you can actually upload multiple different files you can click update and there you go so you can see
under attachments it's added these two attachments for the attach your logo task if I come here there is the comment from earlier and if we go to uh the task details Here is the attach your logo task and there is the attachments right so you can open it directly from here or directly in here we can go to uh Aiden Smith who assigned the task attach your logo and now that it's been uploaded he'll have this button to then download the attachment so if he clicks that uh it should then appear in his downloads folder
um let's see did that work and the down download attachment button doesn't seem to be Working let me just double check what's going on here so within actions download attachment download file uh oh I see we didn't configure it so the file link uh that we need to download is the attachments there you go and then the message is file downloaded so now if we come back here refresh now we should be able to actually download that download Attachment and there you go awesome so that worked just as we wanted it to if we come
to like another task over here you'll see that download attachment button won't be there and that's because the field for the attachment is empty so it'll only show you the button if it's not empty great so that's actually a really great user experience to collaborate and send files and attachments between the employees and the clients next I'm going To show you how you can handle payments within software all right so what's really cool about software is they have a whole bunch of blocks that you can add so if you're building from scratch you generally come
here to this button which says add block and then there are a whole bunch of very beautiful blocks there's forms and what you want to do is you want to come to payment here and you can actually add a uh simple billing block all right so you can see here this One's powered by stripe and if you click that you can see you can actually charge subscriptions or once of payments whatever the case is directly within softer over here to set this up you'd use the integration so under settings you can go to Integrations and
then you can go to stripe and then you can enter your publishable stripe key from your stripe account and then also paste your secret key over there and then you can Configure these parameters and basically you'll have payment set up all right so you usually just come to pages and you'll probably set up another payment page but I'm just going to delete this cuz we're not going to use it how I did it is I just have a separate link so here we have payment link so for each invoice in our invoice page we have
a checkout link so if you click that it'll take you to a separate link So within stripe you can create checkout links uh Why is that not working um anyway doesn't really matter you would just come here and you paste in your checkup links that you get from stripe or uh from any payment processor that you use so the way I'm going to show you that it's going to apply to any payment processor you don't have to use stripe or PayPal or whatever you can use absolutely any payment processor that allows you to have a
checkout page you can even just send them to a link with Your you know your payment details or your banking details for a wire transfer if that's the way you accept payments uh but let me go show you how to set up the actual invoices page so you can go to pages go to invoices okay so you can see we have invoices that the admin can see which should be all of them and then we have the invoices that only the client sees which is their own invoices so for the admin uh invoices we're just
going to come choose the damy data and then The sheet we're going to choose the invoice details and then we don't apply any conditions or any filters because we want to as the admin you want to see every single invoice then if you're the client you want to also connect the invoice details but then we want to apply a filter which only if and if we look at the data so only if the client ID is the logged in users person ID all right and then what that should do is that should Limit the invoices
to only show clients invoices so if I come to a client over here let's see if it's going to show the invoices on the left there it is if I click that it should only show this client's invoice okay so it says there's no open invoices so maybe Mike doesn't have any um but that's client number one which means he should uh c001 is mik yes so why is so it actually should be showing this so Let's go see what's wrong oh I think I forgot to click refresh refresh great there it is so we
have client number one we have the project all right so this is some dummy data we want to go fix that so within both of these we want to go to content remove all the dummy data that came with a template and add in the fields we care about like something like that maybe on the actions here if they click the three Dots actions we can have a make payment so we can add an item and we can say open a URL and we can call this one pay and then we can choose the icon
for maybe this wallet and the URL should be the payment link and that should open in a new tab not in in the same tab so we come back here click refresh there's the client details oh that's not working I think maybe I just need to refresh it again oh I know why That's because the settings that we changed over here were for the admin all right so we don't actually need this pay button for the admin cuz the payments only get done by the client so this can actually be deleted and then within this
this is where we need to come and do the same thing we did before on the other block add in the fields okay client name amount blah payment link we'll delete that one then you go to actions and then over here They'll say um open URL and then we'll make this one called pay or make payment the icon is this wallet and it sends them to the payment link cool which is the link that we had over there so let's test this out this should not work if I refresh there you go there's all the
fields so so we have the three dots if we click that we can click make payment and then It should so you can see it opened in the in the same tab we want it to open in the new tab okay refresh uh make payment there you go cool so this is looks like it's an expired link or something doesn't really matter but the concept is there You' send it to a stripe checkout page okay uh we can also see that these payment received and payment sent are set to text false let's go make that
Look a little bit better instead of it just being text saying false let's go change these to check boxes payment send check box so now if we view these instead of it saying false it should just be a line great so it's just a line and then if you click these three dots you click Mark payment sent it should then check that we might need to actually configure that so we'll come back here go to actions Mark payment Sent one click update and then the field you want to change is the payment perent all right
replace existing value with we can just say maybe true and click add okay so now oh looks like I just closed that my mistake me reopen it refresh this let's click these three dots Mark payment sent and you can now see it's checked so this is for um invoice 001 if we come Here invoice 001 we can see payment sent is now set to True right so now it's up to the responsibility of the admin to come and Mark this as payment received so coming back here on the admin remember this is the admin one
uh we can go to the actions and byy Mark payment received we can go to oneclick update add field and then payment received and set that to True click add all right so basically what would happen is Once you've seen the payments reflected in your bank account and your stripe account whatever the case is uh the admin would then come and uh approve it so you'll see it's not available here that's because we're in the client view but if we go to Leon which is the admin who has access to see all the invoices so
it says payment received here this payment sent is true that's for invoice number one okay let's go mark this one as payment received so you can see it's Currently false payment received that should change there you go it's now changed to true if you look at the master data they you can see it added that true over there uh what I'd also recommend is just coming here and also changing these payment received to check boxes that looks good oh not rating great great so now that I've shown you how we can set up payments the
next thing that I'm going to show you is How to actually create a brand new page from scratch and how to use custom blocks so let's say for instance we want to also have a field in our portal we collect client feedback all right so you want a place where the client can go and provide feedback uh maybe they're not happy with something uh and then there's also a way for the admin to actually view all that feedback so what I'm going to do is I'm going to come to Pages I'm going to click this
plus to create a new Page and I'm going to call this feedback that's good you'll click save okay then within this block if I scroll down we want to click add page and then we want to select the feedback page we just created and we can see that's right at the bottom over there uh let's actually set this as a secondary one so I'm just going to drag and drop this down here and we have schedule meeting over there I'm going to delete That we're not going to have anything for scheduling meetings we'll just have
this feedback page cool so we've added our feedback remember whenever you create a new page within your page you want to come to settings visibility and change who can see it so we only going to want logged in users to be able to see the feedback and we want to limit that to only the admin and the client Himself okay we'll also then add Block Level permissions um that only the client can see and only the admin can see but the actual page should be able to be seen by both cool oh let me click
save I'm also just going to drag this just all the way down here okay and and here we are so now we have an empty page you can click this plus button to add a block or you can click this plus button over here and Then let's search for a form or we can come to forms and let's choose maybe we can go with a side text or just a centered form uh or maybe just a single question since it's just feedback right let's go with that single question and then we want to connect this
to our sheet and we want to connect this to our feedback sheet so if I come here we can see we have a feedback sheet which takes the full name the email address and the feedback all right so I'm just going to delete this over here delete rows it's nice and empty we can change the form layout maybe we just have a centered form with no image that looks better okay let's go to the questions section one heading one question let's say this um feedback and then the sub text we can say uh what can
we improve that looks good can add another input field include the feedback the Email and the full name me delete this add in the feedback like that what can we improve I'll put that at placeholder text and and that looks good or let's just set up the success me messages thank you for submitting the form we'll say thank you for your feedback Styles visibility uh so this form should only be visible by logged in clients okay cuz Only clients are giving feedback okay let's go check this out come here refresh and we can go to
feedback okay so currently I'm on my admin over here so that's why I see nothing we haven't set anything up there so let's go to client the client can now see this page we can add in some details uh just going to put in some dummy data over Here B service whatever spelled that wrong doesn't really matter let's submit make sure it worked thank you for your feedback we'll get back to your ASAP it refresh the fields come back here and there is the feedback awesome so that's exactly what we wanted now what we also
want to do is we want to only show the feedback to the admin let's just go make sure that employeers aren't able to see any Feedback yes permission denied that's good okay so we can see this feedback button is still visible to Aiden which isn't good so let's just fix that quickly within the feedback here we can click set visibility only logged in users who are either admin or clients great so now if I refresh this that feedback button should be gone great it's gone so back to admin So currently you can see admin's got
nothing here so let's go set That up let's go add in a new block that's only visible to the admin so I click add block uh maybe a grid table let maybe use a table instead I think that's better select our feedback sheet the the condition is going to be applied here so only if the logged in user is an admin should uh this block be visible and the content should include delete all the standard fields and include the email feedback and full Name yeah that looks good cool the order maybe we can go put
the full name first then the email then the feedback cool and that looks fine add record we don't really need to add a record because you're not going to add feedback because it's an admin who's seeing this uh title and description we can just give this a title saying client Feedback and a subt won't have a subtitle we'll leave that blank cool let's go make sure this is working click refresh cool there's the feedback and it's only available on the client if I come to an employee that should not be yeah great permission denied exactly
what we wanted only thing I'll change maybe here is under feedback let's go change the little icon over here so instead of it being a paperclip let's Use something let search feedback see what comes up uh maybe like this speaker phone or bow yeah let's go with that one so let's see what other Pages we also have uh we also have this my profile over here where you might want to go and actually edit your profile or your details uh so a good place to add that would probably be over here at the bottom you
have account settings and the sign up button maybe we have a my profile over there so to get that you Click this left pen over here scroll down to the bottom and here under user menu we can see there's account settings sign out and we can also add one so we can add a page and the page you want to select is my profile so I'll select that and it should open the page my profile in the same tab that looks good my profile let's use like a little user icon something like that and then
within This this needs to be the dummy data then we need to select the sheet which is user details and this needs to be the current user so we need to add a condition if the person ID is the logged in users person ID and then that should show the current users details over there then for the content we have their photo which is already mapped then you can add the other fields which is all of these that looks good enough then the main thing is the Person's name so we actually want this to be
the header you want that to be at the top and actually over here is where we want to put all the details in this second section it'll look a little bit better so I'll put all of these except the person name I'll keep the person name and the company at the top then I'll delete everything else Like that person name the company there's a whole bunch of details so if we click over here click on my profile that should now shots Aiden's profile there you go fantastic uh then for editing his profile you can see
it says the field name is not mapped to anything you can fix this in studio so if you see that error you always just need to come here go to actions and you change something here so we can see there's edit settings for what admins can edit And then there's edit settings for what the employee and client can edit anyone to be able to edit is their person ID so we'll keep that unchecked and everything else they should be able to edit cool whereas if you're an admin you should be able to edit everything so
if I come ad field admin should be able to edit the person ID cool so now if we come here refresh so let's say his role is now RPA Like analyst or something can come here change the to RPA analyst and then click save and then that should change the user's details there you go to this RPA analyst in our Master data we come here and we go to Aiden and you can see he is now an RPA analyst awesome so that worked last thing I would probably go and do is maybe just delete any
Pages we're not using but looking through here uh maybe contract we haven't used Contract so I would come and delete that or set it as draft if you want to use it later we're not going to use that um Team person profile resources we're not using that so I'll set that as draft schedule meeting set that as draft feedback we created the signin page what I would do here is I would come in update the logo so that it's using my company image so we can use this asset okay everything else seems fine the Signin
is all configured this is all set up for us in the within the template visibility for non logged in users makes sense cool uh maybe the login page let's go see what we need to do there it already pulled in the the logo for us we can remove this let's see if there's a way to change that style so there's a background image uh side section yeah let's remove that image that looks better nice and Clean uh last thing you can do is just click here to add a custom domain so you can buy a
domain from like GoDaddy or name chep paste it in there you'll then need to add in some DNS records to configure it if you do have any questions about how to set this up uh you can feel free to like ask me in the comments another really Nifty feature on the professional plan is you can come here and go to mobile app and you can put in some details of your app name so It would be something like futurized portal all right you can upload your icon and then what would happen is it would add
the app as a progressive web app on a user's device it'll show them they need to click this little button on iPhone and click add to home screen and then it'll add a little icon and it'll make it seem like your website is an actual application that was downloaded from the App Store so that makes it nice and accessible for your team for your Employees and for your CL cents to have quick access to your client portal yeah that's basically all I hope you enjoyed this video if you did please do like the video subscribe
to the channel if you'd like to see more content like this I hope you now feel well prepared to go ahead and build a client portal for your own business if you'd like to download this template and that spreadsheet the links will be included in the description of this video and thank you So much for watching and I'll see you in the next