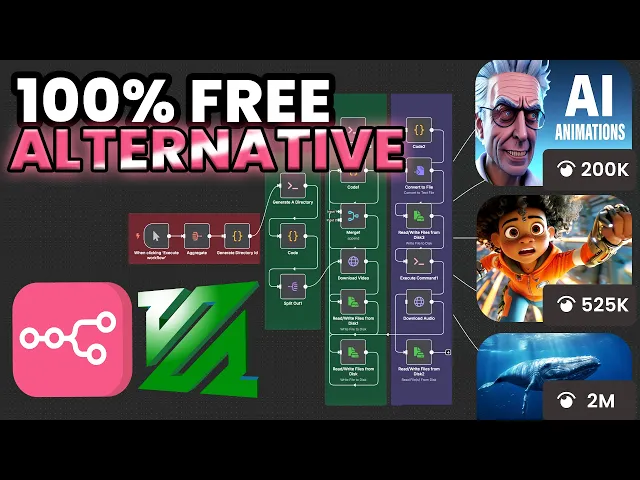
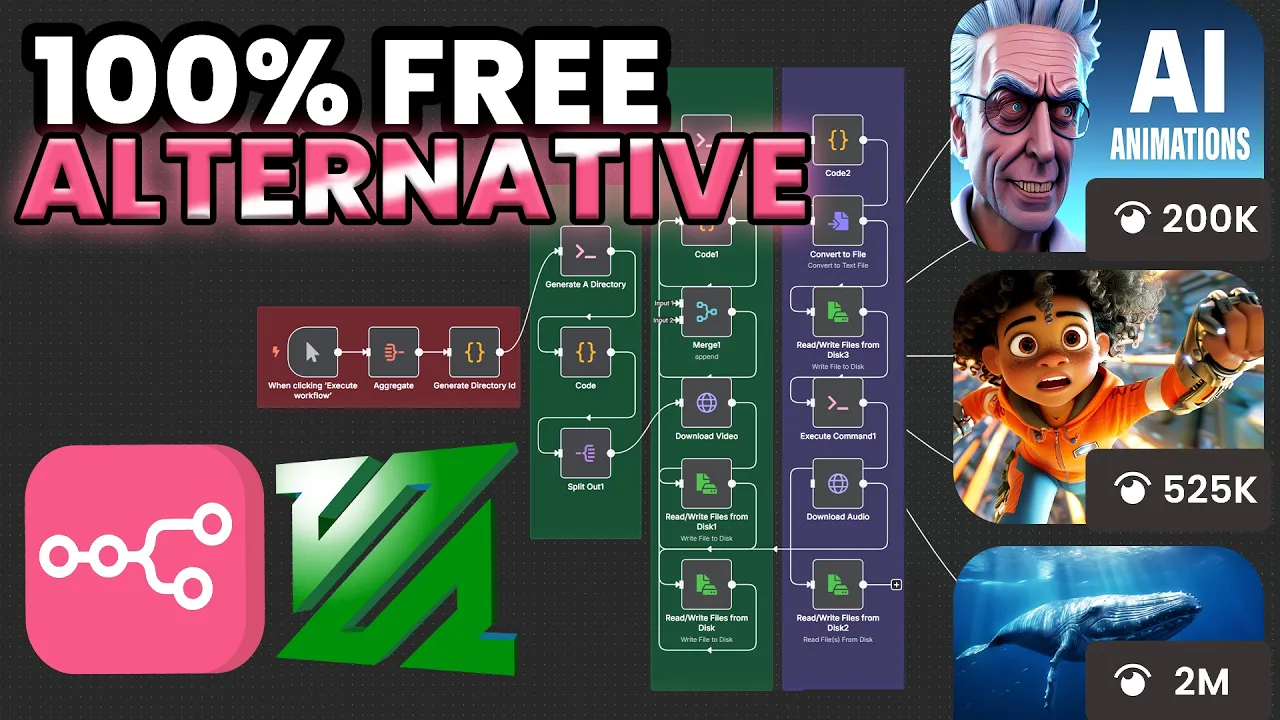
All right. So, what I have here are three pairs of audio and video sources. And what this workflow is going to do is first merge each individual pair. And once that's done, it will concatenate all the resulting videos into a single clip. And the best part about this is that it will be doing this for completely free. And we are going to talk about why this is such a huge deal in just a second. But without wasting any more of your time, I'm just going to execute this workflow to demonstrate what it looks like. So,
I'm just going to click on execute workflow. All right, perfect. So, the process is complete. Now, let's take a look at what the final output of it looks like. I'm going to go ahead and click on view for [Music] this. So, there you go. So, as you can see, the workflow was able to first merge the audio and video pairs. And after that, it also concatenated the resulted videos into the single video that we just watched. And to repeat, it was able to do this for completely free. And to get to why this is such
a huge deal is that if you're somebody that's into automating video generation with N8N, then chances are you came across services such as Creoate or JSON to video, which does exactly the same thing. And these tools are very powerful and also convenient. But the cost for using tools like these can actually be quite pricey. For example, for Creoate, if you go over to their website and then look at their pricing plan, you can see that the monthly cost for subscribing to a tool like this can be around $50, which is quite expensive. And even with
this plan, they still impose limits such as 200 plus videos per month that you can use. And when we go over to another tool which is called JSON to video, it has a similar pricing plan. So if I go over to their pricing page, you can see that for $50 you get up to 7,200 credits or up to 120 minutes of rendered videos, which again is not that great, right? Especially considering the amount of money you have to pay. And the crazier part to this is the fact that they are also actually using the same
exact tool that we are using here for free under the hood to provide the service that they are providing us with for $50, which makes this even more awesome. And the tool I'm referring to here is called FFmpeg. And you can see that it has been around for more than 20 years. Its initial release date was in 2000. And when you look at its description, FFmpeg is a free and open-source software project consisting of a suit of libraries and programs for handling video, audio, and other multimedia files and streams. At its core is a command
line FFMPE tool itself designed for processing video and audio files. And this is their website, a complete crossplatform solution to record, convert, and stream audio and video. So this is exactly what I'm using in this workflow here in order to be able to process all these raw uh media files that we have in the beginning of it, right? And this is also what Creoate and JSON to video uses under the hood as well in order to process these videos for us. And so if you learn how to implement and use this tool yourself, you'll essentially
be able to do it for completely free, which is why it is such a huge deal because if you're somebody that is automating your own video generation, then you'll be saving $50 every single month or if you're somebody that provides these templates to clients as a service, then you'll be able to use it as your selling point because you are basically saving them $50 a month. And so if you fall under any of those two categories, then I would 100% recommend you to learn how you can implement this into your N8N instance and also how
to use it so that you can start saving you and your clients money. And in this video, I'm going to walk you through step by step from how you can add this tool to your N8N instance to how you can use it effectively so that you can start reaping the benefits that it provides. And so without further ado, let's get started. All right. So the first requirement for us to be able to use this tool is having N8N self-hosted because we would need to install it within the same environment that we have our N8N instance
running in. And there are usually two ways people would self-host N8N either locally on their computer using Docker or using a VPS provider such as Hostinger or Digital Ocean. And to make sure I cover both the scenarios, I'm going to be showing you two different approaches, one for each. And in this case, for the VPS approach, I'm going to be using Hostinger. So I'll be showing you how you can get access to your N8 and instance using their secure shell terminal and make the necessary changes. And so this video assumes that you already have any
and self-hosted either using one of these approaches. But if you don't already have N8 and self-hosted, then don't worry about it. I have a video on how you can do exactly that using Hostinger. You can go and watch that video. Once you do have N8 self-hosted, you can follow the second approach that I'm going to be showing in this video, which you can literally follow step by step to basically have FFmpeg installed within your N8N instance on Hostinger. But with that said, let's get right to it. By the way, just a quick interjection, I'll be
uploading this template to the classroom section of my premium community. So, if you want to get access to this and many other templates, feel free to check it out. We are currently at 60 members. And apart from all my builds and N8N, you also get N8 tech support by me. We also have three live calls per week. Apart from that, there is a classroom section with full of materials from all my bills in N8N which are production grade. For example, we have business-based templates here. Then we got faces short form contentbased templates as well which
I recently started. And apart from that, there are also plenty of educational templates which you can directly get access to and many other things. So if you're somebody that's serious about NATN, then this community is perfect for you. And for the resources of this video, I'm going to be adding it to this newly created course where I want to start adding setup based tutorials. So once you're in here, you can just go to the relevant page depending on the way you are going to be hosting your N84 ffmpeg and scroll all the way down and
you'll be able to find the template there attached as a resource. Once you're here, you can just basically download it. And once you do that, head over to your canvas, click on the three dotted button here, then select the file you just downloaded, and you should be good to go. But with that said, let's continue with the video. All right. So now we are in my locally hosted N8N. And this is the container that it is running in. Okay. And even though the name says N8N with FFmpeg, currently it doesn't really have it. So we
can actually test it out by using the execute command. And I'm going to execute the ffmpeg version command. And what what this is going to do is it's going to check for the version of ffmpeg within the environment, of course, if it exists. But in this case, it doesn't. So that's why it says ffmpeg not found. And now let's take a look at how we can actually install this within the environment that our nitn is running which is obviously the container. And for this example I have a simple docker compose file prepared. And for those
of you who don't know what a docker compose is in docker it's basically a file that contains a set of instructions that docker uses in order to uh run containers. So in this case we have this particular configuration here for n. We are saying hey container name should be nn and the image we want to use is this particular one here. So this is basically the id of a of the image that we are trying to use that is within the uh docker registry. So if you went over to uh docker here and then typed
in nn you can see that this is one of the images that is available within the registry and the size here is 1.4 gigabytes for instance. Okay. And the next thing we have here are the port bindings and then the volumes bindings. And what volumes is, it's basically what allows us to persist data. So whenever we create our run our N8N container here and we create our credentials for any services or also when we create workflows, they all get stored within uh what we call volumes. And what volumes binding is is basically we are telling
it here for instance you can see there is a colon here. We are saying map this directory within the host machine which in this case is my computer since I am running this locally right to the directory within the container that corresponds to this directory here. So what gets added to this directory within the container for example let's say we create a workflow and that workflow gets added to this directory within the container is also going to be reflected to this directory which is in the host machine in this case our computer. This is the
same for ports. You're basically saying bind this port of the host machine to this port of the container, right? And actually to make it make more sense to you guys, let's actually open up Excel draw and make it more visual because I feel like this is a very important step for us to understand for it to make more sense for you especially when you want to start using tools uh like ffmpeg and I just want to teach you guys how to fish instead of just directly give you the fish. Right? So again we have our
host machine. Okay. And in this case, this host machine is a personal computer since we're running it locally, but it could also be a VPS, right? Which is what we're going to be seeing in just a bit. And within the host machine, we have our Docker installed. And let's actually make it pretty big here. Or maybe to yeah, leave some space for the host machine. And I'm going to call this Docker. Okay. So, this is the Docker application. And this part here basically corresponds to what we are seeing here. We have the containers running within
this right. And here we are going to have docker container. So let's call this let's say in this case our container name is nn. And I'm going to call this natn. Okay. And I'm going to also label it as a container. So within our host machine we are hosting docker. and Docker hosts these isolated environments which again has their own file system right so for example we have N8N inside of this and to let's say to represent N8N I'm going to just add another application like this or another box here and I'll call this N8N
app all right and this N8N app is able to basically connect to anything within this isolated environment right and let's say in this isolated environment based bas on what we saw here there is this directory okay I'm going to add this directory here so now whenever I create a workflow or I set up a credential these data by n's default configuration is going to add them into this directory here and from our computer there is just no way for us to access this directly right so what we use docker for is we are saying look
we have our own directory within our host computer so the host machine has this directory like this. And what we are doing here with this particular part of the configuration is again we are telling docker to basically map this uh directory to the directory in our host machine. Again in this case is my computer. So whenever within this n app we add any kind of workflows these are going to be added to this directory within the container. And because now we map this directory to our local directory. This will also start reflecting whatever gets added
within this directory. And this is also the same with the port here. So let's say we got our port 567. We get this one here. We are mapping it to the port within the host machine. And now we have these connected. And that is basically what port binding does. Or actually we could even represent this better. Let's add this diamond here. And let's call this configuration, right? And this configuration is our docker compose file and that is what helps us to basically map these to the correct destinations within the host machine. Okay. So that's basically
what we are doing with these settings here. Next we have another section for configuring volumes. But this one here differs from this one here in that at this point or this part of the configuration, we are actually creating these volumes and the ones that we create here actually gets created internally uh within the docker app itself. So for instance, we got this one here called N8 and data, right? So we're saying, hey, create a volume called N8 and data. And the one here, we are basically saying, hey, map this named volume to this directory within
the container. And in a bit I'm also going to show you how you can create a volumes binding with a local directory which is what we're going to be adding where we are going to be adding our output data for the videos. Okay. But at this point right now what we're doing or what we did was we tried to execute this command here. Right. And when we executed this command what that command actually did was it looked for an application called ffmpeg within this container here. And because it couldn't find it, it displayed us with
this error saying, "Hey, I couldn't find anything called ffmpeg." And like I said, just like with this directory or this port here, if we had ffmpeg installed in our computer, this container would not be able to access it because container has its own isolated environment, right? It's the same for this. So what we'll have to figure out is how we can actually get fmp installed within this environment itself. So that the next time we run ffmpeg it would be able to find it. Right? So let's say we add ffmpeg here so that the next time
we run this command it would be able to find it. Right? And that is what we're going to be looking into now. And to understand that let's understand exactly what a container is. A container let's just head over to this uh section here. So a container is actually the running instance of an image. And as we talked about earlier we are using or we are pointing to n's image right now. Right? And an image is basically a blueprint which we can execute. When we execute, we create containers. And so this one here is actually the
product of us executing this image here. And unfortunately, N8's image does not come with ffmpeg built in. So what we would have to do is we would have to actually create a custom image that combines both N8's image and ffmpeg together. So that the next time we run it, the container that comes out of it or the container that gets executed will this time contain both N8N and also FFmpeg within a single environment. And so the next time we run this command here, it would indeed be able to find this guy here and would be
able to for this command return us with the version. And let's take a look at how we can actually get this done. Right. For this, what we're going to have to do is we are going to have to go to the folder that has our Docker compos file. And once we are here, we'll have to create something called Docker file. So, what I'm going to do is I'm just going to ask help from chat GPT just because the file has no extension and I couldn't find a straightforward way to create it. So instead I'm going
to say, "Hey, could you please write a cmd command uh for me to create a docker file in Windows or on Windows, whatever. Let me just click on that. Let's see what it comes with." Echo Docker file. This will create an empty file named Docker file in your current directory. I'm going to click on open in terminal. Let's see if this is actually going to work. Nope, it did not. Let me just save this or sorry copy this and pass it back to chat GPT. You are running this in PowerShell not classic. Okay, that that
makes sense. Sorry, chat GPT. And I'm going to click on new item. And perfect. There you go. We got our Docker file created for us. And as you can see, we basically have no type. It's just uh the type is basically just file. I'm going to go inside of this. And once we're in here, I'm going to head over to the cluster section of my community, which by the way, I'm creating this new section for setup tutorials. And I'm starting it with ffmpeg here. And perfect, we are in the local setup. And this is what
we're going to have to pass into our uh docker file. Okay. And what we are basically doing here is we are getting any and uh image. And then what we're doing here is we're switching to the root user from what I understood. And then we are also running this command as a root user. You can see it says add ffmpeg. So obviously this is probably adding ffmpeg to the environment. And then we are switching back to node as the user. And the next thing we'll have to make as a change is when we go here
we can see that we'll have to use build instead of image. So when we go back to our docker compos file we got this image section here. I'm just going to remove this part. And then what I'm going to do then is I am going to add in build instead. And this full stop in front of it. What this tells docker is to look for a docker file within the same directory as this docker compos file. Right? So it's going to look for it. It's going to find this docker file. So for the building part,
it is going to find this docker file and basically execute the commands we have within it. So it's going to say hey get any ends uh image and then run this command and we are ready to go. And so with this set, we are basically creating a new image so that the next time we run the container, we'll have both nn and ffmpeg running in the same environment, allowing us to run the command we ran just now, but this time with it returning the actual version of ffmpeg instead of saying not found. Right? But before
we run this, as I promised, I'm going to show you how you can do volume binding using a local directory. And that is what we are going to do here. I'm going to add another dash and I'm going to do dot and slash right this means relative to again our docker compost file we are saying within this same directory here okay map this directory called shared to the directory called data shared within the container. So with this configuration here we are basically just creating a new volume binding. The next time we write anything into this
directory within the container, it is going to be mapped to this directory here that is going to appear within this folder and or this directory that we can directly access to. And you'll understand much better what I mean once we actually test this out. And this is actually ready. So what I'm going to do now is I'm just going to close this. Okay. And I'm going to open the terminal and in the terminal I am going to run this command here and then paste it. And of course, we have to make sure that we are
running the terminal within the same directory that contains the docker compose file, right? So, I'm going to go ahead and click on docker compose upbuild. Okay. And this should rebuild our image and create a new container out of it. All right. There you go. So, we have everything set here. And you can see that our container is as well running, right? And now, if we went back to the same exact workflow and ran the same exact command, let's see what's going to actually happen. All right. So I'm going to execute this workflow and let's see
what the result. And we can see that indeed this time we got a success response returning the version of uh ffmpeg we have running within the same environment. Okay or within the container. And you can also see that a folder called shared got automatically created within the same directory as uh our docker compos file. And now whatever we add into this folder here or sorry the uh folder that we just mapped just now let's look at that real quick. So, whatever thing we add into this directory from within the N8N instance, that thing will be
mapped to the same directory that we can see here, right? And actually, let's run a simple test for this. And I'm actually just going to use chat GPT for this. that I'm going to say could you please help write me a command in uh for the execute command note in n to create a simple text file in the following directory data shared okay okay so we got the command and I'm just going to execute this command to see what happens when we actually create an an example le text file within this directory in the container
and see if it's actually going to be mapped to our shared folder. Let's see if that's the case. And we can see that indeed that is the case. And so now with this what we did essentially is we created another uh binding right. So for the binding I am going to create another one here. And we call on the uh container side we call this data shared. Okay. Okay. And then we created another configuration and we combined this to a directory within our uh n ffmpeg. Right? This part here. So I'm just going to call
this n with ffmpeg. Right? This is the name of our directory. I'll just remove the spaces. Okay. But with that we successfully looked at how to set up ffmpeg with a locally hosted nn. And so now I want to continue with the second example which is setting up ffmpeg with a VPS hosted N8N. All right. All right. So now I'm in the VPS dashboard where I have my N8N instance hosted and the uh provider here is Hostinger and this is the actual instance. So what I'm going to do here now is uh create an execute
command or add an execute command to uh the canvas here. And I'm going to run the ffmpeg- version command so that we can see we don't have it installed yet. And actually I had it I made a typo here. So I'm just going to uh fix that real quick. And then I'm going to click on execute step again. And we can see that at this moment the nan instance is not able to find any or not the nan instance but this command execution was not able to find an executable within the environment called ffmpeg. And
that is what we're going to be fixing now. Okay. And the way we're going to be doing this is by using the SSH terminal or the secure shell terminal. And in uh Hostinger, the only thing you have to do is you'll basically have to click on this browser terminal button here. And that would automatically log you in the terminal where you can interact with your VPS. And if you're using any other provider other than Hostinger, then don't worry about it. You'll definitely also be given a terminal access or an SSH access to your VPS as
well. So, you'll just have to figure out how to get there. And once you're in, we will essentially be running the exact same commands. And the only difference here could be the directory structure between Hostinger and the VPS provider you're using. And the goal here is to actually get into the directory that contains the Docker Compose file for our N810 instance. And once you're able to get yourself in that directory, you'll be able to just run the exact same commands as I'm going to be running here. And with this setup in Hostinger, when you click
on browser terminal, it will automatically add you in the directory as the docker compost file. So you're I'll basically be able to just run the command straight away. And if in your case that's not the case, that kind of rhymed. But yeah, you could just ask chat GPT or any other uh AI that you prefer to basically guide you to the directory that contains the relevant docker compos file and you'll bas be good to go. You'll just have to follow me from there. And with that said, I'm actually going to go ahead and grab the
uh commands for this. Okay. Oops, I have to do it from my other browser. Let me go ahead real quick. There you go. of which by the way it is coincidentally also $49 just like Creoimate. So you can basically just ditch your Creoimate subscription and join my community instead. Actually I think this is a good time for me to give you my pitch. So I'm a former senior software engineer that quit his career 6 months ago and ever since then I've been just pursuing AI automation with the goal of building an agency and I've been
just obsessed with automation ever since then. I built countless amount of projects and that's also one of the reason why I launch my premium community business AI alliance premium. What I do here is I do all the research and I come up with practical ways to do things such as the one I'm showing in this video. I also build production level workflows and share it directly in the community. I'm also going to be uploading the template I show in this video. And apart from that, there are also plenty classroom materials that you can choose from.
For example, this is where we are going to right now to get the commands for this video for installing FFMP pack to our N8N instance. So, these are all the classroom materials. But anyway, enough with the plug and let's just continue with the video. So, I have this new classroom course section here. The first thing we'll have to do is go to the browser terminal on your VPS dashboard. In our case, since we are using Hostingers VPS, we just had to click on browser terminal, which we are in now. Okay. Then, we'll have to create
a Docker file. So, I'm just going to copy this command and then go back to our terminal. And it says connection close. I'll just reopen that real quick. All right, we are back inside. I'm going to paste this. And once we do that, you can see that it opened up an empty file for us, an empty Docker file. And I'm just going to go ahead and copy this one here and then paste it directly in it. Why did I even click on enter? I didn't need to do that. Because what I'll have to do instead
is I'll have to save this file and exit. And for me to do that, I'll have to click ontrl + o then enter then ctrl + x. So I'm going to do just that. Ctrl O then enter and then Ctrl X. This basically saves this file within this directory. Okay. And now we are going to go with the next step. This time we're going to go inside our docker compost file. So from what I understand, nano is either going to create a file if it doesn't already exist or enter a file if it does exist.
Right? And in this case, when we run nano4 docker compose, because it exists, it's not going to create a new one, but just enter inside the one that already exists. And so we got our services here. And what we need to do is we need to update the image section for the service that says N8N. So we got N8N here, right? And we are interested in this uh particular section. And what we're going to do with this is we are going to remove it and replace it with build. and dot. So I'm going to do
just that build and then dot. Okay. And once we're done with that, we are also going to create another uh volume binding. All right. And for the volume binding bit, we are going to basically for those of you who haven't watched the previous section and doesn't know what this is, volumes is used to persist data. And what volumes binding is basically mapping a directory within the host machine with a directory within the container. Right? because a container is an isolated environment that has its own file system. And so what we're going to be doing here
is create a custom directory just for the purpose of using ffmpeg. By the way, the connection got closed again, which kind of suck. I'll have to re-enter and do this part here. But anyway, the reason we are creating a new volume here is because when we work with ffmpeg and we want to merge data and generate an output, what's going to happen is we would have to actually have those uh media files stored within a directory that the N8N instance can have access to. Right? That's how it's going to work. And when for example, we
generate an output, we'll also have to store it there. So I'm basically going to create a directory just for this purpose because I think it's going to be neater that way. Okay. So, what I'm going to do now is I'm going to restart our connection and not sure if we can do it directly from here. So, I'm just going to close this terminal again and click on browser terminal once more. So, now we are back in and what I'm going to do is I am going to redo this part once more and I'm going to
type build dot. Okay. And then we are going to do the binding now. And I want to create a directory called shared within this directory. And then I'm going to say uh data shared. Okay, perfect. All right, now I'm going to save this again with Ctrl O enter and then Ctrl X. And we are basically done. There's only one step left for us to do in order to make this work. And that is to basically give the permission to write and read files from and to this directory here that we just created just now. And
for those of you wondering what this line here did when we removed this one here, right, image N8N is that instead of just using the image that N8 provides us directly, which is just a basic installation and doesn't include ffmpeg, we are telling docker to look for a file called docker file within the same directory as the docker compose, which is what we are in here, right? And basically execute that in place for the image when building. So instead of just using uh n's provided image here we are actually calling that okay we are using
the image that they provide us with but we are also including another command here that also adds ffmpeg within the same image so that the next time we execute this image the container that's going to run from it is going to contain both the nn instance and also ffmpeg instance but anyway let's continue with the next step and let's update the permission. Okay. And again, the connection is closed. So, I'm going to go back once more and then click on browser terminal. Go ahead and paste the command here. Okay. I'm going to click on enter.
Okay. So, apparently the directory hasn't yet been created, which makes sense. So, I think I have to change the order where we'll have to first build the uh new docker compose file. Okay. Once we do that, it should have the uh directory created after that. So, let's first actually build this one here. All right. Perfect. We got it built. Now, let's run this command once again. Actually, I already have it here. So, I'm just going to Okay, perfect. I'm going to click on enter. Okay. All right. Nice. It worked. And now, let's grab this next
command here. And then I'm going to go ahead and paste this one as well. And then click on enter. Perfect. Now, with this, we basically have FFmpeg installed in the same environment that we have our N8N instance running in, which is super awesome. But I do have to change the uh order for this documentation here. Let me do that real quick. All right, perfect. Now that we also have this done, let's actually head over to our N8N instance. And let's just refresh just in case and re-execute the command to see if it will be able
to find ffmpeg this time. And I'm expecting it to be able to find the version. And there you go. You can see that it indeed did find the version, guys. And this is basically the version we have running within our uh environment. And now you'll be able to start using FFmpeg in any way you like. And like I said, we already have a directory also created for this. So whenever we want to work with any kind of videos, we can use that directory that we have. All right. So now what I want to do is
actually just import the workflow that we saw in the beginning of this video and see if it's going to work right off the bat. I'm expecting it to do so since we have everything set. So here we go. All right. I'm just going to execute this workflow. And here goes nothing. So it's downloading the video. Then it's going to be downloading sorry the videos and then the audios and then it's going to write these files to the directory we specify which is the one we saw earlier. Okay. Actually let me just click on it. You
can see that it is data shared. All right. So the video's finished downloading and now we are writing these files to the disk. Okay. Once this is complete it is going to start downloading the audios and then do the same thing for it. And while we're waiting for this to complete, I also want to run the same exact example for our locally hosted N as well. Okay, so I'm just going to log into that real quick. All right, so here we are. I'm also going to execute this workflow. And the good part about executing this
workflow is the fact that we'll also be able to directly see the output being generated in our shared directory here. Right? So you can see that there's already a new directory created which is uh being a unique ID that I'm creating every time a workflow this workflow gets executed and we are creating the ID or the name for the directory in this case using this code node and you can see that this ID here corresponds to the file name here right the folder name here and now it's doing the exact same thing it is downloading
the videos and then the audios and it's going to merge them first and finally concatenate ate all of the resulting videos together to generate the final output. All right, so the local one is complete. You can go to our shared folder again and see what the output looks like. And you can see we have all of these media files here, right? We got audio one, audio 2, audio 3, then video one, video two, video three. These were all part of the initial sources like source of media, right? We got the audio source, video source for
three different pairs. And what the workflow did was it first created all these three uh outputs for each of these pairs, right? And it did output one, output three, out output two and output three. And finally, it generated a final output. All right, so now let's actually walk through the whole workflow step by step to give you a better idea on what's really going on. Okay, so we first start with a manual trigger. Then I have this aggregate node which I just took from another workflow and I pinned it so that I can have the
data fixed within it. And in here we got the raw materials for the three videos. And the next thing we do is we generate a directory ID. And I'm using this code note here to basically dynamically generate it. And the reason I'm doing this, like I said earlier, is for organization. So that every time we execute this workflow, it creates a separate directory that the rest of the workflow can use to dump in all the data related to this particular workflow. Right? And then we are using this execute command to basically create this directory. Right?
So in this code node here, we are creating the ID or the name for this directory. While the execute command node creates a directory in that name, right? And for those of you wondering what an execute command node is, it basically allows us to run shell commands within the environment that our n instance instance is running. And this is what we're going to be using to interact with ffmpeg as well to execute commands. Okay, by the way, the command we see here is not related to ffmpeg. It's just telling the operating system to create a
directory in this location, right? And obviously, I didn't know how to come up with uh or write this command here. It's super simple at this point. You just have to tell uh chat GPT to do it for you. So, for example, if you wanted to do something like this, you could just head over to chat GPT and say, could you please create a uh command for the execute node execute command node in nn to create directory here and I'm just going to add the directory. For example, I'll say data shared. And once I do that,
chat GPT is basically going to prepare the command for us. And it's probably going to be the exact same thing. And there you go. That's just how simple it is at this point. Even with ffmpeg, you just have to describe to the AI of your choice what you're trying to achieve. And it will just spit out the command for you instantly, which is super cool. And that's basically how I did it. Right. So at this point, we created the ID or the name for our directory. And then we also created a directory in that name
and that's basically this directory here. Right? And then the next part of this workflow is where we download the audio files and the video files. So what I did here was I just aggregated all these videos here. And in here I also created an index to further organize the videos, right? So that we can know which order of videos we are working with. So we got video number one, video number two, video number three. And that is how we get all these numbered outputs for each one of these. Right? So we got audio one, audio
2, audio 3 and so on. So that is basically what we are doing here. And after that I split them out to start downloading them individually. So we got the path where we download the videos one by one. And we are using the video source for it. And for this I simply use the HTTP request node. And for the options I said to return the response format as a file and also set the output which was set by default by the way as data. And the other one we have here is basically doing the same
thing. The only difference is that now it is taking the link from the audio source. Okay. And we are doing it for all the audios and videos here. And these nodes that we have here are also one of the main components when you work with ffmpeg because for you to be able to process uh these media files, you need to have them stored in the disk. And that is what this node does. And what these ones here are doing, right? We download the video and then we write it in the disk. And the way we
do it is we are storing it obviously in the directory that we created data shared and then the ID of the directory for this particular uh execution right we got the ID generated earlier and then for the name of the video we just add video and suffix it with the video number which we looked at earlier where we were I think aggregating it right so we got video number one and we got it set for every video so for the first video it's going to call it video 1.MPP4 mp4 and when we look at the
result here we can actually see it. So we got data shared the directory name then video one.mpp4 and this way we are dynamically organizing the uh videos and the files that we are downloading which drastically makes it easier to work with. Okay. And then we got the same thing for uh the audio as well. We got the same path that we're downloading it into. And then for the name of the audio, we got audio and with the suffix of the video number. So we got audio one, audio 2, audio 3. And when we look at
the result, we can see it here. Right? And at this point, we basically have these parts of the videos downloaded. We got audio one, audio 2, audio 3, and video one, video two, video three. Right? And once we're done with this part of the workflow, we have all of them in our directory. And the next part of the workflow is going to work on merging all these audio pairs, audio and video pairs together. And for this we are I created this merge node here. But the only reason I'm doing that is so that I can
uh merge these two outputs together. Otherwise it doesn't have any other functionality. And the next node we have here is the command node. And it's basically just returning an array of objects with a field called video. And what I'm actually doing here is just a strategy with how the next node is going to process. Right? So because we have three different video sources in this particular workflow. I just return an array with three items. And the value for this video field is actually the video number. So I could have named this better. I could have
said video number here as well. But so we got video one, video two, video three. And it's going to make sense in this node here. So we are returning a collection with three items. Right? So, we're going to be executing this command note three times. And what we're trying to do here is to merge audio and video. And when we go in this execute command, again, I just literally just use chat gpt to prepare this, which is super simple to do. But when you look at what's going on here is that we are basically telling
ffmpeg to merge this video here with this audio here, this video in this directory with this audio in this directory. And then it is essentially creating an output out of it. We are also specifying which directory it should generate its output in and also giving it the name for it. Right? So we are saying hey for the name of the file set it as output in this case one. And this is where the strategy I was talking about comes into play. So we got our previous node generating this collection of items that starts with video
one video two video three. So what I'm doing there is basically again the same thing as using it as a suffix for the video and audio files so that it can do it for all three pairs. And again like I said I just use chat GPT for this. So for example if if this scared you remember you can literally just ask chat GPT because prior to this I had no knowledge regarding ffmpeg. I just told chat gpt what I wanted to achieve and it basically sped out the code for me instantly. I'm going to try
to do it again here. Okay. So we got this scenario here where we're trying to merge an audio and video. So I'll tell chat GPT this time to please audio name as well. And I'm going to call it audio MP3 and call the output output one. All right, let's see what it does. And there you go. It's again just that simple. It's sped out the exact same command that we have here, you know, except for obviously the uh directory which you can customize yourself, but otherwise it's the exact same. We got this whatever this means,
whatever this is and whatever the rest here is, it was able to generate that again. And so at this point now in the workflow, we basically have all these outputs here, right? We got the output for all these merges. And the next part of the workflow, we are going to be concatenating all of these outputs into a single video that we watched earlier, right? And we first start with this code node creating the content of the text file we are going to create in this next node here or these next nodes here. Right? What we
are doing is essentially let me just directly show what it looks like. So this is what the file looks like. Okay. So apparently to concatenate videos we need to give ffmpeg a collection of videos using a text file like this in this format here. Okay. And what I mean by videos is the location to these videos. Right. And that is why we are using this code node here to prepare the content for this file. And then in this next node here we are creating a text file out of it which we later use this node
to write to the directory like we did with the video. So you can see here we are giving it the uh directory path and we are telling it to generate a videos.txt file within this directory and that is what we are using within this execute command to pass to ffmpeg in order to concatenate this video. Again for this command I just simply use chatgpt and in this case chat gpt said we would need to pass it a text file and for that I implemented this part here which was pretty simple since we just have to
create a text file. So let's expand on this command and so we are telling ffmpeg to concatenate the videos within this video text file here and generate an output called final output within this directory. And when we go there, we can actually see that it indeed does contain the video a video called final output. Right? So when we click on that, this is the final result. And then with the next note here, this time instead of writing files to disk, we are reading it. And to do that, I simply just pass to it the directory
of the MP4 we want to get from the directory. Right? And there you go. This is the final outcome. And so that is how you can use FFmpeg to automate editing with N8 and for completely free instead of having to pay $50 per month for tools like Cremate or JSON to video is not all that FFmpeg can do. It can do much more than that. It can do things like extract audio from video, transform media type, clip videos and much more that I haven't even dug into. So this is definitely a very powerful tool that
you can use for all sorts of things. And because now you have tools like chat GPT, it becomes as simple as describing to them what we want to achieve as we also saw earlier in the video. And because of that, you can also use this tool effectively, even if you don't have a tactical background. With that said, I hope you enjoyed this video and that it was helpful for you. If you think it was, a like or a comment would be greatly appreciated as engagement truly helps with the outreach of my videos. And again, I'm
going to be uploading this whole template to the classroom section of my community. So once you're in, you can just head over to the classroom. And normally I add all my bills in this course or this section here. As you can see, it's always at the bottom of the page, right? But for this particular video, I'm going to be adding it to this course as it's related to setting up FFmpeg. So once you're in here, you can just scroll all the way down and then download this workflow. Once you do that, you can just head
over back to your canvas and click on this three dotted button and then click on import from file and just import the file that you just downloaded and you should be good to go. And if you go to the page related to the local installation, then you can also download the resources that contain the docker compose and docker file where you can just go in and run this command to basically set up your local n directly without you doing anything. But yeah, with that said, I hope to see you inside and if I don't, I'll
see you in the next video. Have a great one.