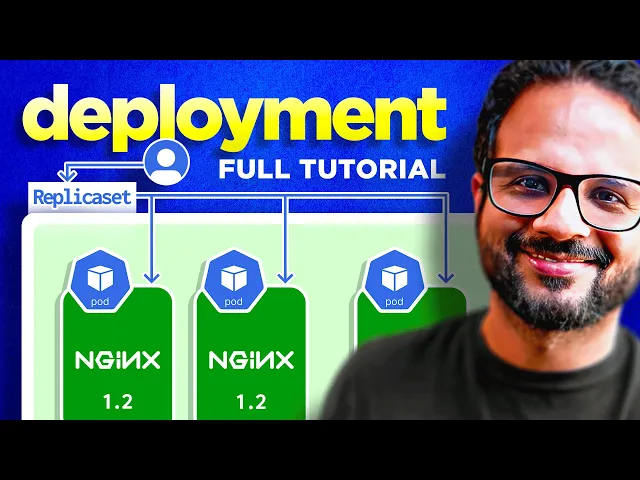
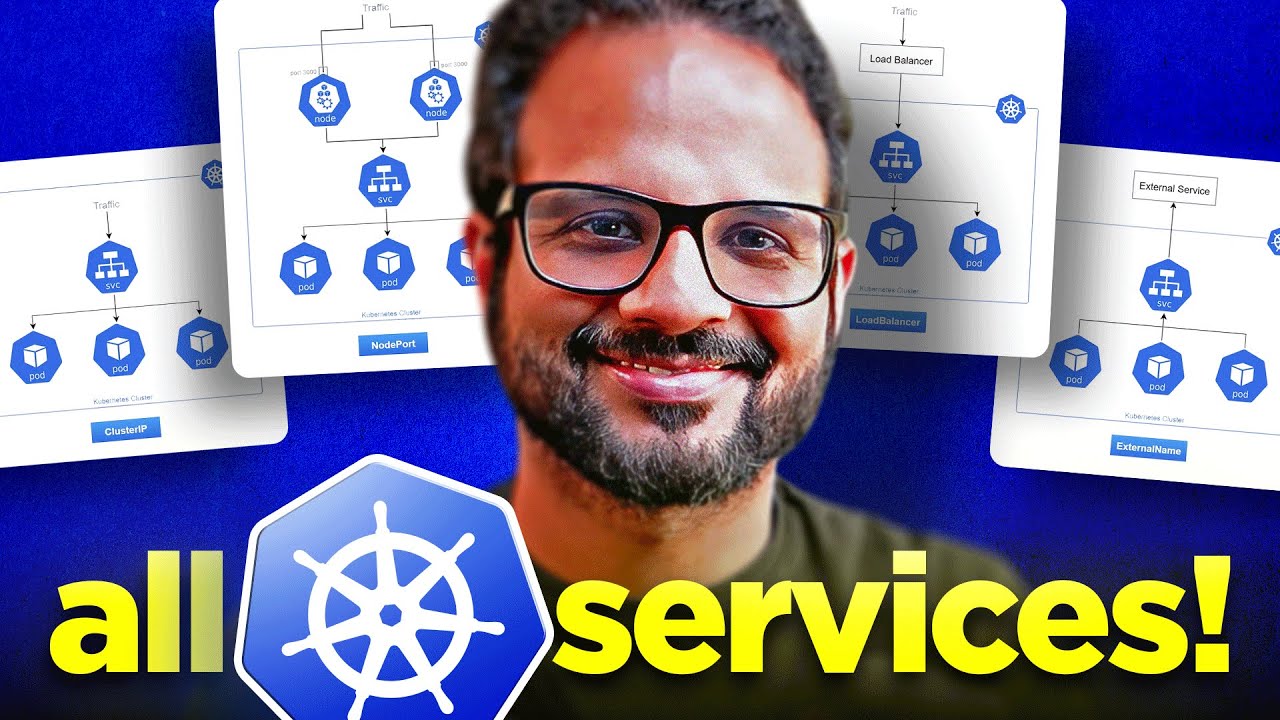
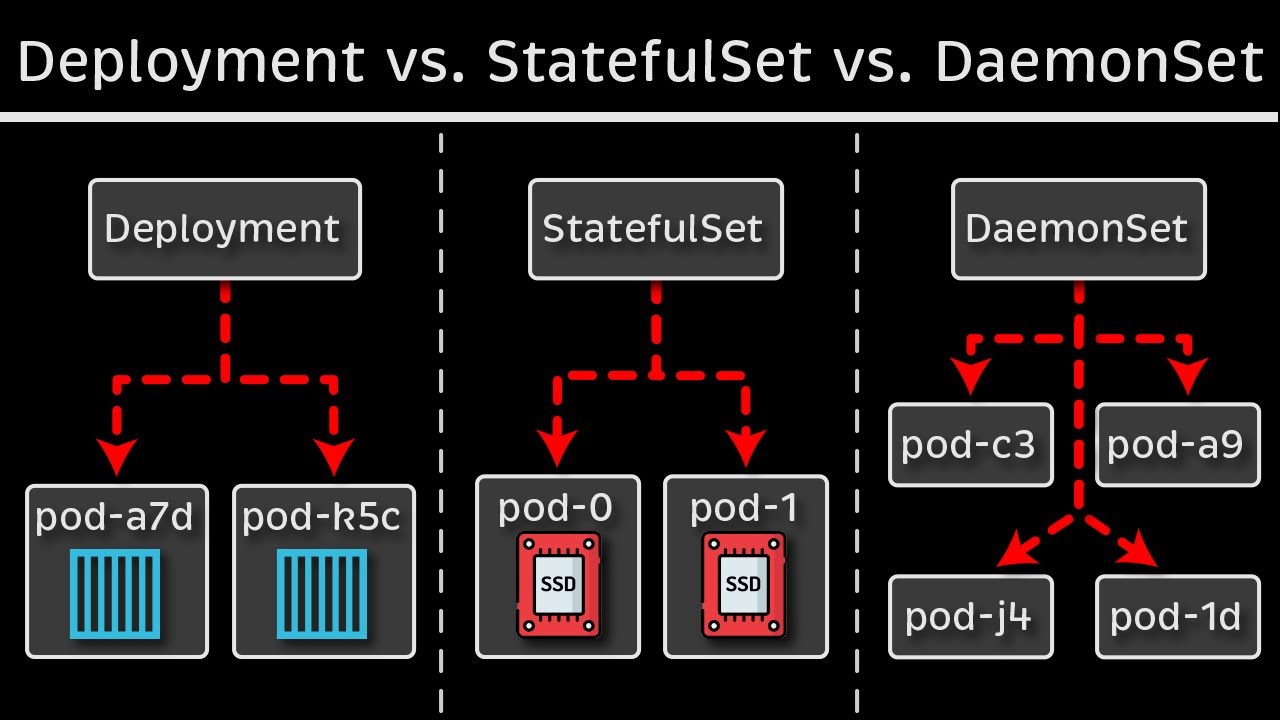
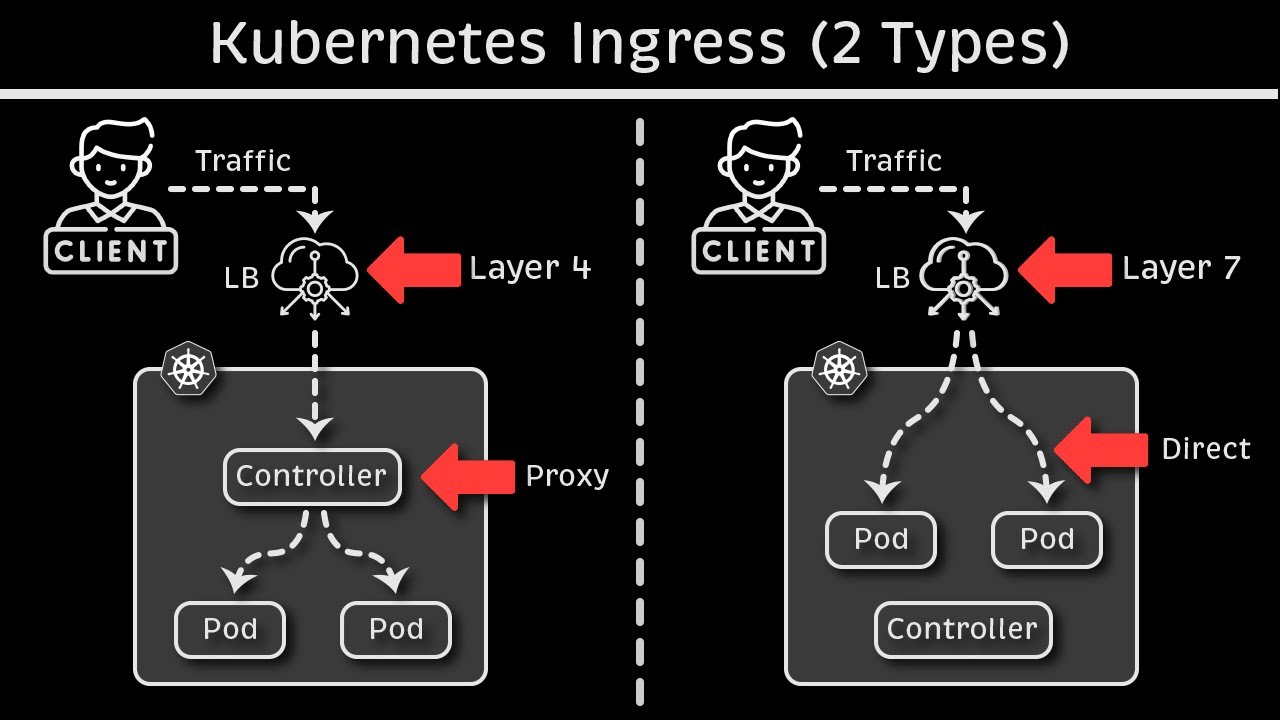
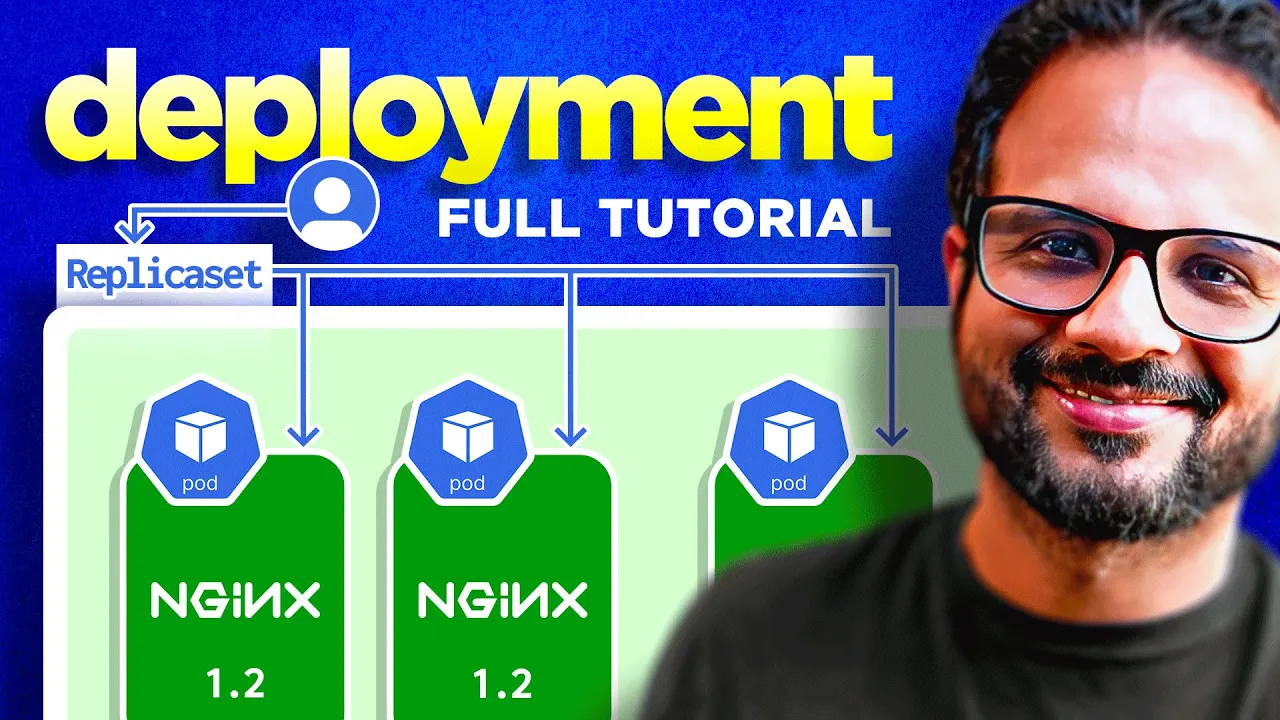
hello everyone welcome back to my channel my name is p this is video number eight in the series CK 2024 and in this particular video we'll be looking in deployments and replica sets so from someone who's working on kubernetes or someone who's preparing for CK this is like one of the most important concept because everything that you do in kubernetes you do it to host your application as a container on the Pod and then pod has to be backed by a replica set a state full set or a deployment so this is one of the important concept that's what I said I'm still having some sore throat and my audio is going to be a little harsh I am still having this tea uh I because I drink this daily before the recording so that I could record I could speak uh it has Ginger it has turmeric like the raw turmeric not the powdered one and some honey and you know it helps me with the recording so uh yeah thank you for showing the patience so far and I hope you're having a good learning experience so far if you think we are going too slow or if we are not covering all the topics don't worry we have a lot to cover and the way I have planned it we are moving ahead in this journey one step at a time so I'm not overwhelming you with a lot of advanced concepts in the beginning I'm going one step at time like baby steps so don't worry about it by the end of this playlist I will make sure sure that you have all the required knowledge of cka and kubernetes fundamentals so have some trust in me and please trust the process it will make you a really good kubernetes administrator at the end of this series so you know just just enjoy the learning and please uh follow along with me keep supporting me with your likes and comments I would really appreciate if I could get you know 120 comments and 200 likes in next 24 hours for this video and that's the Target that we have set so if you can get that I will post another video in the next 24 hours thank you so much for your support so let's uh begin with this video okay so in last video we have seen how pod works and this is the example that we took in the last video we actually spun up a pod on a kubernetes node and you know did some operations with it now let's take it one step forward so let's say this user is accessing this particular pod all right I'll just make some changes to it quickly okay so this user is accessing this particular pod like for now just don't worry about it like how the user is accessing it don't worry about that for now just imagine like there is a load balancer in between or there is some end point that we have exposed externally and we'll look at that uh in one of the later videos but for now just imagine that user is accessing this engine X pod over some Port let's say Port 3000 port 8080 or Port okay and something happened right and uh this particular pod crashes right this pod is no longer available that means the user is not getting any response from the Endo that it is hitting like whichever way he's accessing it now how do we make sure because this is one of the drawbacks of running the docker container stand alone this is what we discussed as well how do we make sure that user does not get an empty response even if the application crashes there is some mechanism right there should be some mechanism because we are using an orchestration system so it should have some mechanism through which it should be able to Auto heal the application or it should be able to spin up a new pod whenever the Pod crash es right so yes uh that's what we are looking at we are looking at replication controller which does the same thing for you so what it will do it will create a new pod for you as soon as this pod crashes or even like it doesn't have to even crash sometimes for high availability most of the times for high availability we have multiple replicas of these pots running so let's say we have uh this running okay and this this is part of a object another kubernetes object which is replica set or replication controller let's start with the replication controller first so this over here is replication controller okay now if you remember when we looked at different controllers because controller is something that is managed by controller man manager one of the kubernetes component which makes sure that your kubernetes object or resource is up and running all the time it is responsible for monitoring the resources and there are different controllers like we have a controller for node for Nam space for pod for everything right so this replication controller is to make sure that we have all the replicas running all the time and it makes sure that application does not crashes even if there is a part failure so these two pods are now part of this replication set or replication controller now there is also a difference between replication controller and replication set we'll look that while we are doing the demo so don't worry about it for now just think about what replication does you know it spins up multiple identical instances of a pod right if we have one engine X PA running it it will spin up another one if we have specified two as the replicas if we have specified three as the replicas it will spin up another C with the same image right so this is what it will do it will have now three images and these all three will be the part of your replication controller okay I hope it is making some sense now okay there is one more thing so let's assume that it also makes sure your application is highly available all the time because now we are not redirecting traffing to just one pod we are redirecting traffic to replication controller and then replication controller has the load balancing logic okay this does not goes well over here okay let me place this user where it belongs okay so now these three application parts are running behind a replication controller and this replication controller is responsible for redirecting the traffic to one of the active parts so it has different mechanism through which it will check okay which pod is active or which pod is healthy and it will redirect the traffic or there are some uh load balancing algorithm through which it finds the you know most healthy parts and so on so this is what it will do now like we have seen even if one part fail let's say we have specified replicas S three okay so it will make sure that we always always have three replicas running we always have three instance of that part running all the time so if one fails it's spin UPS one if two fails it spin UPS two more ports right and let's say if replicas was one okay instead of three let's say if replicas one what do it will do so yes as soon as this particular pod fails the one single instance fail it spin UPS a new pod right so it will make sure the application is highly available as per the replicas that we have said so these number of replicas are the desired number of instances of that part that is running all the time now it also helps like we have seen it also helps with the load balancing and for the increased demand let's say earlier we have three pods or earlier we had two pods and the traffic on this particular endpoint or the application increases right so we need to have more uh end points we need to have more applications to support the increased user traffic so we spun up a new pod by updating the replicas from 2 to3 and like we can increase it uh on a higher level as well and let's say if it increase to the point where this particular node does not have enough resources because SP what it is doing it is sharing the resources from the node itself like CPU memory storage everything is shared from the node itself so let's say it reaches to a point where this this node is running out of capacity so in that case what we can do is we can pin up a new node so let's say we have spun up a new node over here okay so this is uh another kubernetes node we spun it up and we provisioned a pod in the new node itself because this replication controller that you have used it can span multiple nodes right so this is what we are doing now so instead of redirecting traffic to three ports now it will redirect the traffic to four ports and the fourth one belong to a different node and so on so this is one of the manual autoscaling that we do so in later videos we'll look at the auto scaling vertical Auto scaling horizontal Auto scaling and so on there are lot many Concept which takes care of this automatically but for now just understand how we do it manually by updating the replica to the desired number of set and then we can add more notes as well okay so I guess we are good with the theory part we have some basic understanding of how application controller works now let's jump into the demo and let's see how it works actually behind the scenes all right so inside our date folder I'm going to create a new file and to call it rc. yaml for application controller okay so like any other kubernetes manifest any other kubernetes object it should have that top four properties at the top level so API version find metadata and spec right so API version for application controller V1 if you are not sure uh which uh version it is using so Cube CTL explain RC for replication controller and if you go at the very top of this it says version is V1 kind is replication controller with r capital and C capital okay so two spaces one two okay now clear the screen and metadata in metadata you can uh add certain Fields such as your name and labels so hit enter two spaces and then name let call it enginex Pyon RC and at the same level at the level of name because labels will also be part of metadata so labels enter and inside labels we can add multiple labels such as EnV demo okay now inside spec now when we created pod we provided certain specification of the pods right like uh create this pod with this image with this name and uh expose that on this container p and so on now we are creating a replication controller which which will in turn manage some pods Whenever there is a pod that crashes or whenever a pod get deleted it should spin up a new pod but how did it know like which image to use for that pod which version of the image to be used what is the port name and on which Port that P should be exposed so all that details will come from a template inside spec we'll create a new field called template and inside template we specify the metadata and spec of the Pod so if you remember our podl this one right we have uh these again four Fields so I'm going to copy it from the line three uh leave first two lines API version and kind we don't need that and from metadata and spec copy it and then I'm going to paste that in this section in the template section okay now paste it over here now it did not do the formatting and indentation correctly right so I'm going to make this change uh this over till here it's fine right template we have spec this spec is of uh replica controller inside that we have template inside that we have metadata and now this label should come inside metadata so I'm just going to select it I'm going to select the multi-line in Mac it is options plus shift this is the vs code shortcut and if you are in Windows I guess it is alt and shift so I have selected multiple lines and I'm I'm going to press spaces 1 2 now labels it at the metadata we need labels inside metadata so two more okay now if you see this metadata and spec these two are part of template right so this is what we needed label is inside metadata and labels are inside the labels key value pairer now it is correct we have two metadata one is replication controller another one is inside the template but this is for the Pod the same way we have two spec one is for the replication controller another one is for the Pod that is inside the template so don't get confused between these two so this section uh from here is all part of the P template we just copied from the P DML and placed it over here so this is how it should work now it has one more field at the very last line at the level of template right because everything goes inside that spec has children such as template and replicas so over here you specify how many replicas of the Pod you want so this is the desired number of pod that will always be up and running so let's keep it three it save okay now I'm going to apply these changes es so first let me see if we have anything running we do have so Cube CTL delete deploy Eng X and deploy okay now if we run get PS again there is nothing so Cube CTL apply hyphen f and then rc. yaml says it's created Cube CTL get pods we have three pods running all three are part of uh this replication controller so it created the Pod with the name enginex hyphen RC which is the name of replication controller and then added a random number at the end so if we do Cube CT you'll get RC so this is the RC which has three desired Parts currently we have three running parts and all three are ready right and if we want to check the specification of the replica controller or the P we can use Cube CLD describe pod and then let's say this pod hit enter right and it will show you that uh this is the name this is the node on which this is running and this is the label controlled by this replication controller okay image image ID and so on like all the details and at the end it it will show you the events as well so if you face any errors so errors will be logged over here as well so this is replication controller okay so we have seen replication controller now the difference between replication controller and replica set is replication controller is the Legacy version and replica set which we'll be using now so replica set is the newer version so this is uh the preferred way if we have been given a choice we will be using the replica sets over replication controller now the other difference is that replication controller will only be used to manage the resources the parts that were created as part of that replica controller but with replica set we can manage the existing parts as well that were not part of this replica set so we do that with the help of another field called selector so you selector over here and inside that we do match labels so we match the labels of the parts that we want to be part of this particular replica set so inside match label we use let's say the EnV demo this label so every part that is running with this particular label will now be managed by the replica set so this is the one and now hit save let's change the name as well to RS and then um Cube CTL apply hyphen f RC okay it is throwing uh an error it says no matches for kind replica sets in version one that means the version is not correct over here for the object replica set so for that Cube CTL explain RS for replica set and if we go at the very top it says uh the version is V1 but there there is an additional field which is called group apps so that means this version will be part of apps group so the complete version will be apps slv1 group SL verion so that's how the uh version will be return return now hit save and basically run the apply command again and now it says created Cube CTL get parts will show you the number of running parts pods I guess we have yeah these three pods were already part of the replica controller so I will be deleting that replication controller U so Cube CTL delete RC and the name was enginex i1 RC okay it says deleted now if we do get pods we have three parts running so these three are part of the replica set now this is the main difference between replication controller and replica Set uh the match label section at the very end U this is what it makes us different now clear the screen and and we can now make our changes let's say we have to make our replicas from what we have three to five so there are several ways of doing that one is you know you update the Manifest directly from here five save the file and then apply the changes Cube CDL apply hyph F RC so now if you do get pods you will see five pots are running and it made the changes instantly that that's one way another way you can make the changes in the live object instead of updating the yaml so Cube CTL edit and rs enginex iphon RS right so this is the live object this is not the yaml but the live object yaml it will have a lot of other fields instead of what we have specified so so annotation which will show you the last applied configuration so earlier what we have applied so we applied replicas as five earlier so that is why it creates that in the memory and it creates an annotation for that and it provides some other details like Creations time stamp resource version uid some metadata Fields right so let's go to this section where it says spec in Spec inside that there was replicas so now I'm I'm going to use shift a so shift a is a VA editor shortcut to get the cursor at the end of the line and in the insert mode so it is very helpful it is uh very handy so I try to use it very oftenly so you can use that let's make the changes from version 5 to 4 and let's save the file as soon as you save this this will not ask you to apply the changes it has already applied the changes on the live object so now if you do get Parts you will see the four four parts are running so that's two way the Third Way is to use the cube CTL command the imperative way right so Cube CDL kale hyphen hyphen replicas and let's say 10 and then um RS SL enginex hyph RS okay so this is the command says it's scaled now if we do get pods we have now 10 pods running so it made the changes so try to use uh like a tip from the exam perspective try to use the commands all the way that will help you save a lot of time like certain things certain tasks can be achieved through various ways and what we have seen is just one example so try to use the one that will help you saving you a lot of time because in the exam time is the essence you will have a lot of labs you will have a lot of tasks to complete so make sure uh you save your time wherever you can and right so for me let's say if I already know the command so running the command will be easier for me or because we will not be having a vs code editor on in the exam right um if you are good with VI editor shortcuts and everything so updating the live object will always be handy and if you are not comfortable with either of those you can always refer to the cheat sheet uh the one that we saw and all the options are there all the commands are already there so you can just copy paste we have the option to get the commands from help so you can do Cube CTL scale hyen hyphen help and if you go at the beginning you will see the sample uh command as well you know Cube CTL scale if the current replicas is two then make the replicas as three or you can make the changes like this or the way that we have done like this you can copy and paste the command from here as well so whatever is helpful whatever is helping you in saving a lot of time you can use that okay so that's all about replica set now we have to look another concept which is deployment I'm going to go over here so this is what we already U seen replica sets now we have another concept which says deployment and it provides some additional functionality to the replica set so as a user right we will create a deployment so we create a deployment okay so as a user we create the deployment and then that deployments create the replica set right so these all parts and replica set these all will be part of the deployment now deployment manages the replica set and replica set manages the Pod it will provide some additional functionality so what is that let's say uh these pods are running version 1.
1 of engine X because these all are identical pods that means they will be running on the same version as they are part of the same template right and we have to make the changes we have to update the version from 1. 1 to 1. 2 this is what we need we need to roll out the changes basically for that purpose um if we were running the replica set it would apply the changes and it will recreate the Pod all at once and your user will face the downtime your active live users on the application will face the downtime for that brief period for now we are using a small application it's just uh an enginex application and uh it's lightweight uh it doesn't have a lot of things so we might not get a lot of downtime it takes just a couple of seconds to spin up the application to start the container and to keep it healthy but consider this is a real-time production environment uh let's say a banking application or a financial institution um a stock trading application where time is money right so you cannot afford a single millisecond of downtime in those applications so how would you make sure that even though you are rolling out the changes even though you are making the changes to the live environment you users are not impacted for that you use deployment what deployment will do it will make the changes in a rolling update fashion so it will update this particular pod over here and while this pod is getting updated the traffic is being served from these two pods right and it can also spin up a new pod to take care of the the traffic that was part of this pod so once this is up and running it will uh you know add this to the load balancer or add this to the uh replica set and you know start serving the traffic the same way when this version is undergoing changes the traffic is being served from this pod and the last pod and finally this pod will be updated to version 1.
2 and your deployment will be rolled out to your uh application entirely for all the users without any downtime so this is the benefit that we uh get with deployment and you can also roll back the changes to a particular revision or you can undo the changes that have just been done right so let's see how it works so uh I'm in my visual code editor now first let's delete the replica set that we have just created so RS engine X RS okay it's been deleted now let's make the changes over here instead of replica set now it is a deployment API version is same you can check it with explain uh deployment command as well let's make it to deploy and on the last as well it's going to be same let's change the replicas to three okay it's save let's apply the changes apply hyphen f RC ml created and if we do get parts now we have three parts running and these three parts are part of engine X deployment and if we do Cube CTL get deploy so we have one deployment running with three parts out of these three all are healthy all are up to date and all are available now if we do Cube CTL get all so this command will return all the objects that are running in your cluster all the kubernetes resources so get all so it says it has one replica set with three desired three current three ready one deployment with three out of three ready one Service uh this is a default service that comes with your kubernetes cluster but we'll look into service in detail in the next video and it also has three parts that are part of the deployment so deployment created the replica set which then created the parts okay this is how it works now if we we have to make some changes let's say we have to change the image um let's say from nginx to ninx 1. 9. 1 one way is through here to yaml right CTL set image and image for deployment so deploy slinex hyph deploy uh let's use the multi-line command so I'm going to use the back slash hit enter now I'll just continue with my command so Cube CTL image deploy this this this so change from enginex to enginex colon 1.
9. 1 right hit enter says the deployment is updated so if we do Cube CTL okay let's do a describe deployment so describe deploy D enginex deploy okay and if we go up to the section where it shows the image so now image has been updated to 1. 9.
1 the image is not updated in the yaml the local yaml it's still the same still engin X because we changed the object the live object on uh kubernetes right not on the local AML file so over here was the updated now we can check the roll out history with the cubern uh cub CTL roll out history for deploy enginex hyphen deploy and it says there are two revisions the one is the default revision when we created the object and the second one is when we made the changes so you can roll out the changes you can roll back the changes as well so Cube CTL roll out undo this is the command and then the name of the deployment we do that now it should have created a newer version so if we do the roll out history it created a new revision and now if we describe the deployment you will see the changes has been rolled back so we updated the image from engine X latest to enginex 1. 9.