Ah, 3D printer infill. A topic that’s so full of polarized points of views, personal preferences and passionate presumptions that I thought, well this is something that I can jump into and surely not get wrapped up in any controversies. Perfect.
But on a serious note, there are still plenty of things that don’t have a definitive answer yet, so today, I want to test three different aspects to infill: First, what is the “best” infill pattern? And yes, “best” almost never has one single answer, so this breaks down into a couple of sub-sections. I’ll be comparing both how fast they print, how strong they are, and how good of a job they do supporting the print’s top surface, because yes, sometimes all you care about is your print’s looks, and not how rigid or strong they are.
And I’ll be doing all of this with the same amount of material used for each pattern, not just with the same infill percentage - because turns out, you can’t trust the infill percentage number at all when changing patterns. Second, should you be printing your infill with a thicker nozzle? This keeps coming up as an argument for dual-extruder or toolchanger printers, basically saying you can speed up your prints by just using a fatter nozzle for the infill when you won’t be seeing it anyway.
But that also makes the infill structure coarser, so is it worth the speed gain? And third, more infill or a thicker shell? The engineering logic is that you should always prefer putting more material into the shell of your parts, because that’s where the majority of the strain is happening, but there has got to be a crossover point where there’s simply not enough infill to support the shells, so we’ll find that point, again, keeping the amount of filament used constant.
I’ll be printing all this on the XL, because that’s the only printer where I can chuck up different nozzle sizes and use them in the same print. For filament, I thought about materials I would actually use when strength matters. PLA is very rigid and strong, but it also likes to creep and when you really need strength in mechanical applications, you quite often also have at least some amount of heat involved, so while it may make for some easy testing, PLA just seemed a bit pointless.
The other end of the spectrum with polycarbonates, ABS or ASA are good candidates for mechanical applications, but because I don’t have the enclosure set up yet and even then, I don’t think it would be controlled to a consistent temperature, so I compromised and used PETG. It’s the softest of materials and might sometimes bend instead of snapping off, but that’s still good data. And what a coincidence - all the PETG I’ll be using is from today’s sponsor, VOXELPLA!
Their PETG Plus and PLA Pro are among the most affordable filament choices you can print with at just $16. 99 per spool or even less with bulk discounts. VOXEL filaments are exclusively used in their 150-machine print farm in Southern California - and I only have good things to report about them as well.
They print great with default profiles and no tweaking, they’re suitable for high-flow printing and have been a perfectly reliable choice for me. Also check out their printer upgrades like the Bento Box Air Filter, HULA Vibration Damper, and the Python AMS Drer Upgrade - at the link below. Let’s get started with infill patterns.
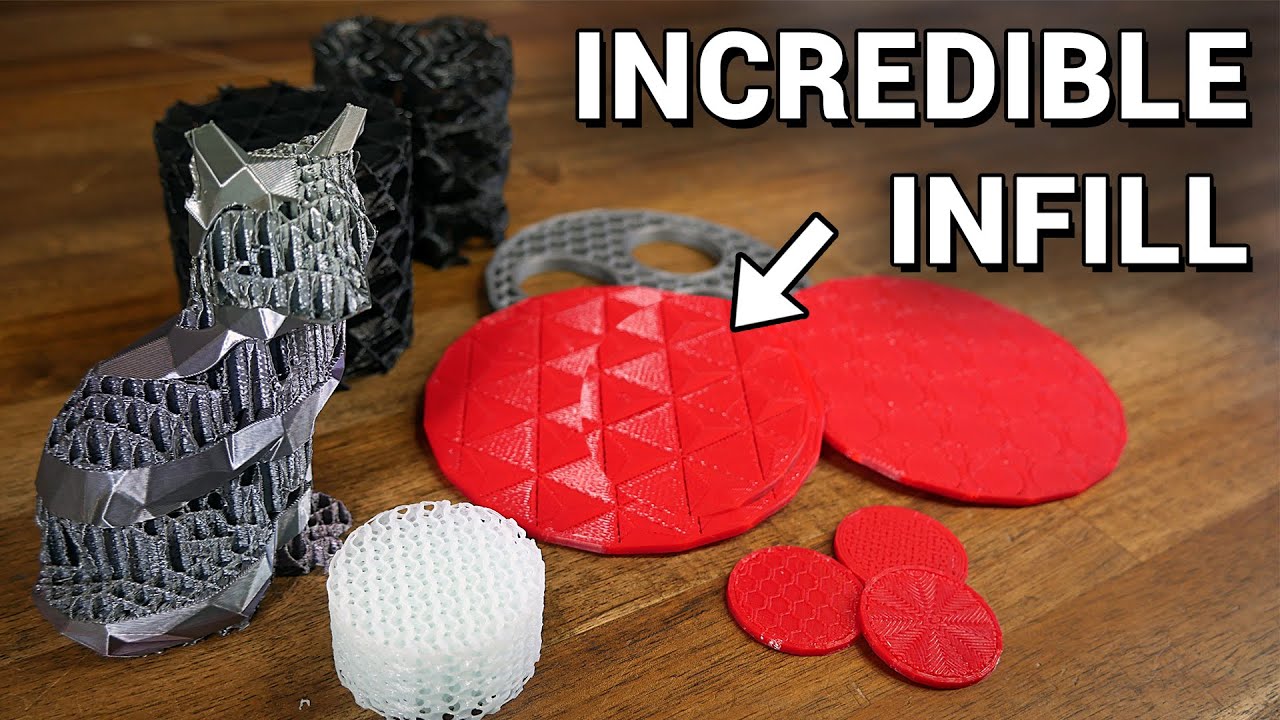
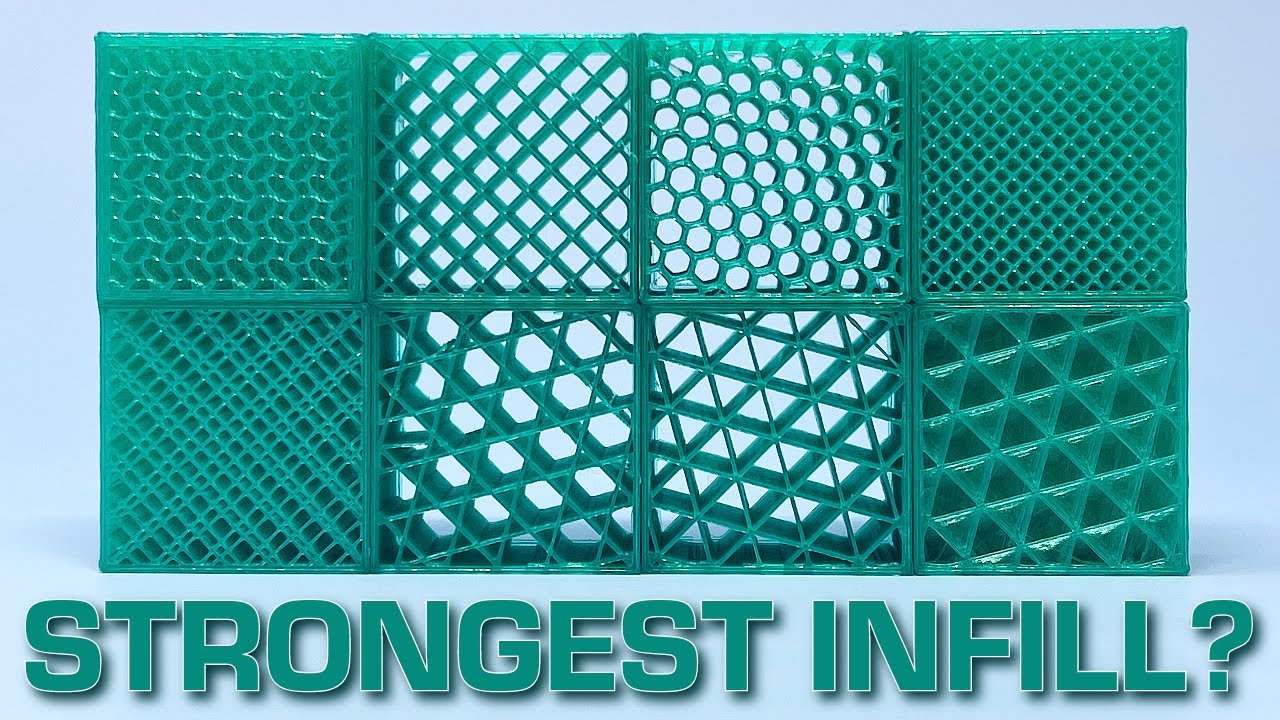
I’m going to group these into four categories: “2D”, “3D”, “specialty”, and “dubious”. In the basic 2D camp, we’ve got old favorites like grid, triangles, stars and honeycomb. The odd one out here is honeycomb, because it’s the only one that avoids crossing over itself and instead creates double-width walls in some spots.
Crossing over already printed paths can be an issue, especially when going fast, because you’ll often see the extruded line rip and tear at those points, which can weaken the infill structure as a whole. But honeycomb, being a hexagonal pattern, has tons of corners that the printer has to slow down for, so it’s a rather slow pattern to print. We’ll get to the exact print speeds in a bit, but as a rough estimate, for the same amount of material, honeycomb takes about 20% longer to print, and that difference only goes up the faster your maximum print speeds are.
Then, the 3D group, the cool kids of the bunch: cubic and its varieties, 3D honeycomb, and gyroid. 3D honeycomb and gyroid are both no-cross patterns too, but again, they’re both on the slower side. The gyroid pattern is explicitly meant to have even strength in all directions and uses a very organic pattern, while 3D honeycomb is more of an octagonal pattern that changes print direction every layer.
Cubic is actually just cubes stacked on their corners, hence the name, so it looks a lot fancier in the slicer than it actually is, and essentially, it’s just a tilted version of grid if it were to print a solid layer every couple of layers. I do like the 3D patterns because I feel like they do a better job of consistently providing some support for top surfaces and tying together perimeters that may not ever get crossed by the static 2D patterns. Then, “specialty”.
These are circumstantially useful, and that’s lightning infill, which is designed to use as little material as possible while still holding up the top solid surface, and support cubic, which… does the same thing, but with the cubic pattern that prints tighter and tighter cubes the closer you get to the top surface. Neither one of these is designed for strength, but just to give you good-looking parts. I’ve printed some samples with lightning infill anyway, but since its strength literally depends on which way you hold it, this is more for completeness than anything.
And then the “dubious” patterns. I mean, I see why they’re in here, and that’s because they are, by their mathematical definition, patterns that fill in a surface, with an adjustable amount of fill density. Yay!
These all happen to be non-crossing patterns by the way, but honestly, I don’t think these will provide any value at all, but hey, I’m very open to be convinced otherwise. The most striking one certainly is the Hilbert curve. It’s more of a mathematical phenomenon than an actually mechanically sound concept, but I have to admit, it does look cool!
I’d also put concentric, Archimedian Chords, and Octagram Spiral in that camp. Rectangular looks similar to grid, only that each layer is exclusively printed in one direction, and it alternates every layer. So this is a pattern that only has point contact between the layers and uses most of its material in unsupported bridges.
Aligned rectilinear is the same pattern, just with all the layers aligned in the same direction. Makes sense. And lastly, the line infill once again is the same pattern as rectilinear, but this time, drunk.
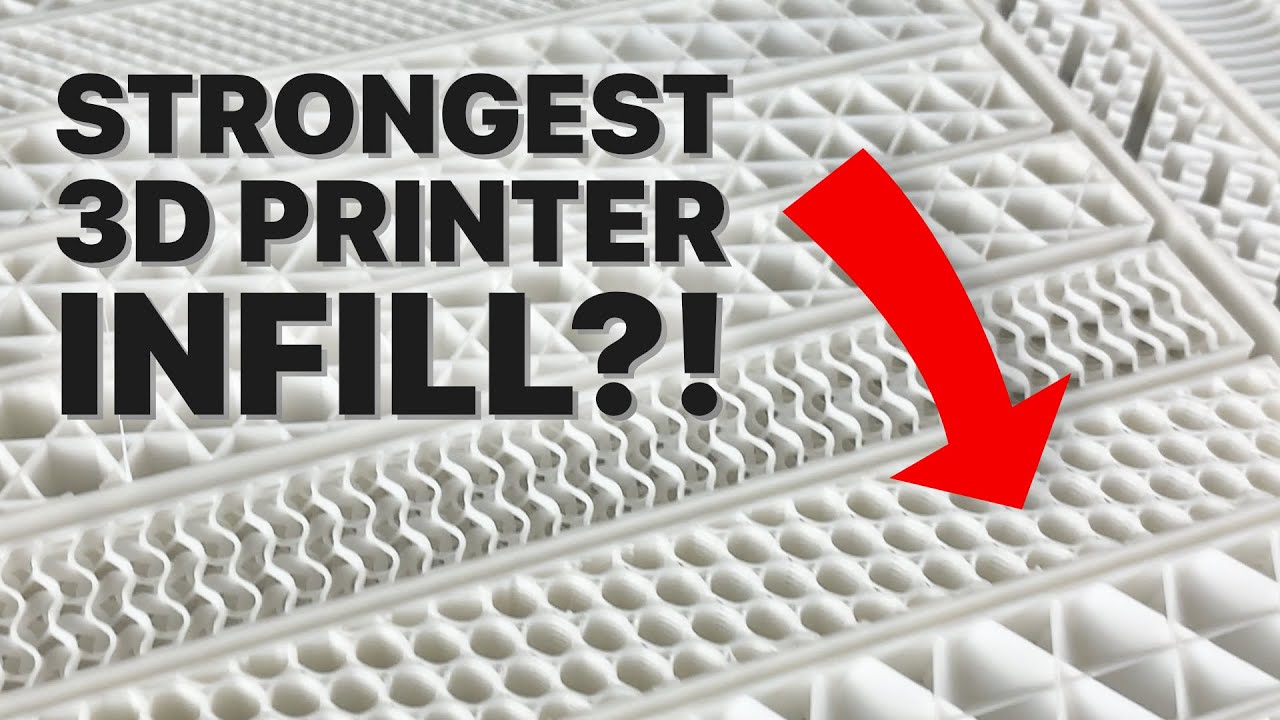
I still printed all of the patterns as test parts, and because my intuition would be that the effect of the different infill patterns would be more pronounced the more space it has to work with, but printing samples large enough where especially the 3D patterns don’t just turn into mush would mean I’d samples that would end up breaking me instead of me breaking them. So I simply scaled everything down and used a 0. 25mm nozzle for the parts.
The parts all printed perfectly with the smaller nozzle, so all I’m doing is scaling down the strength of all the parts evenly. This, of course, also saved me a bunch of filament and print time. Speaking of time, here’s how the patterns stacked up for print times: Basically, there is a fast group and a slow group, but within each group, you’re probably not going to notice a dramatic difference in print times.
But when going from a “fast” pattern to a “slow” one, print times increased on average by a third, and that is with the same amount of material laid down in each of these prints. As expected, patterns that use many short moves instead of longer continuous ones do take significantly longer; with the fastest one being concentric, which does one single, continuous line, making it very hard to beat. The default grid pattern is tied for second place with the three rectangular varieties that also just print straight lines, followed by Stars, Cubic and Triangles.
The slowest pattern overall is Lightning, but it’s an odd one out, because a) I couldn’t get it to lay down so much material that it would use as much as the others, and b) it’s not meant to be used at such high infill ratios anyway, all it does is make the very top structure denser, which, at a certain point, just ends up being material that doesn’t really help the print. Over in the “slow” group, gyroid is the fastest pattern, and while it didn’t make much difference for print times back when the pattern was first introduced before input shaping had become a thing, with printers moving much faster now, it means that they have to slow down to accurately print the swirly goodness that is gyroid. But maybe it makes up for it with its strength?
Well, sort of. It takes third place. Second place is actually the fastest-printing pattern, concentric.
Though take this with a grain of salt, because concentric doesn’t have a consistent pattern throughout, and I think really, we just got lucky here and managed to get a spot that was perfectly oriented for the bend load I was applying. Most of the other patterns form a surprisingly tight middle group, with the only outliers being lightning, again, not meant for strength, and Hilbertcurve, which falls into the same camp as Concentric, Archimedian Chords, Octagram Spiral, of not being a consistent pattern, which I think disqualifies all of them from being used for structural prints. And if you’ve been counting cards, you’ll know what the top spot is - it’s cubic!
With a significant lead, actually! Now, caveats. I tested these patterns printed flat and on their side, but not in any other orientation, so some patterns might behave differently in slightly different alignments; and I only tested for bend load, as it’s the easiest one for me to test, but also, most real-life loads end up inducing a bend load of at least some amount of significance.
Also, while these results are consistent for this geometry with this combination of print profile, machine and material, things might slightly change with different part geometries, and with filament that’s more or less rigid or has higher or lower material strength. But I think the general trends should still transfer. We’re going to dive a bit deeper on strength in a bit, but first, let’s look at top solid layer support.
The test prints for these were done with only three top solid layers and roughly 10% infill, again, I had to adjust each pattern individually to make sure they all used the same amount of material. And all these prints look about the same. They all have some areas where they covered well, other bits where they didn’t do so well, except… for aligned rectilinear.
That one is almost perfect, and it makes total sense! All the other patterns have sections where that first solid layer has to span a distance that’s too large to bridge over cleanly, but because aligned rectangular is, well, aligned, it ends up being perfectly at a 90° angle, which gives that first solid layer the perfect geometry to bridge over. Even lightning isn’t this good!
One interesting thing here is that between the regular cubic and the support cubic print, the support cubic one does print a coarser structure down low, as it should, but because it then wastes material on printing double walls as it transitions to the full-density pattern, if you actually give it the same total amount of material to use, it has the exact same density of pattern when it gets to the top where it supports the top solid layers. With larger parts, there is an actual benefit to using support cubic, but keep in mind that if you just give the support and adaptive cubic patterns the same infill percentage, without even doing anything adaptive, they will by default create a coarser structure and use less material than standard cubic. I know I’m talking a lot about cubic, because that’s the pattern that I think so far comes out as the overall winner.
It’s very strong, prints quickly and doesn’t show issues with its ability to support material printed on top of it. So it’s the pattern I’m moving forward with for the next test, and that is figuring out whether you can just print your infill thicker. Now, this was all done on the XL because I could mix and match nozzle sizes.
But as good as these parts look, the alignment issues struck once again and while one side is perfectly bonded between the shell done on one nozzle and the infill done on another, the other side was completely loose, and this isn’t exactly good for strength. Maybe I’ll come back in the future and explore this topic more, but for this video, I had to compromise and just print everything with one nozzle and different extrusion widths, which worked really well, too, but it’s not the cool two-color look I was going for. The results with what I tested here, though, are promising, and there doesn’t seem to be any significant loss in strength with printing the infill wider and faster.
But again, this was fairly limited testing and more exploration is required here. And lastly, and this was actually the biggest chunk of printing, where should you put your material - into the infill or into the perimeter? I need to explain my methodology here real quick.
I wanted to test 1, 2, 3, 4 and 5 perimeters, so I started with a 30% infill part for each one. I then looked at the weight of each of those samples and for each series, adjusted the infill percentage for all the other perimeter counts until I had a set of parts that all used the same amount of filament, just distributed differently. And of course, I did that for all the other other starting points as well, I also used 5 perimeters and 50% infill as a high-fill starting point, and a single 100% print.
By the way, when I say “perimeters”, I actually mean “shell thickness”, I did increase the top and bottom minimum thickness to be identical to the actual perimeters. And these ended up being quite interesting, or boring, depending on which way you look at it. There was not a single instance where more infill ended up being the better choice over a thicker shell.
This is the result that one should expect, but I definitely thought we would be running into issues with things like wall buckling which would reduce strength, but it looks like those might only start becoming an issue once you go into the extremes with almost no infill and very thin shells, but since I’m testing for strength, I wanted to use settings that you’d typically for functional parts, so those sort of featherweight prints aren’t included here, but they might still hold some interesting data. Now, while these trends would suggest that the best setting to use for strength would be as thick of a shell as you can get and zero infill, I wouldn’t say that that’s universally true. Again, it’s true for this one part shape, but I can easily think of a bunch of shapes that would profit from at least some amount of infill.
Let’s say you have a large flat part, that would not just be unprintable without infill, it would also be pretty bad at supporting any amount of weight. Or something that has, like, a corrugated or baffle-shaped outer wall, even just a small amount of infill would help with the strength and rigidity of that part much more than extra shells. So with typical prints, which are most often compact parts with walls that are a couple of millimeters thick, your material will still be best used in the shell and not in the infill.
I guess as a rule of thumb - I’d say use just enough infill, 15, 20% so that your part prints cleanly, and then use whatever you would have put into the infill to increase the shell thickness. And even in high-infill situations, you’re probably not going to need to go above 30%. And for patterns, honestly, I think your and your slicer’s default should be cubic.
Maybe even adaptive cubic, because that will conveniently save some material with really chunky parts while behaving like regular cubic otherwise as long as you account for the difference in fill density at the same percentage. And if you don’t care about strength and just want fast, clean prints, maybe even give aligned rectilinear a try! Just don’t forget to add a solid layer every now and then.
Let me know what your experiences have been when printing structural parts - do you have a favorite infill pattern? I’d love to hear from you in the comments below. As always, I hope you learned something, thanks for watching, keep on making, and I’ll see you in the next one.