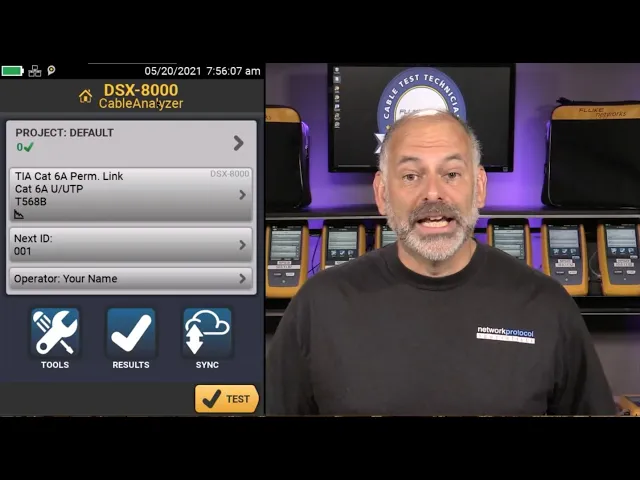
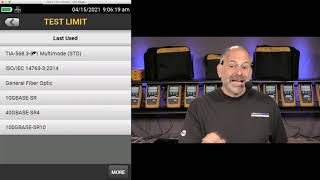
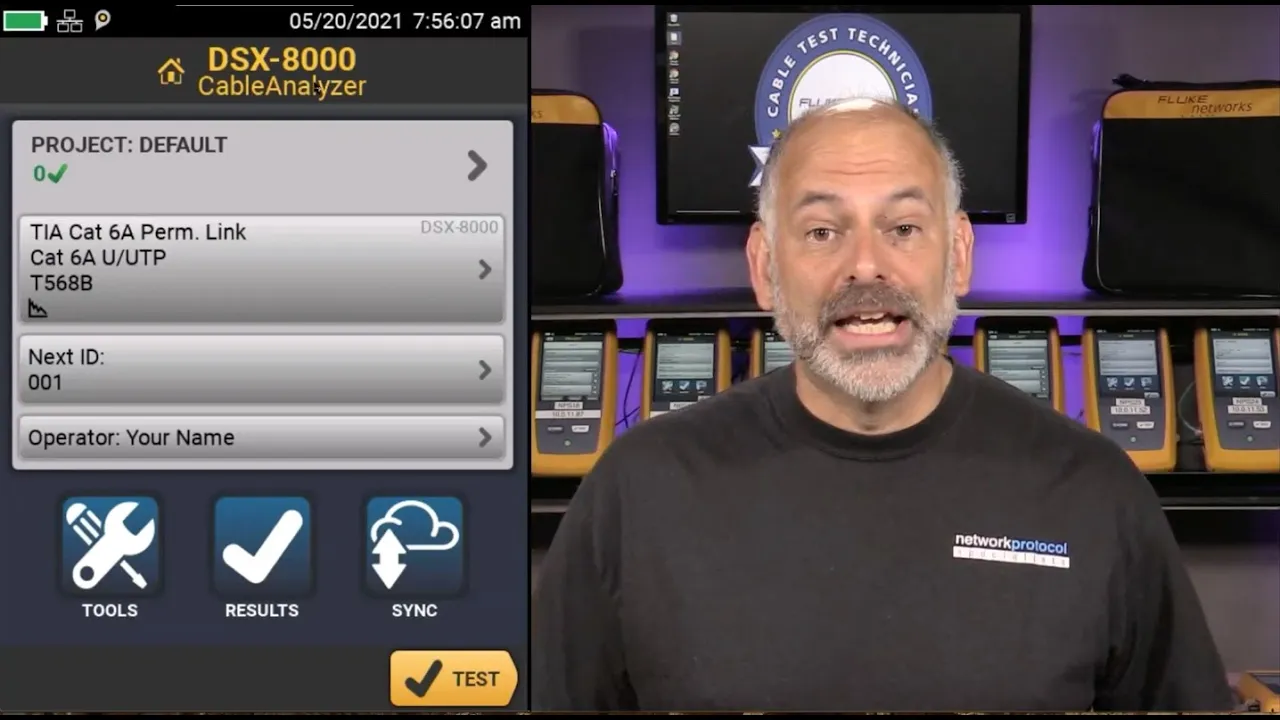
[Music] good morning mike pinacci here and we are going to be going through how to use the dsx cable analyzer in our session this morning now this is a quick start uh i just got done doing two days worth of training on the dsx cable analyzer the certifiber pro and the optifiber pro as part of our cctt training program so that is the paid training that we do we do that every month we do it online it's easy to go in and join that training and you see all these versus behind me we've set up a process where people can access versivs using a web browser so during class you can go in and actually click on the web browser it's pretty slick all right so let's go ahead and we are going to get started with the dsx cable analyzer so if we flip over here hey here it is right there so let's talk about the physical aspects of this first before we get fully going and also i am a question driven person so as we're going through the presentation today if you have any questions please don't hesitate to shoot those questions into the chat window or into the q a window and i'll do my best to get those answered so the module i have in here today is a dsx 8000 this is good up to 2 gigahertz meaning we can test cat 8 cable with it one of the things that i always like to start out with is how do we insert the module properly so if we have our versiv mainframe right here the versa main it's the one with the touchscreen on it what we do is we come in we set that module right in there there's two lines right there we set that module right in there pop that down push those down lock them if you have to force these there is something wrong so we don't want to have to force those you can break those off if you push them hard enough but now we've got that dsx 8000 module in the main unit over here we have the remote so the remote is pretty much the same thing it just doesn't have that touch screen and it doesn't have things like wi-fi built into it we've got the versiv2 right here the versiv2 has a wi-fi adapter built into it which is pretty slick because we can use that to connect to linkware live which i'll be doing in a sessional later on this morning so now that we've got the module in there let's go ahead and i'm going to come in and i'm going to share the screen up here so let me bring up my screen share and i have remoted into my versiv so once we put that module in what we see is the module appears right up here at the top dsx 8000 tells us it's our cable analyzer and it gives us a default project now on the versiv we can have up to 100 projects stored on there at one time i am a huge fan of going in and creating new projects each time i'm doing a new setup it's just an easy way to keep things organized by job by customer etc or what we're going to find is that we can take and we can export those projects out to a usb drive so i could go in and create a project that is the same test i always use export those to a usb drive and instead of recreating it every time i can just put that usb drive in and import that project so we're gonna we'll do that today just to show you how that works so the first thing i do is i come up here and i tap on project this brings up my project information i'll come down and say change project you see that i've got some projects out here i've created as part of the class that we did and i'm going to say new project we're going to create a new project on here and we'll say may i got to use the keyboard on the screen i got to remember that we're going to say may qs okay so this is our may quick start i'll say done so now i've created a brand new project and what i like to do is come in and put my operator name in now we can put in our name in fact let's add a new operator here we're going to add in bill ding i always like that one and here i can put in an email address now if i am using this in conjunction with linkware live putting my email address in is going to speed up my login process so if i were to come in and i'll put in my email address to go with that i'll say done so now i've got building in there so i'm going to select bill and we're now ready to set up our tests now within a project we can have 10 different tests so in the quick start today we're going to go through testing some cat6 cable some cat6a cable and setting up an mptl test now an mptl test is a modular plug terminated link that means i have a patch panel on one end and an rj45 plug on the other and this is particularly popular when we're connecting to things like wireless access points or cameras where we don't want to put a jack and a patch cord up in the ceiling or out on a wall or something like that so we're going to come in and i'm just going to delete the default test i'm going to delete the default cable id because i want you to see how we set up a test right from the beginning we're going to start by setting up our cat 6 test so in this case i'm going to say new test so it's going to tell me my module up here is the dsx8000 now we do not have to have a module in the versiv to set up a test so if i wanted to set up a fiber test but i had the copper module in there i can go ahead and do that just by changing the module right up here and i can select one of the available modules that fits in the versiv next i come into my cable type we're going to select our cable type in here now when we come in it'll show us our last used or the most popular if we're just starting out it's going to be some of the more popular cable types now if the cable type we're looking for is not in this list what we can do is come down and tap on more when i do that i'm i've given i'm given the options of custom generic generic coax and manufacturers now every time fluke networks comes out with a new revision of firmware they update this list of manufacturers so these manufacturers send information into fluke networks about their cables it's then put into the tester so ideally what we want to do is come down through this list and find the manufacturer of the cable that we're working with so i could say commscope and then i would want to come down and find that particular cable this is going to give me the most accurate information for that cable let's say i don't have the manufacturer in that list what i can do is come in and select generic in this case we're going to we're going to test cat 6 u utp this cable does not have an overall shield and the individual pairs are not shielded if we saw something like you know cat 6 a s ftp this would be an overall shield and each pair would be individually shielded so it's important that we know about the cable that we're going to be testing so this first one cat6 unshielded twisted pair now the next important setting here when we're setting up a test is the nominal velocity of propagation now the nominal velocity of propagation gives the tester the information it needs to determine what the length of the cable is so if i come in here and select nvp ideally i'm going to go look at the box the spool or the manufacturer's website to get the nvp for this cable now it is possible to go in and measure the nvp for the cable when we get to the cat6a cable where i have 295 feet of it we're going to go ahead and measure the nvp in this case we're going to set this one to 68 percent okay i'll say done now if this value's wrong the length of the cable will be wrong the next thing is the test limit now when we go in and we set up a test in here we need to make sure that not only do we select the right cable type but we select the right test limit as well because we're certifying this cable and with certification certification is where we take a very accurate test measurement and we compare it with a standard so a number of years ago i was out at a client site doing some training and they said you know this is failing all of our cables the testers no good i said let's find out so we went and we took a look at the setup they had and they had gone in and changed the cable type to cat 5e but they had not changed the test limit so what was happening is they were comparing that cat5e cable and the test results we got from it with cat6a test limit there's no way that cat5e is ever going to pass that so in addition to setting the cable type it is critical that we go in and select the correct test limit so when i select the test limit i can come in here and i can see all these different test limits i've used recently i'm going to go to more and i'm going to go to tia and we see that we've got our different categories of cable and we're testing cat6 in this case so i'm going to select cat6 now i will see cat6 permanent link and cat6 channel so this brings up our adapters so when it comes to the adapters let's flip over here real quick we'll zoom out just a little bit so we've got a number of different adapters that we can use with the tester here we have our permanent link adapters now with these adapters they attach to the module and then they have an rj45 plug on the end now this has a replaceable tip on here so we can put a new tip on there if that tip wears out they're good for approximately 5 000 tests we come over here we have our channel adapters now our channel adapters are designed to be used with a patch cord so in this case this is where i'm connecting to a patch cord to a patch panel on one end and then i've got a patch cord attached to a wall jack on the other now the only time we use our patch cord or our channel adapters is when we're testing the channel and the channel includes these patch cords and these patch cords must be left in place if you use the channel adapters so if you're a network owner and you want to make sure that that link is working properly before you put the hook it up to the server or the pc you could do a channel test it is key that if you are an installer and you do not have the patch cords that will stay in place that you do not use the channel adapters for doing your testing instead you're going to be using the permanent link adapter so in this case you would hook this to the patch panel this to the wall plate or to the other patch panel if you're going patch panel to patch panel so that is one that yeah we see from time to time is that folks will use channel adapters and they'll keep moving these patch cords from one port to the next that is an invalid test because now the patch cord is part of the test so today we're going to be doing a permanent link test we're going to be testing from one port on the patch panel to another port on the patch panel now the next selection is do we do plus poe or plus all now plus poe adds loop resistance and resistance unbalance to our test so this is going to be looking at the resistance of the conductors in each pair this is critical to successfully running poe plus all add some tests like transverse conversion loss and equal level transverse conversion transform loss to our test go whoa like what are those well these are tests that give us a way to evaluate the cable's resistance to outside noise so typically what we find is that if after you've put in the cable system and some and the end user is complaining about performance issues we might come back and run plus all to take a look and see is this cable being is it likely to be affected by outside noise now plus all will about double the test time so today we're going to do plus poe we're going to go ahead and do a poe test along with the basic cat6 permanent link test now if you've ever wondered what is behind all of these test limits this is where you can go out to fluke networks support and downloads and find the limit lines the limit lines is a pdf document the current one's about 282 pages long that goes into great detail on each one of the test limits so we would be able to find the cat6 permanent link plus poe test limit and see exactly what this is testing store plot data we always leave store plot data on and the reason we leave store plot data on is again because cable manufacturers expect to see this on the reports if you're doing a warranty cable install customers expect it and if you want to get help from fluke networks they're going to want to see that too so it's a good idea to leave the store plot data on and also if you're doing any alien crosstalk testing this needs to be on here we have our hd tdr tdx what we're going to see is if a link fails we're going to use this to figure out where the link failed so we'll go ahead and set up a failure here today and i'll show you how we use the hd tdr tdx to figure out where the problem is then lastly we have our outlet configuration so this isn't going to affect the outcome of the test but it is going to change which colors are on which pairs so for example if i click on sample for 568b we see orange is on 1 2 and green is on 3 6. if we switch over to 568 a we see green is on 1 2 and orange is on 3 6. so we just want to choose an outlet configuration that matches up with the outlet configuration we're using today i'm going to be using 568b so i'll say use selected now if you're using the dsx 5000 you're going to see that there's one more option on your screen and that is ac wire map just leave that turned off the only time you would do an ac wire map is if you're testing through a mid span 1000 base tpoe injector probably not something you're going to do so just leave ac wire map turned off so now we've gone in and we've created our project or at least one of the tests so i'll hit save next i'll come and create a cable id set so i'm going to click on new id set i'm going to put in my first cable id now what this does is this creates a sequence of cable ids so i could come in and say let's go with 0 0 1 we'll say a then we'll come over here and we're going to change this to 96 d so in this case what i'm saying is that each one of my wall plates has four jacks on it a b c d and each wall plate is numbered one through ninety six so what i'm this is going to do is it's going to create a sequence for me that goes one a one b one c one d two 2a 2b to c to d up to 96d this is a very quick and easy way to create lots of cable ids and reduce the likelihood of making mistakes when you're typing those in now for sequences to work they have to be the same number of characters so here we've put leading zeros in here so that everything lines up so i'll say done this is going to be a copper test it created 384 cable ids for me i can tap on review and there's my cable ids right there i'll hit save so now i've created my cable ids we can have up to 50 different cable id sets now while we're in here creating tests let's go ahead and create our cat6a test and our mptl test as well so we're going to say new test in this case we're going to test cat 6 a u utp and i'm going to go to nvp now i don't know what the nvp for this cable is so i want to measure it so what i'm going to do is i'm going to come over here and i'm going to connect the permanent link adapter to my main we'll set these cables up to the side here for just a second [Music] now what i like to do is right here that little cover came with your permanent link adapter it is a good idea to hang on to that i use i keep it on there just to protect those pins when i'm not using it now what i'm going to do is i'm going to plug it into my patch panel up here i'm going to plug it into the cable that i'm going to be testing so we'll plug it into this cable right here now what we see on the screen is it says measure now if we have more than 100 feet of cable and this is where it's really a good idea to pull some cable off the spool before you start testing terminate it use it to measure the nvp and also test it to make sure the cable is good but i can tap on measure and now it says that if my nvp is 68.
2 it thinks that cable is 295 feet long it is it turns out that the nvp is exactly right for this cable but if we wanted to change that we could say you know what that's really 290 feet of cable and it would change the nvp for me so we're going to go back to 295. so if we have more than 100 feet of cable we can use this as a way to measure the nvp for the cable so i'll say done we're going to do a cat6a permanent link we'll throw some poe on there too so we're going to say cat6 a permanent link plus poe we'll hit save so now i've added two tests we've got our cable id so some of these cables will say are cat6 summer cat6a next we're going to add our mptl test this is our modular plug terminated link patch panel on one end rj45 plug on the other i'll say new test this is going to be cat6a uutp as well i'll come down here to my test limit i will go to it's already in the list but we're going to go find it tia cat6a and then i can come down here and there is my tia cat6a mptl plus poe so i'll select that so now i've set up that mptl test as well and i'll hit save so now i have three tests in there i can have up to ten i could throw in some cat three for voice grade testing i could even throw in my fiber testing that i'm going to be doing in the next session so we are going to come down i'm going to arrow down let's go back if you're using one of my remote versivs you need to use the arrow key on your keyboard to scroll up and down now we're going to come in here i'm going to create one more cable id set i'm going to call this m p t l 0 1 we're going to do mptl 0 to 12. okay done save so now i've created two cable id sets and i've created three tests so we've got our project all set up now you know what i want to save this project i want to save this project so i could copy it to another versiv if i wanted or i can load it again later so what i'm going to do is i'm going to take a usb drive right here and we're going to flip over here and let's come over and take a look at our tester and on the side of my versiv i've got a usb port and so i'm going to take and plug in my usb drive into that port and i can come down here to transfer so we're going to transfer that project to that usb drive so i can say transfer usb flash drive export and so right here it says active project may qs export so now it has saved that project to that usb drive i can take and put that usb drive in one of the versivs you're accessing and you could load the project and you've got the project right there it's that easy to go in and transfer those projects and save them now it's important to note that if you go in and you transfer that project you are not tran to a usb drive you are not transferring the test results we have to go into results and export those and we'll do that as well so now i'm all ready to go in and start testing so i'm going to come back to my home screen now the remote verses you're connected to don't have modules in them so you're not we're not going to be able to run a test on those but in this case i'm going to come in here's my cat6 permanent link plus poe it tells me my next cable id is cable id 1a has my operator in there so before i do any testing there are a couple of things i always like to do number one i like to make sure that the date and time is correct on the tester this is going to get burned into the test result and onto the report i don't want my customers coming back saying hey wait a second that doesn't match up with when you were here so i can see that it's 8 30 pacific time right now my tester says 8 21.
so i'm going to correct that i'm going to adjust that just a little bit i want it to be right on the money so i'm going to go into tools i'm going to arrow down and of course if you were using the versiv itself you'd swipe down and i'm going to go to date and time i'm going to go to my date is correct i go to my time i'm going to change that to 8 30. so now i know that when that gets burned into my test results that that date and time is right on the money so we'll come back now the other thing i need to do before i start testing is set reference now on the copper tester setting reference is really a synchronization between the main and the remote now one main can be synchronized to up to eight remotes this can be remote units or mains that are running as remotes let me show you that one real quick if i go into tools right here we have main as remote if you have two mains you can put one in remote mode just by going in and tapping on main as remote now again if you're connected to one of the remote versivs you're not going to see this option because there isn't a module in the versiv but now this main right here that i have is acting as a remote i can hit stop so what we're going to do is we're going to come over here we're going to take we've got the permanent link adapter connected to the main we're going to take and connect a channel adapter to the remote and i'm going to connect the main to the remote now i've got my verses muted so we don't hear the chirp but what we would hear is we'd hear a chirp in fact i'm going to turn that on so that we can hear that when i connect those up but before i start doing any testing i connect the main via the permanent link adapter to the remote using the channel adapter i go into tools and i set reference so here it shows that picture permanent link connected to remote using the channel adapter and i hit test [Music] and you know what let's turn on the remote now normally we would recommend the main and the remote being turned on for at least five minutes before we set reference in this case we don't have five minutes to wait we're going to go ahead and set that but here's the thing these have been sitting here in the studio they're at the same temperature i haven't brought them in from the cold but we're going to go ahead and hit test now it's setting reference it's synchronizing the main in the remote what you want to avoid is sending somebody out to the far end with the remote and having it not have reference set and they have to bring the remote back or you have to go to them just a really good little habit to get into and see how quick that was we checked the time we set reference now we're ready to go in and start testing so i'm going to come in here we're going to switch over i'm going to remove that channel adapter from this we'll zoom out just a little bit go up here we're going to remove that channel adapter we're going to grab our other permanent link adapter we're going to connect to our first cat6 link in the patch panel right here now i am going to check i'm going to make sure one thing's we're going to turn off auto save to start with i'll say done so now i'm going to say test so we're going to run our test and we pass so it shows that our wire map is good we come over here to performance we see that all of our test results are good it shows the length of the cable it shows our margins right here great margins so now i can hit save i'm going to save this as 1a now one of the things that i can do to speed up my testing is turn on auto save so if i turn on auto save this will automatically save the test when it completes so i'll hit save so now we'll come over and i'll move to the next connection and i'll hit test and we can hit test on either the main or the remote so now as soon as that completes it saves it it saved it as 1b i can move to the next one so we'll move to the next one this time i'll hit test on the remote it starts the test oh oh generating diagnostics that's never good all right so we failed on that one so now we're just going to go ahead and move to the next one here we'll hit test okay so we can see that it's testing in there let me just throw something in here okay oh that failed horribly everything failed we're gonna move over to this next one we're going to hit test we'll run one more test on the cat6 so we can see our tests are running it's giving us oh generating diagnostics we're not having a good time with these cables all right so what we're going to do is we're going to come in and we are going to change adapters so we see this one failed nearing crosstalk and some return loss now what i'm going to do is hit the home button we're going to change our test i'm going to come in i'm going to move to my cat6a permanent link so i selected the test from the home screen i select cat6a i say use selected so now we haven't changed our cable ids but we're changing our tests we're going to test some cat6a so we'll come back over here we'll move our cables to our cat6a connection i'll hit test all right so we'll test two of those and then we'll test in mptl hey it passed that's great so now let's move over to our other cat6a we'll test one more now before we do the mp uh mptl test what we're going to do is instead of using a channel adapter at the far end we need to use a patch cord adapter so in this case we are going to be using a cat 6a patch cord adapter so the thing the reason that we use the patch cord adapter is the channel adapter does not include the rj45 plug in the test measurement well if we're doing an mptl connection that rj45 plug is a big part of that connection so in order to do an mptl in fact let me show you what happens we're going to come in we're going to remove the permanent link adapter from the remote and i'm going to plug the channel adapter in now let's say my customer has asked me to do an mptl well i say you know what i don't want to get that that patch cord adapter i'm just going to use the channel adapter so i take the rj45 plug end of the cable and i plug it in to the channel adapter i plug the permanent link connection into the patch panel i come out here i change my test to mptl i change my cable ids to mptl so i'm mptl cable id mptl test i hit test the tester comes back and says well wait a second you have the wrong adapter we cannot run an mptl test with a channel adapter we have to come over here we remove our channel adapter i grab that cat6a patch cord adapter i plug that in now these patch cord adapters are not backwards compatible if i want to do a cat 6 mptl test i need a cat 6 patch cord adapter so you need to buy patch cord adapters that match up with the category of cable you're testing so now i plug the plug end of that mptl link into that patch cord adapter so i'm going to hit test so now it's running my mptl test this allows me to test both the patch panel well the patch panel the cable and the rj45 plug at the end and it shows i pass so let's finish up we just have a few more minutes and i need some time to get ready for the next session we're going to finish up by coming in and taking a look at the results so what we see is it shows us we had four passes and four failures so in this case let's go in and let's look at one c what failed there well if we come in and we take a look at our performance we see we failed resistance now if we go to fault info it says cause of failure not identified hmm if we come over here to performance we see a red x next to resistance so i'm going to come into resistance i see that my limit is 21 everything looks okay so i come over here to pair unbalanced and we see this is what failed so in this case where we want to make sure that the resistance is close to the same for the two conductors in each pair so our limit was 0. 2 we're at 0.