in this video I'll walk through how you can build your own powerful Wi-Fi pen testing device The esp32 Marauder to follow along you'll only need a few pieces of hardware and no soldering is required I'll show you all of the steps and everything you need along the way let's hop over to the workbench and get started if you want to follow along and build the marauder yourself there are a few pieces of Hardware that you'll need which I will quickly go over right now the first one is an esp32 dev kit and more specifically I'm using the esp32 W room 32 you'll also need a touchcreen display so I'm using this 2. 8 in TFT touchscreen display and on the back of it it also has an SD card reader as well that we're going to be wiring up to connect everything together and avoid needing to solder I'm going to be using these two miniature breadboards we will also need some female Dupont header pins more specifically we're going to need a row of 14 at the top and four at the bottom so I was able to find these in six and eight sizes so I'll put a six and eight together for a 14 and another six at the bottom for the four one quick thing to show with these is that they frequently come in this size with the smaller pins so you'll notice here the pins are much smaller on this size these will not fit into a Bread Board very well so you want to make sure you get the ones with the longer pins to wire everything up we'll be using some of these jumper wires you could also use a spool of wire and cut and strip it yourself but I find it's much easier to use these pre-cut jumper wires to power the esp32 and also program it I'll be using this USB micro cable and then finally this part is optional but I'm going to be using a power bank here to power the es32 to make this device portable so before we go ahead and connect everything together and wire it up it's much EAS easier to program the es32 with it outside of the device so let's grab our es32 and our USB cable and we'll hop over to the computer and I'll show you how to program the firmware for the marauder onto this before we continue with the video a very important announcement the Black Friday discounts at TCM are live now from today until December 2nd you can get 20% off all certification vouchers and 50% off your first payment to the academy in addition we have some special never seen before bundles on sale and discounts for our two upcoming live trainings the popular attacking and defending active directory and our brand new sock level one live seats to these trainings fill up quickly so if you're interested make sure to act fast if you've been thinking of taking a TCM certification like the PNP or upping your skills with the hundreds of hours of courses on the academy you won't want to miss out on the sale to grab the firmware I'm over at the GitHub repo for the esp32 marauder so this is some open- Source firmware and also all of the hardware and Designs even for 3D printing a case and everything has all been made Open Source by the creator of this project that's just called me Coco so I just want to give a quick shout out and a big thank you for this awesome open- Source software so we scroll down through the repo there's a couple resources we'll need here so the very first one is we're going to need this old read me so I'm going to open that up in a new t and then there's a couple things in the read me I will call out so the very first one is if you are interested in learning more about the project I would definitely recommend checking out this Wiki you get some more details about the capabilities of the esp32 marauder as well also if you are interested in buying a preassembled marauder or you would like a kit then you can get them through this link and that help supports the Creator who has made this all open source and then finally we're going to need the latest release of the firmware so let open that up into a new tab and then if we scroll down here there is some update and install instructions so I'm just going to open those in a new tab as well perfect and the one that we're going to be uh setting up is the esp32 marauder V4 and the easiest way that I found to install this firmware is through this spaceon web updator so what I'll do is I'll just link there right now and the first thing we need to do is go to the web updator so I'm going to open that up in a new window so that we can look at them both at the same time here and then the next thing we need to do is plug in our device so if you haven't already plug in your esp32 to your computer then we'll click connect here and mine shows up as this cp2102 USB to Art Bridge controller if you're using the same dev kit as me then it will most likely show up as this but it could also show up as a ftdi device or a ch340 or ch341 so we go here and I'll click connect and then we'll just give it a second to connect so if you're having any issues with yours connecting I will just quickly call out this help here you can go into this blog and there's some details about issues with connecting and I'll call out the most likely thing is that you're missing your drivers for your serial to USB adapter that is on the dead board most likely it'll be this one but it also could be one of these two so go ahead and follow these instructions for how to install it if you go to this one it gives you the link here for the official drivers so just come back over here and now we can follow through these instructions so all we need to do is we're doing this V4 esp32 and we just need to download each one of these that are linked here so I've already gone ahead and downloaded them and then we also just need to double check and make sure these addresses match up so for me by default they all did but just get to double check they all match up here so mine all match so I'm going to do is I'm just going to go select here and then I will grab all of the different ones so for this one if I just look it's the boot loader so we'll grab this one here and then the next one is the partition so I'll grab the dots partitions here open that up then the next one we need is the boot app so I'll grab this boot app. bin and then finally we're going to need the firmware so just a quick heads up for the firmware the one we're going to need is this uncore oldh hardware.
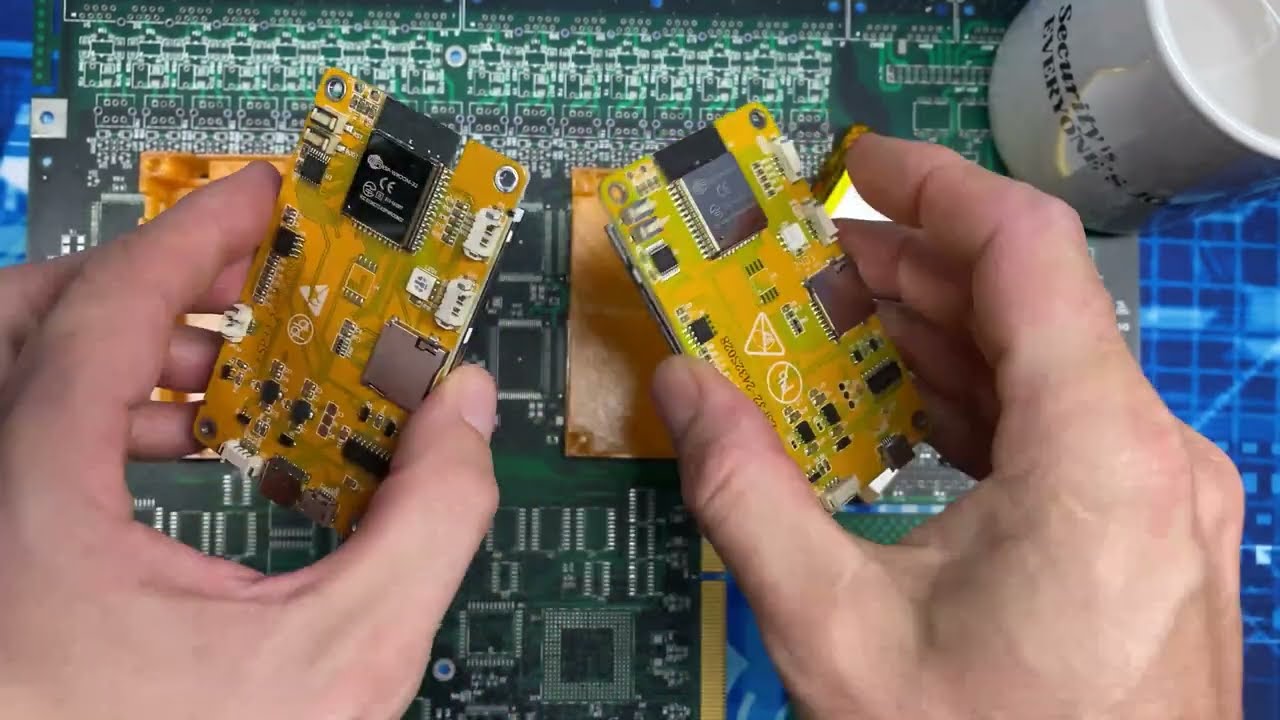
bin so that's the one I've downloaded so we'll just go select here I've got this uncore oldh hardware. bin click open perfect so at this point everything's good to go so we'll just click the program button here click continue and this is going to start uploading all of the firmware this will take a couple minutes so what I'll do is I'll just meet you over here when mine is done okay mine's done flashing so you notice down here at the bottom it just gives us a heads up to run the firmware please reset your device so at this point you can unplug it from the computer and we're now ready to wire it up so before we head over to wire it up let's take a look at the wiring table and that is located in the old read me here and if we just scroll down this is the old read me that I opened up in a new tab before you'll notice there's a do-it-yourself section so if you head there you can get some more details about the hardware and how to wire all of this up if we scroll down there's a connections here and this is just a wiring table that shows what we need to connect between uh the touchscreen and the SD card reader which is actually also on our touch screen as well so you may notice here though if you look at your ESP 32 it doesn't actually have labels like gpio 17 gp5 16 Etc U most of them are a Di and then a number and usually those will line up with the same gpio but some of them will say things like RX or TX and those are also actually gpio pins so you may need to go and take a look at a pin out diagram for your board as well so what I've gone out is just gone to Google and search for esp32 W room 32 devkit pinout and then this will show us which pins are the actual GPI open pins just make sure when you're looking at the picture that it actually matches the one for your dev kit so you'll make sure it matches for mine I found this one from last minute Engineers that was pretty good so what I'll do is I'm just going to go here and we'll go open image a new tab and now I've got a layout here so you can see the different gpio so for example you'll see here we've got like a tx2 and rx2 and those line up to different gpio so what I'll do is I'm going to keep both of these open and I'm going to hop over to the lab now and we can take a look at where this up now that we've got our firmware flashed we're ready to wire everything up so just in case you're not familiar with how a breadboard works I will really quickly go over how the connections inside of this work so on these breadboards we have what are labeled as columns so we've got five columns here all these pins going down or each a column another five here and then we have the rows on a bread bird each of these rows of five are all electrically interconnected to each other so if you put a component for example one end of a component in here or a wire and then another one here then they're actually going to be connected together there isn't a connection over this Gap here so for example if we put a component in here and we want to have connectivity to this row here then we need to put what's called a jumper wire from here to here and we're going to be making advantage of that to wire this up so we'll putting one side of the esp32 in these pins here and then we'll be putting the pins for the display in here and then we just need to add some Jumpers in to wire everything up so let's go ahead and plug the esp32 in now so what I'm going doing is I'll plug it into this side of the breadboard here and you'll notice that it fits with just one pin at the top and one pin at the bottom not plugged in on the breadboard and we can do the exact same thing on this side as well here so we'll just wire this one up now perfect and then yours should look something like this and now the next thing we're going to do is we're going to add in the headers for the display in the top and the bottom and the easiest way to get that all lined up actually I found is just to put the headers on the display and then plug the display in you'll also want to make sure you have your charging port on the right here so that the top of the display so the end with the 14 pins lines up here because most of those actually connect to this side of the esp32 so let's grab our display here and then what I'm going to do is I'm going to put my header pins over it so we'll do these ones first so I got a eight here and a six here perfect and then I got a four here all right and the way that this is going to work now is we're actually just going to fit this over it so it fits it actually will fit perfectly over these breadboards so I'm just going to clip mine in I'll show you here I'm going to clip it so on the top here there'll be one space and then on the left there'll be two okay perfect so I've got mine plugged in so I'll just show you and there will be a little Flex to it here but this is all perfect so now I'm going to do is I'm actually going to just hold onto these header pins and I'm going to pull the display out so we can have access to wire it and then we'll know we have our header pins in the right spot so when yours is done you should have it looking like this so now what we need to do is just add all of those jumper wires so that our connections from for example here go to the right one so you may notice quickly if you look at your wiring guide well we have one that needs to go from VCC which is 3. 3 Vols and that is the furthest uh rightmost pin of this display so one way I like to look at it is since you know this is going to flip over if you hold them like this then you'll see where they all go so this one's VCC and this one's ground so the first two wires we're going to need then is a jumper from here to here for that VCC and a jumper for here to here from that ground and then you you can see the rest of the pins here they all need to be wired up and then we'll also need to wire these ones as well on the bottom just like this so what I'll do is I'll show how to wire a couple of them and then I'll just wire the rest myself off camera and you'll need to follow along with that as well okay so that's what it looks like there now to do those jumpers so we'll need to do is just consult the rest of the wiring guide and then do your jump so just keep in mind that some of them won't be directly over you'll need to um cross over a few of them and some of them are actually going to have to wrap around the side as well so I'm going to wire the rest of mine up now and I'll show you what it looks like when they're done when you're done wiring yours up it should look something like this and what you may want to do at this point is actually go back and just double check all of your connections make sure you didn't miss any and they're all going to the right spot once you are sure they're all right now we can actually just go ahead and plug in our touchscreen display to these headers so the reason we're actually using these is is just so the SD card reader actually just fits over this esp32 here so I find it easier actually to go ahead and plug in the bottom one first so that's what I'll do first here perfect and then we'll just line up these ones here and plug these in as well perfect so this is actually the top here with these four pins and what we can do at this point is I've actually got my uh USB cable plugged in on the other end to power and we can just plug this in and it should power up with the marauder firmware and we'll see that starting up okay perfect that's launching so we can just let this boot up and then I'll put this to the side here so if you got it working to this point then congratulations you've got yours booted up with the marauder firmware the last assembly step I'm going to take is just to attach The Marauder to this power bank so that it can be portable so on the back of these breadboard there's actually adhesiv for two-sided tape so what I'm going to do is I'll just peel these off and then stick them to this power bank and then we can just connect the cable in and have this be portable so we'll just do that right now I've got a shorter USB cable here and a couple zip ties and we can plug this in and get it tucked away nicely so we'll just plug the one end in down here and then just to make sure it works we can plug plug the other end in to the marauder perfect and then what I'm going to do is I'm just going to uh cable these up and then zip tie them there's a couple of holes here mounting holes in the esp32 so I'm just going to zip tie the rest of this cable to those just to get it nicely buttoned up for us perfect so we've now got a nice portable Marauder here of course if we did want to solder all of these together and use a circuit board we can make it a lot more compact however without any soldering here we've now got a portable esp32 Marauder now that we've got our Marauder set up let's take a look at some of its capabilities The esp32 Marauder has a lot of useful tools built in for Wi-Fi and bluet Bluetooth testing in this video I'm just going to be showing two of the more popular Wi-Fi attacks however keep in mind there is a lot more functionality and testing tools if you did pick up this device or built one yourself so the first attack we'll take a look at is a Deo attack and what that's going to do is going to send out dooth packets to a set Wi-Fi network and essentially that's going to kick all of the devices off of that Network so to do that we'll go into Wi-Fi and then the first thing we need to do is actually scan for all of the access points so we'll do that under sniffers and we'll go scan APS here and we can see that we have some APS coming in through here so what I'll do is I'll just let this run through until it picks up all of the access points perfect and I see I've got one here called hack me which is a network that I set up for this testing so we can go back and touch the screen to exit here and now we can go back in and we can go to attack and we're going to run a Deo flood before we run the attack let's take a look on the computer where I am connected to that hackme Network that I set up so since there's no internet what I have done is I've just gone to the browser that the router hosts for setting it up so we can see how this is going to impact our connectivity before we run the dooth flood we will need to select the access point to Target from the list of access points that we previously scanned for so I'll go and run this dooth flood here and we can see that it's starting to send some packets and you can see that it auto it has kicked me off of the hackme network here and if I just try and refresh this we can see that we can't get to that and that's because we are running the dooth right now so if I just touch this to exit here we'll actually be able to go back in and connect to this network and we can already see that it is reconnecting and going to be able to pick back up this website now that we've stopped the dooth the next I'll demonstrate is the evil portal which will allow us to create a evil captive portal which if you're not familiar with those that's when you connect to a Wi-Fi and it pops up in your browser a page to enter a username and password to proceed so we'll click here and we'll run this so we're picking up the access point name here from the config file which I'll demonstrate in a second and it's called free Wi-Fi so that's what I've named it so we take a look at the computer actually and we go down to the Wi-Fi networks here got one called free WiFi that I'm going to connect to and you'll see that it redirects us to this portal here and it's going to ask for a username and password so what I'll do is I'll just put one in here so I'll go test at test.
com and just password and click continue and you can see that it actually does nothing but in the back end we can actually see that it's saved the username test test. com and the password here so what I'm going to do is actually power this off and also show you how it logs us to the SD card and how it's set up I've got the SD card loaded up on my computer here so we can take a look at some of the files required to configure the captive portal so the first one is this ap. config.
txt and inside of that we just put on one line the name of the SSID that we want to run the captive portal on so for me I just called it free Wi-Fi you'll also need an index.