Today, I'm going to be showing you guys this new workflow that I built that helps me scrape an unlimited amount of tweets from X. There's a ton of good stuff that you can find on X, whether it's market analysis, competitor analysis, or just staying up to date with the latest news and trends in a specific industry. So, the system is going to help you do all of that, and as always, I'm giving away the workflow as well as the Google Sheet template for free.
All you need to do is download those things, plug them in, hit run, and you'll be scraping Twitter. All you have to do to get those resources is join my free school community; the link for that's down in the description. But let's not waste any time; let's hop into a live demo, and then I'll show you guys how to set up this API step by step.
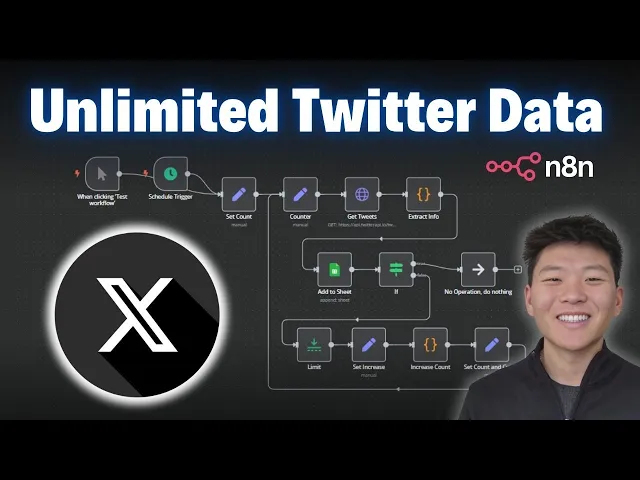
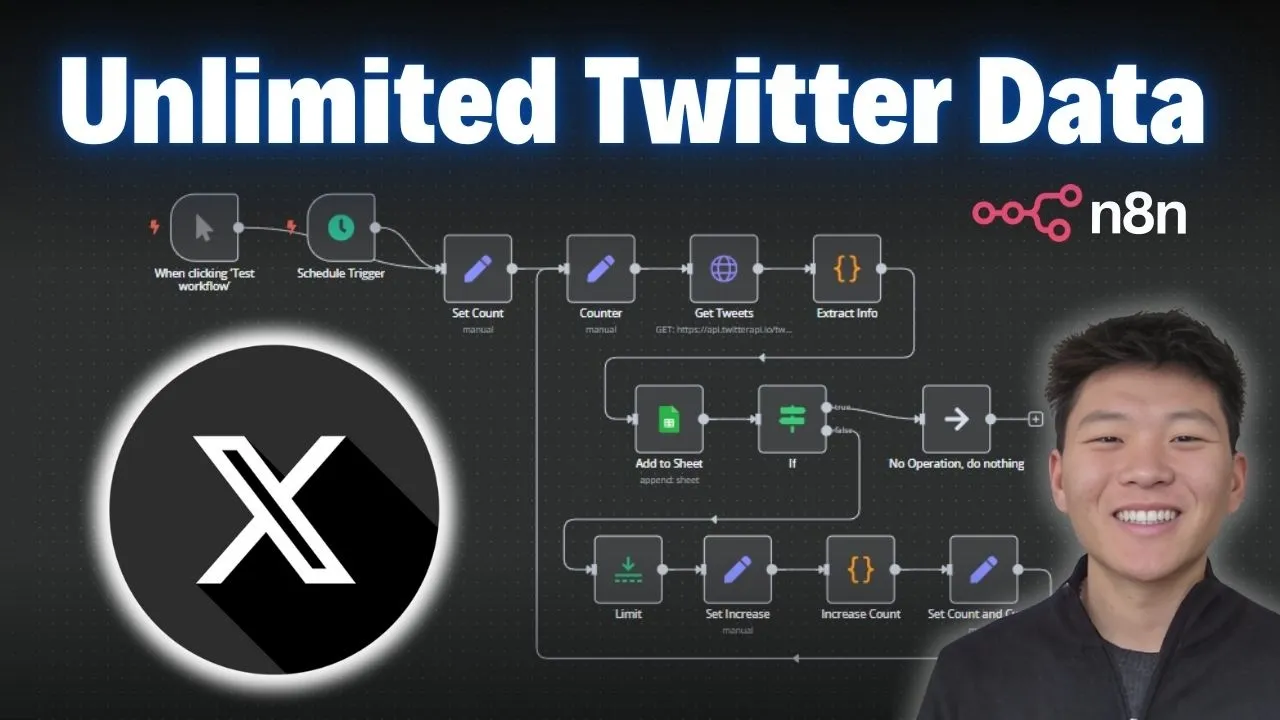
As you can see, here's the workflow that we're going over today. Quick disclaimer: I don't know if this is optimal the way we have these different sets and code notes, so if any of you guys are programmers, please let me know; I can make this more efficient. But anyways, it works, right?
So, we're scraping X up here, we're going to be checking the count, and right now I'm just having it only go three runs through. If you wanted to increase that, you'd have to change the number here as well as increase the sort of count code right here. But if we haven't gone through three times, it's going to come down here.
We're just going to be setting the variables, increasing the count; we have to set the pagination, and then we're going to loop back through. We're just going to keep scraping Twitter until we've done that three times, and then that's the end of the process. But as you can see, we're updating a Google Sheet right here, which has these specific columns like the Tweet ID, the URL, the content, likes, retweets, replies, quotes, views, and the date of the Tweet.
So, we're going to hop back into the workflow, I'm going to hit test workflow, and we'll see this happen live. So, right now it's hitting Twitter, or X. Now we're extracting the info, adding it to the sheet, and then you're going to see it loop all the way back down here.
We're, once again, hitting the API again, we're doing the second round of scraping, adding that to the sheet. As you can see, there are 38 total items, so there are 38 tweets, and this is going to be the last run. We have 58 tweets, and then it's going to go off this way because we are done.
So, that just finished up. We can click into our Google Sheet and you can see now that we have 58 tweets to look through; each of them, of course, has the URL. So if I clicked into this one, we could see we have a tweet right here: "Open AI, your turn!
Can you give this man a luscious full head of hair and a nice haircut? Looks great! " So, as you can see, if I was to scroll down, we would see that we, in fact, have 58 tweets; all of them have an ID along with the links.
So if we clicked into this one, we can see this was on March 11th and it has almost 31,000 views. If we click into it and we wait for it to load, it's on March 11th and it has almost 31,000 views. So we know that we're actually getting real information into our data sheet.
And, yeah, so let's break down what's going on. Okay, so I told you guys that we were going to walk through setting up that API call step by step, so we're going to do that, and then I'll walk through this actual execution right here, and we'll take a look at what was going on. All right, so this is the API that we're going to be using; it's called the Twitter API.
I'm sure you guys are wondering about the price—it's really not too bad. As you can see, it's sort of a pay-as-you-go model, and you can get a thousand tweets for 15 cents, so it's really not too bad. Also, I have a link for this down in the description, and if you use that specific link, you'll get $6 to start with.
I think if you sign up normally, you only get one, so you'll get five free extra dollars to play with. Anyways, this is the API we're going to be using to access the Twitter data. I'm going to click on "docs," which is the API documentation for the different endpoints that we can hit and basically the different functionality of what we can do using this API.
So, let's take a quick glance at the left. We have user endpoint actions, which would mean we are looking at a specific user wanting to get their tweets, their followers, their mentions. We have tweet endpoints, which means that we can grab an ID of a tweet.
So over here, you see for every tweet we have an ID—we could grab tweets by ID, we could grab their replies, their retweeters, or what we were doing in the demo was just doing an advanced search where we were searching for tweets based on a query. Okay, so I know that API documentation and setting up these requests can be kind of intimidating; I'm going to try to break it down as simply as possible. The first thing I want to point out is whenever you're looking at API documentation, if you see curl commands on the right, which would look like this, you're going to want to.
. . Copy that and go into a new workflow.
Type in HTTP request, and all you're going to want to do is hit import cURL; paste that in there, and when you click import, it's going to populate the fields that you need. So, it's going to be really handy. This one's not too bad because it's a simple GET request with pretty much just authorization here, but in the case of sending over a POST request, where you have to do a full JSON body and set up those parameters, it's going to be really helpful if you're able to just import that cURL and have everything set up.
Okay, so the first thing that we notice is our method and our URL. If I hop back into the documentation, we can see that right here we have a method, which is "GET," and then this is sort of the endpoint. If we were to copy this endpoint and come back here and paste it, it would give us that full endpoint.
I just pasted exactly what we copied, and basically what happens is we have some sort of Base URL—so we're accessing the Twitter API. Every single function has a different endpoint. Right now, we're doing advanced search; that's what it looks like.
If we were doing, you know, "GET user info," the endpoint would be "Twitter userinfo. " As you can see, all of these are going to have different endpoints, which basically just says, "Hey, we're reaching out to this server, and we want to do something different. " What comes next is going to be authorization, and that just means you made an account, you have an API key, and you're paying for this search—not someone else.
Right here, we can see authorization. We have sort of a key-value pair: the key is going to be "x-api-key," and then the actual value is going to be your API key. What's important to notice here is that this is a header.
Sometimes they're query parameters; sometimes they're headers. In this case, we have a header. What you need to do is go to your dashboard.
In the top right, you'll click on your profile, your dashboard, and then you'll have an API key right there to copy. Copy that, and then we'll bring it into NN. As you remember, the key was "x-api-key," and the value was your actual API key.
This is basically saying this is a placeholder; this is where you'll put in your API key. Now, what we can do that's a really cool tip with NN is instead of filling it out here in the header parameters, we're going to do this up here under the authentication tab, which basically just means we're able to save this authentication and use it for later. This is why you needed to remember that this is going to be a header authorization.
I'm going to click on this button; I'm going to click on General credential type. Then, within the General auth type, we're going to choose header because that's what we saw in the documentation. So, header.
Now all we have to do is—as you can see, mine is already configured, but I'm going to pretend like I'm creating a new one—we have a key-value pair, like we talked about. In this case, it was "x-api-key," all caps, and then for the value, you're just going to paste in your API key that you just grabbed from the Twitter API. Then you can basically save this so then you have it forever.
I'm just going to call this one "Twitter demo. " We're saving the credential; it connects successfully, and now, as you can see, I have all these different APIs that I already have saved. When I want to set up a request in the future, I don't have to go find it and put it in here as a header authorization; I just have it saved already.
Now, let's go back to the documentation and see what else we need to configure. Okay, so we're back to the advanced search endpoint. We can see that we have two required fields that we need to put in, which are going to be a query and a query type.
The query is like what we're actually searching Twitter for. In that first example, my query was "open AI," and I'll show you guys that later. That means it's going to be searching Twitter for "open AI.
" Then we have a query type, which basically means you have two options: you can either say "latest tweets" or "top tweets. " What I did in the demo was "top tweets," as you can tell; they were all very high performing with the views and the likes, but they're still going to be pulling recently. All of these tweets, you know, were still within—here's March 8th, so that was about a week ago—but mainly they're still going to be pretty recent, as you can see.
Okay, so anyways, for the query, we have a string, and for the query type, we have a string, but we only have two options. So, I'm going to click on "send query parameters," and we know the first one was called "query. " For this example, let's just do "Manis" because, you know, that dropped and everyone's talking about it.
Then we're going to add another one, which we know was "query type. " I think with a capital "T. " Let's just go make sure.
Query type with a capital "T," and it has to be either "latest" or "top. " So, for this example, let's do "latest" rather than doing "top. " Okay, so that's what we have here.
Um, and then, as you can tell in the demo, we have one more option, which is "cursor. " Um, and we're not going to set that up right now, but this is basically how you paginate through requests. Up here, it says that, um, each page returns exactly—exactly, about—that's kind of weird wording, but each page returns about 20 tweets.
If you want more, like in the demo, we got 58 because we went through three times. So, we're going to leave that blank for now, and we should be set up. So, I'm going to hit "test step.
" We're going to see it's going to be searching now through Twitter, and we're going to get one item. If I just move this over a little bit, we can see we have one item with this; it looks like this only got a total of 16 tweets because this is, um, number 15, and computers start counting from zero. But anyways, this one got us 16 tweets.
So, I'm just going to pin this data so we don't have to rerun the API; we have this to play with. Let's just take a look at one of the tweets. So, here we have the ID of the tweet and the URL.
Let's search Google for this, and we'll see that it should be a recent tweet about Manis. Um, let's translate this. I can't fetch the translation, so let's try another.
It's from a username, Manis Eric, so maybe that's what happened. Okay, maybe let's try something else. I'm going to type in "college basketball," and we'll try this, and it's going to ask me if I want to unpin the data.
Yes, I do, so we can do another run, and then we'll see if we just want to validate some tweets. Okay, let's go over here and pin this, and we will copy this link right here and go to X to see what we got. So, college basketball betting—this one came out at 5:41, which is right now, the current time.
So, that's the latest tweet. Okay, so we have a ton of data coming back, right? And it's all in one item, so what we want to do is clean this up and extract the fields that we're looking for.
So, I'm going to paste in this code node right here, which you can get by joining my free school community. The link for that is in the description. You'll click on "YouTube resources," click on the post associated with this video, and I'll have a text file right here for the actual code that's within the code node.
Or, of course, you could download the workflow, um, where you download this JSON, come into Naden, and hit "Import from file" up here, and then you'll have the whole workflow with all the code nodes and everything. So, of course, this is the workflow that you'll actually be downloading, and if you want to really understand what's going on with this workflow and the looping and the setting fields, then I would definitely recommend you join my paid community. The link for that is also down in the description.
It's really just a more hands-on approach to learning Naden and having deep discussions about what's going on. We have a full classroom about building agents, vector databases, APIs, and HTTP requests, as well as step-by-step builds. This is definitely not a place for experts only.
My whole goal of the channel is to make things as simple as possible. So, um, if this sounds like something that you're interested in, then definitely hop in here. Okay, anyway, so I'm just going to plug in the code node, and then it's already configured.
Basically, what we're saying is out of this item, it could have 15 tweets; it could have 20 tweets every time. What we want to do is just basically pull all the objects out and get what we want. So, actually, in this case, we have 23 tweets.
Um, so this one's different than that first one, right? And as you can see for each one, we've now extracted a tweet ID, a URL, the actual content, the like count, the view count, and as you can see, all of these were just recently posted, so they're very low on views, except for this one; actually, it kind of went crazy. This one was from March 6th, so I'm not sure what happened there.
That was almost two weeks ago now. But, um, anyways, this is our Twitter data. So, what's next from here is putting that into a Google Sheet.
So, I'm going to grab a Google Sheet node all the way down here. Um, we're going to do "append row" and "sheet," or it's going to be "append rows," but we will choose our actual sheet, which is going to be "Twitter data. " We'll choose the—sorry, the document.
Now we're choosing the sheet, which is "Sheet 1. " And now we have to do is map the columns. So, because we were able to extract all of these columns that we want, it's going to be super easy.
It's just as simple as dragging in the values that we need to send over to the columns in our Google Sheet. So, what I'm going to do real quick is delete all 58 items over here so we can just start from scratch. Now we can see we have to basically tell Naden what values we are putting in each of these cells right here.
So, back in the Naden workflow, I'm going to grab the tweet ID from the left from the code node and just drag. . .
It goes into the Tweet ID column. I'm going to grab the URL, drag it into the URL column, and just do all that all the way down. We made it in this order, so it's just really intuitive to drag, um, exactly like I said, in this order.
You can also get the template for this Google Sheet in the Free School Community, um, just so you can basically plug this thing in right away and get going. But we have, um, pretty much everything. One thing I also did in the code node was we formatted the date to look a little more human-readable, but now we have that done, and it's going to be doing that for all 23 items coming through.
If I hit play and then we'll go over to here, we'll basically just watch all 23 tweets pop into this workflow, or, sorry, the sheet. So as you can see, there they are. We have all of the links—are clickable.
So let's click into this one real quick just to verify. There we go, we have some, um, looks like women's college basketball. Nice bucket there!
Anyways, that is pretty much the first step: we scraped, we extracted, and we put it into a Google Sheet. From there, I was thinking, okay, that's cool, but we only got 23 items. What if we, you know, want to put this on a scheduled trigger where every morning we are scraping, you know, AI news, and we want every morning to just get like 100 tweets put into a Google Sheet?
What we had to do was look at how the pagination works. So, as you remember, in the API documentation, it says to use a cursor for pagination. If we see the cursor parameter, it says the cursor to paginate through the results.
The first page is just basically an empty string. This is basically what we just built out: these three nodes where we're getting tweets, extracting info, and adding it to the sheet. But now what we have to do is set up a parameter in here that is the cursor, and it's not just a simple pagination where it's like page zero, page one, page two.
We have to grab a value, and so what we're grabbing here is the output of the actual tweet extraction or tweet scraping. There’s a value called "next cursor. " So item one basically says this was the first page, and if you put this page in another request, you get page two.
Then on page two, we get a different cursor, which basically says, okay, now you can put this cursor in, and you'll get page three. As you can see, they basically get longer each time, so I think that it's just adding a chunk on each time and saying, hey, let's get the next page now. So we had to bake in some other logic here, so I'm just going to break down what's going on in order.
Okay, so the first thing that we did was set a count, and basically, I came in here and hardcoded count to equal number one. This is important because we need this number to work off of. And this is where I said, you know, if you're a coder or a programmer, and this is not the way to do it, let me know.
But this is how I got it to work. So, anyways, we're setting it to number one, and then in the next node, which is the counter, we're feeding in the actual count from the previous node as well as the cursor, which will come from down here. So eventually, the count and cursor will both come from down here, but to start with, on the first run, we're just grabbing count from the previous node, which would be one, and then we're going to feed that into the rest of the process.
Okay, then we move on to the API call where we're going to be scraping Twitter. The first thing that you notice is it's pretty much the same right here as the step-by-step example. We have our endpoint, we have our method, we have our credential, we have our query, which was Open AI, and we have our query type, which was top.
Rather than—then we have our query type, which was top, so searching for top tweets. And then we have our cursor, which we didn't have in the step-by-step example. What I'm going to show you guys is if we go to run number one, there would have been no cursor being fed in.
So on the left, you can see what was fed in, which was counter one At this point and cursor was null. So basically, it was saying, okay, regular request, I'm just hitting, um, looking for top results for Open AI. Then if we go to run two, we can see on the left what happened is we now have a cursor and we now have the counter equals two.
So this is run number two. We're feeding in the cursor, and we're getting different tweets over here. And finally, run number three, on the left, we can see the counter went up to three.
The cursor is now much longer, and we feed that back into the request right away because we're able to always say json. cursor, which means we're always looking here. This is a concept that's kind of hard to explain; we're basically looping everything back together because otherwise, we'd be referencing some sort of absolute node, which it'd be hard to say we want the most recent cursor, not the first time we got one.
So that's why we have to have this counter node, which is really important, that says, okay, whatever I'm getting is going to be the most recent. Count, and also the most recent cursor. So, as you know, we were getting big it coming out of the API call, and then we have to extract them.
So, the exact same code that we used in the step-by-step, we are getting three different runs: run one had 18, run two had 20, and run three had 20, which is a total of 58. Then we're just adding to them to the Google Sheet in the exact same way we did earlier, except for we're doing it one at a time. So, 18 first, all the way back, 20 all the way back, then 20 more.
What's going on over here when we're checking for the count is we basically just have a simple "if" statement, and we're trying to check if the count is equal to three; then we're going to basically end the process. The way we're able to do this is, once again, we're referencing that counter node, which is this one that we're feeding back for the most recent count and cursor. So, we're able to look here.
As you can see, this one ran three times: run one, it was false because the counter was one; run two, it was false because the counter was two; and then on run three, it finally became true because the counter on this run was three. So, we're just sending it off to a no-operation node, which literally just does nothing, and if they're false, it's going to loop all the way back down here. So, the first thing I'm doing here is just setting it to one item only because whatever leaves this branch is going to be either 18 items, 20 items, or however many tweets were pulled back.
I just wanted to set it to one to keep things cleaner. Then, what I did was I set the increase. So basically, I grabbed the counter from earlier, which would be the most recent count.
We're setting it back to two, but we're setting it dynamically here so that the code node can bump it up by one. The exact same thing with the cursor: we're grabbing the cursor from the G tweets node in order to feed it back in later. So here you can see run one, the counter was one, and then later it gets bumped up to two; on run two, what was coming in was two, and then it gets bumped up to three.
Notice each time, the cursor also increased from there. It's a code node that, obviously, disclaimer, all of these code nodes I had GPT-3. 7 write for me.
So like I said, it may not be optimal, but it's working. We have the counter coming in at two, and then we're outputting it called "count," and it's going up one, as you can see. So, on run one, it was coming in as one; it came out as two.
On run two, coming in as two, came out as three. From there, all we're doing is we're setting it one more time. I know there's lots of sets going on, but we're setting it because we need to be able to pull it in dynamically and always have this node able to reference it as JSON.
count or JSON. cursor because, remember earlier, we passed it in as a hard-coded variable. It needs to be able to say, "Okay, I can either look here or here based on whichever one has most recently been activated.
" All right, so that's basically it. I'm definitely aware that this concept of dynamically setting all these things is a little bit confusing, but what I would definitely recommend is you know, download this template, run it, and just look in there and explore and see how it's actually being able to reference things. The key thing to remember here is that when you're referencing a variable, like, let's just go back into here, when you're referencing something and you use a dollar sign followed by JSON, it's looking for whatever is the most immediate node coming beforehand.
Otherwise, if you're doing something like right here where, in this case, we're referencing the counter node or we're referencing the Get Tweets node, that's a lot different because it's like an absolute reference. So, when we use a dollar sign JSON, it's just going to give us a lot more flexibility by being able to reference whatever came previously before so we know we're getting the most up-to-date information. I hope you guys enjoyed this one; I hope you guys learned something new.
As always, if you did, please give it a like; it definitely helps me out a ton, and I always appreciate you guys making it to the end of the videos. Definitely let me know in the comments what else you guys want to see, some other use cases. As you know, there's a ton more we can do with this Twitter API because now that we have the IDs of both the users and the actual tweet, we can look up so much other stuff, like generating lead lists, and stuff like that.
But yeah, that's going to be it. I really appreciate you guys once again, and I'll see you in the next video. Thanks!