hey everyone Christian here and today I'd like to show you my new home lab dashboard this is called homepage and it's a free and open source highly customizable application dashboard that just looks amazing it supports over 100 different service Integrations including all your favorite selfhosted applications like proxmox tress pora monitoring Services smart home gateways and so many more it is absolutely incredible so from now on I don't have to go through all of the app dashboards one by one to know what going on with my home lab I can just open my new homepage and
see the most critical information all at a glance and of course it also takes me directly to all the important applications without having to remember the IP address or host name because yeah I have a terrible memory don't blame me I've deployed it on one of my virtual Linux servers running Docker and customized it to look exactly like I want with a cool background the dark mode and colors so let's go through the installation and setup process alog together I'm showing you everything you have to know so hope you're ready for it but before we
start with that I'd like to take a moment and talk about a new application I've recently discovered because as you might know working at it can be pretty stressful and hard and I recently wanted to learn more about mental health and time management but since I usually don't have the time to read an entire book or listen to a one hour long podcast I found a better way so let me introduce you to blinkist blinkist summarizes the the most important things from over 6,600 non-fiction book summaries and podcast that you can read or listen to
in just about 15 minutes they have a fantastic collection for example I've recently came across the book stop overthinking by Nick Trenton which includes 23 techniques to relieve stress stop negative spirals declutter your mind and focus on the present which I personally found to be super valuable for me and for the German folks out there blinkist also has a lot of titles in German by the way W there I'm currently listening to the 1% method or the% meod by James clear and this is really so helpful because it's so easy to just take a few
minutes every single day to listen to a new blink and learn something new there's so much value you can get within just a couple of minutes so I'm really super excited about it by the way you can also use their new feature blinkist spaces that you can share with your friends and family and recommend titles to each other that's also pretty cool so just try it out yourself and get 25% off blinkist annual premium start your 7-Day free trial by clicking the link in the description box okay so let's get back to topic and start
deploying the homepage dashboard on one of my demo servers and yeah let's configure a couple of services together so you can easily follow along and know how to customize it to your personal needs first let's uh check out the get homepage. Dev website so here you will find the installation and configuration guidelines and also the link to the GitHub repository so make sure to check this out and give it a star here you will find the source code of the application as well as some additional information about the features and the deployment but all of
the information that we're going to need are located on the website so let's open the installation configuration guidelines here you will find instructions to deploy this on Docker U deploy it on kubernetes build it from Source or even install it on Android if you're an Android fan for whatever reason by the way I still have UNR on my list to take a look so I just didn't have the time to do it but at someday I will definitely check it out and compare it to my tress scale installation and find out what's the better Nest
software so I definitely will do that at some point uh but for now I'm happy with installing this on one of my virtual Linux servers that already has darker on board so we can directly start with that so here will'll find some example darker compost projects that you can use to easily spin up a new instance of the homepage dashboard now the first one includes the docker compost project to run it as a root user if you need the local Docker socket integration but I still prefer running it as non-root user don't worry I will
later show you a very secure way to integrate Docker monitoring in this homepage dashboard as well so I'm going to copy all of this stuff here and then I'm opening a connection to one of my demo servers and create another project directory for it let's call it homepage demo one I think that's fine and CD into this directory no I also want to to open this in vs code because it's much easier to update all the configuration files in vs code than using a terminal program so let's open a new remote connection and open this
project folder in here so perfect so here we can create another Docker compost file and just paste all the information from the installation tutorial in here basically you could just go and deploy this Docker compos project as it is but I'd like to customize a couple of settings here for example I just like to remove this version statement here it's actually a depr headed setting that isn't used in Docker compose in any ways so just get rid of it it's unnecessary and also what I don't like is to use the latest tag in the darker
image so I definitely would always use a pin taged version and do the updates manually okay fine so I'm also going to remove that Docker socket here so this is optional and you only need it for Docker Integrations by the way if you're not running this container as root user you won't have access to the docker socket anyway so you can get rid of it and I'm also going to replace this value here with my real user and group ID to know what user and group ID you have just go to your server and type
in the command ID so this will give you the user and group ID just enter the number here and what you should also do is replace the path to the config directory so I'm creating a new config folder and here we go so this is what homepage will use as a persistent storage for storing all the templates in the set settings files and so on I also want to add a restart policy and set it to unless stopped and what you can also do is if you later want to add custom backgrounds or custom icons
for specific services that don't have an official icon somewhere in the library you can also pass in two additional volumes one for background images and mount this to app images and the same you can also do for the icons folder just create those two folders in here this is where you can put your custom f es okay so I think that is everything that we need so let's just go and deploy this project I'm going back to the teral and just start it using the docker compost up- DEC command this will pull down the latest
version of the image and start up the home lab dashboard all right so let's check if everything is up and running by executing the docker compos PS command as you can see the health status currently red sports starting so let's try again in a few seconds so then you should see the status is healthy so we can open a new browser window and open a new connection to My Demo server on the port 3,000 and this is our home lab dashboard it's just as easy as that and I have to say I just love the
look and feel of this very simple and minimalistic homepage dashboard but it still gives you a lot of advanced features to see all the important information at a glance I will show you exactly how to configure that for each of your home lab services but if you just take a look at this it's really amazing you have a widget at the top left corner where you can see the CPU memory and dis utilization you have a search bar you have different groups for all the home Lab Services of course you can customize anything in here
and add new links so we will do that together in a few minutes and you can also add bookmarks as quick links to any website or any portal you like you can also customize the color here in the uh bottom section to make it look blue for example or you can even switch it to light mode if for whatever reason you want to use the light mode but hey I'm not blaming you if you do that so that's fine and yeah so this is how you can customize it by the way if you want to
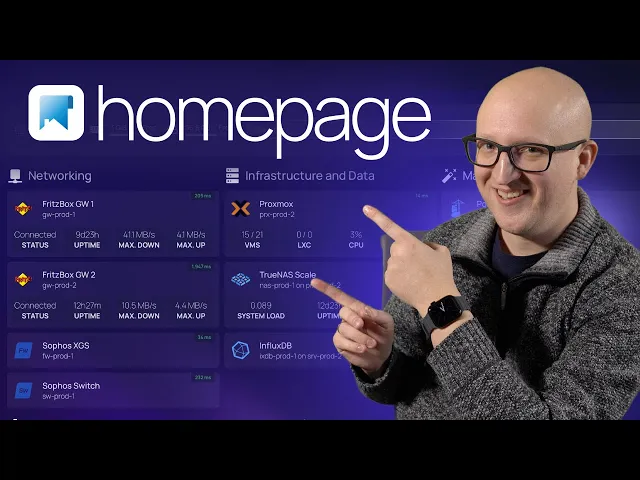
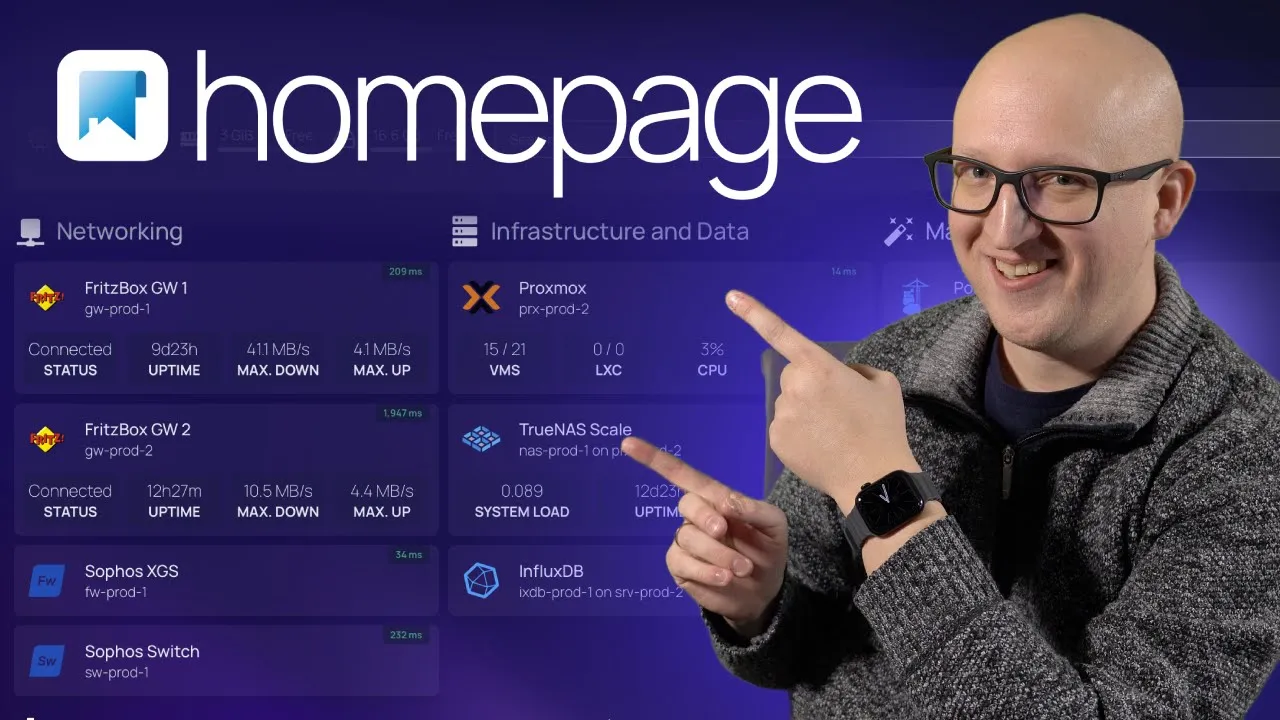
take a look at my homepage dashboard I'm just going to show you this so this is how I configured the whole application to my personal needs so I have a section for networking my two gateways here or quick link to my server's XG firewall to the sofware switch infrastructure I can see the prox Mox and tret server in here you can even see it collect some metrics about the virtual machines the CPU and memory utilization of my proxmox instance which is absolutely cool it also shows me the status so it pings the interfaces regularly and
you can see the Ping request how much latency it has and if the service is up and running here are my uh container management applications I haven't connected all of them here but yeah that's the main painer interface that I'm using also uptime Kuma so that will report all the the sites and uh monitors that I have configured and if they are up or down promethos and grafana for monitoring here I have my automation platforms CRA anible zop 4 Argo CD home assistant that show me how many people are at home so probably me and
I don't know where my wife is right now maybe shopping or whatever I don't know how many lights I've turned on and so on here is security my authentic dashboard that I've shown you in one of my recent videos and here in the bookmark section I've configured a couple of links to my GitHub repository my cloud services applications that I'm using soft cloud cloud flare teleport Tate Network my remote access tools and also any Cloud vendors Microsoft Azure digital ocean SEO anything that I'm using by the way if you want to copy parts of my
configuration you can also find it on my GitHub repository homeab so here you will find the entire infrastructure configuration setup files everything that I've deployed in my home laab so I've made it fully open source for you guys so you can really take a look at everything that I'm using I've created a new folder for homepage the homepage production setup here in the config directory you will find all the settings so just take a look if you want copy parts of it if you need it but let us do a couple of things together here
so you know exactly how this all functions and works together all right so let's go back to the vs code instance and if we take a look at the config directory you can see once you start up the homepage container it starts adding templates for all of these configuration settings in this directory and you can simply just go in there edit the file and it will automatically reload this on the homepage service that's really nice and if you want to get more information about how to exactly configure this stuff just go to the website and
click on configuration so here you will find a section how to configure this stuff for each of those different config files such as setting to configure General things like changing the title of your homepage dashboard so you can simply go in here add a new line and uh this is also where you can configure a background image you looking for a background image on unsplash like this one here I think this is pretty nice so let's just copy the image address put it in here and if we go back to the dashboard you can see
it automatically reloads this now if this uh background image is a bit too bright and you want to lower the brightness or you want to add a blur effect to this you can also do that so just copy those lines here from the document ation make the image a property and then you can lower the saturation here if you have done all those settings just go back to the hom page dashboard and click on reload so now you can see it's not as bright and you have a blur effect in the backgrounds I think this
really looks nice so I'm just going to keep that and let's start adding a couple of services here uh by the way if you want to add bookmarks in here so you can add any links to yeah any website you can just go in here go to bookmark marks and let's just add something new it's very intuitive and very straightforward to um edit all of this stuff so here's a new link to YouTube you can see it automatically changes here and if you want to customize any of the service widgets for example if you want
to change the search provider in here you can also do that in the widget section so here you can find the search provider just change it from D do to Google or to Bing I'm a bing fan I don't know why don't blame me for that right but here you can see it automatically changes the icon and if you search something it automatically opens the search provider here really nice okay so now let's come to the important part and let's start configuring some home Lab Services I know you're here just for the home Lab Services
right so let's do that and go to the configuration go to services and yeah that tells you how you can configure different groups how you can add different services to it and so on let's go and do that together for one example here so so if you want to change the name of the group here you can set this to infra structure it's very simple and just configure something for example proxmox and I want to add the link to my proximo instance I think this is Port 806 if I'm correct yeah I I hope so
now if you want to add a cool icon to this you can also do that by add an icon and just type in proxmox PNG if you reload it you can see it automatically finds a proxmox i icon so how does that actually work where does it get the icon from so there are a couple of possibilities how you can add those icons if you go to the um documentation you can see the dashboard icons which is a GitHub repository containing icons for most of the common home laab services so if you take a look
at those PNG files you can find almost anything in here right and you just can refer to it by typing in the name of the PNG file you can also use the material design icons or simp simple icons once I had a look at the simple icons I really thought well this is really a nice Library simple icons pretty cool they have over 3,000 free SVG icons for popular brands in here so for example if you search for something like proxmox you can see an icon for this just simply copy this one go in here
add an SI for simple icons Dash and then just the name you will find on the website then if you reload this you can see it automatically um adds a gradient logo to this now if you want to customize the color you can just add it uh behind the logo name so if we go back to simple icons you can see this is the official color of the proxmox brand so we can just copy the the hexa code of the color add it uh after the proxmox um icon name and if we now reload the
page you can see it automatically colors this logo and the brand colors I think this is really amazing I also could use this for different environments like like for a production environment it has one color for a demo or testing environment it has different colors maybe this is really really amazing it's super simple and this is how you can add all your different H laab Services okay cool but um how do we get those cool Integrations for procm and tress for example to get some metrics and uptime monitoring about the current virtual machines or the
dis utilization so this is done by adding service widgets and so the widgets you can go in here here and find a list of over 100 different Integrations to all sorts of self-hosted applications you can see it finds authentic in here Cy the reverse proxy grafana promethus home assistant jellin nexcloud engine X proxy manager open sense there are so many cool services in here even uptime Kuma Watchtower so everything that we just love to use in a h lab for example let me show you how to connect the prox Mox virtual environment to this so
here you can find the instructions and then you can just copy this this part here the widget part go into your services file and add a section widget here now it's important to set the type to the specific widget type that you want to integrate the URL of course that should also match the URL of my proxmox instance and of course you should never just paste the username and password as clear text in this configuration file now how you can do this is you can use environment variables for this and the way you have to
do it is start with two curly brackets here and then start with the prefix homepage uncore Vore and this is what you have to use uh before every variable otherwise homepage doesn't know how to use it but then you can just use something like prox username here and the same you can also do for the password okay cool of course we need to get add the username and password as environment variables first into the container of homepage the way how you do this is also pretty simple just go back to the doer compost file and
add a new environment variable in here so just do it like this here and then create another file in this directory that is called EnV and this EnV file you can for example exclude from a git repository if you want to upload your config somewhere or you could also set uh specific permissions that only your user has access to this file and protected securely so here you can just add your username and password now of course you need to take the container down and up again and wait until it has been restarted but then you
should start seeing the virtual machines the Alexi container CPU and memory utilization and this is the way how you can integrate just any app you will find in the widgets documentation of homepage so I really like this a lot this is amazing and by the way you could also start adding custom apis so if there is something that is not supported but you can program and script it somehow I haven't played around with this yet but I definitely will take a look at this because this is how you could also integrate other systems into the
dashboard and basically get metrics from anywhere that you like I think this is really incredible now I want to show you two more things here the first is how you monitor those different applications and services in your homepage dashboard because you could also think about adding a simple ping request to this proxo server and see if it's up and running this is very very simple just go back to the service configuration and add a new section here that is called site Monitor and then just add the URL to the address that you want to Ping
now if you do that you can see the milliseconds delay of the Ping request that is made to the proxmox instance the same you can do for any other URL um or for any IP address you can automatically check the up time with this it's pretty simple now I also want to show you how the docker integration Works in homepage let's try to monitor my engine X test website that is currently running as an engine X evaluation container on the same server where the homage dashboard is running now to enable the docker integration just go
to configuration go to Docker it will tell you exactly what you have to do so it can connect to the docker socket to get more information about the running containers here but this is a section where you actually have to pay attention to because if you're just exposing the docker socket on the network without any form of authentication or protection it literally gives everyone the ability to create and start new container or delete containers on the system where the docker socket is running so that is something you have to pay attention to don't expose the
docker socket without any uh protection on the network I've once done a video how to securely connect to any remote Docker socket using TLS certificates I think that was a video about showing you how to connect remote painer hosts with a Docker socket using the TLs protection so you can do that but I'm not going into detail you can still watch the old video it should be still valid and a great way to connect remote servers and now if you're running homepage on the same server where the docker containers are running that you want a
monitor it's much simpler you could just think about connecting the socker directly however just like I said in the beginning you have to run homepage as root user and I would not really do that but there is still a better way how to do this and this is using the docker socket proxy which is another application it's a very simple and minimalistic application that you could find on GitHub online but this runs another container that has all the Privileges connect to the docker socket and exposes it to the homepage dashboard but it gives you the
ability to have some form of permission settings in here where you can configure that a remote container that connects to the docker socket might just have read permissions and not WR permissions so it means it can get the information about the containers but it could not change anything it could not delete or start new containers I think this is a much better way to do it even in a local environment so what you can do is you can just copy this here as an example let's go into the darker compost file and add this secondary
container and yeah that's all you should have to do but now let's go to the docker yaml file and let's configure a new Docker server I will just call it local Docker and now the host name should be the same as you have defined in the container name so just put Docker proxy in here and use the port that you have exposed in here so now that you have connected your homepage to the docker socket on the local machine you can start adding in your servers for my uh engine X website for example so I'm
just copying the URL in here description and now instead of adding the site monitor you have to choose which Docker server you want to monitor this with so this should match the name that you have defined in here in the dock. yml file in our case local Docker go back to Services choose the docker server and then set the container name so if we go back to this Docker ps-- all you should see the container name that we want to monitor is engine x- evaluation one so let's pick the name in here oh I need
to add a column okay perfect so let's go back to the homepage let's reload and here you can see is our engine X website if I click on this it will take me to the website but it will also show me if the container is up and running so now if I stop the container let's do this stop engine X evaluation one for example let's go back to the homeage dashboard you can see that it has ACD it so this is really an amazing way to monitor all the different content containers and applications in your
homepage dashboard really cool let's start this again and now you can see it's up and running so my new hom lab dashboard using homepage is such a great Improvement to my older hom lab dashboard where I was using homo that just had a couple of links to my application dashboards but honestly I wasn't using it because it didn't provide me any information so now with homepage I can see all the critical data in my home lab I can quickly see all the uptime status of my containers I can see all the virtual machines that are
running so all the important information that I want to see and that is really amazing but now it's your turn so please tell me what home lab dashboard are you using are you using Heim doll dashy organizer or any other of those home lab dashboards thanks everybody for watching a big Thanks goes out to all my supporters on patreon that make all these free tutorial guides possible and I hope to see you in the next video take care everybody bye-bye