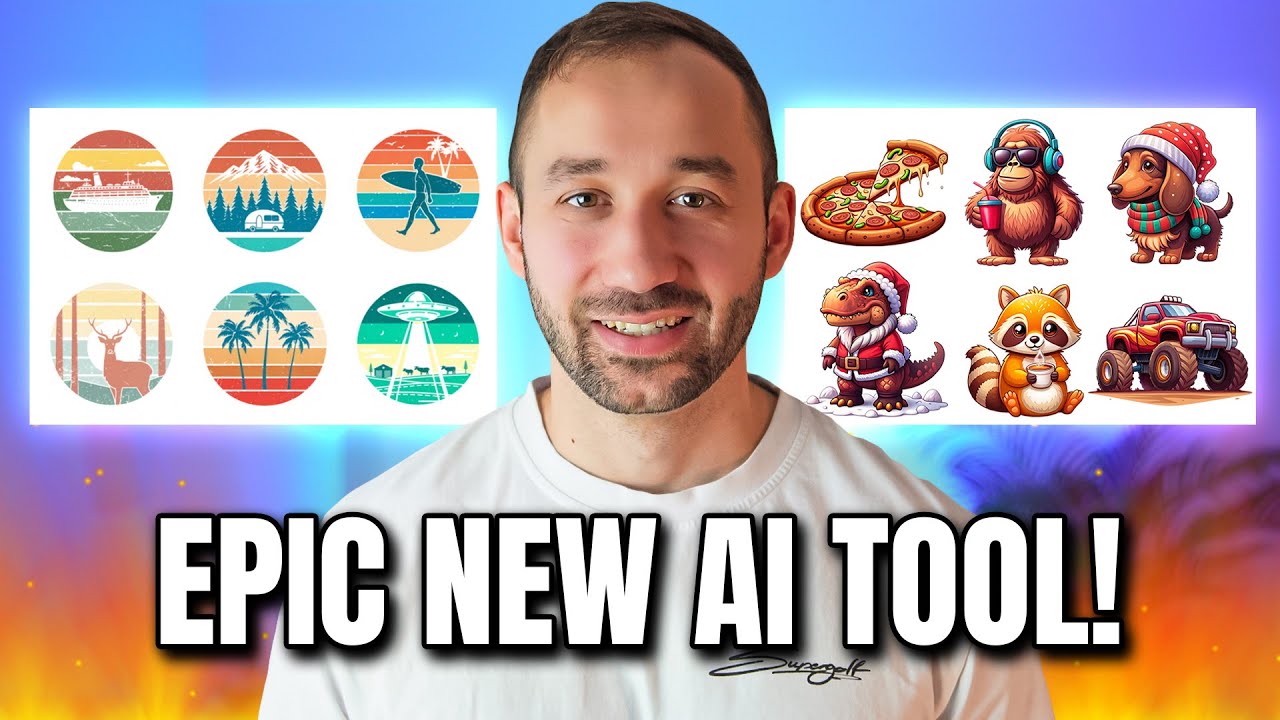
look at that it's now pasted all of these into the queue right here and they're all generating at the same time that that didn't even take a minute and we've got hundreds of graphics for national parks and they all look different in this video I'm going to teach you how to generate AI prompts as well as AI Graphics all in bulk this has never been possible before and when I learned about it my mind was absolutely blown so I can't wait to share this with you and the best thing is this is not limited to
just one a I generator you can do this with idiogram you can do it with flux or even D E3 if you wanted to so the first step to this new method is generating our prompts and bulk I'm going to use the my designs GPT for this which will be linked in the description the way this works is let's imagine you want to create some graphics for national parks in the US but rather than the graphics are looking the same you want them to be unique prompts for every single Park that actually represent the national
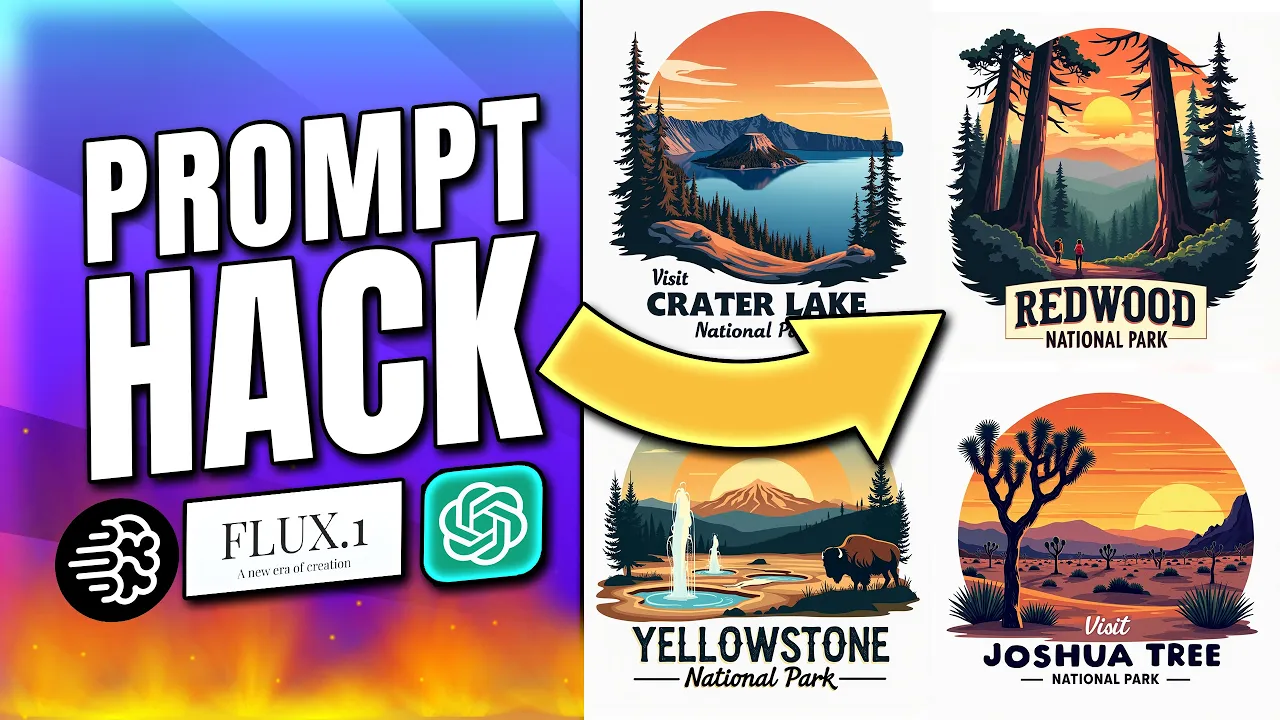
park and make it look like an authentic design well in that case you might already have a base prompt like this one right here you do need a base prompt for this to work but let me go through this example so this one says retro flat 2D Vector Sunset illustration of yusei National Park featuring towering Granite Cliffs waterfalls and black bears there's some descriptive words right there to kind of symbolize yuse National Park in the actual graph graic below the graphic it says visit Y national park and the entire design is isolated on a white
background so a fairly similar straightforward prompt but we want this to be adjusted for all of the other national parks that we're going to create as well what you can do in this case is you can say scale out this prompt to the 30 most popular national parks in the US and 30 is just an example right here you can do more you could do less ever you want then you hit enter and what this GPT is going to do is it will scan this prompt it will keep the same style it will retain this
styling all the same but it will swap out the important variable words or Paths of this prompt that need to be changed in order for the prompt to suit a different National Park and this is kind of like scalable designs on steroids you can do this for an endless amount of niches and topics this is not the only way to use this GPT there but just look at what it's doing right now so it's put out some new prompts right here this one says again retro flat 2D Vector Sunset illustration of Yellowstone National Park featuring
geothermal geeses hot springs and bison below the graphic it says visit Yellowstone National Park and the entire design is isolated on a white background so change that around but only the important details then we've got the Grand Canyon again it's changed these features right here to iconic Canyon layout Cliffs and the color Colorado River and it is still going right it's doing this for 30 national parks notice how there's a gap in between all of these fields as well which is going to be important once we take these into my designs to generate the graphics
so let me copy all of this right here and move over to dream AI which is the builtin aii generator for my designs and by the way this is our base prompt right here we've got e and the results are on the right very nice looking Graphics but what we're going to do next is we will paste all of our new prompts into this box right here and enable parallel prompts because what that does is each new line will generate a separate image so every single prompt that you see here will generate its own images
at just one single click so if you hit dream your mind's going to be blown but let me just show you a few more tips right here because whilst you don't need an active my design subscription to use dream Ai and this parallel prompts feature you do need credits to actually generate the graphics because it it also costs my designs to generate the graphics through flux or through idiogram so you've got a bunch of different models right here to choose from we've got stable diffusion Del 3 some versions of videogram and all the different versions
of flux as well if you want to save on credits if you want to keep the credits to a minimum turn down the amount of images that each prompt generates right here as you can see now the slider is at the minimum and the credits have gone down significantly so that is up to you do you want more images more choice in case you know a couple of the results don't look as great that is going to cost you more credits or do you want to turn this down to just you know test and play
around with this for now you can also change the resolution of course so if you want more of a taller portrait image maybe try 3x4 and also notice how some of these models will be a lot cheaper because idiogram version one only costs 75 credits for one image and this is one image for all of these prompts just a quick reminder but yeah I'm going to use flux Pro cuz that is one of my favorites for these types of Graphics I'm also going to turn this up to four results just so we have more to
look at and now I'm going to hit dream there we go it's now submitted that request is taken off the credits and within a few seconds here your mind will go nuts because look at that it's now pasted all of these into the queue right here and they're all generating at the same time absolutely mind-blowing the first one's already being done right here if I click on this what have you got can lands National Park never heard of that but some of these results look really good and there we go the rest is also getting
there what we got here Capital Reef National Park Lassen Bryce Canyon very nice interesting looking Graphics we've got Death Valley that looks great as well sometimes I didn't put the visit above but for the most part the text looks pretty decent and there we go pretty much everything's ready that that didn't even take a minute and we've got hundreds of graphics for national parks and they are look different they've all been customized and changed to actually suit the topic or the niche in mind so this is absolutely gamechanging whoever takes advantage of this will be
able to create really good looking Graphics that are very specific and very suitable for their own niche in a very short amount of time let me give you a few more tips about this because it doesn't just end here right what do you do next with all of these Graphics what I've been doing is clicking through the results and choosing my favorite so let's say this is your favorite you click on this then you go to the next set you can even scroll up you don't have to even click through the sets now they've changed
this layout so you could just scroll up you could click on all of your favorites as you scroll up once you're done with this process you can then click on either download and download the graphics to your device and then you know upscale them remove the background do that all externally with whichever tool you want you don't have to go through my designs but I want to show you a few extra tips in here to again do all of this in bulk because we could now also click save 10 images to listings I'm going to
say don't upscale for now you can choose a collection right here if you wanted to be save to specific folder I've set one up that says national parks the rest can stay the same then just save to listings I've just quickly selected 10 images at random right here but obviously if we went through this we could probably get you know at least 30 images one for each of these national parks now if we head to the listings tab here we are this is where the graphics have been stored we've just generated and chosen and I
can also select all of these right now go to Quick actions and then say remove background this unfortunately again it uses credits I think they actually use the clip drop model which is one of the best automated background removers out there so if you click on remove background yes continue then it's now going to go through this all in bulk again super easy super hands off and it only takes a few seconds for all these graphics and they're all very well isolated so there shouldn't really be any issues with these kind of Graphics if you
have more complex outlines or edges then yeah you might struggle and there we go that's already done so if you now double click on this mockup one slot right here you can see the background has been removed very effectively what's next well now we need to increase the quality cuz it's still at about 1,000 pixels for all of these graphics and we can head back to Quick actions and either use the vectorizer right here this is using vectorizer doai or the bulk upscaler now in this case we've got a lot of gradients so so I'll
probably upscale these images and one thing to bear in mind right here you want to actually select the second file slot right here because that holds the graphics without a background that's what we want to upscale we don't want to upscale the version with a background right so in my case those are saved in mockup one and these are being saved to a new empty file slot so we'll hit up scale right here wait for this to be done and if that naming right here of the files is confusing to you that's just because we
usually save mockup files into these slots to sell an Etsy through my designs but you can go into the templates and you can change these if it's confusing you so this could just be no background low quality example update that and then here we could say no background upscaled right update that slot and this is essentially the original file don't need to do this this is just for anyone who wants to be a bit more organized or not get confused by the naming now we have high quality Graphics the background taken off we're basically ready
to either once again download them or sell them on Etsy straight away right here through my designs you can go to Quick actions download them as a zip file so just choose the right file slot right there download them you might need to yeah need to take this first if you want them to be zipped up or we can carry on with the process right here for selling them on Etsy so what I would do next is make sure that all of these listings are selected and then go to publish them because you can do
everything including mock Ops and the listing data during the publishing process so we're going to choose a public profile we'll just type in shirt for this example we've got the Bella canva 3001 right here for light colors that's going to work best with our designs so I'll just load this profile which brings us to the mockup stage right here and by default it uses the original file obviously we don't want that because you know it still has the background attached and it's low quality so I'll just change the print file slot to no background upscaled
right there we go this is going to refresh the mockups speaking of which if you wanted to add or delete mockups you've got the choice right here to for example deselect Heather Peach if you don't want that in there um you can add more mockups with this button choose one from the list so if I also wanted a mail model for example I can click on this right here and then enable a white shirt mockup for the male model and these colors swatches by the way are the colors that we're choosing to sell as shirts
on our ety listing so if you also want to sell natural or you want to sell Heather Min you know you have to enable the colors down there and there we go so the mockups have been generated you can change the order of these as well so if you wanted the blue one right here to be at the start as the primary mockup you do have the option by changing the order so lots more customization possible with the mockups right here and this is all being synced by the way to all of the other listings
all of the other designs as well you don't have to do it for each and every design individually like you would do with Printery for example now let's go to populate the data which is the next step here we can use Vision AI for example which will scan all of our designs and then generate the listing data optimized for Etsy so we'll click this right here run Vision AI so here we go about 10 15 seconds later it's already generated the listings for all of these designs we've got some relevant keywords right here for the
title we've got a description and it's also added the product features for the Bell Cana 31 to the description got some tags right here at the bottom and then we can go to choose the price crisis where we have again the template loaded with a very high approximate profit which you can leave this the same or you can further adjust the pricing over here on the left hand side so let's say you wanted to drop the price we can do decrease by dollars and let's say we make it $4 cheaper apply to all sizes there
we go now these are all set just under $30 it's just an example you can do this however you want you could also include a blind lead right here so we could change this to maybe Heather Peach and only for the XS we could say that you know the shirt's going to cost $17.99 apply that to all listings right here but just to that one size for Heather Peach and now this is going to look a lot cheaper in the search results but the majority of the sizes or pretty much all of the sizes and
colors are still our desired price so that is going to lead to more click-throughs and it's very easily done right here with these settings in the pricing tab then we can preview the publish info and from this page we're basically nearly done all you need to do is choose your store of choice if you have multiple integrated with my designs and you can change the category right there if you wanted to I will change this to another company or person created the product and then this is going to show your production partners that you have
set up on Etsy so in this case Swift p is the only choice you can also by the way offer personalization through my designs I have a separate or multiple separate tutorials on that topic as well so if you wanted the customer to be able to customize the design with their name with a date with their dog's name whatever it might be then you do also have the option to do this in bulk with my designs so there we go these are all ready to go all you have to do now is Click publish and
then these will be loaded to the drafts in your Etsy store you can then publish them to the marketplace so as we're getting close to Q4 I really hope you can take advantage of these new ways to generate prompts and AI graphics and even if you don't want to use my designs in this I think at least testing out that GPT can massively help you out with your workflow when it comes to prompting now if you are interested in my designs and this is kind of the first time or one of the first times you've
heard about it you're not really sure what the tool is about then you would probably massively benefit from watching this video next which is my complete my designs beginners overview [Music]