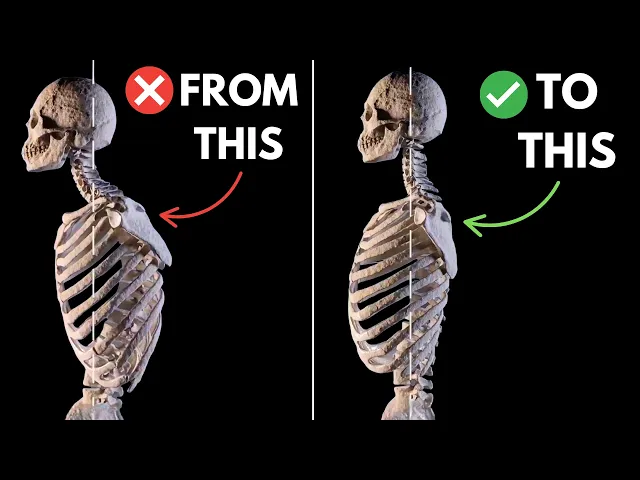
If you have a really rounded upper back and forward shoulders, otherwise known as thoracic kyphosis, this video is going to show you how you can fix it at its root cause. Many people in trying to fix this posture overly fixate on the muscles that are tight, such as tight pecs, pulling the shoulders forward, or they overly fixate on trying to extend or straighten out their thoracic spine. And while that's important, there are other factors that play a significantly larger role as to why those things exist as they do in the first place.
Before we get into that, we need to understand a couple of key concepts about posture and rib cage position and shoulder position. Then we can get into how to actually fix it. Because if you don't understand these things, you're not actually going to effectively be able to implement the interventions.
First of all, it's important to understand that posture is a representation of our body's strategy to control our center of gravity and spine curves against gravity as we are upright against it. And there are a lot of different factors that can influence this such as our age, our injury history or what we're dealing with right now, our genetics, our lifestyle habits, etc. All of these things are creating an environment in which the body needs to create a strategy to alter its spine curve so that way it is upright against gravity.
in the best way possible given the constraints of those variables. A good visualization would be to imagine there's an invisible line going down the midline of the body all the way to the midfoot. And our body is going to alter the position of the knees, the hips, the trunk, and the head in order to stay upright and keep our center of gravity evenly distributed amongst that center of gravity line going down the midline of our body.
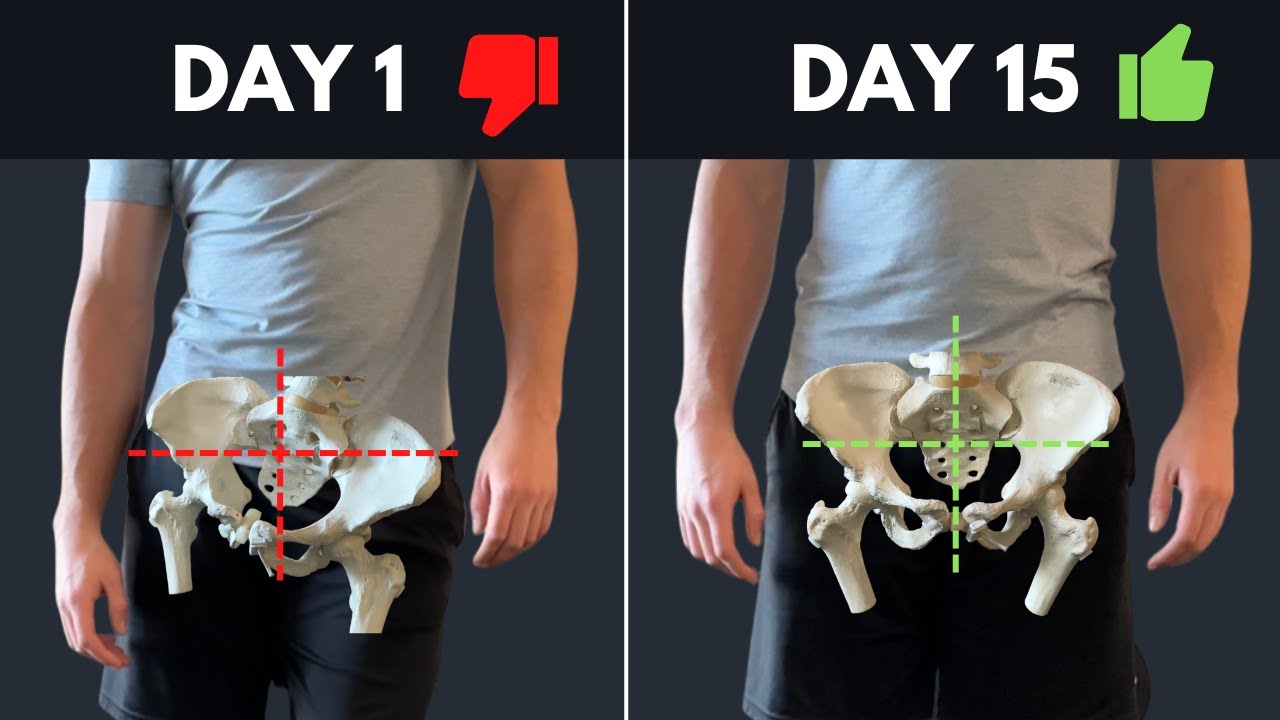
So for some people, they have a pelvis that is tilted back like this. And if that's the case and that pelvis is tilted back, that's going to result in rounding of the upper back and a forward head. And which came first, the chicken or the egg?
It's hard to say. It's usually a global strategy, but as one goes back, something else needs to come forward or else you will literally fall back. Another thing that could happen is that if the pelvis is very far forward at a certain point, if you go too far forward, you might fall flat on your face and you're going to lose that center of gravity control.
So you might need to bring something back like this, like your upper back is significantly rounded, but now you have a very rounded spine as a whole. And this can actually potentially put you in a position where your spine is compressed and you're actually shorter than you actually should be. So the point is is you can't fix this unless you understand everything that's going on down below it.
So any effective intervention needs to be able to eventually integrate what's going on at the head with the rib cage and trunk to the hips and to the feet. Otherwise, you're just going to stand up and go back to your old center of gravity strategy. Now that we understand that, let's understand what's happening at this area itself.
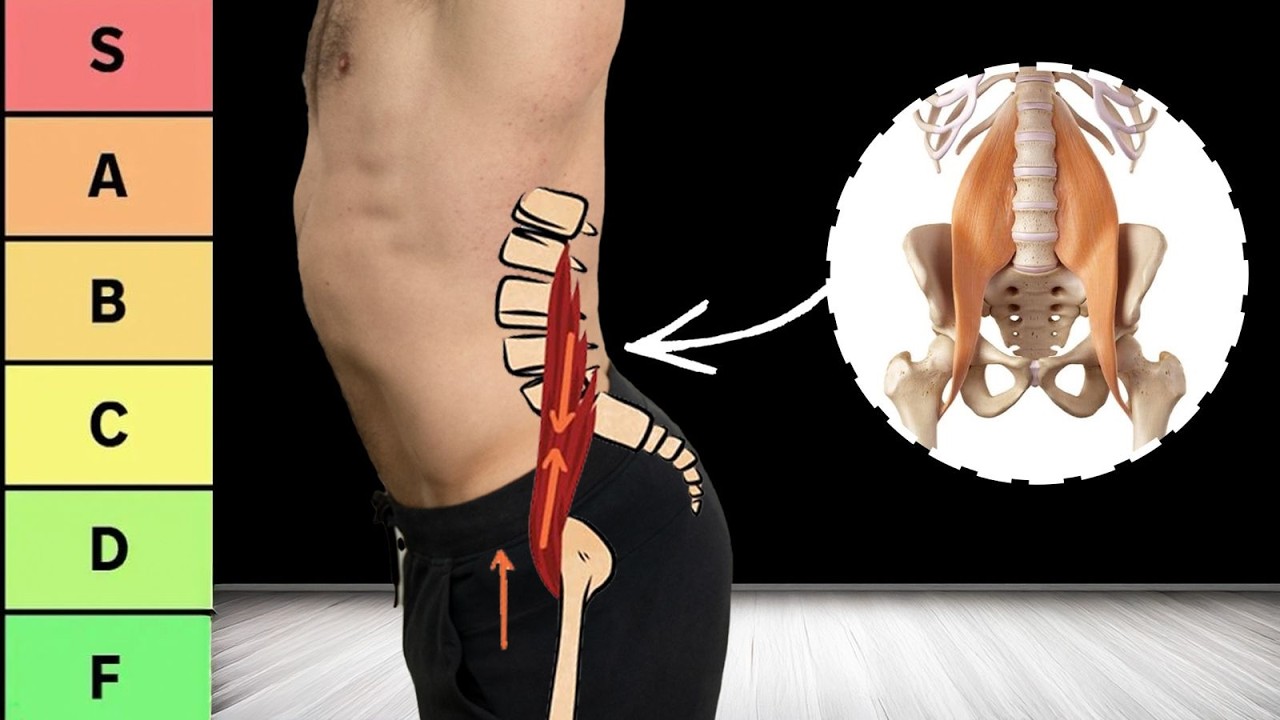
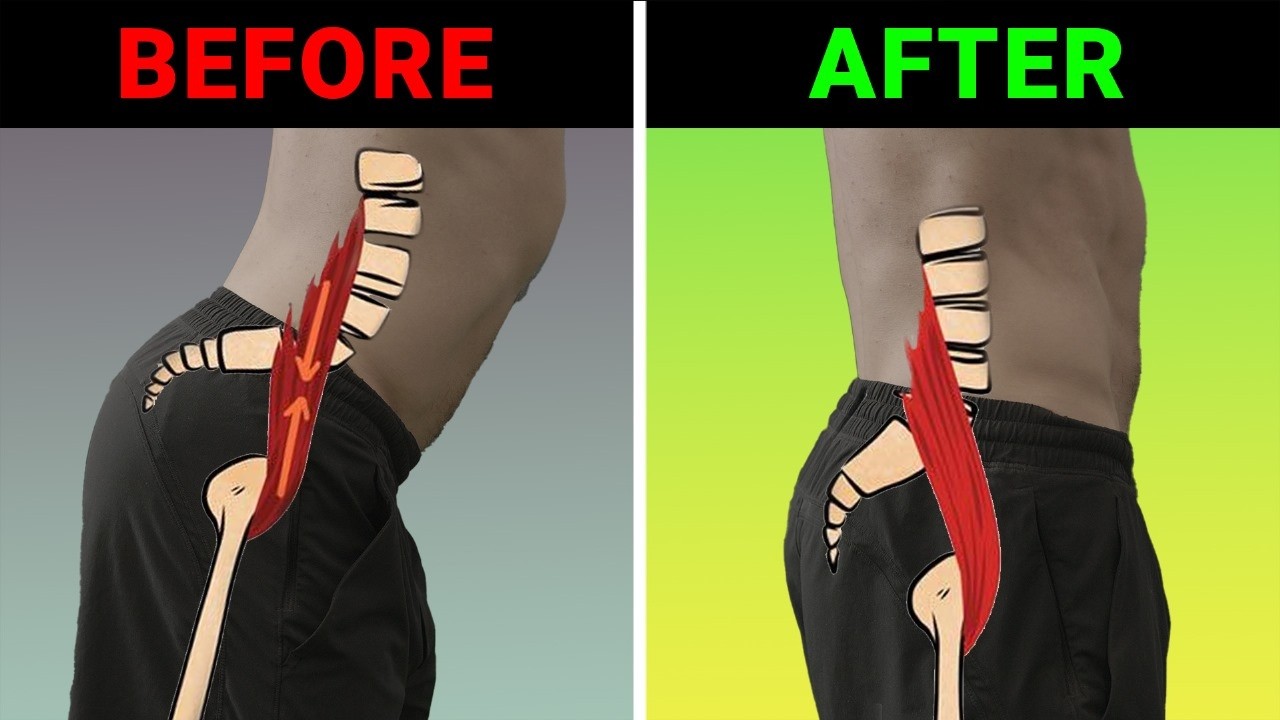
Typically, when a rib cage is in this position and rounded, it is representing a rib cage that is pushed back, obviously here, but it's actually kind of leaning forward in space. And so this leaning forward is pulling the shoulders forward with it. This is pulling our shoulders into internal rotation.
This is compressing the front side of the rib cage. And so this is bringing the neck forward. And if you've ever seen any of my other content before, you understand that the rib cage is a big player in the initial stages of what I do.
So we need to be able to expand the rib cage in all directions with every single breath that we take. With these people, it's certainly not happening in the front side of their body. So, we need to teach them what it feels like to use their diaphragm to open up this space because we breathe 20,000 times a day.
So, imagine you have 20,000 reps of not expanding this space. And you have 20,000 reps of instead pushing your head forward to open up your airway, which is a really effective strategy if you can't open up this space. So, you're just reinforcing that pattern over time as opposed to getting 20,000 reps of opening up this and being able to not use your neck to pull forward.
So the first thing we need to do is teach our body how to open up this space. And secondly, we need to teach our body what it means to actually use this space. So we can open up this space all day long.
But we also need our shoulder to effectively learn how to move and glide and rotate on this rib cage that's now in a better position. Otherwise, it's going to want to use its old movement compensatory strategies. So we're going to teach our body what it means to actually utilize a rib cage that's in a better position.
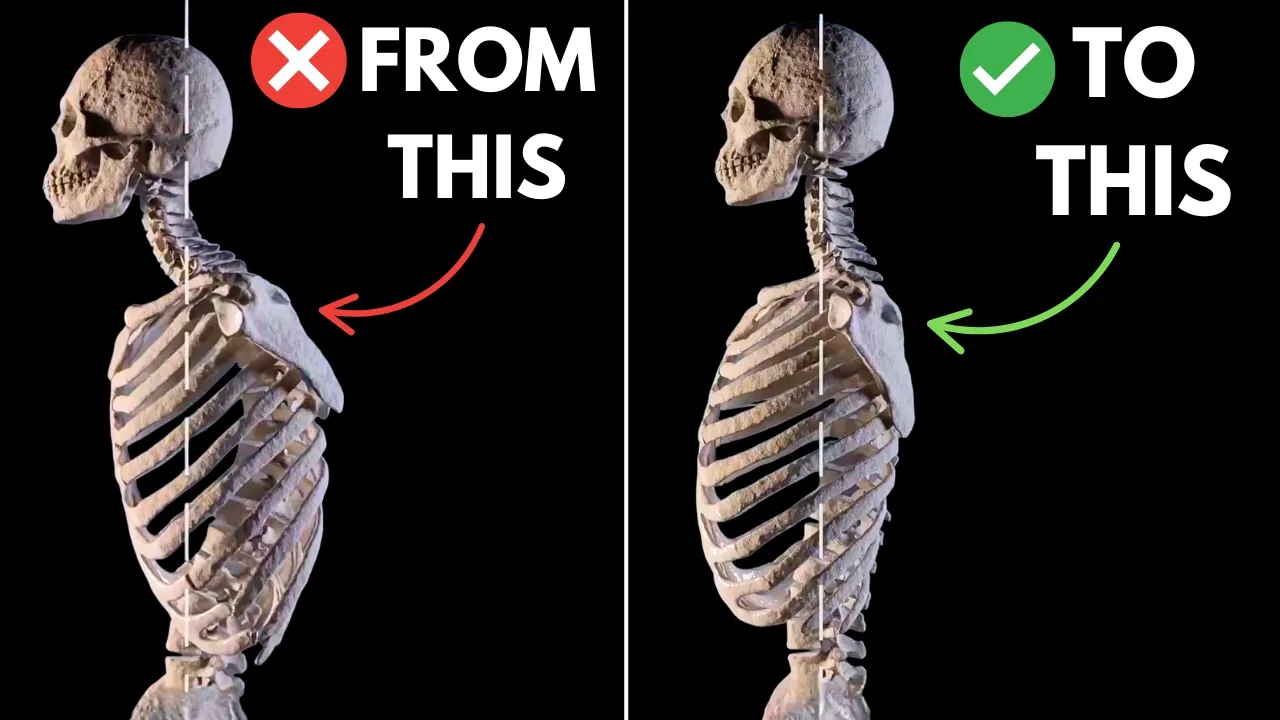
And then finally, we're going to stack our head over our rib cage, over our hips, over our foot in a more effective way that aligns our center of gravity. And that is the true long-term fix. The more you do this, the more you reinforce it.
Now, if you're familiar with my content, this is a classic one that I absolutely love because of how basic and effective it is. This is going to help open up the front side of our rib cage. And I'm sure that you can see how this would carry over to addressing the problem that we're talking about.
So to do this, you're just going to lay prone, meaning you're going to start with your face down, and you're going to have your arms out by your side. So that way your elbow is around the height of your shoulder. It can be slightly less than that if you want, but you don't want to go too far up.
So I'm going to create this shape with my hand, sort of like a triangle, but wider than that. I'm going to rest them on the ground right there. Now, here's the key.
Starting with your face relatively down, you're gonna push through the inside elbow bone right here all the way up through the inside portion of your forearm to your index finger and the base of it right there on both sides evenly. Just about a three out of 10 push. You're going to come up stopping at the point where if you went any higher your low ribs would come off of the ground right there and your elbows would come off too.
So, for me, right about there is good. Last thing you want to make sure you have is that your head is nice and neutral. You're looking about 4 feet in front of you.
You're not too far up here or too far down here. You want to make sure that your neck is in a position that will allow your airway to work well without overly engaging your neck. Now, here's all you're going to do.
Exhale, maintaining slight pressure through the floor. Again, just a three out of 10 intensity. Big open mouth sigh.
You're going to sigh. It can't be this. It needs to be for about 5 to 10 seconds.
At the end of that exhale, you're going to feel your lower rib cage come down a little bit into the floor, but you need to stay with that three out of 10 pressure, keeping yourself upright. And then you're going to pause, put your tongue on the roof of your mouth. And then after a two second pause, you're going to inhale silently but fully through your nose, and you're going to feel your front rib cage expand.
All the while you're maintaining that slight pressure through your forearm on the inside. So, a full rep looks like this. And if you can't get up very high initially, like you start right here, you can get to the point as you do more and more reps of this of getting yourself a little bit taller like this.
But again, don't go to the point where if you went any higher, your low ribs would pop up. Hey guys, I'm throwing this in postedit because what we've realized is that the day that we're releasing this video is also the same day where there is less than 48 hours to join my upcoming new upgraded biomechanics 2. 0 course.
So, if you want to learn more about fixing the true root causes and dysfunctions of poor posture like we're talking about in this video, this is a fantastic opportunity to learn and go into a deep dive about how exactly you can do that. So, if you're a personal trainer, strength coach, physical therapist, massage therapist, anyone that works with bodies, or if you just want a deep dive on how to fix your own body, then this is a fantastic opportunity. There is a final day sale where you can save $100.
So, check it out down below in the description if you want to learn more. Next, you're going to take a hand towel and roll it up about this thick. This is about what you're looking for, but it's going to vary depending on how much support you need.
You're going to place this underneath the apex of your neck curve. So that way when you're in this position, your chin is passively pointed at the ceiling. Please don't skip this step.
It's very important. You're going to have your feet on a foam roller and you're going to feel the contact of your PSIS on your pelvis. These are the points sort of like the upper back portion of your pelvis.
They kind of feel like knuckles and you want to maintain even contact or whatever relative even contact you can get on both sides. The last thing you're going to grab is a dowel or a broomstick. And you're going to get it about shoulder width apart and then go slightly wider than that.
Now, here's the key. Keeping your chin passively pointed at the ceiling and you're not pushing down into the roller. The roller is just there to help you find those pelvis contacts.
You're going to exhale and do the same exact breathing you did on the last exercise. So, don't have any tension in your body really. Just exhale with an open mouth side for 5 to 10 seconds.
And then at the end of that, pause, place your tongue on the roof of your mouth, and then inhale through your nose, not losing much of the side ab tension, not your six-pack abs, but your side ab tension you got at the end of that exhale. What you'll notice is that your front rib cage will expand. And then your hands will go back a little bit further naturally on their own.
Just maybe about an inch or two. So watch, a full rep will look like this. and then repeat and keep doing that.
You'll notice that your hands naturally drift back further and further. This is working on the ability for you to stay stacked within your body and still get some extension and opening of your upper back. So, you're going to reach a point where if you went any further through these breaths, you'd start to flare your rib cage and arch your back.
Stop before you do a rep that would force you to do that. restart and then go again. You'll probably be able to get a little bit further.
Now, what we're going to do is stack everything together. Like I mentioned earlier, we're going to get our center of gravity better moving over our foot and stacked over our foot because when our spine moves into certain positions, certain areas of our rib cage are going to open up. And that is actually specific with how the breath influences the rib cage as well.
So, by doing this, you'll see how we're working on the ability to keep our weight stacked over our midfoot, but still move through different positions of the spine, which is an effective strategy for improving our posture, both in a static and dynamic way. So, what we're going to do is get one foot length away from the wall and we want our feet hipwidth apart. Now, here's the key.
We got to make sure we have the right foot contacts. You want about 60% of your body weight on your heels. And you want that weight to be evenly distributed between both feet.
And you want the other 40% between the base of your first big toe and fifth toe, your little toe right here. The rest of your foot is very much relaxed. Now, here's what you're going to do to start.
Straighten out your knees a little bit and just get your back relatively flat on that wall. Your eyes are looking perfectly straight ahead. Then what you're going to do is you're going to inhale through your nose silently but fully.
And you're going to turn your hands out until they're facing the wall away from you. And you're going to arch your back and let your chin naturally drop. As it does that, your knees are also going to bend to accommodate that change in your spine position.
So it'll look like this. Should happen sequentially. And then as you exhale, you're going to reverse the process.
You're going to exhale through your mouth, straighten out your knees. Your low back is going to flatten out against the wall with some of your upper back, but your shoulders are going to round forward. This spine position is more associated with exhalation.
And inhalation is going to be here. And let the position of the spine here dictate what your head is doing. Don't try to like actively drop your chin too much.
Just keep your eyes at the horizon. And then exhale. Inhale.
And what you'll notice is this is a nice smooth process. And you should feel your body weight always stacked over your foot. But of course, as your knees unlock and come forward during the inhalation portion, you're going to feel like your weight is going slightly more forward over your foot.
Just don't lose your weight in your heels. Always keep those three points of contact at all times. And as you straighten out your legs, you're going to feel your weight in your heels more.
But again, don't lose those forefoot contacts. I would recommend doing those exercises in the order they're presented, probably for about two sets of 8 to 10ish breath cycles per day. The more you do this, the more effective your results likely will be.
But with anything else that is on my channel or relevant to my content, that's an exercise. Execution is absolutely key. This can work for a lot of people, but you got to make sure that you're dialed in with your form.
So, make sure that you watch the video a couple times, get a good idea for what you should feel, and you should see some good things happen. And I want to end by saying this, posture is not necessarily correlated with pain. And it's not something that we need to overly fixate on all the time.
What I actually care about and why I talk about posture so much is I want to improve your movement capabilities. and posture can be representative of certain movement capabilities or restrictions. So that's why I talk about it because I know it's something that the average person is going to identify with.
But at the end of the day, depending on your age and again like what lifestyle habits you have, you may see more or less results improving your actual posture. But what I strongly encourage you to think about more is how good you feel and how well your body can do the things it needs to do on a day-to-day basis to feel better and move better. And if that improves your posture along the way, then that's fantastic.
But just remember, the goal of this video is to improve your overall movement capabilities. I hope to see you guys in the next one.