Hey this is Andrew Brown over here at free Camp bringing you another free Cloud certification study course and this time it's the Azure Solutions architect expert also known as the a305 and the way we're going to achieve uh Azure certification is through lectur content Hands-On labs and as always I provide you a free practice exam that way you can go get that certification to put it on your resume or LinkedIn to go Get that Solutions architecture role if you like these kind of free Cloud study courses the best way to support more of these materials
is by purchasing the optional paid materials over on the exampro platform exampro doco uh if you don't know me I'm Andrew Brown and I've taught a lot of different Cloud certification study courses here Azure adabs gcp kubernetes terraform uh you name it I've taught it so you're in great hands and I will see you in class Uh in a moment [Music] ciaoo hey everyone it's Andrew Brown and we're at the start of our journey asking the most important question first which is what is the a305 so the a305 um is a certification or an exam
uh to get the certification Microsoft Azure solution architect expert I use a funny wording there because um previously you had to take two separate exams the 303 and the 304 and then that would get you the Certification but uh Microsoft has seen the light and now we just have one exam for a certification it looks like it's mostly like that now but just understand the future they might change that but yeah the a305 more or less means Microsoft Azure Solutions architect expert going to get off screen here now but uh yeah it is an expert
level certification and it's focusing on comprehensive strategies for Designing Solutions on Azure it has a deeper dive Into advanced networking configurations you don't see me doing this but I'm doing quotations air quotations here sorry air quotations for the word advance because it's not as in-depth as something like the um uh the A700 Advanced networking but yes you do need to know your networking your Cloud net working very well for the certification it has a broad examination of data and Security Solutions in Azure uh the sc900 is a Great recommendation for that but we'll talk about
that when we look at the road map here and this has extensive Hands-On knowledge you should know how to do things in the Azure portal arm templates and other uh uh resilient architectural tools all Azure exams are very code and script driven so having great developer experience is a must make sure you do things in the um the portal um now this one the 305 is not as um technically heavy like the 104 in terms of Hands-On But it still is a great challenge because of how broad uh the information is being covered in the
305 who's the certification for well consider the certification if you're uh looking to get an Azure Solutions architect expert role uh you're designing Solutions using Microsoft Azure you're implementing and monitoring Azure infrastructure you're creating configuring resources for Azure applications uh enjoy crafting resilient and scalable Cloud architectures I want To warn you this is a hard exam um it is very common to fail this exam even if you practice a lot and you do your best job uh it may just come down to the type of questions you get so you know we do the best
to give you practice exams and all the information here just understand when you get to expert level or professional level certifications it's not you it's just the questions and you might have to try multiple times so don't get discouraged if you uh if you Take an exam and you're just like one point shy away that is what it's like doing these professional or expert certifications let's take a look at our Azure road map um and I'm right away I'm already noticing that this is a bit buggy this is supposed to just say 305 but just
you know ignore that one one little bug there that says 305 but anyway uh we have a bunch of uh Azure certifications Microsoft certifications this isn't the full list um in fact There are some that I probably would even recommend on Route there but definitely before you go for expert you should have your A9 a900 gives you a good broad view of all services uh the a 104 is generally what is uh or absolutely recommended uh on path to the 305 I would also pick up the 204 on the way um in fact in this
course a lot of the content not a lot of the content but a good chunk of the content came from our 104 and our 204 and then we had to Round it out with other things so understand that these two are are part of the course if you've done the 104 204 you're going to be in really good shape or well aligned for the 305 and then you can spend time trying to figure out case studies and things like that I would probably also add the sc9 00 on here uh that is a fundamental certification
the dp900 would be also a good one um I'm just kind of running out of space for all these things that's why I don't have Them all listed like here you can see I have the networking one shoved down in here um but Azure just has a lot a lot of certifications okay um but anyway how long would it take to uh pass uh for studying well if you're beginner don't do this exam it is not a beginner certification it would take you uh well over a month if you're a beginner start in the fundamentals
do the associates um and work your way up to it if you're experienced you already have that 204 That that or and the 104 and you already have multiple uh years working experience it might not take you that long to study but you know on average I think 50 hours is for somebody in the mid-tier area we're looking at 50% lecture 50% uh practice or sorry 50% lecture in Labs 50% practice exams I actually probably would even bump this up a bit more more try to get your hands on as many practice exams as you
can the huge challenge with um uh Microsoft Certifications is they have a rich uh type of exam questions and not everyone can emulate those questions so a lot of times you are uh needing to overstudy uh with simpler exam type questions in order to try to be able to tackle the harder exam so just understand that that is something you have to consider um 30 days absolutely you need a whole month for this exam uh for for uh for studying a recommended study one to two hours really Max your time out and so that you
Are in the best shape possible um what other things should we consider well make sure you watch the video lecture content do the Hands-On Labs absolutely do all of them and do the best that you can in fact there are Labs that we wanted to record but they were so hard to do and this course was already so long that we didn't even record them and put them in here but we actually do have um I believe additional Labs with the instructions on our platform so you know Max out as many Labs as you can
to make sure or or Hands-On work make sure you're in good shape absolutely do paid online practice exams we have our own sets here um just ignore these numbers here I just did not feel like taking a new screenshot um but uh yeah just the the times are a little bit different here because you actually get 120 minutes and it's more around 60 Questions so 57 makes sense um but anyway yeah you definitely want to look Into that in terms of the actual exam guide outline there are four domains and each domain has its own
waiting this determines how many questions in a domain that will show up uh Microsoft exams they like to do arrange of questions which it's not great for the test taker but I guess it makes the exam harder I you know I don't personally like this I don't like that they do ranges like this but uh you know I guess they think that makes it if it's more More confusing then therefore the exam must be more worth it for the end result I don't know so the first domain um or section whatever you want to call
it it's between 25 and 30% of the exams so this design design identity governance Monitoring Solutions the next one is 20 to 25% for design data storage solutions the next one is 12 to 20% so design business continuity Solutions and then 30 to 35% to design infrastructure Solutions where are you going to take This exam it's going to be with Pearson view um previously Microsoft I think they offered it I think it had PSI online before um even adab us is doing the same thing they're just doing Pearson so Pearson and Pearson view um so
you can do it at inperson test center or online for the convenience your home uh from your own home so what we're talking about is Pearson view online this is the online product exam system and then you have the Pearson view uh Network of test centers this is where you do it in person the word Proctor means a supervisor visor so someone is going to monitor you during this exam um sometimes when you uh go for your exam they're uh uh like online they will go and actually call and talk to you and ask you
to show the room and it can be very involved so just understand that uh there is somebody watching while you take these exams uh the grading for this one is um 700 out of a th000 points so Basically it's around 70% I say around 70% because aure uses scaled scoring so um technically it's not exactly 70% it's 700 out of a th000 I know that's confusing but generally uh what you want to do is aim to go get 80 80% I always think if you have a margin of 10% above that you're passing for practice
exams then you're giving yourself a buffer you might even want to go higher and try to Target 85% um and in the result you will Actually probably get 70% um in terms of the the amount of questions there's between 40 and 60 so you should be able to get 12 and 18 questions wrong though the thing is is that when we save 12 18 that's not exactly true because you have to understand the format of the questions for Microsoft Azure exams and they have a lot of different kinds of formatted questions you got multiple choice
you got multiple answer you got drag and Drop you got build list reorder you have active screen you got hot areas you have case studies you'll absolutely see case studies in this exam and then questions can have exhibits so it can get really complex um in terms of what you will see will be different from other folks you definitely will see multiple choice multiple answer you'll definitely see case studies and some of these other ones might show up some questions are worth more than one points there is no Penalty for wrong questions so do not
uh do not leave any questions blank some questions cannot be skipped and you have to fill them in um so yeah there's a lot going on there the duration is two hours um I could have swore that the 204 was three hours but I looked it up and maybe they changed the time but I really thought they would give you more time for this exam but yeah it's just two hours so it is still a stressor um you get two minutes per question basically So we're looking at an exam time of 120 minutes but your
seat time is 150 minutes all we do is we add 30 minutes to to make the seat time the seat time refers to the amount uh uh that you should allocate for the exam um so this includes time to review instructions Show online Proctor your workspace read and accept the NDA complete the exam provide feedback at the end of the exam the reason I I include this here is just to remind you that um when you're when You are planning this you have to plan for all of the time not just the exam but also
the time around the exam this exam is only valid for 12 months uh this is something different so Azure used to have two years and then you'd have to pay every time now they're doing every 12 months so every year you recertify um however the recertification process supposedly isn't as hard because renewals are free um and I think you can even check in like six months into it if You want to do uh uh if you want to do it sooner but we'll take a look at that because again those are new things to me
and I want to uh share those with you yeah hopefully that gives you an idea of the exam guide itself but we'll see you in the next one okay ciao hey this is Andrew Brown and welcome to the marketing site on Microsoft for the a305 and you'll notice the name of this is actually called designing Microsoft Azure infrastructure Solutions and it gets you that badge the uh Solutions expert but the uh strange thing is that Microsoft does not name the badge the same thing as the exam uh it's not that strange if you understand the
history of their certifications they like to sometimes have more than one exam that you have to pass in order to get a badge and so they don't name them the same as the badge so that's just what's there and the old exam used to have two the 304 and the 303 but we'll go down here below because the reason I'm on this page is I want to show you the sandbox if you go here to the sandbox and we'll open this up we can see the formatting of the questions now it's not example questions um
we have example ones on our platform and we have we should have a free set but what we'll do we'll go ahead and click next and this is just like if you were to take it online or a test center and we'll click through and We'll go here and there's just 10 questions and the purpose of the sandbox is to show you the formatting of the questions I'm going to get out of the way there we go and so the first one we have is a multiple choice pretty straightforward says what is your favorite sound
we'll say a bell we'll click next this one is multiple choice so here we can checkbox two things we'll do that the next one here is drag and drop so you have these things you drag And then you drop them into the area on the right here notice that um I can actually fill in multiple so uh you know just it can vary based on the type of question so it might not just be one to one these things might still remain in here then we have um build order build list reorder so which five
tasks should you do in the correct order so you say making a sandwich We'll add the pickles the Mayo the ketchup this that this uh whoops this and that okay and then You can move them around notice that this actually has more than five questions these are draggable here you'll notice these everywhere we'll go ahead and hit next um this question is an active screen so which option should you ACH uh choose to achieve this goal so we'll scroll on down here um to answer select the appropriate setting in the applications example properties window in
the answer area so Notice here if we hover over might be hard to see see but there is a blue line so it's showing like where do you click right so here that's the only one we drop it down then we choose an option here so it's kind of like simulating um a components without actually having the environment we'll go to the next one here so this one is an active screen so you need to implement self- serving provisions of virtual machines this Actually kind of sounds like a proper question the solution must ensure that
the user caner the virtual machines Etc what do you choose so we'll go here and we'll choose option one and then op option to notice that these are relaying to this table here but this is just you know another way that we could be working with stuff here we have a hot area so here it says which Services should you configure so we'll go take a look here and notice that we can select Something from the hot area so it's very similar to that other one um active screen again you're just like clicking on stuff
we'll go to the next one here and so this is a case study so uh case studies are uh pretty complex the idea is you can click around here and read all of this stuff okay so you read through all of this stuff and then what you're going to do is go back to your question at the top I know it's confusing but that's where it is and Then you can go ahead and answer uh the question we'll go back and hit next then you have exhibits so exhibits are basically just tabs the idea is
that you read the question and then you can go look at exhibit there can also be multiple exhibits so I think in this one here's an example where you have multiples and then you go back to your question and then you answer it okay so you know hopefully that uh makes things really clear um but you can see that They really do have a lot of different formatted questions and uh that can make this uh quite challenging if we want to read about the specifics of the exam we can go to the uh study guide
now I remember there being at least in previous exams um or um in other exams you used to have a PDF you can download I can't seem to find that anymore all there is is the marketing site here maybe that's what they want to do but you can go through here and read about Like the certification renewals the scoring all the stuff here we were mentioning about certification renewal so if you want to read a bit more about that where they talk about how renewals are free and you have a six-month renewal window and things
like that you can read all about it um but yeah there you go and uh we'll see you in the next one hey this is Andrew Brown and before we get into Azure ad I need to point Something out it's not called Azure ad anymore it's called Microsoft entra ID Microsoft decided to change the name of azure ad why nobody knows but I can tell you no customer likes this particular change um somebody just had a lot of time on their hands over at Microsoft but we do need to address this and I need to
point out that I'm not refiling all of the content that I made just to change the name because that's crazy I will at some point when this when the Content is stale but the content is not stale they just changed the name on us um but I wanted to just go over that quickly here so uh the names here we have Azure ad is now Microsoft entra ID then the Azure ad tiers is from P1 P2 still P1 P2 the Azure ad external identities is now called Microsoft entra external identities and if we scroll on
down we have a logo change so instead of this which by the way I really like the old Logo they didn't need a muck with it but anyway we have uh the older ones here and so this is the new one here and so there are some name changes here Azure ad single sign on now Microsoft entra entra uh single sign on we'll go down below here and you can see well more name changes okay so um anyway yeah they renamed it and you know customers are just going to take a while to get used
to it I still like calling azuread I know a lot of other people That like still calling it azuread but it's at some point we'll get moved over to it and we're just going to use both names okay now coming over to uh uh the portal I need to show you that if you type in Azure ad it's still going to pull up Microsoft Entre ID okay now you don't want Azure ad B to see which is interesting they didn't rename that U which is a it is part of azure kind of in a sense
but it's more for um if you're building applications and you Want to um have authentication into it so just understand that there's not consistency all over the place especially even their documentation the marketplace still says Azure ad all over the place um even down below uh you know Azure ad notification so you know there's just going to be that Legacy of azure ad but anyway yeah what you want to do is go go over to Microsoft Entre ID it all looks the same it's just some name changes okay but but yeah there you Go see
you in the next [Music] one hey this is Andrew Brown from exam Pro and we are looking at Azure active directory and this is a cloud-based identity and access management service to manage users sign-ins and access to ad related resources so Azure active directory is Microsoft's cloud-based identity and access management service which helps you your employees sign in and access resources so that could be External resources like Microsoft Office 365 Azure portal SAS applications or internal resources so applications within your internal networking or access to workstations on premise and you can use Azure ad to
implement single sign on so you can see that Azure ad is basically like the the the one solution to log everything and uh we actually use it at exam Pro we use it with Microsoft teams or uh you know for the exam pro pro platform our mid panel is tied to it So when we want to log into the mid panel with credentials we have it there uh we use it with AWS to log into there and we use it to log into Azure so it has a lot of flexibility and if you're building out
applications for Enterprises they're likely using ad and so this is the reason why everybody adopts it or needs to understand it so it's a service I really really do want you to understand and know as your active directory comes in for additions We have the free tier and by the way each uh uh uh tier that goes up has the features before it but uh free has MFA SSO basic security usage reports and user management then you have the Office 365 apps which is uh revolves around if you're using that Suite so you have company
branding SLA two sync between on premise and cloud and then the premium tiers which really comes into Enterprise or or or on premise hybrid architecture so hybrid architectures Advanced group Access conditional access premium 2 identity protection and identity governance only thing I don't like about Azure ad is that uh you can't really create your uh custom access controls unless you have premium one or premium two but that's just how they do it so there you go [Music] go so let's take a look at the use case for Azure ad and we basically covered it in
the introduction but I just want to Reiterate it in a different way with a bit of a visual uh so that it really helps uh it sync into your uh brain there so Azure ad can authorize and authenticate to multiple sources so it can authenticate to your on- premise ad to your web application allow users to log in with uh ipds uh so identity providers could be like use Facebook or Google login uh you can use it with Office 365 or a Azure Microsoft and so just a visual here uh notice that uh we Have
Azure ad and using Azure ad connect we can connect to on premise through uh app registrations we're able to uh connect our web application to Azure ad with external identities we can um use Facebook or Google uh uh uh login and then for cloud applications we can connect to Office 365 or Microsoft [Music] Azure so active directory existed way before Azure and so let's just do a quick uh uh rundown of the history so we Have an idea of what we're looking at so um Microsoft introduced active directory domain services in Windows 2000 to give
organizations the ability to manage multiple on-premise infrastructure components and systems using a single identity per user so it's been around for 20 years and Azure ad takes this approach to the next level by providing organizations with identity as a service so idas solution for their apps across uh cloud and on premise and both Versions are still used today because they just have different utility and so we have active directory which is for on premise and then you have Azure ad which is just the cloud hosted version and in many regards these can also be connected
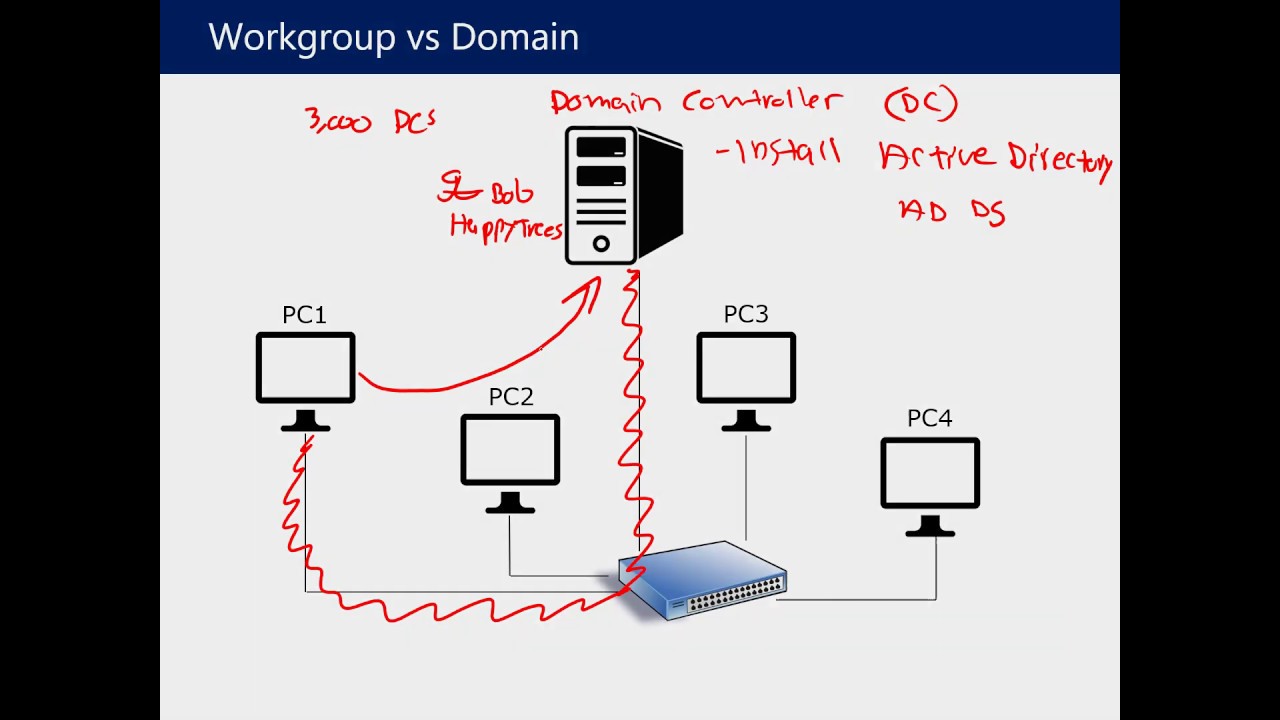
together um but there you go so remember that the domain controller is the server that users are going to be using to authenticate to the directory Service uh and so when you create an active directory Azure sets One up for you but there's some cases where you might want to set one up yourself and the reason why is that you could be like an on like an Enterprise where you already have your own active directory on premise but you've decided that you want to move it over to Azure ad uh because you just want a
fully managed active directory and uh you want to tap into the cloud but uh the thing is that some domain Services those are features on your domain controller just Might not be available and that's where you're going to need to set up your own domain controller and that's where Azure active director domain Services come into play because these provide managed domain services and so they have managed domain services such as domain joins uh group policies uh ldaps uh uh curb Ross Never Can Say That properly ntlm authentication and so the great thing is here is
you can have these domain services but you're not Going to have to deploy them manage them attach them they're just going to work so there you go so let's talk about um uh the term tenant and a tenant represents an organization in an active directory and a tenant is dedicated to the Azure ad service instance a tenant is automatically created when you sign up for either Microsoft Azure or Microsoft InTune or Microsoft 365 and each a or Azure ad tenant is distinct and separate From other azure ad tenants and so if you uh if you
were in um uh Azure ad and you clicked on your tenant information that's that's basically what that is right so that's my exam Pro one and it has its own special tenant ID and we can see that it's licensed for Office 365 and so that tells you that I'm using the Office 365 uh tier of azure [Music] ad so now let's take a look at some of the ad objects starting with users so Users represent an identity for a person or employee in your domain and a user has login credentials and can use them to
log into the Azure portal so here I am a user and you can see it shows how many times I've logged in and I'm part of different uh ad groups uh and so you can assign roles and administrative roles uh to users you can add users to groups you can enforce authentication by uh like with MFA you can track user sign-ins as you can see on the right Hand side you can track device uh devices users login and uh and allow or deny devices uh you can assign Microsoft licenses Azure ad has two kinds of
users we have users that's a user that belongs to an organization and guest users this is a guest uh is a user that belongs from another organization and we'll cover uh Azure ad roles uh in the r section here uh because that is what's that you're going to be using to apply to these Users so groups in Azure ID lets resource owners assign a set of access permissions to all members of the group instead of having to provide the rights one by one and so on the right hand side here you can see I have
a bunch of groups in exam Pro and groups can contain owners and owners have permissions to add or remove members and then the members have rights to do things okay and so for assignment you can assign roles directly to a group you Can assign applications directly to a group and to request join groups so uh the group owner can let users find their own groups to join instead of assigning them to them and the owner can set up the group to automatically accept all users that join or require approval this is really great when uh
you just want people to do the work themselves as opposed to having to do all that manual labor of adding them to groups let's talk about how we're going To uh give users rights to access uh resources and there are four different ways to do that the first is direct assignment and this is where the resource owner is going to directly assign the user to the resource then you have group assignment this is where the resource owner assigns an a a group to the resource which automatically gives all group members access to the resource then
you have rulebase assignment this is resource owner uh this is where the Resource owner creates a group and uses a rule to Define which users are assigned to a specific resource and then you have external uh Authority assignment this is this access comes from an external Source such as an on- premise directory or SAS application and I just want you to know that there's four different ways to do it so uh to get access to resources all right let's take a look at managed identities for Microsoft enter ID or Azure ad managed identities is a
concept in Microsoft enter ID that Associates identities with internal resources where these identities have their own roles and tokens managed identities increases security by allowing you to link directly resources to other resources without having to share any security information over the network those resources will be authenticated against enter ID to see if they have the necessary permissions to Manipulate other resources for example we can allow our applications to access Azure key vault in order to retrieve a secret without exposing any passwords managed identities is available in two types system aside identities are created and managed
by enter ID when you create a managed identity in a service instance only that Azure resource can use this identity to request tokens from enter ID user assigned identities are created and Managed manually the identity is managed separately from the resources that use it the table provides a comparison between system assigned and user assigned features in the context of azure creation for system assigned the identity is created as part of an Azure resource whereas user assign the identity is created as a standalone Azure resource life cycle for system assigned the identity shares its life cycle
with the Azure resource It's Associated with while user assigned the identity has an independent life cycle deletion for system assigned when the associated Azure resource is deleted the identity is also deleted whereas user assigned the identity must be deleted explicitly sharing across Azure resources for system assigned the identity cannot be shared and is associated with only a single Azure resource whereas user assign the identity can be shared and can be Associated with more than one Azure resource managed identity is under the identity blade for an Azure resource you assign roles to provide permissions to a
managed identity in summary managed identities enhance security through seamless resource integration eliminating exposed credentials with system assigned and user assigned options Azure bolsters efficient flexible Resource [Music] Management let's talk about external identities so external identities in aad allows people outside your organization to access your apps and resources while letting them sign in uh and use whatever identity they prefer so your partners Distributors suppliers vendors or other guests can bring their own identities such as uh Google or Facebook uh you can share apps with external users that's for B2B stuff uh if you develop apps and
tender for Azure ad tenants uh for Single tenant or multi-tenant you can do that as well uh you can develop white label apps for consumers and customers so this would be like Azure ad uh b2c so there you go hey this is Andrew Brown from exam Pro and the next topic will be exploring or access reviews in Microsoft enter ID or azuread access reviews in Microsoft enter ID allow you to regularly review and manage access to resources in your organization with access reviews you can Review who has access to resources and determine whether their access
is still necessary access reviews are useful in maintaining security and compliance by ensuring that only authorized individuals have access to sensitive resources access reviews can be conducted for various types of resources such as applications groups and SharePoint online sites you can configure access reviews to occur on a regular schedule and select reviewers to Conduct the reviews reviewers can be internal or external to your organization during an access review the reviewer will be presented with a list of people who have access to the resource being reviewed they can choose to approve or revoke access for each
individual access can be revoked immediately or scheduled for a later date reviewers can also provide a reason for their decision which can be useful for auditing purposes access reviews are Crucial in large organizations to regularly identify and resolve access issues they ensure resources are accessed only by necessary users and that access is revoked when no longer needed overall access reviews maintain security by assessing user access ensuring compliance preventing breaches and safeguarding data promoting a security aware culture make sure to know access reviews because it did show up a few times on the Exam the next
topic will be covering his single side on on an enter ID single sign on an enter ID is a feature that allows users to authenticate once with enter ID and then access multiple applications and services without having to authenticate again when a user signs into enter ID with their credentials enter ID creates a security token that can be used to access other resources within the same organization this token can be used to authenticate the user to Other cloud based or on premises applications that have been integrated with enter ID SSO supports a wide range of
applications including cloud-based applications such as Microsoft 365 Salesforce and Dropbox as well as on premises applications such as SharePoint and sap SSO can also be used with custombuilt applications using industry standard protocols such as saml open ID connect and oo there are several ways you can Configure an application for SSO choosing an SSO method depends on how the application is configured for authentication Cloud applications can use open ID connect ooth saml password-based or or linked for SSO single sideon can also be disabled on premises applications can use password-based integrated Windows authentication header based or linked
for SSO Deon premises choices work when applications are configured for Application proxy this flowchart can help you decide which SSO method is best for your situation the main SSO protocol supported in Azure include open ID connect in ooth open ID connect is an identity layer built on top of ooth 2.0 it allows for authentication and authorization of users in a secure and standardized manner it is saml saml is an XML based protocol used for exchanging authentication and Authorization data between an identity provider and a service provider it is commonly used for Federated authentication scenarios password
based authentication this refers to the traditional username password authentication method where users provide their credentials directly to authenticate linked authentication Azure provides the ability to l link multiple accounts from different identity providers to a single user Identity this allows users to authenticate using any of their linked accounts integrated Windows authentication it will let users access applications using their Windows domain credentials utilizing their current Windows session for authentication header based authentication in this method the application accepts an authentication token in the form of a header in each request the token is validated by the Application to
authenticate the user you'll need to be familiar with these assets o protocols is there will be questions asking you which SSO protocol is best suited for a specific application what is multiactor authentication a security control where after you fill in your username email and password you have to use a second device such as a phone to confirm that it's you logging in MFA protects against people who have stolen your password MFA Is an option in most Cloud providers and even social media websites such as Facebook so that's an overview of single sign on an ENT
ID the next topic we'll be going over is conditional access conditional access provides an extra layer of security before allowing authenticated users to access data or other assets conditional access is implemented via conditional access policies which are a set of rules that specify the conditions under which Sign-ins are evaluated and allowed for example you can create a conditional access policy that states if the user account name is member of a group for users that are assigned The Exchange user password security SharePoint or Global administrator roles require MFA before allowing access this policy enables MFA enforcement
based on group membership simplifying the process compared to configuring MFA for individual users when roles Change conditional access policy analyzes signals including user and location device application and real-time risk and verifies every access attempt via access controls this requires MFA block access and allow access signals or metadata associated with an identity attempting to gain access user or group membership policies Target specific users and groups giving admins find grain control over access named location information IP location Information IP address ranges are used to permit or deny access based on geographical locations device policies can be applied
based on the platform or status of a user's device application users attempting to access specific applications can trigger different conditional access policies real time sign and risk detection signals and Azure ad identity protection detect risky sign-ins if risks emerge policies can prompt actions such as password Resets multifactor authentication or block access pending admin intervention Cloud apps or actions can include or exclude Cloud applications or user actions that will be subject to the policy user risk for customers with identity protection user risk risk can be evaluated as part of a conditional access policy user risk represents
the probability that a given Identity or account is compromised common decisions Define the Access controls that decide what level of access based on Signal information block access most restrictive decision Grant access least restrictive decision still require one or more of the following options require multiactor authentication require device to be marked as compliant require hybrid enter ID join device require approved Client app and require app protection policy conditional access policies are available and can be utilized with the Following licensing plans Microsoft 365 business premium Microsoft 365 E3 and E5 enter ID premium P1 and enter ID
premium P2 licenses overall conditional access acts as a robust security measure in Azure ensuring that authenticated users can only Access Data under specific conditions [Music] hey this is Andrew Brown from exam Pro and in this section we'll be going over The types of azure roles roles can be a bit confusing this is because Azure has three types of roles that can serve the same purpose the first type of role are classic subscription administrator roles this is the original RO system next we have Azure roles this is an authorization system that's also known as role-based access
controls and is built on top of azure resource manager then we have Azure active directory roles Azure ad roles are used to manage Azure a resources in a directory Azure active directory roles are used to manage Azure a resources in a directory such as creating or editing users assigning administrative roles to others resetting user passwords managing user licenses and managing domains among other tasks the rules follow a similar rbac model and include several built-in roles like Global admin application admin application developer and billing admin but also allow the creation of Custom roles for more specific
control Azure rules specifically Azure rule based access control is a system that provides fine grained access management for Azure resources allowing administrators to Grant users specific rights to resources there are several predefined roles in Azure like owner contributor reader and user access administrator each providing specific levels of access to Azure resources and custom roles can be defined as well Classic subscription administrator roles refer to the older model of azure access control and include three types account administrator service ad administrator and co-administrator Azure roles and classic subscription administrator roles can have overlapping responsibilities for example the
service administrator in the classic Model has a similar role to the owner role in the Azure rbac where both can manage resources in the subscription however Azure rbac roles Provide a more granular level of control compared to Classic roles offering more specific access management they allow administrators to delegate specific tasks and Grant specific permissions reducing the need to give full administrative privileges and therefore for enhancing [Music] security the next topic will be covering are the access controls so identity access management essentially allows you To create and assign roles to users for the Azure rules or
the rbac system rules restrict access to Resource actions which are also known as operations there are two types of rules the first type are built-in roles these roles refer to the set of predefined roles offered by Microsoft and azure the rules are read only and cannot be altered cover a wide array of standard scenarios to facilitate efficient and secure access management for Azure resources the Second type of rule are custom rules these rules represent user defined roles in Azure tailored to incorporate unique permissions and logic based on specific requirements that are satisfied by the available
built-in roles a role assignment is when you apply a role to a service principle which could be a user group service principle or managed identity deny assignments lock users from performing specific actions even if a role assignment grants them access the Only way to apply deny assignments is through Azure blueprints so that's the access controls for [Music] Azure hey this is Andrew Brown from exam Pro and in this section we'll be covering classic administrators classic administrators refer to the original role system in Azure despite the Legacy status of classic administrators understanding these roles can still
be beneficial like when work with older Azure setups however it's recommended to use the new rbac system for managing access to resources given its enhanced granularity and flexibility classic administrators have three types of roles the first type is a account administrator this role is essentially the billing owner of the Azure subscription it's responsible for managing subscriptions making payments and changing the billing details the account admin has no access to the Azure Portal meaning they can't manage resources directly the second type is service administrator this Ro shares the same level of access as a user assigned
the owner role at the subscription scope in the rbac model they have full access to the Azure portal meaning they can manage all resources within the subscription the third type is co-administrator this has the same access level of a user who is assigned the owner role at the subscription scope It's similar to a service admin but the main difference is that there can be multiple co- administrators offering shared management capabilities you shouldn't have to worry much about the classic admin roles because I don't think I encountered any exam questions on it it'll mostly be focused
on the rbac and Azure ad roles also note that classic resources and classic administrators will be retired on August 31st [Music] 2024 the next topic we'll be covering is the Azure Ro based access control so Azure Ro based Access Control helps you manage who has access to Azure resources what actions they can perform on resources and in what scope which are the areas they have access to ro assignments are the way you control access to Resources by assigning a role to a security principle like a user group service principle or managed Identity at a particular
scope you define who can perform what actions on which resources our role assignment consists of these three elements scope and role definition and security principle there are four fundamental Azure roles which include owner contributor reader and user access administrator Azure rbac includes over 70 built-in roles these roles are designed to serve many common use case and range from brought to very specific Permissions such as virtual machine contributor or network contributor scope is the set of resources that access for the role assignment applies to scope access controls at the management subscription Resource Group and resource level
assigning a role at the Management Group level inherits it across all Associated subscriptions and resources at the subscription level it applies to all resource groups and resources within the Specific subscription a role assigned at the resource Group level affects all resource within that group at the resource level a role assignment applies only to that specific resource a role definition is a set of permissions that determines what actions can be performed such as read write or delete on various resources roles range from broad such as owner with extensive management permissions to specific such as virtual machine
reader with more targeted Permissions Azure has built-in roles and you can Define custom roles this table shows the four fundamental built-in roles the owner role has full access to all resources including the right to delegate access to others the contributor role can manage all types of azure resources including the ability to create update and delete but can't Grant access to others the reader role has the ability to view existing Azure resources but can't make changes or Grant access To others the user access administrator role has the ability to manage user access to Azure resources including
granting and revoking access but can't create update or delete resources a security principle represents the identities requesting access to an Azure resource such as a user which is an individual who has a profile in Azure active directory a group which is a set of users created in Azure active directory a service Principle which is a security identity used by applications or services to access specific Azure resources or a managed identity which is an identity and Azure active directory that is automatically managed by Azure so that's an overview of azure role-based Access Control the last type
of role we'll be covering are azuread roles azuread roles are used to manage azuread resources in a directory such as create or edit users Asside administrative roles to others reset user passwords manage user licenses and manage domains we'll go over a few important built-in azuread roles so here are some that you should know the first one is global administrator this grants you full access to everything all the features in Azure a another important role is user administrator this grants you full access to create and manage users for The billing administrator role this role can make
purchases manage subscriptions and support tickets including monitor service Health not all organizations needs can be satisfied by these predefined roles therefore you can create custom roles which are very flexible and can Define the exact set of permissions that you need keep in mind that you'll need to purchase either Azure a d premium P1 or P2 to create custom roles so that's a short overview Of azurea D [Music] rolles hey this is Andrew Brown from exam Pro and in this section we'll be covering the anatomy of an Azure role so it's important to know that the
property names in an Azure Ro definition can vary depending on whether you're using Azure Powershell or Azure CLI the two different interfaces use different syntax and terminology we have an example here on the right and we'll go Through the properties together a ro definition and Azure consists of these properties name this is the display name of the custom role also note that the ones highlighted in blue is the Syntax for Azure power shell and bold black is for Azure CLI so it's name for Azure power shell and rle name is for Azure CLI the next
property is ID this is the unique ID of the custom Ro and it is autogenerated for you is custom this indicates whether this is a custom role It can be either true or false description this property describes the role actions this is an AR of strings that specify the management operations that the role is allowed to perform not actions an array of strings that specify the management operations that are excluded from the allowed actions data actions this is an array of strings that specify data operations the role is allowed to perform to your data within
that object not data actions this is an Array of strings that specify the data operations that are excluded from the allowed data actions assignable Scopes this is an array of strings that specify the Scopes that the custom Ro is available for assignment you can only Define why Management Group and assignable scopes of a custom role so in this example we see that there is an asterisk symbol that's used in the specific actions and the actions property like storage Network compute Etc this is called the Wild Card permission symbol represented as an asterisk this is used
in the actions not actions data actions and not data actions properties to represent all or any operations and wild card allows you to apply to match everything in the examp example of actions microsoft. storage asterisk slre in a rle definition this means that the role is granted the permission to perform read operations on all resource Types under the Microsoft storage resource provider so the Wild Card essentially allows you to either Grant or deny a wide range of permissions with a single statement however it should be used with caution because it can grant or deny more
permissions than intended if not properly managed it can be a bit confusing to distinguish between Azure policies and Azure rules so we'll do a little comparison to help You understand the key differences for the Azure policies they are used to ensure compliance of resources they evaluate the state by examining properties on resources that are represented in resource manager and properties of some resource provider it doesn't restrict actions which are also called operations they ensure that resource state is compliant to your business rules without concern for who made the change or who has permission to Make
a change even if an individual has access to perform an action if the result is a non-compliant resource Azure policy still blocks the create or update as for the Azure roles they are used to control access to Azure resources they focus on managing user actions at different levels of Scopes and Azure roles do restriction on Azure resources another thing people tend to get confused between our Azure ad roles versus Azure roles for Azure ad roles They are used for managing Azure ad resources for Azure roles they are used for fine grained Access Control to Azure
resources active directory resources include users groups billing licensing application registration Etc Azure resources included virtual machines databases cloud storage Cloud networking Etc by default Azure roles and Azure a roles are separate and do not span Azure and Azure a by default the global administrator doesn't have permissions To manage Azure resources Global administrator can gain access to Azure resource if granted the user access administrator role so azuread roles are specifically for managing Azure a resources while Azure roles focus on access control to Azure [Music] resources hey this is Andrew Brown from exam Pro and in this
section we'll be covering Azure policies Azure policies enforce organizational standards and Assess compliance at scale policies do not restrict access they only observe for compliance here is an image with a list of built-in policies that you can use right away from Azure let's go over a few key aspects of azure policies the first one are policy definitions which is a Json file used to describe business rules to control access to resources then we have policy assignment this is the scope of a policy's effect it can be assigned to a user a resource Group or Management
Group next we have policy parameters the these are the values you can pass into your policy definition which makes your policies more flexible for reuse and we have initiative definitions this is a collection of policy definitions that you can assign for example a group of policies to enforce pcss compliance next we'll look at viewing non-compliant resources once a policy is assigned it will periodically evaluate The compliance State you can see how compliant we are on the compliance tab according to the example in the image it shows that we we are non-compliant it can occur due
to many factors but it's most likely because virtual machines should have Disaster Recovery enabled so let's look at some of the main use cases for Azure policy organizational compliance Azure policy enforces standards and assesses compliance at scale such as enforcing Compliance labels on all resources cost control policies can prevent over provisioning to save costs like limiting the creation of high class VNS security enhancements policies can improve security by enforcing configurations for example requiring secure transfer for All Storage accounts resource consistency policies can enforce consistent configurations like a specific naming convention or tag structure Regulatory Compliance
policies Can ensure specific configurations for Regulatory Compliance such as data hosting in specific regions for data sovereignty so that's in brief overview of azure [Music] policies the scope of an Azure policy is the set of resources that the policy is applied to when you assign a policy you define the scope at which the policy is enforced this could be as broad as a management group or as specific as a Single resource the hierarchy of Scopes and Azure are like other Scopes like asure resource manager or rbac it moves from brought to specific in the following
order Management Group greater than subscription greater than Resource Group greater than resource at each level you can apply different policies as per your requirements policies apply higher levels of the hierarchy are inherited by all the lower levels this structure provides a powerful mechanism For applying broad organizational policies while still allowing for flexibility and customization at lower levels it's a key part of how Azure enables you to manage and control your resources effectively and in a way that suits your organizational [Music] needs hey this is Andrew Brown from exampro and we'll go over the anatomy of
an Azure policy definition file display name this serves as an identifier for The policy and has a 128 character limit type this field which is red only indicates the source of the policy it could be guiltin maintained by Microsoft custom created by you or static Microsoft owned and typically pertains to Regulatory Compliance description this provides the context of the policy metadata this optional field is used to store key value information on the policy though this determines which res resource types are evaluated and changes Whether resource provider or Azure resource manager is used resource manager modes
include all this includes resource groups subscriptions and all resource types and indexed this only includes resource types that support tags and location resource provider modes were used in deprecated services like Microsoft container service data and are now primarily utilized in services like Microsoft kubernetes data and Microsoft key Vault data moving on To parameters parameters are values passed into the policy to improve its flexibility a parameter has the following properties name the identifier for the parameter type could be a string array object Boolean integer float or datetime metadata utilized by Azure to display userfriendly information such
as description display name strong type assign permissions default value an optional field to set a default parameter value allowed values an Optional field for setting accepted parameter values you reference parameters by using field and in next let's go over the policy rule so this consists of if and then blocks in the if block you define one or more conditions that specify when the policy is enforced you can apply logical operators to these conditions to precisely Define the scenario for a policy the next concept we'll look into is the policy Rule and policy effect Which is
important in determining the impact of the policy so we'll go over a list of common policy effects deny if a resource is created creation or update doesn't adhere to the policy it fails audit this creates a warning event in the activity log when evaluating a non-compliant resource but it doesn't stop the request upend this effect adds extra parameters or FS to the resource during its creation or update for example it could append tags on Resources like cost center or specify allowed IP addresses for a storage resource audit if not exists similarly to the audit effect
this creates a warning event in the activity log when a resource doesn't comply with the policy but it doesn't stop the request audit is used to audit the properties of a resource while audit if not exists is used to audit the existence of a related resource deploy if not exists this effect executes a template deployment When a specific condition is met for example if SQL encryption is enabled on a database a template can be executed after the database creation to configure it in a specific way and the last one is disabled this effect turns off
the policy rule often used for testing purposes these policy effects provide a range of resp responses to non-compliance enabling you to manage your resources according to your organization specific [Music] requirements hey this is angrew Brown from exam Pro and we're going to take a look at how to keep things compliant within our Azure account with Azure policy so let's make our way over to the Azure policy portal by typing policy at the top here and right away you can see already that I have a policy assigned I didn't sign this Azure did this for me
by default and it's a great way to start understanding how this is useful so I'm Going to go ahead and just click into that one there and this is an initiative uh policy meaning that it's made up of a bunch of policies we'll go over that over in a moment but you can see here that's saying hey you should turn on all these things they're not turned on by default so you should turn them on and these are ones that you have not turned on you might not want to consider turning some of these on
uh if you have to consider costs but I think most of These are free um but that's something that you'll have to decide on your own uh but that gives you a general idea there so let's go back to policy at the top on left hand side here we can see our assignments and here I have that initiative type there if I click into it allows me to edit it there uh and what's really nice is if I want to disable it I could just disable it uh but I think this is a default one
so oh no I can disable it okay great and you can see it Was assigned by who uh and then you can also uh take remediation actions uh here so by default this assignment will only take effect on newly created uh resources existing resources can be updated via a remediation task after the policy is assigned so if you need this apply to ones that are created or or prior or updated that's something you might want to do but anyway we'll get out of there and we'll go take a look at all the big list of
predefined uh Definitions uh that Azure gives us so this is a great way for us to get started um you'll notice on the right hand side we have initiative and we have policy again initiative is a collection of policies down below and these are individual ones let's just go take a look at some uh policies and maybe we we can go apply one to like a virtual machine um so what I'm going to do is just drop down um this here and we can just unselect here and let's just go Take a look do we
have one called virtual machines not really um but we we go for compute here and we can just take a look here so uh audit virtual machine without Disaster Recovery let's take a look at that one and I just want to see the full description here audit virtual machine without Disaster Recovery configured I think that sounds really good to me so I'm going to go ahead and assign that and we can choose a Scope and so I'm going to choose my subscription here and then we can choose a resource Group and you're going to notice
that I don't actually have any resources so uh to scope that within so what we'll go do is launch ourself a virtual machine so make our way over to the virtual machine um portal here we'll add a virtual machine and I want something really cheap and so here it's set to a more expensive one because I was launching a Windows Server uh previously but I want the cheapest server I can get actually before I do that I'm just going to go back and oh yeah it's on Ubuntu just making sure and the one I had
that was really cheap is the B1 LS and so I'm just going to go up here to the top we'll name this beour and uh we'll put in the beour group there um this size does not support Azure spot that's totally fine I don't Need spot did I turn that on by accident oh I did and this all looks fine to me I'm not going to be logging into this machine we just want to launch it up as an example I'm going to move to standard SSD CU I don't need premium here and this looks
fine to me we'll go ahead and hit review and create so uh we'll go ahead and create that and I guess we have to download that private key probably a good idea We're not going to use it for anything but that's okay and now it's deploying let's see if we can select the scope as it's creating I'm not sure if it'll let us do that I'm just going to hit cancel here and reopen here and let's see if it shows up now it doesn't so uh we'll just wait a moment here uh I'll go back
to my policy here and I'm just going to wait for this server to create and once that is Created um what we'll do is we'll just come back here and see if we can now scope that all right so after a short little wait um our server is ready here so let's make our way back to our policy here and uh I guess I lost it so I have to go back to definitions and we'll drop down categories deselect we'll go to compute and we'll go ahead and uh click on Disaster Recovery again here you
can see the policy and its entirety so That's kind of nice uh we'll go ahead and assign that and we'll choose our scope so we'll go back here choose subscription one now we should have beour and I'll go ahead and hit select uh we can assign it exclusions not something I'm going to do today um there is the name of it that's totally fine then we can hit enabled and I'm the one who's enabling it so that sounds like a good idea we'll go next uh we're going to leave REM remediation off we don't Need
to do that today we'll hit create uh and so now this policy is assigned it says here please note that the assignment takes around 30 minutes to take effect so if we work our way back here and look at assignments um I don't see it here yet so there it is and um it's probably not going to show us on this there so we'll go back to our overview and so I want to see it hasn't Started yet so we'll just wait for a while here might take 30 minutes might take 10 not sure and
we'll just see what happens this should show up as non-compliant but let's see that actually happen all right so after waiting a little while here I think it was about 15 20 minutes we can now see that it's saying that it's non-compliant so we'll go ahead and click into there and we can see what exactly it is complaining about Let me click over to that resource so there you go it's not too uh complicated there uh we'll go ahead and just uh delete that assignment and uh if you're wondering where blueprints are they're all the
way over here we talked about blueprints in the actual course not something we actually have to do because it is probably a better way of uh doing things I just wanted to point that out uh to you um but yeah there you go so it's as Simple as that hey this is Andrew Brown from exam Pro and in this section we'll be covering Azure resource manager Azure resource manager is a service that allows you to manage Azure resources Azure resource manager is a collection of services in the Azure portal so you can't simply type in
Azure resource manager in the search tab it is a management layer that allows you to create update or delete Resources apply management features such as access controls locks or tags and right infrastructure is code using Json templat we will be examining the following key components that form the Azure resource manager layer we have subscriptions management groups resource groups resource providers resource locks Azure blueprints as well as resource tags Access Control role-based access controls Azure policies and arm Templates you can think of azure resource manager as a gatekeeper all of the requests flow through arm and
it decides whether that request can be performed on a resource such as the creation updating and deletion of a virtual machine and its arm's responsibility to authenticate and authorize these requests arm uses azure's role-based Access Control to determine whether a user has the necessary permissions to carry out a Request when a request is made arm checks the users assigned roles and the permissions associated with those roles if the user has the necessary permissions the request is allowed otherwise it is denied the next concept we'll go over is the scope for Azure resource manager we've briefly
covered scope in Azure policy and Azure rbac but we'll go into more detail with them in the following sections for Arm so scope is a boundary of control for Azure resources it is a way to govern your resource by placing resources within a logical grouping and applying logical restrictions in the form of rules management groups are a logical grouping of multiple subscriptions subscriptions Grant you access to Azure Services based on a billing and support agreement resource groups are a logical grouping of multiple resources and resources can be A specific Azure service such as Azure VM
so that's an overview of azure resource [Music] manager Azure management groups provide a way to manage multiple subscriptions by organizing them into a hierarchical structure every directory is assigned a single top level management group known as The Root Management Group this root group forms the base of the hierarchy and can have multiple management groups Or subscriptions nested under it one of the key benefits of using management groups is that all subscriptions within a Management Group automatically inherit the conditions apply to the Management Group some important facts about management groups you should know are a single
directory can support up to 10,000 management groups the hierarchy of a Management Group tree can be up to six levels deep not including the root level or the subscription level each Management Group and subscription could have only one parent each Management Group could have multiple children all subscriptions and management groups exist within a single hierarchy in each directory so that's a short overview of azure management [Music] groups before you can do anything in your Azure account you'll need to have a subscription an Azure account can have multiple subscriptions and the most Commonly used ones are
free trial pay as you go and Azure for students for example if you wanted developer support you would add a developer support subscription to your account once a subscription is set up it provides you with the ability to configure various settings and features features such as resource tags these allow you to categorize your resources according to your organizational needs access controls helps manage access and Permissions for your Azure resources resources groups are logical containers in which Azure resources are deployed and managed cost management and billing provides tools to track and manage your Cloud spending and
more these features provide you with a high degree of flexibility and control over your Azure resources allowing you to manage your resources effectively and securely the next topic will be covering a Resource groups so a resource Group is a container that holds related resources for an Azure solution for example you might have a resource Group that contains multiple virtual machines for a specific project or application as for resources these are manageable items available through Azure a resource could be an individual entity like a virtual machine next we have resource providers these are services that Supply
Azure resources an example of a resource Provider is Microsoft compute which provides compute resources like VMS in order to use Azure resources you have to register resource providers many resource providers are registered by default for you with your subscription however for certain resources you may need to manually register the resource provider this image shows a list of resource providers available in Azure and in the status you can see if they are either registered or not registered You can register resource providers under your subscription in the Azure portal through Azure Powershell or Azure CLI this ensures
you have access to the latest resources and features provided by that [Music] service the next topic we'll explore our resource tags so a tag is a pair consisting of a key and a value that you can assign to Azure resources these tags can be used to categorize resources Based on different criteria relevant to your organization here are some examples of tags Department equals Finance status equals approved approved team equals compliance environment equals production project equals Enterprise location equals West us tags allow you to organize your resources in the following ways Resource Management tags can help
you sort and manage resources based on specific workloads or environments such as developer environments cost Management and optimization tags can be used for cost tracking setting budgets and creating alerts operations management tags can be used to manage business commitments and service level agreement operations such as Mission critical Services security tags can be used for classifying data and assessing security impact helping you manage your security posture other helpful ways include governance and Regulatory Compliance Automation and workload Optimization all in all tags provide a flexible customizable method for managing your Azure resources according to your specific [Music]
needs the next topic will be covering a res resource locks resource locks are a critical feature in Azure that helps Safeguard important resources from accidental modifications or deletions as an admin you may need to lock a subscription Resource Group or resource To prevent other users from accidentally deleting or modifying critical resources especially in environments with multiple administrators or automated processes in the Azure portal you can set the following lock levels him not delete this lock ensures authorized users can still read and modify a resource but they can't delete the resource read only this lock ensures
authorized users can read a resource but they can delete or update the resource there are A number of ways to manage locks here are some of them Azure portal you can easily create View and delete locks through the Azure portal Azure poers shell UCM dlet like new as resource lock to manage locks Azure CLI commands like as lock create help manage locks Azure resource manage your templates you can also Define locks in your arm templates [Music] hey this is Andrew Brown from exam Pro And in this section we'll be covering Azure blueprints Azure blueprints enable
quick creation of govern subscriptions the key term here is governed while one can easily create a subscription in their account a govern subscription indicates there's a process and set expectations for how the subscription should be configured Azure blueprints allow you to compose artifacts based on common patterns or those specific to an organization into reusable blueprints The service is designed to help with environment set the service is designed to help with environment setup blueprints are a declarative way to orchestrate the deployment of various resource templates and other artifacts such as Ro assignments policy assignments Azure resource
manager templates resource groups Azure blueprint Services powered by the globally distributed Azure Cosmos DB ensuring blueprint objects are Replicated across multiple regions providing redundancy and resilience a common query is the difference between an arm template and an Azure blueprint nearly everything that you want to include for deployment in Azure blueprints can be accomplished with an arm template with arm templates you can store them either locally or in Source control there isn't an active connection or relationship to the arm template post Deployment on the other hand Azure blueprints maintain a connection between the blueprint definition what
should be deployed and the blueprint assignment what has been deployed Azure blueprints can upgrade multiple subscriptions simultaneously if they're governed by the same blueprint this means Azure blueprint supports Improv tracking and auditing of deployments so that's an overview of azure [Music] Blueprints hey this is Andrew Brown from exam Pro and what we're going to be doing is moving resources from one Resource Group to another and understanding the limitations around that uh so I just have this page pulled up here because I just want to emphasize that I've seen exam questions on this stuff and there's
a lot of little nitty-gritty things that could show up as a solution so the idea is that when you're talking about about moving Resources um you know you're moving them uh into different regions or to different subscriptions or different resource groups and generally they're pretty straightforward but there are some edge cases where uh things will not work as expected and that's based on um some particular services so when we're looking at app Services devop Services classic deployment Network movement guidance Recovery Services virtual machines so I definitely know that for App Services you're going to run
into issues uh like if you're moving from uh one subscription to another and you already have a web app uh service in the one that you're moving it into it won't allow you to do it and so there's a lot of little things like that okay um and also if you are migrating them you can go ahead and use the diagnostic tool to uh debug it and it will tell you some additional information so you will have to read Through all of these I just can't show you all that in a follow along um but
what we'll do is we'll just go through the basics here of moving things between between resource groups and so what we'll need is a few resource groups so I'm going to add a new one and we're going to call this one the USS fed or the Federation of planets and we'll put that uh East us and then we will make another Resource Group and we'll call this the Klingon Empire and for fun we will place it in uh West so we'll go ahead and create that so now we just need something we can move around
back and forth so what I'm going to do is I'm going to make my way over to diss because that's a great example of something we can move around and change and so I'm going to add a new dis and uh I'm going to place this in the Federation and I'm just going to say um dilithium I can never spell that right right let's see if I can get the proper spelling for this thing that is not real di lithium here and so it's going to be over here I don't care about availability zones and
stuff like that Source type this is fine and so we have the initial size I do not need a drive that big let's go super small uh we could even do an hcd because Those are even cheaper and we'll just choose the small size down here um and so we'll pick 32 and so this should be alal encryption networking we don't really care we're not doing anything other than moving this around so we'll go ahead and review and create right and so then we'll go create that resource and we'll just wait a little while here
it shouldn't take too Long all right so the dis is ready so we'll go to this resource and here it is so now let's say we want to move that to our other resource Group which is in another region what we're going to do is we're going to go back to our resource groups here and if we go into the Federation of planets what we can do is uh go to overview select the dis go over here and say move to another Resource Group and I'll just click these other ones to show You I don't
have any other subscriptions to move this to um so I'll just go back there I thought maybe could show you some stuff but I just realized I don't have much in this account or with other subscriptions so we'll just go back to overview here and just move it to another Resource Group and technically we're moving it to another region so we'll see how that goes um and so we will select um the klling on Empire I Understand that the tools and scripts associated with the will not work uh etc etc so we'll hit okay and
that's going to take a little bit of time to move so while that is going I'm going to make a new tab so we don't lose that history there I just want to talk about some settings you can put on your resource groups so if we go into the Kling on Empire and we go down below here we should have the ability to apply Locks and there are a few different types of locks we have readon and delete so readon means it's a readon resource and delete means we cannot delete the resource which makes sense
right so read only should mean we shouldn't be able to modify this so I'm going to say uh don't touch do not touch and I say okay here and so what that means is that I should not be able to modify the resource uh whether I can Delete it or not is another story we'll find that out and another question is can I move that resource outside of this if it's set to those modes and that's what we're going to find out so moving back over here um has this finished moving it's still validating so
we're going to have to wait a little bit here and I'll see you back in a moment all right so after waiting a little while here I believe that it's done moving so I'm still in my old Resource Group here What we'll do is click back into here go to overview and we see that it's no longer there but if we go over to the cing on Empire we go back over just clicking to overview there it is so we had no problems moving the dis to another region and another Resource Group now we did
apply this lock over here so what is going to happen when we try to modify this dis I think you know the answer but let's give it a go just to See what happens so over here we're going to want to uh re resize it here I'm going to pick 64 I'm going to go hit resize and it says fail to update the dis because of that reason so um there you cannot perform a right operation because of the lock so there you go um now let's go back and we are going to go apply
uh another lock here this time I'm going to make it so you can't delete it and so we say don't do not delete me all right and so what we'll do is We'll go back uh and we'll try to delete it so we'll hit the delete button we'll say Yes again it says you cannot do it now here's the next question can you move that resource out or in to Resource Group if it has lock or read only on uh and that's what I want you to guess whether you can or not CU you are
in read only so would you be able to move something that's readon so we'll go ahead and move it we're going to move this to another Resource Group and I'm Going to send it back to the Federation of planets I say I understand hit okay and it failed the check we'll see why cannot perform the right operation because there are locks please remove some of the locks so which is it is it delete is it the read only do I have to remove both that's what we need to go find out so back in our
Resource Group I'm going to go ahead and first remove parent resource locks can't be edited here okay that's fine so we'll go back To here and we will go into the locks and we'll first delete the readon and then what we'll do is we will attempt to uh delete this again see what happens it looks like it's moving so it's not that you can't move it uh out if it's in readon or sorry in delete but you but you can't if it's read only because it's readon right now when we're talking about moving resources into
a group that's set to Read only I'm almost certain that you can absolutely do that um so uh we could stage that I guess just to make sure so what I'm going to do is I'm just going to set up another Resource Group just to make sure that we we know this for certain just in case I Wrong the star the Romulan star Empire Romulan star Empire and I'm going to just leave in the same region and so for this one in particular what I'm going to do is apply A readon I might as well
just put both on here but I'll just I'm just going to do read only and we'll say do not delete me and then what I'll do is I'll go back to the Federation planets and I'm just going to actually I'll just go to discs and we'll create a new dis here um and we will place it in the Federation here and we will just say um dark matter or Antimatter and we will just change this to hhd as small as we can go we'll review and create that and we'll go ahead and create that and
this will not take long we do not have to wait that long for this and notice here that um we could not uh this is interesting so there was an error moving the resource moving resources failed because resource grou Federation has active deployment so if you are moving stuff uh And then you do deploy it's going to cancel that deploy so that's interesting to know um so I believe that this new one is deployed I cannot remember I think we set this one to have read only here on the um what do you call it
the uh rulin star Empire which isn't showing up there it is just double check there so the question is can I move a resource into a readon we'll go here and uh I guess we need to actually Go to the Federation of planets we'll go to overview view we have antimatter and I want to move that into Romulan star Empire say I understand it'll either say we can or we can't and we absolutely can otherwise it would aired out at this point so hopefully you can keep that straight so you can move a resource into
a group that has readon you cannot move it out if it's set you can absolutely move it Out if it's set to delete delete just protects against delete if you are moving your resource from one Resource Group to another uh and then you deploy something it's going to cause that movement to fail and then there's those edge cases for uh moving Resources with Azure and that's something you should spend some time reading up on those use cases or maybe I'll just uh pick out the most important ones and put it into a cheat sheet all
right uh and so what I'm Going to do is just go ahead and clean this stuff up um so what I'm need to do here is go and and remove the delete I think it's only on here so if I go to my locks I'm going to go back to Resource groups here and we will delete the locks here and so now I can go ahead and delete these groups I guess I have to do them one by one which is kind of annoying but that's just how it Goes [Music] it says it's locked it's
not locked anymore oh it's still there look at that okay could have swore I definitely uh did something there there we go and we will go ahead and delete the last one there we are so yeah hopefully you know a bit more about moving resources [Music] Around hey this is Andrew Brown from exam Pro and in this segment we'll be diving into arm templates so what exactly is infrastructure is code infrastructure is code is the process of managing and provisioning computer data centers such as those in Azure using machine readable definition files like JSO n
files rather than depending on physical Hardware configuration or interactive configuration tools you write a script that will set up cloud Services for you there are two main approaches to IAC declarative here you describe your desired outcome and the system figures out how to achieve it imperative here you provide Specific Instructions detailing exactly how to reach the desired State arm templates or JSO n files that Define Azure resources you want to provision and Azure Services you want to configure with arm templates you can ensure a declarative approach meaning you merely Define your intended Setup and the
system handles the rest build remove or share entire architectures in minutes reduce configuration mistakes and know exactly what you have defined for a stack to establish an architecture Baseline for compliance or over arm templates Empower you to establish an architecture Baseline for compliance achieve modularity break up your architecture in multiple files and reuse them Ensure sensibility add Powershell and Bash Scripts to your templates test using the arm template toolkit preview changes before you create infrastructure via template see what it will create built-in validation will only deploy your template if it passes track deployments keep track
of changes to architecture over time policy is code apply Azure policies to ensure you remain compliant use Microsoft blueprints which Forge a connection between a resource and its template Integrate with CI CD Pipelines utilize exportable code letting you capture the current state of resource groups and individual resources and benefit from Advanced authoring tools for instance Visual Studio code offers sophisticated features tailored for crafting arm templates so as you can see arm templates has quite a lot of [Music] uses all right moving forward let's delve into the structure or the skeleton Of arm templates skeleton is
a term used to describe the basic framework structure of an arm template think of it as the blueprint that guides how an arm template should be organized and what elements it should contain schema this describes the properties that are available within a template content version this denotes the version of your template you can provide any value for this element API profile use this value to avoid having to specify API versions For each resource in the template parameters these are the dynamic values you feed into your template when you're deploying or updating resources it offers flexibility
and enabling you to use the same template in different scenarios or environments just by changing the parameter values variables this is where you can process or transform the parameters or resource Properties by using function Expressions you can manipulate input values making Your template more Dynamic and adaptable functions within the arm template you can Define user specific functions this allows for reusable custom logic reducing redundancy and simplifying the template resources here you list out all the Azure resources you intend to deploy update it defines what your infrastructure looks like and how each component is configured outputs
after a successful deployment you might want to retrieve specific values or results the Output section is where you define these values be at the IP address of a newly created VM or the URL of a web app overall an arm template skeleton provides a structured and consistent approach to Define deploy and manage Azure [Music] resources moving forward let's just discuss one of the pivotal components of the arm template the resources resource this represents any Azure component or Service you wish to provision it could be a virtual machine a database or a network interface Etc type
this defines the kind of resource you're provisioning this typically follows the format of resource provider /resource type for instance if you're looking to create a storage account you'd use the type microsoft. storage SL storage accounts API version each resource type corresponds to an API version which is essentially the version of the rest API Used for that particular resource it's important to note that each resource provider published has its own API versions so you need to ensure you're using the correct one for your chosen resource name this attribute specifies the unique name of the resource for
example if you're setting up a virtual machine this could be my virtual machine location this is a common attribute for most resources it determines the Azure region where your resource will be Deployed such as East us or west Europe other property beyond the basic attributes each resource type has its own set of properties that allow for deeper configuration these properties can very widely depending on the resource for a virtual machine it could be the size or the operating system for a database it might be the capacity or replication [Music] settings in this segment we'll delve
Into a fundamental component of arm templates the parameters parameters play a critical role in arm templates they allow you to pass specific values into your template thus allowing you to create more flexible and dynamic infrastructure configurations defining a parameter as shown in the example to define a parameter named storage name it's a tight string with a minimum length of five characters and a maximum length of 20 characters once you've defined a parameter you can then reference it in various parts of your template such as type API version name and so forth type dictates the expected
data type for the input value common types include string secur string in bu object secure object and array default value if no value is provided it will be set to default value allowed values this is an array of allowed values Min value the minimal possible value max value the maximum Possible value Min length the maximum length of characters or array max length the maximum length of characters or array description the description that will be displayed to the in the Azure portal in summary parameters are the The Gatekeepers of customization and arm templates the next topic
we'll be covering are the arm template functions functions and arm templates are powerful tools that allow you to transform and manipulate your arm variables think of Them as the building blocks that enable you to create more Dynamic and flexible configurations template functions these are built-in functions provided by Azure for a wide range of common tasks user defined functions these are custom functions you can create to cater to specific needs that aren't addressed by the built-in template functions functions are called using parentheses e such as the example shown here categories of template functions array Functions tools
for handling arrays some of these include array concat contains create array empty first Etc comparison functions for equating or contrasting values coess equals less lesser equals greater and greater or equals date functions to manipulate and time date time ad UTC now deployment functions pertaining to the deployment itself deployment environment parameters and variables logical functions for logical operations and or if not numeric Functions mathematical and numeric operations add copy index div float int min max Etc object functions for object manipulation contains empty intersection Json length and Union resource functions related to Azure resources extension resource ID
list account SAS list Keys list Secrets Etc string functions for string manipulation and evaluation base 64 Bas 64 to Json base 64 to string concat contains Etc we won't go over all of them but this is just to show you That there are a lot of functions available to [Music] you the next topic we'll cover are the arm template variables template variables are used to simplify your arm templates you transform parameters and resource properties using functions and then assign them into a reusable variable in this example the storage name variable is computed by combining a
parameter named storage name prefix with A unique string derived from the resource groups ID to call a variable you use the variable function as shown in this example sometimes your templates might become more intricate and you may need a hierarchical structure to your variables that's where nested variable come in you can use JSO and object to have nested variables to scope your variables for multiple use cases scoping nesting variables based on environment consider Scenarios where you have configurations That Vary based on the environment like test or prod you might want to neatly encapsulate variables specific
to each environment within a JSO n object as shown in the example you can use parameters to choose the environment and then reference nested variables as followed in the example variables parentheses square brackets dotproperty overall variables and R templates are powerful tools that can Simplify your template make it more adaptable and improve its maintainability the arm templates are just about defining and provisioning resources they also offer a way to fetch information about the deploy resources this is where the output section of your arm templates comes into play outputs returns values from deployed resources so you
can use them programmatically for example you might want to know the static IP of a created VM or the Connection string of a deployed database you specify the type and value under outputs here the output name resourc it is capturing the ID of a public IP address resource it's noteworthy that the type is explicitly mentioned ensuring type safety once your resources are deployed these outputs can be fetched using Azure CLI po shell or the Azure sdks for instance with Azure CLI this command retrieves the resourced output value from a specific deployment In a resource Group
so that's a quick overview of outputs and arm [Music] templates hey this is Andrew Brown from exam Pro and we are looking at Azure resource manager templates also known as arm templates and this helps you uh deliver infrastructure as code meaning that when you have a resource such as a virtual machine or a storage account instead of manually configuring it every single time through um uh the portal What you can do is provide a configuration file that defines finds all the properties that you want it to be configured with and the idea is that you
can uh keep this file and share with other uh other people so they can easily uh create the same resources as you and then you know exactly how your stuff is is configured so what we're going to do is uh launch a new template now you can't go up here and just type in arm because these arm templates are managed Uh at different levels so at one level is subscription or the resource groups so when you have a resource Group you have deployments within them and that's where uh these templates are deployed uh but just
to deploy one from here what we're going to do is type in deploy why they didn't make it so you can type an arm I do not know but if you go down here we have deploy a custom template and so from here we have some common templates so if I click into web app and I go edit a template we already have some stuff pre-filled in I'm just going to go back and discard that go back to select a template and we're going to build our own and by default we'll have that schema that
content version which is 1.0.0 point0 our parameters and our resources so today I want to launch a virtual machine and uh what you normally would have to do is go here uh and look up what is that you want to create so if it's this uh Microsoft compute virtual Machine you'd go through here and you'd have to make sure you have all these uh properties so you define the resource here right the type um and then you define the properties that you want and down below you can go through here and see them all that's
a lot of work I don't want to do that so I'll go to add resource here drop this down and click uh where is it virtual machine where are you there you are and I'm going to call this one Warf and Warf and Warf because It's not just going to create a virtual machine it's going to create other things uh that I need with it as well such as the storage account the network interface and the virtual Network so you can see that we have a bunch of parameters here so the name the type the
name the admin username the password and the OS version oh you know what I think I chose a window Windows one I do not want a Windows one I want a Linux one because that is easier for me to work With here so we choose ubun 2 so I'll just fill this in again all right and so um back up here you know we have the Ubuntu version between some versions here and then there's the type so that's for uh replication then we have variables here so if we go to VM size this is the
VM it will it will set here uh variables are either you can have string values or you can use function to transform other parameters into other stuff that you'll Reference throughout your template then down below we have those resources here so what we'll do is um actually I'm going to copy this because it's it's very highly likely we're going to want to make some kind of change and so I have vs code over here on the on the left right hand side I'm just going to paste that on in there um and what we will
do this is a Json file make things a little bit easier here great and what I'll do is just move that off screen and We'll go ahead and we will save this and we'll see if we can deploy this so I'm going to type in Warf here and we'll launch in Canada east I'll name this Warf we will name the username Warf but lowercase and then we'll do testing 1 2 3 4 5 6 capital on the T notice that it is uh hidden there and then we will choose 14 which is defaulted here and
lrs we'll go ahead and do review and create and we'll hit create here So this is going to fail I already know because it has a misconfiguration it'll tell us how but while that's going we'll take a look at our input so this is the values that were inputed these are the outputs if we had defined any which we have not um and if we go back to our template I just wanted to show you that we have that secure string so when we were typing our password that's why we didn't see it um so
just things like that so I'll go back up here and our Deploy failed why what happened so we open it up here the requested VM size standard D1 is not available in the current region so the template we have is not that great um it it needs some configuration because we can't use D1 I think that doesn't exist anymore and so what we really want to use is the standard B1 LS all right standard B1 LS so I'm going to cut that and for the time being I'm going to go back to our original Template
and this is one big template I'm going to look for those variables oh they're all the way at the bottom here nice and so I'm going to just go ahead and paste that in B1 LS just double check making sure I spelled that right standard uh standard B1 LS looks good to me so I'm going to move that off screen and the question is what do we do what do we do when a deploy fails so let's go take a look at what has happened here so this all got deployed into a resource Group and
under here this is where our deployments are so when we look at this template it we can see that it failed we can click into here get the same information um and if we click into here it just brings us back to where we just were but if we go look at what was actually deployed uh under our Resource Group under the overview we'll notice that it created the virtual Network the storage account and the network Interface so when it fails it creates what it can but it doesn't roll back okay so the question is
is then how do you do cleanup so you might think I'll go to deployments and what I'll do is go ahead and delete that template and we can go ahead and do that which by the way you can't edit this template all you can do is um all we can do here see I just want to show you that you cannot edit it we can download it and stuff like that but uh so you might think well If I go ahead and delete that template just making sure we're in the right place here you might
think that might roll back those resources but it doesn't it just deletes the template so if you really want to get rid of this stuff what you got to do is go ahead and delete all these resources manually so um I wish it kind of had a roll back feature but that's just how it is but there are some nice things that Uh Azure does here which we'll talk about in a moment so I think we have adjusted it to the correct value now so hopefully this is going to be all we need to make
it work so what we'll do is go to our deployments here uh and we can't do it here but so we'll go back to the top here and type in deploy and we'll go to custom template and what we'll do is build our own template in our editor and I'm just going to copy the contents Here okay we'll go copy and I will go paste and we'll make sure that this is all good looks fine to me we'll go ahead and hit save and we will choose Warf so we don't have to make a new
one and we will fill in uh the name as Warf username is Warf I'll call Warf 2 just in case helps us keep track of what we're doing here testing 1 2 3 4 5 6 with a capital on the T 14 L RLS lrs and we'll go ahead oh we have one issue here cannot deploy Resource Group worth deleting uh we'll go back and we will hit create here I don't think I deleted the resource Group let me just go double check I almost I'm almost certain I deleted all the contents of it right
oh so there's already one here so we're just waiting for that to delete just going to go delete for us please thank you it failed to delete we'll go take a Look as to why resources not found mhm uh we'll go back to our resource groups give this a refresh here okay so you know what I must have deleted the resource Group which is totally fine I I could have SW I only delete the contents of it but we'll just call this war regular then we'll go ahead and hit uh great here and so this
time I have better feeling about This and so we will just have to wait a little bit it won't take too long I'll see you back in a moment okay so after waiting a little bit here our uh our thing seems to be deployed so if we go to Resource groups we can see that our virtual machine is deployed so uh that's pretty much all there is to it one other thing I'd like to show you is that whatever you have whatever is in your resource Group you can actually export the template so uh if
you did Configure something manually all you'd have to do is find the resource go up here to well um it is export template and there's your template and it just has that single resource in there I can't remember if if I go into here if I select multiples um I go X or where is it export template look it's going to include all that stuff so if you already have existing resources that you provisioned And you want to have them that's what you can do notice that some things won't be included in the template when
you do that but you can just go ahead and download them and then you have them for later so yeah that's all there really is to um arm other than learning the uh the nitty gritties of the actual language that's just how you work with it there so what I'm going to do is make my way over to my Resource Group group here and I'm just going to go ahead and delete This here and we're all good to [Music] go hey this is Andrew Brown from exam Pro and in this section we'll be covering Azure
monitor so Azure monitor is a comprehensive solution for collecting analyzing and acting on Telemetry from your cloud and on premises environments it serves as is the backbone for gaining insight into the performance and health of your Applications infrastructure and even the network he features visual dashboards A visual representation of your data smart alerts intelligent notifications based on specific conditions automated actions set automation based on certain triggers log monitoring track and analyze event logs many Azure Services by default are already sending Telemetry data to Azure monitor what is observability it's the ability to to measure and
understand how internal systems work in order to answer Questions regarding performance tolerance security and faults with a system or application to obtain observability you need to use metrics logs and traces you have to use them together using them in isolation does not gain you observability metrics a number that is measured over a period of time for example if we measured the CPU usage and aggregated it over a period of time we could have an average CPU metric plugs a text file where each line Contains event data about what happened at a certain time traces a
history of request that travels through multiple apps or services so we can pinpoint performance or failure looks like they should have called it the Triforce of observability the sources of common monitoring data to populate data stores order by highest to lowest application operating system Azure resources Azure subscription Azure tenant custom sources the two fundamental data stores are Metrics and logs Azure monitor monor functionalities insights this can be for applications containers VMS or other Monitoring Solutions visualize using dashboards views powerbi and workbooks you can create Rich visual presentations of your data Analyze This involves delving deep
into metrics analytics and log analytics respond Based on data Azure monitor can alert you or even autoscale resources integrate extend the capabilities by using logic apps or Export APS for more flexibility overall as your monitor is a comprehensive solution vital for ensuring that your applications and services run optimally and any issues are detected and dealt with [Music] properly the next topic we'll be covering are the various sources from which azzure monitor collects data application code Azure monitor application insights offers robust Metrics about the performance and functionality of your applications and code you'll get performance traces
application logs and even user Telemetry you'll need to install instrumentation package in your application to collect data for application insights availability tests measure your application's responsiveness from different locations on the public internet this helps in assessing the reliability and uptime of your services Nrixs descriptive data regarding your application's performance operation and custom metrics log store operational data about your application including page views application requests exceptions and traces you can send application data to azure storage for archiving view the details of availability tests stored and debug snapshot data that is captured for a subset of exceptions
is stored in Azure storage log analytics agent is installed For comprehensive monitoring dependency agent collects discovered data about processes running on the virtual machine and external process dependencies agents can be installed on the OS for VMS running in Azure on premises or other Cloud providers Diagnostics extension collect performance counters and store them in metrics application insights logs collect logs and performance counters from the compute resources supporting your Application allowing them to be analyzed alongside other application data the Azure Diagnostics extension always writes to an Azure storage account while Azure monitor for VMS uses the log
analytics agent to store Health State information in a custom location the Diagnostics extension can also stream data to other locations using a vet hubs resource logs provide insights into the internal operation of an Azure resource and are autom automatically created However you must create a diagnostic setting to specify a destination for each resource platform metrics will write to the Azure monitor metrics database with no configuration you can access platform metrics from metrics Explorer for trending and other analyzes use log analytics copy platform metrics to logs send resource logs to Azure storage for archiving stream metrics
to other locations using event hubs Azure subscription this includes Telemetry related to to the health and operation of your Azure subscription Azure service Health provides information about the health of the Azure services in your subscription that your application and resources rely on Telemetry related to your Azure tenant is collected from tenant wide services such as Azure active directory Azure active directory reporting contains the history of sign and activity and audit trail of changes made within a Particular tenant for resources that cannot be monitored using the other data sources write this data to either metrics or
logs using an azure monitor API this will allow you to collect log data from any rest client and store it in log analytics in the Azure monitor metrics [Music] database Azure monitor is integral to maintaining the health and performance of your applications and resources Collecting two fundamental types of data logs and metrics Azure monitor logs collects and organizes log in performance data from a variety of monitored resources data consolidation logs can be pulled from diverse sources such as platform logs from Azure services log and performance data from Agents on Virtual machines and usage and performance
data from applications workspaces all these logs are organized into workspaces providing a centralized Repository for in-depth analysis query language Azure monitor logs offers a sophisticated query language which can quickly analyze millions of Records making it an ideal choice for complex data analytics log analytics you can interactively work with log queries and their results using Azure log Analytics tool in contrast Azure monitor metrics collects numeric data and organizes it into a Time series database here's why that's important numeric data metrics Are numerical values captured at regular intervals they are a snapshot that describes a particular aspect
of a system at a specific Moment In Time lightweight metrics are designed to be lightweight allowing for near realtime data analysis this makes them particularly useful for alerting and the rapid detection of issues metrics Explorer the metrics Explorer tool allows for interactive analysis of metric data providing a more immediate Understanding of your system's performance and [Music] health the next topic we'll cover are the data retention and archive policies of azure monitor logs this is an important aspect of your monitoring strategy as it allows you to control how long your data remains stored and accessible by
default in the Azure portal you can set this retention time anywhere from 30 to 730 days for the Whole workspace if you want you can also specify different storage durations for certain tables within your workspace letting you manage different types of data as needed this gives you the flexibility to meet any business or regulatory rules about data storage however note that to tweak these retention settings you have to be on the paage tier of azure monitor logs to set retention and archive policy by table why navigate to the Azure portal and go To the log
analytics workspace where the data is stored to under the setting section select usage and estimated cost three then select data retention four in the data retention blade you can modify the retention period for each table by default it is set to 31 days but you can extend it up to 730 days five for archiving data you can use Azure data Explorer which lets you retain data beyond the 2-year limit and gives you a highly scalable analytic service so That's an overview of the data retention and archive policies of azure monitor logs you'll most likely encounter
a question related to this on the exam so be sure to know [Music] this hey this is Andrew Brown from exam Pro and in this section we'll be covering Azure log analytics so log analytics is a tool in the Azure portal used to edit and run log queries with data in Azure monitor logs log analytics Processes data from various sources and transforms it into actionable insights it ingests data from Azure monitor windows and Linux agents Azure services and other sources once the data is collected you can use log analytics query language to retrieve consolidate and
analyze the data log analytics uses a query language called kql now we'll go over some of the benefits of log analytics centralized log management collect and analyze data From multiple sources both on premises and in the cloud in a centralized location powerful analytics utilize the custo query language to run Advanced analytics on large amounts of fast streaming data in real time custom dashboards create custom dashboards and visualizations to display real-time data and Trends integration seamless integration with other Azure services and Microsoft Solutions such as powerbi and Azure Automation and alerting set up Alerts based on
specific criteria to proactively identify and respond to potential issues before they affect your users log analytics workspace is a unique environment for Azure monitor log data each workspace has its own data repository and configuration and data source and solutions are configured to store their data in a particular workspace so that's an overview of azure log [Music] Analytics the log analytics agent is a lightweight agent that can be installed on Windows and Linux machines to collect and send log data to Azure monitor it provides a way to centralize logs from various sources and enables the analysis
of the data using tools like Azure monitor logs Azure dashboards and Azure monitor workbooks the agent can collect logs from various sources including Windows event logs custom logs performance counters and CIS log it Supports both agent-based and agentless data collection and can be configured to collect data from on premises and cloud-based environments the log analytics agent is set up to monitor certain Windows event logs like security system or application logs the data from these logs is then gathered and sent to log analytics for analysis using queries and visualizations the log analytics agent is set up
to monitor CIS log servers or Network devices it collects data from these sources and sends it to log analytics allowing for detailed analysis and troubleshooting both methods for collecting log data allow for centralized management and Analysis of log data from multiple sources which can help to improve visibility and streamline troubleshooting and issue resolution you can expect to see a question related to log analytics agents and choosing either Windows event logs For a Windows agent or CIS log for Linux agent on the exam [Music] the next topic will be covering our application insights application insights is
an application Performance Management Service and it's a subservice of azure monitor APM is all about the monitoring and management of performance and availability of software apps it strives to detect and diagnose complex Application performance problems to maintain an expected level of service so yuse application insights automatic detection of performance anomalies application insights automatically identifies performance anomalies in your system powerful analytics tools it comes with robust analytics tools to help you diagnose issues and understand what users do with your app continuous Improvement it is designed to help you continuously improve performance and Usability of your applications
platform agnostic it works for apps on net node.js Java and python hosted on premises hybrid or any public Cloud devops integration it can be integrated into your devops process and mobile app monitoring it can monitor and analyze Telemetry from mobile apps by integrating with visual studio app center to use application insights you need to instrument your application this involves installing the instrument Package or enabling application insights using the application insights agents were supported there are many ways to view your Telemetry data apps can be instrumented from anywhere when you set up application insights monitoring for
your web app you create an application insights resource in Microsoft azure you open this resource in the azzure portal in order to see and analyze the Telemetry collected from your app the resource is identified by an Instrumentation key what does application insights monitor request rates response times and failure rates dependency rates response times and failure rates exceptions page views and low performance ax calls user and session counts performance counters post Diagnostics diagnostic Trace logs and custom events and metrics where do I see my Telemetry smart detection and manual alerts application map profiler usage analysis diagnostic
Search for instance data metrics Explorer for aurad data dashboards live stream metrics analytics Visual Studio ET overall application insights is a comprehensive APM service that offers automatic detection of performance anomalies powerful analytics tools and is designed to help you continuously improve performance and usability [Music] in this segment we'll delve into the topic of application insites Instrumentation so what is instrumentation in simple terms it's a way to make your application smarter by adding a few lines of code or in some cases none at all you can monitor how your app performs and where it might be
running into issues you instrument your application by adding the Azure application insights SDK and implementing traces in the case of a node.js application you can install the Azure application insights SDK using npm With the following command npm install application insights hyphen save application insights this is the name of the package you are installing which is azure SDK for application insights hyphen save this flag saves the package as a dependency in your package.json n file here this piece of code lets you configure what you want to collect Azure supports the following languages net Java python node.js
JavaScript Auto instrumentation allows you to enable application monitoring with application insights without changing your code this table shows which Azure Services support application insights and in what programming languages the services range from Azure app service on Windows and Linux to Azure functions Azure spring Cloud Azure kubernetes service and more GA General availability meaning it's fully supported and ready to use public preview still being tested But you can use it not supported you can't use application sites here through agent you need to install a special piece of software to use this service o NBD on by
default meaning the feature is automatically enabled through extension available but needs an extension to work we won't go through the entire table but we'll give a few examples for applications written in.net and hosted on Azure app service on Windows application insights is generally Available and enabled by default for applications written in Python and hosted on Azure functions application insights is available and enabled by default but for dependencies monitoring you will need to use an extension so that's an overview of application insights [Music] instrumentation hey this is Andrew Brown from exam proo and in this section
we'll be covering Microsoft Sentinel formerly Known as Azure Sentinel Microsoft Sentinel is a scalable Cloud native solution that encompasses two key functionalities security information event management this is all about collecting and analyzing security related data to provide real-time analysis of security alerts generated by applications and network Hardware security orchestration automated response this refers to the collection of tools that enable an organization to Define standardize measure and automate responses to security events Microsoft Sentinel delivers intelligent security analytics and threat intelligence across the Enterprise providing a single solution for alert detection threat visibility proactive hunting and threat
response with Microsoft Sentinel you can collect data at Cloud scale across all users devices applications and infrastructure both on premises and in multiple clouds detect previously Undetected threats and minimize false positives using Microsoft's analytics and unparalleled threat intelligence investigate threats with artificial intelligence and hunt for suspicious activities at scale tapping into years of cyber security work at Microsoft respond to incidents rapidly with built-in orchestration and automation of common tasks Microsoft Sentinel comes with a number of connectors for Microsoft Solutions such as Microsoft 365 Defender Office 365 Azure a or Microsoft enter ID Microsoft Defender for
identity and Microsoft Defender for cloud apps you can use common event formats CIS logit rest API Windows event logs common event format and trusted automated the exchange of indicator information one notable feature of Microsoft Sentinel is the ability to create Azure monitor workbooks workbooks provide a Flexible canvas for data analysis and the creation of Rich visual reports within the Azure portal they allow you to tap into multiple data sources from across Azure and combine them into unified interactive experiences it tells a story about the performance and availability about your applications and services workbooks are temporary
workspaces to define a document like format with visualization intertwined to help investig and discuss Performance Microsoft Sentinel uses analytics to correlate alerts into incidents incidents are groups of related alerts that together create an actionable possible threat that you can investigate and resolve Microsoft Sentinels Automation and orchestration solution provides a highly extensible architecture that enables scalable automation as new technologies and threats emerge built on the foundation of azure logic apps Includes 200 plus connectors for services my Microsoft Sentinel also offers deep investigation tools that help you to understand the scope and find the root cause of
a potential security threat you can choose an entity on the interactive graph to ask interesting questions for a specific entity and drill down into that entity and its connections to get to the root cause of the threat additionally Microsoft Sentinels Powerful hunting search and query tools based on the miter framework enable you to proactively hunt for security threats across your organization's data sources before an alert is triggered after you discover which hunting query provides high value insights into possible attacks you can also create custom detection rules based on your query and surface those insights as
alerts to your security incident responders while hunting you can create Bookmarks for interesting events enabling you to return to them later share them with others and group them with other correlating events to create a compelling incident for investigation lastly let's talk about pricing Microsoft Sentinel has two different pricing models capacity reservations this involves being build a fix fee base on the selected tier enabling a predictable total cost for Microsoft Sentinel pay as you go with This option Bill per gigabyte for the volume of data ingested for analysis in Microsoft Sentinel and stored in the Azure
monitor log analytics workspace and there you have it a comprehensive look at Microsoft Sentinel a robust seam and Source solution that can help protect your organization's infrastructure applications and [Music] data hey this this is Andrew Brown from exam Pro and in this section we'll be Covering the identity management best practices we'll start things off by discussing the principle of lease privilege a term you may have come across before so the principle of lease privilege is a security principle that states that users applications and services should be granted only the minimum access necessary to perform their
assigned tasks and no more in Microsoft Azure the principle of lease privilege is a critical aspect of Security that helps prevent unauthorized access data breaches and other security incidents the principle of lease privilege in Azure involves limiting access to Azure resources such as virtual machines storage accounts and databases as well as Azure services such as Azure active directory and Azure key Vault Azure ro-based Access Control permits administrators to Grant roles to users groups and apps based on their access Levels following the principle of lease privilege helps minimize unauthorized access risks and potential harm from compromised
credentials thus reducing the Azure environment's attack surface following the principle of lease privilege can help organizations comply with regulatory requirements and best practices for security to implement the principle of lease privilege in Azure administrators should follow these best practices assign roles based on the Leaste amount of privilege needed to perform the task monitor role assignments and permissions regularly to ensure they align with business requirements limit the use of shared accounts and use individual user accounts where possible Implement multiactor authentication to prevent unauthorized access access to user accounts use Azure policy to enforce compliance with organizational
policies and Industry regulations Implement Network security groups and firewalls to control traffic to in from aure resources and regularly review Access Control policies and adjust as necessary to ensure that they remain effective so that's an overview of the principle of lease privilege the next topic will cover our privileged identity management or Pim for short within Azure D now why should you care about Pim because it's like a VIP lounge for your most sensitive Resources controlling who gets in when and what they can do once they're inside so privileged identity management is an Azure aervice enabling
you to manage control and monitor access to important resources in your organization you can manage resources from Azure ad Azure Microsoft 365 Microsoft and two and more so what are the key features of P Im Just in Time access this feature allows you to Grant privileged access to Azure ad and Azure resources only when needed Assign time bound access to resources using start and end dates required approval to activate privileged roles enforce multiactor authentication to activate any role use justification to understand why users activate get notifications when privileged roles are activated conduct access reviews to
ensure users still need roles and download audit history for internal or external audit it's important to note that Pim is part of azurea D premium 2o So you'll need that subscription to access these features by taking advantage of Pim and its features you can ensure a more secure and controlled environment for your [Music] organization next we'll be diving into another critical topic Azure ad identity protection so what does it do identity protection is a feature of azuread that enables you to detect investigate remediate and Export identity based Risks for future analysis Microsoft analyzes a staggering
6.5 trillion signals per day to identify and protect customers from threats identity protection can notice risky users risky sign-ins and risk detections let's take a closer look at the types of risks that identity protection can identify Anonymous IP address this is a sign in from an anonymous IP address like those used by the tour browser or anonymizer vpns a Typical travel this refers to a sign in from a location that is atypical based on the users's recent sign-ins malware linked IP address a sign in from an IP address linked to malware unfamiliar signin properties a
sign in with properties that haven't been seen recently for the given user leak credentials indicates that the user's valid credentials have been leaked password spray this involves multiple usernames being attacked using common Passwords in a unified Brute Force manner Azure a de threat intelligence this is when Microsoft's internal and external threat threat intelligence sources have identified a known attack pattern and there are others detected by Microsoft Defender for cloud apps such as new country activity activity from Anonymous IP addresses and suspicious inbox forwarding the risk signals can trigger remediation efforts such as requiring Users to
use azuread multifactor authentication reset their password using self-service password reset or even blocking until an administrator takes action identity protection categorizes risk into three tiers low me medium and high and administrators can use key reports for investigations such as risky users risky sign-ins and risk detections reports in the risky users report you'll find comprehensive details about Detected risks a complete history of all risky sign-ins as well as the users overall risk history to give you a full picture of security concerns in the risky signin report you'll see signin categorized as at risk confirmed compromised confirmed
safe dismissed or remediate this report provides both real time and aggregate risk levels associated with each sign and attempt it also includes the types of risk detections triggered the Conditional access policies applied multiactor authentication details and information about the device application and location involved in the signin risk detections offers filterable data covering up to the past 90 days it provides detailed information about each type of risk detected as well as other risks that were triggered simultaneously in the locations of the sign and attempts had been follow-up actions admins can take various actions like Resetting the
user password confirming a user compromise dismissing user risk blocking user side ends and investigate further using Azure app so with Azure ad identity protection you're not just identifying risks but you're also given powerful tools to act on [Music] them hey this is Andrew Brown from exam Pro in this segment we'll delve deep into Azure key vault pivotal tool to ensure the security of your Cloud Applications and services Azure keyal helps you Safeguard cryptographic keys and other Secrets used by Cloud apps and services Azure key Vault focuses on three things certificate management this feature allows for
easy provision management and deployment of both public and private SSL certificates these certificates can be used with Azure and internally connected resources Key Management this enables the creation and control of encryption Keys used to Encrypt your data secrets manag here you have a secure space to store and tightly control access to tokens passwords certificates API keys and other Secrets note that certificates contain a key pair which is a combination of a key and a secret this should not be confused with key management and secrets management which are distinct functionalities moving forward let's talk about hsms
or Hardware security Modules these are dedicated Hardware devices specifically designed to securely store encryption Keys when it comes to adhering to standard standards we reference the federal information processing standard or fips this is a guideline recognized by the US and Canadian governments that specifies the security requirements for cryptographic modules that protect sensitive information in line with fips we have two levels of compliance for hsms fips 104 diminus 2 level two compliant this compliance level is for multi-tenant hsms where multiple customers are virtually isolated on a single HSM fips 104 diminus 2 level three compliant this
level on the other hand pertains to single tenant hsms where One customer utilizes a dedicated HSM in essence Azure key vault is an indispensable tool for ensuring that your cloud data remains both accessible and secure whether you're working with certificates Encryption keys or various Secrets Azure key Vault has you [Music] covered all right let's dive into the core of azure key Vault the Vault itself a vault is where your secrets and keys reside safeguarded either by software or by hsms validated to the standards of fips 1004 diminus 2 level two Azure key vaults provides two
types of containers vaults these containers support both software and HSM back Keys HSM pools These are specialized containers solely for HSM back keys to activate your HSM you will need to provide a minimum of three RSA key pairs up to a maximum of 10 and specify the minimum number of keys required to decrypt the security domain called a quorum you do not choose the container on creation you just choose between standard and premium when you choose premium and create enough RSA key pairs you will begin to use HSM pools diving a bit into technicalities Azure
key Vault rest API is used for programmatically managing Azure key Vault resources allowing you to perform operations such as create a key or secret import a key or secret revoke a key or secret delete a key or secret authorize user or apps to access its keys or secrets and monitor and manage key usage Azure key Vault rest API supports three different types of authentication managed identities and identity managed by Azure ad recommended Is best practice service principle and certificate this method uses a certificate for authentication Service principle and secret a combination of a user identity
and a secret key one feature to note is the soft delete functionality soft delete allows you to recover or permanently delete a key vault in secrets for the duration of the retention period this feature is enabled by default on cre mandatory retention period prevents the Permanent deletion of key vaults or Secrets prior to the retention period elapsing furthermore enabling Purge protection safeguards your secrets from being prematurely purged either by users or by Microsoft bolstering the security of your Vault next up on our agenda is breaking down the pricing of azure key Vault knowing how your
bill for this service can help you make informed decisions and optimize your costs Azure key Vault Offers two pricing tiers standard and premium the notable distinction between the two is that while both tiers support software protected Keys only the premium tier allows for HSM protected Keys here's a closer look at the pricing tiers first 250 Keys regardless of whether you're on the standard or premium tier you'll be buillt $5 per key every month 25115 Keys the price drops to $2.50 per key monthly again consistent across both Tiers 1501 to 4,000 Keys the cost further reduces
to 90 cents for each key every month 4,1 plus keys for larger key volumes Beyond this point you'll be charged at a rate of 40 cents per key per month Secrets operations both tiers are priced at 3 cents for every 10,000 transactions involving Secrets certificate operations exclusive to the premium tier each certificate renewal request is buil at $3 managed Azure storage account key rotation this Service only available in the premium tier is priced at $1 per renewal HSM protected Keys specifically for HSM protected Keys the pricing is further broken down based on the key types
for RSA 2048 bit Keys the cost is $1 per key per month along with an additional charge of 3 cents per 10,000 transactions for RSA 3072 bit and 4096-bit keys as well as ECC Keys the first 250 keys are priced at $5 per key per month so that's an overview of the Pricing model for Azure key vault [Music] the next topic we'll be covering is double encryption for Azure key Vault before we dive in let's quickly recap infrastructure encryption for storage accounts by default Azure ensures that your storage account data is encrypted when it's at
rest infrastructure encryption adds a second layer of encryption to your storage accounts data now let's jump into Azure diss double Encryption double encryption is precisely what it sounds like it's where two or more independent layers of En encryption are enable to protect against compromises of any one layer of encryption this strategy ensures that even if one encryption layer is compromised the data remains protected by the other Microsoft has a two-layered approach both for data at rest and data in transit for data at rest disk encryption this is achieved using Customer managed keys and infrastructure encryption
this uses platform managed Keys strengthening the base layer and for data in Transit Transit encryption using transport layer Security 1 2 the Safeguard data as it travels through networks and an additional layer of encryption provided at the infrastructure layer so that's a quick overview of double encryption for Azure key vault in this section we'll go into Detail on the keys in Azure key Vault when it comes to creating a key in Azure you have three primary choices generate Azure will generate the key for you import import an existing RSA key that you already possess and
restore backup restore a key from backup for Keys generated by Azure you can use either RSA or EC RSA or rivest shamier or Adelman this supports key sizes of 2048 3072 and 4096 bits EC or elliptic curve cryptography here you can select from P256 P 384 p521 or p256 k for Keys generated by azer you can set an activation and expiration date additionally you're not bound to a static version of a key you can create new versions of keys you can also download backups of keys but remember that backups can only be restored within the
same Azure subscription and within Azure key Vault when you have a premium Vault you'll key options for HSM you can generate either an RSA or EC Specifically for HSM or import an RSA key for HSM as shown in the example now let's talk about Key Management types Microsoft managed key or Keys managed by Microsoft they do not appear in your Vault and in most cases are used by default for many Azure services customer managed key are Keys you create in Azure key Vault you need to select a key from EV Vault for various Services sometimes
customer managed means that the customer has Imported cryptographic material and any generated or imported keys are considered cmk and Azure in order to use a key an Azure service needs an identity established with an Azure adid for permission to access the key from The Vault Additionally you have the option to implement infrastructure encryption while while Azure already encrypt storage account data at Rest by default opting for infrastructure encryption adds a second layer of security Fortifying your storage accounts data even further the next topic will be covering our secrets in Azure key Vault Azure key Vault
Secrets provide Secure Storage of generic Secrets such as passwords and database connection strings key Vault AP as accept and return secret values as strains internally key Vault stores and man of Secrets as sequences of octets with each secret having a maximum size of 25k bytes the key Vault service Doesn't provide semantics for Secrets it accepts the data encrypts it stores it and returns a secret identifier for highly sensitive data clients should consider additional layers of protection for data for example encrypting your data using a separate protection key before storing it in the key Vault keyal
also supports a content type field for Secrets allowing clients to specify the content type of a secret to a assist in interpreting the secret data when it's Retrieved note that the maximum length of this field is 255 characters every secret stored in your key vault is encrypted key vault encrypt Secrets at rest with a hierarchy of encryption Keys all keys in that hierarchy are protected by modules that are fips 14 minutes 2 compliant the encryption Leaf key is unique to each key Vault while the root key is unique to the entire security world the protection
level may vary between Regions for example chid uses fips 1004 dimin 2 level one and all other regions use level two or higher diving into secret attributes we have exp this is the expiration time after which the secret data should not be retrieved NBF not before default value is now this defines the time before which the secret data should not be retrieved enable this tells us whether the secret data can be retrieved or not with its default set to True additionally there are readon Attributes for created an update in order to access Secrets within your
applic a code you can would use the Azure SDK for example we have a net example in this image here another option is to use tools like Azure CLI so that about covers the important details of secrets in Azure key Vault the next topic will be covering our x59 certificates first let's unravel what public key infrastructure is pki is a set of rules policies Hardware Software and procedures needed to to create manage distribute use store and revoke digital certificates and manage public key encryption so what exactly is an x59 certificate it is a standard defined
by the international telecommunication Union for public key certifications X 59 certificates are used in many internet protocols including SSL TLS and https signed and encrypted email and code signing and document signing a certificate contains An identity which could be a host name an organization or an individual along with a public key built on platforms like RSA DSA or ecda but who issues these certificates here comes the role of the certificate Authority a trusted entity that issues digital certificates a c acts is a trusted third part trusted both by the subject of the certificate and by
the party relying upon the certificate a certificate Authority can Issue multiple certificates in the form of tree structure known as a chain of trust root certificate Authority this is a self-signed certificate the private key associated with it signs other certificates it's important that the private key of root or protected intermediate certificate Authority these certificates are signed by the roots private key they protect the root certificate because the root certificate does not have to sign every issued Certificate and entity certificate a certificate issued by the ICA used by the end entity the entity in the case
is an SSL certificate for a website a certificate contains of metadata about version number the version of the x59 standard serial number a unique serial number assigned to the certificate by the certificate Authority signature algorithm ID the algorithm used to sign the certificate such as RSA or DSA issuer the name of The certificate Authority that issued this certificate validity period the start and end dates during which the certificate is valid subject the identifier for the individual or organization to whom the certificate was issued subject public key the public key that is authenticated by this certificate
this field also names the algorithm used for public key generation ation ISS your unique identifier allows multiple Cas to operate as a single Logical CL subject unique identifier allows multiple certificate holders to act as a single logical entity extensions allows a c to associate additional private information with a certificate all the metadata is publicly readable anyone can view it so that's an overview of x59 [Music] certificates hey this is Andrew Brown from exam Pro and in this fall along we're going to be learning all about Azure Vault so let's get to it so what I
want you to do is go on the top here and type in key Vault and here we'll have to go ahead and create ourselves a new Vault and so from there we're going to create a new Resource Group I'm going to call this Resource Group my example Vault and then we will make a vault key here so I'll say My Vault example which is kind of funny because this one's slightly different so you've seen I've done this before so I'm I'm going to do My example vault as the name here and for the region Us
East is fine for pricing we'll keep it at standard soft delete is enabled um and then there's the option for Purge protection so we are going to enable Purge protection and uh this is going to play into other follows we'll explain that as it goes but Purge protection does not allow you to uh Purge things uh easily once it's enabled so what we'll do is go ahead and and review and Create and we'll go ahead and go review create and we'll give it a moment here and we'll just wait till it's done deploying okay all
right so after a short little wait our vault is created and so what I want you to do is go to the resource and we're going to be using this Vault a little bit in some of the Fall alongs and in some cases is not so much [Music] okay hey this is Andrew Brown and this Fall along we're going to be doing some things with uh keys with an Azure key Vault so what I want you to do is make your way to the Keys blade on the left hand side here we're going to generate
or slimport a new key we're going to choose the generate option in terms of naming we're going to call this my disk key and we are going to choose RSA 2048 that seems totally fine to me everything else seems okay so we'll go ahead and create that key so we'll give it a Moment to create doesn't take too long and then what we're going to do is go on the left hand side to I am access controls and what we're want we're going to want to do is add a new Ro assignment so we can
go ahead and start using this uh key so what I want you to do is go and look for key Vault administrator which is here we'll go ahead and hit next and then for our uh user we will choose ourselves so under user I'm going to select the members I'm looking for The account I'm using there I am and your brown go ahead and select that there and so that is all we need to to assign it so that we can actually uh work with that key so I think a good idea is to use
a key uh to encrypt a disk so what we'll do is make our way over to dis encryption sets because before you can encrypt a dis you need to have an encryption set so we'll go ahead and create ourselves a new encryption set we'll call we'll use the uh sorry The same um resource ccrypt so it's very easy clean up afterwards we'll call this my disk encrypt set here and in terms of the encryption type we're going to use double encryption because that's much better you have two keys that encrypt it so that's a lot
better we are going to choose our vault so we have my example Vault there's only one option here and in terms of the key we'll select my dis key terms of the version uh we'll select the current version we'll go ahead and Hit review create and then we will go and create that and we'll give give it a moment to create that encryption set shouldn't take too long here and after a short little wait uh our resource should be deployed it took about a minute for me and if we go here it's going to have
this message up here it's very small but it says to associate disk image snapshot this dis encryption set you must Grant permissions to key Vault so all we have To do is click that uh alert and will grant permissions and so now we are able uh to use that key um or like to to we're going to have the permissions issues is solved so what we'll do is go to type and create a new disk and so we can apply this key to that encryption so we go ahead and create we're going to choose the
same Resource Group here I'm going to call this my example Vault and um or sorry my Example uh dis so that's a little bit more clear than that and for the availability Zone doesn't matter for the source type um it doesn't matter as well in terms of the size we want this to be cheap we're not really using this for real so we'll use standard HDD and we'll say okay in terms of encryption this is where things get fun we go to double encryption we choose our key here we'll go ahead review and create and
we'll just give it a moment For that to well we'll hit create and we'll have to wait a little while here for that create that resource so we'll just wait until that is created okay and after a very short while the dis is ready so we'll go to that resource we'll go to the encryption tab to see that encryption is applied so that's all it takes to use a key to encrypt a dis so we are going to still use some of these accounts there's no clean up yet I'll go back here and I'll see
you in the next [Music] one hey this is Andrew Brown and this follow along we're going to learn about backup and restore key so what I want you to do is go back into the uh Resource Group that we just recently created and we're going to make our way over to keys so I'm just or sorry we got to get into the Vault first then we'll go over to keys and the idea is that we have this key here and so um you can see that we have this current version so you Can add additional
versions but what's going to happen if we try to back this up so when you back this up you're going to get this file here and if you open up this file it's going to look like a bunch of gobbly goop so I'm just going to try to open it here um I have it up off screen here so I'm just trying to open it up within uh Visual Studio code so I'm just going to open up visual studio code again doing this off screen here just give me a moment all right and So this
is the file um that we encrypted uh and you take a look here and it's it's doesn't look like anything but the idea is that it is our backup of our key so that we can rein ort that and just taking a look at the key name this is what it looks like so it says my example Vault my dis key then there's this um uh date and that's key backup so just recognize that's the format and the date is very useful to indicate when you backed it up so let's Go ahead and delete this
key because the idea is we want to uh restore that backup and so we have deleted that key there and uh what we're going to do is we're going to attempt a restore so I'm going to go ahead and go occurred while restoring the key the key you're trying to restore already exists why would it throw that error we've clearly deleted it and the reason why is that we have Purge protection on we did that in the um first first part When we set up this actual Vault here I'm going to just see if we
can find the settings wherever that Purge protection is I'm trying to remember where it is Purge protection is enabled so we can go here and once you enable it you cannot turn it off it's going to retain it for a certain amount of days um and so all you can do is soft delete keys so this key is not actually deleted yet if you go to manage deleted Keys you can see the key is over here and if you try to Click on Purge it is disabled because we cannot remove the key because we have
Purge protection on but we can recover the key so we'll go ahead and recover uh and so that will allow us to recover the key and if we refresh here it's going to take a little bit time for that key to restore so we'll just have to uh wait a little bit and then it will show up here's one other thing I wanted to show you was under policy because you Know um if you go under where's policies here um or access policies if you look under our user here and we look at the key
permissions um there is an option to purge and we don't actually have that uh turned on right now but if we were to save this and we were to still go to that Purge option it would still say the same thing so even if you have Purge permissions it does not matter if Purge protections turned on it still will not let you purge but you would need a Combination of those in order to uh you know be able to do things there so to really show you how to do that recovery I think what we
should do I'm just going to delete our old key here because we don't care about it but we are going to well I guess we could try to import it into the other one so I'm just going to undo that for a second but we are going to go ahead and create ourselves another Vault so I'm going to go and type in Vault at the top here and we're going to Be a little bit more careful when we create this Vault so we'll go here and we will choose um my example Vault I'm going to
say My Vault no protect and the pricing tier will be standard one day we're going to leave it or well seven is the lowest and we'll say disable Purge protection because we don't want to have that enabled and we'll see if we can import the key into another Vault I'm not sure If we can do that worst case we'll make a new key download the key re-upload it but I'm just curious what would happen if we tried to upload the same key as it's still in another Vault I'm not exactly sure all right so this
deployment is successful I'm going to go to this resource I'm going to go ahead to go to create and we're going to restore from backup and we're going to take this key and see if we can actually import it Here so it looks like we can take a key and it can exist in multiple vaults I'm going to go ahead and delete this key and we're going to say are you sure you want to delete this key I'm going to say yes and if we go to manage keys and we refresh it takes a a
little bit of time here so we'll just wait a moment for this to uh persist and after a short little wait like about 2 minutes I refresh and the key is here so if I go here you'll Notice the purges option is still not available we can obviously recover um but we don't have Purge um protection on so if we go to access policies over here and we'll go ahead and scroll down and select Purge and save our changes we can then go back to Keys we'll give it a moment to save we go back
to Keys we'll refresh it we'll manage our keys and we'll go ahead and Purge it and that will permanently Purge it there so that's all it takes uh to do that so There you [Music] go hey this is Andrew Brown from exampro and in this section we'll be going over the integration with on premises Solutions with Azure starting with Azure adconnect Azure adconnect is a tool provided by Microsoft that enables organizations to synchronize on premises active directory with Azure active directory C this synchronization enables organizations to extend their on Premises identities and security policies to
the cloud and enable seamless access to cloud-based applications Azure a DEC connect allows for seamless single side on from your on premises workstation to Microsoft Azure Azure adconnect has the following features password hash synchronization this feature syncs user password hashes from on premises active directory to Azure ID enabling the same signing method for both pass through Authentication this allows you users to maintain the same password across on premises and Cloud platforms without needing a separate Federated environment setup Federation integration an optional feature it facilitates a hybrid setup using on premises a DFS infrastructure and provides
management tools like certificate renewal and server deployment synchronization this is responsible for creating and aligning users groups and other objects between On premises and Cloud ensuring identity information matches across both Health monitoring Azure adconnect Health offers robust activity monitoring with a dedicated azzure portal section to review this data here are the steps for installing configuring and synchronizing on premises active directory with azuread using Azure adconnect Why install Azure adconnect install Azure adconnect on a server connected to both on premises a and Azure a to configure Azure ad connect use the wizard to set up synchronization
settings Source Target directories and sync frequency three synchronized directories aure a DEC connect syn on premises a with azzure a d replicating changes from source to Target for Monitor and manage continuously Monitor and manage the synchronization process to ensure accuracy and meet business needs overall Azure a DEC connect is your bridge between the on premises world and Azure It ensures a synchronized coherent and seamless experience the next topic we'll be covering is azure a application proxy Azure a application proxy is a service provided by Microsoft Azure that allows organizations to provide remote access to their
on premises web applications it allows users to access the applications securely from anywhere using any device without the need for complex network configuration or exposing the Applications directly to the internet organizations can publish their on premises applications to the cloud providing secure remote access for their users the service allows organizations to use their existing on premises infrastructure and application architecture leveraging the benefits of the cloud it provides Advanced security features such as multiactor authentication and conditional access policies ensuring that only authorized Users can access the applications the azuread application proxy service consists of two main
components while an Azure a d application proxy connector a lightweight agent that is installed on a server within the organizations's on premises environment the connector establishes a secure outbound connection to the azuread application proxy service which which enables communication between the on premises application and The azuread service to Azure ad application proxy service a cloud-based service that manages the authentication and authorization of users who access the on premises web applications through the application proxy connector it also routes traffic to the appropriate pen servers and enforces policies set by the organization next let's look at the
azuread application proxy architecture here's an image of the process and we'll go through each step why an user access The user accesses the application and gets redirected to azuread for sign in any set conditional access policies are checked two token issuance after successful signin azuread sends a token to the user's device three token interpretation the client sends this token to application proxy which extracts the user principal name and security principal name for request forwarding application proxy forwards the request to the connector installed On premises five additional authentication optionally the connector May perform additional authentication and
then sends the request to the on- premises application six server response the application's response is sent back through the connector to the application proxy service seven response delivery finally the application proxy service delivers the response to the user's device next we'll go over some of the use cases for Azure a application proxy Remote access Azure ad application proxy is commonly used to provide secure remote access to on premise applications employees working from home or other remote locations can securely access their internal applications just as if they were in the office single signon application proxy can
integrate with azuread to provide single signon capabilities this allows users to authenticate once and then access multiple applications without needing to Sign in again conditional access with application proxy you can leverage Azure ad's conditional access policies for your on premise applications this provides granular control over over access based on user location device status and other factors Legacy application modernization application proxy can help organizations expose Legacy on premise applications to the internet in a secure manner without changing the application code this can Be a key part of a strategy to modernize Legacy applications scalability and performance
Azure a d application proxy scales automatically to meet your organization's usage patterns and provides a global reach without needing to open additional firewall ports this can help help improve the performance and availability of your applications in conclusion Azure a application proxy is like a security Guard in a bridge ensuring that your on premises applications are both accessible and protected be sure to know this as it'll definitely appear on the [Music] exam hey this is Andrew Brown from exam Pro and in this section we'll be going over storage accounts in Azure Azure storage offers several types
of storage accounts each with different features and their own pricing models these storage account types include standard General purpose V1 which is now considered Legacy standard general purpose V2 blob storage block blob storage and file storage storage accounts vary with the following features supported Services essentially this answers the question what can I put in this storage account your options include blob file Q table disk and data Lake Gen 2 performance tears this focuses on the speed of your read and write operations Azure offers to tiers Standard and premium access tiers how often do I need
quick access to files the tiers are hot cool archive replication how many redundant copies should be made and where Azure provides various replication options including lrs GRS R GS zrs gzrs R gzrs deployment model Azure has two models resource manager and classic the table details different types of azure storage accounts their capabilities performance tiers access Tiers replication methods and deployment models type this column describes the different types of storage accounts general purpose V2 this is the latest version of azure storage accounts and supports various services like blob file Q table disk and data Lake Gen
2 general purpose V1 this is the older version and supports blob file Q table and disk block blob storage designed for storing block blobs and aen blobs file storage specifically tailored for Azure file Shares blob storage meant for storing block and the pen blobs service these are the storage Services each account type can provide performance tiers Azure offers two performance tiers standard back by hard disk drives and suitable for general purpose storage premium uses solid state drives and is optimized for high performance and low latency workloads access tiers these Define the data access frequency hot
for frequently accessed data tool optimize for storing And frequently accessed data for a minimum of 30 days archive for rarely Access Data with a minimum of 180 days storage duration replication Azure provides multiple replication options for ensuring data durability and availability lrs locally redundant storage stores multiple copies of your data in a single data center GRS Geo redundant storage replicates your data to a secondary region raw GRS read access Geo redundant storage offers Readon access to the data in the secondary location in addition to Geo replication zrs Zone redundant storage spreads data across multiple availability
zones gzrs geozone redundant storage combines both zrs and GRS by spreading data across availability zones and replicating to a secondary region raw gzrs like gzrs but with read access to the secondary region deployment models resource manager this is azure's modern deployment model it Allows you to group related resources together for easier management classic the older deployment model that existed before the the introduction of the Azure resource manager lastly let's explore the five core Services Azure provides in the storage domain Azure blob a massively scalable Object Store for text and binary data also includes support for
big data analytics through data like storage Gen 2 Azure files manage file Shares for cloud or on premises deployments Azure cues a messaging store for Reliable messaging between application components Azure tables a nsql store for schema Less storage of structured data Azure diss Block Level storage volumes for Azure VNS so that's an introduction to storage accounts in Azure the next topic we'll be exploring is azure blob storage in more detail blob storage is an object store that is optimized for storing massive amounts of Unstructured data unstructured data is data that doesn't adhere to a particular
data model or definition such as text or binary data Azure blobs are composed of the following core components storage account this is essentially your unique space or Nam space in Azure and it looks something like this HTTP colon doubleist account. blob. core. windows.net container this component functions similarly to a folder in a file system blobs here is where the actual data is Stored Azure storage supports three types of blobs why block blobs these are ideal for storing text in binary data it's made up of blocks of data that can be maned individually and they can
store up to about 4.75 tip of data two append blobs specially optimized for append operations these are ideal for scenarios such as logging data from virtual machine three page blobs capable of storing random access files up to 8 terabytes in size and they are suited For store virtual hard drive files and serve as discs for Azure virtual machines when it comes to transferring data into Azure blob storage there are multiple Methods at your disposal including as copy and easy easy to use command line tool for Windows and ltic Azure storage data movement Library a net
library that uses as copy in the background Azure data Factory an ETL service by Azure blop pews this virtual file system driver allows for direct Data access through the Linux file system Azure data box a robust physical device designed to transport data to Azure securely Azure import export service a service where you ship your physical discs for data transfer onto Azure so that's an overview of azure blob storage the next topic we'll be covering are the performance tiers in Blob storage in a bit more detail there are two types of performance tiers for Storage accounts
standard and premium before we delve into the details it's essential to understand the term iops iops stands for input output operations per second the higher the iops the faster a drive can read and write premium performance tier in this tier data is stored on solid state drives these drives are optimized for low latency operations ensuring higher throughput and speed data access some of the ideal use cases include interactive Workloads analytics AI or machine learning processes and data transformation tasks and SSD has no moving parts and data is distributed randomly this is why it can read
and write so fast on the other hand standard performance the standard tier stores data on hard disk drives these drives offer VAR Performance Based on the access tier such as hot cool or archive the standard tier shines in the following use cases backup and Disaster Recovery operations storing media content and bulk data processing an HDD as moving Parts an arm that needs to read and write data sequential to a disk it is very good at writing or reading large amounts of data that is close together overall your choice between premium and standard largely depends on
your specific requirements whether you prioritize Lightning Fast data access or more budget friendly voluminous data storage Moving on to the next topic we'll be covering access tiers for blob storage in more detail so there are three types of access tiers for standard storage cool hot and archive hot tier ideal for data that's access frequently it has the highest storage cost but you get the lowest access cost use cases data that's in active use or expected to be access frequently and data that staged for processing an eventual migration to the cool access tier cool here best
for data That's in frequently accessed and stored for at least 30 days it has lower storage cost but higher access cost use case great for short-term backup in Disaster Recovery data sets older media content not viewed frequently anymore but is expected to be available immediately when accessed and large data sets that need to be stored cost- effectively while more data is being gathered for future processing archive tier best for data that's rarely Accessed and stored for at least 180 days it has the lowest storage cost but the highest access cost use case best suited for
long-term backup secondary backup and archival data sets original data that must be preserved even after it has been processed into final usable form and compliance and archival data that needs to be stored for a long time and is hardly ever accessed before we move on let's touch upon some essential technical aspects Account level tiering any blob that doesn't have an explicitly assigned tier infers the tier from the storage account access tier setting blob level tiering you can upload a blob to the tier of your choice changing tiers happens instantly with the exception from moving out
of archive rehydrating a blob when moving a blob out of archive into another tier it can take several hours this is known as rehydrating blob life cycle management here you can create Rule-based policies to transition data to different tiers such as after 30 days move to Cool Storage when a blob is uploaded or moved to another tier it's charged at the new tier rate immediately upon tier change when moving from a cooler tier the operation is building is a right operation to the destination tier where the right operation and data right charges of the destination
tier apply when moving from a hotter tier the Operation is built as a read from the source tier where the read operation and data retrieval charges of the source tier apply early deletion charges for any blot moved out of the cool or archive tier May apply as well cool and archive early deletion any blob that is moved into the cool tier is subject to a cool early deletion period of 30 days any blob that is moved into the archive tier is subject to an archive early deletion per period of 180 days this Charge is prated
so that's a more in-depth look into the access tiers for blob storage the next topic we'll be covering is the replication and data redundancy for storage accounts so when you create a storage account you need to choose a replication type replication stores multiple copies of your data so that it is protected from planned events transient Hardware failures Network or power outages or even massive of natural Disasters primary region redundancy these include locally redundant storage and Zone redundant storage secondary region redundancy this includes Geo redundant storage and geozone redundant storage secondary region redundancy with re access
re access Geo redundant storage and reais geozone redundant storage as you can expect the greater level of redundancy the more expensive the cost of replication for redundancy in the Primary region data is replicated three times in the primary region there are two options for storing in the primary region locally redundant storage copies data synchronously in primary region 99.999999999% that's 11 9's durability this is the cheapest option so redundant storage copies data synchronously across 3 A's in primary region 99.9% 12 9's durability for redundancy in the secondary region data is replicated to a Secondary region in
case of primary Regional disaster the secondary region is determined based on your primary's pair region secondary region isn't available for read or right access Geo redundant storage copies data synchronously in primary region copies data asynchronously to another region 99.9% that's 16 NES of durability gozone redundant storage similar to GRS but adds synchronous replication across three availability zones in the primary Region before a synchronously replicating to another region maintaining the same 99.9% that 1699 durability level redundancy in the secondary region with read access data is replicated synchronously to primary region your data will be in sync
with your primary and you'll have red access read access Geo redundant storage ensures synchronous data replication within the primary region into another region Offering a high durability of 99.9% with 169 read AIS geozone redundant storage this goes a step further by replicating data synchronously across three availability zones in the primary region before synchronous L replicating to another region maintaining the same high durability level so choosing the right replication strategy depends on your business needs weighing costs against data durability and accessibility and That about covers main points for the replication and data redundancy for storage accounts
the next topic we'll be exploring is a z copy so what is a z copy a z copy is a versatile command line tool designed specifically for copying blobs or files to or from Azure storage accounts it's a goto utility for many when they think of data transfer with Azure while download first things first to get started with a z copy You'll need to download the executable file compatible with your operating system be it windows litx or Macos to before you begin transferring data ensure you have the necessary level of authorization you will need to
have the level of authorization via attached roles for downloading you'll require the storage blob data reader Ro for uploading the rules necessary are storage blob data contributor and storage blob data owner three you gain Access either via a z copy login options for authentication include using Azure active directory or a shared access signature known commonly as SAS this prompts you deci side in you'll then be guided to use a web browser open a specific page and enter a given code to authenticate for copying data to move data use the straightforward copy command a z copy
copy whether you're uploading or downloading this command is your way to data transfer so that's a Quick summary of how to utilize a z copy the next topic we'll be covering is the life cycle Management in Azure storage Azure storage life cycle management offers a rule-based policy that you can use to transition blob data to the appropriate access tiers or to expire data at the end of the data life cycle with the life cycle management policy you can transition blobs from cool to hot immediately when they are accessed to optimize for performance Transition blobs blob
versions and blob snapshots to a cooler storage tier if the objects have not been accessed or modified for a period of time to optimize for cost delete blobs blob versions and blob snapshots at the end of their life cycles Define rules to be run once per day at the storage account level and apply rules to Containers or to a subset of blobs using name prefixes or blob index tags as filters so to manage the life cycle of Our blobs inside containers a life cycle management rule must be created navigate to your Azure storage account go
to life cycle management find and select blob service and click on add a rule from here decide whether to May apply this rule to all blobs inside the storage account or filter the blobs to have this rule applied in this storage account for example if Bas blobs were last modified for more than one day ago then delete the blob for example if bass blobs were Last modified from than one day ago then delete the blob if base blobs were last modified more than 2 days ago then then move to Cool Storage overall Azure storage life
cycle management gives you automated tools to handle data efficiently as it progresses through its life cycle balancing between performance needs and cost [Music] considerations hey this is Andrew Brown from exam Pro and in this section we'll Be covering the Azure SQL offerings let's break them down SQL server on Azure VMS provides SQL server and Os level access supports various SQL n OS versions this is an ideal choice for migrations and applications that need direct interaction with the operating system managed instances single instance gives SQL server and Os access for robust needs supports various SQL and
Os versions best for isolated SQL workloads needing dedicated resources instance Pool enables pre-provisioning of resources for efficient migration host smaller cost-effective instances this is a perfect fit if you're looking to migrate several smaller databases in b es suitable for batch migration of smaller databases databases single database offers hyperscale storage up to 100 terabytes features demand-based serverless compute best for cloud applications needing a fully managed service elastic pool enables resource Sharing among databases simplifies Performance Management with multiple databases best for managing and scaling databases with variable usage patterns so that's an overview of the Azure SQL
offerings whether you're migrating scaling or starting fresh Azure has a SQL solution tailored for your needs let's talk about Azure SQL databases in more detail Azure SQL database is a fully managed relational database service provided by Microsoft Azure it's a cloud-based database service that offers a high level of scalability availability and security Azure SQL database is based on the latest version of Microsoft SQL server and it's designed to handle various workloads ranging from small web applications to large Enterprise workloads hazure SQL database supports popular relational database engines such as SQL Server MySQL and postgressql and
offers a variety of deployment options Including single database and elastic pool Azure SQL database offers several benefits that make it a popular choice for businesses looking to migrate their on premises databases to the cloud some of the key benefits include fully managed service Azure handles administrative tasks like patching and backups freeing businesses to focus on core tasks High availability built-in automatic failover and Disaster Recovery capabilities ensure data access even During outages scalability Azure SQL database easily scales resources according to workload optimizing costs security Advanced features like threat protection and data encryption ensure secure data storage
integration Azure SQL database integrates seamlessly with other Azure Services supporting the development of modern datadriven applications the Azure SQL database service offers various tiers to cater to a range of requirements and workloads Here's a breakdown basic tier this is the most economical tier optimized for lighter database workloads its best for tasks like testing and development as well as for other non-critical workloads you can store data up to 2 gb and it provides 5 dtus which stands for database transaction units that offer a combined measure of compute storage and EO resources standard tier this tier is
designed to handle the majority of database Workloads it's ideal for business critical production workloads the storage capacity is up to 1 tbte and it offers a range of 10 to 4,000 dtus premium tier build for Mission critical databases this tier emphasizes High transactional rates it's particularly suitable for workloads with high volume transactions allows data storage up to 4 terabytes and it provides 125 to 20,000 dtus general purpose tier this tier is Designed for customers with demanding database workloads fits best for moderate to heavy transactional workloads offers storage up to 4 terabytes equipped with 5 to
80v cores providing robust computational capacity hyperscale tier optimized for extremely large data volumes High transaction rates and great concurrency this tier is the best fit for large volume of ltp workloads provides a massive storage capacity of up to 100 terabytes provides A compute range of 4 to 160 V cores in summary Azure SQL database offers a comprehensive set of tiers that cater to everything from lightweight development tasks to high demand Mission critical applications ensuring that organizations can pick the perfect blend of cost performance and capacity for their needs the next topic will be covering our
Azure SQL database elastic pools Azure SQL database elastic pools are a simple cost-effective solution for Managing and scaling multiple databases that have varying and unpredictable usage demands the databases in an elastic pool are on a single server and share a set number of resources at a set price the concept of elastic pools refers to a shared pool of resources such as CPU memory and storage allocated to a group of databases this shared set of resources can be automatically adjusted and distributed among the databases based on their varying demand Azure SQL database elastic pools is ideal
for businesses with many databases experiencing varying workloads instead of allocating dedicated resources per database an elastic pool shares resources across databases for efficient use and cost reduction benefits of azure SQL database elastic pools coste effective share resources across databases pay only for what you use Performance Management resources are autom managed across a Pool no manual adjustment required flexibility and scalability auto scales to meet demand handling traffic spikes smoothly simplified Administration easier management with shared resources across databases use cases for Azure SQL database elastic pools SAS providers manage varying customer database activity costs effectively development and
test environments efficient less expensive process for regular database setup and teardown businesses with Multiple apps optimize resource usage and cost by sharing resources among databases with varying activity so that's an overview of aure SQL database elastic [Music] pools next we'll be exploring Azure SQL managed instance in more detail Azure SQL managed instance is a fully managed database service offered by Microsoft Azure designed to provide an easy migration path for SQL Server workloads To Azure it provides a managed instance of SQL server in the cloud allowing you to run your existing applications with minimal changes it's
built on top of the latest SQL server engine and supports all its features including complex queries and userdefined functions it offers various deployment options including Standalone automatic failover configurations and cross region replication for Disaster Recovery aure SQL managed instan is ideal for Modernizing SQL Server workloads consolidating multiple SQL Server instances and building new Cloud native applications some of the main benefits of azure SQL managed instance include easy migration provides a Swift simple migration path for SQL Server workloads to Azure with minimal application changes fully managed Microsoft handles maintenance backups and updates allowing focus on applications
High availability built-in capabilities for automatic Failover and Disaster Recovery ensure constant application availability Security offers features like data encryption and threat detection for data protection performance supports large databases High transaction rates and low latency queries integration seamlessly integrates with other Azure services for easy Cloud native application deployment Azure SQL managed instance has two service tiers general purpose this tier is for light to medium IO applications Using local storage and providing an economical and scalable option suitable for small and medium-sized businesses needing an affordable Cloud option business critical this tier is for high IO applications offering
High availability automatic failover and premium storage ideal for critical applications in large Enterprises ensuring high performance availability and durability so that's a brief overview of azure SQL managed Instances the next topic we'll be covering is database scalability both Azure SQL database and Azure SQL managed instance enable you to scale database Resources with minimal downtime adjusting quickly to workload or traffic changes to dynamically scale database resources you can use the the following options horizontal scaling this involves adding or removing replicas to adjust the capacity of your database both Azure SQL database and Azure SQL managed Instance
support horizontal scaling vertical scaling this involves adjusting the resources allocated to your database such as CPU or memory again both Azure SQL database and Azure SQL managed instance support vertical scaling the exact process for scaling your database resources may vary depending on which service you are using but in general the steps are as follows determine the resource needs of your database such as the required CPU and memory and the Expected workload or traffic decide on the scaling option that best meets your needs whether that be horizontal or vertical scaling use the Azure portal po shell
or the Azure CLI to configure the scaling settings for your database monitor the performance of your database to ensure that the scaling changes are providing the expected improvements the difference between Azure SQL database and Azure SQL managed instance when a when it comes to Dynamically scaling database resources Azure SQL database offers a wide range of service tiers each with varying levels of performance and capabilities these service tiers allow you to choose the level of resources that best meets your needs and to easily scale up or down as needed as your SQL managed instance offers two
service tiers general purpose and business critical these service tiers are designed to meet different needs with general purpose Offering a balance of price and performance and business critical offering higher performance and availability for Miss critical workloads so that's a quick overview of database scalability focusing mainly on the commonly used Azure SQL database and Azure managed SQL instance the next topic we'll be covering is dynamic data masking Dynamic data masking or DDM an Azure is a feature that helps prevent unauthorized Access to sensitive data it is a security feature of azure SQL database Azure synapse analytics
and SQL Server that automatically conceal sensitive data in the result set of a query for example if you have a credit card number stored is 1 2 3 4 5 6 7 8 9101 11121 a dynamic data masking rule might conceal the numbers with all X's except for the ending four numbers in the query results ensuring most of the data stays protected and away from prying eyes Dynamic data masking is useful for scenarios where you want to provide a level of data security without needing to modify database operations it's often used in scenarios like reducing
the exposure of sensitive data in your database when users are running reports or analytics and preventing accidental exposure of sensitive data especially when data is being used for development or testing purposes key features realtime masking Data is masked in real time and does not affect the underlying data stored in the database the actual data remains intact and is not physically changed customizable masking patterns you can Define different types of masks depending on the nature of the data from partially hiding email addresses to fully masking credit card numbers except the last four digits the choices are
vast and flexible role-based access control a masking permissions can be Granted to users who need to access the actual data ease of use Dynamic data masking is simple to set up and doesn't require changes to the database or applications common use cases for dynamic data masking include protecting personally identifiable information financial data and other sensitive data types in non-production environments or in applications with user roles that require access access to a database but not all of its sensitive data so that's An overview of dynamic data masking Azure storage provides several security and encryption features to
ensure the confidentiality integrity and availability of your data here are some of the key features encryption at rest Azure storage automatically encrypts all data at rest using Azure storage service encryption or customer managed Keys using Azure key Vault encryption and Transit all data transferred to INF aure storage is encrypted using secure SSL TLS protocols keeping your data secure during Transmissions rule-based Access Control Azure storage provides rbac which enables you to Grant permissions to users groups and applications at A fine grain level access keys and shared access signatures Azure storage provides two types of authentication mechanisms
for accessing storage accounts access keys and shared access signatures access keys are account keys that allow full access to a storage account while Provides granular Access Control to specific resources within a storage account Azure private link enables you to access Azure storage resources over a private end point in your virtual Network this ensures that traffic between your virtual Network and Azure storage remains on the Microsoft Azure backbone Network Azure virtual network service and points Azure virtual network service and points enable you to extend your Virtual Network to Azure storage similarly to Azure private link this
ensures traffic remains within the confines of the Microsoft azure Azure Network Azure firewall this is a managed cloud-based network security service that protects your Azure virtual network resources you can use Azure firewall to secure traffic between your virtual Network and Azure storage Azure Monitor and Azure security Center Azure Monitor and Azure security Center provide Monitoring and security features for Azure storage Azure monitor allows you to monitor storage account metrics and logs Azure security Center provides security recommendations and threat detection for Azure storage overall Azure storage isn't just a storage solution it's a fortress designed to
protect your data at all levels from encryption mechanisms and access controls to private networking and threat detection it's equipped to tackle Diverse security [Music] challenges hey this is Andrew Brown from exam Pro and in this section we'll be covering Azure synapse analytics so Azure synaps analytics is a data warehouse and unified analytics platform it offers a code free visual environment that streamlines and simplifies the building of ETL elt processes it allows for easy ingestion of data via more than 95 native connectors ensuring Comprehensive access to a wide variety of data sources the integration of Apache
spark into Azure synapse analytics allows for the use of tsql queries across both the data warehouse and Spark engines tsql short for transact SQL is Microsoft's implementation of SQL it's used to interact with relational databases in Microsoft SQL Server in addition it supports a variety of languages including tsql python Scala spark SQL And net broadening its accessibility to different developers Azure synapse analytics is not limited to data warehousing it's also seamlessly integrated with both artificial intelligence and business intelligence tools for instance it works in harmony with Azure machine learning for AI purposes and leverages Azure
cognitive services for identity and access management moreover it integrates effectively with Microsoft powerbi for Efficient data visualiz Iz ation and business intelligence operations taking a look at this image it shows a simple process of azure synapse analytics you can ingest data from many data sources such as on premises data cloud data SAS data or streaming data the data is stored in object storage via data Lake storage Gen 2 you can manage Azure synapse analytics via the synapse studio interface you can output the data to various Azure Services such as Azure purview Azure ml or powerbi
let let's talk a bit about synaps SQL a vital component of this platform snaps SQL is a distributed version of tsql designed for data warehouse workloads it extends tsql to address streaming and machine learning scenarios you can use built-in streaming capabilities to land data from cloud data sources into SQL tables it integrates AI with SQL by using ml Models to score data using the tsql predict function it offers both serverless and dedicated resource models for unpredictable workloads that are unplanned or bursty you can use the always available serverless SQL in point for predictable workloads create
dedicated SQL pools to reserve processing power for data stored in SQL tables and there you have it a concise introduction to Azure synaps analytics the next topic we'll be Covering is the dedicated SQL pool and serverless SQL pool both are crucial components in the Azure synapse analytics Suite but they serve distinct purposes let's break them down dedicated SQL pool is essentially a query service over the data in your data warehouse the unit of scale is an abstraction of compute power that is known as a data warehouse unit think of dwu as a measure of computational
power ensuring your database operations run efficiently once Your dedicated SQL pool is created you can import Big Data with simple poly based tsql queries and then use the power of the distributed query engine to run high performance analytics ensuring you derive meaningful insights from your data on the other hand serverless SQL pool is a query service over the data in your data Lake one of the beauties of the serverless Paradigm is its adaptability scaling is done automatically to accommodate each query Resource requirements in the world of data change is the only constant whether you're adding
nodes removing them or managing failovers the serverless SQL pool is resilient it constantly adapts to ensure every query receives the resources it needs guaranteeing successful execution a in essence if you want Power go with dedicated SQL pool if you value adaptability choose serverless SQL pool either way asure simplifies your data operations making it easy to Manage complex tasks all right let's dive into Apache spark integration within Azure synapse Azure synapse can deeply and seamlessly integrate with Apache spark which is one of the most popular open-source Big Data engine used for data preparation data engineering ETL
and even machine learning tasks it offers machine learning models with sparkml algorithms and azl integration for Apache spark 3.1 with built-in support for Linux Foundation Delta Lake provides a simplified resource model that frees you from having to worry about managing clusters it has a rapid startup process along with aggressive autoscaling capabilities ensuring your system adapts swiftly to workload demands offers built-in support foret allowing you to easily incorporate your expertise and existing net code with in a spark application maximizing efficiency and resource Utilization now let's talk about spark in conjunction with data Lake and Azure synapse
Azure synapse removes the traditional technology barriers between using SQL and Spark together you can seamlessly mix and match based on your needs and expertise tables defined on files in the data Lake are seamlessly consumed by either spark or Hive SQL and Spark can directly explore and analyze paret CSV tsv and JSO n files stored in the data Lake And you benefit from fast and scalable data loading capabilities between SQL and Spark databases overall Azure setups coupled with Apache spark offers a Powerhouse of tools and capabilities making your data operation smoother and more efficient Azure synapse
link is a feature in Azure synapse analytics that provides seamless integration and real-time analytics capabilities between Azure synapse analytics and operational Data stored in Azure Cosmos DB it creates a tight integration between Azure Cosmos DB and Azure synapse analytics allowing users to explore and analyze their data with no extraction transformation and loading process required no data duplication and no impact on the performance of transactional workloads aszure synapse link forms a connection between Azure Cosmos DB's transactional database and Azure synapse analytics analytical Capabilities it accomplishes this by creating a real-time updated columnar based analytical store within
Cosmos DB benefits of azure synaps link for Azure Cosmos DB realtime analytics Azure synaps link enables realtime analytics by allowing direct querying of live operational data in Azure Cosmos DB without impacting its performance operational and analytical data cohesion it eliminates the need for complex ETL processes this simplifies the data Architecture as it provides immediate and seamless access to analyze operational data cost efficiency Azure synaps link reduces costs by avoiding the need for additional storage and resources that are typically required for ETL processes increase productivity by removing the need for manual data extraction or synchronization processes
Azure synaps link saves time and increases productivity for data scientists and Developers improve data freshness with Azure synaps link the most upto-date data from Azure Cosmos DB can be accessed for analytics and Reporting in real time this ensures data freshness and accuracy so when should you use Azure synaps link for Azure Cosmos DB you should consider using Azure synaps link for Azure Cosmos DB when you are an Azure Cosmos DB user wanting to conduct analytics business intelligence and Machine learning on your operational data you are currently running analytics or bi on your Azure Cosmos DB
operational data using separate connectors or you are executing ETL processes to transfer operational data into a distinct analytic system in such cases AZ your synaps link offers a seamless analytics experience without impacting the performance of your transactional store however it's not ideal if you require traditional data Warehouse capabilities like high concurrency workload management and persisting Aggregates across multiple data [Music] sources hey this is Andrew Brown from exam Pro and in this section we'll be covering Azure data Factory Azure data Factory is essentially a cloud-based managed service that plays a pivotal role in ETL elt and
data integration process is it acts like a Powerhouse Orchestrating data movement and and transforming data seamlessly on a large scale here's a breakdown you can create pipelines to schedule data driven workflows making data transformation and integration hassle-free build complex ETL processes that transform data visually with data flows this means you can transform data in a more intuitive and Visually appealing way use compute services such as Azure HD Insight Hado Azure data bricks and Azure SQL database Thus offering flexibility and Power in how you handle your data once your data has undergone transformation you can publish
your transform data to data stores such as Azure synapse analytics which can store and derive meaningful insights Azure data Factory has the ability to turn raw data into organized meaningful data stores and data likes ready for further analysis and Reporting so that's a quick introduction to Azure data Factory the next topic we'll be covering are the core components let's dive into each one and understand their significance Pipelines think of these as the assembly lines of your data Factory at pipeline is a logical grouping of activities that performs a unit of work it orchestrates and automates
the flow of data activities these are the specific tasks within a pipeline an activity is essentially a processing step in a pipeline the action items or The work stages in your pipeline data sets these represent the data structures or the blueprints within the data store Link services they Define the connection information necessary for data Factory to access external resources like your data sources data flows data flows Define how data moves through a pipeline or under goes transformation offering a visual representation of data's journey and manipulations integration run times this Is the engine under the hood
the integration runtimes are the compute infrastructure used by Azure data Factory to facilitate the data movements and compute processes control flow the control flow orchestrates the sequence of activities in a pipeline it determines how activities are chained ordered or branched ensuring the systematic flow and process processing of data in a nutshell these seven components are the backbone of azure Data Factory they work harmoniously ensuring your data is efficiently moved transformed and processed the next topic will cover in Azure data Factory is the data orchestration process data ingestion data is ingested from a variety of data
sources this could be on premises SQL Server databases external data or any other supported data sources a DF supports a wide range of connectors that can be used to pull data from these Sources data can be ingested in batch or realtime modes depending on the requirements data storage and transformation after data ingestion it's often stored in an intermediate storage for processing this could be Azure blob storage which is a scalable object storage for unstructured data for more structured analytics ready data Azure synapse analytics which is an analytics service can be used at this stage ADF
pipelines can transform data by cleaning Shaping and enriching using mapping data flows analysis once the data is ready it's then loaded into a data model for analysis this is where Azure analysis Services come in it allows you to build semantic models on your data which provide a Consolidated view of your business data and support high performance reporting and analytics visualization the data model can then be used by reporting tools like powerbi to create visualizations dashboards and Reports that provide actionable business insights security and authentication throughout this process asure active directory is used for authenticating and
authorizing users it provides identity and access Management Services ensuring that only authorized users have access to your resources and data and there you have it that's an overview of the data orchestration process in Azure data Factory from raw data to insightful visualizations all while being securely Guarded the next topic we'll be covering is Microsoft SQL Server integration Services commonly known as ssis Microsoft SQL Server integration Services is a platform for building Enterprise level data integration and data transformation Solutions as sis can be used to automate SQL Server databases additionally it can be used as an
integration runtime within Azure data Factory you can perform the following tasks with ssis copy or download files Load data into Data warehouses cleansing data for better accuracy dive into Data Mining and managing SQL Server objects and data s sis can perform elt with variety of sources such as XML flat files and relational data sources s sis is built-in tasks and Transformations graphical tools for building packages and integration Services catalog database where you store run and manage packages you can use the graphical integration Services tools to integrate And transform data without having to write code s
sis designer is a graphical tool that you can use to create and maintain integration Services packages picture a canvas where you lay out your data operations all with simple drag and drop functionalities here is an image that outlines the ssis designer in action with a data task flow example ssis allows you to drag out data Transformations with a variety of common Tasks such as aggregate merge lookup and many more and here you can design different kinds of control or data flows so that sums up our overview on Microsoft SQL Server integration services next we'll quickly
go through the pricing tiers of azure data bricks so you can get a better understanding of which one is best for your workload Azure data bricks offers two pricing tiers premium and standard here's what Each tier brings to the table premium SKU the premium tier offers a full set of Advanced Data bricks features such as role-based Access Control integration with Azure active directory for identity management and datab Bricks Delta engine which is a high performance engine for large scale data Lakes it is the most appropriate for Big Data analytics workloads and organizations requiring Advanced security
and team-based workflows standard SKU the standard tier Offers a subset of the data bricks platform features and is more costeffective for smaller workloads or development in test environments it includes the basic data bricks runtime in the collaborative workspace but does not include role-based access control or Azure ad integration so that's an overview of the pricing tiers of azure data bricks hey this is Andrew Brown from exam Pro and in this section we're Delving into to Azure datab bricks a game changer in the world of big data and artificial intelligence Solutions Azure datab bricks is an
Apache spark-based analytics platform optimized for the Microsoft Azure cloud services platform it's designed to simplify the process of building big data and artificial intelligence solutions by providing a unified analytics platform that accelerates the preparation of data for analytics and machine learning key Features collaborative environment Azure data bricks provides a shared workspace for collaboration among data Prof professionals it facilitates dashboard creation and project sharing across various languages Azure integration as a native service it integrates smoothly with Azure services like data Factory synapse analytics machine learning and powerbi simplifying analytics pipeline creation Apache spark integration it incorporates
an optimized runtime for Superior performance offering a serverless Apache spark experience with Auto configurability and integrated Azure Security Auto scaling and performance it offers Auto scaling and speed optimization for faster processing of Big Data workloads scaling to thousands of nodes and handling diverse workloads robust security it delivers Enterprise grade security with data encryption active directory integration role base Access Control private network Connectivity and Industry standard compliance use cases D data analytics Azure data bricks can process large volumes of data in parallel making it suitable for big data processing and analytics machine learning it provides provides
a platform for preparing data and developing training and deploying machine learning models realtime analytics Azure data brick supports streaming analytics allowing for real-time insights from data ETL Processes Azure data bricks can be used for building robust ETL pipelines data exploration and visualization the collaborative workspace in Azure data bricks allows for data exploration and visualization enabling data scientists and analysts to derive insights from data just to recap the key differences as your data focuses on analytics big data and machine learning while Azure data Factory primarily handles data integration and pipeline orchestration In the [Music] cloud hey
this is Andrew Brown from exam Pro and in this but before we delve into the specifics of azure data Lake let's clarify what a data Lake actually is in simple terms a data lake is a centralized and scalable repository capable of storing a vast range of data including raw unstructured and semi-structured data it's designed to accommodate a massive volume of data Commonly utilizing objects referred to as blobs or files as its primary mediums for storage here is a visual of a lake with ones and zeros representing the vast amount of data that it can accommodate
the processing of this data can be simplified and broken down into a few pivotal steps collect this step involves Gathering data from various sources transform here data under goes Transformations or modifications through the usage of elt or ETL this process Converts the raw data into a more organized semi-structured format ready for further analysis distribution this phase makes the transform data accessible to various programs or apis publish finally data sets are published to metadata cataloges making it easier for analysts to locate and tap into valuable data resources so that sums up a quick introduction to data
lakes and the foundational process involved Now that we have a solid grasp on what a data lake is let's delve into the specifics of azure data Lake Azure data lake is a highly scalable and secure data Lake that allows you to store and analyze large amounts of data it is composed of two main components Azure data Lake storage and Azure data Lake analytics Azure data Lake storage this is a massively scalable and secure data Lake that allows you to store all types of data there are two generations of Azure data Lake storage Azure data Lake
storage gen one it provides a single repository where you can capture data of any size type and Speed without forcing changes to your application as the data scales Azure data Lake storage Gen 2 this is a set of capabilities dedicated to big data analytics built on Azure blob storage it combines the scalability and cost benefits of object storage with the reliability and performance of The Big Data file system capabilities to Azure data Lake analytics this is an on demand analytics job service that simplifies big data instead of deploying configuring and tuning Hardware you write queries
to transform your data and extract valuable insights it includes usql a language that unifies the benefits of SQL with the expressive power of your own code it also allows you to dynamically scale the resources you need for your jobs making it coste effective as your data Lake storage gen One the first version of data Lake storage and will be retired in 2024 new users should use Gen 2 Azure data Lake storage Gen 2 Data Lake storage is azure blog storage which is has been extended to support big data analytics work loads designed to handle pedabytes
of data and hundreds of gigabits of throughput in order to efficiently Access Data data Lake storage adds a hierarchical main space to Azure blob storage and there you have it a comprehensive overview of Azure data [Music] like next we'll be exploring Azure data Lake storage Gen 2 in more detail given that the exam will feature questions asking you to identify the most suitable type of storage for specific scenarios it's essential to have a firm Gra grasp on which option is best suited for different tasks Azure data Lake storage Gen 2 plays a vital role in
Azure data Lake by providing a secure scalable Platform to store large data volumes it is tailored to support high performance analytics and machine learning operations here are some of its core features hierarchical mainspace enables organizing and managing data in a hierarchical file and folder structur similar to traditional file systems simplifying data organization and Transformations scalability designed to handle enormous amounts of data from pedabytes to exabytes with high Throughput and low latency it can also manage High volumes of small rights common in Big Data scenarios security incorporates Azure active directory for identity and access management role-based
Access Control firewall rules and virtual network service in points along with encryption at rest and and Transit it also supports Azure private link ensuring data travels over a private Network cost Effectiveness offers lowcost storage with life cycle Management policies that a automatically move data to cheaper storage tiers or deleted after a specified period lowering costs performance provides the high performance Computing needed for big data analytics and allows choosing the best performance characteristics for specific workloads through its performance tiers overall Azure data Lake storage Gen 2 is an extended version of azure blob storage designed for
big data analytics providing Additional capabilities like hierarchical file systems and fine grained Access Control the next topic we'll be covering is the second core component to Azure data Lake which is azure data Lake analytics Azure data Lake analytics is an on demand analytics job service streamlining the complexities of Big Data operations instead of going through the cumbersome processes deploying configuring and Tuning Hardware all you write queries using usql to transform your data and extract valuable insights effortlessly to illustrate its efficiency exporting approximately 2.8 billion rows of TP CDs store sales data which is around 500
GB into a CSV format file took less than 7 minutes and importing a full 1 terab set of source data into Azure analysis Services by using the Azure data Lake connector took less than 6 hours now let's talk a bit about usql usql is a Structured query language included within data Lake analytics to perform queries on your data Lake it's versatile allowing you to query and combine data from a variety of data sources including Azure data Lake storage Azure blob storage Azure sqldb Azure SQL data warehouse and even SQL Server instances running in Azure VMS
for those who like Hands-On experiences you can install Azure data Lake tools for visual studio to perform usql jobs on your Azure data Lake so that's an overview of azure data Lake [Music] analytics hey this is Andrew Brown from exam Pro and in this section we'll be covering is Cosmos DB but before we talk about Cosmos DB it's important to understand the key types of nosql databases first up let's talk about key value stores key value stores are simple and fast but they generally lack features like relationships indexes and Aggregation in a key Value Store
data is stored in pairs where a unique key is stored alongside a corresponding value a simple key Value Store will interpret this data resembling a dictionary also known as associative arrays or hash although this kind of data storage can resemble tabular data it doesn't require consistent columns per row making it schema less due to their simple design they can scale well beyond a relational database next let's explore what a Document store is a document store is a nosql database that stores documents as its primary data structure these documents can be structured as XML but are
more commonly found in JSO or similar formats essentially document stores are a subclass of key value stores but have a more intricate structure allowing for complex queries and operations here's a visual that displays the components of a document store compared to a relational Database now let's move on to understanding graph databases a graph database is a database composed of a data structure that uses vertices also known as nodes or dots which form relationship to other vertices through edges arcs or lines this type of database is particularly powerful for mapping relationships and identifying patterns use cases
for graph database fraud detection real-time recommendation engines Master data management Network And and operations identity and access management traceability and Manufacturing contact tracing data lineage for gdpr customer 360° analysis product recommendations social media graphing and feature engineering the nodes can contain data properties while the edges can hold relational data including directional information and other data properties so that's an overview of three key types of nosql databases Now that we have a better understanding of the key types of nosql databases it's time to delve into the main topic Cosmos DB Azure Cosmos DB is a service
for fully managed nosql databases that are designed to scale and have high performance attributes Cosmos TB facilitates interaction with different types of nosql database engines through distinct apis namely core SQL a document data store as your Cosmos dbapi for mongodb another document data store Azure table a key value data store Gremlin a graph data store based on aache Tinker pop these no SQL engines offer two specific capacities provision throughput where you pay for a guaranteed capacity and serverless where you pay only for what you use Cosmos DB shines with its incredibly quick response times and
solid support for scalability it's a fully managed service meaning Azure takes charge of all automatic management updates and patches Main advantages of azure Cosmos TB into integrates with many Azure services including Azure functions Azure kubernetes services and Azure app services integrates with many databases apis like the native core SQL mongodb Cassandra and Gremlin support for multiple development sdks spanning Donnet Java Python and nodejs offers a schema less service with automatic indexing of data ensuring rapid queries guaranteed uptime SLA of 99.999% availability data replication between Azure regions is automatic data protected with encryption at rest and
ro-based access and autoscale is provided to handle a variety of workload sizes next let's talk about Cosmos DB apis different types of AIS are available in Azure Cosmos DB to support a wider range of applications these apis allow data to be delivered via documents key value pairs y columns or graph data for new projects the core SQL apis are Strongly recommended whereas for existing databases is the specific database API is recommended the apis are as follows for SQL API the default API for utilizing Azure Cosmos DB and enables data querying with a language akin to
SQL mongod DB API facilitates communication with mongod DB databases and document storage Cassandra API allows interaction with Cassandra using the Cassandra query language and supports data storage as a partition row Store Azure table API a communication tool for Azure table storage it supports it indexing in the partition and row Keys Gremlin API helps in creating a graph-based data view that can be quered using graph traversal language so that's an introduction to Cosmos DB next up on our agenda is the cosmos DB Explorer Cosmos DB Explorer provides a userfriendly web interface that allows users to delve
into an engage with their Cosmos DB accounts you can readily Access this interface by heading to cosmos. azure.com here is a cosmos DB core SQL within Cosmos DB Explorer adding a document to the database which is very straightforward it's worth noting that when you journey through Azure to access a cosmos DB account under the data Explorer section you're essentially interacting with the same interface as cosmos DB Explorer furthermore the versatility of Cosmos DB Explorer shines Through with its compatibility with other database types for example it's seamless integration with a graph database using Gremlin so that's
a quick overview of Cosmos DB Explorer the next topic we'll be covering is partitioning schemas in Cosmos DB partitioning in Azure Cosmos DB plays a pivotal role in optimizing performance data in Cosmos DB indexes is strategically grouped by partition Keys ensuring quick and efficient data access Main concepts of partitioning schemas in Azure Cosmos DB partition Keys think of these as the backbone of partitioning they are the keys used to group items together and can be like lik to primary keys in relational databases essentially they dictate how data is divided and organized within the system a
logical partition is a group of items that all have the same partition key value physical partitions consists of a set of logical partitions Azure Cosmos DB Manages logical partitions which can have one to many replica sets are made up of a group of physical partitions that are materialized as a self-managed dynamically load balanced group of replicas that span across multiple fault domains each physical partition is not alone it has a set of clones or replicas this set of replicas is what we refer to as a replica set replicas ensure data durability availability and consistency logical
partitions are Mapped to physical partitions and these physical entities are then spread globally ensuring data availability and low latency access across regions to clarify the term in the image a partition set refers to a collection of physical partitions these partitions collectively manage the same logical partition keys and they Ensure this consistent management across multiple regions in essence Cosmos DB's partitioning architecture is Meticulously designed for scalability fault tolerance and Optimal Performance whether you're considering logical or physical partitions replica sets or partition Keys each plays a crucial role in ensuring that Cosmos DB remains one of the
most efficient nosql databases on the market the next topic we'll be covering is choosing a partition key at partition key has two components partition key path and the partition key value for Example you can consider an item user ID Andrew works for Microsoft if you choose user ID as the partition key the following are the two partition key components while in Partition key path this would be user ID this path essentially points to the property and your data item that holds the partition key value alpha numeric characters and underscores are accepted and you can navigate
through nested objects using the standard path notation to partition Key key value for our example this is Andrew it's the specific value found at the partition key path this value can be either a string or a number your partition key for all containers should be a property that has a value which does not change you can't change the value of a property if it's your partition key the partition key should have a wide range of possible values to distribute data and workload uniformly across various logical partitions spread Request unit consumption and data storage evenly across
all logical partitions this ensures even rot consumption and Storage distribution across your physical partitions let's talk about unique keys so unique Keys provide developers with the ability to add a layer of data Integrity to their database by creating a unique key policy when a container is created you ensure the uniqueness of one or more values per partition key a Unique key is scoped to a logical partition if you partition the container based on the zip code you end up with duplicated items in each logical partition it's important to know that you can't update an existing
container to use a different unique key a unique key policy can have a maximum of 16 path values each unique key policy can have a maximum of 10 unique key constraints or combination when a container has a unique key policy Request unit charges to create update and delete an item are slightly higher in addition unique key names are case sensitive the next topic we'll be covering our containers in Cosmos DB Azure Cosmos containers are useful for scalability in Azure Cosmos DB both in terms of storage and throughput they are beneficial when you need a different
set of configurations for each of your Azure Cosmos DBS because they allow you to customize each container individually Some applications may require robust WR capabilities for logging While others prioritize reading due to data access needs with Cosmos DB containers each application can have a customized container that meets its demands balancing performance and cost asure Cosmos container has some container specific properties and those properties which can be system generated or user configurable vary according on the used API and Azure Cosmos container has a set Of system defined properties depending on which API you use some properties
might not be directly exposed the table lists various system defined properties in Cosmos DB and indicates which ones are system generated versus user configurable additionally it also denotes which properties are used by different apis for nosql Cassandra manga B Gremlin and table rid type system generated purpose acts as a unique identifier for a container supported by Only the API for no SQL eag type system generated purpose utilized for optimistic concurrency control it ensures that only one client can change an item in the database at a time supported by only the API for no SQL TS
type system generated purpose represents the timestamp when the container was last updated supported by only the API for nosql self type system generated purpose provides an addressable Yuri of the the container it's essentially a Unique reference or link to the container supported by only the API for nosql ID type user configurable purpose denotes the name of the container supported by all the apis listed there are many more properties but we won't be able to list them all here the next topic we'll be covering are the capacity of Cosmos DB containers so what is capacity capacity
defines the amount of underlying resources are available to support consumption of Resources such as compute and storage as we've briefly touched upon before Cosmos dbs2 capacity modes provision throughput and serverless provision throughput in this mode you allocate a specific amount of throughput for your containers this throughput is Quantified in terms of request units per second this mode is suitable for workloads where traffic can be predicted it offers a high degree of flexibility letting you match your provision capacity to the expected Demand serverless this mode is the opposite in its approach instead of provisioning in advance
you simply run database operations without setting any predetermined capacity this mode is beneficial for smaller workloads or those that might experience unpredictable traffic spikes while it offers the advantage of Simplicity and configuration there are some inherent limitations to be aware of when it comes to geod distribution the provision Throughput option in Cosmos DB offers unlimited multi- region support in contrast the serverless option is restricted to a single region in terms of storage capacity while provision throughput allows for unlimited storage per container serverless is Cap at 50 GB performance- wise both options deliver less than 10
ms latency for Point reads however while provision throughput guarantees less than 10 ms latency for rights under its SLA serverless offers Less than 30 MS for rights as covered by its SLO regarding billing provision throughput charges per hour based on the set Ru s irrespective of actual R consumption on the other hand serverless charges are based on the actual Ru as consumed by your operations build on an hourly [Music] basis next we'll delve into the consistency levels in Cosmos DB these levels play a pivotal role shaping the Availability latency and accuracy of database operations aure
Cosmos DB provides five different consistency levels to maintain data availability and quering performance depending on your requirements the consistency levels in Cosmos DB can be visualized as the Spectrum this ranges from strong to eventual on the strong side it has higher latency lower availability but has worse read scalability but as you move towards eventual you gain lower Legancy higher availability and better read scalability strong linearizability reads are guarantee to return the most recent version of an item bowed staleness consistent prefix reads lag behind writes by at most K prefixes or t interval session consistent prefix
medonic reads medonic rights read your rights WR follows read reads consistent prefix updates returned or some prefix of all the updates with no gaps eventual outof order reads you set default Consistently at the cosmo B account Level under default consistency blade strong consistency this level guarantees that read operations return the most recent data while it's Rec cost align with bounded tailess they are higher than those of session and eventual consistencies furthermore data written can only be read once the majority of replicas have successfully replicated it now it stailness causes re operations to lack behind rights
due to Time or version disparities despite having the same re cost as strong consistency it's pricier than session and eventual consistencies it stands out as the most consistent when compared to session consistent prefix and eventual this level is ideal for globally distributed applications that prioritize High availability and minimal latency session session consistency ensures that data read within a session matches the most recent write in that Session however other sessions might see outdated or dirty data from recent wrs in different sessions it's the default consistency for new databases its Rec cost fall between those of bounded
stal less strong and eventual consistencies with consistent prefix read operations fetch the latest data replicated among replicas although it may not be the absolute latest situations can arise where dirty data appears due to changes in one replica That haven't propagated to others its consistency is superior to eventual but Trails behind other levels eventual consistency offers the least Assurance with no guarantees on immediate data accuracy however it boasts the lowest latency Optimal Performance and the most cost-effective read operations among all levels so that's an overview of the consistency levels in Cosmos [Music] DB hey this is
Andrew Brown from exam Pro and in this section we'll be covering Azure rid's cach but before we talk about Azure ridy cache we'll need to know what ridy is so ridy is an open source and memory database store Ries accs as caching layer or a very fast database since all data is stored in memory it's highly volatile meaning data loss is possible under certain conditions rides is very fast that it can deliver content from its store with single to double digit milliseconds such As 10ms despite its imemory nature ridies provides options for data persistence allowing
you to balance performance with durability it can periodically save data snapshots to dis or append each command to AOG red is a key value store and it supports the following data structures sets and sorted sets collections of strings in which every item is unique lists a collection of strings sorted according to the order they were inserted hashes Perfect for story objects these are maps between string fields and string values bit maps and bit Fields allow for operations at the bit level providing extremely efficient storage hyper log log a sophisticated algorithm to count unique values geospatial
indexes Grant the ability to manage spatial items in query by position streams new in rides it offers a way to log in realtime stream data so that's an introduction of rid's the next topic we'll be covering Is azure cash for rides Azure rid cash is based on the popular op Source rid's cache it gives you access to a secure dedicated rid's cache that Microsoft manages and that you can access from any Azure application Azure R's caches an in memory database that caches data in key value pairs it helps your application become more responsive even as
the customer load increases it takes advantage of the redu engines low latency High througha capabilities this Distributed cash layer allows your data tier to scale independently allowing for more efficient use of your application layers compute resources Azure red cash perfectly complements Azure database services such as cosmos DB and Azure SQL it provides a cost-effective solution to scale read and write throughput of your data tier using the caches side pattern you can store and share database query results session States static content and more Azure cash for stores session State and other data that needs low latency
access diagram of cash aside pattern on Azure storage first we'll need to check the rid's cach to see if your item is available if the item is found we'll retrieve it if the item is not found we'll pull the item from the table storage recash it in redas and then return the results on the right we have an image that should clearly explain the workflow overview check if cash exists If true go to step two and obtain the data if cash could not be found go to step three and recash the item and return the
results so that's a summary of azure cash redes and how it works the next topic will be covering our caching expiration policies for Azure rid's cach Azure rid's caches expiration policies are configured per each request so we could have an expiration policy different for each cach key for rid's distributed cach Those expiration policies are as follows absolute expiration relative to now this policy sets the duration for the cash to live counting from the moment the item is added to the cash for example if you set this to 10 minutes the cash item will expire 10
minutes after it has been added absolute expiration this policy sets a specific date and time when the cash item will expire once that date and time are reached the cash item is evicted regardless of when it was added Sliding expiration this policy defines an expiration time relative to the last access time of the particular cach item If an item has a slighty expiration of 10 minutes it will expire if it hasn't been accessed in those 10 minutes every time the item is accessed its expiration timer is reset so that's a brief summary of the Azure
rid's caches expiration [Music] policies hey this is Andrew Brown from exam Pro and in this section we'll be Covering non-relational data storage Solutions in Azure starting with Azure table storage Azure table storage isn't your regular relational database instead it's a nosql data store for semi-structured data needly housed within Azure storage accounts what makes it particularly appealing especially in today's fast-paced Tech world is its ability to handle vast amounts of unstructured or semi-structured data without being tied down by a fixed Schema there are two ways to interact with Azure tables the first is azure table storage
API a robust tool for developers to seamlessly integrate query and manage their data it provides you the flexibility to interact programmatically and customize according to your application's needs on the other hand we have Microsoft Azure storage Explorer it offers a userfriendly interface to browse manipulate and manage your data without writing a Single line of code think of it as your visual window into the world of azure tables here is a visual of azure storage Explorer a standalone app that makes it easy to work with Azure storage data on Windows Mac OS and Linux you can
create blob containers upload files create snapshots of disk and more so when should you use Azure table storage large amounts of semi-structured data if you have massive volumes of semi-structured or unstructured data but don't need the Complexities of a relational database costeffective storage Azure table storage is a budget friendly solution especially when compared to full-fledged databases it's suitable for projects where lowcost storage is a priority scheme of flexibility if your application has evolving data structures where the schema can change over time the schema less design of azure table storage offers flexibility scalability requirements for applications
that need To scale out by adding more data entities but don't require complex joins stored procedures or secondary indexes and fast access and high throughput if you need a storage solution with low latency and high availability characteristics for quick access to data so that's an overview of azure table storage the next topic we'll be covering is adding entries in Azure table storage when you enter data you must provide a partition key this is a unique Identifier for each partition within a table this key enables Azure to distribute table data across multiple nodes for improved data
access and load balancing for instance you might use the date and time as a partition key for log data ensuring entries are evenly distributed and easily sorted row key this key is a unique identifier within a partition allowing you to pinpoint a specific entity it's like the address of your data within the partition for Instance in a list of customers a customer ID could serve as a r key Azure table supports a diverse set of data types string textual data such as names or addresses Boolean true or false values binary data such as file or
image date time specific date and time information double floating Point numbers get Global unique identifiers in 32 and in 64 whole numbers both small and large when you need to retrieve data you can perform queries using both Partition and row keys this dual Key System allows for Rob in flexible data retrieval operations for example if you're looking for a specific transaction in a financial database you can use the partition key to narrow down the date and the row key to find the exact transaction Azure table storage allows you to apply additional filters to your queries
if you need to find all entries from a specific location or all entries falling under a particular Category you can easily set up filters to refine your search so that's a quick overview of adding entries in Azure table storage the next topic we'll be covering is azure Q storage Azure Q storage is a robust and straightforward messaging broker that facilitates smooth and secure message exchange between various applications and services within the Azure environment key features simple Message broker Azure Q storage allows Services running on cloud infrastructure to communicate with each other asynchronously it can handle
large numbers of messages simultaneously ensuring your services remain highly responsive security Azure Q storage uses authenticated HTTP as protocols ensuring that data transmission is secure and reliable message size it can hold messages up to 64 kilobytes in size accommodating a wide range of data types And sizes for storage and access storage account Q storage is stored within an Azure storage account ensuring a secure and unified setting for All Storage needs access keys and connection strings utilize the same axis keys and connection strings for Q storage as with other resources in the storage account ensuring streamlined
and consistent access management Azure Q storage offers three ways of handling messages on the Que Peak this option allows you to preview a message in the queue without deleting or locking it it's useful for determining the next message to process delete after successfully processing a message an application will typically delete the message to ensure it isn't processed again receive and lock by locking a message it ensures that other parts of the system can process the message simultaneously after process ing the lock is either renewed or the Message is deleted Azure portal easily create a Quee
and send messages through the userfriendly interface of the Azure portal Azure SDK or CLI for more programmatic control most interactions with the queue including sending peing and deleting messages can be performed using the Azure SDK or command line interface here is a python example to help you understand what this looks like developers can create cues add messages And process them with just a few lines of code so that's an overview of azure Q storage the next topic will be covering are the key Concepts in Azure Q storage cues can be accessed by using the following
URL format https storage account. q.c. windows.net Q the following URL addresses a Que in the diagram https by account. q.c cor. windows.net images to download here's a breakdown of the components store storage account a storage account is Required for all Azure storage access think of it as your gateway to Azure storage Services q a q contains a set of messages keep in mind the Q name must be all lowercase message you can store any format of data in a message but it must not exceeds 64 Koby if for version 2017 0729 the maximum time to
live allow is 7 days for version 2017 0729 or later the maximum time to live can be any positive number or minus one indic that the message doesn't expire in addition the Default time to live is 7 days if this parameter is not specified you can interact with the queue via the Azure CLI subcommand a Z Storage message action clear deletes all messages from the specified que delete deletes the specified message get retrieves one or more messages from the front of the queue peik retrieves one or more messages from the front of the queue but
does not alter the visibility of the message put adds a new message to The back of the message queue update updates the visibility timeout of a message so that's an overview of the key Concepts in Azure Q [Music] storage hey this is Andrew Brown from exam Pro and in this segment we'll be covering Azure files Azure files is a fully managed file share in the cloud a file share is a centralized server for storage that allows multiple connections it's like having one big share drive That everyone or in this example multiple virtual machines can work
on at the same time to connect to the file share you can use Network protocols like the server message block or network file system when a connection is established the file shares file system will be accessible in the specific directory within your own directory tree this process is known as mounting backups you shared snapshots to backup your file share these snapshots Are readed only and incremental meaning they only contain data that has changed since the last snapshot you could have a maximum of 200 snapshots per file share and these can be retained for a whopping
10 years remember backups are stored within your file share if you delete the share you say goodbye to the backups as well soft delete you can prevent accidental deletion by turning on soft delete with soft delete your data isn't immediately removed instead it's marked For deletion and held for a certain period before it's permanently erased Advanced threat protection an additional layer of security intelligence that provides alerts when it detects suspicious activity on your storage account store tiers premium store on to SSD with singled digigit milliseconds for most EO operations transaction optimized store on HDD with
transaction heavy workloads that don't need the latency offered by premium file shares Hot optimized for general purpose file sharing scenarios such as team shares and Azure file sync cool stored on HDD for cost efficient storage optimized for online archade storage scenarios types of storage general purpose version 2 deployed onto HDD file storage deployed on the SSD identity on premises Azure storage can integrate with an on- premises active directory domain service managed Azure storage can be joined to Microsoft managed active Directory domain service store account key use a combination of storage account name as the username
and the account key as the password for mounting networking a aure files can be access from anywhere both inside and outside your Azure account through the storage accounts public in point remember SMB uses Port 445 if you face connection issues check if this port is open in your organization to mount your file share encryption Azure files is encrypted at Rest using Azure storage service encryption Azure files is encrypted and Transit with SMB 3.0 plus with encryption or https and there we have it a comprehensive look into Azure files and its noteworthy features continuing from our
discussion on Azure files let's now explore its main use cases use cases for Azure files completely replace or supplement on premises file servers Network network Attached storage devices lift and shift your on premises storage to the cloud via classic lift or hybrid lift lift and shift means when you move workloads without rear tting for example you can directly import your local VMS to the clab classic lift both the application and its data are moved to Azure hybrid lift here only the application data gets moved to Azure files while the application remains operational on premises simplify
Cloud development Shared application settings multiple VMS and developer workstations need to access the same configuration files diagnostic share all VMS log to the file share developers can M and debug all logs in a centralized Place Dev test debug developers can quickly share essential tools needed for local environments containerization you can use Azure files to persist volumes for stateful containers while use Azure files instead of setting up your own File share server shared access Azure files is preconfigured to function with standard networking protocols like SMB and NFS fully managed Azure manages maintenance and security patches to
ensure your file storage is secure and updated scripting and tooling you can automate the management and creation of files shared with Azure API and Powershell resiliency Azure files is built for durability ensuring that your data is always safe and accessible so These are the main reasons and scenarios for incorporating Azure files into your infrastructure the next topic we'll be covering is azure file sync Azure file sync is a service that it allows you to Cache azzure file shares on an on premises Windows server or Cloud VM how does it work caching Azure file sync transforms
your Windows Server into a quick cach of your Azure file share this means that you can access the data you need faster than ever without having to Rely on the cloud multiple protocols regardless of the protocol you're comfortable with be it SMB NFS or ftps aure file sync lets you access your data locally granting greater flexibility Global caches for businesses operating globally as your file s Sy allows setting up caches in multiple locations for faster data access key benefits centralized storage with Azure file sync you get centralized file services in Azure allowing multiple locations to
use Cloud tiering and direct Cloud access to store and access data integrated with Azure backup Azure file sync integrates seamlessly with Azure backup offering unified and streamlined backup Services Cloud tearing as your storage needs change older or rarely used files can be moved to Azure saving space on your local servers easy integration it's designed to integrate smoothly with your existing infrastructure meaning less learning curve and disruption so that's A brief overview of azure file [Music] sync hey this is Andie Brown from exam Pro and in this follow I'm going to show you how to set
up a file share uh and mount it to a virtual machine so let's get to it so the first thing we're going to do is go all the way to the top and we're going to type in storage accounts because if you type in files or um Azure files you're just not going to get anything because it is a subservice uh Within a storage account so we'll go ahead and hit add and I think I will name uh I'll make a new Resource Group as I always do I'm going to name this one as keos
okay and then we'll name the account as such now I want to show you something here so under the account kind uh if you remember from our lecture content you can create a uh a file share under general purpose 2 um but if you go to premium 2 you'll have just a file Storage type that means only your this storage account is only for creating a file storage and that's if you want to use the premium tier 4 uh um axis and we don't today um but I will show you uh when we get to
that in a moment here uh just to point that out to you so what we'll do is go ahead and hit review create actually before we do that let's just double check if there's anything interesting here sometimes there is so under Azure files for large file shares Um provides file share support up to 100 terabytes so right now it's it's disabled but if you wanted larger files you could go ahead and enable that but we're just going to leave it off I'm going to go ahead and hit review and create now as this is creating
and this goes pretty darn quick uh what I'm going to do is launch a new virtual machine because we need something uh to mount the file share too so make your way over to Virtual Machines and what we're going to do is launch a Linux one just because that's a lot easier for me to do here and they're generally more inexpensive so we'll choose Kos I'm also going to name the virtual machiney evos and we'll choose Ubuntu as our image so just go down here make sure you choose 18 LTS generation 2 and under the
sizes we'll expand it make sure you choose B1 LS because that costs around $6 a month under your password we will Choose Azure user as the name and then for the password itself testing 1 two 3 capital on that t so capital T testing 1 23 4 5 6 sorry it's always uh 1 2 3 4 5 6 we should probably open up Port 44 five um but uh we'll get to that when um we get to the uh actually after we create it here so I'll hit review and create and we will go ahead
and just give it a moment just takes a little bit of time and we'll just go and create that There so as that is creating we'll go back to our storage account we'll go into it and uh as as you notice these are the services the the things that we can launch in our storage account what we want is a file share that's Azure files um and notice here that the capacity is set to 5 terabytes and it has a soft delete for 7 days it's not configured with Azure Azure active directory as of yet
if we wanted to use that to authenticate but what we'll do Is click on file share on the right hand side I'm going to name our file share as keyos I'm going to set the total to uh 3 gigabytes because we don't need a lot of data and remember that tier I talked about well here it is it's disabled but if we had created it a a a premium storage account and a file file storage we could could have chosen that all right so we'll go ahead and hit create and this doesn't take too long
as that's going let's make our way back to our Virtual machine it looks like it's deployed so we'll go to that resource and then on the left hand side we'll go to networking because I want to open up that Port Port Port 445 that's what ssnb SMB communicates on and so uh down below all this is fine but if we were to go here there isn't one for SMB so what we'll do is just put in 445 and we'll say TCP and I'll just write down your SMB and we'll go ahead and hit add and
that only takes a moment there we'll Make our way back to our storage account we'll click in or sorry into our files yeah Serge account in our files notice we have connect and upload and so what we're going to do is Click uh connect and it's going to give us some instructions here that we can run and this is going to be the mount point so I'm going to go make my way back to here and I see that that record has been created and I'm going to open up our uh Cloud Shell and so
if you've never opened up cloud Cloud shell before It'll ask you to make a storage account that is specific just for it just say yes make sure you're in bash mode we cannot do this in Powershell and uh within your virtual machine if you're on the right tab here you'll go to overview and we're going to grab that public IP address type SSH Azure user at sign paste in the IP address we'll hit enter type in yes to accept the fingerprint and then type Your password capital T testing 1 23 4 5 6 okay and
it'll let us in and what we're going to need to do is do a pseudo apt update and I'm going to do Ampersand Ampersand just so we can run this in one line we're going to type in pseudo apt install cifs utils this is the utility that we're going to use to do um that's part of the mounting so we need to make sure that is installed and so we'll let that go um up apt update can take a lot of time or a very little amount of time It just depends on how many updates
there are but it shouldn't take too long um and so what we're going to do is prepare this because this is not the easiest to work with and so what we'll do I already have it open here because I was given this a go earlier this is the exact same thing but I'm going to delete it out so it's one: one because I think it might have changed a little bit here whoops and so I will copy this here and paste it in and we'll just give It a quick read so what it's going to
do um I don't know if it would color this if I went to bash here shell script there we go it's a bit easier so it's going to uh create a Dory called Mount keos um and then it's going to create another directory for the SMB credentials it's going to store the username and then the password in these credentials we're going to chamod it so we have our permissions uh and then we have this bass script here um which is a Little bit hard to read but it is using cifs so it's doing some something
there and setting that stuff up and then it's using CFS it's actually mounting this case so that's what we're going to do so um just go going back over here and back to this other tab um what I'm going to do here is um oh sorry now this is ready we're going to just type in clear and I'm going to run each of these commands so I'm going to grab the make directory Here and I'm going to paste that in if you paste all this in half the time it messes up when you have multi-line
like that so it's not even worth trying uh so we'll do copy we'll make that other directory here and then uh we have this pseudo bash line here so we'll copy that okay hit enter and then we'll grab this next line here we'll copy that paste that in hit enter did not like the space in front of It I think it's just a really long line so what I'll do is I'll just grab that line and move to the wall make my life a little bit easier and we'll paste that in like that um it's
saying the credentials does not exist hold on here so we'll just write clear it's okay if it happens so this directory should exist right so if I do um um PWD Etc or we should just be able to Autocomplete it so CD Etc I'm hitting tab to autocomplete and then we want SMB and this says credential so it's missing the S so there's my mistake okay so I'm going to go ahead and remove that because if we don't have it named right it's just not going to work right so we'll go ahead here and make
sure we copy the entire line that was my mistake and we'll paste that in there we'll go to the next line copy that paste that In copy the next line here paste that in and uh we will what we'll do is we'll chamod the file okay so if we want to check to make sure it's the correct permissions what we can do is is um do an LS paste in the or just write in the path uh which is SMB credentials here and here we can see the file if we do a hyphen La it
will show us that it has the correct permission so see it's really locked Down there that's what the Chabad did if we want to see the contents of that file to make sure that those things are in there uh what we can do is type in um cat and just grab that whole link here we might have to give it pseudo it might complain for that it does so we'll put pseudo in front of that and so we just want to make sure there's one username and one password um and everything looks okay there we'll
type clear we'll make our way back here and so now we'll run These commands so that's the first one and then this say is the second one we'll make sure that that n matches up i o yep I O hit enter and so now it should work so if we were to upload a file uh that should be in good shape but if we want to get to that directory we'll just type in Mount if we keep on hitting tab it will show us there's keyos okay and so you know this is where we're going
to create some files so I actually don't have a file prepared so Give me a moment I'll be back in a moment with a file all right I'm back and I've uh prepared an image for our self load so going back to our uh file share in here we have the upload button just go ahead and click that and on the right hand side it's going to give you a popup and uh within that popup there um just go find your image I'm just offscreen grabbing it so this is uh my image what I'm uploading
which is keas uh keas fagio it's who we named it after He's the collector in Star Trek Con generation and so what I'll do is go ahead and hit upload right and so that file is supposedly there if we go back here and do uh LS there's the file right um and so probably it should be reflective so if we were to go and uh delete this file so we'd say remove or maybe if we made a new directory let's see what happens if we say um you know uh the episode's called the most toys
in Star Trek just see if it actually reflects back and forth so we do a refresh there it is can I drag no I can't drag but I could probably move this file over there so we'll say move uh keos fio into the most toys episode and if we go back here and refresh you get the idea right so yeah u i mean that's as simple it is uh with the file share there okay so now that we're all done here with Azure file share we can't or we can't use this to Make a file
sync because we would have to use Windows for that so this is all pretty much done so what I want you to do is go to your resource groups we'll find keyos and we'll go ahead and delete this and we'll call this uh part of our follow along 100% done here okay so see you in the next [Music] one hey this is angre Brown from exam Pro and we are going to take a look at using Azure file sync so uh previously We set up a file share with just Linux but we're going to take
it a bit further and set up a sync so what we're going to do is we're going to do two things we're going need to set up a new storage account and we'll also have to launch a virtual machine since virtual machines take longer to launch than a storage account what I want you to do I still have the old tab here from the last uh follow along but what I want you to do is make your way over to Virtual Machines open that a new tab and we'll go ahead and launch ourself a Windows
Server so up in the top left corner hit uh ad virtual machine we'll give it a moment I'm going to call this new one uh well we we can use keos again so I'm going to go ahead and do that we'll say this is keyos and I'm going to choose this time Windows 2019 server so we have a Windows server and I want uh 2019 um it doesn't necessarily have to be let me just double check Here um yeah we'll just do 2019 generation 2 here and we'll scroll on down here and I'm going to
put an Azure user and then we'll do um uh capital T testing 1 2 3 4 5 6 capital T testing 1 2 3 4 5 6 scroll on down we are definitely going to want Port 3389 open um we'll open up these two ports as well I think that's okay and we'll go ahead hit review and create well actually before we do that I don't think I choose the right size so um we'll just wait a Moment here as it's complaining and we'll change this because you can't have a B1 LS we're going to
have to go with um uh dsv uh SV uh DS V3 okay because it has two V vcpus at the minimum actually we can go with this one here because it just has to be two and four so I think we can get away with a B2 which is 50 50 bucks a month which we're not going to keep that around for very long we'll go ahead and hit Create um we might need actually before that I'm just going to add another disc just in case because I really don't want to have to do this
if I have to make another one and so we're just going to say an empty disc here I suppose yeah that seems fine to me and I'm going to go ahead and hit uh yeah we should enable dis now we'll do nothing there and we'll say okay and go ahead and hit review create and we'll just give it a moment Takes a little bit of time and go ahead and hit create there and while that's creating now we'll go over and make ourselves a storage account so I'll make a new one here and we'll call
it uh we'll put it in our keos and we'll call it keos we'll stick with Standard General 2 that's totally fine for our use case we'll go ahead and hit create and this will not take long it's very fast to making storage accounts virtual Windows Virtual Machines not as fast so we'll just give it a moment here and it looks like it's created so we'll go to the resource and then under file shares we'll click on that we'll create a new file share and this will be called keos and we'll set 5 gigabytes because we
really don't need a large one we'll create it and so this can be used for Windows or Linux uh in this case we're going to be using it for um uh windows So what we can do uh we'll just have to wait for that to finish deploy but we're going to have to set up as your file so if we go files I think we type it in here will it show up no so if the thing is we need to get file sync and it's in a kind of a weird spot so if we
go to all services and then we type in files whoops it a little bit too quick there uh I'm just looking for it here uh what if we type in sync there we go so what I'm looking for Is storage sync Services can we type it up here sync yeah so that would have been the way I would have gone gone gone and found it there but we need to find uh as your files I'm just trying to remember how to get to there so I could have swore we could type in file sync yeah
here it is a your file sync and so this is how we get to it I know it's quite a let me just double Check to make sure if that's somewhat if we can actually type that up here file sync no okay so what we would want to do is go ahead and uh create this if we want to take a look we can check the plans this seems okay so we'll go ahead and hit create and under here we're going to put it into keyos and then for the provider name it will be the
storage sync service name will just be keyos as well um and I guess we'll stick with Central us I guess it just really Depends on where our virtual machine storage account is I hope everything's launching in the same place I don't think it matters but I'm just going to double check here so this one is in Canada east and then our storage account let's just go take a look where it is it is in um Canada east so maybe we could launch this in Canada east if it doesn't give us any grief it doesn't so
that's great we'll go ahead and hit create and we'll give that a little bit Of time there and if our instance is ready we should go ahead and connect to it because there's going to be a couple things we need to install okay so I'm going to go over to RDP here and we're going to uh download the TP file and that's going to open up that so we'll just double click it we'll say connect if you're on a Mac you got to download the client if you're on Windows it's already it should be pre-installed
if you if you're on a Chromebook you'll Have to use a Bastian but I'm going to type in Azure user and that password capital T testing 1 2 3 4 5 6 we'll hit okay I'll say yes I'll connect and we'll just give it a moment there to load we are going to need uh two things we need to install but just give me a moment here I'll go fetch them all right so now that we uh I have our Windows machine we're uh inside of It here what I want you to do is open
up um Powershell so if you type in Powershell we do need to run this in administrator mode so just type it in it's a little bit slow when you're rping which is totally fine and what I want you to do is right click and run as an administrator uh and what we're going to do is install Azure RM because we need it in order to use um the Azure file sync agent okay so type in install hyphen module and then uh type in name Azure RM and then we'll say allow clobber don't ask me what
clobber does I have no idea but that's what Microsoft or Azure tells us that we should uh whoops uh did I spell that right no it's all correct okay that we should do this thing is pretty darn slow so uh we'll just have to wait here a little while um and once that's done we'll we'll continue on to the next part okay okay so after waiting a little bit it asks us the question so we're just Going to hit why to everything all right and uh as that's going here um it can take a little
bit of time so what I'm going to do if I can even minimize this here um and I did not mean to minimize Azure uh or this here oh the other one already prompted that was pretty fast actually it's going really fast as of today um but as that's going um what we'll do is we'll make our way back over uh to sync storage here because or Storage sync we were waiting for this to get set up uh because we're going to have to go uh set up a sync group so I'm going to just
call this uh keyos make everything easy we'll stick with that Azure subscription we'll drop this down and we'll choose keyos in here uh and then for the Azure file share we'll choose keyos and once that's created we'll click into that and what we are trying to do is we're adding a cloud uh Endpoint here so we would choose our storage account and we would choose uh this here and hit create okay and so now we have a cloud endpoint but we still have to uh continue on with our uh our virtual machine here so just
wait until this is done this will take a little bit of time okay all right so now that uh we um uh we have that installed the the power shell for uh resource manager what we're going to need to install is the Azure File sync agent in order to do that we're going to have to go to the internet but before we do that we really want to uh uh turn off a particular feature um so turn back on protective mode I was fiddling with it earlier but if we were to go and it doesn't
matter where we go we say Azure file uh sync agent okay and if we were to go see we started getting this pop up and drives us crazy so what we can do because this isn't a Big deal it's just for uh testing here we're going to turn that off so um go to your local server where it says I I IE enhanced security configuration click on that and just turn it off you know because it'll drive you crazy and then we'll go back to inter Explorer completely close it reopen it and now uh what
we can do is look for that aure file sync so we'll type in aure file sync uh agent download and that's is azure Microsoft.com maybe later for that experience it's easier if you go to the Microsoft site and uh if you go here just give it a moment scroll on down click on the download button and we want uh 2019 because that's the server we launched right and that and we're trying to uh sync with storage sync so we'll go ahead and hit next this is 50 megabytes so it shouldn't take too long um and
we're going to wait for it to Download if it doesn't uh well we'll say allow once for the site here so maybe it was trying to download yeah there it goes and we will save it and we will always allow for Microsoft here it's totally fine and it's already finished downloading so we'll go ahead and run that and just give it a moment here we'll hit next we'll accept the terms uh we'll install it there that's totally Fine we'll use the existing proxy uh configuration Uh custom configure proxy well we don't have any custom so
we leave it alone we'll leave Microsoft updates on uh it' probably be good to checkbox that on but I'm just going to go install next here all right and so we'll let the agent install usually doesn't take too long any I'll see you back here in a moment all right so now that we have our St agent set up we'll just hit finish here uh and I don't know why it opened a bunch of windows but that's just what it does and so we're just going to wait for for it to pop back up here
and then we'll say okay and then what it'll want to do is connect so it says Azure environment uh so it is azure Cloud right and I'm just going to sign into my account and I'm going to try and log in here so let me just go grab my Credentials all right so I entered my credentials in here so we'll go ahead ahead and hit sign in and we'll give it a moment there we're going to choose our subscription we will choose our Resource Group which is keyos and our storage sync there hit register and
I'll see you back here in a moment all right so it looks like our registration was successful so that means that we should be able to create a server endpoint uh and go from there Okay so I'm going to just go ahead and hit close and uh I'll come back here to you in a moment all right so now what we're going to do is set up a folder for uh that that we're going to want to uh uh be synced okay because the idea is to back up or sync that directory there so uh
what's going to happen here is we're going to make our way down to a file explorer and from this PC I'm just going to go to the C drive I made that other drive because I assumed we were just Going to throw it on there but honestly I'm just going to put it in the window or the C drive here we'll make a new folder called keos we'll make it all lowercase and inside of here I'm just going to make a new file here called hello.txt nothing super exciting um and so uh probably we need
to turn on sharing so that's just a habit of mine so we'll go to properties here sharing share and we'll just make sure that Azure Azure user has both that and it'll Ask us to turn network discovery on we'll say okay keos keos okay I can't remember if we have to turn that on or not but uh you know as long as we get this working that's the most important part here so now that we have that going what we want to do is make our way back to um Azure here and so we had
our uh what was the sync sync storages and what we'll need to do is go into our sync storage once it ever lets us uh get there we'll click on keyos and We'll go into sync groups we'll click into our keyos sync group we have a cloud endpoint we'll need to create an add server endpoint drop down here we have a registered server so you know how we typed in our we typed we typed in our we logged into the Azure file sync agent that's how this registered server is showing up we're going to give
it a path so this is going to be C back SL keyos right um so this all looks okay and what we'll do is we will say Let's just check this here this is all okay and we'll go ahead and hit uh connect all right and so this takes a little bit of time to provision it's going to show up here in a moment if I hit refresh it's provisioning so I'll see you back here in a bit you know I just remembered is that uh we do actually have to turn on cloud tering or
it's going to stay pending forever so so I'm going to go to enable here and uh always preserve specific Percentage of free space on the volume uh sure we can do 20% here we don't need a date policy here and this all looks okay so we'll go ahead and hit save uh because if we don't do that it's not going to actually it's not going to move it to the cloud right so we'll give that a go oh the health is good um and but we'll just give it a moment here okay so we give
it a little bit of time here it says the Point failed which I really don't believe it because I just Checked and it was working totally fine but what I want to do is show you if I go over to Microsoft Azure here and we go over to uh storage accounts and we go to keyos and we go into file shares and we click into this one we can actually see the files here so it clearly is syncing uh I'm not sure why we got that error I've never seen that error before um cloud is
not supported for the specified path well that's fine okay so if the server path didn't work maybe It's the cloud cloud endpoint but but generally that is the workflow to uh get uh syncing working so you pretty much have all the working knowledge you need um but uh what we'll do is go ahead and tear all this stuff down because we are 100% done so I'm going to go to our resource groups here and uh what we'll do is go into keyos and we'll just make sure that everything is there even the storage sync service
I just wanted to make sure It was all there and what we'll do is go ahead and write in keyos and go ahead and delete and that should take everything down no problem all right so there you go all right so just one more thing uh I was doing that cleanup and then today I woke up the next morning and when I checked my resource groups the keyos was still here so I went in here and we still had uh the storage sync service so what you're going to want to do is go in Here
and I think what it wants you to do actually tell us the message here if we go delete Resource Group we type in keyos and uh it will complain that uh it's it still need you have to get rid of the um the resources within it so I already know that's going to fail um but what I want you to do is delete the sync group a so if you select the sync group here and go ahead and delete that we might also have to delete the end points First usually uh usually a is really
great about tearing everything down but in this case uh it's not giving us a lot of help here so we'll just say um yeah we want to delete this end point too let's delete all the server so you got to first delete the server endpoints to delete the cloud endpoint to delete the group then to delete the actual uh service so it's a little bit um convoluted but uh you know I guess for whatever reason this one is not Automated like the other one so just go through those process make sure that you get everything
deleted out okay um and then you should be in good shape [Music] okay hey this is Andrew Brown from exam Pro and in this section we'll be covering the core backup and Disaster Recovery Solutions in Azure starting with Azure site recovery Azure site recovery is a hybrid backup solution that facilitates sight to sight recovery From on premises to the cloud ASR is a critical component for your business continuity and Disaster Recovery strategy site recovery replicates workloads from a primary site to a secondary site in the event the primary site encounters a failure site recovery will
fail over to the secondary site to ensure continuity of services Azure site recovery can replicate Azure VMS between different regions also known as cross region replication various OS such as Windows and Linux on premises to Azure seamlessly transition from your local servers to the cloud between other cloud service providers such as AZ to Azure different machines including VMware hyperv or physical machines recovery time objectives this is the amount of time your business business can afford to have its systems unavailable or offline before it significantly impacts your business recovery Point objectives this is the maximum amount
of data loss Your business can tolerate measured in time before a disaster occurs this overview highlights Azure site recovery a key tool for protecting business operations against unexpected disruptions the next topic we'll be covering is Recovery Solution for Azure site recovery a Recovery Solution for Azure hybrid and on premises workloads should be designed to meet specific recovery objectives including recovery time objective recovery Point objective And Recovery level objective recovery time objective RTO is the maximum amount of time that an application can be down before it starts causing significant business disruption a Recovery Solution should be
able to restore the system and data within the specified RTO time frame for example if the RTO is 1 hour then the Recovery Solution should be able to restore the system and data within 1 hour of an outage recovery Point objective RPO is the Amount of data loss that is acceptable after an outage The Recovery Solution should be able to restore the system and data to the required RPO level for example if the RPO is 1 hour then the Recovery Solution should be able to restore the data to the most recent point in time within
1 hour of the outage recovery level objective R is the level of recovery that is required after an outage the rlo can vary depending on the type of data or application being Recovered a Recovery Solution should be able to restore the data or application to the required rlo level for example if the rlo requires a point in time restore The Recovery Solution should be able to restore the data to the specific point in time when recommending a Recovery Solution for Azure hybrid and on premises workloads the following factors should be considered business requirements The Recovery
Solution should align with the business Requirements including the RTO rlo and RPO objectives these objectives should be identified during the planning phase workload types different types of workloads may have different RTO rlo and RPO requirements The Recovery Solution should be able to accommodate the requirements of each workload type hybrid or on premises The Recovery Solution should be able to handle hybrid or on premises workloads depending on the specific requirements of the Organization data protection The Recovery Solution should provide data protection including backups and replication to ensure that the data can be recovered in case of
an outage testing the Recovery Solution should be tested regularly to ensure that it meets the RTO rlo and RPO objectives testing should be conducted in a controlled environment to avoid any negative impact on production systems by considering these factors you can enhance your Azure Site Recovery Solutions ensuring Swift and efficient data recovery to maintain business continuity in this section we're going to explore an example of azure site recovery architecture This Disaster Recovery Solution utilizes Azure site recovery alongside other managed services like traffic manager and virtual Network this combination provides a costeffective and high availability environment
suitable for Small to medium businesses this allows companies to focus more on their core Solutions benefiting various Industries including Health Care travel and hospitality and Manufacturing for example it can be used in portable healthcare clinics restaurant chains and local Logistics and Supply chains here is a breakdown of the architecture traffic manager this Azure service wrotes DNS traffic enabling easy redirection from one site to another Based on policies set by your organization Azure site recovery this service handles the orchestration of machine replication and manages the setup of failback procedures virtual Network this is the location where
the failover site is established when a disaster happens blot storage this is where the replica images of all machines protected by site recovery are stored so that's an overview of the example Azure site recovery architecture Shown the next topic we'll be covering is the Azure Backup Service another crucial tool for backup and Disaster Recovery Solutions Azure backup service is a Cloud solution from Microsoft that offers secure scalable and simple data backup in recovery across various Azure Services you won't find it by searching based on the service name however Azure backup is seamlessly integrated within numerous
Azure Services making its Operation quite intuitive the five core components of azure backup Mars agent helps in backing up files folders and System state data from on premises machines and Azure VMS to a backup Recovery Services Vault and Azure Recovery Services Vault manages and organizes your backups in a cost effective secure and scalable manner Azure backup server MBS used to backup on premises data to Azure for hybrid protection VM extension allows the Backup of azure VMS without the need to deploy any additional agents backup policy defines when and how your data is backed up what
can be backed up on premises Azure VMS Azure manage discs Azure file shares SQL Server sap handed databases Azure database for postgressql servers and Azure blobs why use Azure backup offload on premises backups saf card your data by moving backups to Azure backup Azure iOS VMS ensure your Azure VM data is Protected scale easily adjust your backup storage size based on your needs get unlimited data transfer no limits or charges for data trans transfer keep data secure ensure your data is secure both at rest in and Transit centralized monitoring and management have a unified View
and manage your backups easily app consistent backups restore applications back to a precise State automatic storage management no need to manage Backup storage explicitly multiple Storage options choose between different storage options based on your needs so that's an overview of azure backup service the next topic we'll be covering is azure Recovery Services Vault Azure Recovery Services vault is a storage entity in Azure that stores backup copies of data and configuration information over time this data can be related to various Azure resources like virtual machines workloads servers or Workstations backup for Azure Services RS Vault protects
data from various Azure services including iOS VMS Azure SQL databases Azure blob storage Azure file shares and Azure functions recovery Services Vault supports various platforms including system center data protection manager Windows server integrates with Azure backup server for application protection and other platforms Recovery Services vaults has the following features enhanced security Azure Recovery Services Vault encrypts data in transit and at rest for secure backup and restore processes Central monitoring the Azure portal allows centralized monitoring of all backup and restore tasks across hybrid environments azure role-based Access Control Azure rbac enables granular access control and management
of Recovery Services vaults soft Elite this feature retains backup data for an additional 14 days after deletion protecting against accidental Or malicious data loss cross region restore crr enables data restoration in a secondary region during a disaster in the primary region ensuring business continuity so that's an overview of azure Recovery Services vault next let's explore the Microsoft Azure Recovery Services agent the Mars agent plays an important role in backing up files folders and the system state from Windows based on premises machines and Azure VMS all backups facilitated by the Mars agent are securely stored in
a Recovery Services vault in Azure Mars agent is also known as the Azure backup agent note that the Mars agent does not support Linux operating systems to get started with utilizing the Mars agent for backup purposes follow these steps create an Azure Recovery Services Vault this Vault will store all the backups create a backup policy within the Vault set the terms and conditions for backups Ensuring they align with your requirements configure secure rub for backup depending on your security and performance needs you might opt for Pathways like Express routes or private end points download the
Mars agent download the agent from Azure install and register the agent to your Windows machine once installed register it for Activation and functionality overall the Mars agent streamlines the backup process for windows-based systems Ensuring that data is both safely stored in Azure and swiftly recoverable when [Music] needed next let's explore the Azure backup policy Azure backup policy allows users to Define and configure how data backups are managed on the Azure platform it lets you set the frequency retention duration and type of backups to ensure data protection and meet organizational requirements creating a backup policy and
azure inv involves a Few essential steps select a data source type choose the type of data you want to back up such as Azure virtual machines or posters ql data base determine the frequency decide how often you want the backups to occur this could be daily weekly or any other frequency that suits your needs set the retention details determine how many snapshots or backup copies you wish to retain and for how long choose the time range for retention specify the time range during which you Want to retain the backups this setting helps in managing the
life cycle of the back up data efficiently in summary Azure backup policy allows you to set customized backup in retention settings for Reliable and consistent data protection the next topic we'll be covering is azure VM backup Azure VM backup is a solution for backing up and restoring virtual machines running on Azure it allows organizations to protect their virtual machines and their data Against various issues such as accidental deletion Hardware failure ransomware and other for forms of data loss how it works Azure VM backup utilizes Azure backup to offer a centralized backup solution manageable through the
Azure portal Powershell or rest apis it supports both windows and Linux virtual machines allowing for backup and restore operations at both the dis and VM levels multiple backup options are available including full Backups incremental backups and differential backups backup retention policies enable organizations to retain backups for specified durations enhancing data man management and compliance ke features the solution employs the robust infrastructure of azure backup ensuring encryption at rest and support for backing up VMS across different regions and availability zones the integration with Recovery Services vaults further strengthens the Protection and management of backup data Disaster
Recovery Beyond backup Azure VM backup bolsters Disaster Recovery strategies by enabling the replication of virtual machines to a secondary region this redundancy is vital in mitigating the impact of outages or disasters organizations can seamlessly fail over in fail back virtual machines ensuring minimal downtime and enhanced business continuity in conclusion Azure VM backup stands out as a resilient and Dependable backup in recovery solution for Azure hosted virtual [Music] machines hey this is Andrew Brown from exam Pro and in this follow along we're going to be looking at backup solutions for Azure so let's make our way
all the way to the top here and launch ourselves a virtual machine that we are going to be using uh as a means to back up so what I'll do is create a new group here um and we will Call it peard uh and we'll call this virtual machine peard and scrolling on down here yeah I want to stick with a Windows Server 2019 Gen 2 so go over here select it uh as generation 2 there and for the machine you want to make sure it's a b2s cuz you need at least two vpcu and
4 GB Ram to launch a Windows uh server there for the the user is going to be Azure user for the password capital T testing 1 2 3 4 5 6 capital T testing 1 2 3 456 Uh we'll have RDP uh I'm not sure if we'll end up using it uh but if we do we have that open we'll go ahead and go to the review page we'll wait for it to allow us to hit create give it a moment great we'll hit create and then we'll give it a moment to see that it
is deploying and if it's deploying I'll see you back here in a moment great so it looks like our virtual machine is ready to go here so what we'll do is go all the way to the Top here and type in backups we can go to vaults directly but let's take a look here at the backup center uh where we can kind of have a bit of an overview of stuff so the idea is we have vaults where we're going to store our backups we can create backup jobs backup policies so let's get to it
and and first create ourselves a vault so we'll go ahead here and create ourselves a new Vault and we have two options we have Recovery Services Vault or a backup Vault so uh the difference here is that one is just for backing up things like databases discs and Etc where Recovery Services is more like a like a sitewide recovery so you're going to notice it includes virtual machines and all these other stuff uh generally you'll probably want to go with Recovery Services Vault because it is just basically a new version of the backup Vault so
let's go ahead and do that and uh we'll place this in our Bard Um a resource Group there and we'll just say peard backup or vault Vault there we go and we'll go ahead and hit review and create and we'll go and hit create there and we'll just give it a moment there to deploy all right so our Recovery Services vault is ready and we'll go ahead and click back up and down below ask us what kind we are running so we have Azure stack and on premise it's just Azure and we have a virtual
machine so we'll go ahead and Hit backup and notice that we'll have to set up a backup policy and here we have a default one but let's actually go and make a new one so we can kind of learn some of the settings that we can set so we can say the frequency the time Etc probably want to set this to my time zone so I'm in Toronto if I can find it here which I believe is -5 uh I was trying to type to see if I could do that but I wasn't uh getting
uh getting there too well um we'll just say Central Canada there that's okay it's off by an hour but that's close enough um and you can have weekly monthly and yearly backups but we're going to stick with the daily backup for 30 days um and this is okay we don't have to enter that in we'll hit all right okay and now we can add our virtual machine so we'll go here and select the card hit okay enable backups please select at least one that has backups enabled so what we'll do is Open up our Azure
tab here make our way over to our virtual machine and just make sure that that stuff is enabled so we'll go over here um and we'll go to backups and here we can actually even set set it from here so I guess we'll select our existing Vault here it'll say enable backups but that set it up with a default one right so I'm a bit surprised we couldn't do it that way But we'll make our way back here as long as it works that's the thing with Azure it's just you know you'll do something and
then you'll find that uh you have to do it slightly different uh but we we'll just wait until that's done there so after waiting a very short while uh it looks like backups are turned on so if we were to go to our overview and go to backups you can see we have one backp item if we go over to our backup items we'll see under Virtual machines we have Bard um we did set the default policy so I guess if we wanted to switch that out we probably could if we just go back and
let's just go create a policy of our own just so that we are familiar with that there um and we'll say an Azure virtual machine one so my special policy okay and um this is for 180 days we go ahead and hit create and once that policy is deployed We'll be able to associate I can't remember if this will be super fast but we'll give it a moment here yep it is super fast and then once uh we have that poliy we can go into it and then start assigning things to it actually I think
when I made the lecture content I don't even remember there being a backup center so to me this is all a little bit new um so maybe I'll go back and up to the slides cuz I I usually say there is no centralized service but they have one Now so um that's uh pretty darn good um so for Associated items we don't fetch any data for services completed um so I'm just trying to figure out how we can change that policy there if we go to backups we just change it over here uh I'm not
sure how to switch out the policy but I know at least if we want to do backup now we just press that there it's really not that important to know how to swap out a policy just more so the fact that you know what a backup Policy is and you can apply to machines and things like that yeah so there we go we just had our own backup there and uh yeah there's not much else here to look at but uh yeah there you go set backup policies so I guess what we'll do is go
ahead and tear all this down and so that was our book card there we'll go ahead and delete this Resource Group and there you [Music] go hey this is Andrew Brown from exam Pro in this section we're diving into an introduction to Azure kubernetes service or a KS Azure kubernetes service simplifies the process of deploying a managed kubernetes cluster in Azure one of the main benefits of using a KS is that Azure will take over the management of the kubernetes master notes for you including Health monitoring and routine maintenance your resp responsibility Lies only in
maintaining the agent nodes an additional benefit is the cost effectiveness of a KS the service itself is free you only incur charges for the agent nodes within the cluster not the Masters when you deploy in a KS cluster both the kubernetes master and all nodes are deployed and configured for you during the deployment process you can also configure additional features such as advanced networking Azure active directory integration to use kubernetes Ro based Access Control monitoring capabilities and Windows Server containers are supported in a KS so when should one opt for a KS well a KS
is ideal in scenarios where you need full container orchestration this includes situations demanding seamless service Discovery across multiple containers automatic scalability to handle varying loads and coordinated and smooth application upgrades in summary a KS offers a streamline managed solution for Container orchestration in Azure simplifying the setup and maintenance of a kubernetes cluster the next topic we'll be covering is called bridge to kubernetes bridge to kubernetes is an extension available for both visual studio and visual studio code that allows developers to write test and debug microservice code directly on their local development workstations with bridge to
kubernetes You can integrate a service running locally with yours cluster this bypasses the need to create Docker and kubernetes configurations for the lifetime of this connection a proxy is added to your cluster in place of your kubernetes deployment that redirects requests to the service to your development computer when you disconnect the application deployment will revert to using the original version of the deployment running on the cluster it's important to Note that Azure Dev spaces will be retired on October 31st 2023 existing users are encouraged to transition to using bridge to kubernetes as their client development
tool ensuring a streamlined and integrated development experience on their local machines while interacting with the ks clusters so that's a brief overview bridge to kubernetes a very useful tool to streamline development and debugging for developers the next topic we'll be Covering are the Recovery Solutions for Azure kubernetes service that's practices for business continuity and Disaster Recovery in Azure kubernetes service use multiple availability zones Azure AKs supports multiple availability zones which distribute your application across different data centers this ensures High availability and resiliency in the event of a data center failure when you create a new
KS cluster you can choose to create it across multiple Availability zones Implement backup and restore backing up your KS cluster ensures that you have a copy of your application and data in case of data loss or corruption Azure AAS supports backing up your application data and kubernetes resources such as deployments and services using the Valero backup and restore tool use Azure site recovery Azure site recovery is a disaster recovery solution that replicates your KS cluster to a secondary location this Can be used useful in the event of a disaster or outage as you can fail
over to the secondary location and resume operations for monitor your a KS cluster it is important to monitor your KS cluster for any potential issues or failures Azure provides a range of monitoring and alerting solutions such as Azure Monitor and Azure service Health which can help you proactively detect and respond to issues five test your Disaster Recovery plan to ensure That your Disaster Recovery plan is effective it is important to test it regularly you can use tools like azure site recovery to perform failover tests and ensure that your KS cluster can be recovered in the
event of a disaster six use Azure kubernetes service with Azure Arc Azure Arc enables you to manage your KS cluster and other kubernetes clusters across multiple clouds and on premises environments from a single control plane this provides greater flexibility and Resilience in the event of a disaster or outage by following these best practices you can ensure that your Azure kubernetes service cluster is resilient highly available and recoverable in the event of a disaster [Music] routage hey this is Andrew Brown from exam Pro and in this section we'll be covering Azure regions and availability zones starting
with Azure regions Azure regions are physical locations around The world where Microsoft as data centers to provide cloud services each region is composed of multiple data centers that are geographically dispersed to provide redundancy resilience and high availability to customers P facts about Azure regions multiple data centers each region is made up of at least one data center but many regions have multiple data centers for added redundancy and availability Global presence Azure regions are Distributed around the world covering almost every major continent and country unique identifiers each Azure region is designated by a distinct name such
as East us or west Europe which indicates its geographical location resource deployment when creating resources in Azure you can choose which region to deploy them to based on factors such as proximity to users data sovereignty require requirements and service availability data residency data in a Region stays within that region unless explicitly copied or replicated to another region for redundancy or Disaster Recovery purposes continuous expansion Microsoft continually expands its Azure footprint adding new regions to cater to emerging markets and customer needs in essence Azure regions are the Cornerstone of azure's global infrastructure guaranteeing High availability redundancy
and adherence to Regional data Norms the next topic we'll be covering our Azure availability zones Azure availability zones are physical data center locations within an Azure region that are typically located in separate buildings or regions but still close enough to provide low latency network connectivity these zones help protect applications and data from data center level failures by providing redundant Power Cooling and networking and Azure Region is a geographic location that contains one or more data centers an availability zone is a unique physical location within an Azure region key points of azure availability zones each availability
zone is composed of one or more data centers with independent Power Cooling and networking each data center within an availability zone is connected through a high-speed low latency Network availability zones are designed to provide High availability for critical Applications by Distributing them across different zones by deploying applications across multiple zones it is possible to achieve a higher level of redundancy and fault tolerance virtual machines storage accounts and other Azure resources can be deployed to specific availability zones within a region to ensure High availability Azure traffic manager can be used to Route traffic between different zones
based on various criteria such as geographic Location latency and performance so that's an overview of azure availability zones the next topic we'll be covering are the availability options for Azure virtual machines while we've briefly mentioned these terms in the past we'll now explore them in detail specifically in the context of VMS Azure virtual machines provide several options for achieving High availability and ensuring business continuity here are the primary strategies availability sets an Availability set is a logical grouping that informs Azure about application redundancy and availability requirements ideally to ensure High availability and meet azure's 99.95%
SLA place at least 2 VMS within an availability set there are no es for the availability set itself costs arise only for the individual VM instances created within virtual machine scale sets these sets enable the automatic deployment and scalability of identical VMS VMS can auto adjust their capacity as per demand facilitating autoscaling for applications VM scale sets are built to integrate with Azure load balancer and application Gateway ensuring traffic is evenly distributed across VM instances VM distribution across fault domains and update domains further fortifies High availability ility Azure site recovery this service delivers Disaster Recovery
capabilities for VMS it facilitates VM replication to a Secondary location which could be another Azure region a different data center or an on premises site both physical servers and virtual ones including those on hyperv and VMware can be replicated using site recovery Azure backup Azure backup offers backup solutions for VMS their applications and data you can back up to the cloud ensuring backups are application consistent meaning they're usable and can be restored as needed these backups Can either be retained in the originating region or transferred to another for Disaster Recovery additionally Azure backup provides extensive
retention periods in backup archiving aligning with Regulatory Compliance needs overall these are the main options for availability options for Azure virtual [Music] machines hey this is Andrew Brown from exam Pro and in this section we'll be Going over Azure virtual machines Azure virtual machines offer a highly configurable server experience through virtualization you can run a server without the hassles and expenses of maintaining physical Hardware however it's important to note that VMS are not entirely maintenance-free they still require OS patch applications and package installations and configurations key points about Azure VMS configuration and size the size
of the VM is Determined by its image this image defines the combination of vcpus memory and Storage capacity subscription limits as of now there's a limit of 20 VMS per region on a per subscription basis billing Azure VMS are buil at an hourly rate availability a single instance VM offers 99.9% availability when all its storage discs are of Premium quality to achieve a 99.95% availability deploy two instances in an availability set storage you can Attach multiple manage discs to your Azure VMS networking components when you launch an Azure virtual machine other networking components will be
either created or Associated to your virtual machine including Network Security Group a virtual firewall with rules concerning ports and protocols this is attached to the Nick network interface a device that handles IP protocols and network communication virtual machine instance The actual server that's running public IP address the address that you will use publicly access your VM virtual Network the network in which your VM is located overall as your virtual machines offer a versatile and strong cloud computing space allowing easy and seamless deployment of robust applications and systems the next topic will be covering our operation
systems in Azure VMS so what is an operation system well I'm sure you already know this but the OS is The program that manages all other programs in a computer who most commonly know operation systems or Windows Mac OS and liux when you launch a virtual machine you need to choose an image which has a specific operation system Microsoft Works closely with Partners to ensure the images available are updated and optimized for an Azure runtime you can find most of these images in the Azure Marketplace including Sue liex Enterprise server Red Hat Enterprise Liex auntu
server Debian free bestd Azure Marketplace flat car container Linux Rancher OS thei library for Azure mesosphere DC OS on Azure Docker images Cloud B Jenkins platform if the available options do not meet your requirements you can bring your own Linux by creating a Linux virtual hard disk note that in Azure only the fixed vhd format is supported not the hyperv virtual hard disk format so that's an overview of the operating systems in Azure VMS the next topic we'll be covering are the sizes of azure VMS Azure VMS come in a variety of sizes that are
also optimized for specific use cases is azure VMS are grouped into types such as general purposes and compute optimized and sizes such as B and dsv 3 also called series or SKU family general purpose balanced CPU to memory ratio testing and development small to medium databases and low to medium traffic web Servers skus B dsv 3 DV3 D4 D4 dsv 2 and so on compute optimized High CPU to memory ratio good for medium traffic web servers work appliances batch processes and app servers skus ffs fsv 2 memory optimized High memory to CPU ratio best for
relational database servers medium to large caches and in memory analytics has K's S3 F3 east4 E4 F4 S4 and so on storage optimized offers High disk throughput and IO ideal for Big Data SQL and osql databases data warehousing and Large transactional databases skus lsv2 GPU specialize VMS for heavy graphic rendering and video editing model training and inferencing with deep learning available with single or multiple gpus skus NC NC V2 ncv3 and cast T4 V3 ND and so on high performance compute features the fastest and most powerful CPU virtual machines with optional High throughput network interfaces
skus HB hbv2 HC H there are previous series of virtual machines Sizes not shown here like basic a the type of image May limit you to specific VM sizes use Azure sorting and filtering options to explore sizes based on various parameters such as cost Azure compute unit provides a way of comparing compute performance across Azure skus ACU is standardized on a small VM aside the value of 100 all other skus then represent approximately how much faster that SK you can run a standard Benchmark let's break down the Provided information information A1 a4u family a CU
vcpu 100 ACU stands for Azure compute unit which is a measure of the relative computational performance of different Azure skus and this family each virtual CPU is rated at 100 acus vcpu core 1:1 this means for every virtual CPU you allocate it corresponds to one physical core D1 D14 SKU family SCU vcpu ranges between 160 to 200 50 this indicates that VMS in this family have a higher computational performance Per vcpu compared to the Asser vcpu core 1:1 similar to the ass series each virtual CPU corresponds to one physical core in summary knowing Azure VM
sizes helps pick the best option for your needs ensuring efficiency and cost Effectiveness the upcoming topic explores hyperv focusing on the distinctions between Generation 1 and generation 2 hyperv is a hardware virtualization product from Microsoft enabling the creation and management of Virtual machines each VM functions as a separate computer equipped with its own operating system and software applications in many ways hyperv mirrors the functionalities of virtual box there are two generations of hyper vvms Generation 1 supports a wide range of guest operating systems generation 2 primarily support 64-bit versions of Windows alongside more recent versions
of litx and free bestd operating systems Azure offers both Generation 1 and Generation 2 VMS aligning with hyperv and structure but bearing distinct characteristics key differences between Azure gen 1 and Gen 2 gen one based on bios architecture Gen 2 utilizes ufi based boot architecture enhancing Boot and installation times only Gen 2 VMS employ secure boot ensuring the boot loader is authenticated by a trustworthy Source gen 2vm support a substantially larger boot volume of up to 64 terab hyper vvms are packaged as either vhd or Vhdx files consolidating their structural components for efficient management and
deployment in conclusion understanding hyperv Generations AIDS in optimizing virtualization and ensuring OS compatibility the next topic we'll be covering is SSH RDP and Bastion Azure virtual machines offer multiple methods to connect including SSH RDP and Bastion let's dive into each secure shell is a protocol to establish a secure Connection between a client and server this is used to remotely connect to your Azure VM via the terminal S sh operates on Port 22 via TCP RSA key pairs are commonly used to authorized access remote desktop protocol is a proprietary protocol developed by Microsoft which provides a
user with a graphical interface to connect to another computer over a network connection this is how you can remotely connect to Windows Server via virtual virtual desktop RDP Operates on Port 3389 utilizing both TCP and UDP Bastion Azure Bastion is a service you deploy that lets you connect to a virtual machine using your browser and the Azure portal it provides secure and seamless RDP SSH connectivity to your virtual machines directly from the Azure portal over TLS a Bastion is a hardened instance that is monitored users connect to this VM which then establishes a connection to
the Target instance sometimes known as jump so to Ensure op optimiz security and connectivity it's important to understand these methods we'll delve deeper into each and subsequent sections let's go into a bit more detail with SSH secure shell or SSH is a cryptographic network protocol commonly employed to securely access and manage servers remotely it is very common to use SSH key pairs as a means to authenticate to your VMS SSH key pairs is when you generate out two keys a Private key this is the key that remains confidential and should never be shared or exposed
it is stored securely on your local system and is used to initiate a connection to the VM a public key as the name suggests this key can be shared publicly it is added to the servers or vm's authorized Keys list how does SSH key authentication work when you attempt to SSH into a server your system uses the private key to send a cryptographic proof the server which has the Corresponding public key verifies the authenticity of the cryptographic proof a if the proof is verified meaning the keys have matched your authenticated and granted access advantages of
using SSH key pairs security SSH Keys provide a more secure method of authentication than traditional passwords without the correct private key unauthorized access attempts are effectively thwarted convenience once set up users can connect without needing to remember and Input a password each time automation automated scripts and services can use key pairs to establish connections without human intervention so that's a more in-depth look into SSH let's dive into the remote desktop protocol commonly known as RDP RDP is a protocol developed by Microsoft that allows users to remotely connect to Windows systems when you want to use
RDP to access your Windows Server you'll first need to download the RDP file for Windows 10 users the remote desktop client is pre-installed so there's no additional software to download however if you're using Mac OS you can easily get the Microsoft Remote Desktop app from the Apple Store once you've got the necessary tools simply open the downloaded RDP file during this process you'll be prompted to enter the username and password that you set up during the creation of your VM on the Azure portal RDP uses encryption to secure Communications ensuring confidentiality it also supports features
like audio redirection clipboard sharing and printer redirection for a seamless remote experience in conclusion RDP provides an efficient way to remotely access Windows those systems the next topic we'll be covering is azure Bastion Azure Bastion serves as a secure Bridge enabling you to connect to your server via SSH or RDP without exposing it to the public it will Provision a web-based interface for both RDP and SSH eliminating the need for external clients this can be especially useful for devices like Google Chromebooks which might not support traditional RDP clients when setting up azure you'll need to
add a dedicated submit to your virtual Network named Azure basan submit this submit should have at least a 27 size equating to 32 addresses if you have a Windows Server which requires RDP and have a Bastion in The same v-net you simply enter in your user name and password as you normally would if you have a Linux server you can SSH with the Bastion you can use SSH private key or password that you set when you created your VM key benefits single click access Rd p and SSH sessions available directly through the Azure portal secure
session Azure Bastion offers RDP SSH over TLS with support for TLS 1.2 plus no public IP needed RDP SSH connects via the vm's Private IP simplified NSG management no need for nsgs on the Azure Bastion subnet allows RDP SSH solely from Azure Bastion managed service Azure Bastion is a fully managed secure platform for RDP SSH protection from scans VMS aren't exposed to the internet preventing Port scanning centralized hardening Bastion at the vnet perimeter eliminates individual VM hardening so that's an overview of azure Bastion let's take a look at a Comparison between Windows versus liux servers
Azure VMS offer the flexibility to run both windows and liux based servers Windows licensing to run Windows you'll need a valid license if you don't act activate it certain features may be restricted Azure does offer a way to leverage existing licenses through its hybrid benefit program authentication typically you set up a username and password during the VM creation instance size to smoothly operate Windows you Typically need a larger VM size starting at least with a B2 due to its comprehensive desktop environment environment Windows provides a full desktop environment complete with a graphical user interface making
it more intuitive for those familiar with the windows ecosystem l licensing most Linux distributions are open source and don't require any licensing fees authentication Linux offers flexible authentication you can Set up a username and password or more commonly use SSH key pairs for a more secure connection instance size Linux servers especially those without a graphical user interface have minimal system requirements this means you can run them on smaller VM sizes conserving resources and cost environment traditionally Linux systems operate with a terminal Bas and environment although there are distributions with graphical interfaces overall your choice between
Windows and Linux will largely depend on the specific needs of your project familiarity with the operating system licensing costs and desired system resources the next topic will be covering is update Management in Azure update management allows you to manage and install operating system updates and patches for both windows and Linux virtual machines that are deployed in azure on premises or with other Cloud providers when you launch an Azure VM You can go to operations and turn on guest plus host Updates this will install the Microsoft monitoring agent that will be used to monitor your instances
Azure automations is the underlying service that is installed the agent update management will perform a scan for update compliance by default a compliance scan is performed every 12 hours on Windows and every 3 hours on Linux it can take between 30 minutes and 6 hours for the dashboard to display Updated dat data from managed computers in Azure automation you can enable the update management change tracking and inventory and start or stop VMS during off hours features for your servers and virtual machines these features have a dependency on a log analytics workspace and therefore require linking
the workspace with an automation account so Azure update management offers a comprehensive solution for ensuring your virtual machines are always up to date With the latest patches and updates oh right let's take a look at Azure virtual desktop formerly known as Windows Virtual desktop Azure virtual desktop on Microsoft Azure is a desktop and app virtualization service that runs on the cloud Azure virtual desktop works across devices like Windows Mac iOS Android and LX with apps that you can use to access remote desktops and apps you can use most modern browsers to access Azure virtual desktop
hosted Experiences use Azure virtual desktop for specific needs like when security is a concern because all day data is saved on the server and cannot be left on the device of a user key features and benefits enable secure and productive remote work on any device Azure virtual desktop provides full Windows 10 and Windows Server desktop and application virtualization on any personal device seamless integration with Microsoft 365 apps for Enterprise and Microsoft teams Reduce cost of Licensing and infrastructure use eligible windows or Microsoft 365 licenses to access Windows Virtual desk top and pay only for what
you use protect against outages to stay productive help keep your team running during outages by leveraging built-in Azure site recovery and Azure backup Technologies simplify it Management Windows Virtual desktop manages the virtual desktop infrastructure for you so you can focus on users apps and Os Images instead of hardware and maintenance Keep application and user data secure easily apply the right access controls to users and devices with Azure active directory conditional access ACC so that's an overview of azure virtual [Music] desktop hey this is Andrew Brown from exam Pro and we're going to be launching our
own Bastion using Azure Bastion services so there's two ways to set this Up we can go to bastions over here and create a Bastion this way or we can create one uh after we've created a virtual machine I prefer the ladder so let's go ahead and do that and launch ourselves a new virtual machine and so we can either use launch a Windows server or a Linux server today I'm going to be launching a Windows server and uh what we'll do is go down here I'll make a new group we'll call it the Enterprise and
uh as we do that we'll just name this uh Enterprise D and we'll launch that in Canada C or us or Central us that's fine with me uh 2019 data center Gen 2 is totally fine if you go here you're trying to find it you go hit select and we'll choose Gen 2 Data Center it is expensive but uh we're not going to be using this for very long uh for the username I'm going to put uh data and for the I'll just make it Azure user to Make our lives a bit easier and then
we'll put testing capital T 1 2 3 4 5 6 testing 1 2 3 4 5 6 and we will go down below we're fine with the settings here we're going to go next to dis we're going to leave the dis to premium that's fine we'll let it create a new network that's totally fine management is okay and we'll just actually go hit review and create and now we'll just hit create so that it will go ahead and do that it'll Tell us that it's in progress and we'll just wait a little bit here I'll
see you back in a moment all right so our instance is ready so let's go ahead and go to this resource here and then on the left hand side you'll have connect and so I'm going to going to show you and you don't it's not necessary for you to do uh this step because you're going to I'm going to show you how to connect VI the Bas in but I'm going to go ahead and download This file the RDP file and this will only work if you're on windows by the way well I guess it
will work on Mac but you'd have to install the um uh the uh RDP uh service for that users with Windows there and so here this is azure user we're going to type in testing with a capital T just double check that there I'm going to log in make sure that this works uh do we'll do that one more time oh you know it's testing 1 2 3 4 5 six there we go we'll say Yes and we'll just make sure that we can uh remote desktop into this just before anything else and there we
go so that's all good to me I don't need to see anymore we'll go over to Bastion we'll say use Bastion and this is going to set up a Bastion service in order to use Bastion you need to have another um uh address space uh defined for it it makes it really easy to uh make it here so I'm just going to go 10.0.1 Do0 24 and we'll go ahead and hit okay and so down below it's going to choose an address space um we have a security group um I'm just going to put it
for none I don't think I want one on that and if we scroll on down here we have the resource Group so we're going to put it in the same Resource Group and we'll go ahead and create That so now before this they didn't have this really nice wizard you used to have to go and and create all those things individually in your virtual network but this is really nice it does take a bit of time for this to provision so I'll see you back here in a bit that took a bit of time for
that to create that Bastion but it is ready to go and so now that we have it we can go ahead and utilize uh this connection here and so right away it I think it's setting up For RDP here so what we'll do is type in Azure user uh and then capital T testing 1 2 3 4 5 6 we'll go ahead and hit connect and so notice that I didn't have to use an external application I could just uh run it in right here it's all in the web browser so that's pretty much how
uh the Bastion works I can't remember the pricing on Bastion I think it's a little bit of money so I don't want to keep this uh laying around here but this is great if you let's say You're on a Chromebook which are becoming really popular where you can't install native applications uh or you're just having issues because you're on like Linux or something like that so there you go that's all there is to it we'll go ahead and clean this up and so I'm just going to go here find the resource Group and we'll go
ahead and delete I'm just making sure that bastion's within there so it is good and there we go [Music] so we just launched a virtual machine for Linux now let's go ahead and launch one for Windows so I'm going to go to the top here and type in Virtual machines we'll go to the first link I'm going to hit add add virtual machine and uh what we'll do is we'll create a new group the last one I had was called beor I'm going to call this one kardashia Kardashia and I'm going to name this uh
machine also named kardashia and this time what we want to do is is we want to move over to a Windows Server I find the easiest one to learn with is the Windows 10 Pro server uh just because I find these ones a little bit daunting so I'm going to go Windows 10 Pro uh and then what we're going to do is go choose a larger size this is not going to work we cannot run A Windows server on a B1 LS so we're going to have to go a little bit larger and uh we
don't have to go too much larger here but the idea here is that there's going to be a a more expensive spend here so we're not going to be wanting to keep this running for long but here we have the b2s that is the appropriate size to run this anything smaller I don't think is going to work and we are going to put in a password here so I'm just going to put In kardashia and we'll do kardashia uh one two3 put a capital on it I guess we'll just do this here and I'm just
going to go back and lowercase this one and uh we're going to allow the inbound Port of 3389 because that is what RDP needs are going to confirm that I have a Windows license I actually don't but the thing is you can still Launch one for uh your test purposes it'll it'll just complain saying you're not activated uh so there are some limitations but it's good enough for us to uh learn okay and so now that that is all great we'll go next to diss we're going to go with pre or standard SSD this time
uh we are going to go ahead and hit uh next and go to networking it's going to create us a new v-net which is a great idea we're going to let it create a uh a network security group On the Nick just like before we'll go ahead and hit next uh we'll leave all these options alone this all seems fine to me uh and we'll hit next review and create and we'll go ahead and create This Server all right and so that's going to go ahead and create it so I'll just see you back here
in a moment when that's uh done deploying all right and so after a short little while here it looks like Our Windows server is now deployed so what we can do is go to that resource and if you want to to see what it's deployed it's the same stuff as always you have your network interface card your virtual Network NSG the IP address but let's actually go to that resource now and so let's see how we can gain access to this virtual machine and so what we can do is use RDP luckily I am on
a Windows machine and so um I already have the rdb client uh that I can use so All I got to do is download the rdb file and then once we have that file I can just double click it and I can open this up if you're on a Mac uh you can download uh the app in the app store and so I'll go ahead and type in my password so my username was kardashia and then my password was capital c a r d a SS I A1 23 we'll hit okay and then it'll give
us another warning we'll say yes and now we are in our virtual machine so there you go how Cool is that I'll give it a moment to load up but this is a full uh Windows 10 Pro uh and as I said before you know we don't actually have a license so if you're afraid of spining up because you think you're going to get charged a license fee uh for Windows you do not have to worry that's not going to happen you have to do some manual intervention uh for that to happen so we'll just
wait a little while here for this to load um it is not we're not using the most Powerful machine so it does take a little bit of time and so we just hit accept here and here we are so we are on uh we have our nice Windows machine here whoops I don't know if it has any games let's go take a look maybe we play M sweeper um no maybe maybe you have to download in the store I'm not that familiar with Windows machines but um so there you go So we'll go ahead and
close that and you know if we were using the Bastion it's the same process you saw how we used it with SSH but if we had the Bastion and it's so much work to set one up we already did that before uh but all you do is enter your credentials in on the page just as we did and it and it's just a lot easier that way uh so let's go ahead and just tear down this machine we're all done with it so I'm just going to hit um uh Delete and uh if we find
that Resource Group we should be able to easily delete them all I find the easiest way is to go up here go to all resources and then there's the resource Group there and then hit delete Resource Group and then I'll type in the name of it which is kardashia and I'll delete all those resources but after that's done always just take a double check uh on your all resources Tab and just make sure that those resources are gone because Sometimes they stick around but there you go that's as simple as it was to launch a
Windows [Music] machine hey this is Andrew Brown from exam Pro and let's take a look here at virtual machines which I consider the backbone of most cloud service providers and Azure keeps it really simple by calling it um virtual machine so we can go up here and type in virtual machine and make our way over here but right now I don't have any options because I'm using a tenant uh that doesn't have a subscription applied to it so what I'm going to do is go switch back to my original tenant and this one has a
sub subscription applied to it and so what I'll do is just click back up here and now we'll just type in Virtual machines and I can now see uh I have options of creating virtual machines so let's go ahead and go create a Linux one First and then we'll go ahead and create a Windows one and then we'll see how we can connect to it all right so first we'll go to the top here and hit add we'll click on virtual machine and we're going to be presented with a lot of options so we'll have
to choose a subscription and so there is mine I want to probably create a new Resource Group here I'm going to call this one beour and we'll name this uh vour again And I'm going to launch this in Us East I'll just set it to one availability zone for the time being uh then here we have what we can choose as an image I can click on see all images and choose from a variety of them so if I didn't want to use Ubuntu I could launch something else like Debian or something like that uh
but really I just want to uh stick with uh Ubuntu cuz I'm fine with that version with 18 uh then here's what what really matters is The size cuz that's going to affect our cost so if we click on see all sizes we have this uh Nifty um table where we can sort the cost it's just loading in the cost here it's Dynamic this is going to be based on uh what your base subscription is so if you're in Canada you're going to see Canadian prices you're in the US you're going to see us prices
etc etc and I care a lot about cost here so I'm just going to sort this by cost and here we have the B1 LS which Is very cost effective we have a ram of5 GB and some other options there so we'll go ahead and select that there and we have a couple options we can use SSH public key or we can uh utilize a password and so I think what we'll do is use an SSH public key because that's uh pretty much the standard there we're going to name the username beig or if it
lets us probably won't probably want some additional options there oh it's okay oh Great and uh we'll go ahead and generate a new key pair and I'm just going to name that one beour and uh we have some options here for inbound rules uh so you could set to none this is just setting up the uh NSG for you uh but we're probably going to want to have that Port open uh for SSH because that's how we're going to make our way back in here if we're running a um like an apachi server we'd want
to have Port 80 open so we can go ahead and Do that we'll take a look at now diss so here we have an options between premium um standard and standard hhd um I just want this to be cost effective so I'm just going to go with standard HDD uh but generally you you want to have um at least uh standard or premium SSD when you're running uh real web development workloads uh then there's encryption here and so it's always turned on by default which is great they also have This option of double encryption with
the platform manage and customer manage key uh we're just going to leave that that as default enable alteris compatibility that's not something we need to do here CU we are not using alter disk and here you can see that you can attach multiple uh diss here um so I can go and do that but that's not something I need to do today and some other Advanced options which we do not care about we'll go over to networking And so it's going to end up creating us a new v-net for us and we'll create a new
subnet for us and assign it a IP address uh it will also set up a NYX uh network security group so the network Security Group is not going to be applied at the subnet level it's going to be applied at the Nick which is attached to the um dc2 there and so we'll just leave it to basic we're going to allow in inbound ports for Port 80 um and 22 that was carried over uh from Earlier we can put this behind a load balancer but I don't think we're going to do that right now we'll
go over to management uh we have some additional options here for monitoring uh this is all okay here we can set it to auto shutdown actually I'll leave that alone loone you can also enable backups here we'll go Advanced and now we have this option here for custom data uh I covered a section on cloud and nit and uh they don't call this user data but most other Providers will call this user data so we could provide a bash script or additional information here if we wanted to then down below uh there's some host group
options we're not going to worry about that and proximity placement group this is really important if you need to have um instances nearby uh I think this is pretty common with um what's it called high capacity workloads H hfc I can't remember the initialism right now but we covered in the core content then We can tag our resource here uh we'll just leave that alone I don't care about tagging too much but generally it's good to tag in practice and then we will get to review and create our server here we'll go ahead and hit
create and then we'll have to download our private key so we can utilize it later and so that's downloaded there and now we're just waiting for it to deploy this and I'll see you back here in a moment so we had to wait a little bit There and finally um our deployment is complete and we can go ahead and just review all the things that it created so notice that it created the virtual machine it created a network interface a Nick for us the NSG the network security group the um virtual Network and also a
public IP address um when I do cleanup a lot of things I always miss are these IP addresses and I know that um azzure gave me a warning that said hey you're about to spend uh $700 yearly on IP addresses Because you weren't releasing them so when we do the cleanup step I'll definitely uh emphasize about deleting those IP addresses and how to go about that let's go take a look at the actual resource now so here we are and uh you can see we have a lot of options the left hand side such as
the disk um so we can see the disk options there and there's additional Security Options let's go go take a look at how we can go ahead and Connect to the server and so uh there's different options here so we have RDP SSH and Bastion since we are using a Linux machine we're not going to be using RDP that's really for Windows um but the trick here is that um I would need to have a client on my computer to connect like um I think it's called putty if you're on a Linux based machine it's
a lot easier uh and certainly I have the uh Linux subsystem installed so I could probably um connect That way but I figured let's just go ahead and connect via Bastion because I think this is a pretty darn cool feature so let's go ahead and create ourselves a Bastion and this will take a little bit of time here but we'll go ahead here and just set up subnet so to associate a virtual Network to a Bastion it must contain a subnet with the Azure Bastion subnet so they actually have a special subnet for it so
what we'll do is we'll Just go back to our um our server here uh which we called beour and I think we can find the subnet through here so on the left hand side if we go to networking we probably could find it that way um so I'm just looking for that Security Group um in there it should be um maybe it's not there if it's not there um well you know we could just go over make our way over to subnets it's not a big Deal cuz it's called beour it's pretty darn easy to
find to begin with and so under subnet here what we need to do is add a a special one here and just got to remember how this works um so you need to create a a subnet called Azure Bastion subnet with a prefix of at least 27 so we'll go ahead and add a new subnet and we'll call it that uh we'll take out the space there and the range is 10 0 1 0 Etc so we'll just do it on two 0 do um 2.0 sl27 uh 102 is not contained yeah it overlaps so
we'll do two do not contain the virtual Network address space oh right so we have to add the address space first oops we'll just hit cancel here that's okay we'll discard that we'll make our way over to address space and we'll go ahead and add 10.0 uh 2.04 that'll give was a pretty darn uh Large range there and so now what we'll do is go back to our subnet and we'll go ahead and create that there and it said only needed 27 so we'll just give it only 27 we don't need to go bigger than
we need and that should be okay we'll go ahead and hit save and it shouldn't take too long so now that we have that we can go back here and we'll give give this another go Here here uh it's there so it shouldn't be complaining maybe what we'll do is just start from the uh the start here again yeah there you go that the Azure portal is like that a lot where you'll have something set up and it has the Old State of it and so you just have to trust yourself that you know what
you're doing and you have to go back but if you don't have a lot of confidence a lot of times you'll get stuck and you'll think Okay I don't have it right but always just try again and hit refresh um because the Azure portal is very inconsistent so we're just going to have to wait for this to create this does take uh a little while to create so I'll see you back in a moment so after waiting five minutes our Bastion is now created and so what we can do is without even using a putty
client or having to use Linux directly uh we can just uh connect through via the Bastion uh so Here uh we'll see we have some options here so we want to do SS H uh private key from local file okay and what we can do is go ahead and select our beor key and then I'll just scroll down here and hit connect oh um and I think we made the username beour and we'll go ahead and connect now and it's complaining about a popup here so we'll go up here and say always Allow and we'll
try that again and then we'll say allow again and so now that we're into our server here let's go ahead and try to install aachi and see if we can get at least the default page running um so this is using Ubuntu if my memory serves me correctly should be app get install Apachi 2 and we'll just hit Y for continue and we'll just wait for this to Install doesn't take too darn long and after a short little wait there uh it finally did install also if you notice this little icon here we have a
a little clipboard here um I don't seem to ever use that there so that's fine um now when you install a Pochi we might have to go ahead and start it up um so let's just take a look to see if it actually is in the running directory here so we'll go to cdar www and so That's where the default directory is right um but we can just check to see if uh it's running by doing a PS Ox I think it's httpd or we can say Apache here and so it looks like it's already
running so that's pretty great for us and since it's running on Port 80 and we've opened up Port 80 we should probably be able to access that um here so let's go back to our actual virtual machine so we'll go to Virtual Machines and uh we have that virtual machine running I'm just going to click into it because I just want to find out it's public IP address so here it is there and for lucky this will just work just a copy to clipboard button right there and look at that we have the default page
Isn't that cool um so that's all there really is to it and I could even update this page you don't have to do it but I'm just going to Update it for fun actually I probably have to restart the server so maybe I won't do that um but yeah so we connected through the basion so that was pretty darn easy we probably could have also used um the cloud shell to connect um but maybe we should we could give that a go as well since we're all done here let's go ahead and do some cleanup
the first thing I want to do is uh the easiest way Is actually to go to all resources here at the left hand side and this really gives you an idea of everything that's running in your account so I actually have other stuff in here uh that's not relevant um but the idea is that all of our stuff is running within a resource Group um and so I'm just taking a look there I'm not seeing this is all resources here um see if we see Resource Group here yeah they're all there right there so I
can go ahead and click that And so everything more or less should be self-contained within here see all that stuff um you can even see the v-net is part of it as well and so if I go ahead and delete this Resource Group it should delete all this stuff so I'm just going to type beour to confirm and we'll go ahead and delete and that should do a good job of cleaning up all those files I'm not sure if it will delete the IP it should right there but if it Doesn't what I recommend is
after everything is deleted just go back here to all resources and just double check to make sure they all vanish because when this is done they're all going to uh start to vanish from this list and if there's anything remaining you'll know because it's still here right so just be careful about that that's all I want you to know um and so that's the Linux part and so let's go ahead and actually now set up a Windows Server hey hey this is Andrew Brown from exampro and in this section we'll be covering Azure app service
Azure app service is an HTTP based platform for web apps re estf apis and mobile bin Services you can choose your programming language in Python Java or any other language and run it in either a Windows or Linux environment it is a platform as service so it's the Heroku equivalent for Azure Azure app service takes care of the following underlying Infrastructure OS and language security patches load balancing Auto scaling and infrastructure management azzure app service makes it easy to implement common Integrations and features such as Azure Dev Ops for deployments GitHub and dockerhub package Management
Systems easy to set up staging environments custom domains and attaching TLS or SSL certificates you pay based on an Azure app service plan shared tier includes free and shared options litex isn't Supported here dedicated tier includes basic standard premium premium 2 Premium 3 and there's isolated tier as your app service is versatile you can deploy single or multi-container Docker applications when you create your app you have to choose a unique name since it becomes a fully qualified domain overall Azure app service simplifies your web hosting needs ensuring you can focus on coding and let Azure
do the heavy Lifting let's delve into runtimes in Azure app service so what is a runtime environment a runtime environment refers to the softt sof Ware and settings needed for a program to run in a defined way at runtime a runtime generally means what programming language and libraries and framework you are using a runtime for Azure app services will be a predefined container that has your programming language and commonly used library for that language installed with Azure app Services you're presented with a range of runtimes to choose from including net. netcore javar Ruby node.js PHP
and python moreover Azure app Services generally supports multiple versions of each prr programming language for example for Ruby you might find versions 2.6 and 2.7 it's worth noting that cloud providers including Azure May phase out support for older versions over time this not only ensures that they're Offering the latest and most efficient tools but also promotes better security practices among users pushing them to keep up with the latest patches so that's an overview of runtimes and Azure app service the next thing we'll be covering are custom containers in Azure app service Azure app service gives
you the flexibility to use custom containers for both windows and Linux the primary reason you might opt for a custom Container is to use a distinct runtime that isn't natively supported or to incorporate specific packages and software here's a straightforward process to get started with custom containers and Azure app service design your container Begin by creating a Docker container tailored to your needs on your local Machine push to Azure once your container is ready push it to the Azure container registry this centralized repository ensures that your Container is easily accessible within Azure deploy and go
live finally deploy your container image directly to the Azure app service once deployed Azure takes care of scaling maintenance and updates another advantage of custom containers in Azure app services that they offer more granular control over your environment you can fine-tune performance security and other aspects of your application environment to suit your Needs the next topic will be covering our deployment slots in Azure app service deployment slots allow you to create different environments of your web application Associated to a different host name this is useful when you require a testing staging or QA environment alongside
your production setup deployment slots let you swiftly replicate your production setting for various purposes ensuring consistent testing environments you could also swap Environments this is useful for executing blue green deployments by using swap you can promote your stage in environment to production with thesee you can promote our staging to production by swapping if something goes wrong you could swap them back this capability ensures minimal downtime and enhances the user experience since you can introduce changes in a controlled manner rolling them back if necessary in addition Azure ensures that when Swapping the instances are warmed up
before traffic is routed resulting in zero downtime so that's a quick overview of deployment slots the next topic we'll be covering is the app service environment in Azure app Service app service environment is an Azure app service feature that provides a fully isolated and dedicated environment for securely running app service apps at high scale this allow you to host windows and liux web apps Docker containers mobile apps and functions app service environments are appropriate for application workloads that require very high-scale isolation and secure network access and high memory utilization customers can create multiple ases within
a a single Azure region or across multiple Azure regions making ases ideal for horizontally scaling stateless application tiers in support of high requests per second workloads ases comes with its own Pricing tier called the isolated tier ases can be used to configure security architecture apps running on ases can have their access gated by Upstream devices such as web application firewalls app service environments can be deployed into availability zones using Zone pinning there are two deployment types for an app service environment external ass and ilbs external ass exposes the ass hosted apps on an internet accessible
IP Address if the v-net is connected to your on premises Network apps and your ass also have access to resources there without additional configuration because the ass is within the v-net it can also access resources within the v-net without any additional configuration ilbs exposes the ass hosted apps on an IP address inside your v-net the internal in point is an internal load balancer so that's an overview of app service environment and Azure app service the next thing we'll be going over is deployment in Azure app service so what is deployment well it's the action of
pushing changes or updates from a local environment or repository into a remote environment Azure app Services provides many ways to deploy your applications including run from package deploy zip or War deploy via FTP deploy via Cloud sync such as Dropbox or one drive deploy continuously with GitHub bitbucket and Azure repos which using kudu and Azure pipelines deploy using a custom container CI CD pipeline deploy from local git deploy using GitHub actions deploy using GitHub actions containers and deploy with template run from a package is when the files in the package are not copied to the
WW root directory instead the zip package itself gets mounted directly as the re only ww rout directory all other deployment methods in app service have Deployed to the following directory for Windows Deon we use back slashes home site ww root for Linux we use forward sles home site ww rout since the same directory is used by your app at runtime it's possible for deployment to fail because of file lock conflicts and for the app to behave unpredictably because some of the files are not yet updated zip and War file deployment uses the same kuduo service
that powers continuous integration based deployments Kudu is the engine behind get deployments in Azure app service it's an open source project that can also R outside of azure kudu supports the following functionality for zip file deployment deletion of files left over from a previous deployment option to turn on the default build process which includes package restore deployment customization including running deployment scripts deployment logs and a file size limit of 248 megabytes you can Deploy using Azure CLI Azure API via rest and Azure portal you can use file transfer protocol to upload files you will need
your own FTP client you just drag and upload your files go to the deployment Center get the FTP credentials for your FTP client you can use dropbox or one drive to deploy using a Cloud sync Dropbox is a third-party cloud storage service one drive is Microsoft's cloud storage service you go to deployment Center configure for Dropbox or one drive when you turn on sync it will create a folder in your Dropbox Cloud Drive one drive apps as your web apps drop box apps Azure this will sync with your home site ww root so you just
update files in that folder in summary Azure app service offers a range of deployment methods ensuring flexibility and ease for developers the next topic we'll be covering is autoscale and Azure app Service autoscaling is the process of adjusting a server infrastructure capability to fulfill incoming requests from your web application it usually takes seconds for the changes to take effect and can be done automatically according to preconfigured metrics it does not need any new deployment or coding changes scaling options in Azure app service horizontal scaling this involves adding or removing servers from your infrastructure for example
during Hight traffic periods you might scale up from 1 to three virtual machines when demand decreases you can reduce the C to minimize cost vertical scaling this suggest the resources of an existing server such as CPU memory or storage for example if you find that your app application is processing a large amount of data and needs more storage for logs you might opt to increase the storage capacity of your existing server overall Azure app service autoscaling Dynamically adjusts resources to meet real time application demands the next thing we'll be covering is the Azure app service
plan Azure app service plan determines the region of the physical server where your web application will be hosted and defines the amount of storage RAM and CPU your application will will use it offers several pricing tiers shareed tiers there are two shared tiers free and shared free tier provides this tier Offers 1 GB of disk space supports up to 10 apps on a single shared instance provides no availability SLA and allows each app a compute quoto 60 minutes per day shared tier provides hosting multiple apps up to 100 on a single shared instance no availability
s SLA is offered and each app gets a compute quote of 240 minutes per day it's worth noting that litx based instances are supported in this tier dedicated tiers basic standard Premium premium 2 Premium 3 Bic offers more disk space unlimited apps three levels in this tier that offer varying amounts of compute power memory and disk storage standard allows scaling out to three dedicated instances guarantees 99.95% availability and also has three levels with varying resources premium provides the ability to scale up to 10 dedicated instances and ensures 99.95% availability and it includes multiple Hardware level
Options isolated tier dedicated Azure virtual Network full Network and compute isolation scale out to 100 instances and availability SLA of 99.95% so the Azure app service plan lets you tailor your hosting environment and budget to fit your application needs the next topic will be going over is enabling diagnostic logging in azzure app service Azure provides built-in Diagnostics to assist with debugging an app Service app Diagnostics logging is An important part of any web application's operation it allows you to troubleshoot exceptions not exception errors alerts and warnings as well as track and improve the user experience
with Azure Diagnostics logging you may log application events generated by your application web server logging with a raw version of requests made to your app only available for for the windows platform detailed error Pages saving copies of the error Pages presented to Your user only available for the windows platform failed request tracing with detailed information regarding failed requests deployment logging logging detailed information about the deployment process in order to troubleshoot when a deployment fails to enable application logging for Windows apps in the Azure portal navigate to your app and select app service logs select on
for either application logging or application logging or both the file System option is for temporary debugging purposes and turns itself off in 12 hours The Blob option is for long-term logging and needs a blob storage container to write logs to you can also set the level of details included in the log as shown in the table below disabled this level doesn't capture any logs error at this level only error and critical logs are captured warning this level captures logs that are warning error and critical information this Level encompasses a broader range of logs capturing info
warning error and critical categories verbose this is the most detailed level capturing all categories Trace debug info warning error and critical in essence As you move from disabled to verbose the range of logs captured increases with verbose capturing the most comprehensive set of logs enable application logging for Linux container in app service log set the application logging option to file System in Quota specify the dis quota for the application logs in retention period set the number of days the log should be retained when finished select save it so asure app Services diagnostic logging is essential
for optimizing troubleshooting and monitoring your application let's take a look at configuring Azure web app settings Azure web app settings can be configured through the Azure portal or the Azure CLI the Azure portal also offers a bulk Editing option the main settings that may be configured for your Azure web app are the following t SL SL SSL settings to have a secure and encrypted Communication channel API settings such as technology stacker platform Settings app settings you can override your configuration stored on the web config connection strings in order to do not have it written on
the web config default documents displays default web pages when accessing the root of your Website URL path mappings configure settings according to the user OS overall Azure web app settings offer a simplified way to optimize and here your Azure web [Music] application hey this is Andrew Brown from exam Pro and we are going to be learning about Azure app services in this follow along uh and it's a service that's supposed to make it easy for you to deploy web applications I say Supposed to because it really depends on your stack Azure has more synergies with
other stacks and others so like if you're like me and you like Ruby on Rails you're going to find a lot of friction with rails and Linux but if you're using something like Windows servers or python orn net you're going to have a much easier time still really great service just wish they'd make it a bit more broad there but let's hop into it so before we can go use that service Let's make sure that it's activated and so we'll go over here and we'll go to as your subscription and then down below we're going
to go to Resource provider now you think what you could do is just type in app Services uh and you'd be wrong because the the service is under a particular provider so if you want to figure out what provider it is we can go um Azure resource providers and they have a page on documentation here that lists them all So if I search for Azure app Services it's under web and domain registration so we're going to make sure this is registered if we're using a custom domain which we are not today we need this one
activated so going back here I will type in web and you can see it's registered so if yours is not registered go ahead and hit that I believe this by default is generally registered with new Azure accounts so I don't think that is an issue for you but We'll go back up here close these additional tabs and we will type in Azure app services and we will look for that service so there it is and we'll go ahead and hit add um and so I'm going to give it a new name I just made it
a moment ago but I'm going to try again and try to use the same name so we're going to call this Voyager Great and then I'm going to go ahead and name this Voyager and I Already know that that is taken so I'm going to type in Delta Flyer and these are fully qualified domain so they are unique with Azure app Services you can run a Docker container we're doing code this time around and what I like to use is Ruby um but again you know if I want to use the cicd I'm not going
to be able to use the deployment center with Ruby so that is not possible um and so we're going to go with python and run either a flask or a Django app I haven't decided yet I am in Canada so let's go to Canada east and uh down below here we have the plans generally the plans will tell you the cost underneath look you'll notice that it's loading but I just want to show you that there are some discrepancies in terms of pricing so if I was to go to Azure app Services pricing and we
were to pull this up here we can kind of see the pricing here okay and if we scroll on down right Now we're looking at a premium V2 uh and oh no I don't need help I'm okay you'll notice that it's 20 cents per hour so if I go here and do that times 730 because there's 730 hours in the year that's $146 I believe this is showing me in USD dollars yeah and in here it's showing me03 Canadian which is lower um so it could be that because I'm running in a Canada east region
it's the price is different but you could imagine that if I had this at this cost at uh what did We say here um at 146 USD to CAD I'd actually be paying $182 so you got to watch out for that kind of stuff but I'm pretty sure this is what the cost is so just be aware that if you look stuff up in here it's not necessarily reflective so you got to do a little bit more work to figure that out uh if we wanted to go here uh we cannot choose the free tier
when we're using Linux if we're using Windows I believe we can use it we're working with Linux today so that's just how it's going to be um for the B1 this is totally fine but we want to utilize deployment slots deployment slots is an advanced feature of uh the production version and that's the only way we're going to be able to use it here this is 20 cents per hour again so I don't want to be doing this for too long but I think what we'll do is before we do that we can just do
an upgrade to devb to prod so we can experience that I'm going To go and just choose B1 okay so we go next um we do not need any application insights for the time being and it will not let us so it's okay we'll go next review and create and we'll go ahead and create this resource here and I will see you back when this is done so um our resources Now set up we'll go to Resource and now that we're in here you'll notice if we hit browse we're not going to see anything because
we do not Have anything deployed which makes sense right uh so we're going to actually have to go ahead and deploy something so we are going to make our way over to the deployment Center and uh it's just going to tell us that we have yet to configure anything and that's totally fine we're going to go to settings it'll give it a moment and so the thing is is that we're going to need something to deploy um I did not create An app but the great thing uh is in the Azure documentation they have a
bunch of quick starts here all right and apparently they have one for Ruby as well but today we are looking at python uh and so they actually have an example repository for us here which is github.com asure samples python docs hello world and I mean I could go make a repo for you but we might as well just use the one that is already provided to us so I'm just going to pull this up to Show you what's in it it's a very very simple application even if you don't know anything about building web apps
I'm going to walk you through really easily here okay so we're going to open up app.py so we are using flask if you've never heard of flask it is a very minimal python framework for creating web apps uh very uninspiring uh homepage here but it gets the job done it's going to create a default route for us which uh we have there we're going to call Hello here and we're going to have hello world so that's all that's going on here very very simple and we have a requirements this is our package manager I don't
know why python uses dxt files is very outdated to me but that's what they use and here we have flask all right so we're going to use that repo it's a public repo so it should be very easy for us to connect so we'll drop down go to GitHub and uh the next thing we need to do is Authorize GitHub all right so I ran into a bit of trouble there because I could not uh authenticate my uh GitHub account but you know what I just made another GitHub account so that made it a lot
easier I'm going to go ahead here hit GitHub and we're going to try to authorize it and so now I'm logged into this new one called exampro Dev and we'll go ahead and authorize this application and we're now in good shape this repository doesn't have anything in It so um if I want to clone something I guess I'll probably have to Fork that repo so we'll give it a moment to authorize and while that's going I think that's what I'm going to do I'm going to go and uh Fork the example repo if I can
find the link again here uh myself uh I believe it is that's still authorizing over there I'm still looking for it so it was like examples or something samples or examp Examples all right so I found a way around the problem I just made a new uh GitHub account so that's all I had to do um and I just won't be using my primary account until I get my phone back but um so what we'll do is go hit connect I'll hit authorize and it didn't prompt me because it already connected to this new one
called exam prodev you might have to put your credentials in here and it's going to ask me to select some things It's a new account so there are no organizations there are no repositories there are no branches totally brand new so what I'm going to need to do is get a repo in there so we'll just go ahead and Fork the Azure samples one so that is azure samples python docs hello world and if I type that right we're in good shape I'm going to go ahead and Fork this repository I'll say got it and
then I'll Move this off screen here this is now cloned you should see it cloned here and we'll go back here and this probably isn't live so there's no refresh button here so we'll have to hit discard and we will give this another go here and we will select our organization which is our name there is the repository uh should be main branch this is kind of outdated I'm sorry but it's called Master that's what it is not my fault that's azure's fault okay um and I Think that's it I don't know if we need
a workflow configuration file I don't think so going to double check here no I don't think so and uh what we'll do is we'll just go ahead and save that and so now we are set up for [Music] deployment all right so now that that's all hooked up if we were to go to browse we're actually still seeing the default page a deployment hasn't been triggered Just yet yet uh so the way it works is it's using GitHub action so if we click into our I'm going to call it main branch I know they got
the wrong name but uh we're going to click into our GitHub workflows and then below here we can see we have a yaml file uh and this is for GitHub actions integration here and so what it's doing is it's specifying the branch uh what how it's going to uh build it's going to run onto buntu latest the steps it's going to do It's going to check it out it's going to set up the python version it's going to build it it's going to do that stuff and so in order for this to um take action
we'd actually have to go ahead and make some kind of manual change which we have yet to do so okay so what we'll do is we'll go back to our main here and uh it should be as simple as uh just changing something here so it's not I'm not sure how it's supposed to know that it's supposed to be doing the hello We oh I guess yeah sorry so this means it's going to Route over to here um so I'm just going to make any kind of change here doesn't matter what it is just one
space we'll go ahead and give it a commit and um if I go back to my latest commits we should see that I made that change there it is we'll go back over here and this should be deploying um so if we go over to logs here you can see one's in progress right Now okay and so that's what we're waiting we're just going to see that finish there we could probably open the logs and get some more information there and so it just brings you back over to GitHub actions and say here's GitHub actions
and it's performing the stuff here so we're just going to give it time here and I'll see you back in a moment so we didn't have to wait too long it only took 1 minute and 29 seconds if we go back over here um we might need to do A refresh and so we can see this is reflected over here and so if we go back to it doesn't really matter if we go to settings or logs here but I'm going to hit browse and see if my page is deployed it still is not so
we do have a small little problem here and it's really going to just have to do with how the app is served so that's what we need to figure out next all right so our app is not currently working and uh there's a few approaches we can take and the Thing I can think right away is we should go and SSH into that instance if you scroll on down here from developer tools you can go to SSH and click this button and that's going to SSH you right into that machine right away you can also
uh access SSH via the um CLI command so I believe it's like it's like a web app um SSH it'll do the exact same thing you do that from the cloud shell but that's Not what we're doing today if I give this an LS in here and we're in Linux we can see we have our app here and uh what I would do is I would see what's running so I I would do a puma uh or sorry not Puma PS Ox grep uh Python and you can notice that we have a g unicorn that's
running so that is where our python instances are running so you're not looking for flas you're looking for python here and and if we wanted to make sure that was working we just type in Curl Local Host um and so that is going to return up Port 80 so that tells me that because like curl just means like let's go look at that page um it should return some HTML like print out the HTML to us so that means the app is not running um so what you could do is run flask run and it's
going to start on Port 5000 right so what I can do Is I can go up uh back to my deployment Center here and I'm going to go get that link here I just ignore the fact that it's working uh it's it's not working right now I know for certain it's not um but if we do 5,000 that won't resolve because Port 5,000 isn't open so we can't really just uh put 5,000 in there and the default server here would be 5,000 so if I stop this and I specify Port 80 right then this will
start up the app on Port 80 and so now when you go here okay it will work uh this is not a great way because of course as soon as you kill it here uh technically the S should stop running um and so you'll run into that step uh so what we need to do is provide a configuration to gunicorn which is a python thing again it's not so important that you know how like what these things are but the idea is that You understand as administrator you want to make sure you have an app
that runs after you do a deploy so in this particular one we need a startup. txt uh and interestingly enough there is a example code by the same author of the other one we were looking at here I believe it's the same person or it might not be but uh they have a startup txt right and so in here you can see that it binds on Port 0000 it starts up for workers starts up the App all right um and so that's something that we can go ahead and do so uh what I will do
is I will go back to my GitHub repository that we have here and I can just go ahead and add a new file so I'm going to say um add a file create a new file here we'll call it startup. txt I'm going to copy this command here and paste it in there so gunicorn will bind the workers and startup on the app Um startup app is being ran by uh something here so if I go back here I I think they have a startup High here and that's all that it is doing um I
think I want to I could do it this way I suppose let me just see here there's is a slightly different I so they actually have like a full app going on here and I just want a very simple flask app so I think what I can do is put flask run Here Port 80 and that should start up the app there I'm going to go ahead and commit that file okay and as soon as I commit that if I go back to my actions it created that startup file there so it should trigger a
build it's queued up um and I'll just put this tab up here so we'll be back here in two seconds and if I give this a nice refresh yeah you Can see it deploys in progress so uh this doesn't take too long we'll just wait close that there we'll just wait a few minutes we click logs it just opens it back up here and we'll see how that goes all right so uh your deploy may have finished there but the thing is is that we're not going to really know if uh a change has taken
effect unless we actually go ahead and update our code so what I want you to do is go to your code tab go to your app.py we'll hit edit and I'm going to go ahead and change this to Vulcan and then we'll scroll on down hit commit changes and we'll make our way back over to our deployment Center and we'll give it a refresh here and we're just going to wait until this one is complete and we will double check to make sure that that is changed if it is not we will take action to
fix that okay all right so we just waited a little while there for that deploy to happen and if we go to our website here it is Taking effect so that's all we had to do to get it working so that's pretty good um so that is uh deployment so let's talk about deployment slots in order to utilize this feature we're going to actually have to upgrade our account because we cannot utilize them at this uh the basic plan here we got to go to standard or premium so let's go ahead and give that an
upgrade uh so here's the B1 we're going To go to production here um and I think yeah we're going to have to choose this one here uh very expensive so the thing is we're going to just upgrade it temporarily unless there's more options down below that are cheaper yeah these are the standard tiers let's go with this one here because it's only $880 again we're not going to be doing this for long but I want to show you how to do staging slots and auto scaling okay so we'll go ahead And apply that there and
now it says that it's applied so if I go back to our app here and we click on deployment slots sometimes it doesn't show up right away if it doesn't that's not a big deal you just wait a bit but today it's super fast so we're going to go ahead and add a new slot we're going to call it uh staging we're going to deploy from our production Branch here and I'm going to go ahead and create that There and we'll just wait until that's done okay great so we waited a little bit there and
uh our slot is created so I'm going to just hit close there and so now let's go take a look and see if we can actually see the application here so I just clicked into it I click browse and we're getting the default page so nothing is actually really deployed to it uh so how are we going to do that that's the the main question here um so What I'm going to do is I'm going to make my way over to the deployment Center and you can see that it's not configured for the slot so
we are going to have to set it up all over again even though it copied over configuration settings it didn't copy over the code so we go to GitHub we'll choose our organization again I'm going to choose the repository we're going to choose that main branch again there we're going to let it add a workflow and notice that This time it's going to call it staging do yaml so there'll be separate workflow that gets created we're going to go ahead and save that there and what we can do is again click onto our Branch name
there and if we click into our workflows we'll not now notice that we have a staging example it's the same thing um but it should be able to now deploy so the whole purpose of um these deployment branches is that it helps us uh we can deploy different Versions of our apps but also um it's just a place where we can uh uh view things before we actually roll them out so we want to make sure 100% that they are working correctly um I don't think this will automatically push out let me just go to
my actions to see if this is deploying notice that we have two workflows now we have staging here uh and yeah it looks like it's going to deploy here so we'll just wait a little bit um but maybe what we can do is try To have a slightly different version uh for each one here okay but we'll just let that finish and I'll see you back in a moment all right so our deploy finished there so now if we go back to our website here we go browse we should see that application it says hello
Vulcan and if we go and take out this we still have hello Vulcan so how can we have a a variant of this so that we can push out to that so what I'm going to do is I'm Going to go back to my application here I'm going to go to code and I'm just going to make a minor change um I don't say also is that spelled right startup that does look correct to me um so maybe I'll go ahead and adjust that file but it doesn't seem to be affecting anything which is I'm
a bit surprised there so what I'll do is I'm going to go and edit that file and give it the proper name can I rename this file yes I can so we'll call that startup File I thought we need that for deployment I guess it just works without it which is nice uh if we go back here I'm going to go and I actually just want to edit my um app here again and I'm going to go and edit this and we'll say um hello Andor or hello andorians maybe and so if I go back
to my actions the question what is it deploying is it going to deploy the production or the staging and it looks like it's going to Do both looks like it's doing both here but one way we could tell is we can go to our logs here and we can see that um so we did two deploys so there's one change here uh if we go back to our main application and our deployment Center here and we go over to our logs you can see that they're both deploying so it doesn't seem like it's a great
thing that that's how it works so the question is is then how would we um Facilitate that deploy right how could we do that I suppose what we could do is just make a separate staging Branch um so if I go over to code here um I don't think we can just make branches through here so what I'm going to have to do is go ahead and oh I can create a branch right here so we'll just type in staging and we'll go create ourselves a new branch and now we are in this branch and
what I'm going to do is go ahead and Modify this and we're just going to call this um hello Klingons okay we'll go ahead and update that and so this should be a separate Branch so you think what we could do is go in and just change our settings so that it deploys from that one uh we'll go back to our deployment slots we'll click into staging here and we need to change our configuration settings um I think we Could just do it [Music] from here hold on here I I could have swore it specified
the branch if we go to deployment Center here I think it's set up on that other branch there I think we just adjust it here so yeah I think we could just um adjust these settings um we can't discard them but maybe what we can do is just go in and modify that file so we will go into our code Here and uh we will go ahead and click into here go into staging and we'll just change what the branch is called so we'll just say staging and we'll hit start commit and we will save
that and we'll see if it actually reflects those changes there so we will go here and hit refresh we'll see if it picks up staging now if we go to settings it's not picking it up so um I'm not sure I don't think perform a redeploy operation we don't want to redeploy so maybe what we'll do is just we'll have to do a disconnect here because it's collect it has the wrong one here so save workflow file um okay we'll just go ahead and delete it it's not a big deal we'll just have to make
a new one here we'll go to GitHub we'll choose our uh organization again or repository our staging Branch this time around we'll Let it add one see it says we can use an available workflow so we could have kept it there and added it there um and we'll go ahead and save that so now we'll have two separate branches there and we'll give that some time to deploy because that will now trigger a deploy off the bat and so I'll see you back here in a moment all right so after a short little wait here
it looks like our app is done deploying so we'll go over here we'll make sure that this is our staging Server is good and we want to see that our production is different perfect so we now have a way to deploy to each one but imagine that we want to swap our traffic so we're happy with our staging server we want to roll that out to production and that's where we can uh do some SWAT and so what we'll do is click the swap button and we're going to say the source is the staging and
this is our Target production and we're going to perform that swap uh right now we can't Do a preview because we don't have a particular setting set that's okay and it's kind of showing if there are any changes so set of configuration changes we don't have any so that's totally fine as well we'll go ahead and hit Swap and that's going to swap those two I believe it's has zero downtime so we will be in good shape if that happens there and we'll just give it a moment to do that great so after a short
little wait There the swap is complete and so uh if we remember clearly this was our production right and so if I was to hit refresh it so now say Klingons and if I go to my staging server it should be the other way around right good so now imagine that I want to just split the traffic uh that's something else that we can do um so notice over here we have these percent is here um not sure why it won't let me change Those so maybe I'll have to look into that so I'll be
back so I'm not sure why it's not showing us that traffic slot there but what I'm going to do is just maybe try to trigger deploy back into our staging and maybe that's what it wants to see um so what I'm going to do is go back to my code here we'll be in our staging Branch here I'm going to go ahead and uh edit this file here and we will just change this to borans And we will hit update and we will let that go ahead and deploy so we go to actions here we
can see that it is deploying um and we'll just give it some time okay so see you back here in a bit I mean the other reason could be that we're just not at the main level hold on here uh if we go back here to deployment slots you know what I think it's just because I was clicked into here and then I was clicked into deployment slots that They're both grayed out yeah it is so we can actually do it that top level there doesn't hurt to do another deploy though so um we'll just
wait for I'll wait for that deploy to finish and then we'll come here and uh adjust that there okay all right so let's take a look at uh doing some traffic switching here so right now if we were to go to our production we have Klingons and if we were to uh go to our staging we have Boran so imagine that we Only want 50% of that traffic to show up so what we can do is put in 50% and what I'm going to do is um do I hit enter here or oh sorry save
up here there we go um and so what's going to happen is this should take effect I think right away yep uh and so now we have 50 50 50% chance of getting something else here um so I'm just going to keep on hitting enter here if that doesn't work we can try an incognito tab and there we go we got the opposite There and so this is serving up staging right uh and this is serving up production but they're both on the production URL so that's a way you can split the traffic so uh
that's pretty much all I wanted to show you for deployment slots let's now talk about scaling hey this is Andrew Brown from exam Pro and in this section we'll be covering Azure container instances Azure container instances allow you to launch Containers without the need to worry about configuring or managing the underlying virtual machine aure container instances is design designed for isolated containers they are tailored for simple applications task Automation and tasks like build jobs containers can be provisioned within seconds whereas VMS can take several minutes containers are built per second whereas VMS are built per
hour providing potential cost savings containers have Granular and custom sizing of vcpus memory and gpus whereas VM sizes are predetermined ACI can deploy both windows and Linux containers you can persist storage with Azure files for your ACI containers once deployed AIS are accessible via a fully qualified domain name like custom label. aure region. aure container. Azure provides quick start images to start launching example applications but you can also Source Containers from Azure container registry Docker Hub or even privately hosted container registry container groups are collection of containers that get scheduled on the same host machine
the containers in a container group share life cycle resources local network and storage volumes container groups are similar to a kubernetes pod multi-container groups currently support only Linux containers There are two ways to deploy a multi-container group to deploy a multi-container group you can use either a resource manage or template if deploying additional Azure service resources or a yml file for deployments involving only container instances overall Azure container instances simplify container deployment and scaling removing the complexities of infrastructure management The next topic we'll be going over our container restart policies a container restart policy specifies
what a container should do when their process has completed these policies ensure that the container instances can handle different scenarios effectively based on the specific requirements of the application or task Azure container instances has three restart policy options always this policy ensures that the containers restart continuously Regardless of whether they exit successfully or not it's useful for app applications that need to be constantly available such as web servers never with this policy containers do not restart once they've completed their execution this is ideal for tasks that are designed to run once and then terminate such
as batch jobs or scheduled tasks on failure containers will only restart if they stop due to an error or unexpected termination this ensures that if a Container crashes or faces an unexpected error it will try to restart and continue its operations overall choosing the appropriate restart policy is vital for the the stability and responsiveness of your applications the next topic we'll be covering our container environment variables environment variables are key value pairs that can be used to configure and manage the behavior of applications running inside containers Environment variables allow you to pass configuration details to
your containers which can be critical in guiding applications on how to connect to databases where to find certain resources or how to adjust their behavior based on the environment they're running in in Azure you can easily set up these environment variables for your containers using the Azure portal CLI or Powershell secured environment variables by default Environment variables are stored in plain text to address this Azure offers the option to secure your environment variables instead of storing them in plain text which could expose sensitive information if breached you can Leverage The secure environment variables flag so
that's a quick overview of container environment variables the next topic we'll be covering is container troubleshooting Troubleshooting containers in Azure involves a series of commands that help diagnose and resolve issues as container logs this command lets you fetch logs from your container these logs can provide insights into application behavior and possible errors as container attach if you need diagnostic data during container startup use this command it helps in understanding issues that might arise during the initialization phase of a container as Container EXA for a deeper dive into the Container this command starts an interactive session
this is useful for live debugging and to inspect the container's current state as monitor metrics list this command gives you metrics related to your container such as CPU usage which can be essential for performance tuning or identifying bottle X so these are the commonly used commands for container [Music] Troubleshooting hey this is Andrew Brown from exam Pro and we're going to take a look at a your container instances so here it is so all we got to do is go to container instances we'll hit add and the nice thing is that Azure provides us with
a Hello World one so it's very easy for us to get started um it's a Linux machine and it looks like it's pretty inexpensive there so we'll stick with that I'm going to create a new group here we're going to call it banana um And we'll name the container instance banana and East Us 2 seems fine to me you'll notice we're on a quick start image if we wanted we could use something from the docker Hub and provide our own link but we'll just take with the quick uh start image for today we're going to
go ahead and hit next to networking just to see what we have as options you can make it public or private we'll go to Advanced hold on here yep those are just the ports you Can expose we'll go to advance and for the restart policy we can set on failure always or never we can pass in environment variables and I covered this a lot more in detail in the lecture content so we don't need to really dive deep into this um and we'll go ahead and create this instance and so we'll have to wait a
little while here and I'll see you back in a moment okay and so after a short wait our container instance is ready We'll go to that resource there and take a look around so on the left hand side we can go to our containers and there we can see it running we can see the events down below of what's going on so you can see that it's pulled the image it successfully pulled it and it started the container some properties nothing interesting there the logs if we wanted to see stuff and if we wanted to
connect to the instance we could also go here and hit connect which is kind of nice um I don't have any purpose to do that right now so and it's also not going to work the way we're doing it but I just wanted to show you you had those opportunities uh you can do identity so that means manage it with ro base access controls but what I want to see is actually this uh hello world working I'm assuming that must be a a hello page I've never looked at it before so we're going to go
here grab the public IP address and paste it on in the top and There we go so we have deployed a instance onto Azure container instances or a container I should say so nothing super exciting to talk about here um but we do need to know the basics uh there um if we wanted to deploy other containers it's just the one there so that's all you really need to do um but yeah so yeah hopefully that uh gives you an idea there I'll just go back to the list here so we can see it and
we'll go ahead and just uh delete that probably Do it for the vi the resources on the left hand side like I always like to do uh and we will go into banana here and we will delete banana and there you [Music] go hey this is Andrew Brown from exam Pro in this section we're diving into the Azure container registry Azure container registry is a managed Docker registry service based on the open Source Docker registry 2.0 it's designed For building storing and managing containerized applications and images use Azure container Registries with your existing container development
and deployment pipelines use Azure container registry tasks to automate image builds directly in Azure when you commit code you can seamlessly pull images from ACR for deployment to various orchestrators such as kubernetes DC OS and Docker swarm many Azure services including Azure kubernetes service Azure app Service Azure B and Azure service fabric offer direct support to interface with ACR this ensures a cohesive workflow for deploying applications developers can also push container images to a container registry as part of a container development workflow with delivery tools such as Azure pipelines and Jenkins ACR offers various interfaces
for interaction you can manage and configure it using the Azure CLI Azure Powershell Azure portal Azure SDK or even the docker extension for visual studio code in conclusion azure container registry securely and efficiently manages your Docker images streamlining build storage and deployment the next topic will be covering our Azure container registry tasks ACR tasks are designed to automate the process of patching the operating system and Frameworks within your Docker containers for quick tasks ACR tasks let you instantly push a specific container Image to azure's container registry without needing a local Docker engine installation ACR tasks
offer automation flexibility you can set up automated builds that are triggered by different events such as updates made to the source code updates to a containers based image or predetermined schedules or timers with ACR tasks multi-step workflows become easier for example you could build a web application image run the web application container build a Web application test image and deploy the container that will run tests on the web application each ACR task has an Associated source code Contex the location of a set of source files used to build a container image or other artifact furthermore
ACR tasks support the use of run variables making it possible to repurpose task definitions and enforce consistent image and artifact tagging standards in summary ACR tasks amplify the automation Efficiency and consistency of container management and Azure the next topic we'll be going over is Docker Docker is a powerful platform design designed for automating the deployment scaling and management of applications using containerization Docker abstracts infrastructure and environment variables allowing you to create a controlled environment within your Docker container we can install Docker images into those Docker containers with each Docker image representing one or a group
of common software the machine on which Docker is installed and running is usually referred to as a Docker host or host when you deploy an application on the host it will create a logical entity to host where the application called a container or Docker container container a Docker container does not have any OS installed and running on it it has a virtual copy of the process table Network interface and the file system outpoint which have been inherited from the OS of the host on which the container is hosted in Runing the kernel of the host
OS is shared across all the containers that are running on it this allows each container to be isolated from the other present on the same host it supports multiple containers with different application requirements and dependencies to run on the same host if the OS requirements are the same Docker Key benefits Docker supports multiple applications with different requirements and dependencies to be hosted on the same host if the OS requirements are the same storage optimized containers are typically a few megabytes in size and consume very little disk space allowing a large number of applications to be
hosted on the same host robustness robustness containers don't contain a full OS making them more lightweight than virtual machines as a result they Use significantly less memory and can boot up in mere seconds whereas a might take several minutes reduces costs Docker is less demanding when it comes to the hardware required to run it better or Disaster Recovery you can back up a Docker image of the state of the container at a specific point in time and restore it later if serious issues arise faster configuration with consistency you can just put your configurations into code
and deploy it Saves a lot of time from preparing the setup and deployment documentation overall Docker provides a robust efficient and cost-effective solution for application deployment and management through containerization the next topic we'll be going over is a Docker file in Docker a Docker file is a text document that contains all the commands a user could call on the command line to assemble an image by using the docker Bill command Users can automate the image creation process by executing the instructions laid out in the docker file here are some essential points to understand about Docker
files the docker file is a text file that contains the instruction that you would execute on the command line to create an image a Docker file is a step-by-step set of instructions Docker offers standard commands for use within the docker file such as from specifies the base image to start with Copy copies files from the host system into the image run executes a command EnV sets environment variables expose informs Docker that the container will listen on a specified Network Port at runtime CMD provides defaults for the executing container docker will build a Docker image automatically
by reading these instructions from the docker file overall a Docker file provides a reproducible and consistent method to build Docker container [Music] images hey it's Andrew Brown from exam Pro and in this section we'll delve into Azure functions but first it's essential to understand the concepts of serverless and functions as a service so what is serverless serverless architecture generally describes fully managed cloud services that classification of a cloud service being serverless is not a Boolean answer but an answer on a scale where a cloud service has a degree of Serverless a serverless service could have
alter most of the following characteristics High elasticity and scalability high availability high durability and secure by default abstracts away the underlying infrastructure and are built based on the execution of your business task serverless can scale to zero meaning when not and use the serverless resources cost nothing pay for Value model where you only pay for actual use Usage eliminating costs for idle resources an analogy of serverless could be similar to an energy rating labels which allows consumers to compare the Energy Efficiency of a product some services are more serverless than others what is function is
a service FAS empowers developers to concentrate on Crafting specific pieces of code known as functions these functions can be event driven meaning they either trigger based on events or produce event data Typically several functions are interwoven to form a serverless application and these functions are activated only when called upon function as a service is not serverless on its own f is only serverless if it's fully managed and scales to zero in conclusion serverless and F represent transformative approaches in cloud computing emphasizing efficiency scalability and cost-effective me the next topic we'll be covering is Azure functions
Azure functions is a function as a service offering that allows developers to focus on writing code and not worry about maintaining the underlying Computing infrastructure a function app defines the underlying compute for a collection of functions a function app defines the hosting runtime and other Global configurations a function represents code LA with application runtime configuration a trigger is the chosen Event data that will cause function to execute you can only have one trigger input bindings or what are multiple data sources that will be pass to the function when a trigger occurs output bindings are one
more data syns that will receive outputed data from the function on successful execution there are four versions of azure functions 1 x 2 x 3 x and 4 x we are currently using for X Azure functions storage Considerations every function app requires a storage account to operate if that account is deleted your functions won't work Azure functions uses the following storage types in the storage account blob storage maintain binding State and function keys Azure files file share used to store and run your function app code in a consumption plan and Premium plan Azure files is
set up by default but you can create an app without Azure files under certain Conditions H Storage used by task hubs and durable functions and table storage also used by task hubs and durable functions Azure functions anatomy of a function function. JSO n configuration of a single function defining bindings code the code for your function Funk ignore to ignore host. JS n Global configuration of all functions at the function app level local project a place to locally store code in conclusion Azure functions offers developers an Effortless way to build event driven Solutions without managing infrastructure
the next topic we'll be overgo is the authorization levels for Azure functions HTTP triggers authorization level determines what keys if any need to be present on on the request in order to invoke the function the authorization level can be one of the following values Anonymous no API key is required function a specific API key for that function is needed admin The master key for all functions within that function app is required in this example we're creating an HTTP trigger the desired authorization level can be selected note that the authorization level can usually be changed after
Creation in the portal and is set on the trigger Azure functions debugging you can can enable streaming logs for Azure functions to see your real-time logging when an error occurs there are two ways to view a stream of log files being Generated by your function executions built-in log streaming the app service platform provides an inbuilt feature to stream application log files allowing developers to trace function executions live live metric stream when your function app is connected to application insights you can view log data and other metrics in near real time in the Azure portal using
live metric stream it's worth highlighting that these lock stream can be viewed both in the portal And in most local development environments overall Azure functions provide adaptable HTTP trigger authorization and robust debugging tools enhancing security and developer troubleshooting the next let's break them down lightweight and serverless Azure functions are Compact and potentially serverless removing the need for heavy infrastructure efficiency and speed easy to write deploy and upgrade without effect other website components Azure functions are fast to execute because there is no large application startup time initialization and other events fired before the code is executed
event driven execution ensures they run only when an event triggers them zero maintenance no need for active infrastructure management or Associated costs they scale automatically to meet traffic demands even scaling to zero cost when idle development e Azure functions can be built tested and Deployed directly from the Azure portal they provide built-in CI CD through Azure devops and monitoring with Azure monitor streamline the development process cost effective you pay only for the actual runtime eliminating costs when functions are idle interoperability using industry standard protocols Azure functions can seamlessly communicate with various apis databases and libraries
Azure functions use cases for business use cases Azure functions are Great for scheduled tasks reminders and notifications lightweight web API sending background emails running background backup tasks and Performing bin calculations for technical use cases Azure functions are ideal in sending emails starting backup order processing and task scheduling such as database cleanup sending notifications messages and iot data processing Azure functions are best suited for smaller apps have Events that can work independently of other websites in conclusion Azure functions are serverless and efficient streamlining development for both business and Technical tasks and event driven compaction applications the
next topic we'll be covering is our Azure function templates Azure provides function templates to get you started with common function scenarios in Visual Studio code the selection of a function template occurs Exclusively during the project creation phase HTTP triggered by an HTTP request and returns HTTP tyer triggered based on a predefined schedule blot storage triggered when files are either uploaded or updated in a blob storage container Cosmos DB executes in response to the addition or modification of documents in Cosmos DB Q storage triggered by Azure storage Q messages event grid triggered by event from event
grid many Azure Services can trigger a function through Event grid essentially event grid operates as a serverless event bus that is deeply integrated with various Azure Services event Hub triggered by event Hub event and is particularly effective for streaming scenar scenarios service bus Q triggered when there's a new message in a service bus que making it optimal for messaging systems service bus topics triggered by an event from bus topic aligning it with the pub submodel send grid specifically designed To be triggered by an email event within the third party service send grid overall Azure function
templates offer developers a structured foundation for common scenarios enabling quicker deployment and integration within azure the next topic we'll be going over the functions configuration for Azure functions each function comes with a specific configuration file named function. JSO n this file serves an Important role outlining the trigger bindings and additional configuration settings for the function the Essential Elements of this file include type specifies The Binding type Direction indicates whether the binding is for receiving data into the function or sending data from the function name represents the the data binding in the function in C this
would be an argument name whereas in JavaScript it would manifest as a key and a key value Pair let's take a look at the host configuration for Azure functions every function app has a host configuration file named host. Json this configuration file contains Global configurations options and parameters for all the functions within the function app the host has lot of configuration options these include aggregator application insights blobs console Cosmos d custom Handler durable task event Hub extensions extension bundle functions Function timeout health monitor HTTP loging manage dependency cues retri send grid service bus Singleton version
watch directories and watch file settings essentially these configurations offer developers a framework to adapt functions respond to event triggers and ensure consistency across the function app the next thing will be be covering are the plan services and Azure functions Azure functions offers three distinct plan Services each tailored to Different needs consumption plan cold starts you only pay for the time your code or application is running billing is based on the number of executions the duration of each execution and the amount of memory used just pay while you have functions running and scale out automatically even
through long loading times Premium plan pre-warmed the user has designated a set of pre-warmed cases which are already online and ready to react instantly Azure provides any Additional Computing Services that are required when your function is running you pay for the constantly pre-warmed instances including any additional instances needed to scale the Azure app in out Azure functions host instances are added and removed based on the number of incoming events dedicated plan VM sharing when you use app service for other apps your functions will run on the same plan at no extra cost you may scale
it up manually by adding more VM Instances for an app service plan you may have autoscale enabled optimal when you have existing underutilized VMS which also operate other instances of the app service in summary when choosing an Azure functions plan we your budget responsiveness needs and current infrastructure for Optimal Performance and value the next thing we'll be covering are triggers and bindings and Azure functions triggers and bindings let you Avoid hardcoding access to other services and abstracting Away boiler plate code keeping your functions lean what is a trigger a trigger is a specific type of
event which causes the function to run it defines how a function is invoked and a function must only have one trigger triggers can have Associated data which is often provided as the payload of the function what is a binding binding is defined if your function is connected to another service The data from bindings is provided to the function as parameters bindings are optional and a function can have multiple input and output bindings Azure functions support a wide range of bindings to facilitate integration and data processing these include Storage Solutions like blob storage Azure Cosmos DB
and Azure SQL Dapper event grid and event Hub cater to event driven architectures with iot Hub focusing on event data from Hardware Devices HTTP and web hooks facilitate real-time data interaction while Kafka processes stream data mobile apps helps in Mobile development and notification hubs are for push notifications Hugh storage rabbit and Q a messaging broker and service bus ensure seamless data transfer and messaging send Grit optimizes email delivery SLE R an open source.net Library provides asynchronous notifications to web apps table storage is the nsql KE Value Store timer Triggers are based on scheduled rejects expressions
and twio offers a cloud platform for Voice and text messaging systems the table provides a breakdown of various Azure functions Integrations and their support across versions one Hax and 2 x and higher both blob storage and Azure Cosmos DB are fully supported across all categories for both versions Azure data Explorer Azure SQL Dapper cafka and Signal are supported from version 2 x Awards some Integrations Such as mobile apps notification hubs and send grid have limited support across the versions specifically with triggers inputs or outputs others like event grid event hubs HTTP and web hooks iot
Hub Q storage service bus and table storage have brought support but may lack in one or two categories overall Azure functions offer serverless computation and seamless service integration using triggers and bindings they eliminate redundant code the Platform supports diverse bindings but some Integrations have limits the next topic we'll be covering into is The Binding Direction and Azure functions all triggers and bindings have a direction property in the function. JSO n file the direction of triggers is always in input and output bindings use in out or both some bindings support a special Direction and out out
the trigger is defined alongside the input and output bindings trigger will have The same as the input type but with trigger appended for example an input binding name blob would have a trigger name blob trigger if you use an out only the advanced editor is available via the integrate tab in the portal if you use an out only the advanced editor is available via the integrate tab in the portal in scenarios requiring periodic data processing Azure functions offers tailored Solutions suppose every hour you want to read new log files delivered By your app application and
you need to transform the data to be ingested in your nosql database that resides in Cosmos DB you'll use the trigger type timer because it's a scheduled job that will run at a specific time the blob storage would be an in binding as the function reads the data from it the cosmos DB would be an out binding enabling the function to write the processed data into the database in essence by understanding and effectively Leveraging these binding directions developers can architect efficient event-driven solutions that seamlessly integrate various Azure services [Music] hey this is Andrew Brown from
exam Pro and in this section we'll be covering Azure front door Azure front door is a traffic manager traffic accelerator Global load balancer and content distribution Network Azure front door is a modern application delivery Network Platform providing a secure scalable CDN Dynamic site acceleration and Global HTTP load balancing for your Global web applications Azure front door featur fees caching similar to traditional cdns Azure front door offers caching with specified rules and expiration policies resiliency by Distributing incoming traffic across multiple or different Azure regions cookie based session affinity for restful applications when traffic needs to be
redirected back to The same back end Health probe to determine the healthiest and closest backend to the client request web application firewall a crucial security measure protecting your back ends from malicious attacks and vulnerabilities URL redirect redirecting traffic based on protocol HTTP or https host name path and query string URL rewrite with a powerful engine for rewriting income requests to a different backend request an Azure front door is made up Of frontends domains these front-ends domains are connected to backend pools where those connections are filtered by routing rules Azure front door core components profile containers
all front door components and Point acts as a pathway or Bridge connecting the front end to the back end origin groups a grouping of Origins origin defining the road to back end rule sets a grouping of rules rules routing rules overall aure front door optimizes web application Delivery within the Azure ecosystem by utilizing its features businesses can enhance web traffic management efficiency the next topic we'll be covering are the tiers for Azure front door door Azure front door offers two distinct tiers tailored for different needs first we have standard this auction optimizes content delivery offers
both static and dynamic content acceleration offering Global load balancing SSL offload domain and Certificate management enhanced traffic analytics and basic security capabilities and we have premium this option includes all the features of the standard tier asure front door premium tier offers extensive security capabilities with Waf by protection private links support and integration with Microsoft thread intelligence and security analytics in conclusion Azure front door provides standard for Content delivery and premium with added security Ensuring Global application performance and protection the next topic we'll be going over is routing and Azure front door routing in Azure front
door determines the path in HTTP request from a user takes to reach a configured backend service here's how it works an HTTP request from a user is directed to the nearest Edge location it then matches with an Azure front door profile and evaluates any web application firewall Rules following this it matches with an Azure front door route evaluates engine rules and either returns cash content or selects the appropriate origin group finally the request is directed to the selected origin which then sends it to the corresponding back end Azure front door offers four distinct traffic routing
methods latency routes requests to the backends with the lowest latency within a specified sensitivity range priority directs requests based on a User defined priority number weighted distributes requests to backends proportionally based on assigned weight coefficients session Affinity ensures requests from the same end user are directed to the same back end ideal for stateful backends in summary Azure front door enhances user experience and backend performance through its efficient routing capabilities the next topic will be covering is origin and origin grp groups In Azure front door the origin is what Azure front door will point at to
the end user origin is the endpoint that points to your back end Azure front door provides robust support for a variety of Origins to seamlessly integrate with its application delivery Network among the supported origins or Azure blob storage which offers vast storage capabilities and Azure storage with static website hosting catering to web hosting needs additionally Azure supports cloud Services app services and static web apps for diverse application deployments for comprehensive API management Azure front door integrates with API management furthermore application Gateway public IP address Azure traffic manager Azure spring cloud and Azure container instances are
also supported notably there's flexibility for users as they can also add custom Origins by providing a host name priority and Azure front door determines who is the primary Recipient of traffic or who who to send traffic to First you select a value ranging from 1 to 5 a lower value signifies a higher priority and multiple backends can share this number weights allow you to determine the split of traffic distribution between origins of the same priority a number between 1 to 1,000 the default value is 50 origin groups in Azure front door are collections of Origins
every origin must be part of an origin Group by default as Your front door profiles contain An Origin group named default origin group origin groups facilitate the application of Health probes to assess the condition of your Origins and load balancing settings to manage the distribution among them to direct inbound traffic to a particular origin group and inlo must link to the origin group through a designated route overall as your front door optimizes web traffic management With diverse Origins prioritization and weight mechanisms using origin groups it leverages health probes and load balancing for efficient application delivery
the next topic will be covering our health checks in Azure front door Azure front door uses origin group Health probes to periodically ping a backend verifying whether it returns a healthy response typically a healthy response is determined by status 20 100 if a backend fails to produce a healthy Response aure front door will redirect the traffic to other available and healthy backends assuming other Origins are configured what is a HTTP Response Code when a user sends an HTTP request a HTTP response is returned and HTTP responses will have a response code to communicate how a
backend server interpreted the request a response code is number that coordinates to what happened for example 200 signifies okay 4003 means forbidden 4004 indicates not found 500 represents internal server error Azure front door load balancing settings origin group load balancing settings and Azure front door enable you to specify the criteria determining the health of a back end essentially these settings Define which sample set should be used to classify a backend as either healthy or unhealthy when the latency sensitivity is set to zero aure front door prioritizes and routes traffic to the quickest available Backend if
it's set to any other value the system adopts a round robin approach Distributing traffic between the fastest back end and subsequent ones all within the bounds of the preconfigured latency sensitivity the next topic will be covering a routes and Azure front door routes and Azure front door serve as mapping tools linking your domains and corresponding URL path patterns to specific origin groups routes of caching and compression features applied rules From rule sets can be Associated to routes to apply intelligent routing one of the standout features of azure front door is its capability for traffic acceleration
this feature ensures faster Global delivery of your application without necessitating any changes to your existing application code hazure achieves this traffic acceleration by directing traffic to the nearest Edge location to a ramp into the Azure Network traffic that is following Within the internal Azure Network travels at accelerated speed while also taking the most direct path think of it as an expressway in essence asure front door routes link domains to origin groups incorporating caching compression and intelligent routing the next topic will be covering a rule sets in Azure front door Azure front door rules engine allows
you to customize how HTTP requests gets handled at the edge and provides a more Controlled Behavior to your web application this interface is a configuration screen for defining rules in Azure front door a Content delivery and application acceleration service let's break down what's presented rule Name by rule this is the name assigned to the current rule condition if represents the conditions under which the Rule's action should be executed request header the rule is triggered based on an HTTP header present in the Incoming request header name my header the rule looks for this specific header in
the incoming request operator equal specifies the comparison type here it checks if the header's value exactly matches the defined value header value my value the value that my header should have to meet the condition string transform to lowercase before checking the value it will convert the header's value to lowercase action then represents the action to be taken if the Condition is met URL redirect the action taken will be a URL redirect redirect type found specifies the type of HTTP redirect 3002 means a temporary redirect redirect protocol match request the protocol of the redirected URL will
match that of the original request destination host not specified in the image which means it'll redirect to the same host or domain destination path go here this is the path to which the user will be redirected if the condition is Met some of the available conditions include device type HTTP version and request cookies it also examines post args the query string and the remote address of the requester details like the request body request file name request file extension and request header is scrutinized furthermore the request method request path request protocol and request URL are taken
into account during processing aure front door utilizes rule sets to manage its Operations offering a range of operators for precise control these operators include equal contains less than greater than less than or equal greater than or equal begins with ends with and re X additionally each of these operators has a corresponding knot variant providing enhanced flexibility and specificity in defining rule conditions action cache expiration cache Behavior bypass override set of missing cash key query string Behavior include Cach every unique URL exclude ignore query string modify request header modify response header operator append overwrite delete URL
redirect redirect type found moved temporary redirect permanent redirect redirect protocol match request HTTP https URL Rite Source pattern and destination and origin group overr right so that's an overview of rule sets for Azure front [Music] Door hey this is angrew brown and this fall along we're going to be utilizing Azure front door so before we do that we're going to need ourselves a storage account to set up some static website uh storage so what I want you to do is go to storage accounts and there is a static web app host uh hosting that we
can use but we're going to do it the old school way because it's always great to learn a few different ways to do things in Azure and so uh there's probably Another fall along where we we use uh the static static site thing there um so what we're going to do is create a new uh we're going to create a new um Resource Group I'm going to call this one uh my uh Azure front door and we'll say okay and from here we'll have to name it something so we'll just say my Azure front door
or sorry we'll do uh step static Storage storage 8888 if you can't get the 48s because I'm using it then just Give it a different um number sequence because these are treated like fully qualified domains choose like a a US region so that we're all doing the same thing for performance we're going to stick with standard it doesn't matter if it's on Geo redundant we're not doing anything fancy there so what I want you to do is go ahead and hit review and create and then give it a moment and hit create and we're going
to wait for that to uh finish deployment and from there We'll then have to enable uh static website so it doesn't take too long to deploy so we'll just give it a moment and while that's going uh we do need to create ourselves a um index HTML file so you're going to need some kind of editor so I'm just opening up visual studio code on my computer just give it a moment there and I'm just creating a new file here this is taking it Taking a moment to load Okay so and what we need to
do is just create an index HTML file these are really basic you can find them anywhere online but this one's going to say hello Mars hello Mars very very simple so I'm going to go ahead and save this to my desktop so save as and um show local maybe there we go that's a little bit more sayane and we'll just say index.html and we will now go to the resource and we're going to go to website static is a blade on left hand Side so we can do St website stuff we're going to say index
HTML I think we have to set that for it to work I cannot remember if that's the case we have a primary end point this is uh these matter for later but we'll come back to that and we're going to go over to our containers and we're going to have to create a new container so I'm just going to call that actually we don't because we're going to put it in web so when we turned on static website hosting it Already gave us a blob or container a container for us to uh add our add
our or upload our files there so we'll go to upload here and then I'm going to go ahead and select that index HTML file and upload it in place um we need to change our access level for this uh this uh container to um I think just blob so I'm just double checking here yeah I think it's blob access uh can only be anonymous request container data is not available so we'll say okay I believe that is correct okay okay uh sometimes you can like we're clicked into it but I think like in the my
instructions I do it a little bit different so I'm just going to double check to see what the settings are there just so you can see it if you're following my instructions so change access private blob yeah okay so that's fine um so blob access should be okay and so now what we want to do is just Test that our our page is working so if we go back to static website here on the left hand side we can grab this primary endpoint and we should be able to post it anywhere here see I have
the old tutorial here this is a moment ago so that's why it's a bit confusing but um so hello Mars is working but this is on static stor this isn't in front of or behind aure front door uh which is what we'll want to do next so what I want you to do is just close a couple of These tabs out we're going to type in Azure front door or front door should be enough front there we go and we have a whole bunch of options we'll just hit create that's a front door we actually
do use for the platform we have Azure front door we have create I always go custom I don't think I've ever done quick create I just I just have more trust in custom and from here we will choose front door and ECS is Fine I'm just wondering where our storage account is that's why we should always just kind of set them to be the same place so go storage account I don't think it will matter but I'm just going to double check storage account and this one is in East us so we're going to be
okay just make sure they match just so we have less problems and I'm going to call this one my Azure front Door now there are more functionalities in the premium but standard is fine for us we'll go next to Secrets um this is if we want to add a certificate um like you could bring your own certificate um but uh we're not too worried about that we're going to have to add a new endpoint so I'm going to just say my endpoint here there's a lot of small steps in here so this should be fun
hopefully we don't configure anything wrong here and then we need to add a Route say my route and it's going to use the default domain that's totally fine uh we don't have to do anything it's going to just be on the for SL Aster there we do need to create an origin group so we'll go here and create a new origin group so my origin group and then from there we need to add an origin yes it is very squirely going through all this my origin the origin type is going to be Azure or sorry
storage static website and from Here we need to choose the right one we call it static storage uh this is fine this is all fine we'll go ahead and hit add and down below we have some load balancing we don't care about any of that uh so you can see it status is enabled all this should be okay the protocol here for the health probe should be HTTP um actually let me double check I remember this is where I ran into some trouble I believe yeah HTTP I think it's Htps okay I think I read
somewhere that's it's like um Stack Storage doesn't use HTTP but clearly it does because when we went to the link earlier it was htps so I might have the screenshots wrong but I've corrected them in the actual instructions on my site we'll go ahead and save that I think it's htps and then the the the protocol here um we'll just leave it matching it's totally fine origin path is fine we'll go ahead and add that There and we'll go review create we'll give it a moment and we'll create all right so after waiting um about
a few minutes like 2 3 minutes it looks like uh as your front door set up so we'll go to the resource and I'm just hoping this works sometimes you have to play around with the settings but if you see the endpoint host name we'll go ahead and grab that there paste it on in and we get a 404 so something's not working just right so we'll have to go Do some debugging which I was hoping we didn't have to do so we go to the front door manager this is the same setup we have
here before there are like different ways to get to it um but we'll have to just kind of go through and debug it so we do have my route my origin group so we can click into our origin group and then from here we'll expand it and we have our route so there's something that is not correct and that's What we have to to figure out so I'm just going to double check my instructions cuz this was a bit tricky to figure out um and it really came down to like these protocols here so let
me keep checking and I mean I think the probe is working correctly so if we go on the origin if this wasn't working correctly then it wouldn't it wouldn't show Green so go back up a step Here you know what maybe we should just wait a little bit because sometimes it takes time to propagate and I don't I don't 100% trust that it's not working because I feel like we configured it exactly right so we'll open up a new tab here says 404 still my origin group that's fine we'll go here yeah so what I'm
going to do let go back to our storage account I just want To double check uh what that uh string was for the static website I'm pretty sure it was htps it is HPS so there's no reason that should not work this is what I was trying to uh spare you the uh the debugging of this and it's very common it's not just Azure anything that has a CDN sometimes it's it's difficult to uh figure that stuff out we'll go ahead and edit that route And we'll just carefully look at what we have here so
patterns to match that is fine it's the correct end point both Protocols are accepted that's totally fine redirect HPS that's totally fine match that doesn't matter so it should just work the only thing we didn't do was enable caching which I think wouldn't hurt to do um because it is a CDN we don't take advantage of it if we Don't turn it on so we'll do that and say ignore that query string I mean that's not going to fix this problem if the routing is messed up again I'm just hoping that maybe it just has
to do with propagation go back to the overview here and we will open this again whoops grab this let's just make sure it's doing HPS we're working to restore all services as possible right now what do you mean our services aren't Available right now let's go look at Azure status uh page here and we will take a look at front door as your front door it's saying that it's fine Us East there's no green beside it good so we go down here I guess it's a it's a non- regional service so if it's green it's
green so you know what I'm going to play around with this for a little oh 404 web So this is better right it's just saying it can't find the content well I mean I guess that makes sense because that was there so we'll just clear that out oh now it's loading so I think it what the issue is there was no issue it's just propagating to all the servers and it took some time so uh I think that's what really threw me for a loop um when I was originally doing it so just give it
some patience and it will work eventually so We are all done here so we can go ahead and clean this up and I'm just looking for the resource Group here we'll go ahead and delete it and there you go that's Azure front [Music] door and I'll see you in the next next one okay hey this is Andrew Brown from exam Pro and in this section we'll be covering Azure CDN Azure content delivery network is an Azure service That provides your applications with a distributed network of servers with Azure CDN you can improve your applications load
time save bandwidth with caching strategies and speed up responsiveness with compressed files Azure CDN centralizes requests from your origin into a single location making it easier to manage your inbound and outbound traffic with features such as caching strategies these outline which requests or cach and specify their Expiration timelines file compression by minimizing static file sizes Azure CDN ensures bandwidth the ficiency during requests Geo filtering disallows or denies requests based on geographical regions global distribution azures regions span across the globe ensuring widespread reach integration Azure CDN seamlessly integrates with other Azure Services robust security Advanced security
measures are in place without any extra cost scalability and load Balancing Azure CDN makes application scalability straightforward thanks to its built-in load balancing Azure CDN can help you reduce load times save bandwidth and improve responsiveness it's used to cach static content such as images CSS or HTML Azure CDN is ideal when you're developing or managing websites or mobile apps encoding and distributing streaming media gaming software firmware updates and iot and points in essence Azure CDN Provides a robust framework to enhance the delivery and performance of your digital assets the next topic will delve into are
the different tiers available for Azure CDN Azure CDN is available in the following tiers Microsoft CDN standard Verizon standard aami premium Verizon aami is one of the world's largest CD provider with a large distributed network of servers around the world on the other hand Verizon media operates a Global CDN platform with a focus on media streaming delivery and security the CDN features greatly vary based on the chosen option and it requires exploring a large feature table comparison keep in mind that Azure CDN from acami is scheduled to be retired on October 31st 2023 so that's
a quick overview of azure CDN tiers next we'll explore the purge feature in Azure CDN The Purge function in Azure CDN serves as an essential tool when you want to refresh cach content it enables the removal of cach content from all Edge points of presence ensuring that the latest assets are fetched directly from the origin when requested when you're looking to purge specific files within a directory while cards represented by an asterisk can be employed for example to clear all files in a directory you'd utilize this wild Card feature however note that the capabilities like
like Purge all and wild card Purge AR available for Azure CDN when sourc from acam overall The Purge feature in Azure CDM provides administrators with granular control over the content caching ensuring that users always have access to the most updated [Music] assets hey this is Andrew Brown from exam Pro and in this section we're Diving into Azure service bus service bus is a fully managed Enterprise message broker that allows you to publish or subscribe to topics and Q messages it can scale your applications with asynchronous messages and built-in integration with Azure Services Azure service bus
allows for single or batch messaging message load balancing topic subscriptions message sessions and transactions ensuring compliance with industry standards this includes Protocols such as amqp 1.0 with JMS 2.0 available for premium SKU and JMS 1.1 for standard SKU service bus key Concepts the namespace works like a server with cues and topics Q contains the messages sender is who sends the message receiver is who receives the message topic is a queue with multiple receivers that works like a queue subscription is a receiver in a topic a batch is a group of messages safe batch validates if
each Message can be included the batch session allows you to use fifo and group your messages in a queue Peak returns a message to the que without removing it dead letter q a q for messages that were unable to be delivered through the normal queue Peak and lock retrieves a message from the queue without removing it and locks it so other receivers cannot receive it receive and delete retrieves and delete a message from the queue Auto delete on idol sets a time Span to delete the queue if it is not used duplicate detection history checks
if the message was not sent earlier before sending a message it overall this gives you a comprehensive overview of azure service bus and its various components and features the next next topic we'll be covering is a namespace in Azure service bus an Azure service bus namespace serves as a container for all messaging components including both cues and Topics container for messaging components one namespace can house multiple cues and topics making them versatile structures within the Azure service bus they're commonly used as application containers capacity slice think of a service bus Nam space as a segment
of a large scale cluster this cluster comprises numerous all active virtual machines that fall under your control Azure availability zones a namespace can potentially span up to Three Azure availability zones offering enhanced availability and resilience benefits at scale using Azure service bus means you're using a messaging system built for large scale operations offering High reliability and strength serverless messaging with Azure service bus it is serverless messaging this means you get to use the messaging service without getting bogged down by the intricacies of the underlying infrastructure so that's a quick Overview of a nam space in
Azure service bus [Music] next let's talk about qes and Azure service bus cues are used to send and receive messages messages are stored in cues until the receiving application is ready to accept and process them messages and qes are ordered and timestamped on arrival once accepted by the broker the message is always held durably in triple redundant storage Spread across availability zones if the name space is Zone enabled service bus never leaves messages in memory or volatile storage after after they've been reported to the client is accepted messages are delivered in pull mode only delivering
messages when requested configuration aspects of azure service bus cues include time to live this determines the duration a message remains in the queue if it isn't processed within this time frame it Either gets removed or is transferred to the dead letter Q lock duration this represents the period during which a message is locked by locking messages service bus ensures that no two users can read or process the same message simultaneously to sum it up q's and Azure service bus are efficient tools to handle message sending and receiving in a structured and reliable manner so that's
an overview of q's and Azure service Bus the next topic will be covering our topics in Azure service bus topics can be used to send and receive messages a q is often used for pointto point or one toone communication whereas topics are useful in publish subscribe or on to many communication it's important to endnote that topics are not available at the basic pricing tier you need to opt for either the standard or premium tier a unique feature of topics is their support for multiple independent Subscriptions multiple independent subscriptions can be attached to a topic and
work in the same way as cues from the receiver's side a subscriber to a topic can receive a copy of each message sent to that topic it's also worth noting that subscriptions or named entities providing an organizational structure you can Define rules on a subscription a subscription rule has a filter that specifies a condition for a message to be copied into the Subscription as well as an optional action that modifies message metadata when creating a topic consider the following configuration settings Max topic size you can specify a size ranging from 1 to 5 GB time
to live the setting determines the duration after which a message is removed from the topic duplicate message avoidance this ensures that duplicate messages are processed partitioning useful for efficiently managing a large influx of Events a subscription in Azure service bus is a named entity associated with a topic that allows subscribers to receive copies of messages sent to that topic in a publish subscribe model of azure service bus topics can be thought of as the channels to send messages subscriptions are like the virtual cues to receive those messages there are also additional configuration settings for subscriptions
Max delivery count this setting can be adjusted between 1 to 2,000 defining the number of delivery attempts for a particular message message sessions when sessions are activated a subscription can ensure that messages are delivered in a first in first out sequence so that's an overview of topics and Azure so that's an overview of topics and Azure the next topic we'll be covering is the different pricing tiers in Azure service bus Azure service bus has three different pricing tiers basic standard And premium the more expensive the tiers the more functionality it provides let break down the
features and their availability across these tiers Hughes this is the foundational messaging structure in service bus allowing messages to be sent and received all three tiers offer support for cues schedule messages this feature allows users to set messages to be dispatched at a future specified time it's available across all three tiers topics Topics support the publish subscribe messaging pattern this feature isn't available in the basic tier but is offered in both the standard and premium tiers transactions and uring a set of operations are completed successfully and in order transactions are not available in the basic
tier however both the standard and premium tiers support this feature to duplication this ensures that duplicate messages are processed more than once only the standard and Premium tiers offer this feature with the basic tier lacking it sessions ensuring ordered and related sets of messages are processed in the correct sequence this feature is excluded in the basic tier but is available in the standard and premium tiers forward to send via this facility Ates forwarding a message or routing it via a specific path it's not supported in the basic tier but is available in the standard and
premium tiers message size dictates The maximum allowable size for an individual message the basic and standard tier support messages up to 256 kilobytes while the premium tier significantly extends this limit to 100 megabytes resource isolation this provides isolated computational resources to ensure better performance and reliability it's a feature exclusive to the premium tier G Geo Disaster Recovery in the event of significant geographical or infrastructure Disruptions this recovery feature helps maintain service Integrity it's denoted with an asterisk suggesting there might be additional details or conditions this feature is reserved for the premium tear Java messaging service
supporting JMS a standard messaging protocol for Java this feature is only available in the premium tier availability Zone support this ensures High resilience and availability by Distributing Services across multiple isolated data centers or Zones it's exclusive to the premium tier the next topic we'll be going over is a dead letter q and Azure service bus the dead letter q and Azure service bus is a specialized queue that stores messages that couldn't be delivered or processed successfully these messages might fail due to various reasons message that is sent to a queue that does not exist Hue
length limit exceeded message length limit exceeded message is rejected by another q Exchange Message reaches a threshold read counter number because it is not consumed sometimes this is called a backout q the message expires due to per message TTL or the message is not processed successfully dead letter cues provide several benefits including monitoring failed message deliveries to understand and address the underlying issues ruing messages for another attempt at processing especially after resolving the reason for the initial failure Initiating follow-up actions such as alerting remediation or alternative processing paths when specific failure patterns are detected in
essence dead letter cues are vital for ensuring the reliability and resilience of a messaging system the next topic will be covering are the Azure CLI commands for Azure service bus Azure CLI offers various subcommands specifically tailored for Azure service bus these subcommands Enable efficient management and configuration as serviceus geore recovery Alias as service bu migration as service bu Nam space as service bu Q as serviceus topic notably unlike Azure storage Q Azure service bus does not have direct CLI commands to send messages to cues or topics for sending messages to a que You' need to
use the Azure SDK for example using the node.js SDK you can install the necessary package with npm install at Azure Servicebus this will allow you to integrate Azure service bus functionalities directly into your application and send messages programmatically so that's an overview of the key Azure CLI commands for Azure service [Music] bus hey this is Andrew Brown from exampro and we are going to take a look at service bus so what I want you to do is type in servers bus at the top here What's interesting is that this is the old icon they have
a new icon so just realize that there's some inconsistencies there and that's not my fault that's azure's fault um but the first thing we need to do is create a name space because a service bus is kind of like you you know storage account where you can have uh a variety of different kinds of storages well you can have uh more than one type of messaging system and so we have our traditional One uh like event messaging similar to storage CU but with first in first out functionality and we have Pub sub via topic so
what you'll do is create a new service bus namespace and I'm going to create a new Resource Group I'm can call this the a204 um service bus and we'll say message or sorry Q because we're going to do a que and then we're going to do a topic separately and for this I'm going to call the Nam space Um service bus Q to keep it simple we'll let it launch wherever it wants to launch and notice there are multiple pricing tiers depending on the tier affects the functionality so if we do basic we're only going
to have access to Q we're not going to have access to um uh topics and so this is totally safe and fine to do um like even if we did premium it's fine because it's based on your consumption it's not based on um you know you just having holding around So we'll get the basic one here and we'll go to networking I don't think there's anything interesting there we'll go ahead and review and create and we'll let that create click create again and it's deploying as that is deploying which will not take too long what
I've done is set up a private repository here you'll probably see me use this throughout the course it's literally an empty repository because I already have the code done I've been Doing the follow alongs and document them here in the free Azure developer associate but when you're doing follow alongs with me you should do them with uh do them from scratch and then if you need to you can reference the stuff here so um I have this uh separate repository I have a g pod account which has a free tier you can totally do this
in your own Visual Studio code on your little local machine the reason I'm doing a g pod is because I always want to show you how to Set up the CLI and those other tools um and when you launch G pod gives you a blank environment so I'm just going to launch that up there as that's going we'll go back here and take a look and see if this is ready just hit refresh here it is still going but we already have our environment and while that is going in the background I want to go
install the Azure CLI so we don't even have a single file here I'm just going to say readme.md so I can see what is Going on here maybe we'll just dump things in here as we go I'm going to go get the Azure CLI uh Linux because this is running Linux Ubuntu uh here so something you should always check is like uh what Linux version am I running if you're on Windows of course this is going to be different but even Windows using the windows subsystem Linux is using Ubuntu as well so what I'll do
here I'll go to The first link nope that's not the one I want maybe the second one there's usually like a command here I can run uh which Linux version am I running let's try this one here it's usually like so maybe it's this here cat proc version it really does vary based on what you're using and so here I'm going To go file uh or sorry terminal new terminal we'll paste that in there hit enter and so here it says Linux 513 Ubuntu 11 uh 18 so I know that this is auntu I don't
really like that one there um let's try this instead because it just doesn't read very well there we go we're running Ubuntu 204 I already knew that um but I just wanted to double check and the Reason that matters is that when you're installing the CLI it might matter what version you're using so we're going to go here and I'm going to go to Linux and the instructions might vary this one says 16 18 20 so they're all the same here and we have this one liner here that we'll install and what I'll do here
is drop drop it in here and hit enter I'm not sure if this font is too small so while that's going I'm going to See if I can bump up our font here I'm looking for the terminal font size here terminal let's just say 20 here there we go and so the Azure CLI should be installed so I'll just type in clear so we say Azure or a to run it looks good to me so we'll type in Azure login um I don't want to log in with um that way I want to log with
the device so we'll do ay login device because if you're on your regular Computer you can just click a button and go to the browser but I'm not going to be able to do that so I going to have to do device login device well I'll have to do it the wrong way first to do it the right way soit enter Because the problem is if I go here it's going to go to Local Host because it's trying to launch in my local machine so it does that and that's no Good and so here it
says do the a login use device code okay so that's the one I really wanted to use so hyphen hyphen use device code enter and that will give us a code so what we do is we will need uh this link here so I'll have to expand that to here and then I'm going to go ahead and grab that code continue and so now go back this will authenticate it'll just take a Second here close the tab here there we go may had to close the tab uh and so now I'm authenticated so I should
should be able to uh do whatever I want um what I need to do next is create ourselves a message Q so we'll go to the resource here and notice here entities it only says Q now if we had uh other than the basic the standard plan then we would see topics here we'll Go click into que click create a new queue I'm going to call it my qu we have some options here the Q size can go up to 5 gigabytes the max delivery count so this is the maximum deliveries time to live that
is how long they live in the queue before they are dropped out or they are dropped into a dead letter a system there we have lock duration so the set the amount of time a message is locked for other receivers you can enable partitioning uh that's pretty Complicated but we'll go ahead and create our que and so this should be pretty darn quick there is our queue we'll click into it and you'll notice that there isn't really a way to view messages there's not a way to add messages uh here we have the service bus
Explorer um which I guess technically you can send and receive here I had not noticed this before at least it was not working for me so I suppose we could send a message here saying like Hello World this literally wasn't here last time I checked here um and we can go ahead and just hit send okay and notice here it says there's one active message and we can receive it say yes and so it says it received the message it's not showing us the answer so I guess they're kind of is something here I guess
they're still working on it but uh mostly what we're going to have to do is uh do things Programmatically so that is why we have this account so what I want you to do is open a new tab here and we're going to type in aure service bus documentation cuz we're going to grab some code there modify it make it our own so it's a bit easier to to work with so here I'm in the service bus we'll go to tutorials um I'm not sure if this one is the right one Azure service bus documentation
Q it's the same thing Here but this is doesn't look right what is service bus I mean it is the right page but it had a couple tutorials here uh that I had here so we'll type in like Azure service bus uh tutorial topics sometimes things aren't where you think they're supposed to be okay we'll type in service bus seems like the same page Again ah it was quick starts sorry so we have tutorials here and then we have quick starts so under the quick starts this is where I was Finding uh the example code
that I thought was okay notice that we could do everything via the CLI um that is not that fun but I mean this only does the creation of it doesn't necessarily do sending and receiving messages notice so that we only can use code so we'll use JavaScript because I think that will be The easiest to use uh so I already have node node comes pre-installed on git pod you'll have to figure that out for yourself on your own machine or you can just use get pod as well because it does have a generous free tier
what I'll do is go ahead and paste on in this command it doesn't seem to want to paste today so I'll hit copy and then we'll go back here and go right click enter paste hit enter and so what that will do is install that Library if You're not very familiar with nodejs package Json is the package manager and this is showing that this requirement is there I want to install one other thing uh called EnV this will make our lives a lot easier um for node it comes for different things but I just want
it for um JavaScript here so then we'll do mpm install. emvy save that's just a safe way for us to pass along our environment variables and So now both of these are installed so what we'll do is we'll go back over to this code and we'll scroll on down and they have one called send and they have one called receive so what I'll do is create myself a couple files here so we'll have send. Js and we'll have receive. Js and then what we'll do is go ahead and copy this is the send code so
we'll put this in the sjs file and then down below we have the Receive code and we will paste that on in there so I'll just make this bigger and we'll take a quick look look here at what it's doing so what this does is it Imports the SDK for service bus we need to set a connection string we need to set the Q name here is a bunch of messages that we are going to be passing along here we establish a service bus client very common in all sdks a set of a client first
then we are creating a um sender And then here we are doing uh create batch messages so it's a way of sending messages in batch very efficiently so we have a for Loop here and uh so it says there's a batch and then it says try to add the message to the batch if it's not wait until it's ready then send the message okay so pretty straightforward for that code receive is going to be similar so connection string Q name create that client create a receiver and then from there we will set up a Handler
For the receiver an error and so then we'll subscribe and we will listen for the message and handlers so even though we are doing cu's it's called a subscription still so just don't get too mixed up with that what I want to do is just make sure that we're passing our environment variables in safely or configuration so this is pretty standard or uh good uh best practices when working with any language the idea is you don't want to hardcode your values So I'm going to do process EnV uh and we'll do connection string here and
then we'll do process EnV Q name this is the way you grab environment variables in JavaScript for every language it's a little bit different okay and I believe these are the same so I'm just going to go ahead and grab that there like this and I'll paste that on in here and I want to load environment Variable so I'll make a new file here called EnV this is all part of that EnV dot thing they we're looking at EMV dot I'm just pulling that up again here or EnV you going to get the the right
one because we need this line here requir Dov config that will load the environment variables uh it'll load it from that EnV file so we will go above here and hit paste and then we'll go to the receive here and do this as Well and in here we need to Define these so I'm just going to copy this so I don't have to type it out by hand we will paste that on in here and so I just need need the Q Q name and connection string we'll just say equals and then equals so our
Q was called my q and then we need to go grab the connection string so I'm just thinking here this is probably yeah it's at the names Space Level and we'll go to share access policies notice it's called shared access policies remember when we were doing the storage key it was like called key access so it's totally different interface this is what I'm talking about where um Azure is inconsistent we're clicking on the root manage shared access key probably could create your own so it doesn't have full privileges but for this purpose we're just going
to use this one on the Le hand side we have A primary and secondary we're going to use the primary one and we will go back here and we will paste on that value in so I'll paste that in there notice we don't have to do double quotations here it should uh already Escape in double quotations but when we're doing the CLI when we did the storage accounts that wasn't something that we could do um so we have these two values here so they should get loaded when we use them and this should all be
good so we'll type in Node sjs and hopefully it just works fingers crossed and so it sent a batch of messages to the queue so we'll go back over to our Q here and see if we can see anything and we'll click into here I'm just trying to see so there's 10 active messages that are here right now and so what we'll do is we'll receive all those messages so we'll go up and hit node receive JS so this code is now receiving those messages from the service bus q and we're just going to wait
here because it takes time for whatever reason to uh finish here but we'll give it a little bit of time here to figure out that it's done still waiting there we go and so that's all there really is to it so that is q and we will do this again but next time with topics so what I want you to do is make your way over back to your resource Groups we'll find the one that we just created which was uh this one here AZ 204 service bus Q we'll delete this Service Group hit delete
delete and there you go and as always double check to make sure that you've uh for sure deleted that stuff and that's it for service bus Q we'll do topics next [Music] okay hey this is Andrew Brown from exam Pro and we are looking at service bus And this time we're looking at topics so what I want you to do just like before is go to the top we'll type in service bus and we'll go to the service bus uh service you can still see the old one is there it should be deleting that's how
slow this thing is but we'll create a new one and we will create a new Resource Group and we will call it a204 uh service bus topic we'll say okay we'll name this service bus topic and this time it already exists and if it Does just dump a bunch of numbers here on the end because it's Unique based on that so having a domain name if somebody has it you're going to have a problem and so here I'm going to go to standard because in order for us to use those additional features we will need
to be on the standard plan so we'll go ahead and hit review and create and that'll take a little bit of time to create but while that's going I'm going to uh launch my environment Here so this was the one I was just using a moment ago with uh GitHub and so what I'm going to do is I'm just going to go back to our repo here I'm just doing it off screen because I don't want to expose all my stuff here here and again if you want to you can do this in your local
V Visual Studio code I just want to show everything from scratch every time so here's my M3 repo with get pod and so I'll just close this One and it will vanish all that code is now gone I'll H get pod this will launch a new environment it's trying to tell me to open the last one nope I'm going to make a new one for this workspace here and we'll get going here in a moment so this namespace has been created so we'll go ahead and hit create and uh I guess it's still making I
I thought I already deployed it there but I guess I didn't okay while that's going we'll go Ahead and install the Azure CLI we'll type in Azure CLI Linux because that is what we're using here today we'll go to Linux here we'll scroll on down grab this oneliner here to install it I'm going to open up my terminal your terminal might be somewhere else allow I'm going to go ahead and paste that on in there that's going to install our Azure CLI as that's installing it will be done here in a Moment let's see if
this is done this is still creating the uh namespace I think and this is still installing shouldn't take too long while this is going we can start grabbing the code for this so for this we'll type in Azure um Azure service bus documentation and this I found it under the quick start so we will go to Quick Start Ser topics and services because there's some code here that I want under the JavaScript and we have one for send to topic so we'll just grab that name there make a new file send to topic JS and
we will go down here to this other one this is receive from subscription you're going to notice this is very similar to doing a q the difference is that you can have multiple subscriptions consume the same stuff uh our CLI is done so we'll type in a login um I can't remember what it Is so we'll hit enter here I know this is the wrong way but I just can't remember what it is I want used device code that's what it is so I'll go ahead and grab this and I'll just hit contrl C to
exit out of that and then paste that in there and then we'll do it the way that we actually want to do it so then we will go ahead and grab grab this for device login we will provide the code AS suggested Here we will hit continue we will close this and it will say that we are authenticated so we are now authenticated we can use a or the Azure c um I don't know if we need the CLI well we have it anyway at least we had to authenticate so at least that was out
of the way I'm not sure if we're actually going to use the CLI in this one um but what we'll do is go to the resource Here and we want to create a topic this time around and I'm going to call this my topic we have a topic size between 1 to five you have a TTL you can do U make sure there aren't duplicates we're going to go ahead and create this topic okay so just like last time we need to install install a couple things so if we go to the top here there
should be like an npm install here it is npm install service bus so we'll paste that on in there we'll need ourv so look upv Again and we will just install npm install. EnV for environment variables hit enter we'll create ourselves a newv file and we will need to look at what environment variables we are going to need so uh looks like we didn't copy the send to topic content at least I didn't so we will go back over to here and go up here and get sent to topic paste that on in there we'll
go all the way to the top and I'm looking for what we need here so here we have one which is Connection string whoops did not mean to delete all that so we'll hit process EnV connection string and we have to spell it right or it's going to have a problem and then we have process EnV topic name and I think in this one it actually also has subscription so we'll have to have a third one so I'm just going to copy these two over so I'm to type it 100 times and this one will
Be process EnV subscription name you're noticing I'm not having the um semicolon that is optional in JavaScript so it won't break anything if I don't have them there subscription name and so these are the three that we'll need I'm going to just split this to make my life a little bit easier and I'm just going to copy this here paste not exactly how I wanted to paste it but that's totally fine I'm going to copy This I don't think we made a subscription yet but I know we're going to call it my subscription to make
our lives easy so we'll say my topic my subscription and we'll grab this in a moment so we'll go back over to Azure we got too many tabs open here while we're here we might as well go grab this code um before we go back to Azure so I'm going grab grab this EMV config that is going to load our Configur uh configuration environments so we go to the top here paste that on in there for both files again best practice never to hardcode your values always pass it in like that with environment variables we'll
go back to our service bus the first thing we need well we made a topic we're going to need a subcription so we go to topic here and click into it we can create ourselves a subscription so we'll go here we'll say my subscription Notice we have Max delivery count we have to set this between a value of 1 and 2,000 I'm going to say 12 for fun we can set the idle notice here if we want to um have first in first out we would checkbox enable sessions we're going to leave that alone does
not matter too much for our demo so we'll go ahead and create that subscription it is created now what I need you to do is go back to the the service bus topic namespace and from there on the left hand side we're Going to Shared access policies we're going to click into the root manage shared access we're going to grab the primary connection string key the secondary would work too it's just a second optional one because they always give you a two we'll paste that on in there and if this is all correct these should
just work so now what we'll do is type in node um actually we did want the CI installed because I wanted to show you Uh that there was stuff in the queue whereas with um storage queue when we're doing Azure storage que I couldn't show you because um I just didn't know of a command I believe at least I think that was the case but any we'll take a look and see what we can see okay um so actually we didn't do it at any time I wonder which one I did that for let's just
double check here I have um off screen here somewhere my instructions because I Wrote it for one of these maybe it was for the que that we did it yeah I didn't do the last one but I did an Azure service bus Q show and the idea was to show you that there was a message count 10 so you could see the que but I think that since we saw it in the UI just wasn't too worried about it now did I do it for this one I'm not sure yeah we do a topic show
so we'll do that for fun but first we need to insert our Messages which are part of the topic send I don't think we read through these so let's just quickly read they look very very similar to the last one so you have your messages that you want to send you create your yourself a client uh you create yourself a sender you create a batch message send message like it's basically identical like I can't even tell the difference here except here we're supplying a topic name so Um I mean I see it here ah here
create Center the topic name is specified there so I just imagine that instead of providing a topic name you provide the Q name and that's how it knows the difference but anyway what we'll do is go ahead and execute this code we'll say node sent to topic uh JS okay and so it sent the stuff now we didn't do this last time so let's do it this time around so we'll type in Azure Service bus topic show um and here we'll need to set the resource Group so this was called I don't know let's go
take a look here what is our service group called it is called AZ 204 bring that down a bit here a 20 for service bus topic we need to specify the namespace name so that's just called service bus topic hyphen 7238 49 because we couldn't get the Number we want and then we need to specify the name so I assume it's the name of the topic so the top is my topic and I'll enter and it says service bus name is misspelled or not recognized by the service you mean service bus yeah I got to
spell that right enter and that looks fine but I just want to specify it as output yaml just hit up on your keyboard if you want to go back to those previous commands with Enter so this is a little bit easier to read and so what we're looking for here is just kind of like the message count does it show us here we subscription count I don't see it so I guess it's not visible in the same way as uh the que is like if we did this and we didn't do in the last one
it would we just saw like that message count there but let's take a look at what we can see in the CLI to just see what information or a UI that Or portal so we can see some information here so we have one subscription here we'll click into here um we have Max size incoming request 12 um yeah I don't really see it message count 10 Max delivery count 12 okay so I guess there was 10 and that's the 12 so I guess that's where it's being counted let's go run the other one to receive
I'm going to just Double check to make sure that we set those we did that's all good so we'll type in node receive if you're wondering how I'm Auto completing without typing that I just hit tab on my keyboard so it's receiving those good and that finish I'm going to go hit refresh see if there's any difference here notice that the message counted zero so when the topics were there it was held in the subscription saying 10 is here and they've yet to be Delivered when we ran it they were received and so that number
cleared out that's all we really need to learn for um uh topics so we are done with topics so let's make our way over to Resource groups and we'll go over to our service bus topic go ahead and delete this here delete there it is deleting we are all good to go um and you know just as always don't ever trust Azure to delete these things come back and check in 3 Four minutes make sure it's deleted so you just don't have things lingering around um but uh yeah there you go hey this is Andrew
Brown from exam Pro in this section we're diving into Azure event grid Azure event grid is a service that allows you to manage event routing from any source to any destination event grid provides a simple and strong customizable event delivery process that allows you to manage at a minimum level which types of events will Be received as well as which subscribers will receive those events one of event grid strengths is its event fan out capability combined with 24-hour retry reliability ensuring your events are consistently delivered it's a costeffective serverless solution with dynamic scalability making it
an excellent choice for businesses of all sizes asure event grid is ideal in event-driven architectures you can subscribe to events from Azure resources And then route them to an event handler or webbook Furthermore with custom topics you have the flexibility to craft and publish your own events within your event grid so that's an overview of azure event grid the next topic will be covering our event sources and handlers in Azure event grid Azure event grid is divided into two categories event sources and event handlers azure's event grid operates as a central Hub coordinating Between various
event sources and event handlers on the side of event sources which are services that emit data we have blob storage signal R resource groups Azure app configuration subscription Azure machine learning event how Azure communication Services media service Azure cash for Ries iot Hub Cloud events service bus Azure policy Azure Maps custom events and Azure container registry these sources send their data to the event grid on the Other end we have event handlers which are the services that receive and act upon this data the serverless code category involves functions for workflow and integration the services user
service bus and logic apps buffering and competing consumers handle the influx of data through event Hub and storage queue additionally there are other services and applications which incompass hybrid connections web sockets web hooks Automation and essentially any service Or application these handlers effectively process or route the data sent by the event sources through event grid enabling a seamless flow of information across Azure Services the next topic will be going over are the key concepts of azure event grid domains are used to group event grid topics that are related to the same application for easier management
topics these serve as the destinations to which events are dispatched system topics Azure services offer these built-in topics in contrast custom topics pertain to individual applications and thirdparty topics additionally partner events enable thirdparty software as a service providers to broadcast events events these encapsulate specific occurrences within a service Publishers is the service that published The Event Event sources are where the event took place event subscriptions are the mechanism that routes the events event Subscription expiration this allows users to designate a lifespan for their event subscriptions after which they become valid event handlers these are the
applications or Services tailored to process or act upon the received events event delivery is the delivery of events and batches or a single events batching is the sending of a group of events in a single request overall these are the key concepts of azure event [Music] Grid hey this is angre Brown from exam Pro and we're going to take a look at event grid Basics so let's get to it so the first thing we're going to want to do is we're going to search up subscriptions because we're going to need to make sure that in
uh like in order for us to use aent grid that we have it turned on and so we'll go into our subscription and we're going to go under um resource providers resource Providers ah there it is and this is all the stuff that is registered all the providers that are registered so what we're doing is just make making sure that event grid is turned on because that one's not always turned on by default and just make sure that it's registered okay so you'll know that it's registered because it'll have a green uh check mark here
and it'll say registered and so once that is done we can proceed to create a storage account because We're going to integrate a storage account into our event grid so we we'll do is create a new storage account and we're going to create a new Resource Group I'm going to call this Resource Group event grid Basics and we're going to name our storage account event event grid Basics all right and uh yes you can have hyphens you can't have anything else um and we'll just make sure we spelled that Right Event Event grid Basics I
can't remember if these are fully qualified domains if they are you might have to add some numbers on the end there but it is what it is we're doing uh USC I mean it just randomizes every time but this is where you should probably set it to we have standard premium we'll leave it as standard and everything else seems fine so we'll go ahead and create review and create and then it's going to allow us To review we'll go ahead and hit create and it's going to create the resource Group here we'll just wait for
it finish uh deploying and then we'll go into the resource all right looks like it is finished deploying so we're going to go ahead and go to that resource we're going to go to containers and we're going to have to create a couple containers the first the first one is going to be called basic we're going to leave it as uh private just make sure It's basic not Basics and and we'll create another container called basic alt the idea is that we're going to use an event Grid in order to move one file from one
storage account to another uh and that's going to be facilitated by log uh via a logic app because that's going to be the easiest way to use event grid um so what I want you to do is search for logic apps up here and we're going to go ahead and add a new logic app and what we want to do is choose our Resource Group and we'll just go event grid Basics here uh we are going to name uh this event grid Basics um maybe we'll do LG to indicate that it is a logic app
or LG maybe uh L yeah LG is fine like short for logic and from here we have a workflow or a Docker container we're going to stick with a workflow um just to knock on wood we're going to just put in the same region as our um storage account so East US we Have standard consumption I'd rather do consumption for this um so you pay only as much as you use because we don't need Enterprise level service application here we just need a consumption model we're going to leave this uh to disable so that is
totally fine there's nothing else to do here so we'll go review plus create and we'll go ahead and create this logic app and we just have to wait for this to finish deploying all right so that should have Been very very quick like under uh 10 seconds there so we've gone into the resource I just click go to the resource and so we have this uh very fun interface and so what we need to do is start with a common trigger there's a few different ways to get to it but there should be something on
the front here uh I don't know if they redesigned this recently so I'm just going to search Start with a comment oh yeah it's up here okay I'm being silly um and so what we want to do is because this is an event grid follow along we want to click on when an event grid occurs and so this is the designer where we can make things a lot easier for ourself and so we're going to have to first sign in to authenticate so I'm this is my tenant exam Pro Training Inc so we'll go ahead
and get connected there just give it a moment we'll select Andrew Brown which is totally fine and now that is connected so that is great so once we are signed in we can click continue and we're going to go ahead and add select our subscription here um and we need to choose a resource here so I guess in this case it's going to be event grid event Grid or could have swore yeah yeah I think that's what we want to do let me just Double check here oh you know what it's just not for some
reason I'm I'm searching it's not Auto completing properly okay I just wasn't sure there and as far as I can remember this would be probably an event grid topic and then we need to give this a resource name so um let me just think about this for a moment okay all right so I think I understand where my confusion was it was Because we click continue and I never I didn't see event crit anymore so I thought we had to configure it when it was already configured right so this is where we were so we're
not we at this stage like event Grid's already hooked up so it's ready to be triggered so this is the step that follows into it which is where we want to do our storage account so that's where I was getting confused so we'll choose our subscription here it's okay You know if you ever get confused just step uh step back a couple steps and just double check what you're doing happens to me all the time so um what we want to do is actually um connect storage uh storage accounts so we type in storage accounts
here great uh we'll have that selected and then we need to select our storage account so this one's called event grid Basics and then we're going to have to enter in um some additional information Event type so we want to have it happen when we add something to The Container so the basic container so we'll do blob created um and then from there we need to actually filter out the information so we need to add a new parameter and I think we'll have to do it on the prefix filter so a filter like whatever yeah
so that's probably a good idea CU then we could place it into a particular place and I believe that um there are very specific uh filters that you can do for This because if I recall there's like standardized ones yeah see here like it's always going to be SL blob Services default containers Etc and you'll know that because you know if you read the documentation and you have to do that stuff you'll figure that out so I'm just just going to type it by hand here blob Services default containers and then we can put our
container name so basic uh and I believe we have it without the S There so uh Services see I don't trust my writing here I'm just going to copy paste it in okay and that looks good to me um so I think that is what it needs to be so we'll go ahead and hit the next step and so the idea is anything in that folder uh like when something's added to that folder then follow up with this operation Right um and maybe before we do that we should probably um you know observe that this
stuff works that's probably be a good idea so what I'm going to do here is I'm going to make my way back over to our storage account so we'll just close this tab here I'm going to open a new tab and we're going to make our way over to storage accounts and we'll go event grid Basics and we will go to containers and we'll click into our Basic container because I want to just see that this is working um and I'm going to need a file upload so let me just go grab an image really
quick all right so I just grabbed an image off the internet so I just have data here but before we upload we probably should save what we have because if we don't save it we're not going to be able to observe it so I went back to logic app and we just hit save in the top left corner so we'll give it a moment to save and it looks Like it's saved now I'm just going to go back over to here if we can um look at some of the code that gets executed I'm just
trying to remember uh where it is because once it executes we want to um see what happened right so what I'll do is I'm going to go all the way back over here and I'm just going to go and drag or actually I'll have the upload button so I don't trust that that there and I'll drag it onto here nope I still don't trust it so what I'm going to do Is just click the files and I'm just going to grab it this way and say open and we'll do upload and so that is now
uploaded and so there is somewhere where we can observe um where stuff has happened so I'm just trying to remember where it is [Music] um I mean we could run the trigger we yeah we probably should run the trigger Right run I think it's running so we'll just give it a moment okay you know I was thinking about it it doesn't make sense we shouldn't have to run it because it should just happen automatically I think it's on the overview page ah okay so if we look here we can see the Run history and so
and there's also trigger history of when the things are triggered so we could we Could manually but it doesn't make sense so I think this is the run that we just did if we click into here yes this is what it is so here we can see what what has happened so if we expand it we can see the inputs right so it's we have a blob created um it might show some information so here we can see data yep and it's a webp file and so it's gotten this far through and so that's a
great way to kind of like debug so you can uh Logic run app you can do it each step but right now we are using um event grid to do that integration right we're just doing through logic uh logic app because it's a lot easier so now that we have that what we should do is go back to our designer and we're going to have to add the follow-up step um so we have this oh yeah okay so that's the first step event grid doesn't show up there which is weird but um so we have
this step here from our storage account and so the next Step what we want to do is put it into another uh container so that will be the tricky part um so I'm just trying to remember what we do so we'll hit next step and um I think what we need to do is initialize a variable first because we're going to have to get some way to grab the name of the string because if we go back to our run over Here just give it a moment here and we go enter a run again here
we need to extract some data to pass along because there are some limitations in terms of how Json gets passed along or data gets passed along and so um what we want is we just want this part of the name we want to say take this name as the identifier so that when we're copying stuff over it will work and so what we'll have to do is store that into an intermediate variable so um we'll Just type in variables here and I'm just seeing ah yeah so they look like this CU I can remember they
might be in the built-in yeah that looks a lot better um and so we need a variable and it's an initialized variable and we're going to name this file name and this is a string of course and now we need to insert the value so in here what we need to do is write an expression in order to extract that Information out um so what we'll do is go to the expression Tab and over here you can see we have all sorts of Expressions that we can use so going to type in last parentheses and
then in there we'll do split parenthesis and then what we're looking for is trigger body and then we'll do question mark Square braces single quotations subject how did I know how to do that I I looked it up I looked it up somewhere and you know I just don't feel like there's much uh reason to to teach this part because uh you I mean if you really need to know you can go here um and learn all about it but a lot of times like if you need something you can just say I need this
kind of function somebody's already done it right because there's so many common use cases so I probably search something like how do I get the name out of the The thing you know like for the blob and somebody had that there but it makes sense to me so let's hit okay here and it should turn purple because it is dime expression if you type it in here it probably won't work correctly you have to type it in here and then hit okay so it shows up like that uh but you notice we typed in like
trigger body so if we go back over to our run here um this is the body here so when they say trigger body they're talking about here and then It was just grabbing that subject line there all right um so that would be the second step and that gets it into a variable but the next part is we need to actually um get the blob content and then insert it and then create a new blob so what we'll do is hit next step and we'll type in Blob and see if we can find anything here
and from here we need to get the get Blob content using path version two so I'm just going to scroll down Here and take a look for it there it is based on the path and we'll go down here and um um I guess it would be access key oh because we're setting up a connection for the first time so enter name for connection um I know what the storage account is but what is the connection connection name I do not remember give me two seconds okay there wasn't much to help Me here cuz what
I remember before was that you click it and you'd authenticate it like the event grid but it's not doing that SoBe maybe we just have to name it something so I don't know we'll just say Azure storage account maybe it just wants a name maybe it doesn't really matter oh yeah like they sign in that's what I want so connection name yeah so we'll say uh you know storage account event Grid okay because if we can just single sign on let's do that that's super easy and we'll click that there okay so this is starting
to look how I expect it to look and so we need the storage account name I don't know why it's not showing me any names here but that's okay we'll just go over back to our storage account here and it's called event grid Basics so we'll type in event grid Basics event grid basics uh that's custom value sure I mean that's what its name is I'm not sure why it's not autocom completing um but here what we need to do is we need to provide the path so it's going to be for SL basic ah
and so now there's our environment V or that variable so we'll just click that there so that will make it super super easy now notice that it is showing basic Now so I just clicked here the folder we typed it in manually but we could have clicked uh here and then put the environment variable in or the uh this this initialized variable in here but I did type that manually and it still did work correctly so we are okay here infer the content type sure why not um it doesn't matter if they do um so
this gets the content so now this gets the path and so the next thing is actually to create the blob you can't like do an Easy clone you have to do it this um intermediate step that's just how it works um and so what we'll need to do is go to our built-in once here we'll type in Blob again maybe standard and this time we want to create a blob so there it is uh block blob no we just want a blob and so what we'll do is um I guess we have to connect again
I'm surprised it's not showing the name yeah it's just The name that's fine so we'll go back over here I just don't want to type it wrong so we'll just copy paste in event grid Basics event grid Basics enter custom value because it's giving us so much trouble for no particular reason make sure there's no space on the end there there now it works fine um and in this case what we want is basic alt and the blob name can be the file name which is totally Fine and the blob content will be the file
content and I don't think we need anything else so what we'll do is go ahead and click off and we will save all right so that's just the way we're going to have to do it um so what we can do is go back to our overview and we'll go back to our basic folder and we'll delete data say okay and we'll go upload we'll select our file again we'll Grab it we will upload and then we will make our way back over to our logic app close this tab here so we don't get too
mixed up refresh the page and it failed so it failed for some reason so something has not been configured correctly it failed on the initialized variable so something's wrong there so unable to process the template language expression in the actions initialized variable uh inputs at line Z column zero template function split is not defined Is not valid so it's possible I just spelled it wrong so what we'll do is go back to our event grid we'll go back to our logic app designer here initialize variable we will click it and we probably just spiled it
wrong spilt spilt what if we do lit spilt split um so if that's wrong we'll just scroll on down and we'll just take a look I could have swore that it autoc Completed for us oh you know what it is spelled wrong it should be SP i l t spoit all right and I'm just double checking to see if there's any other problems here no looks fine to me so go ahead and say update we will save it in the top left corner we'll go back we'll delete our file here we'll say okay and we'll
have to select a new file we'll click open just double check make sure that's been saved it looks like it's Been saved we'll hit upload we'll go back to our overview page it's already running super fast by the way and we'll click into it and we'll see if we get any other failure so there's another failure that's totally okay so we'll just expand it this request is not authorized to perform this operation using the permissions um so it does not like the permissions I gave it totally fine so we will go back to our app
Designer we will go to this second step here even though it did select this properly so we'll change the connection uh I guess we'll add a new one so we did ad integrated oh let's do managed identity you you must enable managed identities in the logic app to use manage identities authentication you must Grant required access to the identity in the Target room resource okay uh there is an identity tab so we Can go over there and take a look there quickly I don't remember it being that hard to do uh system assign manage identities
restricted to one person one person resource is tied to life cycle you can grant permissions etc etc um can we just turn that on and hit save well it can be granted access resources protected by a sure let's give it a go all right so um it seems like we have to Assign some Ro stuff so we can try and assign a role um can we do the subscription [Music] level contributor okay there's few different ways you can authenticate so hopefully this will be the EAS way to do it uh we'll refresh here did assign
it and I don't think it said it all right so give me a moment and let Me see what I can figure out okay you know what just to make this easier I think what we should do is just do the access key cuz that seems like the easiest way to do it I was just hoping that we could have you know just did a simple sign in here but it's not a big deal so we'll hit change connection we're going to add a new connection just say storage account um Event Event grid um key
and so this is going to want The aure storage account name so this one will be the name of the storage account if we can find it it's called event grid Basics and then we need the Azure storage account access key so there's probably a tab called keys yep and we will show the key and we will copy the key if I don't have to pass along keys I like to not do that please check your account info again uh storage account Access key should be a correct base 64 encoded string come on give me
a break here I am doing what you asked me to do so we will try this again this thing just hates me today give me a second okay you know what it was really short so I really don't trust it so let's just do I just cleared it out there I didn't do anything else what we're going to do is go back here click the copy and then rightclick and paste that's so much longer okay That has to be the right key we'll hit create and we'll give it a moment okay great so that's for
that one um but this has to have the right connection as well so what we'll do is just change the connection you have a few here e um and the one we want is the one that's valid so we'll go to this one down below as you can see few attempts here and we'll save it and we'll go Back to our overview here I'm just going to close that Tab out we're going to close this out we're going to go back into here we're going to go into our containers we're going to go into our
basic we're going to go ahead and delete this we'll say okay and we will upload a new file we will choose the new file we'll choose data upload it we'll go back over here here and I want to see the latest run here we'll give this a Refresh is it running it looks like it's running it's hard because this one looks like it just failed and and now the the messaging is getting really muddy here what is it doing so we'll click off here sometimes the portal is a bit funny is it just triggering over
and over again did we make an infinite Loop uhoh okay think we have a problem here what if we go here is it basic or it's basic alt this one's Basic so what's the problem we'll refresh failed why did it fail conflict another active upload session exists please retry after some time okay uh well let's just go take a look here go back it's here so it's it's here uh so it clearly has worked why it's triggering multiple times I don't know um don't particularly like That there we go I'm just go ahead and delete
this one here and it's just it's just going over and over and over again so there's something wrong with my workflow so this looks fine to me that looks fine to me maybe it's triggering oh you know what the the parameters out of here so this is supposed to have a prefix here so what's happening is that it's Triggering on anytime a basic one is set up or basic alt one and it's just stuck in an infinite Loop which is really really bad um so we did do this earlier but for whatever reason um the
changes still are not here so what we'll need to do is set up that prefix so what we'll do is type in Blob Services default containers basic because we really don't want to trigger it on any but that that Uh container there and uh did it save it it doesn't look yeah I mean it should be there so what we'll do is go ahead like why is it not filtering oh um I guess it wants to filter based on name but we gave it its name so I'm not sure what else we would have to
type there okay um I'm just going to put um dot it's the Prefix filter so data I guess I don't know like it's not letting me save okay there we go we'll save that I just want to stop the infinite Loop there for a moment so we'll go back over to the overview and we'll just make sure we're not uh running up our bill here and I'm just refreshing I just want to see it's not triggering anymore so it stopped triggering which is good and we'll go back over to here and we'll look at this
prefix filter because I I Don't remember having to do this so a filter like sample etc etc so we'll type it in again I guess blob Services default containers basic it's very oddd because like we typed it oh you know what I probably did I typed in the the filter parameter here we're supposed to add it then put it in there so it's just me getting confused by the UI silly me okay so what we'll do is go back to the overview and this time we Just want to see it trigger once so we go
back to basic alt we'll go ahead and delete this we'll say okay and we'll go back to our vent grid we go in or our event grid our basic our basic container we're going to go ahead and delete delete uh data here again and we're going to go upload one more time it's actually good that we had that problem because I got to show you uh why filters are so important um when we're dealing with uh the app logic there um Or logic apps so we'll go ahead and hit upload we'll go make our way
back over here we're going to give this a refresh and now we have a new one and it only happened once and that's what we wanted to happen so we'll go back over to here and we go to basic alt there it is so that's a means to which we can use event grid to integrate stuff you can see logic app is extremely useful for developers uh building uh all sorts of tools uh but we are all done here and What we'll do is make our way over to our Resource Group and we are going
to just go ahead and clean up so we'll go into event grid Basics and we'll go ahead and delete this Resource Group there we go and it's going to go ahead and delete there uh yeah and there you [Music] go hey this is Andrew Brown from exam Pro and in this section we'll be covering Azure event Hub Azure event Hub Serves as a critical component for event ingestion capable of consuming millions of events from mirriad sources and processing them in real time or via micro batching its potent Auto inflate feature automatic scales throughput units to
accommodate varying demands ensuring seamless processing even during traffic spikes notably Azure event Hub offers seamless integration with Apache cafka applications and clients Bridging the capabilities of both Platforms Azure event Hub helps you build your big data pipeline to analyze logging anomalies user and device Telemetry where you only pay for what you use breaking down the key concepts of azure event Hub Nam space is an endpoint for receiving and distributing events to event hubs event Hub is where your events will be delivered event Hub cluster is a dedicated event Hub with a 99.99% SLA event Hub
capture allows you to automatically capture and save Streaming events events hubs for Apache Kafka event Hub and points are compatible with Apache cafka event Publishers or applications or services that publish events to an event Hub publisher policy is a unique IDE used to identify Publishers partitions are used to organize the sequence of events in an event Hub event consumers or applications or services that read events from an event Hub consumer group enable consuming applications to each Have a separate view of the event stream stream offset holds the position of an event inside a partition checkpointing
is the process of distinguishing between read and unread events diving into scaling with Azure event Hub Auto inflate a dynamic feature that enables automatic scaling up to the Pinnacle of tus predicated on traffic exigencies however it's worth noting that this feature is not accessible within the basic pricing tier the image Showcases various configuration options related to Azure event Hub pricing tier the standard tier is selected priced at approximately $22 USD per throughput unit monthly other plans can be browsed for more features throughput units the selected number is one in Azure event Hub throughput units dictate
the events process per second and related data volume Auto inflate maximum throughput units the maximum number of throughput units that can be scaled to using the Auto inflate feature is set to 12 the next topic will be covering are the pricing tiers for Azure event Hub plans and their key features basic Plan cost 1 cent divided by hour for every throughput unit data input charges 2 cents for every million events storage holds up to 84 GB of data data hold time keeps data for only one day does not offer capture Apache Kafka schem of registry
or extended retention standard Plan cost 3 cents divided hour per two Data input same cost as Basic 2 cents per million events capture available at an additional $73 divided by month for each two storage same as basic 84 GB data hold time keeps data for 7 Days offers Apache Kafka and schem of registry however it lacks extended retention Premium plan cost a bit pricier at $123 divided hour but now it's for every processing unit data input included in the plan no extra cost capture included As well storage a lot more space with 1 terab for
each poo data whole time retains data for a longer 90 days offers Apache CFA schema registry and also has extended retention at 12 cents GB month with 1 terabyte already included dedicated Plan cost the highest at $684 divided our for each capacity unit data input included in the plan no extra cost capture also included storage huge space with 10 terab for each CU data hold time holds data for 90 days same as Premium offers all the features of premium and its extended retention is also at 12 cents GB month but generously includes 10 terabytes terms
capacity Unit A measure of capacity for the dedicated plan Processing Unit A measure of capacity for the Premium plan serit Unit A measure of capacity for both basic and standard plans the next thing we'll be going over is the producer in Azure event Hub also Known as the publisher the producer is responsible for sending data to the stream Publishers can publish events using the following protocols https the majority of azure sdks prefer https amqp 1.0 Advanced message queuing protocol taffa protocol compatible with the Apache CFA ecosystem generally developers use the Azure SDK for publishing events
you can publish an event either one at a time events can be published individually or batches Multiple events can be grouped and published together however there's a size limit of 1 Megabyte for both individual and batched events any event or batch exceeding this limit will be rejected for authorization Publishers use either Azure ad with oo2 issued JWT tokens or shared access signature comparison https versus amqp for publishing events amqp requires the establishment of a persistent by directional socket in addition to Transport level security or SSL TLS amqp is higher Network costs when initializing the session
amqp is higher performance for frequent Publishers and can achieve much lower latencies when used with a synchronous publishing code https requires additional TLS overhead for every request publisher policies event hubs enables granular control over event Publishers through publisher policies publisher policies are runtime features designed to facilitate large Numbers of independent event Publishers with Publisher policies each publisher uses its own unique identifier when publishing events to an event Hub ensuring that events are properly segregated authenticated and managed for each individual Source enhancing security and traceability within the system the next topic we'll be covering is a
consumer in Azure event Hub the Azure event Hub consumer also commonly referred to as a reader is responsible For receiving and processing data from the the stream connection protocol all event hubs consumers Connect using the amqp 1.0 protocol as events become available they are delivered through this session this eliminates the need for the client to continuously check or pull for the availability of new data a consumer group represents a particular view like a state position or offset of an entire event Hub consumer groups enable multiple consuming applications To each have a separate view of the
event stream and to read the stream independently at their own pace and with their own offsets typically in a stream processing architecture each Downstream application equates to a consumer group there's always a default consumer group in an event Hub and you can create up to the maximum number of consumer groups for the corresponding pricing tier there can be at most five concurrent readers on a Partition per consumer group however it's recommended that there's only one active receiver on a partition per consumer group some clients offered by the Azure sdks are intelligent consumer agents that automatically
manage the details of ensuring that each partition has a single reader and that all partitions for an event Hub are being read from this allows your code to focus on processing the events being read from the event Hub so it can ignore many of The details of the partitions so that's an overview of a consumer in Azure event [Music] Hub next let's talk about offsets in Azure event Hub in the realm of azure event Hub the term offset refers to the position of an event within a specific partition offsets enables a consumer to specify a
point in the event stream for from which they want to begin reading events you have the option to specify the offset either as a distinct Timestamp or as a numerical offset value consumers are responsible for storing their own offset values outside of the event Hub service every event situated within a partition comes equipped with an offset Azure event Hub checkpointing checkpointing is a process by which readers Mark or commit their position within a partition event sequence checkpointing is the responsibility of the consumer and occurs on a per Partition basis within a cons consumer group the
consumer is fully responsible for checkpointing this means that for each consumer group every individual partition reader must monitor its ongoing position within the event stream and notify the event Hub service once it recognizes the data stream to be complete or processed so that's an overview of offsets in Azure event Hub the next topic we'll be covering is the event retention for Azure event Hub Published events are removed from an vent Hub based on a configurable timebase retention policy the default value in shortest possible retention period is 1 hour for event Hub standard the maximum retention
period is 7 days for event hubs premium and dedicated the maximum retention period is 90 days if you change the retention period it applies to all messages including messages that are already in the event Hub it's important to note that Individual events cannot be explicitly deleted the reason for event hubs limit on data retention based on time is to prevent large volumes of historic customer data getting trapped in a deep store that is only indexed by a timestamp and only allows for sequential access if you need to Archive events beyond the allowed retention period you
can have them automatically stored in Azure storage or Azure data Lake by turning on the event hub's capture Feature if you need to search or analyze such deep archives you can easily import them into Azure synaps or other similar stores and analytics platforms so that's an overview of vent retention for Azure event hub let's break down a comparison between event grid event Hub and service bus event grid event Hub and service bus all event driven services for application integration and use an event bus as Means to work with event data Azure event grid provides the
backbone for event-driven architectures without the need for infrastructure management Azure service to service communication primarily designed for communication between various Azure Services dynamically scalable cost efficient and guarantees at least once delivery of an event Azure event Hub streaming data ideal for ingesting massive amounts of streaming data low latency processes Events with minimal delay High throughput capable of receiving and processing millions of events every second and guarantees at least once delivery of an event Azure service bus supports both cues and publish subscribe patterns making it suitable for a range of web applications reliable as synchronous message
delivery that requires in advanced messaging features like first in and first out batching sessions transactions dead lettering Temporal control routing and filtering and duplicate detection guarantees at least once delivery of a message and offers an optional feature to ensure messages are delivered in sequence the breakdown highlights the differences between Azure event grid event Hub and service bus showcasing their unique strengths tailored to different [Music] scenarios hey this is angrew Brown from exam Pro and this fall along we are Going to learn all about Azure event Hub uh so what I want you to do is
go to the top here and type in event Hub and we are going to create ourselves a new event Hub uh namespace so we'll go here and hit create and we'll create a new Resource Group as we always do and call it my event Hub and then for the namespace name we'll say um my event Hub if it doesn't let you do that you'll have to put some numbers on the end I'm just putting some numbers here because Often these are taken doesn't matter what location is just choose whichever one we're going go with basic
because there's not a huge difference between the pricing terms in terms of feature sets that we want to use today so we'll go ahead and create this namespace so we'll give it a moment and we'll go ahead and hit create and then we'll just wait for this namespace to provision all right so after waiting about a couple minutes There our namespace is deployed we're going to go ahead and create our CES and event Hub I'm going to call this one My Hub we'll go ahead and hit review and create and we'll create and these create
very very quickly so we're not going to have to wait too long we need to set some shared access policies here so I'm going to go into the Hub here we going to hit manage I call this my SAS SAS Shar access policy and there we will now have The ability to have a primary key and connection key so we can actually connect uh to it so what we're going to do is go to GitHub and I want to create a new Repository and we'll go ahead here and we'll go down below go to exam
Pro we'll say my event Hub that's already taken because I've done this before so for M I'm going to call it new and we'll go down to private we're going to use nodejs so we'll just type in Nodejs so that it ignores the node modules you're going to want to have git pod or a visual studio code installed on your computer the easiest way is honestly get pod because these environments are temporary and it's free to uh utilize it so if you can go get the Chrome extension or uh if you don't want to install
the Chrome extension all you got to do is attach this to the end of the repo to launch a GitHub or git pod environment so I'll give that a Moment to launch and there we go so I do have some code uh for this so I'm just looking for it off screen here and uh we're going to need to have a couple files here we're going to need a new file called send JS and we're going to need a new file here called receive Js I'm not typing the full word receive because I'm always really
bad at Spelling it so I'm just trying to save myself some trouble and uh we're also going to have to initialize a new package Json file so there we go and we're going to have to get um a couple things installed yeah so we'll need mpm install Azure Event Event hubs Azure storage blob Azure event hubs checkpoint store blob save Dev and it make our lives a Bit easier seems like I typed something wrong here I'll just hit up I forgot the Ford slash here and so we'll just go event Hub um Azure JavaScript because
I believe yeah I kind of use this one but I modified it to make it a little bit easier I think this is the one I was doing no I don't think so tutorial might be this one yeah it looks like this um so this Is just the JavaScript there so for send we will grab this code here we're not going to do exactly the way they do it but pretty close and then there is a receive code so we'll go down below and we'll grab this as you can see there's a lot going on
here that will be our receive couple things we need to properly set so these will be all environment variables so what we'll do is go to the top here and we'll just Do constant process requires process that's going to allow us to import our environment variables so we just say copy let's just save that we'll paste that in there as well and then this is where we need to replace all environment variables as you can see I always have things pcking up on me here so just close my teams out and just Lin to make
this a little bit Faster so default will be what we'll keep here um this will be our storage connection string say process EnV uh storage connection string then this one will be process EnV container name then we need process EnV event Hub name and up here we'll have process EnV um event Hub connection string and then we'll go over to our send here We'll do something very similar so process EnV event Hub connection string and then we'll have process EnV event Hub name so we need to set all of these I'm just going to copy
this for a moment here I'm going to make a new file file new file sure it doesn't really matter we're just using this as a quick scratch pad and so uh what I want to do here is just delete out this Part and we're going to do export on the end here we'll take out this one here and the idea is that we'll just set them all here and then we will make our lives a little bit easier when we have to mass set Mass set these so we do have the connection string because we
saw it over here so we we'll grab the primary one doesn't matter which one primary secondary and that is for the uh vent Hub we called [Music] The the vent Hub was called My Hub I believe we'll just double check what the Hub was called yeah it's called My Hub up there we'll need a storage account so what I'm going to do wish this thing we get out of here get out of here I'm not I'm not trying to save a freaking file there we go hit escape a bunch of times and we'll go back
here and we'll create ourselves a new storage account I'm actually make this in a new tab so we can see what we're Doing so we go over to storage accounts and we'll create ourselveses a new storage account we'll create this uh storage account in the same name space so we'll go down to my event Hub we'll just say my um or we'll just say my event Hub 8888 again you might have to change it based on your standards but um or like what is available to you we'll go ahead and go review create and for
the container name uh we'll probably just call Container maybe container one we just have to wait for this to create to grab that connection string so this usually doesn't take too long just a couple seconds okay so there we are um we'll go over to access keys and we'll grab the connection string from here I believe this one should work U let me just double check yeah I think this will work so what we'll do is go back over here if it Doesn't we'll find out pretty soon and we'll just generate out a a shared
policy uh we'll go ahead and paste that on in here and just double checking that this is the correct one this looks identical to that one that can't be correct so we'll go back here this is the storage account so we'll go oh I have to actually hit the copy button that's what it didn't do we'll go ahead and paste that in and so theoretically this should Work so we'll go ahead and copy these we'll drag our terminal up a bit we'll paste these in here and uh what I'll do is just double check that
they're here so we'll say EnV GP event Hub so those are both set and then we'll do storage that one is set and we'll do container that one is set so these are all in good shape for our storage account we still have to create the Container so go here and create a new container say container one we'll go ahead and create that we'll make our way back over here and then instead of just having export we'll do GP EnV this is just in case we have to restart the environment for for any reason so
that these environment variables get exported twice so we paste that in there I believe those are all set go ahead and hit enter on the last one there and let's see if our code works so we'll do Ascend um actually we have to set up two scripts here so that we can actually call them so I one call here is called send this will be node send JS and we'll have receive so re just because I always spell receive wrong and I just don't want to have to type it a thousand times times we'll have
that there so now what we'll do is do mpm run send see if that works it says a batch of three events have been sent we'll go and confirm that Over in event Hub if it worked if we go to the overview it should show us some messages were received sometimes there's a bit of delay so we'll just give it a teeny tiny amount of time we'll hit refresh here because we know we sent them but while we're waiting for those to kind of propagate what we'll go back here and just kind of look at
the code because we did didn't really look at it so the way it works is you are defining a client And it will be the producer client um and then down below so we say Okay a producer is someone that produces events it's very common in the messaging system to have a producer and consumer we're going to create a batch job and we're going to add them all to the batch job then we're going to send them all at once and it's going to close and it'll and it will complete and if there are any
errors it will alert us about it so we'll go back over here and we'll do a Refresh so I want to see messages messages would normally show up here so since I don't trust it I'm just going to run it again I mean clearly worked because there was no errors and we'll go back over here and um not here but we'll go back here we'll refresh and I'm just waiting to see something here processing data this is like something that's really powerful with Um vent Hub here so still don't see the messages just give me
a second to debug this I've done this lab like four times so it should work but uh you know sometimes sometimes it's trouble so just a moment all right so I literally did nothing and now it's actually showing up in the uh messaging queue so you know or The Hub the funnel uh so that's just something you have to consider is that sometimes you just have to be a little Bit patient let's see if we can go receive those messages now by running the other uh script so what I'm going to do here is do
mpm run receive and it should receive the messages as long as something isn't typed incorrectly so we'll go back over here we've seem to introduce a little mistake so I'll go ahead and save that we'll hit up and it should receive the events so it should print the three out so there We go and so we are streaming that through the consumer is technically um Storage storage accounts but if we go to the storage account there's nothing really uh um intelligible in terms of what's in here so like there are stuff in here checkpoints I
guess it's saved to checkpoint I personally don't know what I'm looking at so I'm not exactly sure what the point of doing that I guess it's just saying the checkpoint is like The last point it it wrote but if we just take a look at the code here quickly you can see this called consumer so we hit consumer client there's a blob check Point store then we have the consumer client we are subscribing so it's saying hey are there any events let's consume them if there are no events throw a console log so tell us
about it iterate through them then update the checkpoint so move it to the next Point um just say hey this is where It is now and that's pretty much all it wanted you to do we can go ahead and save this code we so we'll say um event Hub code doesn't matter what you name it there we'll sync the changes and we'll go ahead and clean up so we'll go back to our resour resource groups we'll go to vent Hub and we will then go and delete this Resource Group and we'll go here and there
you [Music] Go hey this is Andrew Brown from exam Pro and in this section we'll be covering the Azure Cloud adoption framework Cloud adoption framework is a white paper that is a step-by-step process to help organizations plan and migrate their workloads to Azure the image outlines the Microsoft cloud adoption framework for Azure a systematic approach to transitioning to the Azure Cloud the process is categorized into stages defined strategy Here the focus is on understanding motivations grasping the reasons for cloud adoption business outcomes identifying the desired results business justification validating the moves reasons first adoption project
kickstarting the cloud Journey plan this stage includes rationalizing digital estate evaluating current digital assets initial organization alignment ensuring everyone is aligned with the migration goals skills Readiness Plan equipping Teams with necessary Cloud skills Cloud adoption plan laying out a road map for the cloud transition ready this phase ensures preparedness Azure Readiness guide preparing the environment for Azure First Landing Zone setting up an initial secure Azure environment expanding the blueprint broadening the Azure setup as per requirements best practice validation ensuring adherence to azure best practices adopt the actionable phase where migrate existing Workloads or moved to
Azure this entails the first workload migration understanding expanded scenarios validating best practices and making process improvements innovate transform services in the Azure environment using Innovation guides exploring new scenarios validating best practices and furthering process improvements govern this is about oversight and management establish a methodology and Benchmark for governance Implement initial best Practices standards for Azure use measure governance maturity how well governance rules are followed manage the deals with ongoing operations ensure business commitments are met during the transition set and assess the operations Baseline determine operations maturity gauge the efficiency of cloud operations now let's take
a look at the security roles and responsibilities of the Azure Cloud adoption framework Business and Technology outcomes go and Results expected from security functions security outcomes results an organization aims for including governance prevention and response role types security leadership provides security Direction and strategy security architect designs and implements security blueprints platform app security Engineers ensures security of platforms and applications security operations manages real-time security threats Responsibilities security leadership sets security strategy security architecture design secure systems security compliance ensures adherence to regulations policy and standards set security policies posture management manages overall security stance phases of
security implementation plan identifies security needs build Implement strategies including access control and asset protection run manages ongoing operations including prevention And response feedback loop continuous Improvement cycle and security operations in summary the framework offers a structured way to transition to Azure ensuring strategy alignment preparation adoption governance and effective management let's talk about the Azure well architected framework Azure well architected framework provides best practices for Designing and implementing Solutions on Azure it is structured Around five key pillars cost optimization this pillar focuses on maximizing the value delivered by managing and controlling costs proper cost management can
lead to significant savings without compromising function or performance operational excellence this emphasizes implementing and maintaining system processes to ensure smooth and efficient operations in a production environment it involves routine operations deployment practices Monitoring and iterative Improvement performance efficiency refers to ensuring that systems can scale appropriately and adapt to varying loads both expect and unexpected it's not just about speed but ensuring resources are used efficiently to meet performance requirements reliability concerns the system's ability to recover from interruptions such as failures or outages and continue to operate without significant degradation this pillar Stresses designing for high availability
and disaster recovery security Central to the Azure well architected framework this pillar emphasizes the protection of data and applications from potential threats it covers a broad spectrum from access controls and encryption to threat detection and response strategies so that's an overview of the Azure well architected framework the next topic we'll be covering is azure migrate Azure migrate Offers a streamlined service for migration modernization and optimization on Azure it simplifies the pre-migration processes like discovering assessing and appropriately sizing on premises resources for infrastructure data and applications with an extensible framework as migrate easily integrates with thirdparty
tools broadening its range of supported scenarios here's what it offers unified migration platform a centralized portal to initiate execute And monitor your Azure migration Journey diverse tool set Azure migrate provides a suite of tools for both assessment and migration it features tools such as Azure migrate Discovery and assessment in migration and modernization furthermore it seamlessly integrates with other Azure Services tools and third-party offerings from independent software vendors comprehensive migration and modernization capabilities in the Azure Migrate Hub you can assess migrate and modernize servers databases and web apps assess and migrate on premises servers web apps
and SQL Server instances to Azure databases analyze on premises SQL Server instances and databases and migrate them to Azure SQL on a VM Azure SQL managed instance or Azure SQL database web applications evaluate on premises web applications and transition them to the azzure app service or Azure kubernets service virtual desktops Review your onsite virtual desktop infrastructure and move it to Azure virtual desktop data transfer efficiently and affordably transfer vast data volumes to Azure using Azure data box products by using Azure migrate organizations can streamline and simplify their migration process reduce downtime and improve the overall
efficiency and cost effectiveness of their Cloud migration The next thing we'll be covering are the integrated Tools in Azure migrate the Azure migrate Hub includes these tools Azure migrate Discovery and assessment discover and assess servers including SQL and web apps discover and assess on premises servers running on VMware hyperv and physical servers in preparation for migration to Azure migration and modernization migrate servers migrate VMware VMS hyperv VMS physical servers other virtualized Servers and public cloud VMS to Azure data migration assistant assess SQL Server databases for migration to Azure SQL database Azure SQL managed instance or
Azure vm's running SQL Server data migration assistant assesses SQL servers identifies potential migration problems unsupported features and suggest the best path for database migration Azure database migration service migrate on premises databases to Azure vm's running SQL Server Azure SQL database or SQL Managed instances is azure database migration service is a managed service for seamless migrations to Azure data platforms with minimal downtime maneuver assess servers mover is a SAS platform that enhances business intelligence by accurately depicting it environments within a day web app migration assistant assess on premises web apps and migrate them to Azure Azure
app service migration assistant is a standalone tool to assess on premises websites for Migration to Azure app service Azure data box migrate offline data use Azure datab box products to move large amounts of offline data to Azure so that's an overview of the integrated Tools in Azure migrate the next type of migration solution we'll be going over is azure database migration service Azure database migration service is a fully managed service that enables seamless migrations from various database sources To Azure data platforms with minimal downtime it simplifies the process of moving databases to the cloud and
reduces the risk associated with migration the service supports various Source database engines such as SQL Server MySQL Oracle and postgressql and targets Azure database platforms such as Azure SQL database Azure SQL managed instance and Azure database for posters ql and nql Azure database migration service Currently offers two versions database migration service via Azure SQL migration extension for Azure data Studio Azure portal Powershell and Azure CLI database migration service via Azure portal Powershell and Azure CLI use cases migrations of on premises databases to Azure SQL Services database consolidation and migration to a single platform in Azure
Cloud bursting and Disaster Recovery Solutions features Support for a wide range of source and Target database platforms automated schema and data migration with minimal downtime migration assessment to identify potential issues and guidance for successful migration real-time migration monitoring and error notifications pre and post migration validation and cleanup tools integration with Azure services such as Azure security Center and Azure monitor for enhanced security and monitoring Capabilities how it works set up the migration project create a new migration project in Azure DMS Define the source and Target environments and specify the database objects to migrate configure the
source and Target configure the network connectivity and security settings for the source and Target environments and install the Azure DMS extension on the source database server start the migration start the migration and monitor the progress in the Azure DMS portal the service automatically replicates The Source database to the Target environment and tracks the changes that occur during the migration perform ceed over and post migration tasks after replication initiate the ceed over to transition the application to the Target environment Azure DMS offers validation and cleanup tools post migration [Music] the next migration tool we'll be Covering
is storage migration service the storage migration service simplifies the process of migrating storage to Windows server or Azure it comes with a userfriendly graphical tool that takes stock of data on Windows litex and net appy ifs servers and facilitates its transfer to newer servers or Azure virtual machines the service also enables the migration of a server's identity to the destination server ensuring that applications and users can Access access their data without any changes to Links or paths why use storage migration service use storage migration service because you've got a server or multiple servers that you
want to migrate to newer Hardware or virtual machines storage migration service is designed to help by doing the following tasks inventory multiple servers and their data rapidly transfer files file shares and security configuration from The Source servers optionally take over The identity of the source servers also known as cutting over so that users and apps don't have to change CH anything to access existing data manage one or multiple migrations from the windows admin center user interface migration is a three-step process wi inventory servers to gather info about their files and configuration shown in the following
figure to transfer data from The Source servers to the destination servers three cut over to the new servers the Destination servers assume the source servers former identities so that apps and users don't have to change anything although the source servers retain their files they enter a maintenance mode and become inaccessible at a suitable time these servers can be decommissioned so that's an overview of storage migration service the next migration solution we'll be covering is azure data box the Microsoft Azure data box Cloud solution lets you send terabytes of data into and Out of azure in
a quick inexpensive and reliable way each storage device has a maximum usable storage capacity of 80 terab and is transported to your data Center through a regional carrier it is designed to help customers with slow or limited internet connectivity to move large volumes of data to the cloud let's take a look at some of azure data Box's use cases data box is used to import data to Azure for onetime migrations moving large on premises data Transitioning offline tapes relocating BMS SQL servers applications and transferring historical data for Azure based analysis initial bulk transfers large scale
transfers using data box followed by incremental Network transfers for example moving vast backups with Partners like convolt periodic uploads transferring large volumes of data generated periodically like video content from oil rigs or windmill farms for exporting from Azure Data boxes used for Disaster Recovery restoring Azure data on premises quickly security requirements meeting mandates that require data extraction from meure Storage tiers Like Us Secret migration moving data back to on premises or to a different cloud provider here's how Azure data box works customers order a data box from the Azure portal when the data box arrives
customers connect it to their Network and configure it using the Azure portal customers copy data to the Data box using standard file transfer protocols such as SMB or NFS once the data transfer is complete customers ship the data box back to Azure Azure copies the data from the data box to the customer's Azure storage account so that's an overview of azure data box it's cases and [Music] workflow let's talk about networking for Azure and so everything kind of revolves around the virtual Network also known as The v-net and this is a logically isolated section of
your Azure Network where you launch your Azure resources and here's a very simple uh diagram of using v-net but there's a lot of networking components uh that you're going to be utilizing and we're not going to go through the exhaustive list here but let's just go through some of them just to give you an idea of like all the things you can do within Azure networking so you have Azure DNS this Manages your uh your DNS domain then you have the v-net itself and so underneath that it'll have like address spaces route table subnets then
you have network security groups this acts as a virtual firewall at the subnet or Nick level you have express route this helps you create a very fast connection between your on-prem to your v-net then you have virtual Wan this is a centralized Network to rote different network connections then you have Virtual Network Gateway this is a sight tosite vpm connection between v-ets and local networks then you have your NYX or your network interfaces and these are virtual network devices to allow VMS to communicate using IP protocols and then you have like all your load balancers
and other things like that so again not an exhaustive list uh but just shows you that there's a lot you can do uh within networking on [Music] Azure so as your private links allow you to establish secure connections between Azure resources so traffic remains within your Azure Network and so I got this big old graphic here and so let's just uh Define a few things I'm going to pull out my pen here and so imagine you have workloads on your on Prem or you have your own virtual Network on Azure uh and so you have
some VMS doing some stuff and the idea is that you want to connect them to some other services over Here uh but the thing is is that if you wanted to connect them they might try to transverse the internet so if you're on Prem it's going out here and it's going over here and so the issue with this is that um it's not necessarily secure uh another issue could be um you know it's just faster if it would to stay within the actual Network because if you're already connected you you know your stuff over here
then why wouldn't it just go through uh the actual Network Another thing is like data transfer cost so it's always going out the internet and coming back in and that's not a great scenario uh so I'm just going to erase all that stuff there uh the idea with private link is that it's just keeping everything within the Azure Network um and so that's what it's doing so if you want to uh you know um connect your workloads in your v-net or your on Prem that connects to a specific v-net the idea is that you can
launch a Private link endpoint which is a network interface and this is what's establishing that connection and you're going to have to give that private endpoint a private IP address from your v-net and so then the idea is that on the right hand side that's what you want to connect to there's a lot of azure Services by default works with private link so there's no additional configuration you'll just be able to uh say use private link and they will uh Same thing with some thirdparty providers um in the marketplace uh they might be powered by
private link and then there's a third case where let's say you have like a private subnet and you have some VMS there uh so what you could do is um if you have a load Bouncer and you need to have an internal load balcer there you can uh launch the private link service and this is going to basically make your uh your workload in that v-net become compatible or Powered by private link so there you go let's take a look at subnets and a subnet is a logical division of an address space so we just
looked at address spaces so we're cutting it up one step further and subnets help you define different kinds of workloads and allows you to apply virtual is isolation within your network so when you launch an aure resource you choose the subnet you want to launch with within and an IP from that subnet is assigned to your Resource so uh the thing is is that uh when you create route tables that's how you are associating uh the subnet so it can access the internet or access anything uh and then there's public and private subnets but this
thing is interesting because like again if you if you're using AWS uh those are very clearly defined things but in Azure uh they don't have this concept of public and private you have to Define it yourself so really a public or private Subnet is just a subnet that doesn't have access to the internet and so we saw that when we had the route table and we over over uh Road um the access to the internet to none that M essentially made it a private subnet uh another thing you can do with subnets is you can
associate a network security group and this is going to help protect uh protect your traffic entering and leaving the subnet so you're making rules based on the IP address port and protocol uh and Then there's a special thing called a Gateway subnet so uh it's a specialized uh type of subnet and it's just for Azure virtual Network gateways and so um it's interesting you'll go in and there'll be a separate section just for it and so you'll create it it's just for that [Music] service so uh virtual private networks also know as vpns what they
do is they extend a private Network across a public Network and enables your users to send and receive data across shared or public networks as if their Computing devices were directly connected to the private Network all right uh and so now we have to talk about what is a virtual Network Gateway and so virtual Network Gateway is the software a VPN device uh for your Azure virtual Network so that's how these uh devices are going to connect to your network so when you deploy a virtual Network Gateway it will deploy To or uh two or
more specialized uh VMS in specific subnets you need to create a Gateway subnet and these deployed VMS contain routing tables and run specific Gateway Services you can uh choose the type of Gateway you want it to be and this is going to determine whether You' use something like VPN Gateway or express route Gateway so it's as simple as an option like that but to really understand uh these virtual Network gateways we should just look at some VP And Gateway design so you understand why you're creating these things so to understand VPN Gateway we need to
understand the utility of the service and so we'll look at some different topologies and the first one is site to site this is when you connect Azure to on- premise data center or vice versa and the idea is you create a VPN Gateway that's going to establish connection to your on- premise environment creating IPC tunnel which is A secure connection IP uh connection there but you might be asking well isn't that what Express rout is for well Express rout goes through a part um a edge partner uh so there's a lot more work involved in
that setup this one just goes over the internet so it's not going to be as fast um and there's some other uh downsides but the idea is it's the easiest way to get connected from your uh your on premise to uh Azure the next one is multi sight this is when you Connect Azure to multiple on premise data centers um so it's just like the same model except there's more than one uh tunnel here to more than one uh uh site then you have point to site this is when you connect Azure to multiple individual
computers so imagine you have a bunch of employees around the world and they have laptops and they just need to connect uh securely to the um to the the private v-net or just the v-net in general and So that's where we're going to need uh VPN Gateway and the last one is v-net to vnet this is where you're going to connect two v-ets in two different regions and subscriptions uh or have different deployment models uh and so uh that's again those are transversing the internet uh in all these cases here but yeah that's pretty much
it and I guess I think that if you were to set up Express Ro I think you'd have to set up VPN gateways anyway uh but anyway that's What that is there so hopefully that now makes [Music] sense so Azure Express Roes creates private connections between Azure data centers and infrastructure on your premises or in collocation environments and so uh connections don't go over the public internet and as a result offer more reliability faster speeds consistent latencies and higher security so here's a big old graphic here kind of Representing what's going on here and the
idea is that you're going to have connectivity from different things like from any to any so that's ipvpn Network a point-to-point ethernet Network a virtual cross connection and this is all going to be going through a connectivity provider at a co- location facility so this example would be a uh an edge partner and so you would be the customer Network that' be your on premise or whatever you want to connect so that you Can make it all the way to your Azure services and the way you would establish a connection is you create these express
route circuits uh it's pretty common to have uh more than one because because uh you want to have high availability just in case the other one goes out uh the idea is that you can route them uh route this traffic to a couple different places so the first one would be things like peering to office uh 365 Dynamics 365 or even your Azure public services So when we say Public Services imagine you just launch a um a virtual machine that is in a public subnet that has a an IP that's reachable from the internet uh
that could just be to that or maybe you're using like cosmod DB or like you have fully qualified domains for other services uh so that's just a way that you can get there and then let's talk about the other side which is uh um doing private peering for uh v-ets so the idea is that you have a private V-net so the subnets are private and so the only way is going to be access it uh you want a direct way to access it that way so uh that's the two ways there uh and just to
note there is express route direct and so this is like express route with an additional benefit that has greater bandwidth connections from 50 megabytes per second up to 10 GB per second and this is really ideal if you have hybrid Solutions where you uh you're removing massive amounts of uh Data or where latency matters because you you want uh to feel like these uh cloud services are right there with your on- premise environment you're going to need a lot of speed for [Music] that aure firewall is a managed cloud-based network security service that protects Azure
vnet's resources and it's a fully stateful firewall as a service so you're going to get built-in High availability and unrestricted cloud Scalability and what you can do is uh is essentially create enforce and log application network connectivity policies across subscription and virtual networks so Azure firewall uses a static public IP address for your v-net resources allowing outside firewalls to identify originating from your virtual Network and the service is fully integrated with Azure monitor for logging and analytics so here is a representation of azure firewall and so The idea is that you're going to launch an
Azure firewall into its own v-net and then other v-ets and your on premise or other things are going to pass through that Central v-net onto wherever they want to go and the idea is that uh we're going to be able to uh do things like utilize Microsoft threat intelligence this is going to block known malicious IPS in fqdns that stands for fully qualified domain names and by default the traffic Is uh set to deny uh but you can set connectivity policies to filter out traffic in a variety of ways to make sure that you are
protected uh there so yeah that's all there is to [Music] it so network security groups filter Network traffic to and from the Azure resource naet uh and so an NSG is composed of many security rules and so here's an example of setting an inbound security Rule and each security rule has the following properties so you can give it a unique name which is all the way at the bottom there uh you can set the source or destination so you're going to set an IP address cider block service tag application group things like that uh then
you set the port range so it could just be Port 80 could be all ports where it shows an aster it could be a range of ports you're going to set the protocol so you got TCP UDP icmp you set The action whe whether it's allowed or denied and then you set the priority which is a number between 149 96 and we have two types of security rules we got inbound rules which applies to traffic entering the NSG and outbound rules that apply to traffic leaving the NSG let's take a look at some of the
default security rules that NSG sets for you so when you create an NSG you're going to have some created for you by default uh and that's going to be for Outbound rules and inbound rules so uh for inbound rules uh you're going to be able to uh accept any virtual networks into your um through the uh NS uh it's going to allow Azure load balancer to make its way in and it's going to deny uh everything else all right then for your outbound rules it's allowed to uh go to any other virtual Network it's allowed
to make its way out to the internet and then everything else is denied so there you [Music] go let's take a look here at the logic for security rules and there's a lot of logic here so we'll work our way through it unfortunately there's no fun way to visualize this so we just got work through the textt so you may not create two security rules with the same prior priority and Direction you can have 5,000 nsgs per subscription and 1,000 nsgs rules per NSG for priority rules are processed in priority order with Lowest number uh
process before the higher number and network security groups uh rules are valuated By Priority using a five Tuple information to allow or deny traffic based on source source ports destination destination ports and protocol honestly I don't know what they mean by that uh and I couldn't make any sense it's in the documentation so I'm just showing it to you here then there's flow records They don't exactly explain what they are but I assume the idea is That uh when a request throws uh flows through the NSG they're attaching additional information to it uh so the
flow record allows a network security group to be stateful a flow record is created for existing connections uh communication is a Lowder denied based on the connection state of the flow record and so let's talk about statefulness so if you if you specify an outbound Security Port you don't need to set the inbound Port since it will be Set for you you only need to specify an inbound uh security rule if the communication is init initially externally uh initiated externally and the opposite is also true if inbound traffic is allowed over a port it's not
necessary to specify an outbound security rule to respond to traffic over the port uh and the reason I know this when a when another Port is set with another one that's when it's stateful if it didn't do that then it would be Considered stateless but it's state F uh let's talk about Interruption so existing connections may not be interrupted when you remove a security rule that uh enabled the flow and traffic flows are interrupted when connections are stopped and no traffic is flowing in either direction for at least a few minutes so there's the rules
uh there a lot of stuff there honestly I won't even remember uh 90% of the stuff but I just wanted to go uh through it With you so there you go hey this is Andrew Brown from exam Pro and in this section we'll be covering Azure DDOS protection what is a DDOS attack a malicious attempt to disrupt normal traffic by flooding a website with large amounts of fake traffic DDOS attacks are big worries for people moving their apps to the cloud these attacks try to use up all of an app's resources so real users can
access it any online Point can be a target for These attacks Azure DDOS protection offers Advanced features to counteract DDOS attacks when integrated with recommended application design practices this service is specifically designed for Azure resources within a virtual Network enabling this protection on both new and established virtual networks is simple and doesn't require any changes to apps or resources most frequent types of DDOS attack volumetric attacks these are Volume driven attacks that deluse the network with seemingly legitimate traffic by doing so they exhaust available bandwidth leaving legitimate users unable to access the website these are
typically measured in bits per second protocol attacks these tax exhaust server Resources by sending fake protocol requests that exploit vulnerabilities examples include UDP and TCP Flooding at layers 3 and four these are measured in packets per second Application layer attacks these attacks Target the application layer examples include HTTP floods SQL injections cross- site scripting parameter tampering and slis attacks to defend against these web application firewalls are often employed Azure offers two tiers of DDOS protection DDOS Network protection when combined with best practices in application design Azure DDOS Network protection Offers Advanced DDOS mitigation tools it's
automatically configured to safeguard specific Azure resources in a virtual Network DDOS IP protection this is a paper protected IP model while it shares core features with DDOS Network protection it provides additional services like rapid DDOS response support cost protection and discounts on Waf so that's an overview of azure DDOS [Music] protection so Azure has uh a few Different kinds of load balancers and one in particular is the application Gateway and this is for application Level routing and load bouncing service so application Gateway operates at the OS I layer 7 uh which is also known as
the application layer and the idea here is that when you're working about applications you're working with HTTP requests that's what it is uh and so the idea is that it can look at the contents of the HTP request and do some Interesting things so maybe it's looking at the path and saying okay you're uh if you have a path um and it's payments go to the VM that has our payment system and then if it's for admin go to the VM that does that uh maybe it has to do something with cookies or um maybe
you want to apply a Waf policy to to it and so you can look at those HB requests and determine if it is malicious traffic and filter it out uh so yeah it's all about the application which has to do with HP Requests to configure this thing you need to set up a front ends uh ring rules and backend pools and there are two configurations for the front end you can either have it with a private IP which makes it now an internal load balcer or a public IP which makes it either we would call
a public or external load balancer uh and there's a both I've never used that option before um but I mean you just really need to know the public and private for the Backends you create backend pools and a backend pool is just a collection of resources to which your application Gateway sends traffic uh and so a backend pool can contain virtual machines virtual machine scale sets IP addresses domain names app Service uh and I think you can also send it to like on Prem uh so let's just talk about routing rules which connects the front
end and the back end together and so uh here is a more complex example Gives you a better idea of this Service uh uh at full uh and so the idea is that you have your application Gateway it's going to send uh traffic or sorry like a DNS is going to send to application Gateway and then you have these listeners and they they listen for incoming traffic uh and then what it will do it will pass on that to a rule and a rule just really says who should we pass the data to uh and
then if you are defining a backend pool then you Need to have um an HTTP setting that says how do we handle the HTP requests okay so now we'll just look at more granular detail about request or routing rules let's take a closer look at routing rules this is where all the magic happens so a listener listens on a specified Port an IP address for traffic that uses a specified protocol if the listener criteria are met the application Gateway will apply the routing Rule and these come in two Flavors we got basic which forwards all
requests for any domain to backend pools and multisite forward requests to different backend pools based on host header and host name so the thing is is that uh you uh you can have multiple listeners and you can have an order of them and the idea is that you really want the basic to be on the uh be in last in priority because if it's a first it's going to capture everything because that's its job it's like a catchall uh So just make sure that um if you're using multiple listeners you put basic last uh so
that's just something you need to know then for those backend Targets this is where we either Define a back and pool or redirection redirection is just an HTP redirection like uh 403 or whatever you have their temporary or permanent very simple uh but for backend pools you have to create HTP settings uh and this tells us a little bit more about how we want to handle HTP you know Cookies cook uh connection draining Port requests Etc let's talk about a little bit more so here are the actual options that we can configure for HTP settings
so you have your backend Port uh so generally it's either Port 80 or 443 it just depends on where you're doing your SSL termination uh but generally um if you need end end encryption it'll be 443 or uh and then if you are doing connect or if you're doing SSL termination at the blow balancer then It's 80 um then you have cookie base Affinity this allows you to keep a user session on the same server so if you need to persist cookies and use them for authentication you'll want to enable that you got connection draining
this gracefully uh removes backend pool members during plan service updates so you is that you know when there is an update it's not just going to abruptly cut over it's going to wait until a Connection disconnects from a server before uh not no longer sending more requests there because you don't want a a connection dropping in the middle of an update it's not great for a user then you have request timeouts this is the number of seconds the application Gateway will will wait to receive a response from the backend pool before it returns a connection
timeout error message and last our um oh sorry we still have override back in path these Allow you to override the path in the URL so the request for spe a specific path can be red to another path the idea is imagine you want to send it to um but bananas and you want bananas actually internally route to oranges I don't know why you want to do that or maybe to plantains that' make a lot more sense so that's something you can do uh and the last one is the override the host name so application
Gateway normally leaves the host name alone uh but you know if You're using multi-tenant services like apps uh like app service or API management it needs very specific host header set so this is where you can override them and change them for those services so hopefully that really gives you a good picture of application Gateway but I feel that that's all you need to know so let's take a look here at Azure scale sets and these are used to automatically increase or decrease your Virtual machine capacity so imagine uh you have a web application behind
an application load balancer and you have an increase in traffic you want to be able to quickly add more capacity by adding another identical virtual machine uh or when uh there's a decrease in traffic remove it to save cost and that is what Azure skill sets do um so you're creating uh scale policies to automatically add remove based on host metrics host metrics could be like CPU utilization or uh Network in uh you're going to create health checks and you can also uh set a repair policy to replace unhealthy instances you can associate a load
balancer to distribute virtual machines across uh availability zones and you can scale to 100 or even a th000 VMS using scale sets so one thing you're going to probably want to do with your scale set is associate with a load Bouncer and in Honest I don't run any kind of application workload uh unless it is in a scale set and behind a load balancer because it's just good practice to do that and the reason why you're going to want a load balancer is that it's going to help you evenly distribute your VMS across multiple availability
zones and that's going to give you high availability uh because you definitely want to try to run uh 3 VMS across three azs to get that a high Veil ability uh You can also use a load balancer probe checks and these are more robust health checks than what skill set provides you uh so that's just an added benefit there uh and when we're talking about um load balancers we have two different choices here we have the application Gateway and so this is for HTTP htps web traffic load balancer uh and then you also have Azure
load balancer and this is going to support TCP and UDP Network traffic and things like that so depending on what oi Layer you need to operate on is going to determine what kind of load balcer you need to use so let's take a look at scaling policies and these determine when a virtual machine should be added or removed to meet the current requirements and you have this uh Little Wizard here this is what the What wizard you see or form you see when you're creating a scale set initially with very simple features but let's just
focus on two Things scaling out and scaling in so scaling out is when an instance should be added to a skill set to increase capacity so you choose your metric uh which is hardcode in this case to CPU threshold so you choose your metric the duration how many VMS you want to add and then the scale in is the opposite that's when you're removing uh uh uh something from the scale set to decrease your capacity and again that interface is very simple uh when you actually go Ahead and create a scale set after you go
and update it you're going to end up with a lot more options and here are the options you can see they're extremely robust and so uh you have the option to choose one of the built-in host metrics that are already be being collected on your virtual machine so uh the most popular here and there's more than this but uh the most popular here is CPU Network in network out dis read and write uh then you have your Aggregates So you can decide how you want to group or uh collect that data uh before you apply
your final operations on it uh then you have your operator so you can say greater than or greater than or equal to then you have your actions you can say increase the count of so add uh x amount of of servers or you can say increase by percentage so imagine you had um uh 10 servers and you want to increase the load by 30% that would add three additional servers if you want More metrics than just the built-in host metrics you can absolutely get more uh but you're going to have to install a couple things
uh for app uh if you want more app specific metrics like page performance or page load performance and sessions count you would uh install a small instrumentation package for app insights and uh if you want to have more detailed host metric so you might have host metrics but you want them in more detail or more available host metrics You'd install the Azure diagnostic extension within your VM um there are a few other uh scaling policy options that are well they're not exactly in that form but they are around or are associated with them one is
the scale in policy not to be confused with the scale in option um and this determines what virtual machine should be removed when you decrease capacity so it's just a simple drop down and you have a few Different options so there's the default option this is where it deletes the VM with the highest instance ID and it's going to do that b uh uh take in consideration uh the balancing across A's and ads or it can delete the newest virtual machine so delete the newest VM again uh this one's only across uh virt or availability
zones or delete the oldest VM this is going to delete the oldest VM and balance across availability zones then you have an Update policy and this determines how uh how VM instances are brought up to date with the latest scale that model so again it's another drop down and you have a a few options here so you have automatic so increasing the start upgrade immediately in random over uh order or or manual so existent or existing instances must be manually upgraded or rolling and so this update upgrades roll out uh in batches with optional pause
uh and just one other Note here is that if you want to do automatic OS upgrades you can enable uh this to help ease update management by safely and automatically upgrading the OS dis for all instances so there you [Music] go Health monitoring is a feature with scill sets you're absolutely going to want to turn on uh and what it does is it determines whether your instance your virtual machine instance is healthy or unhealthy so you have that option to Disable or enable it and it comes in two different modes we're going to have the
application Health extension which is what we're seeing on the right hand side here and this is where you ping an HTTP or htps request with a specific path and expect a back a specific status so the status here would be 200 so the idea is that you could say ping the homepage and if the homepage appears then therefore the server must be healthy or you can make it your own custom uh page that's What I like to do I have like a health check page the other mode is load balancer probe uh this is only
going to work if you have an Associated load balancer and uh here you can check based on TCP UDP HTTP request so this is a little bit more robust um um so I generally would recommend using this mode over um the the first mode because generally when you have a scale set you're going to also want to have a load balancer uh now if you want to replace Unhealthy instances they have an automatic repair policy so this is an automatic I mean like it's not turned on by default so you have to uh explicitly say
you want to turn it on and what that will do is that if it finds an instance that is unhealthy it's just going to uh terminate it and then launch a new instance all right and so there you go [Music] all right so now that we have our scale set we're going to continue on learning More about availability by creating an application Gateway so this is actually a type of load balancer even though it has Gateway in the name then there's Azure load balancers and the difference between these two is this one's layer seven for
the applications and this is layer four uh so TCP UDP like at a lower layer so uh you know since we have a web application which is a simple apoi page we're going to want to serve it up via the application Gateway all right so Make your way over to the top here and we'll click on application Gateway or just type that in and we'll go ahead and add ourselves a new application Gateway we'll choose wolf here I'm going to name this wolf um uh application agw and then we do not yeah we don't need
any Autos scaling right now so we'll just leave that alone I'm going to set that to one we're going to choose two one and three because the rule of three counts here we always want three And then down below make sure you choose the correct virtual network if you're not conf make sure you go over to your scale set and just double check to make sure where it resides so if I go over here into my scale set and check it's in wolfnet uh wolf vet 499 how I ended up with more than one I
don't know I just the tutorial I've done this a few revisions so I've ended up with an additional one there notice it's Complaining because it's trying to uh put this in the default but it needs its own uh subnet so here under subnets we're going to create one just for the vgw so vgw and we're going to need a range first so go over to address uh space ranges and we'll pick out the next number so 10.0 uh. 2.02 24 we'll hit save and once that has created we'll make our way over to the subnet
and when we hit subnet it will automatically Select the next one for us I'm going to put vgw in here we'll hit save and then once that's saved we'll make our way back to the wizard notice up here the bread comes if we click one back we can make our way uh back to where we are and then choose that vgw subnet we'll go to the front to the front end uh section here we got public private or both we want public today and we will need a new IP address so I'm going to call
this uh wolf Vgw we'll go ahead and hit okay we'll go to backends here add a backend pool I'm just going to call this backend and we'll drop down and choose a virtual machine scale set if you do not see it here it's because they're not in the same v-net make sure that's the case and then we'll go to configuration so we got a front the back end now we got to glue them together with routing rules we'll just say my rules we have listeners and backend targets so we'll name our Listener name my listener
if you can spell it that's a hard one for me so I'm just going to copy paste that in take out the space there uh the front end IP is it's going to be public we're going to have HTTP on Port 80 we'll have basic if we had multi sight so if you have more than one destination but we do not we'll go to backend targets and we will choose the backend pool that we created and then we have to choose or add um HTTP settings this is all kind of Crammed together it doesn't really
line up very well so I get a bit confused here so I think what we want to do is hit add new here and then we'll say my HTTP settings uh Port 80 is good we do not have cookies we do not care about connection draining all these options are not important to us uh for our very simple application um but if you were creating a real web application that uh that has a session you probably would Want to turn these both on okay we'll go ahead and hit add and we do have path-based routing
but this is not something we need to worry about right now this is where you could say you could have multiple targets so you could say Okay anytime it is uh cookie then go to this virtual machine and then if it's another one you could say go somewhere else or even do a redirect that's a great way of attaching things to your um uh virtual machine there we'll go ahead And hit add and so now we have all of our information we'll hit tags and we will go hit create and I'll see you back here
uh when this is done deploying okay all right so I've been waiting a while here for uh this to complete but uh it looks like that we're still having a bit of trouble uh so what I'm going to do is make my way over to the actual uh load balancer here because I just remembered and this happens because I don't normally make a scale set Separately I usually make it with the load balcer but if we make our way over to the backend pool and we're to click into here it actually has a a thing
that says down here virtual machine skill set was added to this backend pool upgrade all in es of wolf scale set for this change to work so uh those the scale set needs to get updated is the is the problem here so what I'm going to do is make my way over to the scale set and we'll see if we can do an Upgrade here so if we just checkbox them all on there I'm going to go hit upgrade and then this will perform an upgrade on the instances and we'll just give that some time
and I'll see you back here in a moment okay so that didn't take too long for the upgrade and if you just hit the refresh here you're going to wait for the status was running and now they're all healthy so if we make our way back to um our load balancer tab here if you Still have something open just go to backend pools you should see three targets if we go up to our overview over here we'll go grab whoops our IP address now why the uh they copy the text there I have no idea
but if we go paste that up into here and take that out we get our page so there you go that's all it took to get the availability um or the actual server Runing if we go on the left hand side and we go over to health probes this is Interesting to look at we're not going to set it up but I just want to show you that you'd write in your uh health check here and then you could specify um a different path so if you had like a page called and this is pretty
common for a lot of places they'll have a page called health check and so that's a just kind of like a way to configure a custom health check uh for your instances but this is all I really wanted to accomplish here today um I don't think There's really much of anything else that I'd like to do here um so what we'll do is we'll go and make make our way back to all of our resources and we'll try to find our original Resource Group here if we can uh find it's probably easier if we just
go to Resource groups great and I'll just go ahead and delete this one here there we go it's going to delete a whole lot of stuff uh but yeah there we Go
![Microsoft Azure Security Technologies [Exam AZ-500] Full Course](https://img.youtube.com/vi/m1VWSWlrJa8/maxresdefault.jpg)