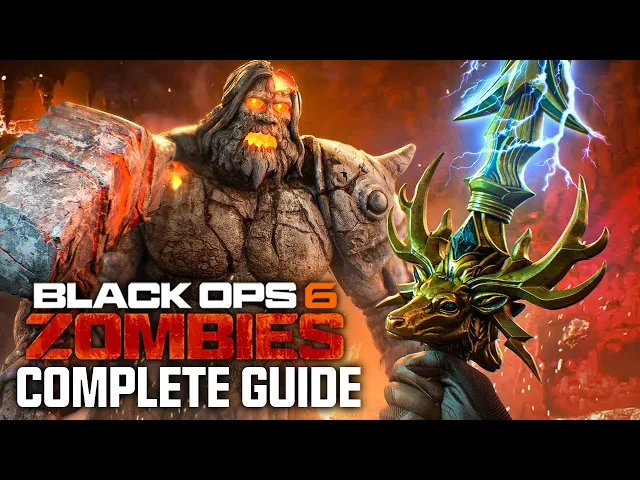
here's a complete guide to completing the Citadel DayM more Easter egg on Black Ops 6 zombies this can be completed on Solo or Co-op and if you find this guide useful then be sure to let me know jumping straight in the first thing you're going to want to do is to open up the map by following the objective markers until you open to the Courtyard once you're in front of the castle you then want to make your way through either one of these doors towards the cannon you want to interact with this to crank the
cannon so it faces towards the door once that's complete go behind the cannon and you should be able to fire the cannon towards the door once this side you want to follow the door markers again ah head down below into the uncraft once the ubet room you want to shoot three locks off this box here be prepared is it's going to spawn a ghoul Gast and once taken out it will spawn a blood ethereum Crystal pick it up and insert the crystal into the portal and the Pack-a-Punch machine will appear on this point your next
objectives in the map to open up to the dungeon and interact with this door here to reveal a conversation with Gabriel C once that conversation's over your next objectives are going to be to build the basic sword and it's four Elemental variants before you can do that you need to progress to round 10 from this round onwards you will start to have zombies spawning in with armored helmets on if you take one of these zombies down it will drop a stamp it will look just like this glowing orange part once you've picked that up in
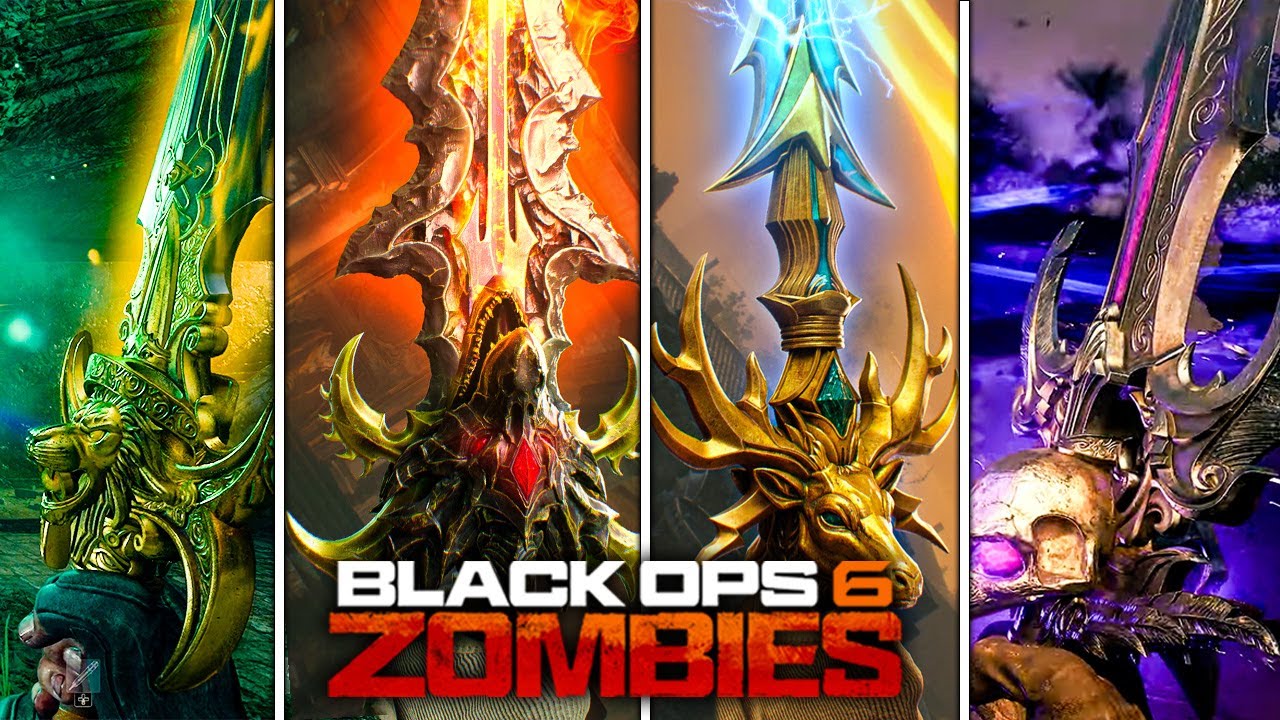
the dining hall you'll be able to interact with one of the Four Knights with the stamp give you the basic version of one of the elemental swords you can do this in any order but we'll start with the dragon sword and this is tied to this Knight here with the dragon symbol on its chest and you've interacted and picked up the basic version of the Dragon Sword we can start with the first step if you make a way above Juggernog you'll see this dragon statue that you'll be able to place the sword into once the
sword is placed three brazers will light up around the map in three locations that stay the same every game first location will be found in the spawn area and it's this brazer in the corner and once you interact with it your character will be set on fire and your job is to make your way all the way back to that Dragon Sword before going to zero HP whilst you're holding this fire you'll be losing 15 HP a second but if you melee any of the zombies in front of you that spawn you'll be able to
increase your health all the way to the dragon you'll then want to repeat this for another Fria which can be found on the nature path and it's the exact same principle where you're going to be losing Health every second whilst you're making your way over to that Dragon nice and easily and the final one could be found to the left of the cannon on the village ramparts which is the closest location to the dragon so you should have no problems whatsoever with this once the third brazer has been returned back to the sword you will
now be given the Dragon Sword which is known as caliburn once you've created your first sword just go ahead and push to the next round where you should get another night spawn that will drop another stamp and we can work on the next sword upgrade and this is going to be the light sword cace which is marked with a lion symbol use your stamp to get the basic version of the lion sword make your way past Speed Cola in the upper Village if you take a left you'll notice under this ceiling there is a door
with a lion statue on it that if you melee will light up a symbol at this point the game is going to spawn four glowing parasites and each time you melee one of these parasites with your sword will make your sword glow yellow that you'll then want to melee the door again to reveal another symbol repat this until four symbols are illuminated on the door and then go ahead and melee it to knock on the lion it will teleport you into a sanctuary where right at the end you'll be able to place down your sword
and underneath the sword there will be a symbol that you'll want to find on the wall to shoot to match once you've matched that symbol a new symbol will appear under the sword that you want to shoot and you want to rinse and repeat this until you've matched all of the symbols until they have all been matched after that your sword will glow yellow and you'll have the lion sword upgraded from here progress to the next take down another Knight zombie collect another stamp and we'll work on the Stag sword get the basic version you
want to interact with this Knight with the Stag logo on its chest once you've acquired the sword we now need to get three lightning rods one of the rods can always be found just to the left of the Deadshot daquiri perk machine up against these boxes for the second one you'll need to have the dead wire ammo mod equipped and in the upper Village by speed Coler there is this fuse box on the wall that if you shoot will send an electrical charge up to an aerial dropping the second Rod third and final Rod can
be from a randomly spawned zombie we'll physically have the rod attached to their body and the best place I've found to get this really quickly is in the dungeon and underground sections of the map once you've acquired all three make your way to the right side of the hillside ramp parts and interact with this vase to place all three rods in it will now create a small thunderstorm on the hillside Rampart spawning infinite zombies from here you want to kill zombies until your sword is lightning up with electricity and then whilst it's electrified run to
the vase and melee it you should notice the charge on your sword disappear onto the vase and onto one of the rods repeat this three total times where your sword has been electrified and melee the vase three times where all three lightning rods are electrified and you should be able to insert your sword and after a short weit you'll be able to pick up durandal the lightning sword progress to the next round until you have a night zombie which will drop another stamp for the final sword upgrade being the Raven sword which is this Knight
with a raven on its shoulder once you have the basic Raven sword make your way into the alchemical lab and somewhere on one of the shelves either in the middle of the room or to the sides is going to be an animal skull and this will vary between games so it won't be the same as what you're seeing here regardless when you pick it up it will say that you've picked up an Antiquity item now this is about doubt the hardest sword upgrade in the game but I'm going to make this extremely easy for you
to understand as far as I'm aware there are 12 different animal skulls that you can find in this room and each Skull part relates to a certain animal but but also to a certain star sign so on screen is a very useful list that I'll also have Linked In the description which you can use to refer to the item you get in your game so in my particular game I had two skulls which means that that would correlate to Gemini as that is also known as the Twins and because I have two sets of skulls
they're referred to as twins once you've worked out exactly what item relates to your star sign you'll then want to also refer to this graphic on screen which you'll be using For an upcoming puzzle so with the Antiquity you picked up you want to make your way to the pub in the spawn in the tavern Cellar you'll be able to insert your Antiquity and then it's going to want your sword once both of those are placed you're then going to be solving a puzzle which seems complicated but I'm going to break it down at this
point you should know what your star sign is based on what animal you have so in this example it's Gemini because I have two skulls then I'm going to use this graphic on screen here which I'll also Link in the description in my puzzle I have an inner ring that contains four green symbols and the outer ring which contains a bunch of white symbols once you know what star sign your part is assigned to so in this example mine is Gemini because it's two skulls I can see that Gemini is under the air heading the
way you inserted the sword right above it is going to be a Green Arrow and we're going to want to rotate the inner ring until we match whatever star sign you have to the corresponding element above so because I'm Gemini that means mine's a triangle with a line on the top that's facing upwards and because my skull is G I'm then going to look for the symbol that matches with my skull so I'm looking for Gemini and that is going to be that I with the two lines in it and as you can see once
I match them up I get the puzzle correct few other antiquities you could have is this which is a scorpion as there is a physical scorpion within the rock itself which would match with Scorpio and another image where I have fish as the Antiquity which means that would match Pisces because in the previous graphic we can see that Pisces relates to the fish if you're still confused at this puzzle I'll have more references and images of every Antiquity that match to the correct puzzle symbol so you can get this done extremely easily if you don't
get the puzzle correct or you take too long you'll have to go to the next round to try again but if done correctly there will be a patch of purple ethereal energy on the floor as well as two orbs that will be floating around following you that you're going to want to lead towards that purple ARA patch to then be swallowed up by the ground the easiest way to do this is to just slowly coax the orbs towards the pathway being a slow as possible and once complete the orb is going to move upstairs into
the main Tavern and spawn on the floor where you'll want to repeat this again this time there will be even more orbs so you just want to be extremely patient slowly walking around the tavern even running outside the tavern if you need to running up the stairs just to try and get them as packed together as possible if the orbs do manage to hit you they will damage you the orbs will respawn at the current progress that you're at where you'll have to try again once that second one is done a third one will spawn
on the second floor of the tavern and a lot of patience is required to duck and weave around the orbs to then make sure that they all collectively head up the stairs in the same sort of Direction so that they can all make their way into this purple patch on the ground and once that third one is complete the orb will go back into the tavern Cellar back into the puzzle and once you interact with the puzzle on the wall you'll notice that the sword will come out of the puzzle fall into the ground and
then respawn giving you the upgraded Shadow sword now that you have all four upgraded swords we can move move on to the next step which is to get four pages from a secret book these Pages can all be found in the sitting rooms and there can be nine different spawns in total but you'll be looking for four pages that look like this with little glowing red symbols on these have some really really well hidden spawns so make sure you're checking everywhere that you're seeing in this video carefully as you will be able to find them
including against the TV on the sofa on the bunk beds next to the stamin up machine on the outer edges of the sitting rooms along all of the walls just make sure you're paying extra attention and every time you're picking up one of these Pages game will be tracking your progress of how many you've collected in total so if you're at any point confused be sure to press your back button where you'll want to have four torn page fragments marked by the Roman numeral for the number four being IV once you've got all of those
pages you'll now want to get the melee machiato perk and make your way to the uncraft where you'll want to melee this wall with your melee machiato to reveal a wall with loads of blue symbols from here you want to head back to spawn and make your way back to the tavern where around the tavern will be six of these vases that will each have Roman numerals on that you want to interact with two will be on that desk one will be on the bar itself another is to the left of the front door there
another can be found upstairs near the pool table and the final one is just above the stairs that lead to the cellar once you've activated all six you'll then want to go around the tavern and take a screenshot of all of these vases in numerical order as you're going to need these symbols in these orders the number one can always be found on the bar right here number two can be found here number three can be above the cellar staircase number four can be found upstairs by the pool table number five can be found on
this table here and number six can be found by one of the front doors and you've noted down all six of these in order from 1 to six you want to head back to the uncraft and with that newly revealed wall with the symbols you want to shoot the one that associated with the number one the symbols will then start transforming and then reveal a new order where you'll need to shoot the one for number two and you'll want to rinse and repeat this with symbols for number three four five and six where each time
you get further and further into the sequence the wall is going to change its symbol orders faster and faster once you've shot all six in the correct order you'll get a quote from your character as well as a Red Orb transferring from that wall to a section next to it where it's going to reveal a book and with those pages that we just picked up you'll be able to interact with the book and place all four pages on the book now each of these Pages correlate to four different symbols which match to four different traps
around the map and these specifically are the point of power traps that are all around the map the four symbols that your book will show will be different every single game you're going to be activating specific point of power traps in a certain order that correlate to your book starting with the symbol in the top left the bottom left then the top right and then the bottom right so for me my first symbol looked like this where it had eight individual points coming out of it and if I look down at the point of power
trap I can also see that the shape is outlined in white which means that this is the correct point of power trap to activate the trap for 1,600 points and in this zombies are going to be a lot slower and you're going to be shooting Magic Bullets and all you need to do is just take out zombies and once complete you will get a completion quote from Craft meaning that was the correct trap and to confirm that it was the correct trap if you go back to the undercroft and look back at the spell book
you should see that the top left symbol has now disappeared my next symbol looked like this and this matched to a point of power trap that was in the hilltop so again I activate it for, 1600 points and take out as many zombies as possible and you should complete this step very quickly this is your correct point of power trap which matches the symbol in the bottom left of your book once completed I went to check the book again in the uncraft and I had two symbols disappeared meaning I only have two more traps to
do the top right symbol looked like an eye with eyelashes which match to a point of power trap location in the dungeon to activate it and take down zombies and that should be completed really quickly and then go back to the book to check if that was correct which for me it was so now I'm on to my fourth and final one for me that matched with a trap within the stamina up room and once you've completed the fourth and final one you'll get a quote from Craft about the owl saying come on in now
that is complete the next step involves us getting four ritual items and upgrading them these can be obtained in any order starting with the easiest which is the Horseshoe which you can find in the barn on nature path by coming inside and above this doorway will be the horseshoe that you can shoot to them pick up once you've got the Horseshoe make your way towards the castle and up to the hill side rampers as you're going to use the cannon shoot yourself back towards the spawn room whil you do this some lightning is going to
be appearing across your screen and somewhere on the map there is going to be a small lightning cloud it can appear in a few locations but just look up in the sky go towards it and on the ground should be pegasus's horseshoe now we've got that ritual item upgraded let's now move on to getting Ra's ank for this you'll want to go to a crafting table and craft three Molotov lefal as we're going to be throwing a Molotov at three different locations around the map these are all going to be centered on the hillside ramp
Parts by the cannon and with your first Molotov you want to throw it onto this debris pile just underneath the pylon your second Molotov is going to be directly above the castle entrance on that balcony there and each one is going to spawn a few zombies from some Fireballs so you know you've done it correctly and the third and final area you're going to throw a Molotov at is just to the left of the acid trap towards speed cola if done correctly Fireballs will spawn more zombies including a ghoul gast Elite that once you take
down and has finished exploding will drop Ra's ank the next ritual item we'll be going for is Raven's Talon in order to get this you want to make your way to the oblet room and take the Fast Travel that leads you back to the spawn and along the Fast Travel right towards the very end to the right you're going to notice a raven that you're going to want to shoot you get a quote from Craft and once you're out you'll see a raven will start flying into the sky simply shoot at it and it's going
to drop down the Raven's Talon but if for some reason you miss it once you come out out of the Fast Travel it will be flying around in the sky and you'll be able to hear it and you'll be able to shoot it down be flying all around the outskirts outside the castle towards spawn the final ritual item is going to be Paladin's brooch in order to get this you want to make your way to the dining hall and right above the vulture a perk machine is going to be a red Crystal that if you
shoot is going to produce a faint beam that you're going to want to align to the next Crystal so for this you want to make your way to the upstairs section of the map and shoot it it aligns with that Crystal right there you then want to stand directly in front of the vulture raid perk machine and shoot the laser to rebound it down to that next Crystal from there you want to go slightly left of the volure raade perk machine to shoot that Crystal to beam the laser into the alchemical lab you'll then want
to run into the alchemical lab and shoot the laser until it twists into this Crystal above the Arsenal machine shoot it while standing in front of this table and it should align all the lasers allowing you to pick up Paladin's broo now we have all four ritual items we can now upgrade each of them this can be done in any order but to upgrade Paladin's breach you'll be interacting with this yellow circle that will have spawned to place the brooch in and simply fill it up with soles until it's complete revealing a climp with a
golden chest to upgrade the raw item make your way in front of the castle and interact with this yellow circle that will have spawned and filled that up with Souls until complete the Horseshoe upgrade can be found right here inside of the spawn room where you'll just want to fill it up with souls to upgrade the Raven ritual item you want to take it to this circle in the underc and and again fill it up with Souls once you've completed all four of these just past the alchemical lab will be this new diagram on the
wall giving you an order of all four Elemental swords the numerical order being 1 2 3 and four take a note of this order as this is the order that we're going to be activating the next step with that involves all four Swords your order will be different to what you're seeing here in my game but for me the Raven sword was first so with whatever sword you do have first you want to make sure that you have it on you you also want want to use the sword on one of the treasure chests that
we just revealed so for the Raven sword that chest is in the underc if I melee the sword I will then be able to take the dark incantation and for this next step we have to give the knights our four Swords as well as the incantations because Raven was the first in my order have the Raven sword as well as the dark incantation and I make my way to the dining hall to find the Knight that matches my sword and I want to use my left bumper to use the incantation and then you want to
bring up your inspect animation with the sword in front of the Knight and if done correctly the Knight should accept that and take your sword making sure that is the first sword in your order and you'll then want to rinse and repeat this for all of the other swords so the next sword in my order was Lion and the location for the lion incantation is this box in the dining hall so using the sword it will bring up that light incantation which I'll pick up then I will use that incantation on the night and then
inspect the sword and it will accept that one for the Stag the electric incantation could be found in the spawn room right here once you have the electric incantation use it on the correct Knight then inspect the sword and it will accept that for the dragon incantation you can find it just in front of the castle right here and with your dragon sword use the incantation on the correct Knight and then inspect your sword and once all four are accepted the knights are going to spawn a Mystic orb that you'll want to pick up with
this Mystic orb there are going to be four Elemental challenges that you can do around the map in any order the first one we'll start with is on the second floor of the dining hall where you'll be able to place the orb into this section on the wall here and it's going to start a mini lock down with a bunch of green orbs spawning in order to complete this challenge all you need to do is stand in the orbs for enough time for them to disappear as each of these big green orbs is going to
send a smaller orb back to the Mystic orb that we placed you will have infinite spawning zombies during this and you don't have to necessarily kill them to complete this challenge you just need to stand in the orbs until the challenge is complete once complete you'll hear a quote from Craft and you'll be able to pick up the Mystic orb another location for a Mystic orb challenge is going to be here in spawn where you'll place it just to the right of the encant ation table which will then start another challenge where if you pay
attention to the element on the orb you'll need to take down zombies using specifically that variation of the sword using its left and right trigger ability as well as the incantation as only that will get souls that will fill up the orb to complete this challenge once complete you'll be able to pick up the Mystic orb and we can move on to our next trial the next trial is a fire trial which can be found right opposite the max ammo here in the courtyard once you've placed the Mystic orb and start the trial you have
to take down zombies using either the ultimate ability of the fire sword or using the fire incantation once complete be sure to pick up that Mystic orb and we can move on to the final trial and the location for this Mystic orb just to the left of the dark incantation in the underc where here you want to be killing zombies using either the dark incantation or the swords charged ability once you've completed the fourth and final Mystic orb and picked it up you will then be boss fight ready so at this point it's highly advised
to make sure you have all of your perks you have all of the necessary Buble gums that you've brought in that you want to have on I highly recommend the gs45 pistols a Kimbo triple pack-a-punched to take out zombies and a main primary weapon being an AR or an lmg with lots of ammo if you have any spare Salvage lying around it's highly advised to create a mutant injection score streak that you can take into the boss once you're ready make your way to the underc stairway and place the Mystic orb in the wall with
the four Elemental sword icons and it will reveal a secret room where you'll be able to pick up an item called The Guardian key as well as experience a brief story moment between the owl and Sam once completed make your way back to the spawn room and interact with the front of this statue here which will activate the statue and teleport you into the final boss fight this is a three-stage boss fight that will take you into a very small circular Arena where around the middle is going to be all four incantations that you can
pick up to take down zombies but you'll mainly be focusing on the boss where during phase one he has a hammer slam attack that can send several streaks of fire as well as walking towards you and stamping nearby for the first part of all three of his phases there is going to be a ridiculous amount of Shield health attached to the boss where you're just going to have to inflict a ton of damage before you'll really be able to start doing any critical damage to him once You' start putting a bit of damage into him
you'll notice that some parts of his body will now be glowing and if you hit those those are critical spots where you'll be able to inflict the most damage to him I highly advise during this be sure to run around the arena either clockwise or anticlockwise wi training up the zombies and using the incantations to take those out whilst you can as those zombies will drop armor plates as well as ammo after a short while the boss's critical spots will disappear and you'll just have to inflict a ton of damage into him again in order
to get more critical spots to appear once he's taken enough damage in phase one he will move into the middle of the arena and become a solid statue during this phase you'll have a ton of zombies that will start spawning as well as some special zombies and this is where your sword as well as the incantations will comeing extremely handy to take them all out before the boss returns again and you'll know you successfully completed this when the boss's health will return and you'll also have a max ammo spawn during this you'll also have your
first ghoul Gast moving into phase two the boss will be even more mobile than he was before and have a brand new attack where he has a homing slam there will be a red circle that will appear near your vision meaning that he's very soon going to jump try to slam down on you or slam down his hammer just like the first phase there will will be a ton of shield on him before his critical spots will start to be revealed this will now move to his arms as well as his legs and feet during
this he will also have a new attack where he'll spread lava across several parts of the Arena which will take about 15 to 20 seconds to disappear but if you walk across will be absolutely deadly once he's taken enough damage he'll Retreat back to the middle again but he'll have Shrunk The Arena down even more so to just the middle as beyond the outer edges is a constant stream of lava once you've taken out the zombies the boss will be back in and it's at this point that I highly recommend using your mutant injection where
you'll be able to do a ton of damage this can be combined with some really good gobble gums like idolize to stop zombies and other specials and Elites tracking you whilst you try to put damage in in this Final Phase but it is extremely important that you be careful around these edges cuz you can go down extremely quickly and even if you do with these pistols be sure to spam all the ammo in them before you use a self-revive or get revived and with a bit of luck and a bit of skill you will have
completed the Citadel day Mo Easter egg and the boss will have dropped an amulet item which you can pick up which will then take you to the final cut scene really hope you guys found this useful and informative if you did be sure to drop a thumbs up on this if you need any help with this Easter egg be sure to drop it in the comments below if you need an Easter egg guide for any of the maps in Black Ops 6 zombies then be sure to check them out on your screen here and subscribe
to not miss out on the future Maps