hey everyone welcome back to the channel today we're continuing the DP 600 series looking at what it's going to take to hopefully past that exam and become a fabric certified analytics engineer Today Is video 4 we're going to be looking at managing the analytics development life cycle and in this section exam we're going to be focusing on implementing Version Control creating and managing powerbi projects planning and implementing deployment Solutions performing impact analysis on down stream activities deploying and managing semantic models through the xmla endpoint and creating reusable assets so powerbi template files powerbi data source
files all these kind of things so that's what we've got in store for you today as ever there's going to be some sample questions at the end I'll also be posting all of the lesson notes and links for further resources in the school Community go and grab them there you will play the main character in the scenario again we're going to be continuing this theme this scenario that we've been developing throughout this course you're the main character are you ready let's begin so as you know already we are a consultant working with the client called
Camila and you've already helped Camila plan and Implement her fabric implementation her environment now the time has come to implement analytics development life cycle now she wants to focus on Version Control at least initially but to be honest she's not really familiar with Git Version Control never really used that in an analytics environment before so what you're going to have to do is set up a call with Camila and walk her through the basics of git first and Version Control what is it why does it even exist why is it now a part of fabric
and what are some of the key terms and terminology that we need to understand when we're implementing Version Control just bear in mind that all of the git integration features are currently in preview and also some of the other features we're going to be looking at today like the deployment pipeline functionality a lot in this kind of analytics life cycle stuff is still in the previous stages so just bear that in mind when we're walking through these examples I'll show you what's possible today but if you've coming from using like GitHub or git a lot
in the past then a lot of the features that you might be used to are currently not available so let's move on okay so I just wanted to start this video with a bit of a primer on git and Version Control in general and I think the best way to do that is to show you what this looks like and along the way we can explain some of the key Concepts in git and Version Control I realize that probably a lot of people who have been coming from maybe a powerbi background don't have experience with
Version Control and git in general so let's set up a project and start at a basic level introduce more and more Concepts as we go through this demo so in fabric the way you're going to start is with azid devops now AZ devops is a service that's used primarily for software development and managing infrastructure and the devop life cycle of that infrastructure and software development but it's also where we're going to use to store our code and our artifacts and our powerbi project files because they come with repositories so you need to set up an
account just go to this website here and I'll leave a link in the description or in the school Community now once you've set up AZ devops for your organization you'll come through to this page here I've set up an organization called fabric University and then you have this concept of project so project is going to be where you store your repositories your code it has lots of other features as well but we won't be going into too many of the other features in this short video so we're going to be creating a new project for
this demo let's just call it dp600 practice we're going to make it private and then just click on create okay so this is an Azure devops project on the left hand side you can see here make that a little bit bigger on the left hand side we've got some useful things to know about right so this is just the overview where you can see an overview of the project probably the most important ones to bear in mind are boards so this is like a Work Management tool for doing development work we're not going to be
focusing much on that in this video what we're interested in is this Repose repositories right so repositories is kind of the core thing that we need to implement Version Control now repositories are also available in GitHub but currently that integration is not possible between Fabric and GitHub you can only use Azure devops repos so that's why we're using this currently so a repository is just where we're going to store our code in the cloud so when you're developing locally like a powerbi report for example really what we want to do is store that report in
the cloud in our repository and that's where we're going to be controlling tracking changes managing who can make changes to that project in the repository so let's just do a bit of configuration here to set up this repository so that we can use it for Version Control so the first thing I'm going to do is right at the bottom here initialize a main branch with a read me and a readme file is just a markdown file it's like a text file just to initialize our branch and we'll talk a bit more about branches in a
bit more detail here currently I have one branch and it's the main branch here now branching is kind of like a whole field in itself there's lots of different strategies for how we can manage different branches when we developing our code or developing our fabric artifacts but we'll get into that in a bit more detail a bit later on for now what we're interested in really is creating a copy of this repository on our local machine right so that's going to be the first sync we want to get these two in sync because the way
that version control works in general is you develop locally on your local machine for powerbi and then you sync those changes up to the repository in the cloud and and if you have a big team of people maybe you have 10 people doing this they're all syncing their changes into this main branch by default so what we want to do is clone this repository and we get this URL here for this git repository we can copy the URL and what we want to do is clone that on our local machine so there's various different ways
to do that you might see in the documentation Microsoft use a tool called VSS code I personally prefer using GitHub desktop this is another tool it's completely free you can download it just Google GitHub desktop download it's built by obviously GitHub but it's also possible to do Azure devops repos in here as well and it just makes the whole process of Version Control and git a lot simpler it basically builds a UI on top of a lot of the git functionality so the first thing we want to do is click on file and clone repository
because we're trying to drag things down from the internet and if you click over to URL we can just copy the URL that we've got here that we got from our azid Devo repository and we can clone it now it's going to ask for a username and password so if you go back to a devops we've got generate this git credentials and we can just copy the username in there copy the password in there save and retry so that's just going to authenticate with our Azure develops account so we know that okay this is the
actual person that owns that repository it's creating that authentication between the two okay so what has that actually done well now what we've got is a copy of what we have in AZ devops in our local machine you can see the file path there is see users learn documents git and what we can actually do is open this in Explorer okay so now I have a copy of those files and folders from Azure devops on my local machine so that is the first thing that we need to do really is clone the repository get that
copy local and what's going to happen now we've got this all set up and synced so that GitHub desktop is Now tracking this folder so any changes you make locally to this folder it's going to pick those up right so for example if I do a new text file call it my file now if we go back to get up desktop you can see that it's picked up that change already it's saying you've added a new file in there it's called my file. text and if I open that with notepad for example just call it
my amazing file and I'll save that here we can see again it's tracked the changes so git works by tracking the changes in text based documents okay so traditionally it's used for code so a python file a SQL script or a Javascript file or C all these kind of things are Textra based right so they work really well with Git so now we've made some changes to our local repository right we've added this text file but what you'll notice is that you know here in Azure devops nothing has changed yet because what we need to
do is push those changes into the cloud environment maybe you've got a team you want other people to see the changes that you've made and we'll start by using this text file right and then we'll slowly move up to more complicated stuff we'll look at powerbi projects as well but for now let's just push these changes so you see down here we can do created a new file so created a new file and then what we're going to do is click this commit to main button so this is going to commit our changes onto that
main branch and up here we click on push to origin so we're going to commit and then push the changes up into the cloud right into Azure devops and so now what's going to happen if we refresh our Azure devops we can see that file there we can see my file. text my amazing file that's in there in this repository in Azure devops now Okay then if we want to make more changes maybe we want to change this a bit more even more or file and we save that again it's going to show you oh
well your original file was this okay this is what we've got stored in Azure devops this is what the the main branch is currently saying now you've changed that file right and we've noticed that okay so it's tracking the changes between every change you make in that file so that's really important thing to bear in mind so let's just update this text file obviously in practice in proper environments you add a more meaningful commit message because these are really important and we'll push that again to the origin using this button here so again if we
just go back to the Azure devops you can see that that has now updated in here as well great so that is the very very basic implementation of git and Version Control and syncing our local repository with our Azure devops repository in the cloud so at this stage I think it's worthwhile just noting what we've done here right so at the top we've created an AZ devops account we've added that read me file we've copied the git URL and cloned it locally and then we've modified that local folder create a new file modified the file
committed those changes back pushed the origin and observed the changes in a devops now this is great it's a good first step right we can track changes now between files but one of the core benefits of git and Version Control in general is that instead of just allowing anyone to update that main branch what we can do is we can protect that main branch so that we can control who has access to and who has the ability to overwrite those changes so let's make a few changes to the figuration of our repository in Azure devops
what we're going to do is we're going to protect that main branch so that nobody can just overwrite that file anymore we want to add in a review and approval phase and this is going to help a lot with our quality and control over who and how that code base is being changed so let's have a look at that in a bit more detail okay so in our Azure devops project here we can go to Project settings and then we can go down to repositories and then what we're going to do is add in a
policy for branch policies protect important branches namespaces so we're going to add something in here protect the default Branch create automatically included reviewers so I'm going to add myself in here as a reviewer just because there's only one person in this project in reality you might have a team of maybe senior developers or lead developers that responsible for reviewing code and approving changes to the the code base so now we've set that up let's have a look at doing something a bit more so we've got our file here so if I save this I've just
added another line in here new changes and if we go back to our GitHub here we can see that oh it's picked up that new changes again but now what I'm going to do is update this so added some new ch and I'm going to commit that and when I try to push this to the origin it's going to say error okay because now pushes to this Branch are not permitted you must use a PLL request to update this Branch so that's going to introduce a few new Concepts that we need to get around this
really number one is the concept of branches and number two is the concept of pull requests let's have a look at both of those now so now that we've implemented some protection over that main branch we have to change how we develop okay so now we have to use branching So currently all of my files that text file and the readme file is on this main branch so if I now want to update what's in that text file I'm going to have to create a new Branch because nobody can update and edit that main branch
directly so what we can do in GitHub desktop it's very easy so what we're going to do is click on Branch New Branch now we can change the name to change text file create this branch and now if we publish this branch and we can add in some changes here so now if we go back to Azure devops let's just go back to our project here and back to Repose and if we go down to this change text file you can see that it has actually found this new Branch this is a branch and if
we go over to the pull requests section we'll explain what that means in a minute but you can see that it's registered the fact that we have now published a new Branch so we've made some changes added that new changes line in the text file and it's popped up saying oh do you want to create a poll request here and so the poll request is when we want to make a change or merge some changes into the main branch okay and you can only do this through a review because that's the policy that I've set
up on that main branch so what we can do is create a PO request you can say oh I've added some new changes in here you can add in a reviewer which is going to be me and you can say oh please review this and you can create a PO request so what that's going to do is going to notify the reviewer and say oh this person wants you to review their changes to the code base on this change text file branch and now as the reviewer because I'm kind of playing both roles here I
can have a look at the file changes I can review the changes like oh yep added new changes that looks good to me I'm going to approve that change and now what you can do is complete so what complete is going to do is merge those changes into the main branch so your protected Branch because we've gone through the reviewer process the text file has been reviewed now we can merge it safely into the main branch there's a few options here that are quite important to bear in mind and we'll look at those when we
move into fabric we'll look at those in a bit more detail but generally kind of the default settings here complete Associated work items after merging is fine we don't want to delete change to text file after after merging generally in Fabric and we'll get to why that is in a minute we'll just do on complete merge Okay so we've now merged our po request let's have a look at the repository so now we have my text file in the main branch and it's got new changes Okay so we've merged our changes into this main branch
great that's the first section of this demo done okay in the second half there what we did was protect the main branch Okay so we've added an approver in the repository we've updated the repo approv a policy we tried committing a new change and it was rejected we've added a new feature Branch we brought the changes onto that Branch we've committed that branch and we've added a p request then our approver has approved it and we've merged it into the main branch and just to reiterate the benefits of that is that now we're checking the
changes between files and we're also controlling who can make changes so we're protecting that main branch and saying okay if you want to update this it has to go through an approval process now up until this point we've just been using one text file actually git can track the changes between any text based file format text base that's the the problem that existed with PB files pbix files kind of a bit of a black box right if you can't open a file in notepad and understand what's going on and it's going to struggle with Source
control Version Control in git now that is one of the core reasons why Microsoft developed the powerbi project file format because it represents a powerbi project in text based files right so let's just have a look at an example of a pbip first and then we'll look at how we can integrate that into Version Control Systems okay so here we are in powerbi desktop and I've just got one of the sample reports here from Microsoft the competitive marketing analysis report now what we're going to do is this is just a PBX file file at the
moment what we're going to do is save this as a pbip a powerbi project file then we're going to explore that and have a look at what that looks like so it's fairly easy to save your powerbi file as a powerbi project file so if we go to file and then save as and what we can do is we can find our git repository so that's in document git dp600 practice that's the repository that we just CL owned from Azure devops and it's currently empty for this kind of thing we can change the save as
type to a powerbi project and we can just save it like that click on Save and now we have our powerbi project saved in pbip format so let's just have a look at what that looks like okay so this is our git repository dp600 practice and we've saved our powerbi project as a pbip file it's actually a number of different files and folders right what we've got here is we've got the read me that was already in the repository and my file is that text file that we've been working with but now what we've got
is two folders a git ignore file and this pbip file format so what it's done is it's basically decomposed our pobi project into a series of files and folders that describe what's going on in that report okay so let's move back to uh GitHub desktop here and what you'll notice is well the first things I've created a new Branch okay so now that we're going to be updating this pbip file we'll notice that all of the files are now listed here because we created that pbip they're all text based they're all trackable using Version Control
first commit of the pbip again we can commit that up into Azure devops push that to the origin in Azure devops now if we go through into azid devops again pull requests we can see that here we can create a new pull request and then we can commit that in there the reviewer will be myself again create that approve it complete merge so now what we've got is our powerbi report in our Azure develops environment and it's been approved and it's now trackable through Version Control now imagine I'm a powerbi developer and I want to
make some changes to that report what is that going to look like well we're going to create a new Branch so anytime you're making changes to your powerbi file going to create a new Branch powerbi changes obviously You' make it a bit more descriptive than that but that's good enough for this purpose here then we're going to go through and actually this isn't a marketing report it's sales and marketing so we're going to update the title here just as an example we're going to save that file and now this is the real power of Version
Control for our powerbi assets but also all of the stuff in fabric that we'll have a look in a minute any changes that we make to that powerbi file and now being tracked in our Version Control System okay and then when we're done we can push those changes up into Azure devops go through the review process merge them into the the main branch okay so you're probably thinking great but up until this point you haven't even mentioned fabric I thought this was a channel talking about fabric well we just built up the concepts of Git
Version Control we've looked at the local case of powerbi report development but everything else in fabric happens in fabric Cloud so now let's look at where fabric fits into all this okay how do we set up a repository in our workspace how do we link a repository to our workspace let's have a look at how fabric fits into this picture now okay so here we are in Microsoft fabric what I've done is I've set up a workspace what we're going to do is link it to our Azure devops repository our Azure devop project so to
do this you will need to be a workspace administrator go to workspace settings so the first time time that you click on git integration you'll need to actually sync it with your account I've already done that with mine and it's going to allow you to select the organization the project the repository the P600 practice and a specific branch that you might want to connect to now one thing I would say is that the way that we've done that protecting of the branching in the last section of the video what I found in practice is that
this doesn't work particularly well currently with the way that git integration is set up in fabric but we'll have a look at what it looks like just click on connect and sync okay so now our first Sync has started and it's been done successfully what you'll notice is this Source control section here it's got zero in it so our source control so our things in AZ devops repository and what's in fabric is perfectly in sync currently and we can see that as well with the green synced and green synced here so now that we've got
uh what's in our Azure devops repo synced with what's in fabric now we can add in fabric items into this mix right so we can create a new data pipeline for example create a data pipeline at the moment I'll just keep it as an empty one and we can just go back to our repository and we can see that it has been uncommitted right and we can see the source control button up here is now saying one so if we click on that we can see that we got one change here so compared to what's
in our main branch in AZ devops it's noticed that we've got a change so it's similar to how we saw in GitHub desktop which tracks local changes this is tracking changes in fabric as well so what we can do is commit this change this data pipeline into our source control in a devops now to do this because we've got a protection on that main branch let's just try committing and see what it says first commit data pipeline but we know that we've got protections on that main branch so when we commit I don't think it's
going to allow us to do that no forbidden due to the branch policy and this is where it gets a bit more complicated within fabric what we're going to have to do is check out a new Branch so maybe we want to do adding data pipeline that can be our new branch and then that's going to allow us to commit added a new data pipeline we're going to click on the item that we want to merge which is our data pipeline or commit not merge and now that's going to go through into Azure devops okay
so if we open up our poll requests section boom we can see the adding data pipeline so now we've got these two things in sync between Fabric and Azure devops and our local repository for powerbi development and Azure devops and again if we want to merge that into the code base into the main branch we can go through a familiar process of choosing a reviewer creating that pull request and if you're the approver you can then approve that pull request and complete and merge it into the main branch so then if we go back to
our repository now we can see that in our main branch we have this my data pipeline data pipeline so that is now being tracked with Version Control in our repository and if we go back to fabric we can say that we've now got three synced items here so it's perfectly in sync with what's in our Branch now the problem here or the slight limitation that I found is changing back to the main branch cuz currently we're on this adding data pipeline Branch okay and that was just a feature Branch we want to move back onto
the main branch normally so that we can maybe create another another Branch but we don't want to be branching from this added data pipeline we want to be branching from the main branch now that is possible we can just go back to workspace settings go through to the get integration again and we can change our Branch back to the main so we're going to switch and override and now we're going back to the the main branch and all three items are synced because we know that we've merged into that main branch but the problem here
is that only the workspace administrator can change that Branch back so if you found any better ways of working with protected branches in git and fabric please let me know okay so we've covered quite a lot of ground there from the basics of git and Version Control in general right through to syncing our changes or tracking changes in a powerbi project into AZ devops and then the same from a fabric environment so tracking changes that we make within fabric also to the same Azure devops Repository let just do a bit of a summary there and
focus back on the exam because obviously not all of that is going to be tested some of it was just for your background knowledge so in general Version Control with Git allows you to track changes made to fabric items we can also revert back to older versions of an item as well I didn't show you how to do that but that is also possible within git item management Git Version Control now one of the benefits of this is that multiple users can collaborate on the same fabric item or the same powerbi report Okay so no
longer are you sending around a PBX file to your colleague everyone can work on the same pbip file and changes are tracked using Version Control and you can also update the same report at the same time as long as there's no conflicts when you merge into your branch two different changes from two different people can both be merged into the same kind of Central Branch as long as there's no conflicts as I mentioned that's absolutely fine so it's a good way that enables collaboration on PBI reports we've also looked at how you can Implement a
check and approval process for approving changes made to fabric items so if you don't want your Junior developer to be updating your fabric notebooks and just pushing those into your Git Version controlled repository Without You approving them you want to set up protections on that on your main branch or your equivalent of a main branch before they get pushed into production now currently the following items are supported I would argue that not all of these are probably fully support supported like as as fully supported as we would like but it is possible to at least
check them into a versin control system so data pipelines lake house notebooks pageat reports reports apart from ones that are connected to Azure analysis services and also semantic models except for these exceptions here so that is git integration and Version Control now the next section of the exam is is related to this but it's around deployment Solutions so let's just look at what do we mean by deployment Solutions well actually let's start with deployment what do we mean by deployment because for many people coming from the world of analytics deployment is probably a bit of
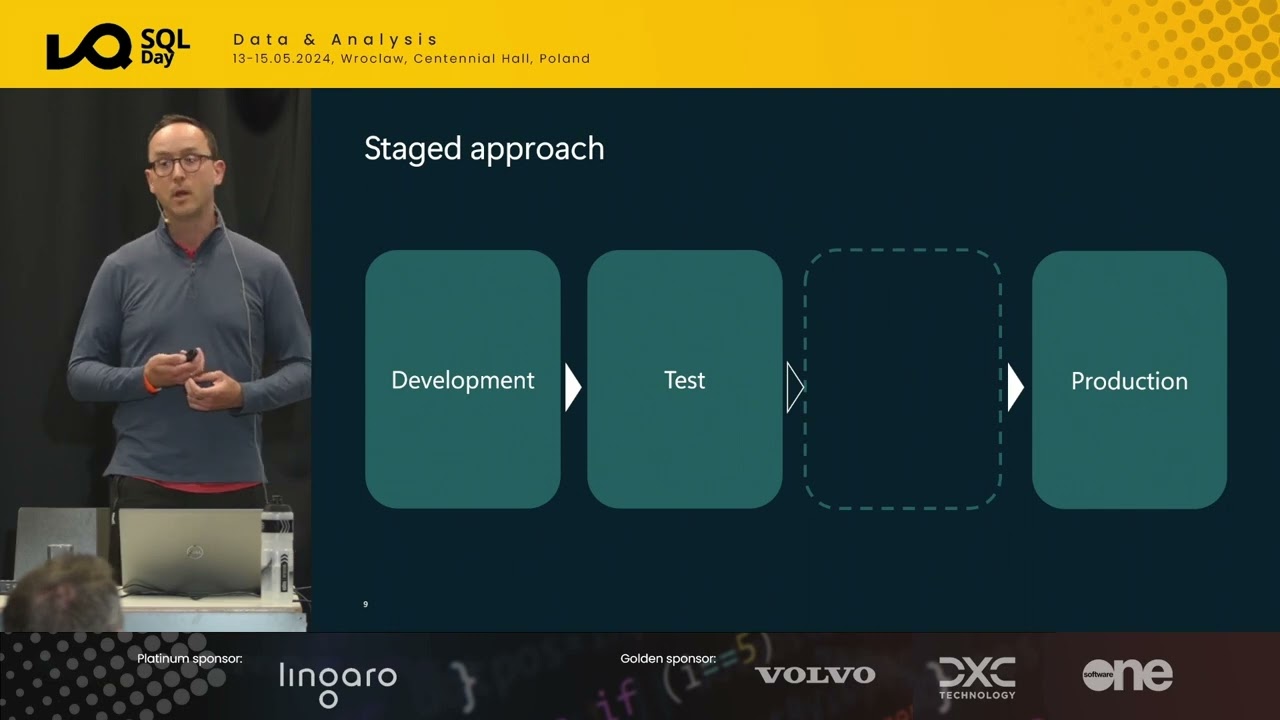
a New Concept okay so rather than having one copy of a powerbi report for example which is your production copy instead we're going to have multiple copies typically three sometimes four we're going to have a development version and that's the version that you're using when you're making changes to the reports we're going to have a test version of that report so so that is the report that you send to your client or your colleagues to review or maybe you've got automated testing in place that's done at that stage and the test version is sometimes also
called the staging version in databases we've also got the production report right so that is the the public facing report that gets given to your client or it gets shared within your organization now Microsoft have released a feature called deployment pipelines to help manage these three environments or more in a bit more detail so let's have a look at deployment pipelines in Microsoft Fabric in a bit more detail okay so now let's look at how we can set up deployment pipelines in Microsoft fabric so what you're going to need here is three workspaces and each
workspace is going to represent a different environment a different stage in our deployment pipeline so if we click through to workspaces you'll see that I've set up dp600 Dev test and production so these are three separate workspaces and currently they're completely empty so what we're going to do is set up a deployment pipeline so that we can manage that deployment process from development test through to production because what we want to be doing is make doing a lot of our development work obviously in the development workspace and then when it's ready we want to push
those changes into our test workspace so that we can do testing know share it with colleagues who might want to test a report or a notebook run test scripts so integration tests unit tests data validation checks something like that in this test environment and then the production is going to be where we're going to be sharing making our public our production reports or notebooks or things like that so what we're going to do to set up a deployment pipeline is click on the workspaces and then deployment pipelines and we're going to set up a new
Pipeline and we're going to give it a name so we can call it dp600 Pipeline and it's going to ask you to customize your stages now you can add multiple stages you can add as many as you like here for our example we're just going to do three development test and production and click create and now we're going to get through to this kind of wizard this UI interface it's going to allow us to specify which workspace we want to connect to which stage in our deployment pipeline process so we want to find our dp600
Dev workspace assign that here then for the test stage dp600 test assign that here then for the production do that as well so now we've synced our three workspaces with our three stages in the deployment Pipeline and currently we can see that this completely empty right so we haven't got any items in any of these three workspaces so let's go through to our dp600 Dev workspace and we can see that it's here we synced it with this deployment pipeline so it knows it's part of a deployment pipeline here so if we create a new notebook
so this is our new ETL notebook let's just call it ETL notebook could be doing whatever you want in there doesn't really matter for these for the purposes of this demo and we're going to go back into our workspace and now we can see we've got this ETL notebook say we're happy with that we've done our development work and we're happy with it now we want to push that into our test environment so we'll go into our deployment Pipeline and here what you can see is that now we can see this deploy right so we
can select any items that we've got in our Dev environment and we can deploy them we can add a note in there if you want and we can deploy that into our test environment so it's going to move one stage to the right into to our test environment what it's going to do is copy exactly the file that you've got there and it's going to copy it and paste it into our test environment so now we can see we've got one notebook in this test environment okay so let's just have a look at that there
so workspaces dp600 test so now we have ETL notebook in our test environment now one thing to bear in mind is that we have a history of our deployments so we've seen that we've deployed to test at this time of date by this person me and we can see the number of items that have changed changed so we've got one new item in that deployment now another thing that we need to look at is this button here so this is quite important it's called deployment rules so if we click on that we can look at
a deployment Rule and deployment rules basically allow you to change different parameters and settings at different stages in the pipeline and they differ depending on the fabric item that you're looking to assign these deployment rules so for the notebook a deploy ment rule that we can set is changing the default Lakehouse okay so we can add a rule in there whereby we can change the default Lakehouse so maybe you have a development Lakehouse and a test lake house and when we push to the test environment actually we want that notebook to be reading from the
test Lakehouse so that's what we're going to be doing here in this deployment rules section so that's something important to note there now if we want to actually deploy this all the way into production we can click on deployment at this test stage and now it's going to copy that notebook into our production environment now if we click on the settings of this stage the production stage we can see that we've got this make stage public okay and what that means is that people can actually access the output of this stage so if they're in
that workspace they're going to be able to see the output they're going to be able to see the items that are in there with the other stages like this test environment by default that is not a public stage so so that's something to bear in mind around public stages and non-public stages so that's the very basics of deployment pipelines now currently the functionality I would say is quite limited as to what you can do in deployment pipelines in fabric I think this is a feature that they're going to be adding a lot more to currently
it's a very manual process right and normally when we're deploying stuff in in the real world in software development World a lot of this is automated Okay so we've looked at the basics of deployment pipelines what that looks like in fabri brick let's just do a bit of a summary of what we've just learned there again focusing back on the exam so the overall goal is to add layers of control when we're developing and deploying new fabric items okay or making changes to existing items in fabric ultimately we're trying to ensure that new things that
you develop are not going to break your existing analytic Solutions right so you're adding in that test layer so we're not just pushing straight into production and risking ruining any sort of analytics in environment now normally this includes three stages development test staging test St staging and production sometimes you had a fourth one in there called like preprod it just depends on your strategy now deployment using deployment pipelines involves copying items from workspace to another and by default in fabric that's a manual process and deployment rules can be implemented to change things like the default
Lakehouse for a notebook or the data sets and data sources that your semantic model reads from for example now as well as the deployment pipelines functionality there's a number of other ways to manage deployment in fabric now that could be done through branching in Azure devops you can also use in Azure devops functionality called pipelines right so you create a yaml template we're not going to go through what that looks like but just for the exam know that it is possible and you can also do deployment of semantic models via the xmla endpoint we're going
to be looking at that in a bit more detail a bit later on in this lesson okay so as I mentioned there are a few other ways that we can deploy things in fabric now a really good resource here to check out is Kevin Chance's blog and I'll leave a link to that in the school Community specifically there's two blog posts here around CD for the data warehouse now the data warehouse is not natively supported yet in fabric but you can set up a SQL project and then use things like yaml pipelines and Azure devops
so if you want to understand and other ways that we can deploy items in fabric I recommend checking out these blogs here now if we're looking specifically at the semantic model and how we can deploy these we also have the option of the xmla endpoint so broadly speaking there's two ways to create and manage semantic models number one is to create and manage your semantic model within your workspace so create it from a lake house or a data warehouse within your workspace but method two is to create your sematic model in a third party tool
for example table editor and then you can deploy that via What's called the xmla endpoint into your workspace now to grab that xmla endpoint you need to go to your workspace settings and you get this pobi URL kind of thing and you can connect that to Tabler editor or SS SMS or Dax Studio as well to deploy your models into fabric using this xmla endpoint okay so the next section of the study guide that we're going to look at is these three different file types or three different items that we can create in pobi and
Microsoft fabric that you need to know for the exam number one is the powerbi template file then we got the powerbi data source file and then shared semantic models so we're going to look at each of these in a bit more detail starting with the powerbi template file okay so the powerbi template file is a reusable asset that can improve the efficiency and consistency when you're creating powerbi reports now you can easily save a PBX file as a powerbi template file and then you can use that to generate new reports in a given style or
with a given layout already specified in that template file if you got parameters in that powerbi file then when you create a new project or a new file from the template you'll be asked to set your parameters in there if there's any parameters in that report let's just have a quick look at how you can create a powerbi template file from a pbix file okay so here we are back in powerbi desktop and here we've got a powerbi project that we're working on our sales and marketing analysis report say we want to create multiple versions
of this report all with the same format the same structure and the same layout here so the same pages in this report what we can do simply is go to file save as and then at the bottom here rather than saving as a PBX or a PBP we're going to save it as a pbit a powerbi template file so we just select a folder to save it to and then click on Save we can give it a description sales template okay and that's going to save your report and the next time you go to create
a new report we can then import that template and that can be your starting point for your new report so the powerbi data source file or PB IDs is a another file type that basically represents a data source file so it's a reusable asset and can help us quickly transfer all of the data connections that you create in one powerbi file transfer them over to another report okay in this section of the exam we're going to be looking at impact analysis and the lineage tool in Microsoft fabric so here we have a workspace and it's
got quite a lot of different items and if we click on this button here in the top right hand corner we can change from this list View to a lineage View and this is what this looks like here we can see all of our fabric it items within that workspace and we can have a look at how data is Flowing from Source through to different lake houses here we've got some notebooks here the semantic model that's being created from that Lake housee now for each of the main items in our lineage view we've got this
button here which is the impact analysis button so for this Bronze Lake housee we can click on the impact analysis and we can look at what the downstream items of that Lakehouse are so if you're going to be making some changes to that Lakehouse that might break some of the notebooks or the semantic model for example the impact analysis basically allows us to see what the downstream items are now in our example we've only got three Downstream items but you could have tens or 20s or hundreds of different Downstream items so it's really important to
know if you make a change Upstream what the impact is going to be another piece of functionality that you have here is to notify people so you can notify people that are listening for notifications on any of those Downstream items and you can let them know before you make a change then we're going to add a new column to this table in the lake house for example we're going to change add some new tables FYI just to make them aware of the changes that you're going to make before you make them so that's basically all
the lineage tool and the impact analysis tool in fabric look like at the moment again I think they're adding a lot more functionality to these features in the future that's basically all you can do with this at the moment just bearing that in mind for the exam because you might get asked questions around notification about how do you find Downstream items of a particular fabric item so just have a quick look at some of your workspaces perform some impact analysis just by looking at the downstream items for the exam Okay so we've covered a lot
of grounds there in that video Let's just round the video up with some practice questions to test your knowledge of this section of the exam question one you are looking to improve the efficiency and consistency of your powerbi development team you want each report created by the team to always consist of three pages the intro the context and the analysis the reports should always align to the company branding which of the following would help you achieve this number one would you create a pbip file two create a PBX file three create a pbit file four
create a PB IDs file or number five using a Jason custom report theme pause the video here have a think and I'll reveal the answer shortly so the answer here is the pbit file because that is the powerbi template file now the important part of this question was you want each report created by the team to consist of the following pages right so you might have thought oh we're talking about branding we talking about following a style guide e might be an answer there using the Json report theme that we looked at in the first
video in this series but if we want to include Pages kind of template Pages then that's going to be the powerbi template file pbip the project file the PBX that's not going to do the job and the pbids is just for data sources not for giving us a template structure to follow for our report which of the following most accurately describes git a to use Git You must be using GitHub B git is a Microsoft product for tracking changes made to fabric items C git is an open- Source version control system that tracks changes in
any set of text based files D git allows us to add deployment rules to fabric deployment pipelines so the answer here is C git is an open-source version control system that tracks changes in any set of text based files right so git the underlying technology is open source and it's used in a wide variety of Version Control Systems one of which is azure devops the rep in there GitHub is another example bit bucket is another example there's lots of these different ones so you don't have to be using GitHub to be using git git is
not a Microsoft product for using specifically in fabric it's kind of like a generic tool that's used right across software development industry and it's nothing to do really with deployment rules in fabric deployment pipelines although you can set up git to be the version control system in different stages different workspaces in your deployment Pipelines but it's not really best describing git question three in an Azure devops repo the main branch is protected so it needs approval before any changes are merged into it the repo contains one pbip file you have to update the title in
the report merging these changes to the main branch in which order should you carry out the following tasks to achieve this now this is an unordered list your job is to order this list so the tasks here are commit and push the feature Branch wait for approval then merge into the main branch clone the repository to your local machine make the required changes to the report check out a new feature Branch from the main branch and then open a poll request in Azure repos or Azure devops so order this list and then we'll show you
the correct order shortly so the correct ordering here starts with cloning the repository to your local machine so if you want to make any changes to a report you need that repository to be in your local environment first then you're going to check out a branch because the main branch is protected so we can't edit that directly we need to check out a new Branch from the main branch then we're going to make the changes to the report these are going to be tracked via our Version Control System we're going to commit and push those
changes that we made on that feature Branch we're going to open a pull request in Azure repos or Azure devops and we're going to wait for approval and then merge it into the main branch so that is the correct order here question four you want to deploy a semantic model using the xmla endo point where can you find the XML mend point to set up a connection with a third party tool is it a go to the workspace settings for the workspace you want to deploy your model to B go to the fabric admin portal
and then capacity settings C in your workspace find your semantic model then click on the settings to get the xmla endpoint address in the Azure portal in your fabric capacity go to the xmla endpoint connection string settings so the answer here is a go to the workspace settings for your workspace you want to deploy your model to when we're creating that xmla endpoint connection that's going to link to our workspace in fabric that's where you're going to go to get the address not in capacity settings not in the Azure portal and C in your workspace
find your sematic model where the sematic model doesn't actually exist in that workspace because we want to deploy it into there and even if it did exist it doesn't have the XML m point in the settings anyway so congratulations that is the first section of the exam study guide complete next up we move into the biggest section of the exam which is worth 40 to 45% Camila has been seriously impressed with your skills and knowledge so far in the next lesson we'll be looking at how to create objects in a Lakehouse and a data warehouse
so click here for the next lesson in this series


![Visual Calculations in Power BI - DAX Made Easy! [Full Course]](https://img.youtube.com/vi/JITM2iW2uLQ/maxresdefault.jpg)