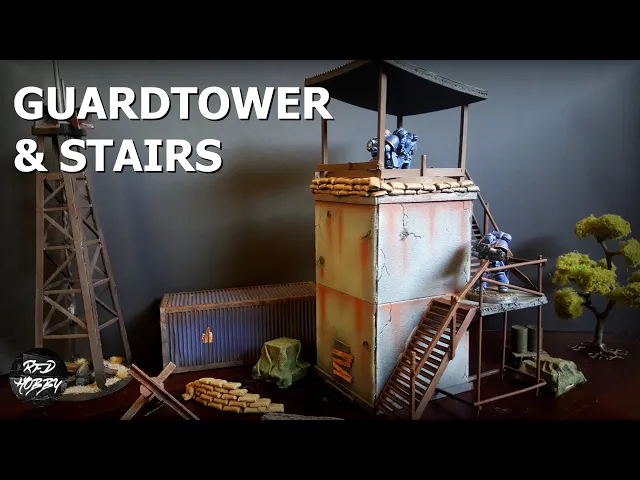
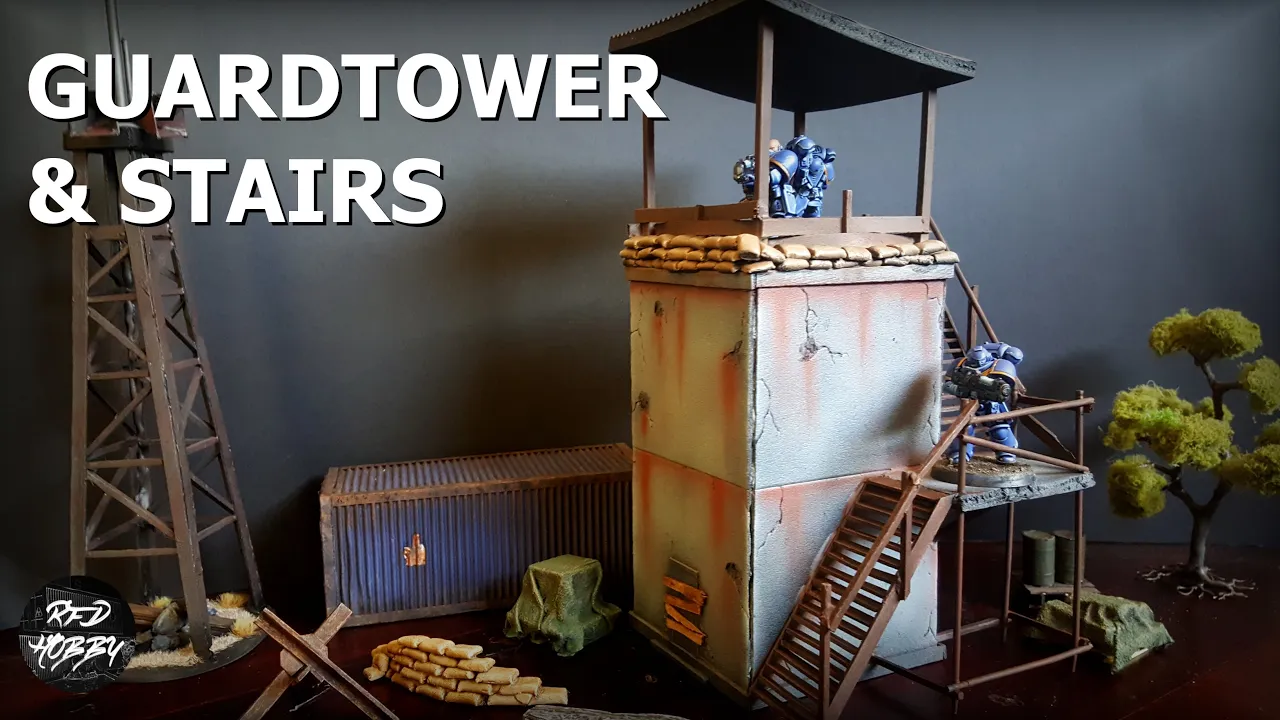
I Ronon welcome to another war gaming terrain tutorial this week we're going to be looking at building this guard tower here now this girl tower the main structure this is pretty simple but we are going to complicate things a little bit by building these stairs as well now we're going to pull together a couple of different techniques that are used in different videos over the last couple of months I'll point those out as we go through I can enjoy the video and I hope you have a go at this because it is a fantastic looking
little building as you can see let's get stuck in now for the main structure of this building I'm using foam board you probably use cardboard here but foam boards really good because it will give us a nice concrete look and allows us to sort of carve in some cracks and things like that into it as well the dimensions are down there below you could probably change those to suit your needs but make sure that you are allowing enough room for those stairs if you're going to put the stairs on there to creep around the side
of this building so to join these up to make the tower structure what I'm going to do is just carve these into I'll cover a 45 angle along the long edge of all of these just so that these when I glue them together they'll butt up and give us some nicer slightly sharper corners this doesn't have to be perfect on these cuts just do your best to steady hand and a sharp knife here will will give you a good pretty good result and at the end of the day you'll see on mind these these don't
join up perfectly but they still look fantastic so don't sweat this too much just do your best to get through cutting these at that 45 like I said just take it nice and slow and you should be able to get through that pretty easily you can see here even though these weren't perfect cuts they're going to join up just just fine so the other thing I'm going to do here is just a little detail for the outside of the building I'm just scoring a little line on these this just gives us a little bit of
a join in the concrete structure you don't need to do that just adds a little extra detail there so all I'm going to do for these it is hot glue this seems to work fine sets really quickly just be careful obviously the hot glue can melt the foam a little bit so and it is really tricky if you do let this dry before you get the glue get the joint glued together so try to work as quick as you can make sure you've got your lines if you've scored those lines that I did on the
outside make sure that they line up ripping this apart doesn't do great things for the foam if you're trying to pull this hot glue apart but basically just join those four sides together exactly like that until you get that main structure as I said the hot glue here dries really quickly so you should be able to get that built up nice and quickly and the next thing we're going to do is just put a cap on the top so that we've got a platform to stand on so make sure your glue is dried and you've
got this as square as possible to make the cap for the end or the platform basically just sit it down or a piece of foam core and you can just mark that out and cut it it's really quite simple not much do that we'll just hot glue that down onto the onto the top of the platform so make sure you know which which side is going to be a top and which is going to be your bottom I've scored that line not in the middle so I do have a top and a bottom that I'm
working on the next thing I'm going to do here is just I'm just going to frame the top and the bottom with these staring sticks this just gave it a little bit of extra detail around it made it look quite nice again you're just marking this out on the building itself and just hot gluing these sticks into place now once you've got that done you'll see here also what I've done is just to add a little door to the front of this building now to do that I just use cereal box cardboard in the exact
same way I did when I made the doors for the shipping containers so if you haven't seen that there's a link at the top of the screen for that video there's very simple not much to that at all again just adds another little base piece of detail to the building now these sticks here I'm not exactly sure what they are I found them in the catering section of the cheap shop these are bamboo I think the reason I really like these is that this QR part of these is square and it's quite thick so this
will work perfectly for the supports for our roof on our guard tower I'm not going to cut these or change these at all at the moment these are glue in nicely they have that big flat section on the end which helps us with the glue ups a little bit more contact point there to put these through what I do is just feed them through the bottom you want to try and make sure that these are as straight as possible so what I do is just lay it on the table like that and just press them
in making sure again that they are as square as possible to the building once you've got them in place you can feed those right through then you've got your holes ready to go so we can just pull these out add some glue then and push them back in and make sure that they are sitting pretty straight once you've got them pushed through the top just make sure again that they are square and straight up and down it's pretty easy for them to sort of a skewer off to the side so keep an eye on those
as you push them through make sure they're nice straight up and down now you do want to leave that to dry you don't want to start this next part of this process while those are still wet because we will be applying so a little bit of pressure as we put this roof on now all I've done is just cut another piece of foamboard same size as the as the footprint of the building now when you're pushing this down on here you do want to make sure that you are pushing it down at the angle or
roughly at the angle that you want your roof to sit so don't try and push it on flat and Pierce it through because there you're going to then try and twist it which is going to put extra pressure and perhaps change these or you know push these pillars off square so try and push it down at the angle roughly that you want it to sit on the building and that will make sure it doesn't sort of distort those those supports that we've put in place there so once you've got that push down and roughly where
you want to put it at the height you want it you just go through and Mark those with a pencil or a pen or something and we'll come through and trim those off with the garden shears again these are pretty thick sticks so you probably won't get through these with a pair of scissors now do make sure you mark where is the top and the front of of your roof here so that when you do put it back on it does go back on the same way I just make sure all the lines of the
whole sorry line up properly and when we put it back on it should seem nice and exactly where we want it so as you can see there that's all in place I haven't glued at this stage I will go back and put some glue on those a little bit later on just allows me to take it off if I need to while I'm doing this next part so the next thing we're going to do is put on the little walls around the top of the guard tower there for this I need some little supports in
the middle of those main uprights we've got there so I'm just getting some matchsticks and just sort of Shaving these off with my craft knife down to a bit of a point this just allows it to push through that foam a little bit easier so what I want is on the three sides where I'm going to have the walls and kind of put in one of these middle supports basically just you know cut it to the size you want it and push it down into the foam board it should sit pretty good it's it's it's
not you know it's not going to be exactly sturdy at this stage once we put a bit of pressure on there as you'll see it will move around and Bend but we just want these in place for the time being and then we will hit them with some glue a little bit later on so once you've got three of those in there you're ready to start looking at these little wooden walls now when we're putting these on I'm just using the staring sticks these all you'll find these will be perfect for this they're flexible and
they're not too thick and that will work for the way we're going to build this wall most of this is going to be covered up so you could go about this however you like what I found is kind of its kind of like weaving them on there I guess I'm not sure the proper term for this but as you can see they're basically going to be putting pressure on that center piece that Center upright that we've put in place there and we're just going to work these against each other and it will pull them back
straight so make sure you've got these trimmed down to you know as tight as you can get them to fit in there so you don't want these little sticks to be overhanging too much it will affect when we put the sides on see you'll probably notice in a minute I'm going to actually have to pull this apart and re you know cut some of these sticks back to the way they should have been so it's a little bit of trial and error to get this all to line up when you're going putting these sides on
but as you can see they will sit in place properly a Sicilian place pretty firmly without any glue they'll just sit there but we will add a favorite of PVA glue to all these joints and all these places whether this contact or supports so here you can see I'm just trimming up these sticks a little bit again just so that these side ones go on properly a little bit of trial and error there's not much to this as you can see it didn't take me too long to get this all trimmed up and in place
properly as long as you've got those middle supports pushed down far enough they shouldn't peel out or break off as you're going through just be a little bit careful as you go through and and you will get to the desired result now I've put three on each side obviously leaving the back for the entrance and as you can see here once you've got that in place and it's looking pretty good just hit all the joints with a fair dollop of PVA glue there just so that that'll hold those in place once it's dried the next
thing we're going to do is add some sandbags now I'll put a link to the video for this I'm not going to make them in this video because I did do that last time now to put these on it's just a big bead of and a nice hefty bead of PVA glue along there pretty much exactly the same as we made the sandbag walls but this time we're just building it onto the side of the structure here there should be enough of a Ledge there for these to go on without too much trouble just work
your way around until you've got that built up to the desired height and you'll see straight away it starts to look really good we've covered up that a lot of that timber structure behind it but I think having both their works really well so we're just worth putting that extra time in to get that done like that as you can see that's looking really good you do want to be very liberal with the PVA glue on that one just to make sure that they aren't going to fall off or break at any stage now we're
going to get stuck into building this stairs so the first thing we want to do is make a little jig for to set these up and glue them up once you've got this little jig you can reuse it over and over so building this once is enough to get through multiple sets of stairs all we're going to do is grab some matchsticks on a base of cardboard you want to snap these matchsticks to be less than the length of your actual stairs so my stairs are going to be three centimeters wide so I made sure
I've snapped those down to be less than that we can trim them up after the fact after we've glued them down but you will find that if you can snap them down to roughly the right length of the the first way or the first time through you'll find that it makes it a bit easier down the track now you do want to put a bead of glue down the middle makes you sure you're not gluing all there all the way to the ends of these matchsticks it just makes it a bit easier for trimming them
up a bit later on now the next thing I'm going to do there is just put a support along the side now I've glued this too far away from my matchsticks so I did have to pull it off and and put it back in there but you'll see in the next shot that I've trimmed it up and I've actually new I've trimmed up all the matchsticks and I've actually moved that support in a little bit closer the reason for that you'll see very shortly so you want to make sure the distance between each of these
matchsticks is roughly the the width of another matchstick so try and get them as even as possible it doesn't really matter but the stairs are going to look janky no matter what but they are they're more careful you can be with that the better now just use some stirring sticks again and I've cut all these down to three centimetres now you can see that I've got enough room there where I can place a staring stick along the side and also one at the top without actually a impacting those glued down matchsticks so I know it's
a bit hard to explain but you'll see as I go through the video here exactly what I'm talking about so this is going to be the side rail for our stairs so you can just sort of get these into place make a few small adjustments and we get our steering stick here add a bit of PVA glue and we're just going to line that along that side rail that we've glued in that paddle pop stick we've glued along the side there so just place that in there and this next shot I'm sorry it's not the
best shot but it will show you basically what we're going to do so we've got two stirring sticks along the sides these are the side rails for our stairs and I'm just using my mat here just just sort of as a bit of a vice to push this push these all together now the trick here is that your stairs are going to you know if you're hand cutting these it's going to be very very lucky if you can get these to be all exactly the same length so you're going to probably have some that don't
contact properly but what we're going to do is add some extra glue on these once you've got them a little bit dry now you do want to be taking these off this jig after about five or ten maybe fifteen minutes before the glue is fully dry you just want to make sure that you don't glue that down to the jig and you'll see here that once you've got these dried up they do look pretty good again leave them in there as long as you can make sure that these are dry fully dry before you start
playing around with them PVA glue does take a little while and you don't want these to be breaking apart as you're cutting them now because our stairs are going to wrap around the side of the building we do need a little platform here just to join these two together and wrap around the side again I'm just making sure that the width of this little platform is as wide or just a little bit wider than with the my stairs so you can just sort of place that up against your building make sure that it is going
to give you enough enough there for the second set of stairs to go on trimming up your stairs you probably find there not going to be the exact length you want them to be for your building so I just found hitting them with a craft knife and working your way through will get them trimmed down to the right length for you now we're just kind of quickly test fit this to make sure it's going to sit on there properly make a few markings and as I said again just make sure that everything's going to line
up it's best to get this right before you glue it on very hard to cut this once you've put it on there so do your best to just do a bit of a test fit on that and get it in there and get it trimmed up now hot glue works best for this again it's nice and quick it'll put it straight on there and we'll be able to move through this build pretty quick at this point now using this hot glue you could probably PVA it on there but I found hot glue work just fine
we're gonna add some supports to they said at the end anyway so don't worry too much about it now here I'm just going to glue on my platform again making sure that we've got enough room around that side for that second set of stairs to butt up on there so so long as you put some good marks on there you shouldn't have too much trouble with this with a platform on there we can now look at the second set of stairs going up to the top of the tower again test fit this before you glue
it just to make sure you're not going to make any mistakes where you haven't you know shorted yourself under number of stairs that you need putting this in place it's pretty pretty easy again nice and quick with that hot glue and we'll add the second platform on here as well now I'm not going to go into a great lot of detail on adding all the supports and the handrails on this stair it's basically just PVA glue matchsticks and a bit of patience for this so because we're using PVA glue for the handrails it does take
a little while to dry so you want to sort of work your way through this pretty slowly like I said a bit of patience with your PVA glue before you move onto each new support or or rail that you're putting on for the sides here I'm just using some toothpicks just push straight down and from this we will start building our handrails and adding on our little bits of detail on the outside here you can adding as much as you need you'll see in the next shot here where I've put these rails and supports you
can just stick in things through the bottom as you can see there this doesn't have to be perfect this is really janky looking but this is a you know as far as I'm concerned this is an add-on to this structure so it's not who wasn't part of the main structure when it was built something that's being put on there and then needing worked into this building already so it doesn't matter that it doesn't need to be perfect you can see this is certainly not perfect but this gives us a lot of extra support on here
and holds everything in place pretty well as I mentioned gluing these on can get a little bit frustrating like I said it takes a bit of patience to work with that PVA glue but if you let this set and add a bit of extra PVA glue once it's in place you'll find that that is going to be nice and strong getting thrown around the tables probably not it's probably not kind of sort of life but you know this looks really good I mean if you're just looking for the items for your shelf you know or
if you're going to be careful with it you'll find this it's going to this is going to look great so the next thing I'm going to do is just add a little a couple of little supports underneath these platforms and I want these to go in at an angle so again I've just cut down the points of these matchsticks to make them go into this foam board a little bit easier now when you're pushing them in do you want to try and put them on the angle that you roughly want them to sit but I
might but them up against the bottom of that platform as best you can what you'll find is once you sort of pierce this in and get it in you'll be able to push the top bit up into the foam board platform just enough for it to sit there and look like it's part of that structure so as you can see here just angled in and pushed in and it looks perfect so you'll see with this one exactly what I mean I've just put them in there at the angle roughly where I want them to see
it and push them through the sidewall that give it a little push up into the top of the platform and it really does look like it's part of that structure so we'll add some glue to these joints as well and as you can see looking pretty good so far I've added another one under that big platform and we're just about done with this building now you could probably stop here if you wanted to I am going to add some extra details just around the concrete of this building to do this all we did was exactly
the same thing we did with the concrete barriers on if you remember that video we made those out of foam board as well and we added some cracks and and different things there I'll put a link at the top of the screen you can see so I won't go through the entire process of this you can check out that video if you want to see some more exactly how I did this but basically just a small pen or mechanical pencil and you'll be able to put some cracks and some divots into the concrete walls and
we are just about ready to paint so I'm not going to go through painting in this video we've already taken too long I think so I might do another video where I paint this one up for you but I hope you enjoyed this one please hit that subscribe button if you haven't already thank you to those that have if you've enjoyed the video hit like as well feel free to leave me a comment if you have any suggestions or ideas and you guys have a great day