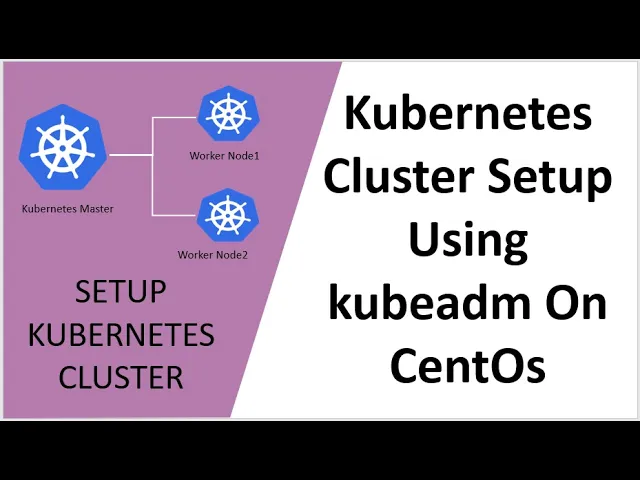
so [Music] hello friends welcome back to my channel and today we are back with another exciting tutorial so we are back with the kubernetes tutorial for beginners and in this tutorial we are going to talk about how to set up kubernetes cluster using cubed among centos so in our previous tutorials on kubernetes we have used mini cube for overall testing and learning these tutorials but now we are going into actual production kind of setup where we will have you know a cluster kubernetes cluster so when we talk about kubernetes cluster uh we had this tutorial
section covered in one of my previous tutorial about the kubernetes architecture so what components we will have it in a cluster like we'll have a kubernetes master or a control plane and we will have workers or nodes so we also discussed about different components which the control plane will have it or the workers like api servers etcd like no schedulers cubelet q proxy so all those things we have discussed in in our previous tutorial on kubernetes cluster so you can have a look on that i will link that video as well in this video description
so in this uh topic what we are going to do is in our setup of kubernetes cluster we are going to have a kubernetes master and also we will have a kubernetes nodes so we will have two worker nodes one for one worker node and another worker node two so that will be our setup where we'll have three machines one will act as a kubernetes master and other two will act as a worker nodes so we will see how to set up this kind of kubernetes cluster in the section of this tutorial so let's talk
about you know some pre requests what we want to do as part of our uh this tutorial so to start with we need uh three virtual machines so it can be on your locally using oracle virtualbox or vmware workstation what we are going to use in our tutorial is uh is like a local virtual machine for using workstation vmware workstation if you want to have it like a cloud machine you can have that as well because that's pretty easy you can build some cloud servers but i've been getting a lot of queries where what people
want to set up kubernetes cluster on there locally so this will be you know using the local machines over we'll have a kubernetes master and two worker nodes and the kubernetes not master vm should have with a minimum configuration like two cpus and 2gb ram minimum if you don't have that configuration then the installation will fail so that will be the minimum configuration for master and uh you know you can have worker node with one cpu or 1gb or you know you can have more than like 2 cpu so it's up to you sure but
master this is a minimum requirement and since we are using our uh you know vmware workstation virtual machine uh we will also assign some static ips for this vm so that you know the ip won't get changed because in workstations virtual machines it will keep changing when you restart and all those things okay so but i know if it's a cloud machine probably you can directly go and use the standard ip address and we'll also set some host name for this vm so we can use that as part of our total i know set up
so we will see all these step-by-step process okay so i just want to tell you these are some pre requests if you have it then it's pretty good if not i'll show you how to do that as well so let's talk about creating kubernetes cluster using cubed and what all the steps we will do so please make make sure that this is going to be a lengthy process very complicated sometimes you know you will miss something here and there and you know we may face some prom so if you follow these steps uh not clearly
i will also give each and every command which i run in this tutorial in the video description using my github link so you can go to the github link and you can completely see the step-by-step instructions which uh we are running it so you can just copy and paste those commands into your uh command prompt or you know into your shell prompt okay so what we will do is the first step should be like set the host name if you have not done it so i will show you how to set the host name then
we will set the static ip address i will also show like you know how we can set the static ip and we have to set uh some configuration the host file so that you know all the host name and ip address are configured so machines can interact each other and we will do a seal and x disabling so if you know how to configure a cnx based on your requirement you don't need to disable it but the simple option is you can disable s linux and we also will disable firewall and make some edit in
the ip tables here also you don't need to disable firewall you need to give exceptions or rules for allowing some of the port numbers but the easiest option is disable the firewall so the configurations you know it can happen all those port numbers okay so uh then we will set up the kubernetes repo because we need to install uh cube adm so for that we need to set up the kubernetes repo and then we will install cubarium and also docker and then we answer the installation is completed we will enable and start the services for
kuberium and docker okay so moving on you know once we do that then we have other steps as well so as i said it's a lengthy process we have to disable swap on those machines and will initiate the kubernetes cluster okay on the master first then we will get the token for the joining the nodes so we'll make a note of that and uh we'll also install the port network using calico network on the master so that you know it can interact with the nodes and you know then we will run the command to join
the worker nodes to the master on the worker nodes so all these steps we don't have to do it on master and the nodes so i have separated what has to be run on the nodes what has to be run on the you know uh master node when the when we do the process i will show you like you know each commands this command has to be run only on the master this has to be run both on worker and master and this has to be run only on the worker note so that has been
also segregated so when you see the you know a command wise you know i have when we run it i'll show you which has to be run on which machine so before i get into the actual demo process i would request you like if you are new to my channel or if you have not subscribed to my channel click on the subscribe button and also like my videos share and comment so let's uh see you know the actual demo process now if you see i have this machine which is uh set as uh master okay
so and i also have other two machine this is a worker one and this one is a worker too so three um centos machine i have it ready so uh the host name i have already set it but i will show you how to set the host name as well so you can set your host name and it's not mandatory that you need to give kkk s master you can give any name based on your requirement so let's get into the i know uh the actual commands which we are going to run so the first
step i said it's the setting of hostname so set hostname ctls hostname ctl set hostname and the name of the hostname that should be the command which you need to run so on the master i have set as k8 master so i'll run that and on the worker node i will run as the name worker one and the other no worker two so if you see this command is applicable for both master and worker so based on which machine you can set the host name based on that so you can run this uh command and
you can set the host name as per your requirement if you want to give the same name you can give that otherwise you can use a different name so you just go to the machine and you know run the command like so you just run the command like hostname ctl set hostname and the name of your uh machine so if you want to give something else you just give that name and run it so since i already set it i'm not going to run it the next step is like you need to assign a static
ip on this uh virtual machines so as i said since i'm using a virtual workstation machine so i don't want the ip to keep changing so i would prefer to set a static ip so you can run this command nmcl icon this is a available command on the centos machine so this uh tutorial is applicable for centos okay so once you run it you will see what kind of network it's using and the name of the network and you know what you can do is you can go to we this location slash etc sysconfig network
script and this name ifcfg hyphen ens33 so the ens33 is in my case so in when you run this nmcl icon it will show you what is the name so depending upon that name this will change so please look for the you know network on your machine and you check this file okay so once you go there you can have to make some changes so this is how a sample uh you know static file will look like the type is ethernet for my case so if it's different for you you have to set that and
the proxy method is set none and browser no boot pro no none and the ip address you may not have this ip address in the case of dhcp so you need to add an ip address and i have set the iap address as 107. in your case your ip address range will be different so based on that you need to set the ip address so this is an example and if you prefix you can give 24 uh subnets so and you can use a gateway so the gateway has to be based on your router or
your network gateway so in uh this is just a sample a high given and you have to give us some dns so that it can interact with you know outside like if you want download or something so you set this dns and defraud route yes ipv4 uh you have to set no and ipv6 you have set no and you know the name as i said the name will change for you so you just set the name based on your network device and name okay and uid also will change based on your network so use that
uid so let me show you like i already set the ip static ip over here so let me run those commands and let me show you how you can set it so if you run this command nmcli uh space con it will show you the name of your network uh the uid type and the device right so this will tell you like okay so in your case it may like ens 0 8 or something then you you it will change based on that okay so i'm going to go to this location slash edc slash sysconfig
network scripts and if i list down you see i have a file called ifc ens33 right so this 33 coming from this name and you know i have already set the static ip over here if you see i have a file called old so the one which was the dhcp i have you know made as old so let me just open that one so you can see how the dhcp would like so in the dhcp you can see like the boot pro is dhcp right and we don't have an ip address range you know all
those things and if i go to this file which i have created a new one you can see the difference you boot pro is none and we have a few settings over here like ip address prefix gateway and you know uh some settings right and the ipv6 all are set as no so you can compare you know the dhcp you can go to your uh machine you can copy this contents for the dhcp and you can make the modification based on uh what should be done for the static okay and as i said i will
give all these links and this documentation for what i have been i have set it so you can just refer the github link and you can refer it then you can compare it with your system and you can change it okay so let me clear out the screen so you have to do this uh static ip on all uh machine master and the worker notes and you set a different static ip on all those machines so the next step is like once you have a static ip assigned you have to put those entries in the
slide slash etc host file so what i'm going to do is i'm going to set the ip address for example 192.168.0 and daw i think it's one zero six four k eight master and one zero seven four and one zero eight for worker two so all these details i'm going to put into the slash edc host in all these three machines so you can see all these steps you have to do it on all the machines both worker and master one thing i have left is like once you make the changes for uh another static
ip you need to restart the network so you need to run the system ctl restart network then only the network setting will be set okay so i just forgot that to be informed now let's set our etc host file so i'm going to run this command uh cat end of file and etc so i'm going to run this uh file okay now if i go to read the file slash dc slash host now you can see i have added uh you know these files into the same file right so now let me run that into
the other machine as well so this is the worker uh one so i'm going to run this on the worker one and also on the worker two okay so we are done on all the machines okay so once we set the etc host the next step is to disable a clinic so to disable sc linux you need to run this command so i will give this comments as well you can just copy and run those commands from the github link okay so let me go and run these commands so it should be sentence40 and the
next one is this command okay so both these commands i have to run it on all the machines so i'm running those in the worker machine as well and the worker 2 as well okay so we are done from the sc linux side we have run all the commands on all the three machines okay so uh c linux is disabled so once you disable the sc linux the next step is to disable the firewall and we also need to make some changes in the ip table so for that what we will do is first we
will send run the command system ctl disable firewall d and as i said this is not a straightforward uh no ways there are different ways you can set up a kubernetes cluster okay so you can run commands to just accept some firewall ports and that is the one option but i would i would say like this is the simplest way so you can also run the other command like mod pro br that filter and echo the bridge ip table so you know these commands will make those changes which is necessary for our kubernetes cluster setup
so let's run those also so let me run that okay you can see that let me run the other commands as well okay so you need to run this on the other worker nodes as well so let me do that and come back so i'm running it on the worker node as well so we are done on the both workers okay so let me clear out the screen so i have done it on both the worker node as well and also on the master so we are done from the firewall settings and iptable settings so
once we do that the next step is like we need to set up the kubernetes repo so this command will add repo so if you see like i'm using the base url kubernetes e17 x64 uh no 164 x864 right so if you read the kubernetes documentation there is other way like you can search the base search which will also look for some you know latest version but i would say like you know i will go with this uh i will go with this repo directly and i will add it and i will use that for
installing kuberium and and on then i will install docker as well so i will use this command and i know you can use this as well if you find any problem you can let us know so let me run this uh command uh on the machine so we'll uh we have to run it on all three machines so i will run it so for you you know it's uh pretty simple like you just copy and paste it from my documentation which i will give it in the video description so don't worry so you don't have
to worry much about what a command you have to search so we have done the repo edition now the next step is like we need to install cubadium and docker and once the installation is completed we need to enable and the start the service for cubarium and docker as well so what to do that you will run the command like you yam install cubarium docker hyphen y and also we will run these commands like enable cubelet docker commands okay so we'll enable the cubelet and docker on the machine as well once we complete the installation
of cubadium and docker so let me run the command m install cubedm docker hyphen y okay so that's the command so let me run this so it may take some time because it has to download uh the plugins and all those things from the internet and then it will go to the process it may take a few minutes for depending upon your internet speed and i will run these things on all the three machines master and the worker notes then i will come back once the installation is completed so you can see the qpedium and
docker installation is completed on the master okay let me enable the q palette and docker as well so in order to enable you need to run system ctl enable keyblade and we need to start it so i'll run start cubelet okay and in order to enable docker i will run systemctl enable docker and we need to start that as well okay so that is done on the master i will do the same thing on the worker node as well so it may take some time i will be back once that is done so as i
said i'm just running it on the worker uh one and also worker two i'll be back once the installation is completed okay great so we completed the installation of cubelet uh kubereum and docker and we have also enabled cubelet and docker on the both the worker machines now we can move on to the next step so once we complete that the next step is like we need to disable swap so you can use swap off hyphen a but i think that will the problem is like once you restart the machine the swap will enable again
so i would suggest like you know you can run that and also you go to this uh etc slash fs tab and you edit the file and there will be a line which have a swap keyword which you just uh commented so let's do that okay this is also we'll do it on both master and worker nodes so i'll run swap off and i'll also go to this file vi slash etc fs tab and you can see there is a line called device mapper sendos swap right so what i will do is i will just
comment this line and just save it so i will do the same thing on the other machines as well so i'm doing this on the worker node as well so i'm done in the both the worker node as well so we can move on to the next step so let's go back to our master so great so now we are into the almost to the initialization phase so we have set up our machines with the cubelet and docker and all those configurations now we can initialize the cluster so this command you know what we are
doing is only applicable on the master node you don't have to run these commands on the worker so please be uh careful on that so this is for to initialize your master okay so we are going to use kuberium in it so once you run it it will take some time it will download some images and all those things then it will tell you uh you need to run some other commands as well so those commands will be like mkdrp home cube and you need to copy some config file and also you need to give
some ownership also what you need to do is like once you run qbarium init it will also give you a you know configuration or cube cubed m or cubelet join command which will be used to join the worker node so you just need to copy that and you need to keep it uh somewhere in a notepad because you know you need to use that to add your worker note to your master okay so once you run the qb you need to make sure that you copy that uh you know command which comes out of it
so let's see that what we get so for initializing the master so we are going to run so you see i'm running it on the master so you don't run it on the worker because this will make this machine as the master okay so i'm going to run a cube adm in it so i'm going to run cubeadm in it on the master machine so let's wait so it may do some pre-check when you run this command and as i said you know uh you may see some firewall uh options and everything i mentioned like
if you're uh you know also the cpu and the memory and all those things it will check and if it's fine you know some of uh you know uh configuration is uh having conflict the pre-flight checks if it's failed then it will not move to the next phase so that's what i said we need to have that uh configurations of uh two cpu and 2gb ram if you don't have it it will fail here okay and now if you see it's uh doing the pulling of some config image files so you can do this manually
before we run this as well but it's not a problem it will take some time to do this cubadium config image pull action so let's keep it running then we will be back once this is completed so as you can see the whole process is completed and you can see we got a command for cubarium join with the ip talker number right so you need to copy that and you do keep it somewhere so i will copy that into a notepad okay so you can see it also tell you like to start your cluster you
need to run this uh command as a regular users right so you need to run this command as well so since i'm already running as a root user i'm going to run uh without the pseudo because i don't need the serial for a root user if you are running as a regular user you need to add the pseudo command okay so this process what we run cube in it you see like it has done the whole process and you know this cube config image pull this may take some time okay because for me it takes
around 10-15 minutes depending upon your uh you know pc and the internet connection so if it's taking some time you know don't worry just leave it uh running so once you once it get completed you will get this message so what you need to do is we need to run this command to start the cluster okay so let's clear out this screen and let me run this command okay and the one to copy the config file and taking the ownership of the file okay so now we run this command okay so we are done uh
with that part and as i said i also copied that uh qberium join command which we will use it for i know adding to the worker node so don't do anything now i will tell you what we had to so now since we have completed the initialization we can check the status so if i run cube ctl get nodes you can see you know our master the control plane master is available but the status is not ready right this is because we have not installed the pod networks so that will be our next step okay
so let's go to the next step so once we completed the qberium init and we got the join command and also we run those command to start the you know cluster since the cluster is not ready status we need to install a port network using the kaliko network okay so we are using calico network uh here so to run uh to set up this port network you need to run this command uh call uh this yaml file okay you need to download it then you need to apply the calico ml file okay so that should
be the overall process so once you run it i know you can check you know the cube ctl get parts and under the cube system if you see it may start creating some new parts okay so that is a required for the whole uh kubernetes cluster so you need to wait until all the parts are running then you can check the status of your kubernetes master node okay then you should be changed to already status so let's uh check that so let me run this uh command for uh downloading the yaml file and again these
commands are only required on the master node you don't need to run this on the worker node so let me show you you are what are the parts running first if you go to cube ctl get parts and the namespace cube system you can see some of things are running right you have api master right controller proxy schedule right now let's apply our calico system so i'm going to apply the cube ctl apply calico.ml so now we can see it started creating you know quite some things and now if i go and check the parts
you can see it started uh you know creating uh these things and it's pending right you can see calico notes right so let's wait okay you can see it's uh changing you know the containers it's it's trying to create the container for calico right and also the init containers it's changing so let's wait you can also see like this core dns is now getting created container is creating so let's uh wait for all these status change to running okay almost done we have one more container getting created so you can see others all statuses change
running okay great so you can see now all the you know parts are running and we can see all the status are running now right so now let's go back and we see cube ctl get nodes now you can see the status is changed ready for our master or note right so it's a great sign that you know our master is ready now so the next step is like since our master is ready we need to join the worker nodes now so in order to join the worker node we have this cubarium join and the
command which we got when we run the cube area in it right which we have copied and kept it in our notepad so let's run that into your worker node so this has to be done only on the worker node okay you don't have to do this or this step is specifically for the worker node so let me go to the worker one and let me run this command which we copied it uh from our master node when we run the cubadium and you know let's wait for uh this to be completed you can see
it's running there's some pre-flight checks so and we'll see what the message we get hopefully you know it will complete the normal process and it we get a message like this worker node is added to the you know cluster great so we have our worker node added so you can see this node has been joined the cluster i have run the same command on the marker too so you can see here also it has been joined so one thing i just want to share even though you know we have disabled the firewall if in case
if you get any message like you know dial tcp the port number 6443 connect no route to the host what you need to do is you need to you know do some firewall exception for those port number alone and how you can do that is you can run this command you can run the command pseudo firewall cmt at port 6443 permanent and you can restart the firewall so once you do that you know that port will be open and you should be able to add your worker node okay so again i will give this commands
as well in the description so you can do that as well so let's uh check uh you know cubectl get nodes now you can see the worker 2 is ready worker 1 is still not ready so we need to wait okay so it just added so we'll wait for some more time great so you can see all our notes are ready you can see our master the control plane master is ready and we have to work our kubernetes nodes our con no kubernetes cluster is ready so this is not a highly available cluster because you
don't have two masters you have only one master but you have a higher available notes but so in case of your application side you know you can have high availability for application as far as your master is running you have multiple nodes so worker nodes you know your application can run on any one of the nodes okay sure uh but as i said it's not a high available with the master uh you know uh setup where we have two masters we will see that in the upcoming tutorial but this is a great start for you
so you can set up your own you know kubernetes cluster with one master and multiple worker node in your own uh no machine or using your cloud vms then you can start or know learning or more about that so so just to give you a recap what we did is we set the host name assign static ipv we did some changes in the host file uh we disable the selinex we disable the firewall and edit some ip table regarding the firewall as i said even though it's disabled we need to do some uh opening of
port for you know connecting uh from master to no worker so which i will also share it in the documentation we set up the kubernetes repo we install the kuberium and docker we enable cubelet and docker services we also disable swap we initialize the kubernetes cluster and we you know copied the command to join the worker node to enable uh the nodes we have installed the port network using kalikan network and then we joined our worker nodes so overall you know we these are the complete stuff we did it so that is all for this
tutorial so there are quite a lot of comments which we need to run so thank you for watching i hope this uh tutorial is really informative for you and you can set up your own cuban in this cluster so kindly subscribe to my videos for uh getting more videos and more updates from my end and also keep supporting you know by liking the video sharing and comment giving your feedback [Music] you