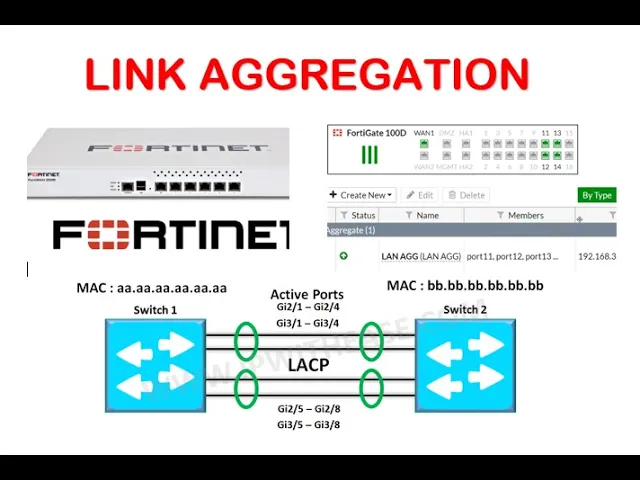
hello and welcome to the channel today i'm going to take you through a series of steps to set up link aggregation on a fortnite firewall well this is the resource the only resource that i have for this particular topic and i'm going to add that in the description so don't worry copying that right now just take your time and then let's go through the steps first so link aggregation what does that actually mean link aggregation simply means that when you combine more than one physical um physical ports on a switch or on a router or firewall you know to enable them to function as one single logical path but why would people want to do link aggregation okay well the first important thing about link aggregation is it increases bandwidth and to um it enhanced redundancy like fault tolerance just like if one interface was to go bad the rest of the interfaces will continue to operate as if nothing happen except that maybe there might be a drop in the bandwidth okay so generally general process for creating aggregated interfaces so one is configuration of the aggregated interfaces via or a g say or cli that's a command line or gui graphical user all right so in doing that we have to work so a unique aggregated interface then we need to find a name for the what aggregated interface second we have to work the physical interfaces or parts to be configured as members of the aggregated interface we have to define or look for the members which part are we going to use for the aggregation all right third we have to ensure that lacp that's linked regression is to be enabled or disabled so by default in some routers link aggregation is enabled and others such as in aruba uh switches it is disabled so you might have to go into the port that you want to use for the aggregation and actually enable lacp so what are the limitations so a maximum of four physical interfaces may be combined into one aggregate interface so at every aggregation the maximum number of ports is four a physical interface may belong to no more than one aggregated interface that's very clear and when assigning interfaces uh to a vlan only one interface so that means that before you can assign a vlan to um an aggregated interface uh so you have to first do the port aggregation first then you assign that particular uh group to the vlan that's how you it'll have to be done okay the protocol for this um link ignition is called 802. 380 bonding bonding mode also known as lacp or link aggregation control protocol mode it is used for load what balancing you might hear of each channel but either channel that is a cisco proprietary protocol for the same thing actually so now i'm going to take you through the steps the [Music] um the lab aspect of this particular uh protocol so let's do this so first i need to go into my uh i'm gonna log into my fortinet firewall this model of fortunate firewall i have is um 100d that's the model of what that i have so it's basically doesn't have any configuration on it yet so we're doing it together so i just logged in default password is empty there's no password for default so to do link aggregation when you log in successfully onto your graphical user interface please click on the network and then click on interfaces then under interface you click on what create new and interface so this is the step it will say we need to give it a name so in this case i want to call it a lan lan agg lan aggregation so i can give it an alias name but i can just oh i can leave it empty so in this case i'm going to call it like lan agg so the type remember is 802. 380.
so we select that and now we have to select the members so you need to select what the members so first before you start link aggregation you need to be sure that you have some ports available to the aggregation so in this case you see that i don't have any a lot of ports i just have high availability ports um i want to go back so that interfaces then i'm going to go to the lan so that i can release some ports on the line so on the port i have port 11 48 in port 14. these are the ports i want to use for my aggregation because at the moment that is what i have connected before we proceed on this lab let me give you a heads up on the topology of this lab so we here i have a switch um that is connected with four cored four cables to the router so i am doing the link aggregation on this router the ports on the router that um the switch is connecting to is part 11 of 18 and 14 and on the switch a spot 37 38 39 and 40. this is very important and when we get there i will explain to you why it is important and on my one i'm connecting to a switch so i can get internet okay and this pc is a pc that i'm going to be using for the test after the aggregation is complete so i'm going to show you [Music] my my setup it's that pretty much dark so this pc that you see the windows pc over here it's the pc below here it's the fortinet and above here is an aruba switch that the four ports are connected to so this is the topology of the lab so let's go back to our router and continue so remember i just freed port 11 18 and 14 so that i can use that for what link aggregation so i'm going to create interface and i'm going to call it lan agg again alias is going to be the same lan agg and the type is what 802.
3 aggregate and then the members i'm going to select port 11 12 18 and 14. these are the members so this role is supposed to be what lan is selected and the ip address i want to assign it 192. 168.
3. 1 and the subnet max is 255. the 255 is zero and what protocol do i want to allow on this interface i can choose these protocols that i want um that's pretty much it and i want it to be a dt server that means that any um computer that is going to the switch should be given an ip address from 2 all the way to 254 so and i want to specify my dns as the google dns 8.
8. 8. 8 and this should be good and then just click ok so at the moment link aggregation is set up and it's complete so you can see lan agg is green so the next thing we need to do is just make sure that we do have um i'm going to go back into the i'm gonna go into the policy object to be sure that the internet configuration has been done so i'm gonna do a policy edit here to make sure that we got everything so implicit denied let's check this policy this policy looks good i don't know so i'm going to call it internet this is the protocol that i'm going to use to allow me to connect to the internet after my pc my lan has been given an ip address so internet let's go ahead and internet okay now incoming interface so this is talking about my lan aggregated my lan agg this is what i wanted to be and then my outgoing interface should be my when that's perfect and all the protocols this is all all except everything is good so good okay so as let's go back to the network interface okay as you can see port 11.
2 potato input 14 before it was green it tend to like to off so this is where i was telling you is important to observe these ports because this is the port on the switch that i'm connecting to for 3078 39 and 40. you have to understand that by default link aggregation is turned off on the switch of aruba the the type that i have by default is off so i need to make sure that link aggregation is on and then everything will be back to normal so i'm going to go into the switch so i have the suite connected on my putty so config terminal t okay so i'm interface so i want to go into the interface remember to use the tab key to help you complete the ethernet ports number 37-40 is going to be the interior interface range that i'm going to configure link aggregation on so that i can be able to have so now it took me into the interface then all the other thing i'm going to do now is to activate lncp so l a c p [Music] active and press enter and then link aggregation has been enabled on the port so now we're going to go back onto our lan and refresh and you see our link is up okay so so that's basically about about it so let me know if you have any questions in the comment section and then thank you so much for watching i hope this was very helpful for you please if it is click on the like and subscribe button thank you and i'll see you in my next video hello and welcome to the channel today i'm going to take you through a series of steps to set up link aggregation on a fortnite firewall well this is the resource the only resource that i have for this particular topic and i'm going to add that in the description so don't worry copying that right now just take your time and then let's go through the steps first so link aggregation what does that actually mean link aggregation simply means that when you combine more than one physical um physical ports on a switch or on a router or firewall you know to enable them to function as one single logical path but why would people want to do link aggregation okay well the first important thing about link aggregation is it increases bandwidth and to um it enhanced redundancy like fault tolerance just like if one interface was to go bad the rest of the interfaces will continue to operate as if nothing happen except that maybe there might be a drop in the bandwidth okay so generally general process for creating aggregated interfaces so one is configuration of the aggregated interfaces via or a g say or cli that's a command line or gui graphical user all right so in doing that we have to work so a unique aggregated interface then we need to find a name for the what aggregated interface second we have to work the physical interfaces or parts to be configured as members of the aggregated interface we have to define or look for the members which part are we going to use for the aggregation all right third we have to ensure that lacp that's linked regression is to be enabled or disabled so by default in some routers link aggregation is enabled and others such as in aruba uh switches it is disabled so you might have to go into the port that you want to use for the aggregation and actually enable lacp so what are the limitations so a maximum of four physical interfaces may be combined into one aggregate interface so at every aggregation the maximum number of ports is four a physical interface may belong to no more than one aggregated interface that's very clear and when assigning interfaces uh to a vlan only one interface so that means that before you can assign a vlan to um an aggregated interface uh so you have to first do the port aggregation first then you assign that particular uh group to the vlan that's how you it'll have to be done okay the protocol for this um link ignition is called 802. 380 bonding bonding mode also known as lacp or link aggregation control protocol mode it is used for load what balancing you might hear of each channel but either channel that is a cisco proprietary protocol for the same thing actually so now i'm going to take you through the steps the [Music] um the lab aspect of this particular uh protocol so let's do this so first i need to go into my uh i'm gonna log into my fortinet firewall this model of fortunate firewall i have is um 100d that's the model of what that i have so it's basically doesn't have any configuration on it yet so we're doing it together so i just logged in default password is empty there's no password for default so to do link aggregation when you log in successfully onto your graphical user interface please click on the network and then click on interfaces then under interface you click on what create new and interface so this is the step it will say we need to give it a name so in this case i want to call it a lan lan agg lan aggregation so i can give it an alias name but i can just oh i can leave it empty so in this case i'm going to call it like lan agg so the type remember is 802.
380. so we select that and now we have to select the members so you need to select what the members so first before you start link aggregation you need to be sure that you have some ports available to the aggregation so in this case you see that i don't have any a lot of ports i just have high availability ports um i want to go back so that interfaces then i'm going to go to the lan so that i can release some ports on the line so on the port i have port 11 48 in port 14. these are the ports i want to use for my aggregation because at the moment that is what i have connected before we proceed on this lab let me give you a heads up on the topology of this lab so we here i have a switch um that is connected with four cored four cables to the router so i am doing the link aggregation on this router the ports on the router that um the switch is connecting to is part 11 of 18 and 14 and on the switch a spot 37 38 39 and 40.
this is very important and when we get there i will explain to you why it is important and on my one i'm connecting to a switch so i can get internet okay and this pc is a pc that i'm going to be using for the test after the aggregation is complete so i'm going to show you [Music] my my setup it's that pretty much dark so this pc that you see the windows pc over here it's the pc below here it's the fortinet and above here is an aruba switch that the four ports are connected to so this is the topology of the lab so let's go back to our router and continue so remember i just freed port 11 18 and 14 so that i can use that for what link aggregation so i'm going to create interface and i'm going to call it lan agg again alias is going to be the same lan agg and the type is what 802. 3 aggregate and then the members i'm going to select port 11 12 18 and 14. these are the members so this role is supposed to be what lan is selected and the ip address i want to assign it 192.
168. 3. 1 and the subnet max is 255.
the 255 is zero and what protocol do i want to allow on this interface i can choose these protocols that i want um that's pretty much it and i want it to be a dt server that means that any um computer that is going to the switch should be given an ip address from 2 all the way to 254 so and i want to specify my dns as the google dns 8. 8. 8.
8 and this should be good and then just click ok so at the moment link aggregation is set up and it's complete so you can see lan agg is green so the next thing we need to do is just make sure that we do have um i'm going to go back into the i'm gonna go into the policy object to be sure that the internet configuration has been done so i'm gonna do a policy edit here to make sure that we got everything so implicit denied let's check this policy this policy looks good i don't know so i'm going to call it internet this is the protocol that i'm going to use to allow me to connect to the internet after my pc my lan has been given an ip address so internet let's go ahead and internet okay now incoming interface so this is talking about my lan aggregated my lan agg this is what i wanted to be and then my outgoing interface should be my when that's perfect and all the protocols this is all all except everything is good so good okay so as let's go back to the network interface okay as you can see port 11. 2 potato input 14 before it was green it tend to like to off so this is where i was telling you is important to observe these ports because this is the port on the switch that i'm connecting to for 3078 39 and 40.


![SD-WAN /Load Balancing/Link Failure/Dual ISP Configuration in Fortigate Firewall [7.x.x]](https://i.ytimg.com/vi/uzyVajI2c7w/mqdefault.jpg)
