Welcome to this online epoxy master class where we are going to build this massive epoxy coffee table together where i am going to teach you from start to finish all our techniques and methods we use in building all our tables the course is four hours long and it's broken down into lessons and you do have to follow the lessons from first all the way to the last lesson to achieve the perfect perfect epoxy coffee table my Name is greg vittorius and i am the face and artist behind crafthouse custom furniture or you would know me
as diy with greg now we are a small company based in pretoria south africa and we mainly focus on epoxy projects such as epoxy coffee tables but our main focus is epoxy tables now i'm going to share a few pictures with you of some previous projects we delivered And very very satisfied clients and we are very proud and happy of our brand we launched about two years ago but just to give you a little bit of background where we come from i started a construction company in 2011 2012 and unfortunately we had to close down
due to covet when the first lockdown struck us early 2020 And i was forced to use my hobby and my passion i have for woodworking which also came from i started with working around about the same time 2011 2010 i started woodworking and this is basically a hobby and a passion that's running in the background for all these years and i was forced to use my hobby for a income when covert struck us and i do have to Say we are very blessed we have grown so much as a company from 2020 where we are
at the stage where we are booked two to three months ahead and international orders started coming in now before we're going to start with this online epoxy master class you might want to pause your screen for a few seconds just to read very important information Before we going to continue the class this just basically say that everything i'm going to show you is our techniques and our methods it's my knowledge and my experience with building epoxy tables now there's a lot of technical data you have to get from your epoxy supplier which is most probably
not the same as the epoxy we are using and that can be A very big factor in if your table is going to be successful or not now this clause is going to be broken down into sections each section will obviously be individual on its own there's another thing you need to understand that in our current journey where we are now i believe that the way we are building tables now is the absolute best way we can possibly Build epoxy tables but you need to understand that we will always look to improve our methods and
techniques meaning that in a year from now we might have developed a new skill in helping us build better tables i've got a saying that today we will build the best possible table we can Tomorrow we're going to build it better and that's the slogan we stand by and we actually got it in our shop where all our staff can see it and that's something we believe in and like i said all this information and the online course currently is the method i believe it's the best way in building epoxy tables but we will continuously
look for new Improved ways in building better tables starting off with the first section in our video is moisture content what does moisture content mean moisture content basically means that it's the amount of water that's inside your slab so when they're cutting the tree down from the earth they the tree still contains water even if they cut it into slabs and they store It somewhere it means that the slab still contains water now even if that slab stands under a roof or inside a covered area for two to three to four years it doesn't mean
that that slab is going to be dry your wooden slab needs to go into a kiln oven it's a special oven That basically removes the moisture the water from your slab this step is super super critical if you're not going to follow this step and you're going to build your table what happens to wood when it dries over time wood shrinks and it warps and it paints over time as it dries so you're gonna build your table it's gonna look nice for a couple of months and as time goes by the moisture slowly Releases from
your wood and your wood is going to shrink and it can either break at the where the wood is meeting the epoxy or your table is going to bend or it's going to work and you absolutely do not want that now i know where i'm from in south africa we don't get dry wood unfortunately we have to source our own wood From suppliers that's basically cutting the trees down and we have to take it ourselves to the kiln dry supplier and from there it can sit in the oven for well three to six months even
to a year it depends on how thick the slab is now your moisture content in your slab can be measured with a moisture meter now you also need to understand that you get a thousand different types of moisture meters on the market meaning that your cheapest one most probably is Not going to give you accurate reading it's going to show your wood is dry and you're going to build your table and it's going to be a mess at the end of the day now the moisture meter our kiln dryer supplier is using is a very
expensive moisture meter from i think it's from england and it's basically two pins you hit right into the core of the slab you plug a small computer in you leave it for a few minutes and it gives you The accurate moisture levels inside that piece of wood now you need to follow this step and this is super crucial before you even think of starting your project now i know countries like canada and the us actually as companies where you can just walk in and buy dry wood now unfortunately for us even this table that's in
front of me We had to source this table seven months ago and we can only start working with it now so very crucial step i don't know where you are from in the world but you need to make sure that the piece of wood you are using is dry you don't want to use wet wood when you're going to work with epoxy so the next topic i want to discuss is what good species to use this is a Question we get all the time on all our social media platforms and youtube is people right around
the world asking us can they use this wood species or can they use that good species and honestly speaking i don't know i don't know all the white species in the world i am only limited to what i've got available in my country So we've got say for instance matumi which is the most popular wood we are using to build river tables you get kiart you get iron wood you get jackal berry so we've got a small handful of wood species we are using in our country now i know for instance in the us and
canada you get walnut and maple burl which is also suitable for epoxy projects now I get a lot of queries from indonesia and india and russia norway ireland the list goes on and on and on of people asking me can they use this wood species for epoxy tables and i honestly don't know i don't know all the wood species in the world but the advice i can give you is where you are from in the world You also have local epoxy companies that's manufacturing tables go and look on their social media pages what which species
are they using and if you don't have that available get in contact with local wood companies or local companies that's manufacturing tables and get in contact with them and ask them listen what which species can they recommend for Building epoxy tables or maybe you are from a country that hasn't got epoxy tables then i would recommend get in contact with woodworking companies that's building wooden furniture and ask them listen what woods is hard and what which is soft what woods would they recommend staying away with some wood disperse some wood contains too much oil Some
wood like pine i will strongly not recommend because it it moves too much when it's hot and cold and stay away from pine so that's the advice i can give you is look at what your local fabricators are doing in terms of building tables follow them you know it's not a sin to ask someone for advice so ask them listen you are planning to build your first table or you are Planning to start a small epoxy company building small coffee tables or tables or whatever and ask them listen what wood can you use for your
epoxy projects it's time to remove the bark and soft wood from your slab meaning that the piece of wood you purchased or got obviously it's got bulk and softwood on now you don't want your epoxy to bond to that material because bark can be removed literally with your hand So removing the bulk and soft wood we would typically start with a hammer and a chisel removing all the bigger pieces of bark on our slab then we will move to steel brushes and the ones we are using we will typically start with a very aggressive steel
wire brush now this will remove 90 percent of the bark and soft wood but this wire brush actually makes very deep marks on Your physical piece of wood and then we will move to a softer steel wire brush and this will remove all the markings your aggressive steel wire brush made and you also get different shapes and sizes of brushes we will typically use the handheld one to get into all the small spaces that your steel wire brushes can't get to and you get all different shapes and sizes of steel wire brushes to remove all
the Bark and soft wood from your table so luckily for us this specific wood species like i mentioned in the drying process the bark fell off naturally so we don't have to go and clean the side of our live edge but for the sake of this epoxy online master class i am going to show you one of our previous projects we've done and you'll see some wood species has got a lot of bulk on the live edge meaning that you Need to remove the bark and we're going to start off with a hammer and a
chisel this is just to remove all the bulkier pieces of bach and make sure you don't hit into the wood itself but you'll see a clear line where the box starts and once you remove all the bigger pieces of bark from your life edge it's time to remove all the softer wood and by achieving this we are going to use A steel wire brush like i showed you before we're going to start off with the aggressive steel wire brush and you will notice that this steel wire brush actually makes lines and it actually i won't
say damaging your live edge but it literally removes all all the soft wood from your live edge now once we are done with the aggressive steel wire brush we're going to move to the softer steel wire brush Now this is basically just to clean up what the aggressive steel wire brush done and just to remove all the lines the aggressive steel wire brush has done and you also see the paints from slab to slab sometimes the steel wire brushes are not going to get into areas and that's where you have to use the hand-held steel
wire brush and you also get a lot of different shapes and sizes of steel wire brushes to get into all the small little spaces To make sure you remove all the dirt and soft to it and bark from your large now this is very critical when you're going to pull epoxy because you don't want your epoxy to bond with the bark you want your epoxy to bond with your physical slab itself table design now this is where things really get interesting how do you design your table now There's a few ways and there's a few
methods but this topic is what is going to make you different from all the rest of epoxy table manufacturers is the slab you're going to choose to build your table are you going to pick something that's straight Which is a very boring river table or are you going to pick something that's complicated it's got a lot of twists and bends and it's just got a lot of character now that is what i personally feel makes us different from all the rest of the fabricators out there is we go through great lengths in picking and choosing
all our pieces Of wood we literally hand pick each and every single one of them we don't call a supplier and ask him to come and drop us 40 pieces of slabs and then we start working we literally go out and hand pick every single slab we want to use and every single piece i've got a vision so i can see the end result almost when we pick the slab from our suppliers so This is what's going to make you different and is going to make you the best supplier in the world is choose the
correct wood for your project every single piece of slab i choose is something i will build and put in my own house that's basically how i see it and i Think that's what gives all our tables a personal touch is i'm building something that i would put in my own home and this is something that's going to make you different from all the rest is when you're going to your supplier to pick your wood you need to make sure that you see the end result you need to make sure that whoever you're building the table
for is Going to be amazed when you're going to deliver this project or your table or whatever and if i can give you advice i know there's a lot of people that bolts frames and then they will position the frame around the table until they get a design they see and look or you can take pictures and you can crop it and play around with it on Photoshop and the method we also like using a lot actually is we would take our white melamine sheet to and then we will cut it to its final size
what the table or coffee table is going to be and then we will position the slab on top of the white melamine sheet we will play with it around and then we will mark actually with a marker on the white melamine sheet The design we're going for the look and feel and then we will send that picture to the client and then they can actually see how the river is actually going to look and then also in the same breath we can calculate more or less how much epoxy we're going to use for that specific
project so let me give you a good idea of how we Design 80 of our tables using only the white melamine sheet and this is the method we take in designing the specific table now we haven't got a finished size yet on this specific project so this white melamine sheet is obviously a little bit bigger than what i'm planning but this is going to give you a very good idea of how i design all my tables I will mark on top of the wood halfway then i will sketch on top of the white melamine sheet
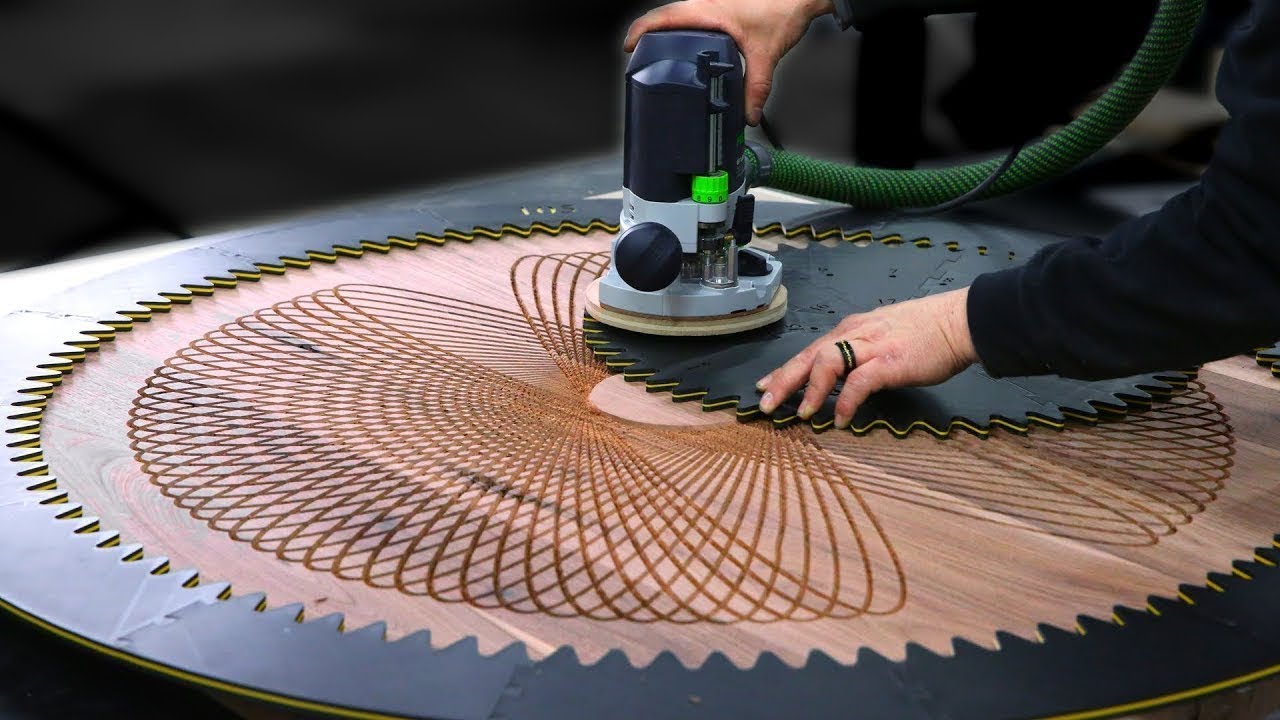
just more or less what i've got in mind for this specific table i remember this hasn't been flattened yet so that piece we will obviously cut off so this is basically how I design all my tables this is going to give you a good idea of how i design my tables and can see the river that's going through there you can see so now that i have determined exactly where i want to cut my slab i'm going to use my face tool hk85 which can cut you 85 more thick which is an absolute blast to
have in Your shop when it comes to cutting slabs [Applause] and just to turn the woods around to give you a good idea of what i visioned and now this is one of the best parts of building tables is to actually see your end product so this is just to give you a good idea of exactly what i saw the first time when i picked this slab This is the layout i saw right at the beginning that this beautiful piece the river is just absolutely amazing and i think the final size will most probably end
up being around about 1.4 1.5 to round about 700 will be the final size so But for now we need to get this to the cnc supplier to make it flat both sides so we can continue to the next step so we got our slab back from our cnc supplier and as you can see it's flat now it's flat flat flat and that's exactly what we want when we're going to pour the epoxy now the next step we're going to take is cutting our slab to size and remember what i taught you Before is make
sure to cut your slab and your mold slightly bigger lengthwise and widthwise this is going to leave room for area if you're going to make a mistake now the first thing i want to do is get the size now i already inspected the slab and i saw that this specific coffee table we're going To build 1.5 meters long by 700 mils wide meaning that we're going to start off with one corner cut it square and then we're going to measure 700 mil this is just the estimate 700 mil plus 20 ml just to make sure
you have room for error so measure 700 mil plus 20 ml for room for error you're not necessarily going to cut off that 20 mole or if it's going to be 1.5 we're going To make it one five two zero you're not necessarily going to cut that too anymore off but it's there if you're going to make a mistake so we're going to start over this corner and cut it square [Music] [Applause] so now that we've got one corner square we're going to measure one meter 500 plus 20 more For room for error now we're
going to cut this corner square so what i'm doing now is this slab is already cut to its final size now this specific piece has got two very beautiful features i want to keep this is a very beautiful feature i want to keep and that side it's a beautiful beautiful beautiful River now this side if you come this side here is also a very very beautiful feature i don't want to lose so now i'm just checking this is down to its final size now i'm just measuring 700 mil from here today and now i can
follow this line and draw a line directly to this slab now i know where i can cut this one and exactly the same On this side just going to take this line straight through and now i know exactly where i need to cut this slab to keep both features on this coffee table so [Applause] when we talk about slab preparation you need to understand that the slab you bought from your supplier is not going to be 100 straight on top And 100 straight at the bottom meaning that in the drying process um as the moisture
left your piece of slab the it's natural for the piece of wood to twist and bend this is just as the fibers release all the moisture and stuff now before you can start using that slab you have to actually get it flat now how do you get your slab flat now we Previously on our first table we used a manual router sled now this led to my complete shop totally messed up it was dust and epoxy and everything was just a disaster and that's when i decided that we are rather going to take our tables
in to a supplier that's got a cnc machine and we are saving much more time and cost wise as well so this is the Method we like using is we would typically take our slab to be flattened on a cnc machine at one of our local suppliers as you can see this slab is warped a lot during the curing process to get this dry and where you will typically put this whole slab on the cnc sometimes you are losing too much wood because it's warped too much Meaning that i'm going to show you now we
will typically cut our slab exactly where we're going to cut it in half and then we will put each individual piece on the cnc let me show you so now we are currently sitting with a slab that looks like this now for the cnc we obviously need to get it straight both sides meaning that we are going to lose that And we are going to lose that that's the pieces we're going to lose if it makes any sense now the tip i want to give you is cut your slabbing off there we cut in and
off now you have two pieces now this specific piece you can actually twist a little bit downside and this piece you can twist meaning that you're going to lose less wood you're going to end up with a thicker slab at the end of The day so now we're going to move to the building process of our table this is basically where we are going to take our piece of slab and start preparing it for the epoxy we're going to pour building a epoxy mold it just basically means you are building a mold if you're going
to pour your epoxy that your epoxy is not going to leak out now there's a few methods you can do This i know there's a lot of people that's using like mdf superwood and they apply duct tape inside the mold to make sure the epoxy is not going to stick to the wood now at crafthouse we like using white melamine sheets because the epoxy is not penetrating into the wood due to the white melamine sheet it's got on now we haven't got tuck tape available in our country We've got a product called ramrex but that's
something we're going to get to and the tip i want to give you is when you're going to build your mold the final dimensions of your table always make sure you build your melt and your table slightly bigger lengthwise and widthwise that's going to leave you room for error if you're going to make a mistake somewhere so if you make a mistake and you have to cut your table Shorter you have room for area so always make sure you build your table slightly bigger lengthwise and with wise the next step i want to give you
is on your mold always make sure to build your side panels you're going to install around your mult slightly higher than your slab you're going to install in the middle this is just going to allow you to when you're going to pull your epoxy That it's not going to overflow onto the floor so this is basically how you build a mold so i already got my bottom piece of my mold cut down to its final size well like i said a little bit bigger on lengthwise and widthwise and i already got my side panels cut
down to its final size also slightly higher than the thickness of my slab now fastening my side panels to the bottom piece of my white melamine i'm just going to use a normal nail gun And i'm not going to apply any silicone between this mold and this one but i'm going to apply silicone later on which i will show you but for now we're going to install the side panels on the lengthwise and widthwise [Music] and another tip i want to give you why i am fastening my side panels on the side of my bottom
mold and not the top is once you're going to remove the side panels when your epoxy is dry The nails sometimes tend to break off and then when you slide your table up and down these nails can damage your wood or your epoxy so that's why i put it on the side and you can also use screws but we find using a nail gun is just much faster than applying screws [Music] [Music] and now that i'm done with my mold i'm just going to give it a quick wipe then We're going to install silicon on
the inside corner right around my mold that's to make sure when you're going to pour the epoxy that the epoxy is not going to leak out and before we're going to install the silicon i just want to double check and make sure that my slab actually fits into my mouth because otherwise we're doing all this and then it's for nothing moment of truth And it fits like a glove as always now just applying the silicone in between my white melamine sheets and remember you it's not necessary to have a perfect joint at this stage because
remember we're going to cut our table to its final size later on so it's just important that you have a very good bondage and a very good seal On this specific corner this is just to make sure the epoxy is not going to leak out when you're going to pour your table and you're almost probably wondering why my white melamine sheet is so dirty that's because we can use these white melamine sheets over and over and over again until the epoxy actually sticks to the sheet and The sheet breaks off from your table we can
use the sheets over and over again so release agent wax now i did mention that i know in some countries you get duct tape now where i'm from we don't have duct tape available so we've got a product we call ram wax i think it's a local product in south africa it's just a normal wax i'm not too sure What wax it is but this is also something you can source from your local epoxy company manufacturers that's in your area is you can ask them what a release agent they are using to make sure the
epoxy is not sticking to the mold or you can use duct tape there's absolutely nothing wrong with duct tape so now we're going to apply ram wax on the inside of our mold and it's Basically a release mold agent and it's to make sure that your epoxy is not going to stick to your white melamine sheet and applying your wax you just want to make sure you cover the complete surface of the inside of your mold basically just applying the wax in a circular motion and you want to make sure you cover your complete surface
because it happened before and you missed a small Spot and believe me your epoxy actually sticks to the wood and you have to break the wood off and it's quite a lengthy process just to remove that wood that's sticking to the epoxy so i'm applying the wax and i'm going to leave it for around about 20 minutes then i'm just going to come and wipe it off and you want to Make sure you get into all the little corners and the side walls you want to make sure you cover your complete surface and the reason
why we are not using duct tape is because we haven't got it available in our country that's why we're just using wax and my personal opinion is i think wax is a better method in making sure the epoxy doesn't stick to Your mold and it's faster and it is quite critical once you are done you need to make sure you wash your hands because that waxes on your hands if you're gonna touch any other object or touch of wood the epoxy won't stick to that section of the wood so you need to make sure once
you finish with your wax you wash your hands completely so now i'm just going to give my mold a quick Wipe down just to make sure it's clean on the inside before i'm going to insert my wood into my mold setting your wooden slab into your mouth now this sounds like something easy but what we've noticed and picked up before is sometimes when you're busy with a bigger table your piece of wood is literally too Heavy to pick up yourself and to put inside your mouth and then you will try and do it yourself and
you will get the actual piece of wood inside your mold but then the wood is too heavy and it will push and pull the wood on top of your mold on the inside of your mold and that will remove the wax on the Inside of your mold or it will tear your tuck tape and when you're going to pour the epoxy the epoxy is going to stick to that section of the table so make sure that your if it's a small table you put your slab into your mould and you just drop it or if
it's a bigger table make sure you're two or three people that actually picks up the slab and put it inside the mold And you don't pull and push it around inside the mold now wood will obviously float meaning that we need to add cross braces on top of the wood clamp them down to make sure once we're going to put our epoxy that the wood is not going to be moving around in the caring process epoxy you get a thousand different types of epoxy on The market and all the methods techniques ratios the recipe we
are using and the epoxy we are using locally in south africa is most probably going to be different than yours it's not going to be the same epoxy so this technical data you need to get from the supplier where you buy your epoxy from meaning that i'm going to go through With you this whole video and you might think that you're going to use the same recipe and mixing ratios to the epoxy you've got available in your country and it's going to be a total disaster so this is something you need to get from the
supplier that is giving you the epoxy so the epoxy we are using i know it gets imported from somewhere i don't know But the company we buy our epoxy from is called amt compensate and the product is called crystal 100 or would cost 30. now you get two different types of epoxy well you get a thousand but you get two different types of epoxy meaning that you get a deep casting epoxy that you can pour the full thickness of your slab in one go i know the curing time takes more And then you get a
epoxy you cast in layers over a period of time now it all depends i know that deep costing epoxy is much more expensive than the epoxy you cast in layers now we basically use both it just depends on the design the client wants to go for and each each individual epoxy has different gearing times so the epoxy we are using if we're going to pour in layers We can pour after every five to seven hours we can pour our second layer but once we reach the full thickness of our slab it takes around about five
to seven days for the epoxy to be fully fully cured now the deep costing epoxy i know once you cast your epoxy it takes around about i think 72 hours for the epoxy to dry but also takes about five to seven days for the epoxy To clear fully now this is also the technical data you need to get from the supplier you buying your epoxy from and they will basically tell you how long the epoxy will take to be fully fully cured this is very critical if you're going to move to the next step another
thing i want to add to the epoxy topic which is also very important and a question we also get a lot from our clients is they're asking they want a epoxy Table they want to put outdoors now once a client asks us that question we are straight away epoxy is not made to be outdoors and to be exposed to the outside elements such as rain wind water sun all those elements now i do know you get uv stable epoxy meaning that it's meant for outdoors It's meant to handle sun and all those things but we
as a epoxy table company manufacturer are not going to take the risk in using uv stable epoxy that's meant for sun and take the risk of replacing a table within a few months or years It's just too big of a risk so we tell our clients straight away epoxy is not meant for outdoors it's meant for indoors so how do you actually calculate epoxy this is a question we get all the time is how do you calculate epoxy now we need to calculate volume how do you calculate volume volume gets calculated by length times width
times height That is going to give you the volume but the tricky thing is that we are not sitting with a square table we are sitting with a live edge table that's doing this and how do you actually calculate the volume of the table so before i'm going to do my calculations you have to understand that where i'm from we work in centimeters millimeters and meters now we i am absolutely not familiar with working in foot and inches so I'm going to calculate this in the metrics that i know best because i don't want to
calculate in inches or foot and then there's a calculation area and then we don't want to be responsible for making new order two tons of epoxy for a small one meter by one meter coffee table so i'm going to show you how to calculate the amount of epoxy in centimeters so as I mentioned before our slab now is 1.5 meters long meaning it's 150 centimeters and my height is 5.5 centimeters high so we are going to measure every 100 mil we're going to measure and i'm going to show you why we do that now so
there's here's your first point one two three 4 5 6 7 8 9 10 11 12 13 14 15 and then the last one is 16. so you agree with me that we've got 16 points we measured now 100 millimeters apart so we got 16 points don't forget that 16 i'm gonna show you now why we're gonna use that 16 okay so now we're going to measure on each point we're going to measure the width and then we're going to write it down on the slab so the first one is 15 15 centimeters the second
one is 10 centimeters third one Is 14 centimeters the third one is 20 centimeters 19 20 23 26 24 13 15. 20 28 32 32 18. so now we got a estimate with every 100 ml going straight through the whole slab now we need to calculate all these together and then we're going to get our amount so so now that we've got our 16 points and we calculated an estimate with in Between all of them now we're going to calculate all those measurements together and we're going to get a total i am going to put
the measurements up on the screen so you can understand better what i'm trying to explain so remember we've got 16 points 100 mils um 100 mils from each other so we're going to take all these estimate points and calculate them together and that amount is 329. so Divided by 16 points remember we got 16 points if you got a longer table you're gonna have more points if you're gonna have a smaller table you're gonna have less points so it's 16 points so it's 329 divided by 16 and that's going to give you a average width
of 20.5 now remember what i told you calculating volume is length times width times height now we got our length of our table which is 150 centimeters Times the average width we just calculated which is 20.5 centimeters times the height of 5.5 centimeters now times all of that together and we are getting a total of sixteen thousand nine hundred and thirteen now we need to convert volume into liters and by doing that is dividing that amount by a thousand and that's going to give you 16.913 now the next step is to convert your liters into
kilogram because the epoxy We are using gets calculated into kilograms so by doing that is the epoxy we are using the crystal 100 and the crystal 50 and the wood cost 30. one liter is 1.1 kilograms so your epoxy might be a different weight and you need to get that specification from your supplier so then you take 16.913 and you times that by the weight of your epoxy which is 1.1 kilogram and that's giving me a total of 18.60 kilograms of epoxy i'm going to use for this project now remember we have to allow for
wastage and we normally add around about 10 but for the sake of this project we are going to use 18.6 kilograms of epoxy so it makes sense just to make it 20 kilograms of epoxy 20 kilograms of epoxy is what i'm going to need for my project now remember We are casting in layers and for this specific project i'm going to cast two layers meaning that i'm going to cast the first layer which is 10 kilograms of epoxy and the second layer is also going to be 10 kilograms so calculating that amount the ratio we
are using for our epoxy we are going to use a hundred percent resin and 33 Of that is going to be the hardener so we're going to take 20 kilograms and we're going to divide that by 1.33 and that's going to give me a total of 15.04 [Music] kilograms of resin i'm going to knit totally for this project because that 20 kilogram is your resin and your hardener together now you take 15.4 15.04 and you times that with 33 and that's going to give you 4.96 kilograms of hardness now remember we're going to cast two
layers taking 15.04 divide that by two and that's giving me a total of 7.52 kilograms of resin and taking 4.96 divide that by 2 and that's 2.48 kilograms of hardness and just to make sure take 7.52 plus 2.48 that gives me a total of 10 kilograms of epoxy so hopefully this calculation is going to help you in calculating the volume now i know a lot of epoxies gets calculated by Liters but the ones we are using gets calculated into kilograms that's how we calculate the amount of epoxy we're going to need for this project mixing
epoxy how do you mix epoxy now this might seem like a simple topic but we like using the old school method we just use a wooden spoon and we make sure we mix each batch of epoxy between three to five minutes and we Make sure we scrape the sides the corners the bottom and we just make sure we don't stir epoxy aggressively because if you do it that way you're going to make more bubbles and once we used this pedal and this created 25 million bubbles now i'm not too sure if we used it wrongly
but we completely moved away from this method and we're just going old school with a wooden spoon And that gives us the less bubbles we can ask for now we're going to move on to mixing our epoxy and our resin our pot a i left it in the sun for around about two to three hours just to get it a little bit hotter to make it a little bit more liquidy now i do know you get some epoxies that's very liquidy and you don't need to do this step but for us we in south africa
we are heading in our Winter months now meaning that when i come to my shop in the morning the epoxy is very cold meaning that if i'm going to mix it the air bubbles is not going to be released very easy it's going to be difficult for all the air bubbles to come up so we leave the epoxy in the sun for two to three to four hours and that makes the epoxy a little bit more liquid so now we're going to mix the epoxy and we already calculated exactly how Much epoxy we need for
this project so the first batch of epoxy is going to be 10 kilogram in total without the weight of the bucket and the scale i'm using is obviously working in kilograms and we're going to add 7.52 kilograms of resin which is part a and another tip i want to give you is when you work over your bucket always make sure that the underside of your buckets and your resin buckets and Anything that has to do with you working over your epoxy is clean it happened before where we put in our bucket and these dust particles
and everything that's going in our main batch of epoxy we are busy mixing so this is five kilograms in total meaning this will be the whole batch just gonna move this down so you can see now we're going to add the other two Point something kilogram of resin to make 7.52 and then the total amount of these two together should be 10 kilograms so now we're going to add our hardener which is almost like water 10 kilograms on the money epoxy color consistency what does that mean it means that how do you get Exactly the
same color on each layer you're going to cost in your table now this topic is not applicable for your deep costing epoxy because you're obviously going to mix your whole batch and you're going to pour your table in one go this topic is applicable for people that's going to cost in layers now you need to understand that each epoxy is different and each epoxy layer you're going to cast is going to Be different thicknesses depending on the specification from your supplier now the two epoxies we are using is called crystal 100 we only pour 35
millimeters at one time and then the other product we use is called would cost 30 meaning that we can only pour 12 moles at a time say for instance a table with this thickness we're going to do a total of five castings five epoxy layers to make my table full Till the top so how do i get the same color consistency in each layer i'm going to cast so the way we've done it before is we purchase epoxy in 40 kilogram batches meaning that you will get 25 kilograms of resin and then you will get
15 kilograms of hardness so what we will do is we will calculate the amount of epoxy we're going to use say for instance for this table and we see okay we're going to use two batches of epoxy which is 80 Kilograms of epoxy so then we will typically take the resin not the hardener we will take the resin and we will either add our color pigments or our drops inside the batch of resin so say for instance there's two batches 40 kilogram 40 kilogram we will add say for instance exactly the same amount of pigments
or drops in this patch and in that batch meaning that every single time i'm going to pour a layer i'm going to get exactly the Same color consistency in each pour i'm going to do but we stopped using that method because why let me show you we started sitting with we started sitting with batches like this say for instance you do 10 tables 10 tables times this amount of resin that's left you can basically have a full batch of Resin so that's why we stopped using that method now our new method we are using is
we will calculate the amount of epoxy we're going to need for this specific table we will divide it in the amount of layers we're going to cost and for each layer we're going to add the exact same amount of color pigments or drops now the tip i want to give you is you obviously get Two different types themes of epoxy tables you get your solid color which you are not able to see through you're not able to see the edge of the table and you get your transparent colors which you are able to actually see
the edge inside your table now the advice i want to give you is if you're going to add drops or color pigments add the exact same amount of grams into each Batch and the drops you're going to add don't add in equal drops if that's what they call it like say three drops or five drops or seven drops going on um add like two drops or four or six or eight or ten meaning that you can divide two in half You can divide two drops and then you get one drop you can divide four drops
then you get two drops you can divide six drops and then you get three drops but how do you divide three drops it's technically one and a half drop meaning that let me sum it up for you say for instance your calculation is a little bit out on the amount of epoxy you're going to need and say for Instance you calculated more than what you anticipated for meaning that say for instance this table is going to take amount of five layers of epoxy i'm going to cost now you get to your last layer and you
see you are not going to use the full amount you calculated now the last layer you want to divide in half now say for instance you used four drops and now you can use two drops of color pigment in that specific batch So don't use three five seven or in equal numbers of grams and stuff if you want the same color consistency now for someone like us that's building a lot of these tables i know my ratios more or less i'm going to start to mix my pot a and part b resin and hotnet together
i am going to add for now two drops of black into my main batch then we're going to Mix it and then we're going to check the color and see if we are happy with that color another tip i want to give you is if you want to see your end color get a see-through cup with about more or less the thickness you want to pour for your table and then you'll see your in color more or less with our experience what we've noticed is that your color always comes out slightly Darker than what you
plan for in this step so you can take this a shade or two a little bit darker that is going to be your finished color now for me this is still a little bit light so i'm gonna add another two drops of black so we got four drops in total now whether to seal your life edges or not what does this mean this is a ongoing battle for epoxy table company manufacturers Worldwide is whether to seal your life edges with epoxy or not now why do we do this and why don't we do this well
the reason why well let me put it this way we seal our edges on some occasions and some occasions we do not seal it it basically means that your piece of wood actually contains air inside meaning that if you're going to pour a liquid inside the air is naturally going to be released inside the epoxy it's natural for that to Happen now we believe that we get a better bond between our wood and our epoxy if we are not sealing our edges meaning that we literally give the epoxy time to penetrate into the wood and
into all the small cracks and that's going to give you a better bond between your wood and your epoxy now if you're going to seal Your edges we believe that you are weakening that bondage so that's why if a client goes with a transparent color meaning that you can actually see straight through your table and the client is going with a high gloss polish finish where you can see straight through your table It is easier for air bubbles to be trapped on your life edge that is why we seal our edges now but i'm still
not too comfortable with that method now we basically the way we do it now is we would seal our edges with epoxy we will wait for it to dry and then we will come and scuff it up with a steel wire brush just to give Your epoxy you're going to pour a better bondage a better grip between your wood and your epoxy now the new method we got planned is something we are going to try together for the first time and like i said right at the beginning of this video is we will continuously look
for new methods and ways to improve ourselves now the new method we're going to use is something that's going to make both parties happy so Is a concept that's going to make the people happy that is sealing the edges and it's going to make the people happy that's not sealing the edges so what we are going to do is we are going to seal our live edges with epoxy right then we are going to place our wood into the mold then before we're going to wait for the epoxy to dry against our Live edge we
are going to pour our epoxy once our epoxy on our live edge is tacky now this makes sense in a way that your wet epoxy is going to bond better with your tacky epoxy if it makes sense so that's something we're going to try together and i am pretty confident with this method and that is going to help you to have zero zero zero bubbles on your epoxy table so i Mixed a little bit of epoxy and we're going to seal our edges but if a client goes for a solid color you don't necessarily have
to seal your edges and if a client is going with a transparent color it is easier for bubbles to show so for this specific project we are going to do things a little bit differently we are going to seal the edges with epoxy But we are going to leave it until it's stacky and then we're going to put our epoxy that makes sense that the wet epoxy you pour into your project is going to bond with the tacky epoxy and then we're going to leave the epoxy for around about 24 hours until that is tacky
as well and then we're going to pour our last layer of epoxy applying the epoxy on the edges it's Going to take around about i would say two to three hours before it becomes tacky and then we're going to move on to do the full half pour of our table and you don't really have to worry too much about bubbles in the little bit epoxy you're mixing for your edges because they will go away and another tip i want to give you is when you're going to seal your edges put your slabs straight up so
If you're going to apply your epoxy on your live edge that if there's any big cracks that the epoxy can run into those cracks and if you're going to put your slab sideways you're literally just going to close that cracks with epoxy so put your slab straight up we're going to use a brush so we make sure the epoxy you're applying on the live edge is going into all the little Cracks and holes so [Music] [Music] so so [Music] [Music] so i've sealed all my edges now i'm just going to give it a quick run
down with my gas gun just to make sure i remove all the last unwanted bubbles And i will normally repeat this process maybe two times and this is what i mean with tacky it's almost set you can see your fingerprints will still stay there and the epoxy will come with your finger that's tacky pouring epoxy now there's nothing special about this topic but there's a lot of things you need to keep in mind When you're going to poor epoxy now when we planning to pour epoxy and it is summer months in south africa it really
gets hot here we would typically leave the batch epoxy outside in the sun for a few hours and we would bring it inside our shop we would close the shop at the end of the day and i would come in at night when the temperatures are cooler in our shop Because we haven't got room temperature control yet meaning that i have to come in at night because we have to pour in lower temperatures now the reason why we leave the epoxy on the outside is we want the epoxy to be hot meaning not the epoxy
and the resin mixed together we would leave both batches outside they will bring it Inside and we'll make sure the epoxy itself is above 27 degrees that's making the epoxy more liquid meaning that if the epoxy is cold the air bubbles struggle to release when you're going to mix your epoxy but when the epoxy is more liquid the air bubbles will release much easier and that's where you also get So many different types of epoxies on the market you get very thick epoxy and you get thin epoxy now thin epoxy is obviously the way to
go because once you're going to mix it the air bubbles will release much easier now the epoxy we've got in our country is basically in between it's not a very thick epoxy and it's not a very thin epoxy but it is halfway we still need to Leave it outside so the epoxy can be above 27 degrees which makes it more liquid like i explained to you before the way we mix our epoxy is with a standard old-school spoon paddle and we will not mix aggressively we will just mix it smooth another tip i want to
give you is to clean your cross braces as well to make sure there's no dust That's going to fall in your epoxy also another tip i want to give you and something that's very critical is the table you are physically pouring your epoxy on needs to be 100 level that's to make sure that when you're going to pour your epoxy it's going to be level it's not going to be applying more epoxy on the one side than the other if it makes any sense at all ah It's good good so now that i left my
epoxy for around about 20 to 25 minutes outside i basically popped all my bubbles on the inside of my bucket now pouring your epoxy there's not nothing there's not anything special about it we just pour very slowly to minimize bubbles as much as we can so this is the first layer Of epoxy and this color is going to be absolutely beautiful so so so it's the next day coming back around about 24 hours later and the epoxy is definitely tacky when you put your finger on the epoxy your fingerprint stays there so it's tacky and
now i'm going to start to prepare For the second coat and i already left the epoxy out in the sun for about three hours and it's about 4 p.m now in south africa heading into the winter season meaning that my preparation is going to take around about hour to hour and a half meaning that it's around about 4 p.m now meaning that i will start pouring about 5 30 p.m meaning that the first 12 hours of my epoxy casting is going to be in a cold environment now we haven't got air conditioning yet and room
temperature control yet that's why we operating at night so that the first few hours of the epoxy can be in a very cold environment so let's start prepping for Our second pour and let's start mixing the epoxy so the one thing you can also do to minimize bubbles as much as possible is to pour a thin layer of epoxy and then use your gas torch and pour another thin layer of epoxy and go through with your gas torch and make sure you remove all the bubbles but Ninety percent of my bubbles has been removed so
we shouldn't sit with a problem but for the sake of this video we're going to stop pour a thin layer and use our gas torch to remove most of the bubbles this is always the Part of the project that i question myself and to see if my calculations are actually accurate and see how much epoxy is left or if i'm going to short any so fingers crossed let's see if we let's see if our calculations are correct but it's looking good so far i think my Calculations are going to be spot on i'm just going
to wait another 10 minutes for most of the bubbles to rise and then we're going to do our last last bit of pouring and then our table should be filled to the top and i honestly do have to say with this new technique of sealing the edges and wait for the epoxy to become tacky i honestly do have to say i love this And i will think we will start manufacturing all our tables from yawn forward like this i can literally pick up not a single bubble on the edge of my table it's literally flawless
and i absolutely love it now the moment of truth to see if our calculations were spot on and to see if we can fold this to the top now Remember this side is 0.5 moles higher than this side so according to me this is actually fine already but we've got a little bit left so might as well use it well i think according to my calculations we were pretty pretty pretty spot on i think we i think we could have maybe calculated another kilogram less than a kilogram But this should be fine are we still
going to finish at the very thick coffee table so this should be 100 fine so according to our epoxy supplier this needs to sit now for five to seven days until it gets fully cured and fully hot so i'm just going to pop the last bubbles and then i will most probably see you within the next five to seven days to start to demold This bad boy and then we're going to move on to the next steps sanding between layers why do we sand between layers now this is obviously yet again not applicable for people
that's using deep casting epoxy sanding between layers just basically means that when you're going to pour your next layer you are giving that bond between the two layers a Better bond it's going to have a better grip because you're basically sanding grooves inside your epoxy now i know you think that you're going to see all the scratch marks from the sanding believe me we've tested this and it absolutely works so for instance if we're going to do five layers we would come and do our first layer of epoxy we will not sand between the first
and the second layer but between the Second and the third layer we will sand and between the third and the fourth layer we will not sand and between the fourth layer and the last layer we will sand we will not sand in between all the layers just like two or three sandings in between the layers just to give you a little bit of better bondage between all your layers and then obviously you need to make sure that between all the layers you use your air hose A wet cloth a damp cloth dry cloth and you
repeat this process all the time to make sure that there's no dust particles whatsoever on your surface when you're going to pour your next layer of epoxy dealing with bubbles how do you remove bubbles well we did discuss the sealing of the edges which has a major impact of bubbles but how do you deal with bubbles now you're going to see once you mix your Epoxy you are going to leave that batch epoxy the resin and hardener mixed together with your color pigments in your bucket you're going to mix it for five to three minutes
you're going to leave the bucket for around about 10 minutes you will see a lot of the air bubbles will come up and then you can just pop that with a gas flame gun that's going to remove most of the bubbles and you're Going to see once you pour your epoxy into your mold there will also be a little bit of bubble so we would technically pour our table we would wait around about half an hour then we will come and do our first popping bubbles so we would use our gas torch gun not on
a super high heat and we don't want the flame to be on the epoxy like just a few centimeters on top of the epoxy because if the epoxy is going to Receive too much heat that specific section can either become super hot and it can start to smoke and you don't want that now look the ultimate will obviously be if you have a combustion chamber that will be the ultimate goal and that's going basically to remove 100 of your bubbles so what i will typically do now is i will pop all the bubbles with my
gas gun i will wait around about 20 minutes i Will come back repeat the process and wait 20 minutes and then i will repeat the process again and if you're popping your bubbles don't hold the flame too long on top of the epoxy otherwise the epoxy will heat and it will burn so what is the maximum depth you can pour epoxy to now you need to understand that epoxy is a very sensitive substance meaning That you need to go and source this technical data from your supplier now the total thickness is critical you absolutely have
to follow the recipe your supplier gives you if you're going to pour more epoxy than you're supposed to and that's a recipe for disaster meaning that your epoxy is going to overheat it's going to make a lot of bubbles it's Going to make smoke and that is going to lead to a massive disaster now we would typically the boxes we are using we if we're going to use crystal 100 we just go up to 35 mil and the would cost 30 we only pour up to 12 millimeters at the time now you will also see
we also sometimes get shrinkage and i was so stressed when this happened The first time it's basically when you pour your layers the epoxy overheats a bit meaning that you did follow the recipe your supplier gave you to the maximum depth you can put to but it means that your environment is very hot meaning that it's more than 27 degrees and there's certain spots on your table that might be where there's more epoxy than say for instance where there's like a narrow Piece between the wood where there's less epoxy meaning that in the winter epoxy
will take more time will take longer to cure and in the summer it might be faster but epoxy doesn't want too much heat it just wants a stable environment and the longer your epoxy can cure the better curing time how long does epoxy take to clear this is also technical data you have to get from your supplier but the Epoxy we are using if we're going to cast layers we can cast the next layer between four and seven hours we can cast our next layer and from there on forth when we put all our layers
on our table the epoxy typically takes five to seven days to be fully fully cured removing the table from your mold now the only advice i can give you is do not use a steel hammer we would either Use a rubber hammer or we would use a wooden mullet this just makes sure that if you're going to hit the epoxy it's not going to crack or break if you're going to use a steel hammer so use a rubber so use a rubber armor or a wooden mallet [Applause] [Applause] coming back five days later our epoxy
is hot as a rock so now it's time to demold and we're going to remove Our table from our melamine sheet and we're going to remove the sides first and the advice i want to give you is don't use a steel hammer either use a wooden mullet or a rubber hammer to remove the side wall panels of your mold also another tip i want to give you is remember if you're going to remove the side panels of your mold where the epoxy is this edge is extremely extremely sharp so we just Normally take a file
a steel file and we will file this edge to make sure you don't cut yourself and let's get the molding [Applause] [Applause] always be careful for the screws that you don't see hmm hmm absolutely beautiful So now that my table is fully cured and demolded it's time to load it and take it back to our cnc supplier to get the slab flat on top and at the bottom so we work with the even surface then we're going to move to the next step but for now let's load this bad boy and take it to our
cnc supplier once our table is fully cured and is removed from the mold we obviously have to get our surface of Our table flat again now by doing this you can either use your manual manual router sled or in our case we take it to our local cnc supplier to make sure your wooden surface and your epoxy surface is 100 level [Music] [Music] feel like [Music] [Music] So [Music] [Music] oh [Music] start sanding so this is where we will typically start sanding and we will we used to start sanding with a belt sander but we
stopped because the belt sander is too aggressive it removes too much material at once that's why we invested in the rotex Machine the festool rotax machine has got two different settings it's got the rotax setting which is very aggressive but not as aggressive as a belt sander and then you have your normal orbital sender mode so we will typically start sanding with 80 grit sandpaper then we will move up to a 400 grit sandpaper depending on what finish the client wants so having my project back in my shop the absolute First thing i always do
is give my project a sand on top and at the bottom with my face tool rotex machine with the 80 grit sandpaper that is just basically to remove all the lines the cnc machine made now we like using the rotex for multiple reasons the first reason is because it's got the rotex setting meaning that this machine comes with two different settings it's got a normal orbital sander setting and then it's got a rotax Setting the rotex setting is a more aggressive type of setting it's not as aggressive as a belt sander and it's not sanding
as light as a normal orbital sander when having the rotex in the rotec setting now this just makes it easier for us to remove all the cnc lines the cnc machine made now we're going to start off with a 80 grit sandpaper and as you know the Face tool sandpaper is specifically designed for the festool sanders you'll see it's got a lot of holes inside now some of these holes are designed to push air out and some of these holes are designed to suck air inside that's why you got all these holes on your sandpaper
and on your sanding pad that's what i love about face tool everything is designed to work together and to minimize dust as far as possible now we're going to start in the right deck Setting and how do you know it's in the right x setting you've got your setting button here and you have to feel that it's struggle you have to struggle to turn your sanding pad and then you know it's on rotax sitting now we're going to start so [Music] do [Music] [Music] Cutting your table to size and edging so we would typically start
sanding our table with 80 grit 120 grit and then 180 grit then we will cut our table to size using our festool track saw then the side of the table that we cut with our track saw we would sand up to 180 to give your router bit it's got a bearing on to give your router bit a smooth surface to run on so once that is done You will see that the actual bearing will make a small groove on the side of your table right around that's when we continue sanding to 400 grit onwards depending
on what finish your client wants so cutting our table down to its final size we're going to use the face tool hk85 and we invested in this machine for multiple of reasons the first reason is it can cut up to 85 more thick meaning That if we have a very thick slab we're going to start the project with we can cut it down straight in the middle without any hassle and cutting our table down to its funnel size you have to make sure that you've got a very fine blade a finishing blade to have a
very smooth edge when you're going to cut your table down to its final size so cutting our table down to its final size we would typically start With the longer edge of the table we would cut a straight line and then from this straight line we would get our big square we would square this line off we would square this line off then we will cut out two smaller sides and then we will not square this side off to go that side we would take the measurement from here the measurement from here the exact same
measurement taking up then we'll cut the last piece of our table so Let's do that so as you can see we got a little bit of overflow of epoxy this side but i still got a clear line where my physical table where my physical would actually stop so i'm just going to use this as reference as close as possible to that line to lose as less as possible material [Music] [Music] so before i'm going to strip my tracks or to cut the two sides off i'm going to Take the same measurement i take this side
and copy and paste on this side and because this is just a master class and this table isn't for someone specific i'm going to cut it obviously as big as i can 600 and 95 695 so because my blade is a little bit dull but it's not at the stage where i need To replace it i'm going to make two cuts on this side instead of one [Applause] [Music] [Music] and now that my two longer sides of my table has been cut parallel with each other and is exactly the same width in between we're going
to square off one side and with our experience we don't need the pencil anymore i'm going to show you the method we take in squaring Most of our tables off and it's working for us so what we will typically do is get our clamps at the bottom in place like that like then we would use our big square and just square of our track so it's exactly square then we will just clamp our track down [Applause] safety [Music] [Music] [Music] edging our table now it's time to move to the process where we're going to give
our table a small 45 degree chamfer right around and this is the style we like going for because we like to keep the thickness of the table and we are using the face tool Oa 1400 we just love this machine overall and we're using a normal 45 degree router bit and the reason why we only sand 280 grit is because the bearing of the router bit actually makes a small line and a small not a groove but there's a small marking on the side of your table and this is also the part of the project
well actually you need to decide before you start with what finish you're going with Like i mentioned before if you're going with rubio monaco you can send your project to 180 grit if you're going with odis oil like we're going to do on this project we're going to use odis oil i can sand up to 400 grit sandpaper so the reason why we stopped at 180 grit is because from 220 grit onwards we can send that small little line the router made on the edge of your table we can send that away let's do That
[Music] [Music] [Music] if you guys are using rubio monaco and you stopped sanding at 180 grit you will also see that where your router is going to pass on the epoxy side the underside of your router with all the dust and stuff you will definitely have some scratch marks on your epoxy so You can just sand your table again with 180 grit sanding your table do you use a normal orbital sander or do you use a finishing sander this is a lesson we've learned the hard way at the beginning of our journey where we manufactured
these tables we did not have a finishing sander and we continued having shrill marks on our tables and i couldn't understand what was happening so we will start sanding our tables with our rotex 280 Grit from 180 grit we will put this baby away and we will start sanding our table with our face tool ets 5 finishing sander a finishing sander has got a much more stable shaft as your normal orbital sander and it can send for long durations of time we can send six to seven hours each day with this machine and it doesn't
get hot So that's the difference between a normal orbital sander and a finishing sander now if you're going with a solid color epoxy a normal orbital sander will work fine but if you're going with a transparent colour a normal orbital sander is not the correct sander to use invest in a finishing sander and you will get the perfect finish for your tables filling the cracks and holes you will see once you have your table back in Your shop and your epoxy and your wooden surface is actually level it's time to close all the small little
cracks and holes on your table and how do we do this we previously used a syringe with the same color epoxy as our table and we will only close the crack of the table but that led to once that piece of epoxy is dry on that specific section where there was a crack We would come and sand it down that epoxy we applied with a syringe on the crack penetrates into the wood meaning that you will sit with a mark there exactly where you put that epoxy so we would patch all the cracks and holes
we will sand it down and then you will see this actual mark where the epoxy was so we stopped using that method the way we use it now is we would come with a scraper And a little bit of clear epoxy we would cover the complete surface of our table meaning that we are basically staining the complete wood on top once we are done with that step then we would come afterwards with a small syringe and we will start closing all the small little cracks and holes and one thing that helps us to see all
the cracks and also we actually need to have a light where you can inspect your table but on Either side of our shop we've got very big doors so we would stand on one side of the shop and we will use the natural light that shines on top of the table where we can see all the small imperfections on the table and we will use this technique and this method in closing all the small little cracks and holes sometimes you will see you will close up a hole or crack and you will obviously wait a
day or two for this method and This technique for the epoxy to dry and you'll come back the next day and you'll see that crack the epoxy actually went into the crack more and you need to fill that again so if i can give you advice don't do this before you go home do this while you are busy in the shop during the day because you're going to close the cracks and holes and you're going to come back off an hour later and You're going to see that epoxy inside that track penetrate it more into
the crack meaning that you have to fill that cracking so you need to make sure you inspect your table say every one or two hours for the next four hours to make sure that the epoxy you're applying into the crack or hole actually is level or a little bit overflowing to make sure that that crack and hole is actually Closed 100 and when you're going to leave it for two or three days you don't have to come back the next day to fill that crack again and because time is running so that's how we close
all our cracks and holes closing the small little cracks and holes inside your table that's not perfect now the way we used to do it before is we would use the same color epoxy that we're doing our project with we Will drip small little amounts of epoxy into all the cracks to fill those cracks now the overflowing epoxy over that crack normally leaves a stain on top of your wood about 50 percent of the time when you come and sand it down and you put your oil literally only the manufacturer will notice this but there
will be a slight stain in color on that specific crack or hole you're filling now Then we moved to rather using color epoxy as the same color as our project we would start using clear epoxy now that worked much better but we would still have that little slight stain of the epoxy on top of the wood now the solution for this is when we get our slab back from our cnc supplier where they flatten our top before we do anything we would come and do a slight thin layer over the whole Complete surface well except
for over the epoxy because it's not necessary so we would do a very thin layer of epoxy over the complete surface of our table then luckily for us we would use the natural sunlight to a level where we can see all the small little imperfections and holes and we will use that to fill all the small little cracks like you see in front of me we are busy with a six seated table And all the little cracks and holes is already filled now when i'm going to sand this off there will literally be no stained
wood because i literally stained all wood that's basically what it is we would close all the cracks and holes and all the imperfection of our table and like i explained to you before the way we've done it before is we would typically seal the whole slab with a very thin Layer of epoxy and then we would come afterwards still while the layer of epoxy is wet then we would come and fold all the cracks and holes and imperfections the reason why we do it this way is if you only going to close the crack or
hole the epoxy that's overflowing over that specific area penetrates into the wood meaning that when you're going to come and send your table afterwards you're going to send that specific Place you put the epoxy you're going to sand over it the epoxy will penetrate into the wood meaning it will be like a stain so you'll sit with these stains everywhere on your table so that's why we would come and do a very thin layer of epoxy through the hole through our whole project be basically staining your whole wood now this is where i mentioned right
at the beginning of this video that we will Keep on looking and seeking for better ways to improve our own system now it's time to announce that we came up with a better solution we recently got this product in our country called crystal uv and it's a quick set epoxy it basically needs uv light to dry very quickly just to give you a good idea if we fill our hole or crack with the crystal uv It will typically take around about 30 to 40 seconds so the epoxy gets really hot and you can leave it
for five minutes to be well set extremely hard so it needs uv light to become hot so we got a small little uv torch or we can push our project out into the sun and the epoxy will sit in 30 seconds but we will leave it for five minutes Just for in case and the nice thing about this product is it dries so quickly it doesn't give the epoxy time to actually penetrate into the wood and that's why you won't be left with a stain afterwards and we will repeat this process on top and at
the bottom of our table exactly the same epoxy finishes the first finish we're Going to discuss is a smoky finish and i'm going to show you a picture now of our smoky finish looks it's not eye glossy to finish it's basically you send your epoxy all the way up to 320 grit or 400 grit is what we send all our tables to if we go with a smoky finish so once you are done sanding to 320 grit face tool has got this scorch pad we will typically use it's very soft And it gives you a
very even smooth surface and then we will finish sanding our table with the 320 grit scorch pad so how do you achieve a frost smoky finish on your epoxy a frost smoky finish is basically a matte cloudy finish it's a finish where you're not sanding all the way up to your polishing stages now a frost smoky finish is very popular underneath the solid epoxy colors and for us that's using transparent colors It's also very popular because our main goal is to still to be able to see your live edge on your table now how do
you achieve this finish now we already sanded our table down with 80 grit sandpaper 120 grit sandpaper and 180 grit sandpaper then we routed our edges and we mentioned that the bearing of the router is going to make a small little line on the side of your table now this is also the part where you need to decide or you're going to stop at 180 Grit because it's all dependent on what oil you're going to use for your project and at this stage you will obviously send only your epoxy section on your table further now
for us that's going to use odis oil we can sand all the way up to 400 even 600 if we really want to now we're going to continue sanding with a 220 grit all the way up to 400 grit then we're going to use the festool scorch Pad in finishing off the last sanding stage of our project and remember we're going to do all of this with a finishing sander and as i mentioned we're using the ets 5 which is a finishing sander for face tool and as we're going to sand there will be a
few tips i want to share with you on how we do all our sanding on our projects let's do that [Music] so when it comes to sanding there's a Lot of aspects you have to keep in mind to achieve the perfect perfect finish and the first first step and the most important one is you are going to spend the most time on your project sanding and this is going to determine your finish so if i can give you advice spend a lot of time in sanding your project don't rush the sanding stage of your project
this is the most crucial step in your project and the second tip I want to give you in sanding is we will typically start sending our epoxy section on our table first then we will move to the wood section of our table and if you're going to start sanding your epoxy don't put your machine directly onto the epoxy and start the machine this will result in your machine having that one second wobble before it's on full speed so the way we will start sanding our epoxy is we will start Our machine on the wood section
of our table then we will move our sander to the epoxy it will look something like this and even when you want to put your sander off take your sander off the epoxy onto the wood section then only you remove your sand the next step i want to share with you is from 80 grit all the way up to about 320 grit we will apply the normal amount of pressure to our machine from about 400 grit all the way up to 800 000 grit we will only apply a medium amount of pressure to our machine
and from 800 to 1000 grit upwards to 1500 grit we would basically only use the weight of the sander to sand our table we will apply almost no pressure at all and the next step i want to share with you you will see from 180 grit up all the way to about 400 600 grit sandpaper you will see that the white dust for the epoxy will clog up underneath your sandpaper and this is where you need to have your air hose close by and you will sand your epoxy section for around about 20 to 25
seconds you will come with your air hose you will clean the underside of your pad from about 600 grit onwards you will see the air hose won't be applicable anymore and you can just use A normal cloth in wiping the underside of your sandpaper clean to make sure that there's no obstructions or no clogging up or clots or anything that's underneath your sandpaper that can result in your epoxy having swirl marks [Music] [Music] so the next step i want to share with you when sanding is we will typically sand in lines so we would send
this side then we will come down this Side and we will make sure that we overlap each time when we're sanding so once we are done with this method then we would come the opposite side in this way and we will typically just finish with a circular motion when we sand it will basically look something like this so and the next step i want to share with you every single time you move to a new sandpaper grit make sure you just wipe Your epoxy section to remove all the white powder dust from your surface this
is just to make sure when you're going to start with a new sanding pad that you have a very clean surface to sand on so [Music] and this is the white powder dust i spoke about that's underneath your sander that you need to clean consistently after 20 to 25 seconds So another tip i want to give you while you're busy sanding and you start seeing these small little swirl marks it means that there's a lot of white powder dust underneath your sanding pad that you need to clean and make sure the underside of your pad
is very clean because these little swirl marks can result in bigger straw marks over the complete surface of your epoxy it's going to look something like this So now that i have sanded my complete epoxy surface down to 400 grit sandpaper we're going to move to the last step in achieving the perfect frost smoky finish on our table and achieving the perfect finish we are going to finish sanding our epoxy surface with a face tool scorched pad now this is the main key in removing swirl marks from your table what is swirl box remox is
basically it doesn't matter if you have the Softest pad in the world you will continuously have swirl marks on your table swirl marks is basically your sanding machine will never have the same amount of pressure right around meaning that when you're going to sand the one side of your table there might be a little bit more weight on the one side of the sander than the other side and when you come this side There will be maybe a little bit more weight on this side of the sander and that's going to result in straw marks
now what i love about the scorch pad is it's very thick and it's very spongy meaning that even if you put more weight on the one side of the pad it's not going to result in straw marks and i know face tool has got a lot of different pads and they got a very big wide range i think they got 320 They got 800 they got fine they got rough i'm not even sure what the whole range has but the one we use is just called green and i think it's more or less the same
as about 600 to 800 grit sandpaper so let me show you how we're going to achieve the last step and achieving the perfect finish on our epoxy surface and remember we also have to clean the underside of our pad every 20 to 25 seconds because the white Powder does clog up underneath any pad [Music] minimum [Music] so now that we finish sanding our epoxy section on our table to 400 grit sandpaper and we finish sanding with a festool scorch pad and before we're going to start oiling our table there's one more step i want to
share with you but this is typically The part of the project where we custom manufacture our own steel bases we send them in for powder coating once we get them back we will apply the steel base on the underside of our table as the table lies here in front of me then we will typically start doing our markings where we need to drill for our threaded inserts we will take the steel base off we will do our threaded inserts and then we will oil our table but this Is a topic completely on its own because
you get 10 different ways enforcing any base to your project you get so many different designs on bases steel bases wood bases this is a complete topic on its own and for the purpose for this master class we are only only going to focus on the epoxy and wood section to get the perfect finish and to teach you our methods and our techniques we use in Building our everyday epoxy tables so the final step we're going to take before we're going to oil we're just going to give our table a quick clean i know this
is the wrap 150 it's a polish machine from festool and we are not going to polish the underside of a table we just use this technique with a sheep will buff just to clean the epoxy section of our table we're going to do it quickly we're going To do it fast then we're going to wipe the wood then we're going to start to oil our project [Music] so this step didn't even took me a total of one minute this step we just use is cleaning our surface of our table then we will come with our
airbrush and we will just do the final final cleaning we will not use a cloth after this because we tend and we found that the Cloth does make markings on your wood and and it does make markings on your epoxy and when you oil that marks tends to stay there so now before we're going to start oil we're just going to give it a quick airbrush so the next finish we're going to discuss is a high gloss see-through finish now we are going to use the same methods as the smoky finish We are just going
to continue sanding from 400 grit onwards all the way up to 1500 grit now there's a few tips i want to share with you that i will show you in the examples to follow epoxy polishing now this is only applicable if you go with a high-gloss see-through finish now you will sand all the way up to 1500 grit and the polish system we like using is the face tool poly system we've tried a Few but the one that gives us the best results is the face tool system now you get your three different polish sponge
pads with your three different polishes you will typically start with your orange one then you will move to your blue one then you will finish with the white polish pad this we've tried and tested this and i'll show you some results we've got before we are super impressed with this system And we will continue using this for all our future projects eye gloss polish finish how to achieve a high gloss polish finish now our new bottom side of our table we're going to follow exactly the same steps we took in achieving the smoky frost finish
except for we are not going to finish with the scorch pad we're going to sand up all the way to 1500 grit not skipping one sandpaper grit and remember you do have to pay attention to Sanding invest a lot of time in sanding that is going to give you the best results now we're going to sand up all the way to 1500 grit then i'm going to show you the polishing stages of this project i am honestly not going to record myself sanding this piece for the next two hours so i'm just going to give
you some highlights through my whole process how i got to 1500 grit let's do that [Music] so [Music] mmm [Music] [Music] now we're moving to the last sandpaper grit which is a thousand five hundred we're going to finish over the thousand five hundred and as you saw we will typically sand and then we will just wipe the underside of our sandpaper To make sure we remove all the white powder dust that's clogging up underneath our sand paper polishing our table now we completely sanded down our epoxy section of our table to a thousand five hundred
grit now it's time for the final process of this project and that is polishing now few aspects you have to keep in mind we are using the face tool system it's not a one poly system one go there is three different polishes And as you can see the orange pad obviously works with the orange compound and the blue obviously with the blue compound and the finishing stages the white with a white compound it has to be in this specific order because that's the way the system is constructed and to work the absolute best now the
machine we're using is called the shine x from face tool as well this is an absolute beast it's got a lot of different settings and polishing your table we Just use the middle setting which is about three we don't want to go too fast and we do not want to go too slow if you go a little bit over onto the wood when you're polishing don't worry too much because the oil we're going to use odis oil we can sand up a little bit higher to 400 grit even up a little bit higher to 600
to 800 grit so the wood section of our table we only send it to 400 grit sandpaper and the epoxy section we send It all the way up to 1500 grit now the first stage in polishing our table we're going to use the orange pad on our shine x on a medium setting then we're going to move to the other two compounds which i'm going to show you now and we don't want to add too much polish compound at this stage and overkill is absolutely not necessary make sure you spread it a little bit Before
you start polishing so when the polish compound starts to dry up that's when we know we need to stop and we will either do another layer of the same compound if we feel like it that's most probably always the case we will do this two times with each compound before we move to the next compound so we're gonna do this one more time with a little bit less compound and now your sponge ball is sad you can just wash it with water but Before we do that i am immediately going to move to the blue
polish compound just give it a good shake and we repeat this process [Applause] and now you will start to see it will really really really become shiny and that's how you get a height loss polish finish [Applause] now the last step is to move to the last Polish compound and that's the white one oh so finishing off my last polish compound you will see the compound with the rotisserie of the polish machine actually made a little bit of messier now we do have to get rid of the small little polish compound the excess that spat
onto your wood because if you're going to oil your table you're going to see all of these lines so what we will typically do is we will wipe the Compound off then we will just come with another 400 grit sandpaper as close as possible to the line not touching the epoxy just to make sure you clean your surface again and make it ready for oil [Music] so [Music] so now you'll notice that i still haven't wiped off the last excess of polish Compound on my epoxy so we polished the epoxy section of our table then
we sanded away all the excess polish that splat all over my wood section and now the small little dust particles that's on my epoxy i'm just going to blow off with my air then we're going to clean off the last epoxy section the polish compound with my sheep will buff and then the magic is going to happen you're going to see this baby It's going to shine like a mirror [Applause] [Applause] [Applause] and that ladies and gentlemen is how you polish a table this thing looks like a glass and as you can see you can
see my roof on the epoxy and that's what we want to achieve so that it looks like a mirror i hope you can see me now that our underside of our table Received a high gloss polish finish it's time to move on to the absolute last step of this project and that's to give it a coat of oil now we will not apply a coat of oil over the epoxy section because it doesn't make sense it's already like a glass surface it's like when you go to your house and you see your window and you
take olive oil and you apply olive oil to your window it's Just gonna be an absolute mess so what we will typically do when we oil our table is we will oil our table overlapping the epoxy just just slightly then we will come and wipe it off we will wait for our second coat of oil which will follow the next day we will follow the same process and then once we're going to buff off the last coat of oil we apply to our table the absolute last last step is we will come with our sheep
will buff for The last time on our epoxy section of our table wood surface finishing now this is obviously a personal preference what oil are you going to use for your project now the ones we like using is it depends on how we feel the day we will either use odis oil or we will use rubio monaco now why we need to discuss this at this specific time is that we are busy sending a table now odis oil we will sand to 320 or 400 grit and they claim you can sand to whatever Your heart
desires and rubia monaco you can sand to 180 grit because this linseed oil is designed in such a way to penetrate much better into the wood when you sand to 180 grit now osmo oil and all these other oils i don't know the specification on those brands we like using these two brands and this is our preferred oil we like using and the reason why we bring this up is Because we are in the process of sanding our table meaning that we need to decide if we're going to use this then we know we can
send our epoxy and our wood to 400 and from there on forward we will only send our epoxy to 1500 if we're going with a high glossy to finish or if we decide we're going with ruby and monocoat we know that we can only send our wood to 180 grit and the epoxy we need to continue Sanding with higher grits oiling our table now that we completed sanding the underside of our table to 400 grit and finished off with the scorch pad to achieve a frost smoky finish we're going to move on by oiling our
table and as i mentioned before for this specific project we're going with odis oil and we're going to start off with the odis oil super duper which is a more liquid type of oil then we're going to Finish off with the original odis oil which is a more wax type of oil and by applying our oil we're going to use the specific scorch pad odisworld recommends and you can either use this by hand but because we are doing large quantities of tables we are not using the hand method anymore we just got one of our
oldest sanding machines on the lowest setting possible and this is just going to make the Process much faster and what i like about this method in using the machine is the vibration of the machine basically massages the oil into the wood we used to use our festool ets 5 for this method before but the problem we got with that method is we are working with oil then we will use the same machine for sanding the wood and sanding the epoxy then we will clean it and we will move to the oiling stage And that resulted
in oil and wood particles not working together so we are only using our old sanding machine for this specific reason in oiling our tables and this machine will forever just stay the oiling machine in our shop now applying the oil to your table with our experience in oiling our tables is we will start with the liquid type of odyss oil which is the super duper we will oil our table we will leave it For around about 30 minutes to 45 minutes we will come and buff it off then we will leave our table for 24
hours we will come back and then we will apply the original odis oil we will leave that for 30 minutes to 45 minutes we would buff it off we will leave the table for 24 hours then we will move to the other side of our table yes meaning that the oiling stage for each project That goes out of our shop takes four days in total and the reason why we like using odis oil and as i mentioned before is we can send our project down to 320 grit or 400 grit which gives you a very
smooth surface on your wood which we absolutely love and currently in our journey that's giving us the best finish on all our projects so let's apply this oil [Music] [Music] so so [Music] so while i'm busy oiling the underside of our table i came to the realization that this was actually the top of our table but this is not going to influence the master class at all the original plan was to have a high gloss polish finish on the top of our table and a frost smoky Finish at the bottom now the two finishes are
just going to be turned around meaning that we're gonna have a frost finish on top and a high gloss finish at the bottom so we can still show you how to achieve both finishes my humbled humble humble topologies for this noob move so now that my table has been willed completely we're going to leave this for around about half an hour to 45 minutes then we're Going to come and buff it off we're going to leave it for 24 hours going to come back we're going to apply the same method with the original odis oil
we're going to wait 30 minutes to 45 minutes we're going to come and buff it off we're going to leave it for another 24 hours then we're going to come back to do the underside of our table which is going to be a high gloss polish finish so [Music] so [Music] tabletop supports c channels do you install c channels underneath your table we need to understand that wood is a material that can move whether you like it or not just to give you an example still c channels are designed to minimize Wood movement but root
movement will always happen and you need to understand that wood movement is something that will always happen whether you build a table for yourself or for a client with movement is always always possible something we've learned our first table we've ever built we ended up replacing that for client why Because we purchased wet wood from a supplier that guaranteed us that the wood was dry anyway what can we learn from this when we inspected the table afterwards as the wood dried over time and the wood the table obviously bended and twisted but what we've picked
up is that the epoxy actually bended with the wood And that taught us something that we are building our tables thicker now to make sure we minimize with movement and where it's possible we do install steel channels but on most of our tables there's not really any space for c channels so how do we do this we specifically design each steel base That's going out with our tables we design it in such a way to minimize wood movement as much as possible and the way we do it is we use thicker steel and base plates
so normally where you will have your threaded inserts we would apply a full base plate on that specific section where we had one threaded insert now we have four threaded inserts on that Specific corner if it makes any sense how do we forsen our steel base to the underside of our table that's very easy we used to use coach screws now coach cruz we would obviously position in different spots on our tables and we would fasten it directly into the support beams of our steel frame but we stopped using this method then we used the
angle ions so we would typically use an angle iron we will cut It into small pieces then we will position it into different spots of the table where we think the table obviously needs to be fastened now you're obviously not going to force an a threaded insert right into the epoxy section of the table because if you're gonna look from the top side you're obviously going to see there's a threaded insert now we stopped using that method and something i want to share with you we Are going to do from this table on forward is
adding base plates in between our steel frame and our wooden table so we would weld this base plate on our steel frame it basically means that where we typically had only one fastening point here on our table with the threaded inserts and the angle iron now we have four points which will support this whole section of the table And the good thing about this is you will never in your life twist this base plate and you will never twist this beam if this beam is properly welded to your steel legs now this is something i
feel that's definitely going to help us in improving our systems and our builds for for our customers and it's something i think that's really a big game changer not only for us but hopefully for someone that's watching These videos it's something that's definitely going to help us in building the perfect perfect table fastening our steel base to the underside of our coffee table now there's a lot of ways you can do this but i am going to show you our methods we take in forcing all our steel bases to the underside of our tables and
as i mentioned before we custom design and manufacture all our steel work in our shop once it's completed we Sent it in for powder coating once we get it back then only we start doing all our markings and drillings to fasten our steel base to the underside of our tables now we obviously not going into detail on how we built all our steel work because that's a complete lesson and master class on its own for the purpose of this video i am going to show you the methods we take enforcing all our steel bases to
all our tables and the method we use is called Threaded insets now threaded inserts it's not something new in the market it's something that's here for ages but i'm just going to show you our methods and techniques we use in forcing our steel bases to the underside of our projects so obviously the underside of your table is facing up and your steel base is on the underside of your table now we've got these base plates we already pre-drilled holes where we're going to Fasten our threaded inserts in so one tip i want to give you
before you're going to force on your steel base to your table is we've got this one-sided carpet stickers whatever you call it we apply it between our steel base and our wooden table to make sure the steel is not going to scratch the wood so before we're going to force on our steel work to our wooden table you need to make sure that your spacings are sitting at the correct place you need to make sure That your steel base is sitting in the center of your wooden slab let's do that so once your steel frame
is in its final position we need to mark where we're going to drill for our threaded insets now our steel work already got pre-drilled holes where our bolts need to go through once we're going to do our markings we're going to use a 10 millimeter wooden bit to drill into our wooden Section of our table and we need to make sure that you obviously don't drill too deep and the way we're going to do that is we're going to use a threaded insert we're going to place it next to our wooden bit and we're going
to use masking tape to make sure that we don't drill too deep into our wood so once all our holes has been drilled we're going to use a countersink bit to counter sink slightly to make sure that your threaded insert is going to sit flush with your Wood and after you counter sunk all the holes we're going to sand paper slightly over that hole to make sure it's clean and flush then we're going to insert our threaded inserts now applying your threaded insert into your wood we got a small allen key that's obviously going into
the threaded insert and we're going to apply this allen key into our drill and we're going to drill all the threaded inserts into the holes we pre-drilled For our threaded inserts and we're going to make sure they sit flush and after our threaded inserts has been inserted into all the holes we're going to place our steel frame on top of our table so that our holes align exactly over the holes we just drilled then we're going to add our bolts with washers into the holes we pre-drilled into our steel section and we're going to forsen
our steel base to the underside of our table it's a very simple method and it's Working for us conclusion so at the bottom of my heart i honestly honestly hope you guys learned something in this masterclass and remember you are not going to become a master of this craft by watching those four hours of video but it's definitely going to teach you our methods and techniques we take in building all our tables what i'm trying to say is if you want to become a master At any craft it's not going to happen overnight you do
have to practice this craft you do have to make mistakes and the only way you're going to learn is to make mistakes even us as a epoxy company manufacturer we also make mistakes on a daily base but it's helping us to become stronger and it's helping us to build better tables and like i mentioned at the beginning we strive every single day to build better tables and we will continue Seeking for better methods and techniques to be the best company we can be i honestly hope that you benefited from watching this online epoxy master class
and gain some knowledge and insight on each aspect to consider watching this epoxy online masterclass where we built this massive coffee table together there are numerous of books to be written on each aspect which i try to Address in the short epoxy master class and we can make this class 8 hours to 12 hours to 2 days long but i constructed this course to be compact and try and gave as much information as i can into one session of masterclass and i just want to thank everyone for purchasing this masterclass i know you did absolutely
learn something new today and if you're going to attempt your First project or if you learned something new today please reach out to me share your pictures your projects i would love love to see them thanks guys i hope you enjoyed this masterclass cheers