As if podcast editing wasn't already time-conuming and difficult enough, throw video into the mix and things become really overwhelming. The good news is is that you can actually edit a video and audio podcast the same way and at the same time. And in this video, I'm going to share with you sevenstep process that is by far the quickest, easiest, and most professional way you can edit a video podcast.
We've got a lot to cover, so we [music] better get started. I'm going above and beyond and I am going to drop some serious wisdom nuggets for you when it comes to your podcast. We're going to be using Adobe Premiere, which is my go-to video editing software.
And I really recommend that you give Adobe Premiere a try and follow along with this video so that you can get skyrocket fast at editing your podcast. The technique, which is one of the seven steps that I'm going to show you, it's called the switching cut, and you are going to love me for it. I'm going to be editing one of our podcast episodes, Content Hefe.
Content Hefe is our new podcast and it will help you to create better content [music] and more money. You can check out the podcast by clicking on the little I button thingy here and see what you think of the podcast or see the final result of what we're going to be editing in this video. So, without further ado, let's hop into Adobe Premiere and you are going to learn some serious game-changing professional editing techniques.
All right. So, the first step with the super speedy method is to create a multicam sequence. So, first we're going to need to set up a new project in Premiere by clicking new project.
And we'll title the project and select create. Now, let's drag all of the files that we're going to need for our project into the project panel in the left bottom corner. And like I mentioned, we only have one camera shot.
It's a 1 125minut take, and it's this shot right here. I'm going to rename this clip to us. And then if I hold down control and click or right click on a PC, while this clip is selected, I see this drop-own menu.
From this menu, let's select duplicate. And now I'll rename the duplicated file Steve. And controll-click on the Steve clip and duplicate it once more.
And this time I'll rename this clip Veronica. Now let's controllclick or rightclick on the Steve clip once more. And this time from the drop- down menu, let's select new sequence from clip.
This sequence is where we're going to create the shot that I want to be the default close-up for what we could call the Steve camera. And all we have to do is to zoom in and move the position a bit. This is really easy to do by adjusting the scale and position in the top left panel called effect controls.
Once we have a nice scale and position for this shot, let's repeat this process with Veronica's shot. control or rightclick, select new sequence from clip and from the effects controls panel, we can change the scale and the position to get a nice looking shot for Veronica. Okay, so now I want to make a multicam sequence that includes the original clip that we renamed to us and the two sequences that we created named Steve and Veronica, not the two duplicated clips.
This is an important distinction to observe. So to do this, I will highlight these three files by holding control when I click them. And now I have these three files highlighted that I want to be included in my sequence as camera shots, you could say.
I will once again control or rightclick and this time I'll select create multi- camera source sequence. A menu comes up to allow me to make adjustments to the multicam. But the way it defaults is just peachy.
So we can just press okay. And now a sequence has appeared in our project panel. If we control or rightclick on this sequence, we can again select new sequence from clip.
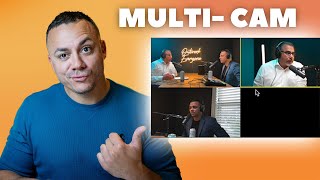
And here is our multicam sequence. At first glance, it looks like it's just the one shot of Veronica. But if we hover our mouse over this wrench icon under the video here, you'll see it says settings.
And if we click on the wrench icon, we'll get more options. It defaults at composite view, but we can also change it to multicam. This multicam is so cool.
Now you can see the three different shots. Veronica's close-up, my close-up, and the wide shot of both of us. Premiere has also assigned numbers to each of these shots in order.
So Veronica's shot is one, mine is two, and the wide shot is three. If I press the 1, two, or three key on my keyboard, it will instantly switch to the corresponding shot, just like a live switchboard. How cool is that?
You can also press the one, two, and three keys from the composite view that Premiere defaults as, which is what I'm going to do. And from this composite view, you can change the shot wherever the playhead is at by pressing one of these keys. This is how we are going to be able to switch camera angles and make cuts in our edit at the same time.
The switch and cut. But first, we need to move on to step number two, and that is to sync the audio with the video. This step is pretty easy.
All we do is drag the two audio files of our podcast microphones into the timeline. These files were recorded at the same time, so they have the same start and end points. Before we actually started the episode, we said the episode number out loud and we clapped our hands.
This creates a nice spike in the audio file, both on our podcast mics and also on the camera microphone. So, this makes syncing really easy. We just have to find the spike on the camera audio and match it up with the spike on the good audio.
Once we have them matched up, we can test it real quick by pressing play and listening. Hello, amigo. Amigaso.
And now we can get rid of the camera audio completely cuz we don't want that and replace it with the good audio. To do this, we can select our main clip on the timeline and control or rightclick from the menu. Let's select unlink.
Now we can delete just the audio portion of this clip. Once we've done that, we can slide the new audio up into its place. We can now click, hold, and drag our mouse to create this marquee looking thingy.
And that will let us select all three clips at once. With the clip selected, we can control or rightclick and select link. And just like that, we've replaced the camera audio with the sweet audio from our podcast mics.
And now for step three, insert the intro video. Now, this step is the easiest and it really takes maybe 6 seconds. We just slide over the main clip and drag in the intro video that we use for every podcast episode into the timeline.
P sounds cool presents content heavy. But this intro video has an extra step that we need to take and that's this little transition effect at the end that I created in After Effects using a green background. So to remove this green color from this part of the video clip inside the window that holds the project panel, you'll find more tabs which will bring up more windows by clicking on this icon right here with the arrows.
Let's select effects. This brings up the effects panel where we can search through Premiier's video effects. Let's type in ultra into the search bar and this will bring up the ultra key effect.
I love this effect because you just drag it onto the clip and then from the effect controls panel top left. You'll see the parameters for this effect. There's an eyropper that lets us select any color from any frame.
So, let's select the green color and boom, no more green. Now, I can find where I want the episode to start and I'll just slide it underneath this video intro to get this transition effect. Hello, amigo.
Amigaso. Okay. And now on to the next step.
This is where the real magic happens. Step four, the switch and cut. What we do now is to watch through the whole episode.
And as we're watching, we can cut out any filler words or sentences that may help the delivery more. And we may also decide to cut out short sections of the episode to make a more straightforward and enjoyable episode. The recorded time of this episode, for example, is 25 minutes, which is typical.
And I usually cut out about 5 minutes worth of time from the episode. So for this step, we just cut as usual. The magic that happens now that we are editing a multicam sequence is that now as we work our way through the edit, we can instantly change the camera shot by pressing the 1, two, or three keys.
Wherever the playhead is when we press the keys, that clip will be changed to that corresponding shot. One thing I like to do with our podcast that makes the episode a bit more dynamic and digestible is to add a three to five second pause from talking and add a little bit of music in between our main points. So I will commonly jump over to Canva and make a quick video title card for the points which only takes 1 minute to export out of Canva.
And then I drag this little Canva video and I drag a song into Premiere on the timeline. I will usually fade the song into the transition point and then I will quickly fade the song out once we start talking again. This is a little Studio Steve technique that makes clients really happy when you apply this sort of chapter style approach to their episodes.
And it's an easy way to work in a little more music or sound effects into your episodes without sounding corny, cheesy, or over the top. Even to approach brands yourself. Yeah.
So, why don't we get started with the first tip? The first uh point that I [music] want to share with you and that I think it's important is I've sped up the video of this whole step, but in total for this illustration, I spent 40 minutes on this step. And if you've ever edited a podcast before, you know that's pretty damn fast.
And if you add to that the fact that I also switched the camera shots from three different angles in a stylistic way that emphasized who was speaking, this approach was lightning fast. So now that the switch and cut is complete, it's time to put the finishing touches on this episode with the next two steps. That is crazy cool, right?
What did you think about the multicam? Are you finding value in this video? [music] If so, do me a favor and hit the like button.
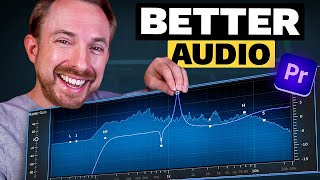
Remember to subscribe so that you can come back every week. We post really helpful videos that is going to help you to take your content creation to the next level. Step number five, treat the audio.
First, if we don't see the audio track mixer, let's click on window from the top menu bar and we can select audio track mixer. This brings up the audio track mixer in the same area as our effect controls. Next, we want to access the inserts for these audio tracks that we see so that we can add some plugins.
To do that, we click on this arrow in the top left corner here. Now, we can add any plugins we want to make the audio sound great. I love this feature in Premiere because you can use any thirdparty plugins you want.
My favorite plugins for this are from Waves. Each of Waves plugins will cost you around $30, and you really only need three or four to create top-of-the-line audio mixes with just a few clicks. I will run you through a quick demonstration of the effects I typically use.
That'll get your juices flowing. But you will need to take the time to understand how each of these effects actually work, meaning what they do to your audio and why they are important. But I will say this process is similar to what you will find in the workflow of most audio professionals treating podcast or broadcast voices.
The first effect I like to apply is a gate. This is by far the biggest timesaver plugin you can use. What a gate does is it allows you to cut quieter sounds out of your recording while allowing only the full volume sounds to come through or to pass through the gate, you can say.
Why is this so useful? Because it's perfect for cutting out microphone bleed. So, check this out.
For example, I have Veronica's track here soloed, so it's the only one we're hearing. And with the gate active and set to the right level, when I am speaking, none of my voice can be heard on her track, but when she speaks, we hear her perfectly. Yeah.
So, why don't we get started with the first the first uh point that I want to share with you. Next on the list, I will add a nice warm and juicy compressor. My go-to for this is the 1176 by Waves or Waves version of the 1176.
Now, I will add a DSER. This effect will reduce the harsh S noises that can be overbearing and hurt our ears a little bit when we pronounce words that are heavy in the S's. The next effect I add is another noise reduction effect, the NS1 by Waves.
It's a favorite of mine and it does a great job at reducing noise from the recordings episode is that we are starting being approached by and finally I like to add an EQ unit. I will usually use a highpass filter set to 80 Hz and then I will add a teeny bit of low. I'll kill a bit of low mid and high mid and then a really teeny boost in the 3 kHz region.
I find with EQ that less is usually more. Now, once I have repeated adding this same series of effects to my voice or any of the speakers in the episode, I will finish up the audio mix by adding a master limiter. In this case, on this computer, I like the Waves L1 Maximizer.
With limiters, you can really just pull the threshold down to minus4, -5, or - 6, and you'll be good to go. And just like that, this entire episode is treated, sounding beefy and delicious and ready for broadcast. Now we can move on to the second to last step.
Step number six, color grade. You can add color grading effects directly onto any clip or you can create an adjustment layer and drag the adjustment layer over your entire project. Just be sure that you rearrange the order of any clips that you don't want to be color corrected by dragging them on top of the adjustment layer like I have done with these title cards here.
So now let's click on window again from the drop-own menu and this time let's select lummetry color. This color panel appears and we can now easily apply nice color correction and grading to our footage. I will usually keep this simple and just start by balancing the color.
This footage was a little heavy in the orange temperature. So we can cool it off by making it more blue and a little touch of magenta looks [clears throat] really good in this case too. Then we can add a touch of exposure, a little bit of contrast, and maybe a teeny teeny bit of saturation and or vibrance.
And we'll finish it off with a little vignette for some added drama. And now for the final touch, I'm going to use a favorite video plugin of ours from Digital Anarchy. It's called Beauty Box.
This effect allows you to use an eyropper to find the dark and the light parts of your face and then it creates a mask or a selection you could say of only your skin. Then it allows you to adjust some parameters to soften your skin complexion. Think of it as digital makeup or an expensive IG filter for Premiere.
And that's it. Now the look of this video pops and it's more moody and more delicious. So now on to the final and probably the most simple step.
Step number seven, export. This one's easy. We just click on the export tab at the very top left or we can press control or commandm for media or export media and we come to the export window.
I like to edit in 4K. These episodes are going to Spotify and YouTube which both support 4K. So I will usually just select the YouTube 4K preset and click export.
And there you have it. What do you think? Did you find this helpful?
Are you going to be able to implement some of these things into your content strategy? Do you love me? Do you hate me?
Let me know in the comments below. And again, please do me a favor and like this video, share it with another podcaster, with video podcaster, content creator, and subscribe to our channel. And until next time, remember to check out the finished result of this podcast.
You can find it here by pressing the I button thing. Happy content creation.


![Lear How to Edit Video Podcast Interviews Fast [COMPLETE TUTORIAL]](https://img.youtube.com/vi/xf672kHykTQ/mqdefault.jpg)