all right so today I'm going to be walking through step by step how to build a super simple email AI agent if you know anything about agents you know that they can get super complex as you give them access to more tools and expose them to different scenarios so I just wanted to keep this first one super simple just to give everyone a good understanding of what agents are capable of and how you connect them to Tools in order to do what you want them to do to automate workflows basically so let's get straight into
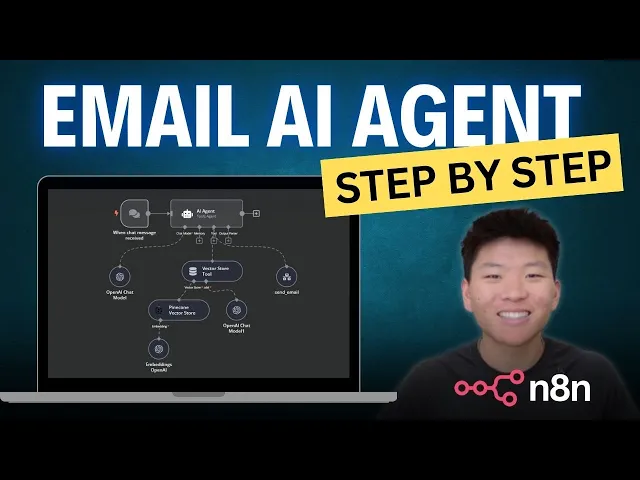
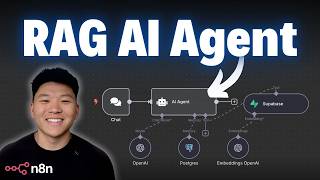
this one we just wanted to start off here with a quick demo of what the agent actually looks like and what it's going to do we got the agent don't worry a lot of this stuff probably won't make sense but by the end of the video it all will we've got the tools it's going to use here email the pine cone Vector database and then you can see all of the embeddings of a large language model in here we're using open Ai and that is basically just how it's going to know what to make the
email say how to find the information the contact information that sort of stuff so let's go in here and say send an email to phield dumpy asking him what's up hopefully this doesn't take too long to execute email has been sent to Phil dumpy asking what's up if you need anything else feel free to ask Perfect all right so let's just go in here hey Phil just checking in to see what's up best Nate super simple email but just wanted to give you guys a quick demo of that okay let's get into actually building this
now so the resources needed for this video naden that is the software we're going to be using to to build this um agent we got pine cone that's just a vector database tool where we'll be putting our contact information we got Google Docs which is actually where we have our content information we'll be pushing it from Google Docs into the vector database and then we've got open AI API obviously that is how we're going to use the large language model in this um agent and then 5 years of coding experience um yeah obviously that's a
joke because that's kind of the whole point of this video and these low code no code tools so we're going to be building three separate workflows today the first one is going to be to push contact data from Google docs to the pine cone Vector store and if you've never heard of a vector database right now um or if you've never heard of it before don't worry about that right now it's basically just where we're going to be pushing the data so that the agent can pull it there's a lot of resources on what Vector
databases actually are and why they're important for agents but let's just keep it simple for now um we're going to be building the tool also in NN that's going to be the send email tool and then finally the actual agent itself and all three of these workflows are going to be in n8n which is really awesome to keep everything together so yeah that's basically it let's just get straight into this first let me just show you what my contact data looks like so um these are all of my best friends pretty much I've got their
email addresses here obviously fake email add addresses besides this one is one of mine so we're going to be sending it to Phil dumpy and that's how it knows to send it to this email address here um then this is pine cone you want to go in here make an account um it's super super cheap it's actually I don't even know if I've paid for it yet it's based on usage so um yeah super cheap you're going to basically just go into pine cone here you're going to create an index you can name it whatever
you want the only thing that really matters to set up here is right here the configuration you need to set it up by model three small you're going to set that configuration and create that index so I'm not going to make one cuz I already I've already got one as you can see right here it's called sample and actually let me just get rid of this data in here so I can show we exactly how we're going to push this data in here so all right back to end end so we're going to add workflow
to project and this first one is going to be the workflow that's going to push the data into pine cone so I'm just going to call this one pine cone um all right so the first step is we need to add a trigger as you can see there's a lot of different options for triggering this workflow um but we are going to start off with trigger manually we'll get into a few of these other ones later but we're going to trigger manually which basically just means that when we click test workflow that's when the scenario
is going to run so we've got this trigger here we're going to click on this plus to add a node the node that we're going to grab here is Google Docs so as you can see there's tons of Integrations in NN we're going to grab Google Docs and then we have to choose a specific action within Google doc so what we're going to do here is um get a document okay so here's something that I got really confused about when I was trying to learn about how to build agents and stuff and that was being
able to call all these different nodes so Google Docs open API um Google Drive Gmail pine cone pretty much all of those you have to call them through n in and it has to know that you have permission to access this information so you have to set up these credentials API Keys whatever they're called whatever you want to call them so you're going to go in here you won't have this you'll have to create a new credential um kind of seems confusing you need client ID client secret but if you click on open docs it's
super super intuitive to just follow exactly what they say here so you'll have the instructions here just follow it step by step but I'll kind of show you what you need to do here you're going to go into Google cloud services I think it's right here Google Cloud account yeah you're going to go in here make an account set up a project and then once you're in that project you need to find what you need to enable so you've got like Drive Gmail and docs is pretty much what I have here so like let's say
for Google Docs I search it the Google Docs API and then all you have to do really is just enable it right here there'll be a button maybe here that says enable so you'll enable it and then you will need to go down to credentials you're going to create credentials o off client ID and then it'll be right here basically it'll have your client ID and your secret I'm not going to open mine up because it looks Bose me but that's all you need to do pretty much and then you're going to put those into
here ID secret copy and paste then you need to set up o 2 going to be in the same exact place o consent screen pretty much just giving permission what I did was I added my email here as a test user so it knows that I have remission or that NAD has permission to access my Google Docs my Gmail anything like that you could also just publish the app but if you're running into issues on nadn where it's saying that your account is blocked or you don't have permission it's probably because you didn't set up
that o off2 screen correctly and then finally while you're setting all that up there will be a prompt that tells you to enter this redirect URL so you're just going to copy that paste it right into there if I didn't explain that well enough like I said just go to docs um and it's super simple okay so I'm going to connect to my Google Docs account we're getting a document we're getting it and then you need the doc ID or URL the ID is basically this part of the um URL so I copy this here
you just want to make sure you don't get the slash edit everything after right here I'm going to put that um ID into there and then you want to test it because then you know if it actually is working or not we're testing it we see this is um the information the Conta information that we wanted to pull so that step is working here okay so now we know that that's pulling correctly now we need to um add a node that's going to push this into pine cone so pine cone Vector store credentials once again
you're going to have to set up the credentials so you're going to create a new one all the one needs is an API key back into pine cone super simple right on this leth hand side API Keys copy that paste it in n andn and you're good to go so I think we'll go with this one here I think that's the right one we don't want to retrieve documents as you can see this is the operation for this node we want to insert documents we'll be retrieving them later but right now just inserting and then
um the index is sample as you can see that is what my index is called right here so we want to make sure that we're choosing sample because that's the one that we're pushing our contact database into and then finally you want to add a name space we're going to call this one context and this is basically just to organize your data basically if you've got different client information you want to split that into different name spaces that sort of thing it makes the agent more efficient at being able to find what you're looking for
basically Okay so we've got that set up here now we need need to add um a data loader can leave this as as it is and then a token splitter and we've got chunk size and we've got chunk overlap so the chunk size is basically just the number of characters that's going to be in each chunk um your agent's going to call this tool go search in the vector database and it's going to grab chunks and look through them so the bigger your chunk size the the more data at a time but like I said
the database wasn't that big for contact data base so I'm just going to go 200 here and then overlap is how much overlap is going to be between chunks so we can just leave that as zero doesn't really apply too much right now and then the last thing we need to do is add the embedding I always pretty much just do open API or open Ai and then again another credential this one again you're going to need your API key so another simple one you're going to go to open AI if you haven't made an
account you have to make this so that you can call the large language model open or AI API keys and then right here just copy that value once again I can't show you guys cuz I'll be exposed but important step here make sure that the model is three small because if you remember in our pine cone Vector store you made the model three small so you got to make sure you do that again here too okay now we're just going to want to go ahead and save that and test this workflow so that's going to
run everything grab the Google Doc oh you see here it's not connected to this node so connect that save it let's run it again it's going to pull that now it's going into here loaded our data and now let's go back into the name space and check if it worked oh yeah I just refreshed as it came in but I just wasted like 10 seconds of everyone time okay contacts there we go it's in there we're good to go so that is this workflow our pine cone pushing it into pineco now we're going to do
the the send email tool so we've got send email trigger so this workflow is going to be called by the agent when we tell the agent hey can you send an email to blank then it knows okay I've got to use the tool that says to send an email so the trigger here is when called by another workflow we haven't made that workflow yet of the AI agent that's going to call this but that's how this one will be triggered um we'll configure this in a sec we just wanted to start that off here um
the next thing that we need to do here is grab Gmail and a lot of Integrations again a lot of actions here obviously we just want to send a message so we're going to click Send a message I think this is the last credential you need to connect I hope CU it's super annoying but once you do then they're all there so Gmail you're going to have to get client ID and client secret but I'm pretty sure um that should be easy now that you already have all this other stuff set up and you've got
your credential screen right here so super simple all right so we've got all that set up we're going to be sending a message and all of this stuff is going to be variable right so you want to change two to an expression CU that's going to change subject expression email type I'm going to do text the message is definitely going to be variable and then we've got some options here append NN you want to turn that off otherwise at the bottom it's going to say like this message was generated by you know or sent by
n turn that off BCC also variable CCC also variable and if you if these things are left blank it'll just be left blank it won't really it won't mess with or it won't break the Automation and then send name this can actually be fixed because likely this email will be a personal agent or or sorry this agent will be a personal agent or for a specific client and they'll always be sending from the same address so you can leave that as fixed and just leave it blank for now because we have to get the script
to read into these specific Fields so come out of here copy this node just you know command C and then we're going to use chat so if you paste that in here it's going to show you basically like the Json script that is behind this node all we need here is we're looking at the parameters because that's what's going to fill in so I'll try to explain that better in a sec but let's just grab these parameters real quick we're going to copy those parameters paste them back in here and ask chat to um list
these parameters in a query field as a stringified list okay we also want to exclude options I hope it understands that we're talking about the this parameter okay that is not what we wanted let's try that again chat list these parameters in a query field as a stringified list let's just try that okay not cooperating okay this looks more like it there's lots of ways to do it um I wanted to show you guys how to use chat to do it because it's easier for um you know low code no code so this looks more
right it didn't exclude options so we're going to ask it to do that okay yeah that looks a lot more right right so you can go ahead and copy this here but I'm also going to show you guys the way that I usually do it because it's easier to read and easier to troubleshoot um and that's you're going to put it right in here basically so I'm not going to use the one that chat just gave us I'm going to use this I just think this one's a lot easier to read because basically all you're
saying is the agent has to figure out who's it going to send to and the next one is going to be subject the next one's going to be email type is already already text message is what so if that makes sense it's a lot easier for it's a lot easier to read that in my opinion than seeing all these um slashes and closed brackets square brackets all that kind of stuff so that's why I use sort of this um what do you want to call it taxonomy but got to make sure it's in a query
field and in quotes like this so probably doesn't make a ton of sense right now but let's just take a step back so when the agent is understanding that you need to send an email it's going to take your message so if it says can you send an email to Phil dumpy asking what's up it's going to understand okay so we need to send it to Phil dumy we're going to make a subject based on what they prompted me so the subject here is going to be what's up the message is going to be hey
how's it going was wondering how you're doing you know what's up with you that sort of thing and then it will leave these other ones blank because we didn't mention a BCC CCC that kind of thing and then before we push it into Gmail we need to grab uh open Ai and we're going to do message a model connect that you should be good on that already we've got text message model we're going to choose 40 just seems to work the best and then in this in this message we are basically going to say parse
the query the one that we just put into the previous tool and output the parameters separately I like to do system prompt then it knows um it's sort of its role we've got simplify output we want to Output the content as J on and then we also need to add this message here because it doesn't know exactly what the query is that it's parsing so that's where we drag from here this query is going to go right into here make that fixed or sorry make that an expression and this we should be good to go
with this node you want to go ahead and test this step here and you can see that it came through correctly so it knows these are our parameters we're going to send it to someone subject message all this kind of stuff stuff so that's how we know that this node is working correctly but one thing that's super important here that I forget and I pretty much just forgot again is in front of this Json query you need to add json. stringify and then open parenthesis and close it off if you don't do that it's going
to read in your um values over here as objects rather than a string and that's not good because it's going to give you an error and say expected string but received an object that sort of thing and really frustrating because well I just hate when things don't work right so okay we've got that set up now we need to come into here and actually set up Gmail so it knows what to send and who to send it to it's really simple we've got our content over here from that Json query and we're just going to
drag stuff in so send two is the two for the Gmail node subject subject super easy right got message CCC CCC and then here we're just going to go ahead and send her name it's going to be from Nate okay save that and now we just need to do one more thing we're going to grab a set it's edit Fields set so this is manually making a field manual mapping add one here we're going to call that response make sure it's a string and then we're going to say sent that's all you need to do
here save that and our email tool should be done so the reason why we have to do this is because the agent sends um the query over here it's going to go through here go through here and then we need to go back to the agent we need to communicate back to the agent that we did this task that it's done so then it can communicate back to the human that prompted it okay we did it so this sets the the variable the field as of response to set sent so then the human knows right
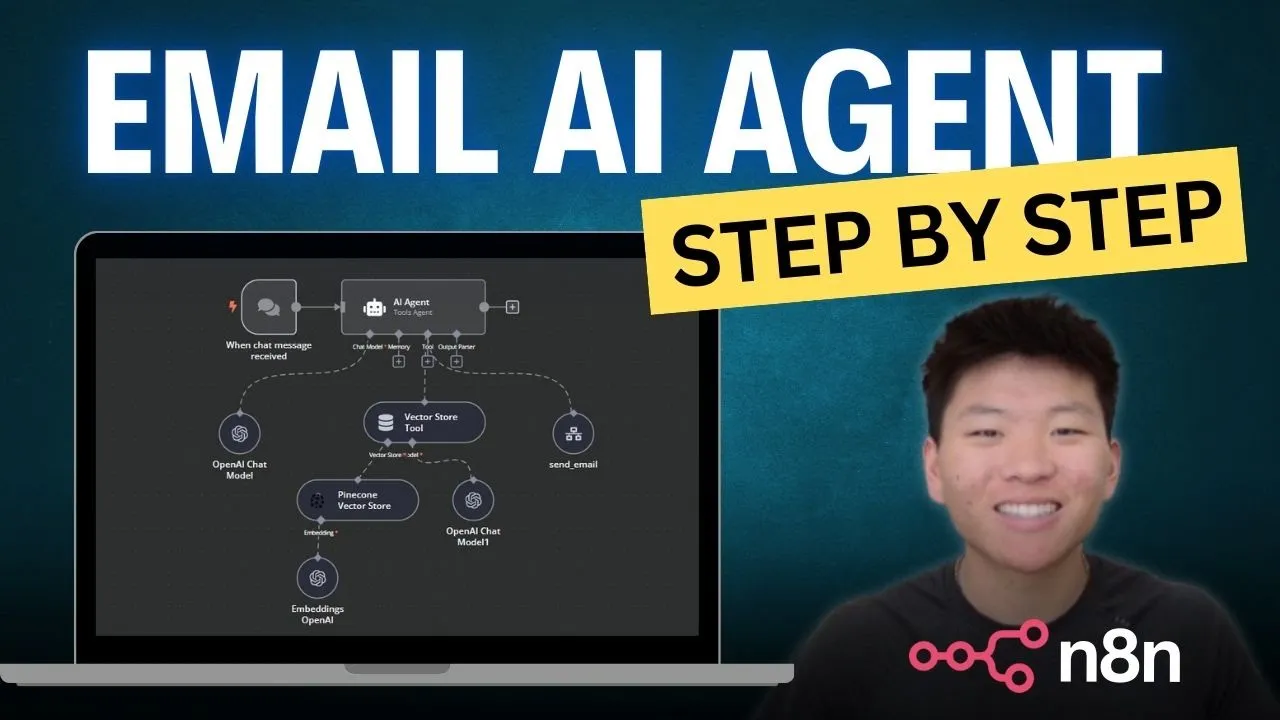
okay so we've got pine cone we've got the send email now we're going to actually make the agent so first up again we have to build a we have to put a trigger we're going to use on chat message this time because we want to trigger the agent or trigger the workflow by talking to it so we're going to leave that as is for now the next thing to do is add the agent we can also just go down here to Advanced AI you see the different there's the templates there are different things here with
you know text classifier question and answer chain we're just going to grab the agent it's going to be a tools agent um and we're not going to take from previous node automatically we're going to Define that and this is going to be um it's going to be this variable right here json. chat input it's not working yet because we haven't actually ran anything but that that is what's going to fill in over here basically saying like this is what the human just asked us to do so we're going to go to require specific output formula
and then system message this is where you're actually going to prompt the agent so we're not going to do that yet but just wanted to add in these options real quick here so we don't forget and then I want to return immediate steps so that when things error and don't work we can see what the agent did exactly so this is what we need to do for now we need to come back here and prompt this later but that's a good start so you can see we've got different things we can add to the agent
output parser tool memory chat model we're just going to touch tool and chat model for today so chat model same thing open AI connect it we're going to grab 40 especially for one that's going to be talking to us and thinking tool we're going to call an n8n workflow this is obviously the one that we just made the tool that's a send email just want to keep everything organized here especially once you start to have multiple tools given to an agent and then you need to give it a description of when is the agent going
to use this tool so call this tool when you want when you need to send an email there we go it's simple as that Source um database the workflow we can Define from a list um you can also do it by ID but you'd have to grab that URL thing so the list is easier because we have the send email right here field to return response so that's when we set the response field earlier to sent and let's see is there anything else that we need to do on this one specify input schema yeah that's
what we need to do we want to Define below and this is like the schema that this tool is going to be using so what we need to do save that real quick we need to go back to our send email tool we need to make sure that the schema is the same from right here because this is what we gave this tool so copy that head back over to our agent which is this one I should name this real quick so I don't get confused okay and then we're going to put that we're going
to paste that right back into here there we go so this tool should be set up now save that okay I think we just need to add the one more tool which is going to be the pine cone Vector database and as you can see we can't just straight up add pine cone we have to add the vector store so we've got this um this is just going to be contacts data again we need to give it a description so call this to retrieve information about contact like email address um what's wrong with this ah
can't put a space in that for some reason so good to go here we got to add a model we're going to again go open AI 40 that's good to go I'm just going to move this stuff over here and then the actual Vector store what's it pulling the data from Pine Cone got to connect this again here this time we're going to do retrieve obviously get the right index and then again going to make sure you're pulling the right name space contacts I'm pretty sure that's what we called it right contacts sample okay perfect
got that here so let's save that oh can't forget to do the embedding otherwise it wouldn't know how to figure out what's a name what's an email address that sort of thing so again make sure it's three small because that's how we set up our Vector store and then we're just going to save that okay so going to test this out now hopefully it doesn't air but if it does we can sort of go into how you can find out where it's airing and how to fix that so let's try this so again send an
email to Bill duny asking if he wants to get lunch seems there's an issue with sending the email would you like to try again later okay so let's see what happened we can see it AED at the send email tool we're going to go to all executions to figure out what happened so we can see this here we're going to view it this is basically showing us what sort of data was running through at the time so we've got oh okay I think I know exactly what happened we didn't go back and prompt the agent
so look it's got like it's got the right email it's got the right subject all this kind of stuff the issue I believe is just that we didn't prompt the agent because we always just forget to do that so that should be the issue so okay something cool that you can do is grab a screenshot of this workflow copy that we're going to go back into chat we're going to give it this picture and say please prompt this agent um include the parameters for the email tool as well as overall context background and instructions okay
so prompting is super super important this definitely is not the way you'd want to do it when you're really building out a complicated agent but for now this should work but comp prompting is super super important as far as getting the email or getting the agent to consistently work the way you want it to so let's see if this works we're just going to grab from here up well okay so it's got context background instructions it included the parameters here for the email tool so let's try this again right now I just thought it was
a helpful assistant which it is but it didn't have all of this instructions and also one thing I like to do at the end is um sign off the email from Nate because it knows the sender name is usually just for when it pops up right here to say like it's from Nate but sometimes down here it would say in Brackets like sender name or something so it's nice to sort of specify that so we got that saved in here let's try that again send an email to Phil dumpy asking if he wants to get
launch and we just hope that he says yes I've sent an email to Phil dumpy inviting him to launch is there anything else I can assist you with okay perfect inbox launch invitation hey Phil would you like to get lunch sometime best Nate perfect super simple um yeah so that is just a very very basic one it's got one tool we didn't even give it a Windows memory buffer which is just how you can continuously chat it'll it'll keep history of past messages that you've sent and it's going to be able to know to work
off those but that's just a very basic one and it's it's really good to get in here and play around with n8n it's going to give you a great idea of like I said the triggers different nodes as you can see there's so many Integrations like if we just go to you know Gmail you've got all these different things and you can build an agent that strictly can do everything for you that you might need to do in Gmail like an inbox management agent so yeah super simple one great one to start off with building
I'm going to be making more videos where we'll probably add on different tools to this agent so it'll be a complete personal one where it can do stuff with your calendar do stuff with your Google drive just cool things like that so like I said if you enjoyed this video I'm going to try to tailor stuff towards people that are new to the space I'm trying to learn as much as I can so trying to help as many people learn as much as they can but yeah that's all I've got for today so thanks guys