In this video, I will show you everything you need to know to set up your first online store using Wix. This is a tutorial for e-commerce websites using Wix, which is obviously an extremely powerful tool. So many people use it to build their websites because it's very powerful, it's very easy, and it's pretty affordable as far as website builders go.
With that in mind, if you're choosing Wix to build your site, this video will be a step-by-step tutorial, showing you everything you need to know: all the tools, all of the settings, to take you from an absolute beginner to having a full-blown store at the end of this video. So, with that in mind, we have a lot to cover here. Stick around for the entire video, and the first thing we want to do is actually open up a browser.
I recommend Google Chrome; hopefully, that's what you're watching this video on already. If not, any other browser works. Google Chrome, I find, is a little better though, just because you can have some extensions that, further on down the road, might help with your website.
But if you're building it on a different browser, that's not a problem. So, what you want to do is go down in the description of this video, hold down Ctrl on your keyboard, and click on the link at the top of the description. That will open up a new tab, and it should look something like what we're seeing right here.
Now, instead, it might have a big picture and a big blue button in the middle. Click on the button; it will probably say "Get Started" or something. Click on that, create an account, and it'll bring you to this page right here.
Now, on this page, what we want to do is go up to the top right, click on the "Create New Site" button, and we're getting started with our site. It opens up a new tab here and asks us what type of website we want to create. Now, a quick disclaimer: Wix, from time to time, may change the first step here; it might look slightly different.
But if it looks different for you, just stick around; I'm sure it'll look similar in a couple of steps down the road. What we have here are many options we can choose: business, designer, blog. We're setting up an online store, so it makes sense to click that now.
What that is essentially doing is adding the application to our website to have an online store. It's adding the cart, the Thank You page, the products—stuff like that is being added right now. Now, if we use any other, you know, photography layout, or if we use other layouts, whatever you're using, you can still add a store later on, and I'll show you where you would do that.
But for us, we're just going to click "Online Store" to make our lives a little bit easier. Now, the next step is to choose if we want the ADI creator or if we want the Wix website editor. The ADI creator goes through a bunch of questions and just kind of puts your website out right away.
It's less customizable, so you can't optimize it quite as much, but it is a lot quicker. Now, in this video, for first stores, if you're being serious about your business, I really recommend you choose a template with the Wix editor. So we're going to do that in this video, and it brings you to this template page right here.
Now, remember before I said that it didn't really matter what you clicked on in the first step? That's because all of those are on the left side. So business is right there: photography, video, it doesn't really matter.
You can click on any of those in the first step, and it just brings you to this; it makes it seem easier; it's really the same thing. So from here, what you want to do is go down and choose a template that you think looks good. It doesn't really matter which one you choose; obviously, the pictures will all be customizable; you can change all the pictures, all the colors, all the text.
But choosing one that is similar to what you want in the end will save you work. So for our purposes right here, we are going to go down to this one right here: the plant. We're gonna sell some.
. . yeah, let's just sell some plants, I guess.
So let's go down, and you can actually view it first to see more about it so it's not just a little tiny icon there. If you go to "View," you can get a good experience of what it's like. So scroll down, click on things, see what it looks like, and you know what?
I think this one looks pretty good for us. I like the little image in the background at the top. So if this is what we want, you can go to "Edit This Site," or you can actually go back and choose a different one.
So we are going to edit this site; I think this is a good one for our needs right here. It starts setting it up again with another tab with the Wix website editor. It may take a few minutes, but you should end up on a page that looks something like this.
Now, what we're going to see here is across the top a menu bar, and on the left side, all these little bubbles that essentially allow you to customize your website a little bit more. Now, no matter which template you chose, there are going to be a lot of similar features here. But, for example, When we go to the top left, the first thing is your pages, and it shows you all of the different pages you have on your website.
Of course, this is going to be different for everybody, depending on the template you chose. But for the paid template I chose, we have: Home, Shop, Shipping and Returns, a page about the Privacy Policy, and so on. You can click on any one of those pages, and it'll bring you into the editor for that page.
So, if you want to go and change your Privacy Policy, you click on that up at the top, and then down here, you can click on anything you want. Then you can edit the text and move it around. So let's say this one right here, if we want to change the Privacy Policy, we can click on "Edit Text" right there.
We can change it to whatever we want. Within that, you can also change the theme of it. You can change it if it's like a header or something; you can change the font.
Of course, adding too many fonts will slow down your load speed. I recommend sticking to one or two fonts to make things quicker and easier to read. You can change the font size; you can do all the normal text editing here: with color, underlining, making it left-aligned, right-aligned, and you can change some effects with it, and a lot of stuff like that.
Now, one thing that is really useful, and I point this out a lot, I'll point it out later on in the video as well, is that you can go and add links. So, if you want, right here, this is supposed to be a clickable link; you can have that text linked to either a web address or a page within your website, an anchor. I'll talk about anchors later on in the video.
The top of the page, the bottom of the page—so for now, let's just say it links to the top of the page for some reason. And so, that's how we're going to be editing text. That is just one of the many things you can do here.
I'll talk more about editing a little bit later on. If you want to see it in mobile mode, which I highly recommend (most traffic on the Internet is actually on phones these days), what you want to do is switch to mobile mode. While the editing is slightly more limited here, it is actually a great way to at least check it out, make sure text isn't cut off, move things around, and just make sure that your site is optimized for the mobile version.
Now, let's go back to the desktop. You can switch to desktop mode easily across the top. Then, going across here, you can actually go to "Site," which is how you save it.
You can preview it; the preview just shows you what it would look like if you actually went to the website. As long as it's unpublished, you can publish it and then actually go to the website in a new tab. That's essentially all we want to really do right there.
"Site History" allows you to roll things back if you need to. So next, we have "Settings," which allows you to connect a domain. A domain is obviously very important; it makes it so that your website is like santromediacom instead of micwix.
com/sandtrailmedia, which is obviously all over the place and very hard to find—not a good website. So, we will connect a domain; I'll show you how in a few minutes. We can get a mailbox, which means getting G Suite on here.
So, if you want to be mycat@santromediacom, it's much more professional than mycat@gmail. com, which seems like you're not really running a real business. Now, we go down to "Upgrade," and "Upgrade" will allow you to actually use the website with the domain and everything I just talked about.
But before we can upgrade, let's go back to "Site" and go down and save it. When you save it, it's going to ask you to name it. Choose a name for it, so we're gonna say "San Trail Store" for now, and then click "Done.
" Now what we want to do is go back to "Settings," go down to "Upgrade," and it'll bring us to a new tab. Because this is an online store, we have to make sure that we're getting an e-commerce one. So "Business and E-commerce" is what we want to choose, and it doesn't really matter which one you choose—read through these and select whichever one makes the most sense for your business.
If you want 35 gigabytes, 50, or 20 gigabytes, it doesn't quite matter; you can do lots of different options here. I'm going to select "Business Basic" for this video. Then you can choose either yearly, monthly (which of course is more expensive), or three years.
The longer your plan is, the more money you're saving. If you think you can have a business for, I recommend at least one or two years. I'm doing monthly right here because I'm not actually doing this; it's just for the tutorial.
But regardless, I'm just going to go and follow through with this and get the monthly plan for now. Okay, so once you put in your credit card and you click "Next," it'll bring you to this page right here, and it says, "Congratulations! Your site is premium," which is good.
Now, the next thing we want to do is find a domain for our site. So, let's say San Trel Media Apparel dot-com and say something that we want right there. So, you go and it says it is available.
The next we can say, "Get it! " and honestly, this is the easiest way to do this. Sometimes I recommend you go and check out, so it's actually very cheap for $15 a year.
Sometimes, I recommend you go and get it from Google Domains because it is cheaper, but there are a few extra steps. If you're interested in that, I'll link out a video in the description where you can see how I did that in another video. But for this video, let's just go and do it this way.
So, we're going to continue: $15. 00 per year. We're going to go down and purchase this.
So then it asks if you want it to be a public or private registration, and I recommend you do this private just so people can't come to your door and call you, and have your phone number, your address, and actually, you know, try to bug you and buy your domain. So, I recommend doing private. It's an extra ten dollars per year, so you are paying $25 a year, which is a little bit more expensive.
But I mean, if it’s worth a few to save the extra maybe ten or twelve dollars, you can go and do this through Squarespace or through, you know, Google Domains. There are a lot of other ways to do this, so we're just going to continue with this for the purposes of this video, though. So, we're going to go and submit the purchase and check out here.
While we're kind of going down this rabbit hole of upgrades here, which is very essential for your website, the next thing you could do is actually go down and buy a mailbox. It's something that should be pretty self-explanatory; I'm not going to get into that for this video. We're focusing on building the website right now, and also, I don't want to spend any more of my money on this video.
I respect like fifty dollars there, but regardless, let's go back to our website here and actually continue building it. So, once we have it upgraded, let's go and refresh this site right here, our website builder. So we have a domain, as you can see right here; we are done with that.
So, let's close out and go back to our website. Now, it's not published yet, and it doesn't have to be published. You can keep saving it as you edit and then publish when you're done, or you can publish it right now.
Realistically, not many people will be seeing it in the beginning, so maybe you want to publish it, and then you can go back and see what it looks like on different monitors, maybe different phones, different devices. It's something that I recommend just to make sure that it looks good on all the different devices you have. So, up top, let's make sure that we save this; it's still saved, and let's continue going across the top.
So right there, you can see this time that it actually did save it as our domain, which is good; that's exactly what we wanted. In settings, you can get found on Google and stuff like that—that's all more advanced stuff that I'm not going to cover in this video. The tools are essentially what you're seeing, so like this little thing right here, tools on the left side.
So if anything's missing, just go up here and check it out and maybe add the ruler. The ruler is a good way to make sure that if you want to make sure something is centered around a third, it's pretty easy to go up here and just click on that and drop a line and move it around. So, you can find out if this is like 980 pixels wide, as I think it is, you can move it to the middle and say like 490 pixels would be about halfway.
So, you can move this to 490, and you can snap things onto the center right there. It's something that does make it easier when you're trying to build your website. Likewise, you can do it this way and have things line up using these little bars.
Now, if you don't want one, you just click on it and click delete; it's pretty easy to do. So just click on it, click the little trash can, and it goes away. You can go to dev mode; again, we're not doing that in this video.
We can go to help, and we can go to upgrade, which we already upgraded. If you need a bigger site or more storage, you can upgrade even further. So that's everything across the top.
When you go here, you can hire a Wix partner; again, not really that important. So going up to the top right, then we have zoom out, reorder, undo, redo, save, preview, and publish. I talked about save, preview, and publish already, but zoom out and reorder is very powerful early on in your website when you're trying to figure out the general structure of it.
Wix usually builds websites with a kind of a stripe layout, so what they do if they have these sections—these blocks that you see—they're highlighted in blue, and they all kind of do something different. It’s a nice layout, but if you want to reorder them, you can go and move this one down. So you can just keep moving it down, move it wherever you want to, and you can actually delete them if you don't want the section.
You can. . .
Duplicate the section, or if you need extra space between sections—so say you want to add some extra pictures in there or something—you can actually go and click on the thick blue bar right there and drag that down so that you end up with more of that gray space or whatever the background color is right there. So when we're done with that, click on the X up on the green thing on the top, and it brings us back to our website editor. So that's everything I talked about across the top.
Now, let's get in and actually start building this as a store. Before we go in and change the logo and stuff like that, I just want to go down to my store here and start showing you guys where you can add products. Now, if we go and click on my store, it says "Welcome to my store.
Get started," and it's going to kind of walk you through how to add different things. So we're going to go to the dashboard. Right there is what it wants you to do: you can add products; you can see your store pages right here.
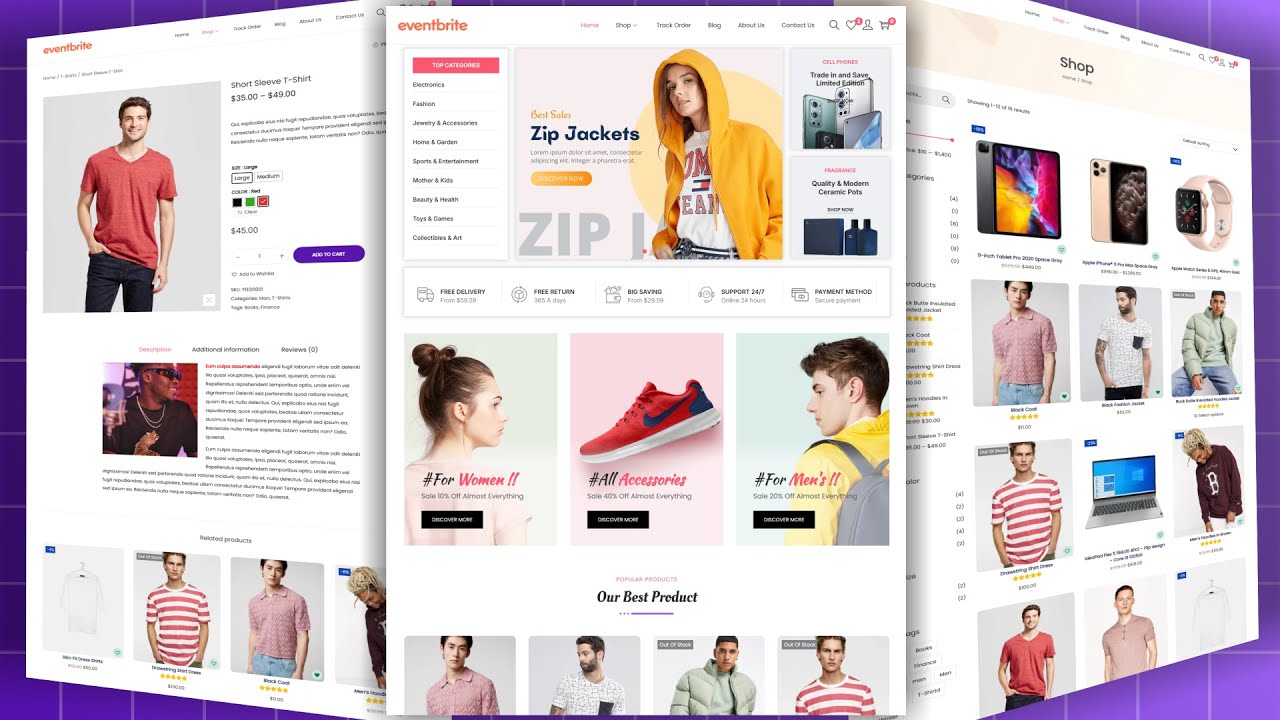
We have four store pages: we have "Shop," which is like your main page that shows all of your products. So think of it as like if you go to Walmart. com and you're just scrolling through that; that is "Shop.
" It's going to look like that with all of your products. The product page is going to be the individual product that you're looking at, so how they're laid out when you click on a product. You want your logo at the top; we will not get into that later on as well.
The cart page is self-explanatory, and then the Thank You page is after somebody makes a purchase. You can go down and add store elements, so if you want to have a different type of gallery, if you want it to be a carousel, or if you want a slider right there, if you want a big product widget, there are a lot of different ways you can have these little store elements right there, and you can add those into your website. Lastly, "Learn more" is something that’s a good resource if you want to see more about finding the support forum and stuff like that.
But for our purposes, we are really looking at the top three right here. So let's go and add some products. What we want to do, it'll bring you to a page that looks like this and says, "What are your products?
" The first product we want, let's just say, "San Trail t-shirt. " We can go and add images of this, or you can add videos. I recommend for some physical products, or actually for digital products either one, having a video is actually pretty nice.
So let's go down and upload media here. It gives you all these options; you can find it from Google Drve, from Facebook, pretty much everywhere you want. So we are going to upload it from my computer right now, and we are going to select this shirt right here, the just t-shirt that I kind of just threw together right there.
It says, "I love central media," so it's not actually for sale; this is not a real kind. But there it is! That is our first product we're going to add.
There’s the product right there; that's the first picture. Obviously, you should have more pictures, not just one, but for our purposes, let's choose one. You can choose if you want it to be, yeah, let’s say this is a new arrival.
We can change the price for it, so let's just say $15 for this. We can put it on sale for maybe a discount; it would be like 20% off—20%. So let's say maybe originally it was like 20 bucks; it's on sale for $16.
Something that a lot of people like to do is mark things up and make them on sale, obviously at everyone's discretion—choose whatever you want to do for that. Then, write your description right here. So let’s just say, "Awesome San Trail t-shirt.
" You should probably beef that up a little bit more than that, but regardless, let’s go down and you can go and add additional info right there, such as your return policy, maybe something about sizing. You can go down and add some custom text fields, and we can also add some other product options. This could be the color, so let's just say "Color," and we could have a list.
We could have blue, white, or we could have—and we should make that capital. That's how you get your different sizes or your different colors. So there's a drop-down menu right there.
We could manage the pricing and inventory based on the different colors, assuming we have infinite inventory and assuming we don't really care about the pricing between colors. I'm just going to leave that as it is right now. You can track inventory, so you can tell it how many you have of each color.
It's a great way, if you have multiple products, to use Wix to track things and let you know when you're running low. For me, I'm not going to do that in this video; but regardless, it's something that is very easy to do and is a very useful tool. Right up there, you can choose which collection you want this in, so let's create a new collection and call this "Central Apparel.
" We're going to make a new collection right there, and then you can go down and promote it by creating different discounts. Videos you can send an email campaign, and you can edit the SEO settings of this. So let's make sure we save the changes of this and continue, and this will actually set up your shipping regions.
We're not going to worry about shipping regions right now. So over here, the SEO settings allow you to be found on Google. SEO is search engine optimization, so making sure that this is something that Google can find when somebody looks up "San Trial T-shirt.
" You want to make sure that they're finding your product—these San Trial T-shirts. So we want to make sure that the URL slug is what you want. So, like, you know, whatever centralmediaapparel.
com/product/SanTrialT-shirt, and that's what we want right there. And then it's going to pop up; the title is going to be that, and then that is going to be our description. Populate these with as many relevant keywords as possible so that you rank higher in Google for your own product.
This is something that's actually especially big as Google is starting to be more and more like their end goal. I think it is to be a little bit more like Amazon, where you can go to search things on Google and find the products right there and buy them. So having this ready for SEO means that you will find more traffic, not just through social media or wherever you're marketing, but also through Google with organic search.
So once we have this right here, let's go up and save, and that is our first product right there. The first product is ready to go, and we can have many other products down here. You can add new products; like I said, we can actually rearrange the order of the products.
But let's just say those are the products we have right now—I'm selling a San Trial T-shirt and a whole bunch of other things. Again, you can have discounts right there; it's in stock, you can track the inventory, you can have a SKU right there, and you can choose if it's a physical or a digital product. So let's right now actually add one that is a digital product.
If you want a digital product, something people might be selling, like video courses, eBooks, or something like that, let's just do that right now. So if we want to upload a file, you can actually go if it's an audio file, a document, or a zip file. Let's upload a document right now.
So upload the media from my laptop right here, and let's just upload this PDF right here. So it's going to upload it, and if you want to give out a free PDF, for example, let's just go in there and make sure it's a free PDF right there. So add to product; we added the file right there; you can change it.
And let's just say free. We're going to call this one free, and we're going to call it "Free YouTube Success Blueprint," and we're going to say that price is zero dollars right now so people can, you know, just add it to their cart, download it, and they get this free, you know, PDF. Let's go and save this right now.
The next thing is you can see on the top, it is prompting us to add a payment method, and this is something that you obviously have to do if you're selling things on your store, which if it's a store, I hope you are. You can go there and accept things with PayPal or with Wix credit card, debit card, whatever. So we're going to connect; actually, let’s use not PayPal for now, let's just use that.
So it's going to be connecting the payment methods, and it'll tell you then that you're ready to go. You can accept debit cards and you can set up the regions you're willing to ship to. Again, that popped up right there and is suggesting it.
It kind of walks you through a lot of stuff. Wix usually tells you, like, "Hey, do you want to do this? This is probably the next thing that you should be doing.
" So we are going to not ship internationally, just domestic for the purposes of, I don't know, we’re selling this T-shirt; maybe we're shipping with the US Postal Service, right? So that is what we're going to be doing right there. And let's just X out of this; then it'll bring us back to our page here.
So right there, we saw that we had our products store pages here, so we have four different pages. You can add another store page if you want. Typically, when you go to the store template, I find that four is good enough for my needs for basic e-commerce stores.
You can add other ones, and so you can just click Add right there. You can rename it, so click the little three dots right there, go to settings, and this is where you can rename what that page is. And basically, for any page, if you go up to the top and click on that, you can change any page in the same way we can rename it.
You can choose if it's on your menu, so you can hide it from the menu on the top—the menu being like up here; it's hidden right now, though. Then we can also set it as your home page if you want those layouts. If you do or do not want a header and the footer—so the header being the thing that says "Call us now,” the footer probably says something similar.
You can go down to over to permissions, and you can say it's a members-only page, which is a great way if you're. . .
Trying to kind of build an email list, and you want to have people sign up for your email and get a free PDF. You can make it a Members Only page, so they set up an account with your site, and you get a contact list to send out notifications to them. Then, you can also go to SEO on Google right here, which is also what I showed you before; you can change the URL slug and things like that to make sure that your page is optimized for Google.
With that being said, that’s essentially how you’re going to do the store side of things—adding products. But how do we actually manage what the site looks like? If we go back up to the top and click on this, let’s just go to Home for now, and we’re going to kind of optimize what this looks like.
On the left side, you have some different options here. We talked about menus and pages; this is going to be actually the same thing as what we talked about at the top, except this gives you more options. If you go down to Site Menu, it shows you all the different pages you have, and again, you can reorder them, move them wherever you want, add pages, delete pages.
If you click on the three dots, this can also let you either optimize it for Google, copy it, duplicate it, hide it, or make it a sub-page. There are lots of different options. I recommend that everyone has different needs, so mess around with that a little bit and see what actually works best for you.
Now, as we go down, you have Member Pages—Members Sign Up right here. So, when members are signing up for your site, what is that actually going to be like for them? You can say, “The Member Signup Form,” and you can change this; you can optimize it, or you can just leave it as it is.
Continuing down the options on the left side, you have the Page Background. If you chose a good template, you probably don’t need to change the page background. You can go down to add different things right here.
There are so many different things you can add in Wix, and it’s all drag-and-drop; it’s very easy to resize things, change the angle, the location of them, and you can add text, like you see right here—all these different texts, images; the images can be things that you upload, some free Wix clipart, free Wix images, stock images, stuff from Facebook. Lots of options for where to get your images. Then, you can add a gallery if you want to have an array of images.
You can add vector art; you can add shapes; interactive—actually, go back to shapes. If you want a line anywhere, they consider that a shape, so going to shapes allows you to add lines. If you want, you can have interactive things, like a slideshow, for example, or things that you hover over.
You know, you can add buttons, which is essentially a picture with text in it that links out. So, let’s just add a button right now; buttons are something that I add all over my websites. Let’s say we want this button to be, I don’t know, like, “Don’t want to click?
” and drag everything. So, let’s just say that we want this button—where does our button go? There it is.
Okay, so let’s just say we want this button right here to be a lot larger. We can go and make this significantly bigger, and we can change the text of it; we can change where it links to. If we want this to link to an anchor, for example, we can add an anchor somewhere on the page.
An anchor means when they click on it, it scrolls to a certain section. So, if you have an FAQ page, this is a great way to use anchors where you have all the different questions at the top and each one links out to a paragraph below that shows you what it is. So, we’re going to say done.
If you want to add an anchor, go back over to add. You’re linking to an anchor here; the anchor you want to link to, you can find these over on the left side. Then, going down, we have a box right there, which is also a shape.
Basically, you can add an entire strip. I showed you before how you can rearrange the strips; this is how you add new strips. There are so many different options for what type of strip it is, and they kind of come pre-formatted for essentially what you're looking for: lists and grids.
You can add video, you can add music, you can add social. I recommend adding social somewhere on here; social is a huge aspect of websites these days. You can add contact forms, which give people fields they can type in, click submit, and then it’ll send it to you.
This is a great way if you’re having, maybe, support, or if you’re trying to get more leads on something—it’s a great way to do that. You have a menu right here; you can add a lightbox, and the lightbox is just something that pops up when someone’s on your website and says, like, “Hey, did you know we’re running a sale today? ” or “Sign up for our email list,” or various options for what’s going to pop up in your lightbox.
Then we can go down to. . .
Start a blog. You can start a store. We already have a store.
Obviously, you can start bookings. You can set up, you know, members and more. And here, when you go to more, is where I said you can find anchors.
Anchors are right here, and if you want an anchor, you just click and drag it, and you can put it wherever you want on the page. And so, if we put an anchor right there, then this button we could link to the anchor, which means it's going to scroll until that anchor is lined up with the top of this screen. So definitely try this out, though.
Once you put it in there, make sure it actually works and scrolls to the right location because you don't want a website that is going to scroll like halfway through the paragraph and just looks very unprofessional. So, going back to add here, let's just continue and finish out the other things you can add because there really is a lot right there. You can add a chat in the bottom left.
You see we have that little brown box there. You can add events. You can add play buttons, pay buttons, sorry, Google Maps and document buttons.
So, just lots of other stuff to add there. And then if we go down to the next option here, this is the Wix app market. So if you remember, in the very beginning of this video, I said it didn't matter if you chose one that was not a store.
That's because if you chose one that was photography, for example, it wouldn't have a store built in as a page already. But you can go in here and add a store app. These different apps are going to allow you to do things like the store where it's all integrated, has a checkout, a cart, a thank-you page, and so you can do all of that within here.
Or you can add other things, some other free apps, online stores, photography—just go through this. There are hundreds of different apps you can get, and a lot of them are made by Wix, which means they're extremely powerful and very well integrated with your website. So continuing down, you have media, which is going to be anything you upload—documents and pictures that you uploaded.
Maybe if you want them somewhere on your page, you just want to add more media or whatever. When we go down to start a blog, that's something that a lot of stores have. Blogs these days—maybe you can add it if you want; you don't necessarily need one.
And again, we can go down and see our store. So that is a lot of what we're doing here. Of course, when you're trying to mess around with different things, I recommend going into each different element individually, clicking on it.
It should be fairly self-explanatory. So, if we go to our home page here, you'll see that, like adding a logo at the top right there, it is a button. You can change the text of it.
You can add your image up there in the header and make sure it links to home. That's something that a lot of people miss out on. I don't know why people forget to do that.
The top left should always link to home if it's your logo. Well, let's just say right here, if this is our— they actually put text there. I would recommend maybe like an image for your logo.
But if you want to rotate this, you just click on the top left and rotate. You can resize it. You can move it around, and ultimately, you want to make sure that everything kind of stays between the two dotted lines you see on the left here—so right there and right there.
That's something that Wix recommends, so it looks good on different aspect ratios of phones, laptops, old computers, or TVs, projectors. You never know where somebody will be looking at your website, and you want it to look good on all of them. So, guys, that's what I have to say in this video.
I know this was a pretty lengthy video, but hopefully that gave you a pretty in-depth tutorial and showed you what you need to know to set up a store using Wix. Now, the next step for you right now is obviously to go through and populate this and do what I showed you in this video. So add your logo, add the text everywhere, fill everything out, add your products, and then, by the end, the last thing you do is go up and click publish so that your site is ready to go and people can start buying.
Now, of course, I also recommend you go through and actually follow through on your own website on maybe a new tab or on a different laptop and actually go through and kind of follow the user experience. Go through checkout; make sure you don't have any broken links or broken pages so that when somebody is using your site, it's smooth, seamless, and it works perfectly whenever they're trying to buy your product. So, guys, I hope this video helped you.
If it did, please remember to like and subscribe. As always, thank you all for watching. I'll see you next time!