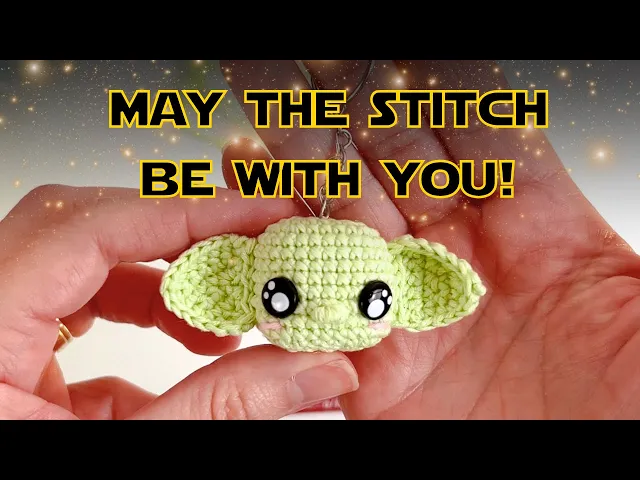
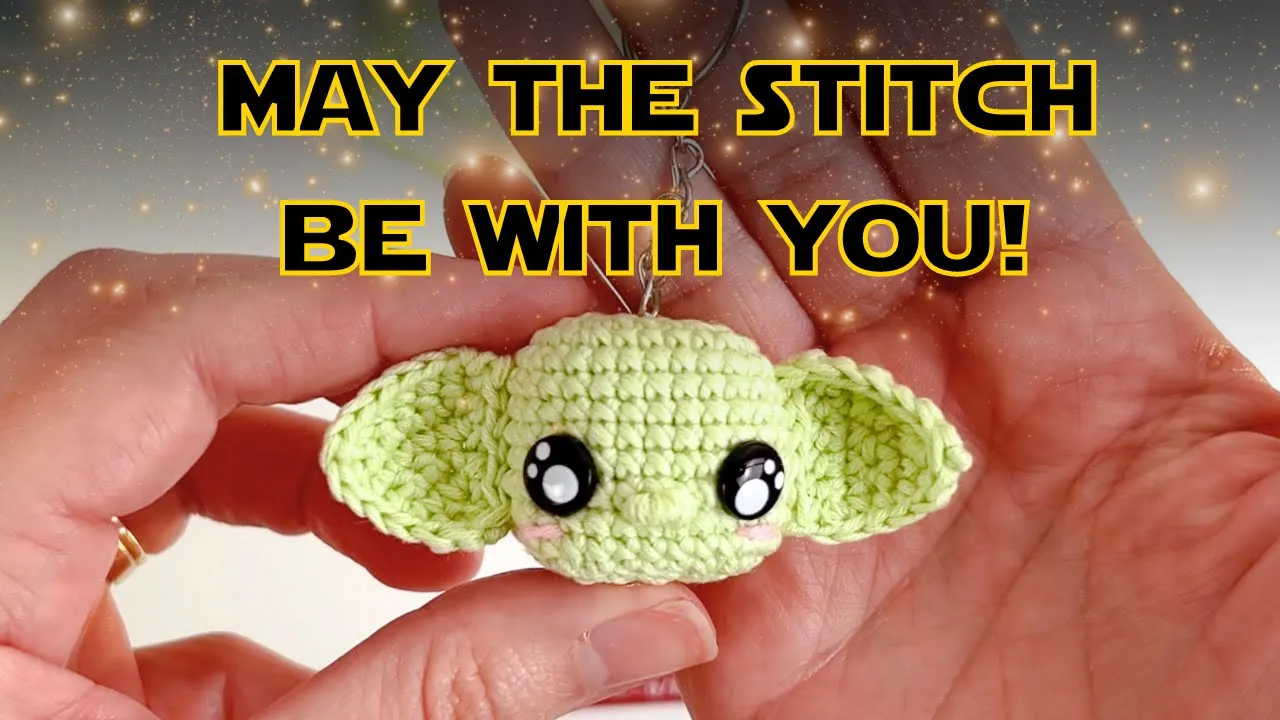
in today's video I'll teach you how to crochet this beautiful baby Yoda keychain it's a very simple and easy pattern to be done and very fast as well um so yeah come with me I'm really sure you will love to crochet this cutie so to create our beautiful baby Yoda in a kitchen all we need is of course the kitchen because we have to attach it tapestry needle um Stitch markers you know that this is my favorite I already separated the one that I'm going to use a pair of scissors look how beautiful this one
is I'm in love with the scissors um the yarn that I use is this one DMC NATA just cotton this is 100% cotton yarn looks a bit messy but yeah this is the the yarn that I'm using I can leave the the number of the color in the description so you can check it later and this yarn here is Alba I will also leave the link for this yarn in the description but this is just used uh for the blush part you can use any kind of pink yarn that you have at home the crochet
hook that I'm using is this 2.2 mm size from tulip which you know is my favorite so that's it let's get it started so we start with eight single crochets inside the magic [Music] ring so I finish the magic ring and we do one 2 3 4 5 6 7 eight single crochets inside the magic ring pull the thread to close it and this is our round number one round two we make eight increases so this is my first Stitch I'll make one single crochet another single crochet on top of it oops and this is
my first increase so now I take the stitch marker and place it here the first Stitch of the increase if you're new here in the channel I have to tell you this because it's important I always place the stitch marker on the first Stitch of the round there are some people who prefer to do it in the last but I prefer to Mark the first Stitch of the round it's just a matter of habit so I will continue making increases eight increases to end up with 16 single crochets so I finished round number two and
I have 16 single crochets in this round you see that the magic ring opened up a little bit this is something that I don't like and when it whenever it happens I just pull the thread a bit harder and you see now it's very very TI side so stuffing won't come out of it good round number three we make two increases and two single crochets and we repeat the sequence four times okay so let me ah the yarn is split a little bit but I I grabbed it correctly so two in greases let me do
the first one and Mark with the Stitch Mar marker so we won't get lost okay second increase two single crochets so this is the sequence that you have to do in round number three you repeat the sequence four times and you end up with 24 single crochets okay so I will keep making the sequence and I will come back when I finish round number three so I finished round number three and we have 24 single crochets in this round round number four we will make one single crochet place the stitch marker and now we make
two increases so one increase second increase my stitches are really really tight as you can see it's important to keep the shape you will see so I made one single crochet two increases and now I will do four single crochets two increases three times Okay so 1 2 3 four oops four two increases first oops first increase second increase four single crochets 1 2 3 four two increases four single crochets this is the third time I'm doing it one [Music] 2 3 4 first increase second increase and we have three single crochets left so you
just complete the round with three single crochets 2 and three you see oops you see that we already have like a square shape here it's not round there is another video actually there are a couple of videos here in the channel where I teach how to make a perfect square had um there are lots of videos tips and I always give lots of tips regarding this shape because I know people have questions about this I will will leave the link for all of these videos here in the description so you can check it later and
there is another video in which I crochet uh small hat for Anam mcroy base doll and I if you have never done that before I totally recommend you check this video because in this other the video I give all the tips on how to crochet the corners correctly and how to preserve the shape of the amigi all the stuff so this video is like super super important in case it's your first square shape okay but you can see that now we have what we want the shape that we want we ended this round with 32
single crochets and now from round five to round 12 we just repeat the sequence okay so we have to crochet eight rounds uh with 32 single crochets I will crochet the first one with you just to give heads up on the tips that I mentioned that I already give in the other videos sorry I get confused sometimes when I'm crocheting and speaking at the same time but um yeah I will crochet this round with you just to explain some details um and as I said you can check the other videos here in the channel as
well so you just repeat the sequence crocheting uh 32 single crochets in each round you see that my stitches are tied and this is important for a couple of reasons okay first of all you have a more professional look in your omig groomies when you don't see holes like gaps between stitches they will look prettier you see that I crochet with um yarn under technique this is my favorite technique because stitches are usually tighter when you crochet with yarn under but if you want to crochet with with yarn over or the vshape it's totally fine
and it will work it's a bit different but it will work and in the first video that I I made um giving tips for the square head I showed an example because I crocheted an entire Square hat with a vshape and I proved that it works okay so don't worry if this is your style you can keep your Stitch the way that you like just keep in mind that the stitches have to be tied and the main reason why I'm crocheting this round with you it's not like a chatchat is because I want to get
to the corners and highlight some important details here the corners of the square head is where we have two increases together so you can see that this is one increase that are two stitches this is another uh increase that are two stitches so this is the corner of the square shape when you crochet this part you must be sure in that your stitches are even tighter because if it's not you'll have like and I'm forcing it to explain um instead of bending the Corners to create the square shape you'll keep it rounded and it will
not have the result that we are looking [Music] for so it's really really important to keep it tight okay I think you got the idea I would just keep crocheting this round and all the others because as I said you have to repeat the sequence for eight rounds and then I'll come back like to place the eyes finish the squarehead and also give the tips on how to stuff it don't stuff the amigi because this is something super important oh my God I always say it I sound like a broken record sometimes but stuffing the
amigi correctly is super important okay so I still haven't finished there is one stitch left but that's okay you can reshape it with your hands we will adjust everything when I have all the all the rounds crocheted I will keep doing it and I will come back so I finished here the eight continuous rounds let's count it together we have one 2 3 4 5 6 7 8 9 10 11 11 12 so we have 12 rounds and we have 32 single crochets here so now on round 13 we'll start decreasing and again I will
decrease this round with you because there are some secrets in the decrease that we must pay attention so in this round we will make one single crochet as I always do I place the stitch marker in the first Stitch of the round and now I will make two decreases If You observe here this is the increase it's lined up with the next two stitches that I have to degre make sure that your stitches are tighter in the corners the rule that I gave I mean the tip that I gave you here for the increases also
applies for the decreases okay the increases are here if we go up up up up two uh stitches here they belong to this increase part here so now decrease always make sure that this Loop here that we call the golden Loop is tight in the crochet hook you don't want this large let me show you let me give you an example this Loop controls the height the the height of this the the Stitch if you do it like this your Stitch will be loose if you keep it tight in the crochet hook then you have
your stitches ther so that's what you have to do okay so I made one single crochet two decreases that's what you have to do in the corners okay so the sequence is four single crochets two decrees here in the corner four single crochets two in the corner four two decrees and then we complete the round but I will continue croche and I will come back in the last corner here you see it's a square shape so four single crochets one 2 3 four single crochets decrease look at the increase here if you go up we
have two stitches lined up with the increases so now one [Music] decre and second decrease okay so remember four decrease four decrease and then we complete the round I will keep doing it and I will come back so I did the last two decreases here there are three stitches left so as I said before you just complete the round with single crochets okay and then we have 24 single crochets in this round you see that by tightening the stitches in the corners you preserve the square shape look how beautiful it is it's very tiny and
you you have the square shape that we want so now we stop ping for a bit because we are going to insert the safety eyes I have these ones here 8 mm size and honestly these are the smallest that I have so that's why I'm using them you should insert the eyes between rounds nine and 10 so let's count the rounds together 1 2 3 4 5 6 7 8 9 and 10 so is this round here how do I do that some people already asked me that question how do I measure exactly the same
place usually I like to keep the stitch marker at the back of the amigi so if the stitch marker is in this side this will be the front of my amigi this is not a rule this is simply how I like to do it okay and since it's a square shape I mean it has sides okay so this is one side this is another side and I want the eyes here in the front part of course it cannot be like in the corner because it will be weird so first I try to open the stitches
using the the same crochet hook that I'm crocheting just to measure if the distance is okay I already crocheted um this pattern before of course because I had to test it this is not my first attempt but I do not have the the other amigi here with me so I can show it to you right now because I already G gave it to someone as a gift and the idea is that we place the eyes between rounds N9 and 10 and have four stitches apart from each other okay but I will measure if this distance
is okay now so I open the stitches here and I have one two three four five stitches apart since it's a small crochet hook like 2.2 mm it will not open that much so I always like to use other accessories to open the stitches I have this accessory here um it's from a Brazilian brand they develop some interesting accessories for amig gromis you see it's very nice to open the stitches but if this kind of equipment is not available for you you can all also try a bigger crochet hook size for for example so observe
my 2.2 with this one 4.5 mm if you insert this crochet hook here it's even a bit difficult because my stitches are tied and the cupon yarn is not very flexible yeah it opens the stitches and it makes it easier to insert the safety eyes okay like this that's how I usually do it okay I think these eyes are a bit bigger than I wanted but as I said I only have this size I wish I had like a six I don't I don't think I have ever used a smaller size than this but that's
okay when I have to open this one as well so I will keep doing it and I will come back when I have the eye the eyes already placed okay guys so I finished like placing the eyes I put them like right here in the edge of the corners and they are placed as I said between rounds 9 and 10 and I have four stitches apart from each other which is exactly what I wanted so let's put the safety locks in the [Music] igy okay so let's continue decreasing so next round round number 14 we'll
make two decreases and two single crochets four times okay so let me do the first decrease here [Music] Mark with the stitch marker now make the second [Music] decrease [Music] and two single crochets so this is the sequence that you have to do in this round round number 14 two decreases two single crochets I will keep decreasing here and I will come back when I finish just make sure again and I know I'm repeating this a lot but make sure that your decreases are very tight in order to keep the corners of your square look
how cute and how tiny it is it's super beautiful right there's only one round left for us to finish but of course we have to start stuffing I will remove the stitch marker okay be careful not to lose the last Stitch that you have here I always leave like a big loop like this and we have to start stuffing stuffing the square hat is one of the most important aspects as well I emphasized the decrease and you can see when I put the head like this that we can see Corners we can also see Corners
here but if you stuff it too much it will get rounded you'll lose this shape so the first thing that I do this this head is too small to do that the first thing that I do is I put some stuffing inside randomly like this and after I put some stuffing I start emphasizing the corners so you take small bows of stuffing and very small bows of stuffing because this amigi is Tiny and I also like to use tweezers there is a video here in the channel where I teach how to stuff the amigi correctly
I'll leave the link in the description it's super important for you to watch this people underestimate how important stuffing is and you can shape reshape your amigi with stuffing you see I put stuff in here and now I don't know if it's that clear with the video but this part is way more accentuated than this side just because I put stuffing there so wrap the yarn in the way that I teach in the video if you have haven't seen it you're actually learning how do it right now and stuff the corners okay emphasize the corners
to keep the shape and always like reshape it with your hands after you put stuffing inside the amigi okay I will keep stuffing it I'll just accelerate the video here right now because otherwise it will be boring for you to watch I guess but just keep that in mind [Music] okay okay so I finished stuffing it's super cute isn't it oh my God I'm so proud of this so let's let's crochet the last round and in this last round we only have to make decreases okay okay so we make eight decreases and end up with
eight single crochets 1 [Music] 2 3 4 five six seven and the last one it's so tiny right you can you can't even see sometimes to decrease it UL so this is the last decrease and also the last moment for you to put more stuffing in case you feel like you need to in my case it's okay but if you feel like it's still a bit empty you can use the tweezers because this is a small there is a small hole and you cannot put your fingers look at the size of my fingers here so
you can use the tweezers to help you stuff your M gr I will just oops cut the remaining thread here here and let's close it with an inverted magic ring so let me take the tapestry [Music] needle and close it with the inverted magic ring I'm sorry I assumed that everyone already knows but in case you don't know how to fasten it off you only grab like the front Loop of the Stitch so I skip the first one front Loop of the next pass the yarn skip this one front Loop of the next pass the
yarn of course there is a tutorial here in the channel where I teach it like very very slowly so you you can check it yeah it was good already I insert the crochet hook here and I leave at any point in my amig gry pull the thread and it enters the amig gry and look how tiny and beautiful our Square hat is right now in order to fasten up I mean you can just cut this yarn because it won't Escape or you can do the invisible knot which is something that I always like to do
just to make sure that this is safe okay and to do the in invisible knot I take any Loop next next where the yarn is like this and I simply tie a lot this yarn is very good actually but it keeps dis spitting this is the only bad side in it but the the quality of the yarn is very very good and it's very smooth it doesn't hurt my fingers to crochet with it which is something also important when we crochet especially for long hours with cotton yarn and now you cut the remaining thread if
there's something here you can see like some remaining thread you just put it inside with the help of the tapestry needle or the tweezers and you hide it okay good it looks very beautiful so now let's continue so to embroider the nose what we do is we pass the tapestry needle horizontally like this between rounds 10 and 11 with the distance of two single crochets okay so I pass the yarn oh I'm sorry I'm always saying the yarn I pass the tapestry needle like this won okay we pass it twice so there is one line
we want to create another one so you pass it again one more time like this there is another video here in the channel of course I created so many videos already I have to tell you this but there is of course a video where I teach how to embroider this type of nose that I really really like okay so two times you pass it horizontally and now you will pass vertically like this so you pass the tapestry needle below the two horizontal lines that you created and how many times you do that as many as
you want to create the volume in the nose Okay so there is no rule here for the amount of times that you pass the yarn vertically and you see that I pass and I keep like adjusting with my fingers my [Music] nails and you do that to create this volume in the nose Okay so I already have the volume that I want so now I will use this technique here which is pass the yarn the tapestry needle with the yarn any point in your amigi like this it could be here on the side it doesn't
matter where it is cut the yarn that you started I still haven't removed the label for from my scissors sorry for that I will do that when I finish recording and now you pass the yarn exactly to the same Gap the same hole where the other remaining thread is like this very simple and what you do tie or not I like to keep it tight so your ti a knot put the knot inside with the help of the tweezers and you cut the remaining thread simple right you can do the same that we did before
the tapestry needle or the tweezers the other time I did of the tapestry needle so now I will hide with the tweezer so you can see how how I do it and that's it very cute right to make the face even cuter I take the pink yarn and I'll pass here like using two yeah I use two single crochets right below the eyes you see just to make like a blush just the detail to make it even prettier and you can use the same technique that we just did right now to fasten It Off and
that's it I embroidered the blush it looks cute so now let's crochet the ears and yeah this will be the last part of the yumig gry so now for the last part I already have one ear here let's crochet the other together we start with three chains so let's make it together I have one 2 three chains and from the second chain you make two single crochets one two single crochets turn the crochet piece some people like to make a chain and turn in this case I will not make a chain I'll just turn the
piece okay so round row now it's row not round force of habit so the first row we made two single crochets and now we turn second row row number two we make two increases so one increase second increase third the crochet piece row number three you just repeat the sequence so you make four single crochets oops the yarn splits I hate when it happens let me organize it okay sorry for that as I was saying now we make four single crochets so one 2 3 my goodness my stitches are even tighter here four single crochets
turn the base and this was our round our row number three row four you make one increase [Music] okay so one increase two single crochets and one increase again and we end up with six single crochets thir turn the piece and now row number five and six we just repeat the sequence making six single crochets in each okay so now round number raw not round row row five I make one two 3 4 five and six this is so fast that I will crochet with you turn and the last one one 2 3 4 you
see that it forms like a triangle five and oops six okay so we finished but my recommend recation for you is make single crochets around this triangle to make like a perfect finish okay it's very very beautiful when we do that if you compare this to this one that I already made Single crochets around the piece looks way prettier let me show you it looks way prettier than this one in the left without the single crochets so that's what I would do right now I make I'll make a chain and simply crochet single crochets around
this crochet triangle around the piece okay so I finished the two ears and you can see how beautiful it is it's way more beautiful now you see the triangle with the single crochets around it's way more beautiful like this so now we will sew this part to the Head the beautiful head that we have okay so again you take the tapestry needle before um using the tapestry needle something that I like doing whenever I have to sew is using bins I don't like sewing and I think all crocheters or almost all crocheters hate doing it
too so in order to avoid having to Uno and it was not good then you have to do it all over again I prefer to pin everything first so let's find the right position you should place the ears like three single crochets apart from the the eyes Okay so one two three is in this line here I just put the pins so we know the line that I have to do it okay one pin it first oops be careful because I was not [Music] okay look how beautiful it is and you do the same at
the other side this part where you have the remaining thread this is the part that should be placed like this because you will Sew It To The Head okay so one two three this is the line bin it just to make sure that it is in the right position take a look at it first if you're satisfied with the playset it is now you can sew [Music] it okay so I finished sewing and you saw how simple it was but my recommendation is don't fasten off the first year yet okay so you finished sewing okay
pass the thread through like any part of the IG groomy and don't fasten off because maybe after sewing this one you see that they are not evenly distributed they are not like um in the correct place and you want to make it again that's why I think it's so important to use pins at this point you have one part already placed so now it's even easier for you to reach the right place with this one because you can measure like am I supposed to crochet here no it's too close to the eyes maybe here no
it's too much in the back where is it so now you have an idea and you can compare both sides to check where you should do it okay so again I'll measure I'll take a look okay it's even I'll place the pins and start crocheting the next [Music] one [Music] so now I crocheted both sides as you could see the oops they are in the correct place I'm satisfied with the result so now I can fasten off the threets okay you can use the same technique that we have have already done in the other parts
like the nose and the blush of the yig gromy I'll make a knot put the knot inside with the help of the tapestry needle or the tweezers for [Music] example and then you cut the remaining [Music] thread and that's it our baby Yoda is finally finished but of course we still have to put the keychain and attach to it um the way that I do it is again very simple and as you know I try to keep keep things as simple as possible I passed the yarn through the tapestry needle like this and the with
the yarn in my tapestry needle I pass it in this Loop which is like the first or the last one depends on the point of view from the keychain okay like this it doesn't have to be that long the pie of thread that you will [Music] cut but I have the keychain like this and now I'll will pass it like this in the middle of the magic ring where we started our work okay you pass the yarn like this and the other end of the yarn you pass through the same hole the same hole that
you pass the first one in the magic ring like this okay pull the yarn so it it's tight in the amigi like this let me try to focus the camera you see and now I will make the invisible knot with this two threads here I already did the invisible knot with you so I don't have to demonstrate it right now but that's how I usually attach the keychain I make the invisible knot just to make sure this yarn is safe and it won't escape and this one is pretty tight so wherever I want to hang
my keychain this won't esape okay and that's it we finally finished our beautiful baby Yoda keychain look how cute and tiny it is it's very very tiny um I really hope you liked this tutorial if you enjoy crocheting it with me remember to give me a thumbs up and subscribe to my channel um this is a way that you can support me and support my work so I keep creating videos like this you can also subscribe to my newsletter to keep updated on the behind the scenes and maybe help me on the next projects to
crochet that's it guys thank you