[Music] hello and welcome to this color correction tutorial for Adobe premere Pro um and in this tutorial we're going to look at the issue of secondary color correction how you can correct just one part of your shot without affecting the rest of your shot and for this we're going to use the tool called the three-way color corrector but what do we have so far well this is the shot that we have been saving um and it's had three problems originally it had a color cast and it was too bright around the edges and the third
problem the one we're going to deal with today is this red bucket which we need to desaturate so that it doesn't draw people's attention away from the action so let's just have a quick look at our shots this layer here the black video layer was our V yet so if we turn that off we can see what a difference that's made around the edges if we select our original shot we've got the fast color corrector applied if we turn that off that's what we started with we've got a shot with a hue with a color
cast that we needed to get rid of and we've used the tools in the fast color corrector to correct that shot and then we've used some vignette techniques on this black video to take our viewers attention away from the background and concentrate them on the action however we need to deal with a problem of this bucket and to deal with that we need another tool so if we select the layer that we're going to be adding the tool to we need to find the three-way color corrector now I've already got something in here I was
demonstrating the 16o garbage mat and I've started typing that into my search box I need to make sure I X this off and then I can start typing three by the time I've typed the word three you'll see down here in video effects color correction I have the three-way color corrector and if I click and drag hold of that and drop it on the clip you'll see that it appears up here in my effects control panel it's actually dropped it here above my fast color corrector I actually think I want it below my fast color
corrector so I'm going to take the fast color corrector and I'm going to drag it above the three-way color corrector and then I'm going to click on little twirly the triangle beside three-way color corrector to open it up and if you can't see it wides screen like this it's because you have this show hide button enabled so you click on that and that gives you a small view clicking again here and that gives you a full View and I can pull down and see I've got a something that looks like the fast color corrector but
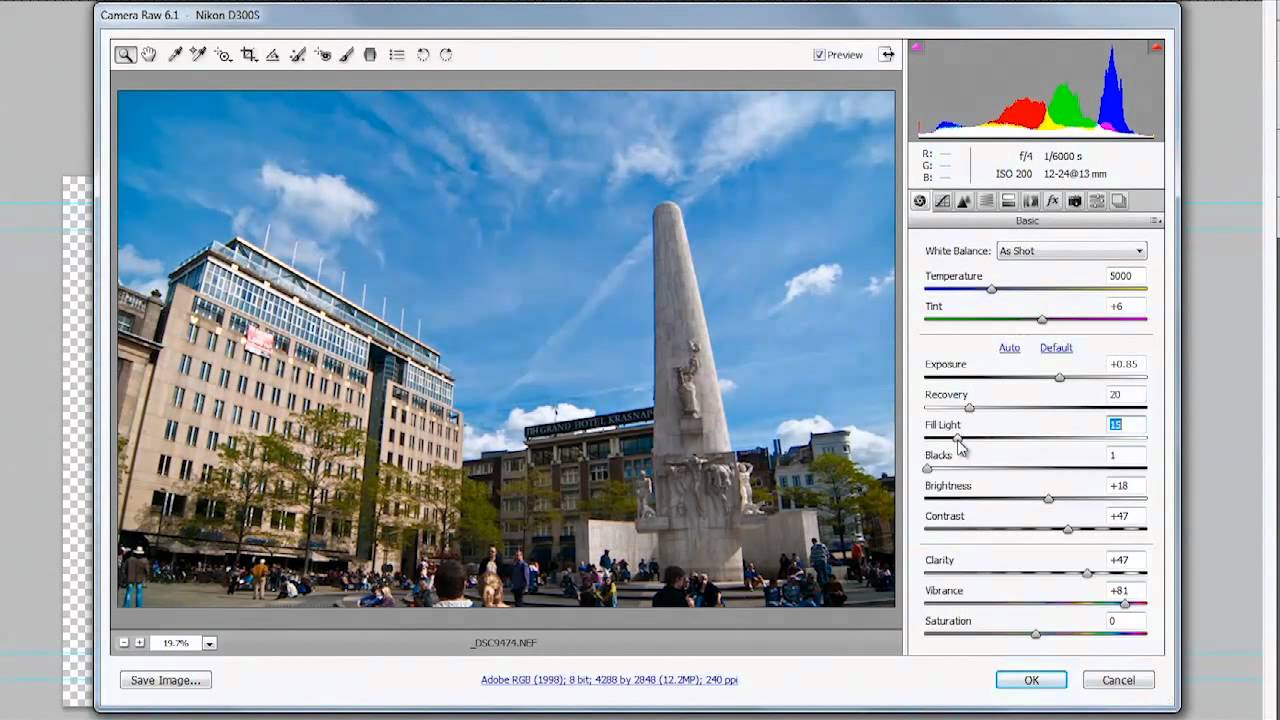
is somewhat different okay so what have we got that's going on here what is the three-way color corrector about and why is it different from the ordinary fast color corrector well it's simply because you have three areas of pixel that you can affect with color correction and those three areas I'm going to just go up to the top and I'm going to click where it says output from composite to tonal range if I click tonal range I get this very funny look and what it's saying to me is there are three types of pixels in
this image there are highlight pixels which are these white ones on this tonal range there are midtone colors which are shown in Gray so quite a lot of midtone in this shot and there are shadows which are shown in black and these are the full tonal range of the shot so it's giving me the option to color correct just those tonal ranges so I can choose everything that is in the Highlight area and in this wheel over here I can change the color of just the highlights whatever's shown white in this middle color wheel I
can change just the color of everything that's shown in Gray and in this far left wheel I can change the color of just everything that is in the shadows or shown in Black so I have a much more powerful tool for dealing with different problems so if you know that you've got a problems in your highlights but you're happy with everything else you can change the color of just the highlights going to go back from tonal range to composite we're not actually going to be doing color correction on this shot because actually the color ranges
I'm very happy with but let me just demonstrate here is my highlights and we know for instance the color maybe bit on her face and the back of her hand will all highlights if I start pulling that towards the red it's hard to see but if I start keep moving around you can see that that if you look on her hand particularly over here it's starting just to change the color of those pixels a bit as we move around move the color wheel around around okay so contrl Zed to undo that now if I look
at the midtones if I change them now there's quite a lot of midtones particularly in his jumper again if I pull this up and start to pulling it around you can see that there's a color cast in the bits that were just the midtones the rest of the image is unaffected but the midtones are definitely being changed contrl Zed to undo that command Zed and mac and then the Shadows again if I click in the middle here and pull it right out it's just going to affect the dark areas you can particularly see it in
her blouse over here pull it around you can see the blouse is just changing color as I pull through so that's how you canect just a particular tonal range command Zed or control Zed a couple of times to undo that um equally you can see here where we had white balance in the fast color corrector you can also have a black balance so you could actually click in an area that you know is fully black and a gray balance and see if you can actually balance out the shot and see if you can do these
changes automatically so if I did the white balance it would move the white areas if I did the gray balance it would automatically correct the gray areas and the shadow balance or the black balance would change this area so you can see that this is actually a much more powerful tool however um a little word of warning often when you change something as well as having the wheels themselves you've got sliders that you can change or angle sliders that you can change as opposed to just doing it visibly here you can do it by numbers
but beware at the top here it says tonal range highlight and you would think that that means that somehow all of these wheels are affected for just the highlights but actually that's not true whatever is in tonal range here refers to what is below the wheels so if you see highlights it does not affect these wheels one jot it affects what's shown down here so if I change this now to midtones all the sliders have changed to midtones but it hasn't affected these wheels and again if I go to to Shadows all the shadow sliders
have changed but it's not affected these wheels I still got access to these Shadows I've still got access to the midtones I still got access to the highlights uh the only time you'll really see A change is when you go to master and then it just gives you the one big wheel and you're pretty much back into the same territory as you were with a fast color corrector so be careful take that back to Highlights don't think that because it says highlights here that these three wheels refer to Highlights it only refers to what's below
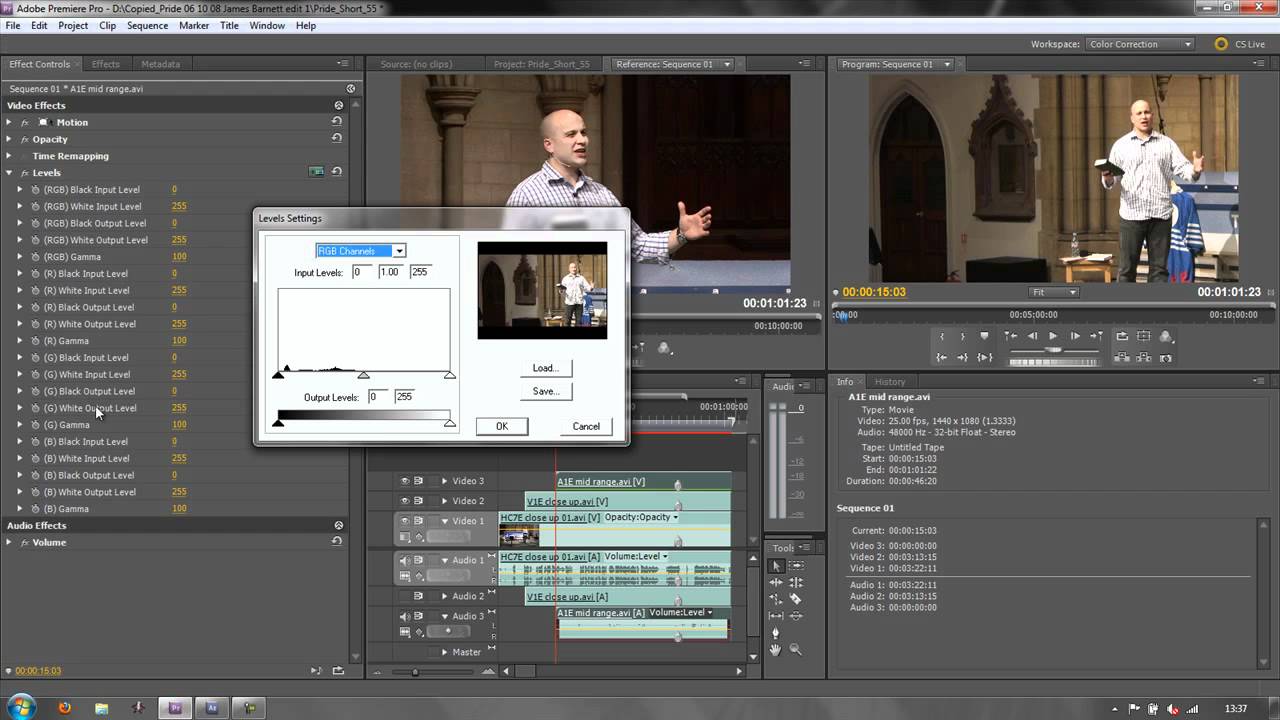
the wheels and I just kind of wish that adobe would drop this little highlight below these color wheels because it would be a lot more obvious what's going on now we've looked at the contrast bits and pieces it's what's at the very bottom of the three-way color corrector that interests us it's a new area that's called secondary color correction and I want you to open up secondary color correction now what we want to do with secondary color correction is we want to make a selection and then we want to alter that selection so we really
want to select the redness of this bucket I'm just take this back to the beginning we want to select the redness of this bucket so that it is completely selected and nothing else is selected and then change just this red color now to do that believe it or not I'm going to go right to the top and I'm going to change where it says output I'm going to change it to mask and when you put it to mask you can see well hang on a second that's pretty much all white what's going on here um
you can see this black here this is the yeah which I'm just going to turn off so literally is completely all white which means that any effect I make will affect everything so white means everything's affected I don't want to affect everything I want to affect just the bucket so let's go back up to the composite output and let's go back down to where it says secondary color correction and let's choose this picker where it says Center choose the Picker and then go to the bucket and click on the bucket buet now we can then
go back up to our mask and see what difference that's made look it's saying the only thing that's going to be affected now is what's white is this little bit of color range on the bucket well that's not actually enough for us everything that's black won't be affected but what's white will be affected so we've made a massive difference already but that's not enough for us so go back to composite and we've got a little plus sign at the bottom can you see you got a little plus and click on the plus and I'm going
to click to one side just over here in fact I'm going to click on the plus and I'm going to click on the other side over here and I'm going to go all the way back up to composite and go to mask and see what it's like now we're getting somewhere most of the bucket is showing now we've got some other controls down here now we've got a saturation problem with this bucket so let's open up the saturation tab now it's showing us that this is the area that is going to be affected so let's
just see what happens when we pull out the saturation area or more of the bucket was included try pulling out a bit further this way more is included notice some other bits and pieces are coming out now you see that you've got a triangle here and a square here this is the softness of the edge so if I look at n softness if I pull the slider with the hot text here I'm sliding it out and it's beginning to soften the edges and I can do the same the start softness and I can pull it
out see if that's well that's beginning to pull in too much let's go back a bit and let's maybe just try pulling this out out a bit more it's a compromise because you don't want to bring in too much of the other colors but you want to have as much of the bucket as you can possibly have so let's just pull it out until we look like we're getting a good result bit too much coming in there try a bit more from this side right I think now we're probably getting as good as we can
get let's just play with the Luma tab because some of it was a bit bright and let's see you know we've got a bright highlight here and some bright highlights there so let's just pull these out a bit and we're including more and more of the highlighted stuff let's soften The Edge on that see if we pull in a bit more we are try it the other way as well see if we pull in more again we're pulling in a little bit more basically we're building up a mask we're building up a mask around the
bucket as much as we can using the saturation and the Luma just to include as much of the bucket as possible because whatever is white will be affected so we are affecting some other minor bits and pieces but as you can see we're getting hold of the whole of the bucket here and obviously you can select Things based on its Hue it saturation and its luminance and we can even look at softening up the edges which is really effectively just going to blur it a bit to be honest so you pull it out a bit
it just blurs it makes it a little bit softer around the edge so this is what's going to be affected whatever is white is affected whatever is black is unaffected right now let's go back up to our mask and go to composite it now we are ready to reduce the saturation of the whole thing now we need to go back up to the saturation controls and we're going to be taking out um let's just have a look I think this is midtone so we just see composite do our tonal range yeah that's pretty much midtones
and shadows is where we're going to need to take it out of we've got some Shadows at the side and midtones so it's on the saturation on the midtones and on the Shadows that we're going to need to remove the color so go back back to composite and I'm going to take the saturation sliders down so at the moment we're on highlight saturation which we don't want so let's start by taking the midtone saturation let's open up where it says saturation and start to pull it down and see what difference we get can you see
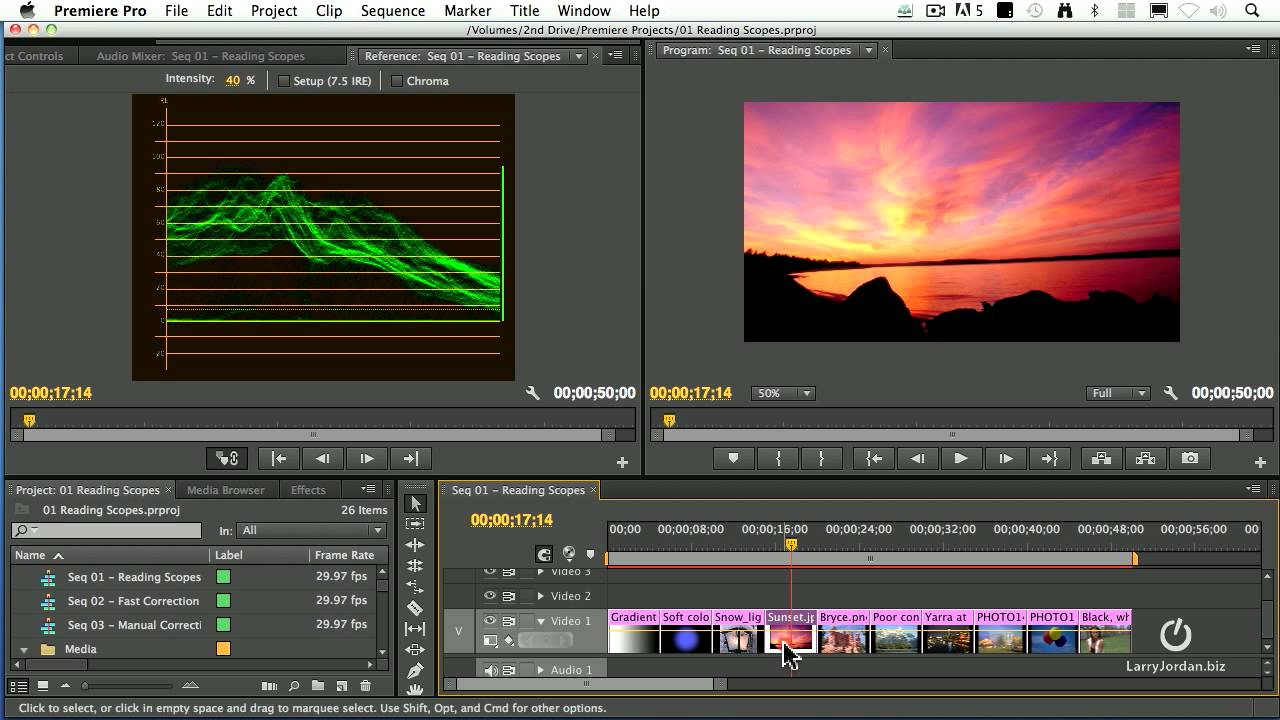
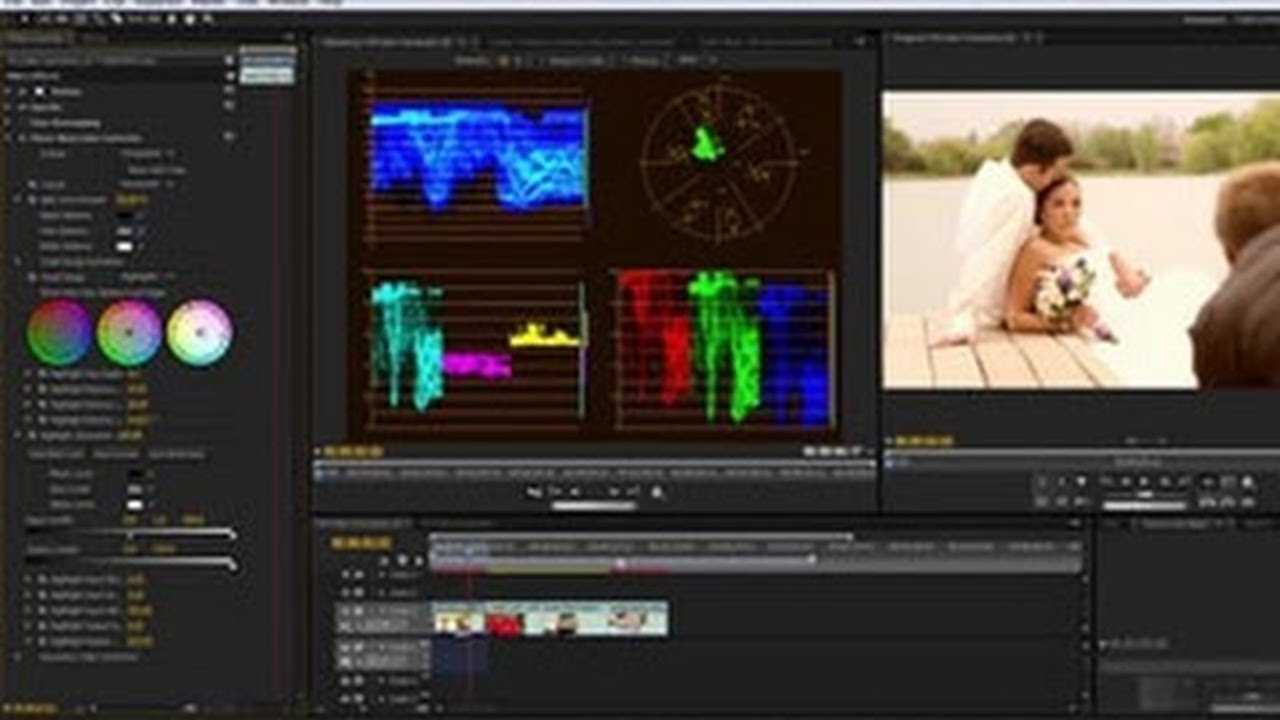
that we've actually pulled the saturation of that color down the Shadows have been unaffected so we actually now need to move the Shadows a bit so we go from midtones to Shadows open up the shadow saturation to start to pull that down as well and suddenly the bucket that was really bright has become very dull let's have a little look with our reference monitor so we go window reference Monitor and then remember to the drop down here which says output we're going to go to Vector scope click on Vector scope now we can see that
the level we're at at the moment so let's see what happens when we turn off the three-way color corrector let's get to the top of the three-way color corrector and turn it off that's how it was before so beyond broadcast safe illegal limits turn it back on you can also see it's very bright in the picture here turn it back on and it's got a lot duller and it's been pulled back down to broadcast safe so that's how we can affect with secondary color correction one individual item we've created a mask and then we've applied
our controls to the mask and we've looked at things such as on the output level we've looked at the tonal ranges so we can see that actually we needed to affect both shadows and midtones to change this shot and also we looked at our mask so that we could create an area that we knew was going to be affected unfortunately some other bits and pieces have been pulled in but it's not a great deal because we've dealt with the main problem that we had here if we wanted to we could also create a mask around
this particular area that would leave the rest unaffected but that's for another tutorial I think go back to composite so what happens if there's more than one area that we need to deal with well you simply drag in another copy of the three-way color corrector so you drag that and drop it on top and there would be your second version and then you would need to start to work on your second version to deal with the other area that was causing you problems and you just drag in another copy of the three-way color corrector for
everything that you need to do for secondary color correction so if I turn back on my vignette there we go we have our saved shot we've taken people's attention away from the edges we've concentrated their attention on the actors we've dealt with this wretched bucket so that it's nothing like a saturated it was before and in actual fact you can even change the Hue of this if you wanted so you could change it from now that we've got a mask around it we could change it from say red to to Green if we wanted by
creating a mask with saying we're just affecting this area but we've got rid of that so let's just turn bits and pieces off and see what we started with that's what we started with then we added in the fast color corrector then we added in the vignette and then we added in the three-way color corrector watch the bucket as I click this on I think it's the bottom one there we go so we've got rid of the problem with the bucket we haven't affected the rest of the shot and we have saved this shot and
we've learned some very Advanced color correction techniques well I hope you found this useful and I hope you can apply it to your own work my name's Andrew divas and thank you for watching [Music]