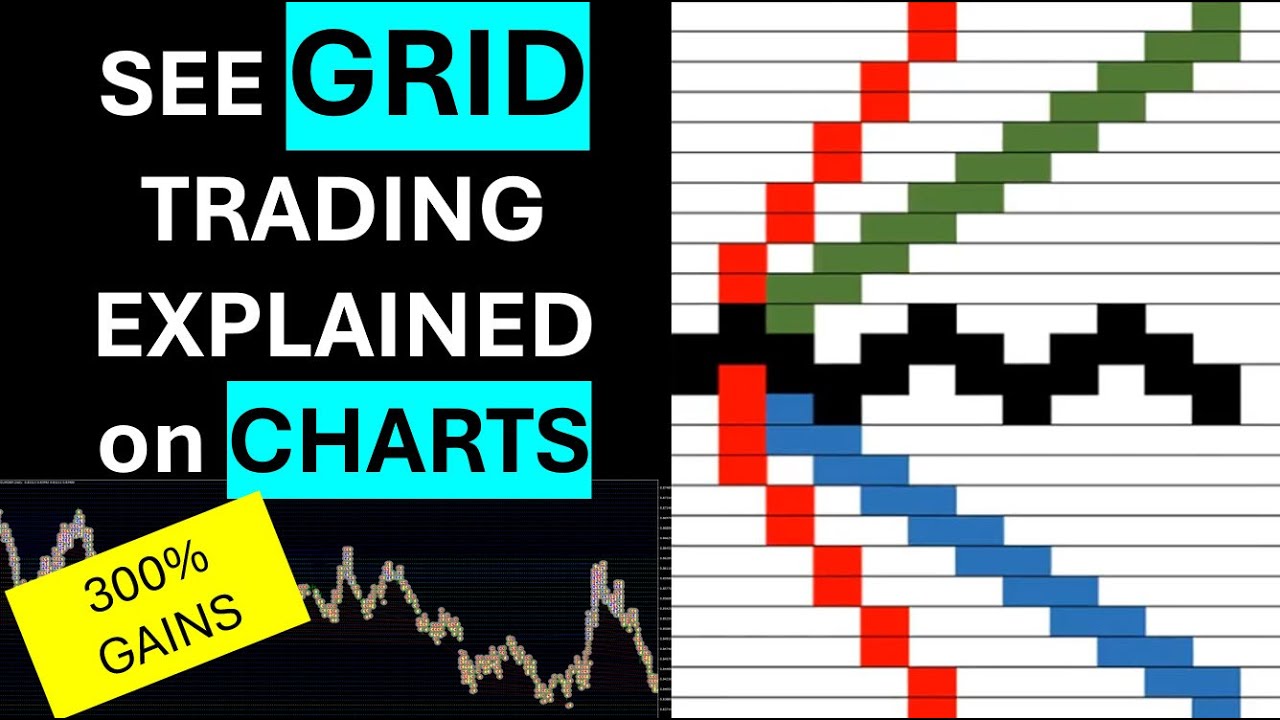
hi everybody Alex here from expert Forex and in this video you I give you an opportunity to see the free grit Trader in action on your screen you can see some of the output that you'll be seeing later on in the video so yesterday we made the simple grid Trader available to everybody on a free basis now they've been con suable downloads of this free EA it's it's fantastic it is profitable easy to use and ideal for beginners who want to learn how to trade robots so in this video we I'm going to show you three examples of the grit Trader being used and we are going to be using very specific currencies and it's very important to select currencies very carefully for the grit Trader we want currencies that trade sideways that are not trending currencies and that takes a lot of risk out of the trading and in order to do that we actually use a tool called the trend analyzer and to find currencies with small trends that we can use for grid trading and here are some of the uh currencies that we'll be looking at the Euro pound definitely the New Zealand Frank the Aussie New Zealand and we're only going to be looking at those three but you can see how small their Trends are compared to to some of the trends down here that are absolutely ginormous so we're going to cut our teeth on the easy bits and in fact they're not easy they're actually essential ones you need to trade sideway techniques on using sideway currencies now this tool is actually also a free tool that you can download from our websites a link to that tool will be provided in the description of the video as well as in the commentary of the video as well as the actual grid Trader now the beauty of the simple grid Trader is it only has two settings and here we go all you have to do is the grid size and then you have to tell it how many lots to use and then the EA will trade using the following logic it it ensures a buy and a sell at every grid level so it divides the market into grids based on the grid size that you tell it to do it and it will then sacked at these grid levels and make sure there's a buy and a sell at every grid level that the price is currently at that makes sure that you are guaranteed of a successful trade in your next trade what it then does it just leaves the negative leg of the two open until that leg either goes positive or gets closed in a basket that is most likely to be positive in total so let's move on to the actual testing of the simple grid Trader on charts so that you can actually see the transactions happening on charts also what you're going to be seeing is a secret method that a lot of grd Traders use to reduce risk tremendously and to increase income tremendously so keep on watching just a reminder to join our expert Forex community of over 30,000 Forex Traders it is free so don't miss out on any new developments a link is in the description of the video okay so let's start back testing and I must just point out that this back testing is happening on another server I'm linking into that server using any desk so the quality of the display is not that great but we're going to do our best to make it make sure that it's very clear about what's going on here so here we go we uh as we said we're going to start testing the Euro pound and that is what I have loaded into the strategy Tester the Euro pound uh I'm using the simple grid Trader and I'm using every tick which is the most accurate way that you can back test a strategy I'm using one month from the 21st of December to the 21st of November and I'm using visual mode so we're going to be looking at the actual trading happening as it happens uh we're going to use a spread of of one and we're going to use a time frame of 15 minutes now that isn't required by the EA the EA doesn't use a time frame it use uses price levels but 15 minute displays very nicely in the trading scenario so that's why I've chosen 15 minutes and then let's let's have a look at the settings the settings the gap size that I've chosen is 30 and why have I done that because I've we've told you to do that so for the pound the Euro pound we said use 30 Pips and the lot sizing is 0. 1 and for um a 10K account we are saying use 0. 1 and this is a 10K account we we're basically back testing one month of the settings that we told you to use and the reason for that is to just show you how the EA trades and to show you few Concepts that you need to know about trading this the git system there are a few things that I'm going to be mentioning as we're testing that is going to be critical to the your future success of grid trading now although we only using those two settings you need to know a few management so we say okay so we ready to roll and we going to start now before I start I'm going to actually this is the visual mode that we're going to be using using I'm going to move to right to the end like that so that it it doesn't move much because I'm going to need to change the chart it doesn't display very well in Black so I'm going to change the chart when after it started and there we are it's uh started there uh and it has already opened a buy and a sell over there so what I'm going to do I'm actually going to go into the the chart properties and I'm going to change the background to something light like ice blue and I'm going to the foreground I'm going to make dark and I'm going to make the actual chart dark green or the bars dark green and that should be okay that's that's a lot clearer and then what will make it even clearer is is I I'm going to remove the the grid so now we're ready to go and what I'm going to do is I'm going to increase the speed of the tra tring you'll see we've got a buy and a sell why and why there two lines there is because there's a difference between a buy and a sell price in terms of the spread so the spread causes a difference between the buy and the sell price now I've got it on the second fastest speed and it is too slow we're going to take a very long time to to do this trading so I'm going to actually put it on Fast which is actually too fast so we don't have the Goldilocks situation we we can either get too slow or too fast I'm I'm going to put it on and hopefully it will respond to when I instruct it to stop so it hasn't hit another grid level yet and there it's hit the grid level so so it looks like I'm going to have to control the chart from the original server and uh there we are so the first thing I'm going to do is I'm going to reduce the size of the chart uh and let's have a look at what's happened so we started with a buy and a sell uh then the price went down to the lower grid level and then a second lower grid level went up very quickly after that which meant we cashed in a Cell there a sell there cached in a buy going up and cashed in a buy so we've had four Cashin and uh we have also had three levels open so there is now a cell that that is sitting there a cell that is sitting there and we have a buy and a sell at that particular level okay so let's move on from there and now these open trades are what we call a blanket of open trades so this blanket can build up to about 10 or 15 open trades at times and at the moment there's only three that you can see and every time the price touches one of these levels there we are you see it it will cash in so that's how the grid system works it makes sure that there's a buy and sell at every level when the price gets there there make sure that any direction the price moves there will be a positive cash in and then it just leaves the negative trades open so they are left open so that's why there's a sell and a sell and a buy and a buy uh currently running there now the most critical number that we're going to be looking at throughout is the equity number because the equity number must be above 10,000 for us to be profitable and and for us to have paid for the carpet that the price is trading on because if the carpet is trading is paid for and the price is moving on the carpet it's just cashing in cashing in and it's already paid for so it's just cashing in new money when it leaves the carpet and it's not paid for then Equity goes negative and we haven't paid for the carpet when the price is trading on a paid carpet we're printing money when it's off a paid carpet we have to start paying for that extra carpet size but after time you'll see that the carpet matures and the price starts bouncing up and down on the actual carpet so here we are we've got a small carpet this is only four levels and it's just cashing and every time it's like an electric fence every time it get the price touches it it Cashes in so let's see what happens the equity is currently nicely positive the the account balance is nicy positive and we have a draw down of about $200 we're going at full blast at the moment it's the 5th of December we're trading to the 21st so we basically halfway through the trading and uh let's see what happened so so sometimes trading can be very boring as you can see we uh basically are just looking at the trading happening five levels open at the moment the price is going nicely into the middle of the carpet which means it's it'll go into a printing of money mode and uh we'll just watch it until it gets to the 21st of December and when it reaches that point what happens with a tester is it will then close all the trades and give us a result for the trading now which is very unnatural because what happens with this kind of trading you don't normally close your trades but it will do that and that's fair enough we can then see the true profitability of that particular trading okay we at the 18th of December and we almost finished let's have a look so the equity is nicely positive um the draw down is quite big 230 but uh nice nice nice positive Equity now as I said the settings have been designed to give a 3% return and we are actually exceeding the 3% return and that's the end we've reached the end and we at the 21st of December and the equity is sitting at 4 and 1 half% profitability pretty good and all it's done is traded the grid system and make sure that there's a buy and a sell at each grid level when the price gets there and it's left the negative trades open Okay so let's have a look at the actual results and there they are uh the the profit was $449 the uh draw down maximum draw down was 335 the absolute draw down was only $100 so nice everything's nice and control and that is what we've given new conservative settings to keep everything nicely under control at the end of the video I'm actually going to run some aggressive settings I'm going to show you how to make your settings more aggressive so that you can increase those returns dramatically without increasing risk excessively okay so that's the one currency let's move on to the next currency you can also see the results as like a normal trading account you can actually see the results coming through you can see there's the the regular 30 Pips being being cashed in and there is the final cash in that has happened okay so let's move on to the next currency and the next currency is we'll go for the Oz New Zealand there's the Oz New Zealand boom boom boom and we going to do exactly the same thing again and we're going to just say start now I have slowed it down because it didn't give me time to change the uh chart so I'm going to just quickly do that um we're going to go for a light blue chart and we're going to go for dark there candle of dark green dark green and we're going to say okay and then we're going to get rid of the grid the grid that uh metat Trader uses is not the same as the grid that we trading at the moment so there we are it started with a buy and sell the buy was cashed in with that trip and then that level has a buy and a sell so that's what I mean by each level that the price visit will have a buy and a sell but the ones where there are open trades might only have uh the open trade that hasn't been closed so there we are so there the Aussie New Zealand has started and let's just keep it going and I'm going to just increase the the speed of it and let's go okay there we are I'm going to decrease the size so we can see a bit more clearly so this one has actually started with a bit of a trend you can see the trend's gone all up one two three levels it's gone up then it came down and now it's going back into the carpet so it's got a carpet of already four lines but if it stays in the middle of the carpet that's the most healthy thing because it's just continuously cashing in and cashing in at the moment the equity is has just gone negative because the car caret is increasing as the carpet increases the equity will go negative okay so there's this carpet it's 1 2 3 4 5 six levels that's at the edge of the carpet so that means it's at its worst and that is why Equity is currently negative uh uh that part of the carpet hasn't been paid for and in fact it's increased to Seven Levels now and Equity is still battling to become positive so this is what I mean by we are now trading with a carpet that hasn't been paid for if the price now goes into the center of the carpet it will go into printing mode and every movement on that carpet will just generate extra income Equity has now gone nicely positive and hopefully it will stay there okay so the same principes still apply uh by it it Cashes in all the positive deals leaves the negative ones open and it grows the carpet in that way we now have a carpet of eight levels which could increase as I said they can get pretty big but the minute the price goes into the center of the carpet then the printing of money happens and it is already on a a positive of equity so oh there it's went negative again so it's quite delicate at the moment there's another cash in so each cash in helps prop up the account balance which in turn props up the equity balance and uh so so the more Cashin and you can see cash inss happen over and over and over on the same level as you can see here one the price has got there one two three four times what that we can see uh and there it's gone three times so uh it visits the same level over and over again and that's how it multiplies the cash ins over and over again so the equity is going nicely positive it's now $200 positive the draw down is still $270 so let's see how this is going it is currently the 13th of December so we've got one week left uh of trading let's hope that the price ends up more or less in the middle of the carpet at the end of this period that'll give us a good result for the month's trading now there is a trick to this uh Equity management and I will tell you about that after we've tested the next currency because that trick is quite critical if you are going to trade the grid system on a continuous basis okay so Equity is jumping up quite nicely it's almost at300 uh which is the the goal for these particular settings that we've provided so when you reach $300 you've actually achieved the goal that we've set for these settings and there we are it's stopped so uh we have ended up with over our 3% it's three uh 3 $10 so that's pretty good that's the aim for the for the um monthly return and we've had a draw down of2 260 but in spite of that draw down we still have a positive Equity of $310 and that was for the Aussie New Zealand I think you're getting a hang of the thing now I'm going to run another one and let's see how that one works and that's going to be the New Zealand Frank so let's go and get the New Zealand Frank there is the New Zealand I'm not changing anything here because it's the same conditions they all have a city pip Gap and A.
1 lot sizing so here I go I'm going to just run this one again and get that one going if you have any questions please uh mention them in the oops I better stop this one it's going a little bit fast it's right I'll slow it down and let's uh let's formatting I can't use templates because the templates wipe the uh the EA table out so we're going to go light [Music] color dark color and we're going to make that a dark green and a dark green Okay so we've done all that okay and then we go and we uh get rid of the grid too much clutter and uh caught this one in time because it's it still only has a buy and a sell open so now we can accelerate the trading and let's see what happens so it hasn't hit a grid level yet oh and then we can also decrease the size okay it's hit another grid level cached in and uh let's see it's it's gone back to the starting point which is a very profitable uh uh formation there it's now gone down and it's just cashing in cashing in all the time growing the carpet that we talked about and let's see how this one goes another cach in maybe we can make it even more condensed okay there's more condens there's the next cach in so it's been uh trading between two levels only and it's cashing in cashing in so Equity is very nicely positive because it's been trading in such a narrow range that's that is what we want for grit trading we want a sideways market trading in a narrow range and just cashing in cashing in all time which is doing at the moment it's already reached $180 positive a $200 positive right now as uh $230 profit $250 profitable so so this is this is ideal these are absolutely ideal grid trading conditions small blanket and the price is just bouncing up and down on the on the carpet there's another cash in we're at actually at our goal which is $300 and it's the 5th of December but things could change quite uh rapidly Let's us see how much uh how how big the carpet grows over the next few days okay there it's starting to grow it's now I've got four levels Equity is still nicely positive so we've got a paid carpet at the moment it's going back into the carpet which is what we want cashing in cashing in uh so uh we are now nicely positive in terms of equity it's now on the edge of the carpet which is the um area where more investment into carpet is required and therefore Equity will drop at that level but another cash in helped a lot and let's see so we now have five levels and let's see how this turns out okay more cash ins more cash ins um and Equity is nicely positive 3 80 so uh really good return on Equity mainly because this currency has gone sideways quite a bit and you can see the size of the carpet there's only five levels to this carpet and that and it's in the middle of the carpet that's the ideal position from here we can just print money print print print money if the price stays around that level another cash in and um let's see how this goes now it's going to the edge of the carpet again oh on the edge so now there's a chance that it'll open a new level let's see if that happens it opened another level in fact I think it might have evented two levels not sure uh that happened a little bit quickly and uh we now have a lot of um open levels another spiky trade there Equity has dropped quite a bit but it's still nicely positive so it means we've actually paid for the carpet so if we look at the uh uh situation right now we look at Equity of 6 $167 so nicely positive not at the 300 but we were at the 300 we were in fact at the 400 now if you've watched the equity as we've been trading you'll see that it sometimes goes to 400 and 500 and so it goes very high and then we'll come down to these low levels like this particular one this one was at 450 uh it it's now down to 67 so now I'm going to show tell you about the next intervention that a lot of Traders do so let's say we've now designed this to produce a 3% return on our money this strategy now we know that the equity goes like this all the time so what we try and do is we try and catch the equity at the top and cash cash everything in in other words we cash a whole blanket in at that point so when Equity reaches let's say 3% 300 we just cash it everything in and start again that way we end up trading with the trend because if the trend has been down and we C and we started here and we cash in there we have start we have actually gone with the trend so that's a way of getting the grid to trade with a trend you cash in when you've reached your goal and Al a way of reducing your risk tremendously now that's not built into the EA at the moment because I I want you to experience the grit trading as as normal and this this is normal grit trading that we're looking at here but certainly once you've mastered the simple grid trading then we can start moving into the more refined ones where we have these goals and when we cash when we get reach the goal we cash in we cash in and reduce risk all the time so so we basically finished these three currencies and this was nicely positive the you can see the draw down was 500 so we actually ended the trading at a very bad time it was at the edge of the carpet very artificial when that happens but uh that unfortunate that but it has been nicely positive you could basically C cash in everything right now and start again which might be a good thing because it looks like this one's starting to Trend but now I'm going to show you a way of Turbo boosting your results so let's do that so I'm going to go back to our original currency which I think was a Euro Euro pound yeah that one so how do you turbo boost your results and I'm going to just show you one way that sometimes works sometimes doesn't um the there are three things you can do you can reduce the size of the Gap the the the smaller the Gap the more you cash in but also the higher the risk so let's let's just I'm going to actually half that just to to take it to extremes and then the other thing that you can do is you can increase the lot size so what I've now done I've doubled the risk by Haring the gap size and I'm going to double I'm going to increase the risk on the gap size by I'm going to double the risk on the Gap Si from increasing it from 0. 1 to 0.