all right class this is lecture three for our design for manufacturing module the last module in manufacturing and design in this lecture we're gonna be kind of putting it all together and we'll look at design for manufacturing and assembly principles these are the rules and guidelines that are going to help us to design parts and assemblies and products that look forward to the manufacturing method and take into consideration the material and how the parts are going to be assembled and produced and brings it all back to the the initial stages where we're actually designing and
and coming up with our product and and how we're going to be developing it so this is a step from lecture 2 alright so lecture 2 we started to discuss how and when and why and in what manner we are going to introduce materials or the concepts of materials and manufacturing into our design and in lecture 3 we're just going to pick up where we left off there and and get more detailed alright so let's get started so first thing is what is designed for manufacturing and assembly and you can see on the on the
left hand side this is kind of a graphical representation before DFM a we have 111 parts for this very complex design and after d FMA we're reducing our parts making it more simple so we're we're cutting down over 60 70 parts and getting down to just the essential ingredients for this and that's kind of the overarching theme with design for manufacturing and assembly which is an engineering design methodology which aims to influence the design of products in order to optimize their manufacturing and assembly process and and what it's going to do is it's going to
allow us in the design Stages going back to to the early stages of the design and and start to introduce those manufacturing and assembly concerns and considerations early on so that they don't hit us later as surprises or as costly additions we can break the FMA up into essentially two elements right even though they're often linked together we can talk about design for manufacturing DFM which is the methodology of designing parts so that their manufacture is as easy and as inexpensive as possible while meeting their functional requirements and then design for assembly DFA which is
the design parts in such a way that their assembly into a final product is as easy and as inexpensive as possible while maintaining their functional requirements so like I said earlier it's it's really we know that parts and products have to be manufactured and assembled we know that that's going to happen later on so what we're trying to do is is to look forward to the manufacturing and assembly stages and bring those concepts and ideas and considerations back into the initial stages of the design process and and this is gonna do a lot of good
things for us okay as we'll talk about I don't want to give a give it away but as we'll talk about the FMA is a combination of the FM and DFA right and EF ma is part of what's called concurrent engineering and concurrent engineering is that idea of designing things looking at the total picture right so when we design something we think about how it's going to be used how we're gonna manufacture it how it's going to be recycled how it's gonna go through its end cycle management how it's going to be refurbished we look
at all those things down the road we look into the future to help influence our present day design activities okay so why do we use the FMA or why does the industry use them DFM a well it's really for three reasons one is as I said concurrent and concurrent engineering this provides guidance for does the design team in the present looking towards the future it simplifies the product structure reduces manufacturing and assembly costs it also helps to quantify the improvement so we can say we improved it by X percent or we reduced the number of
parts from X to Y it gives us a tool for benchmarking against competitors okay and it also gives us a cost tool it's a way to help negotiate suppliers contracts by saying you know this should cost this amount because we've you know gotten rid of all the fluff so how does DF MA affect the our knowledge and learning throughout the design process okay so so what we're looking at here is a is a graph a chart right and though the x-axis is the time into the design process so here on the left hand side is
where we start the design and then as time goes on and we move towards our right we get to the end product where the product is actually manufactured at some point in the future right here this is the production date so this is when we move from conceptual drawings designs to we're actually making the thing right here okay and this is kind of an important point in the design cycle time in the in the time for a product because pass this point to the loop to the right of this point we can't really go back
and if we do go back it's very very expensive very expensive so we want to make all of our decisions right here right because the production date is kind of the drop-dead date all right not only that but to say that we want to make our decisions too on the left side of the production date we can go even further to say that the earlier we make our decisions in the design process the cheaper it's going to be okay and we can see that right here so as this curve basically shows our understanding of the
part of the of the product as time goes on so as time goes on in this we don't really understand the product right so there's a steep curve right here but as we learn more and more about how the product behaves what its requirements are what its constraints are what does limitations are that curve kind of flattens out right so here in the early stages we're learning a lot about the product behavior about the design itself our freedom to make changes is actually decreasing so it actually has the opposite effect here so our freedom to
make changes in the initial stages we can make any changes we want you know it's conceptual we you know we're dealing with sketches or early CAD drawings but as we get closer and closer to production date here our freedom to make these changes becomes minimize it becomes much much much smaller and of course our cost of change and this is what I was talking about our cost of change goes up greatly right here changing a CAD drawing is infinitesimally small right the cost of changing a CAD drawing here the cost of changing a robotic assembly
line because we've already gotten pieces and parts in place is enormous ly expensive so we want to move our decisions as early as possible all right so what we see here is our process capability knowledge right so we start to understand our process capabilities as we're getting things ready for the production date and as we move forward and essentially what we want to do is we want to shift this earlier right our process capability knowledge our knowledge our understanding of how the processes for the production of this these parts and the product we want to
shift that as early as possible because that's when it's cheap and that's when we have the freedom to make design changes so what is the FMA in a nutshell it's a systematic process it's gonna help us it's gonna result in simpler more reliable products it's gonna help us to reduce manufacturing and assembly costs it's gonna help us to reduce design manufacturing in assembly time and it's gonna help us to reduce design manufacturing and assembly problems all right so that's kind of the the trifecta there it's actually more than three but you know those are the
these are what every company is really striving for so the design team that is undertaking a DFM a methodology for their design the design team must determine two essential questions how will the product be assembled and how is this part going to be manufactured and parts of the product all right so assembly and manufacturing these questions must be answered as early as possible as I showed in the chart as early as possible and by involve in involving all of the relevant parties though that means we have to involve manufacturing we have to involve you know
all kinds of planning we have to involve marketing we have to involve management so the more people involved in this the better going back to our our design process right this is basically the the the same process that we looked at in lecture 1 and lecture 2 but now you know we're going to look at it a little bit differently because now we want to optimize the design for part count and assembly right here and then optimize design for production ready in this right here so beat around steps 1 & 2 is where we need
to start optimizing the design for part count and assembly and as we exit stage 2 and move on to stage whoops that's that's numbered wrong we want to optimize it for design and production readiness step number one is the concept design stage this is the initial stage in all design processes this is that fuzzy front end right this is where we want to translate customer requirements into engineering specifications we're going to determine the principle functions objectives and constraints of our product the goal for step one the end result of step one is to analyze test
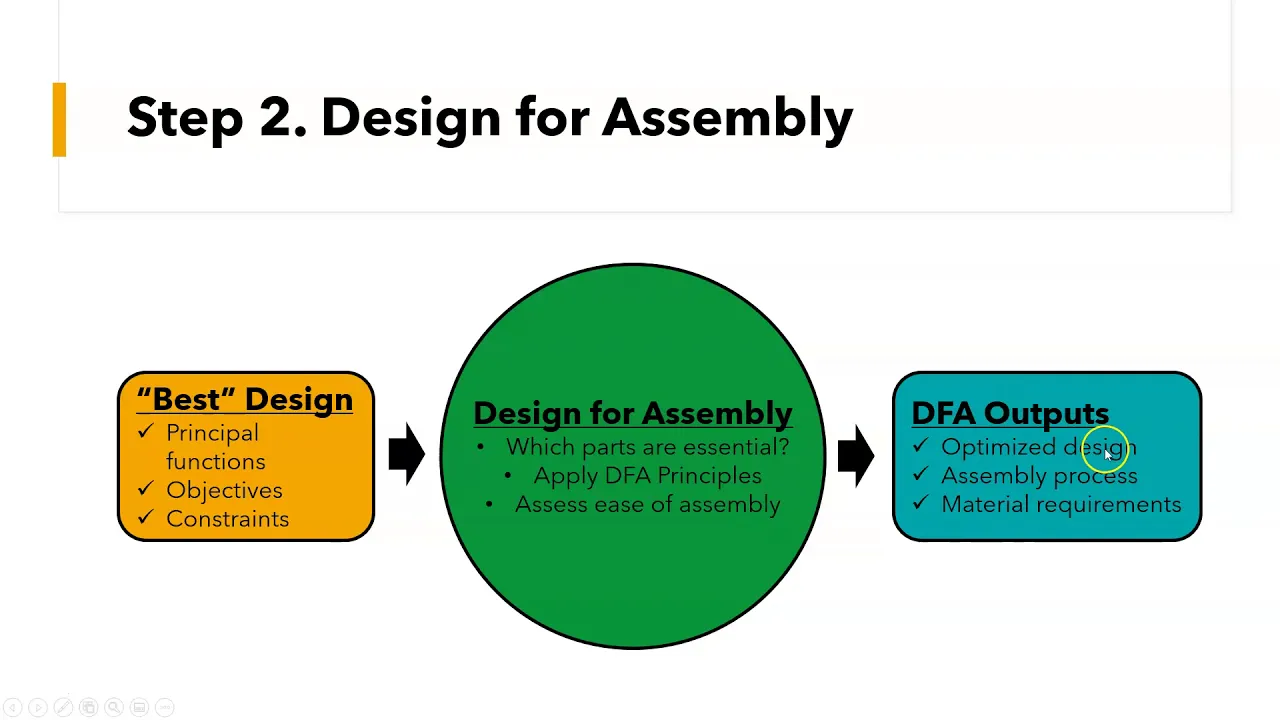
and evaluate a number of design alternatives to choose the best design so at the end of step one what we want is the quote unquote best design so that we can start to move forward step two is now where we start to introduce design for methodology it designed for assembly okay so DFA is a critical prerequisite for design for manufacturing so we have to understand the assembly process before we understand and start to adjust the manufacturing process alright DFA addresses product structure simplification right so think about it when we're under when we're trying to understand
the assembly of a product we may be taking parts in and out we may be adding and changing parts or changing the way a part looks so that's why it makes sense to look at DFA assembly before we look at DFM manufacture because the parts are still in flux during this stage alright we want to consider the method of assembly whether it's manual or automated because this is going to influence this is also going to influence our production volume and our product product complexity so the goal at the end of step two is to reduce
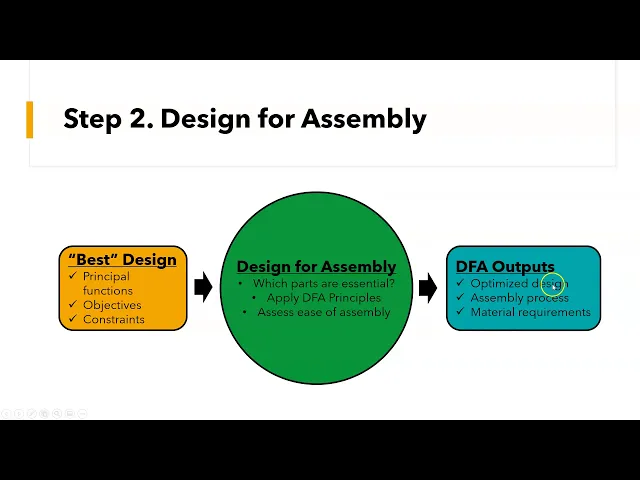
assembly time problems and errors so it looks something like this so we move with our best design right so we have our principle functions objectives and constraints and this gets fed into this design for assembly machine right this is where we have to ask ourselves which parts are essential here we want to apply the DFA principles and we want to assess the ease of assembly the outputs here are an optimized design and assembly process and material requirements so what are these general DFA principles now we're gonna we're gonna get a little bit more detailed here
but general DFA principles apply to whether it's manual or automated assembly all right and and these are these include reducing part count and part types alright we don't want a thousand different parts we want as as few as necessary and we also run that one as few parts as necessary we want to standardize these parts we want to design parts with self fastening features minimize reorientation of parts during assembly design parts for retrieval handling and insertion and sure and ensure access and unrestricted vision during assembly emphasize top-down assemblies design parts that cannot be installed incorrectly
designed for a base part to locate other components design parts with self aligning and self locating features and to maximize part symmetry if possible and make parts obviously a sum a symmetric if not possible alright so you know one of the one of the neat things about this is you know we've probably all put something together or you know built something so think about every time you built something think about the problems that you had and see if any of these principles would help with your your own experiences with assembly now in fact we can
break this this assembly down into three different types okay so we can design for automated assembly we can design for manual assembly and we can also design for robotic assembly each one is going to have a fine-tuned DFA principles right they have so they have key differences between each of these three methodologies so designed for manual assembly we want we can divide this into two areas we can design for ease of handling and we can design for ease of insertion and facet fascinating so remember for manual assembly somebody is going to be picking the parts
up and assembling them into the into the unit or the product so you know we have some figures here don't design things that are too small that are slippery that are flexible that are sharp those are bad no no's design parts that are symmetrical that have pronounced asymmetrical look to it that cannot jam and that cannot tangle so as an example here we have a part the part on the left consists of 19 total parts there are six different operations to get this assembled the assembly time in the study that looked into this was 227
almost 220 seven and a half seconds to put this together the assembly cost was a dollar seventy two cents per unit all right on the redesign on the right look at how simplified this was this was made so we went from 19 total parts to 8 total parts essential parts we went from 6 operations to 2 operations and we cut the assembly time down from 227 and 1/2 seconds to just shy of 84 seconds and then we cut the assembly cost by almost a third right so this is an example of what DFA can do
for you in this case for manual assembly these were all design changes right this this was the original design and this was the redesign early in the design process or design cycle all right the next we'll look at design for high speed automated assembly right so some principles here are guidelines again reduce the number of parts that's a common theme here introduce guides and chamfers that directly facilitate assembly use self aligning parts use a top-down assemblies approach emphasizing sandwiching or layering identify and use a base part again a common thing what we looked at for
the general principles avoid the need for reorientation during assembly and design parts that can be easily handled from bulk right because we're gonna be using a automated assembly right so you can see this in this bottling process here the bottles are uniform and they're of a uniform diameter and the cap is easy to locate and easy to twist on moving on to design for robotic assembly right so in this we want to consider what type of robotic assembly are we talking about a single station with one robot arm or are we talking about the single
station with two robot arms are we talking a multi station with robots special purpose and of arm tooling and manual assembly stations as appropriate so some guidelines for design for robotic assembly include and again reduce the number of parts that's a common theme introduce guys and chamfers use self aligning parts another common theme use self locating parts design parts for handling by the robot gripper use top-down assemblies emphasizing layering avoid the need for reorientation during assembly write and design parts that can be easily handled from bulk all right so once we once we do the
DFA then we want to move into the selection of materials and processes ok so this is an integral part of designed for manufacturing and assembly the designers are always going to be biased towards familiar materials and processes and this is we're doing more heads more designers in can help 2x ban that knowledge base so we want to look for opportunities for manufacturing improvements and lost due to limited knowledge and understanding I think we we talked about this to a greater extent in in our lecture too but early material and process selection product life volume is
huge permissible tooling possible parts shaping and categories of complexity service environment appearance factors and accuracy factors these are all points that we talked about in lecture two all right so then moving on to step number three so so we've we've done our DFA analysis we've reduced our number of parts we've optimized certain things so that parts can be or the product can be assembled as efficiently as possible and we move on to design for manufacturing so now we look at individual parts right so we're looking at individual parts now and we want to apply the
principles and best practices to tailor those parts to specific manufacturing processes so this is going to opt so this is is really for example optimizing a part for machining but understanding that that's going to require a different DM DFM principles and practices than the same part optimized for injection molding or casting or forging or sheet metal bending or any other manufacturing process so each DFM principle that we apply to a part is going to be specific to that manufacturing process so DFM is based on the material the process and the geometry of the specific part
being designed the goal is to reduce manufacturing problems errors and time general DFM principles okay first and foremost kiss the KISS principle keep it simple stupid alright secondly use standard materials and components and eyes the design of the product that is if we have similar designs let's use those pre-made designs right think of a car and how the the chassis or the underbody or even the engine is common between different models so you change just what you need to change and keep everything else standard eliminate unnecessarily tight tolerances use materials that are easy to process
collaborate with manufacturing personnel this is a must avoid secondary manufacturing operations right why because those are timely and costly designed to expected levels of production all right don't make larger demands or higher demands than can be achieved utilize special process capabilities we'll talk about that and avoid process restrictions in in drawings we'll talk about that too all right so let's go let's look at the each one of these a little bit more in particular so the kiss rule or the KISS principle keep it simple stupid do not overly or unnecessarily complicate the design minimize the
number of parts hey that's a concept minimizing number parts complex shapes and manufacturing operations this reduces the cost improves reliability it makes it easier to service and improves robustness of the part of the product standard material use standard materials and components right so use standard parts in standard sizes with widely available materials this eases purchasing it simplifies inventory management improves supply chain robustness and invoice unnecessary tooling expenses if you are with me in my detailing class MDT 110 you know that we talked a lot about this using standard sizes standard parts all that good stuff
standardized product design right for similar products use the same materials parts sub assemblies as much as possible so here on the right we have three gear reducers different models but you know what they all use the same gears they all use the same bearings the only thing that changes is their configuration and the housing on the outside right this provides economies of scale provides better product understanding because we're reusing the product so the engineers designers manufacturing people they really start to know how the material and how the product behaves it simplifies operations and it simplifies
inventory management maintain rational tolerance usage now tolerances serve a point right they allow us they allow the engineer to convey the importance or the lack of importance of some features sizes dimensions geometries all that good stuff but unnecessarily tightening tolerances is is has a negative effect it's counterproductive right it doesn't make the part or the product better just because we have tired of tolerances it actually just drives up the cost and doesn't necessarily make it a better product so we want to use standard tolerances unless tighter tolerances are necessary we want to match the tolerances
to the manufacturing process overly tight tolerances are expensive to produce and to verify because remember we have to verify that that that the part is in tolerance so that means that we have to have somebody in Quality Control checking it use easily process materials I use materials that are common and easy to process using the selected production methods come materials are cheaper to procure and more people have experience using them simpler processing translating directly into less expensive production communicate with manufacturing personnel alright the more people involved early the better that's that's that's kind of common
sense here we want to bring in manufacturing we want to bring in marketing we want to bring in logistics and supply chain people we want to bring in as many people as possible because that means we're making decisions early on rather than late on we're eliminating the chance of surprises all right avoid unnecessary manufacturing operations right secondary manufacturing operations are great you know if we want to make the part look shiny and bright we want to reduce burrs and sharp edges but they add time and they add cost right so minimize the need for secondary
manufacturing operations by using primary operations appropriately and are altering the design all right secondary operations may include certain machining operation conditioning operations finishing operations secondary operations increase processing time introduce potential for error and increase cost designed to expected levels of production ok so this is the economies of scale so if we know we're going to produce something with a very small amount of quantity produced then the cost is going to be hot and we can we can choose our manufacturing and materials accordingly but if we're going to be producing things with with a great number
of quantity produced the cost is going to go down so we can we can choose and and have a better units early on in terms of our dyes make make the dyes more robust because we're gonna be able to spread out the cost of those dyes over a longer time frame for the for the manufacturing process utilize special process capabilities now this one you know it we see this more often than not in plastic parts ok so instead of building instead of building a design or designing something that needs to be screwed together you know
assembled with screws fasteners why not use the basic snap fit designs that we can design in a plastic part right so this eliminates this reduces parts count because we're eliminating faster fasteners it makes assembly easier right so we can build these integrated features including snap fits living hinges there's lots of other ones in here but these integrated features help reduce Park count and simplify assembly avoid process restrictions and drawing so this is actually and again if you're in my detailing class do you've heard me talk about this the this is a rule in the in
in the dimensioning and tolerancing standard asme y 14.5 - 2009 actually it was in before 2009 but I put a snippet of here this is fundamental rule number 1 point 4 subsection e the drawing should define a part without specifying manufacturing methods thus only the diameter of the hole is given without indicating whether is to be drilled reamed punched or made by any other operations so we want to leave the manufacturing decisions to the manufacturing X experts right because they're better able to understand and select the process according to the dimensional and tolerancing specifications that
the designer has so for example I have a part here so we have here you know sawed edge we're specifying drill here and ream we don't want to do this we don't want to specify drill we just want to give the the dimensional and tolerance specifications that are required and let the manufacturing people choose that so lastly you know I didn't want to get into the details here I put this on the in the module where you can all look at this but designed for manufacturing is highly dependent on the process so actually there is
there is plenty of material on design for casting designed for forging design for welding machining sheet metal injection molding additive manufacturing and the list goes on and on so for example and design for casting there's designed for investment casting designed for sand casting for forging there's designed for open-die forging designed for closed eye forging each one of these you're going to want to be well-versed in when you choose your manufacturing process right so when we choose that we're gonna have a part machined we need to go in to and understand and apply the principles of
design for machining for CNC machining not just designed for manufacturing principles in general all right so these design rules guidelines and best practices that exist for every manufacturing process so we want to introduce this early in the design process so that we can make those decisions when it's cheaper when they have the least ramifications for production and for time all right so that is our three lecture series on design for manufacturing or as I called it in the module design 4x okay so I hope that helps you understand the concepts here again this is not
in your book so you're you're really going to be using for the for the homework assignment you're really going to be using these three lectures as always if you have any questions please reach out to me send me an email if I need if you want me to go through anything if you want me to make a video I'll be more than happy to do that I'll be talking briefly in another video about the final exam which is now out in the in the canvas so you can go ahead and have a look at that
it is not a multiple-choice exam it is well we'll talk about that so so gonna have a look at that and if you have any questions please let me know and as always stay healthy thanks bye