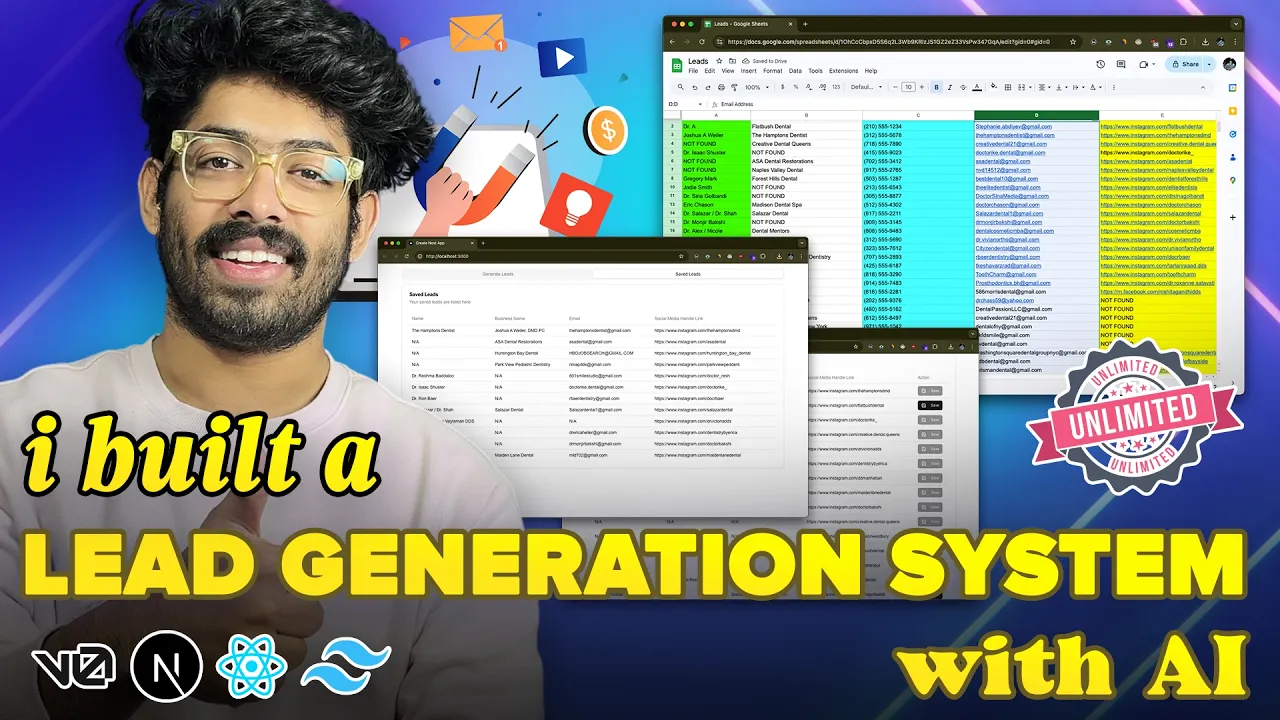
all right so a couple of days back I posted a video about lead generation and in that video I explained how you can come up with thousands of leads using chat gbt and Google search so even though a lot of the process was automated you had to search for different keywords then copy paste a lot of content paste it into chat GPT turn into a table then you'll have to go ahead and paste it into a Google sheet I mean there was like a lot of work involved right but then I thought we have a lot of AI tools out there so why not build a in-house solution or more like an application where we can just go ahead and enter a keyword and our criterias and with the Press of a button the tool will show you a list of uh leads right how cool is that so we don't need to go ahead and do all the manual work like copy pasting stuff between chat GPT and Google search like everything is automated and that's exactly what I'm going to show you in this video so I have successfully managed to build a in-house application or more like a SAS application for lead generation so you go ahead and enter the criteria and the keyword with the press off a button the tool will list all the details like the name contact details email uh business file link and a whole bunch of other details and by the way if you don't want to follow along and create the app by yourself you can I will also leave link to the tool like all the code and everything in the description below so you can go ahead and download it and set it up locally on your mission as well so all you got to do is to grab the gini API key and also proxy details from tulip and you should be pretty much good to go and you can start generating leads like thousands of leads in one hour or so so yeah that's for that all right so to build the lead generation application we are going to primarily use two tools and the first one is v. d which is is like an AI coding assistant where you can go ahead and enter Simple Text prompts in your own natural language and the AI tool will write code for it so this is the primarily the tool that we going to use and next up we will also need to use a proxy and for that we are going to use tulip proxy so if you look we are going to search for Google for a particular keyword and we are basically going to scrape the data and process it and we'll extract the leads out of it right so if you let's say want to do this for multiple keywords and want to generate thousands of leads in a short span of time then you'll definitely have to use a proxy because otherwise Google will straight away ban your IP address and that is something that we don't really want to right and if you are not a tech savvy person and if you're planning to sort of run this application that we develop in your own local machine then also you will need a uh proxy like this because otherwise your uh the IP address of your computer will be banned which will again cause a lot of other problems and for that reasons we are going to use tulip proxy and they provide really high quality proxies that you can integrate it into your app in less than 1 minute now I'll head back to vzer and I'll go ahead and paste a prompt like this so I just went ahead and typed out my requirements and this exactly is that I want to create a lead generation website in xjs here is how it works the user will enter the main keyword site address location and email domain a Google search should be made like site is to uh site address main keyword location atate email. com now the entire content visually seen on the screen on Google search results page should be copied and should be sent to the Gemini API with the following prompt I'm attaching a cluttered and messy data please process it and give the response back as Json the process data should be a table contained in the main columns like name business name email social media handling Etc the API response should be nicely shown in the UI as table with all the required details as for using gini API use the following snippet from their dogs and I just went ahead and searched for gini API dogs and I copied a snippet of code like not JS one this from their homepage and I pasted it in here and that's what you see right here and I don't want any database or other features I want you to implement the entire API functionality as well so I'll go ahead and send this prompt first so this is the starting point I will if you want to I will leave the prompt and everything else in the description below so you can check this out yourself as well all right so wezo has done generating the code and I guess we have a problem over here because uh vzer is trying to use a Google search API for this purpose so I went ahead and said I don't want to use Google API just make a simple Google search and copy the entire content on the screen and use Cheerio and axios for this one so in this earlier uh code that it gave it was trying to make use of this Google Search API which actually is kind of deprecated and also very uh tedious to work with so I went ahead and gave it another prompt and we have an updated set of code right here so this is what we're going to use and the next step is to initialize n xjs project and copy all the code and if you don't already know how to initialize a nextjs project simply just go ahead and search for nexj docs and come to this installation section and you will find all the commands here and the first thing that you got to make sure is that you have not JS 188 or above like installed on your machine so simply click on this link and you'll be able to download the version and just install it to your computer and you should be all good to go and once you have this node Jazz thing set up you can go ahead and copy this Command right here so npx create next app atate La test I'll go ahead and copy it and next I'll open Visual Studio code and just like this right here here and next up I'll go ahead and drag and drop a folder called leads in here so basically this is the folder to which I'm going to initialize my project so I'll go ahead and open Terminal and copy The Prompt that I mean the command that we copied from here so paste it right here and PX create next app at the latest and maybe after that you should also put a dot slash so that that will make sure the nextjs will be installed to this directory or the whatever folder that we selected I'll go ahead and hit enter typescript yes I mean a couple of options will be shown and you can just go ahead and select the defaults es yes Tailwind yes SRC directory yes app router yes and turbo pack no and import alas no now once you select the defaults for all these options within a couple of seconds nextjs will be successfully installed and you can take it up from there so let's wait till it is done all right so the latest version of nextjs is successfully installed and to run it simply go ahead and type npm run Dev and hit enter and it should start the development server in local host 3000 and if you press command and press on this link it should be automatically opened in a web browser like this and there you have it the boiler plate code of nextjs so the next thing that you going to do is to come back to VZ and we'll start copying and pasting all these uh code okay so first we got to copy the page.
TSX file so I'll go ahead and copy the code and replace delete all the file in the page. TSX file right here so inside of the r SRC folder app folder we have a page. SX file I'll go ahead and delete everything and paste the code that we copied from VZ so we'll fix this import errors in a bit and next we need to create an AP route to I'll go ahead and press on this one and copy this code right here so copy and got to create a new folder called API inside of the SRC folder so inside of that you got to create another folder called generate uh leads and inside of that route.
TS and we'll go ahead and copy and paste all the code and to make this thing work we need to install a couple of npm packages so as you can see we need to install axos sherio and also Google generative AI npm package so simply copy this one from here and I'll go ahead and open a new terminal instance and paste it in here and press enter and within seconds axio sterio and generative AI packages will be installed and that should be pretty much it I guess oops we also need to create a new one called env. loal file so I'll go ahead and click it so this is the this is where you need to put your a Gemini API key I'll show you show you how to generate one in a second but for now press anywhere in the root of the project click on the create new file and env. local and hit enter and paste this right here and I guess the first step let's go ahead and get this Google gini API key and for that you can open Google and uh simply search for gerini API key and click on the first link get a gerini API key and you'll find an option that says get a Gemini API key in Google AI studio and this is 100% free so you can go ahead and log to your Google account and you should be pretty much good to go and I already have a API key right here and if you want to generate one simple the option that says uh create API key it will ask you to select a project from here and once you select you can go ahead and generate a key and now I already have a key right here so I'll go ahead and copy it like just like so and now I'll come back and replace your Gemini API key with my key right just like this all right and now if we have a lot of components that is missing that is we have to install the button input and table component from Shad CN so simply just go ahead and search for Shad CN uh like go to this website click on docs and installation nextjs and copy this Command right here and I'll go ahead and paste it and install Shad CN just leave the defaults uh okay all right um next we need to install a couple of uh packages so I'll just go go ahead and select this button from here and next up I'll copy this one as well and paste it in here now in addition to the button we also need to install input and table so I'll go ahead and select button input and table oops table and hit enter uh just pressing enter all right so all these components are ready and if I save now all these import errors should be gone and everything looks good to me so I'll just go ahead and refresh it and this is the basic app that we have generated we have an error okay we'll fix that in a second but for now I'll just go ahead and enter the main keyword let's say dentist site address let's say instagram.
com location I'll put New York and email domain I'll put gmail. com okay so let's just go ahead and test this I'll go ahead and click on generate leads and we have an error unexpected token doc type is not a valid Json copy the entire error code and go ahead and paste it in v0 and I'll just go ahead and hit enter all right so we have the updated code I'll go ahead and copy this one from here and head back to our Visual Studio code and replace the entire content in the root. TS file and I'll give it a save and hopefully everything works now heading back to our app I'll refresh it and let's enter dentist site address let's say instagram.
com location I'll put as New York uh email domain will be gmail. com and let's hit generate leads and yes a request is made to our API so let's wait if it works let's see and boom there you have it we have the name business name email social media handles and all these details and everything just works as we want so we have some dispares and errors with the name and everything is not exactly correct but this is a good starting point and now if you notice we can only see about 10 results right here right so let's say you want to see a 100 results all in one page all in one single go uh I guess you already know about this trick so for example if you search for something let's say Google and if you make a search and if uh by default it will only show you like 10 results on this page but if you open the URL and put uh ant num is equal to 100 at the end of the URL and if you press enter it will show you 100 results in the first page of Google now we want to implement the exact same functionality when uh the API is making a Google search so all you got to do is to open vs code and if you look at here we can see a thing called con search URL is equal to and this is the URL right so I'll go ahead and enter the exact same thing here as well and num is equal to 100 and I'll give it a save and if I repeat the exact same search now where is it yeah if I repeat the exact same search right now it should give us results for 100 pages I mean 100 results but it will take a little longer than usual so let's wait and if you look we can see we have a lot more details right now the results for 100 pages so we have the Instagram handle link we have the email we have the business name then we have the name or the name of the location again it won't be 100% correct but it's a great starting point and now that we have the basic functionality working the next step is to implement the proxy functionality as you can see we are searching for about I mean we are trying to get about 100 results in one search and we going to repeat it multiple times right for different location different keywords different email and all of that right so this is the time for us to implement the proxy functionality to our app so first thing that you got to do is to click the link in the description below and head to this page T. O so this is the proxy provider that we're going to use for today's video or today's project so you can simply sign up for a new account and once you're logged in simply go to the dashboard and once you are on the dashboard if this is your first time you will find a page something like this and you can click on an option that says buy proxy or something like that and upon clicking that it will take you to this page and you have a couple of options here we can get a shared data center proxy dedicated data center proxy static residential proxy or rotating residential proxy so you can use any one of these for our purpose I'll go with the rotating residential proxy this one right here and for the duration we have weekly monthly and quarterly terms so you can uh build it as per your requirements so let's uh so the first thing that you got to do is to buy and add a rotating residential proxy to your account and once you have added that you should find something like this and the first thing that you got to do is to click on this option that says generate proxy and click on the option that says configure proxies so I'll click on it and wait all right so a proxy is configured and they are giving us the code to use it so since we are using nextjs or JavaScript basically we'll go ahead and select the option that says node.
js and I'll come scroll down a little bit and copy this area right here that says uh con proxy is equal to and whatever details so I'll go ahead and copy that one and now I'll head back to v0 and I'll go ahead and say Implement proxy in our API and I'll paste the code right here use the above given proxy in our app when making Google searches all right and next up if you look you can see an option that says country and session so the country as I'm searching for leads from you uh the US I'll go ahead and put us and as for session let me put let's say five all right so the good thing about this one right here the rotating residential proxy is that each time a new request is fired from this proxy a new IP address will be shown so basically even if you try to do a lot of request in short span of time everything will be fired from different IP address and this way you will get a lot more uh results from Google and also your IP will be protected as well so I'll go ahead and click on send and let's see what it comes up with hopefully it should give us the updated code with the API implementation so let's wait all right so VZ has done generating the code with the proxy implementation so I'll go ahead and copy it from here and I'll go ahead and paste the new code right here and one important thing that you got to do is to uh where is it find the Google search URL and put the ant num is equal to 100 thing right here so because we want to uh extract 100 results from each uh Google search so I'll put and num is equal to 100 and that should be pretty much it all right so everything is pretty much done so I'll go ahead and open our app and this time I'll go ahead and say Realtors then site address I'll put as instagram. com location I'll put New York and Gmail for the email domain and I'll click on the option that says generate leads and wait for a second and yes we have our API fired up Google response status is 200 and fetching the results for query so whatever uh keywords and all the details that we sent and indeed our proxy is working which is also a good sign so let's wait and see all right so we have all the details that we asked for so we have a lot of results with this na thing so that's obviously unavoidable and the thing is that you need to filter out all the results by yourself so we have the name the email and the uh Instagram handle ID so that's a good thing so it actually kind of works so we have all the details right here all right now that our application is working the core functionality is working and the proxy implementation is also correct another feature that I want to include in our application is that after our application list the contact details and all of the details of all the leads I want to show an option that says save right next to each of the entries so I should be able to press that save button and upon hitting save all the entries that I saved should be uh accessible from saved section all right so I should be able to go through the list select the leads that I want save it and I should be able to see all the selected list in one place so let's just go ahead and Implement that functionality first so I'll open v0 and I'll go ahead and say I want to add a save button uh right next to each entries and upon clicking save the entry and all other details should be saved to the saved section add a navigation bar to the top to access the saved leads all right so I'll go ahead and hit enter and let's see the we is writing the updated code for the page. TSX file and I'll wait till it is done all right so we have the updated code so I'll go ahead and copy the code and replace the content in the page.
TSX file just like so all right so we need to install a new Shad CN UI component called tabs so I'll go ahead and open Terminal and put npx SN at the latest ad and simply put tabs and hit enter and let's wait for it to install and boom that's done all right so importer is gone I'll go ahead and refresh the app and we have a saved leads section right here so let's just go ahead and make an updated search I'll go ahead and put the main keyword as Realtors site address as okay let's try facebook. com this time and location let's put New York and domain let's put gmail.


![I Created An AI VOICE AGENT In 5 Minutes [600ms Latency Only] - Millis AI Tutorial](https://img.youtube.com/vi/fvr60grSrK8/maxresdefault.jpg)
![I Built a $1M AI App [No Code]](https://img.youtube.com/vi/IZsQqarWXtY/maxresdefault.jpg)