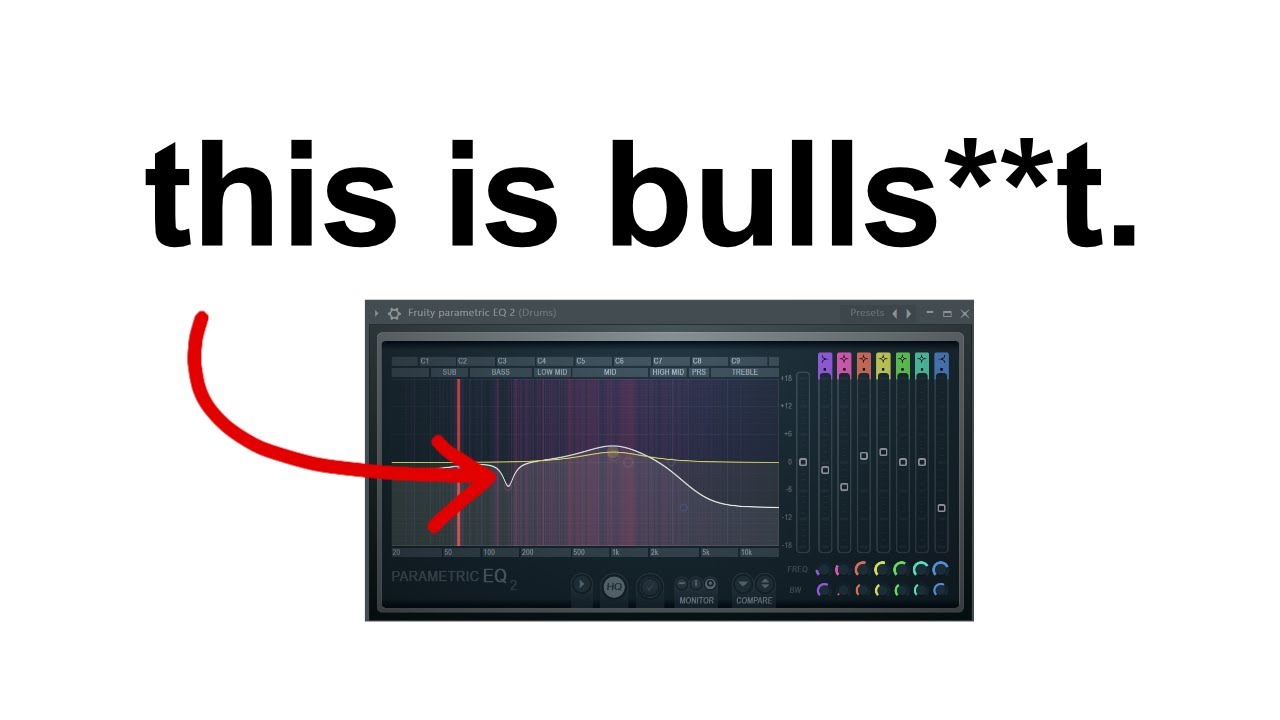
hello there welcome back today I want to talk about snare and I want to talk about eq'ing snare and I just want to highlight a few small handful of frequency areas that you can go to to quickly get your snare um sitting in the mix a bit better than what it might well be doing at the moment so this is also a follow-up video to the EQ and Kingdom video so if you haven't seen that I'll put a link to that up top somewhere and you can check that out this song as a quick review is a simple uh country Americana Style song and there's not much to it at all we've just got a nice simple drum kit we've got a tambourine bass guitar a couple of electric guitars an organ and a vocal I'd like to thank Steve Payne for allowing me to use these multi-tracks to be able to demonstrate this these EQ techniques to you so the snare coupled with the kick really important aspects of the drum kit and I tend to just go to the same frequencies over and over again to get the to fix any issues with the snare and to fix any or enhance any nice qualities of the snare so that it cuts through the mix and regardless of the snare and the recording uh sometimes and the mics used these frequencies are what I tend to keep going back to now rather than me giving you specific frequencies I'm going to give you a small range of frequencies that you should keep in mind to go to to accentuate certain aspects of the snare drum I'm drums being drums they basically have a similar wave shape in that they are hit with an implement and they react pretty much the same way in that you get that initial Spike or that transient which is equal to the snap of the whatever it is the drum the snare the skin the the beta head hitting the head of the kick drum so you get that initial Peak and then you get um the tone of the drum and then the decay of the drum those three aspects of the drum are what we think about in our head when we're going to go and apply some EQ those three areas coupled with a couple of uh kind of safe choices um housekeeping choices uh will really help how your overall drum kit sounds in the mix so let's get on with it shall we let me solo these drums which will lead off from the the kick drum um video take a listen to the drum mix and listen to the snare [Music] so it's actually a really nice sounding snare uh at first listen you may think well there's not an awful lot I need to do to that and that's great but it's so it's such a good sounding snare perhaps there are elements of it that we can enhance and perhaps there are elements of it we can just look for to try and tidy up now I'm a big proponent of if you don't hear a problem don't go looking for one so let's listen to this in the mix and see if our perception of the snare drum changes [Music] can we count on you for just a little dull [Music] I said I think I left the oven on I gotta go [Music] in my house burns down I'll be out in the cold [Music] okay so it's holding its own it sounds still sounds really good but I think uh what's happening is that when all the instrumentation comes in and then certainly when the vocal comes in and we get into the chorus we um we still hear the snare book just feel as though it could do with a little bit more life a little bit more Sizzle and snap so let's dive deeper into this snare and try and add some of that bring some of that life back into the snare let's listen to it in Solo [Music] and then let's listen to it with the overheads [Music] so quite clearly the overheads are uh providing a lot of the main tonal characters of that snare the dryson air on its own [Music] so it's quite sort of short sounding we get the snap we get the stick hit but the actual length and uh Sizzle and uh sustain of the snare is happening more so in the overheads [Music] the overheads are doing a great job of capturing the entire drum kit and um are giving us a picture of how the drums sounded in the room so it'd be nice to find some of those qualities in the close mic that we've got captured here so I spoke about the uh the transient the initial hit the smack the the the stick on the skin of the snare and that is what's going to get uh that's that's what's going to focus the snare that's what's gonna pull it out and have uh the listeners ear detect it in the mix the Chow strip I'm going to use today is the Neve on the kick drum I used the SSL but today I want to use an eve Channel strip because I want to highlight the benefits some of the Hidden benefits of using this style of EQ of this style of Channel strip on the kick drum we use the SSL 4000e and I spoke about the benefits of using that channel strip there so again go back to that video and have a look at that for the lowdown on the SSL Channel strip but the main difference between the two apart from any tonal differences is that the Neve offers you fixed frequencies whereas on the SSL you can move you can go all in between these frequencies to your heart's desire um and and get more get really into the finer details or work in a higher resolution I guess on the SSL than on the Neve but the advantage of having these fixed bands is you've got less choice or and that means that you can make decisions faster and so that's something I I really love about working with these consoles so let's solo up this snare and first of all work on the stick attack and that area is here so uh we're looking at between 1. 5 K and in this instance 8. 2 K well on a snare we're looking at somewhere between 2.
7 and 3. 3 maybe 3. 9 I like to start at 2.
7 on the snare the one of the driving factors of deciding the final frequency to use here for that stick attack is the frequency that I used on the kick drum for the beta hitting the skin there so what I like to do is choose a different area if I'd chosen 3. 3 or 3. 5 for the kick then I would more likely see if I can make 2.
7 work or 2. 5 work as an alternative so that they're both sitting in at different points in the frequency spectrum and therefore can be differentiated between a little bit easier by The Listener and add to that separation element so uh let's see what did I do on the kick drum well I chose 3K on that kick drum so on this snare I'm probably gonna look to see if I can make the 2. 7 work it doesn't feel like that's an awfully long way away from three kilohertz and it's not in reality so uh let's have a play around and see what we can find on this snare that's going to work and hopefully give it some point of difference uh from the kick drum so my method of working here is to listen first of all to the signal without applying any EQ in that band so I'm not boosting or cutting I just want to listen to it as it is and then I'm going to do probably a bit of a boost and then start to move around the frequencies here the frequency choices here and decide what I think sounds best [Music] so you can hear how tonally the three points sound a slightly different to each other and in Solo it can be hard to make that decision which one to go for and as we discussed earlier the overheads have got a huge impact on how this snare sounds so I'm going to make this decision with all the drum solos I'm just gonna listen to the drum mix here and decide which frequency I'm going to choose I'm going to zero this out again I'm just going to do a bit of a bit of a loop there an untidy Loop probably let's listen to this [Music] [Music] okay I felt for sure that it's somewhere between the 3.
3 and the 3. 9 that was giving me that attack that stick attack so let's uh zoom out a little bit here and listen to the whole mix and decide which one we're going to keep and again I'm going to do this kind of zeroing uh zeroing out the gain so that I can take stock of the sound in the entire mix uh in its natural state before actually deciding and applying the EQ start here at 2. 7 [Music] foreign [Music] thank you [Music] okay I think I'm gonna go with 2.
7 because it felt more Woody and it felt more like the stick and also I can add more air and shine in a later move when we go to the higher frequencies here so let's dial this in properly foreign [Music] I like that sounding really cool I like how it's bringing more Focus to the snare rolls as well it's really pulling them out of the mix and I love that sort of stuff so that's the snap taken care of that's the stick attack now I've given you the areas there on the Neve to audition between and that's uh the the 2. 7 the 3. 3 and the 3.
9 that lower quadrant air and the great thing is that you can you you saw me do it is that you can select a good a healthy boost and then just flick between those three choices and decide which one is working best for you um on the SSL you can obviously do the same thing but your sweeping between every frequency between 2. 7 and 3. 9 um and so it's all the more important when using the SSL to use your first instinct I guess and not overthink and just choose what sounds best to you problem frequencies on the snare tend to make it sound uh boxy and so we can certainly go in here and have a look and see if we've got that issue on the soloed snare boxy frequencies tend to be around about 500 hertz can go up as high as 700.
let's use that technique of uh doing a little bit of a boost and flicking between some Choice frequencies here on this lower part here to see if we can find some not so nice frequencies to pull out of this snare drum [Music] foreign [Music] so for me that 470 there sounds as all uh just sounds a little bit um well boxy so let's uh go back to zero and play through and start to pull a little bit this 470 out and see how that's making it sound [Music] so whilst that sounds clean in isolation let's take a listen to the drum mix and see how it sounds there [Music] so that sounds really nice it sounds really clean focused pointed but by taking a little bit of that boxiness away that 470 away we're taking a little bit of the way away as well to add some fatness back to this snare and to any snare the frequencies to look at are somewhere between 180 and 220. usually that's where the we can really get that fatness dialed into the snare Neve as well great Channel strip for adding fatness so let's play around with that so down moving down here we go let's set this to 180. but what you notice is um our next choice is 330 and the choice below it is 100.
so we're not quite got the flexibility here as we do with the SSL to be able to really move around that to 20 to 180 Zone to find our sweet spot for the uh for the body of the snare before we start applying boosts to this lower end of the snare drum we need to establish that this snare is actually um in fears with the rest of the kit so let's try that out [Music] [Music] and quite clearly you could hear there when I selected the fears button here the polarity button on on the channel strip we lost all the low end so we know for sure that our snare is is in good order here and we can happily boost away in the the lower end of the snare and hopefully make it sound a little bit fatter than it does right now so let's set this to 180 apply a boost and see if we can enhance the sound of the snow [Music] that sounded pretty cool to me it's sounding really nice whilst we're here in this area the lower end of the snare now we can start thinking about tidying up a little bit with a low cut here we've got options we've got 27 we've got 47 we've got 82 and we've got 150. 150 is plainly gonna be a bit too much for a snare it's going to start and make it sound a little bit weak so we're really looking at somewhere between 82 and 27. let's just solo up this snack and see what this local will do [Music] [Music] what's actually happening there is you can you can hear its effect on the spill of the kick drum as well it's not such a problem on this track but that's certainly an element to think about if you're working with tracks that do have um a significant amount of Kick Drm bleed on the snare then that will inform your decision about how far you may want to go here with this low cut I certainly want to preserve the body of the snare as much as I can and in this instance um it's just a matter of housekeeping really just to take away the very sublers and any rumbles that may have been introduced uh just naturally playing a drum kit [Music] in this instance I'm gonna uh ER on the side of caution and stick with 47.
sometimes I'll go up to 82 but I did feel as though that was taking a little bit a tiny bit out of the lower end of the snare just noticeable so I'm for the as a starting point I'm just going to go with 47 and be happy in the knowledge that any lower rumbles are being taken care of so as a recap then on that parameter you're looking at anywhere from 27 to 82. 150 is just too much for a snare and starts to really cut into the body the tone of it so 82 I would say is about the max you want to go when you're cutting the low end of the snare foreign so what we've done so far is we've done a couple of cuts the 47 Hertz cut and then the 470 Hertz cut to tidy up and tighten up the sound do a bit of housekeeping we've done uh two moves two enhancing moves and that was at 2. 7 for the stick attack the woodiness of the stick attack and then at 180 to bring some of the body and fatness back to the snare so now it'd be nice to try and bring a little bit of air into the snare and by air I'm talking about sizzle I'm talking about that perception of sustain that you can get by boosting some of the higher frequencies in the snare track we're looking to bring back a little bit of that sort of crack or snap of the snare as well again this is something to do in the context of the mix if you can and you should so the go-to frequency here on the Neve to do that is going to be this 10 kilohertz shelf filter here so uh it could be that we go up to 15 we can try it at 6.
8 but let's start off with 10 and see what that does foreign [Music] because we're listening to it in the context of the whole mix and we established early on that the overheads were providing an awful lot of the nice tones to this snare and it was picking up a lot of the high frequency as well so we only needed to boost a tiny bit there at 1. 5 boost at 10K and let's listen to the snare in Solo and examine this 10K boost a little bit more [Music] so you can really hear that's not a terrific amount of boost of gain that we've applied to that 10K shelf but it really does make a difference let's just try at 15 and see what that sounds like [Music] foreign so obviously you can hear that there's more high frequencies being excited there because 10K and above on a Shelf versus 15K and above on a shelf so for the in this instance in the instance of snares generally if you can go anywhere from sort of eight kilohertz to to 10 to possibly 15 then do that there there you're three that's your quadrant there to try to get some of this Sizzle snare wire sound sustaining sound come through on the snare to get it to pull it through the mix so I'm going to zero that out again and I'm going to play the mix again and then I'm going to just dial this back into taste [Music] okay I'm happy with that just 1. 5 DB boost seems to be doing the trick there and I'm going to stick with that for the duration of of this mix one thing I am missing slightly is a bit of that body on the snare just feel as though we've lost a little bit of that of fatness so I'm going to revisit this 180 Hertz boost here see if we can play around with that and and find out the right sweet spot there for this snare thank you foreign [Music] as the loop tantalizingly was teasing us into the chorus I do want to check the chorus because that's where the the snare is being played the hardest and therefore the tone of the drum itself will change so let's just check that out thank you [Music] the more we boost that 180 Hertz the body the fatness there the more we lose the the crack and definition of the top end that we've dialed in so it's a fine Balancing Act once you've added a bit more fatness you may may certainly have to go back to the other parameters and it's just it's you're just going in circles all the time until you find the right balance because that's what we do is mixed Engineers where balance Engineers that's our job so let's uh revisit I'm going to revisit this chorus one last time and try it and get and find that balance between the crack the sizzle and the body [Music] thank you [Music] Telltale sign for me is at solo that solitary snare hit at the end of the chorus [Music] foreign [Music] when I start to get past about four DBS of boost there at 180.