hey there o doers Jose ignasio here today we're going to see how Jose's beastro or JBS manages its processes now this place happens to be a restaurant located in downtown Santa Cruz and it's a special spot for locals that manages a short but beloved menu with options that anyone can get behind doesn't try to be something it's not like grapefruits uh I'm looking at you at JB's everything from the employee schedules and even just cooking their dishes needs a fast-paced approach so they use ODU to make sure that they don't lose to that new burger
spot that opened up we don't like them with ODU they succeeded in automating many of their processes making things far easier and more efficient I think it's time for us to dive into JB's daily life with ODU I'll see you there enough chitchat in a restaurant there are many different jobs owners waiters chefs dishwashers the list goes on but it's vital to organize schedules according to avoid an empty shift or a double dub shift for someone so to manage this Jose's Bistro uses odu's planning application so let's actually hop into the right now okay so
to save some time I've actually gone ahead and set up the previous week's schedule so that we can just edit it as needed this is going to be important for what we're going to head into so to start I have all of my employees over here on the left and I just want to say this makes it look really easy this happens to be listed by name and you'll see above the employees are open shifts as well so this view that we're in is an overview of the schedule which right now I'm viewing by the
resource aka the employee they are our resources if I would like to view it by roll I can actually go up here to the top and schedule and then choose by roll but for now we're going to go back again to Resource okay so this view Itself by the way if you're wondering is called a Gant View and it is incredibly useful for a few reasons you're going to see that right now so I'm going to go ahead and make sure that I don't have any notes that apply to this week so I can actually
click into the shifts like this one here and I could see a nice not very friendly note but it lets me know hey I should watch out for this so you'll find the notes appear right here in this case with a message bubble icon on the shift if you see it at the top you know that there's something going on they can be pretty basic or as informational as you need them to be you're also going to find all of the open shifts as I said on this overview and if I wanted to here's the
fun part I can actually drag and drop them for any employee and if I'm feeling even lazier I can actually hold down the control key right now while moving it and I have just duplicated it this can save you time depending on what you're doing and while I'm at it you probably notice that holding down the key open up the shortcuts that you can also take advantage of you got this nice little visual that shows them around okay since we're here I'm actually going to go ahead and create a shift by hovering over the day
that I want and then the employee and just clicking on the empty box there we go okay so of course schedule conflicts can still happen happen in that specific case a warning is displayed as a result on the shift as you just saw me very eloquently create now unpublished shifts as well will appear striped like we see here but then let's assume that JB's planning is ready when that happens the manager actually just has to click over here at the top on the publish button and that sends out this week's schedule to the employees now
the nice thing here as well is that the arrow next to this also allows us to copy our previous week as well as Auto plan to learn more about those though so please check the description below for our sweet docs so let's click it and once we do that the option to send and publish will appear inside of this pop-up window the option as well to include open shifts is an option that we can select I have it right there already set up and we're going to do that right now but let's talk about availability
if an employee happens to not be available for the shift they can request a shift change that has to be validated by the manager you're going to notice now that the schedule is published all those stripes are gone and I love these pastel colors so now that the planning has been sent employees can get to work which means that orders will be placed and waiters and Cooks need to communicate I think we can all agree that most of us here are visual Learners I mean you happen to be on a YouTube video and I happen
to always show you a lot of these things in theory so I think it's time for us to grab our hat and head on over to Jose's beastro so I can show you what this all looks like on a tablet so I'll see you right there [Music] welcome to hodu POS here when open the front end offers an overview of the floor's map here we have the main dining room floor as well as our patio we can actually toggle between them by selecting them just like this this is particularly useful when working with an iPad
or tablet to take orders from table to table here's a helpful tip the POS can be updated on the Fly and these tables can be moved and they can also be removed as well as being added let me show you how to do that in order to start we're going to select our main floor then we're going to select our stack icon and then we select edit plan for my example I'm going to select table seven now if I touch these white dots I can actually drag them around to change the size of the square
but I'd like to direct our attention up above the very first option allows us to change the tables to the shape of a circle allowing you to cater to a non-square floor map kind of like table six down there speaking of maps our next option allows you to upload your own table map this allows you to bust out that sweet design you paid for or maybe you needed to save some money and you used AI to save even further time ODU doesn't care but it let you carry those options options like changing the number on
any one of these tables with this rename button and if you like the table so much well let's assume that you want to duplicate it well we've got you covered with our clone button over here this allows you to stamp across all the tables that you've been duplicating and save further time but let's assume you messed up well here's this trash icon and you can now Erase Away Your mist Stakes just to add a table once again with this table button now that we finished talking about these options I think it's time for us to
zoom out you probably noticed I skipped one of them well that's because this button coming up allows us to change something very important when selected we can change the number of seats with this little people Icon 137 it does not matter how many people are on those seats once you hit okay it's saved and just like that now that we figured out everything to our business I think it's time to hit safe and Pat ourselves on the back it's finally time to order so to do that we first select a table like table three here
we are greeted with a large selection of items you don't have to scroll through it all instead you can select a category at the top such as drinks or maybe you just want to see food or both again because you're indecisive we could do it all so let's get started adding items like this espresso and you know what what goes best with coffee Seafood so let's add this salmon now the table wants Italian so how about we s like something like this pizza now we're greeted with this ODU lets you configure additional extras in things
like combos with drinks and sides so for this pizza I'm just going to go with the pepperoni to ruin the margarita Vibes awesome but let me tell you about one more thing let's assume we add something like the salmon avocado over here which I know comes with a sauce and we've just learned that the person who asked for this has an allergy so we need to modify it so to do that we finally select the kitchen note option and we get this popup once that we click it where now we can manually enter the note
in or we can use one of these preconfigured notes that we set up for the kitchen this can save you time typing so once we're back at this screen over here we finally choose our no dressing option and then once that I do that you'll see it fill in below and we apply now the kitchen will be notified of this modification automatically once the we proceed with sending it through to the kitchen sweet I think it's time for us to talk about the sharpest team here at J's beastro no not that team of course I'm
talking about our kitchen staff so let's head into odu's kitchen display once that this loads we're going to select our preparation screen and inside of here keyo doers can see that not dressing has been color labeled as a predefined internal note along with all of our orders we have sent so far this allows Chef to immediately see what's ready to go and wait staff to also see what's been completed each of these orders only require simple clicks to move between stages making certain weight staff and kitchen staff don't waste any time that was a free
joke with that time we just saved o doers you treated someone to a meal and they ordered stuff out of your budget so there's only one option you'd like to split the bill well thankfully Odo has you covered let's assume your waiter comes by to check on the table so they decide to go into actions and double check the count for the table and make sure it's two and then they decide to go back into the actions menu because this time you've told them I would like to split the bill now on one side they
see the items and they are told which ones to select and then they just split the order awesome now we have the two orders and the current screen has changed the paying for just the two items we selected the forb at the top lets us know this is one of the split orders for table four we can now go and process the payment for this order and then process the payment for the remaining order however they've told me they are not ready to to pay yet so let's get out of here and direct our attention
to another table that's asking for their bill so table 12 has entered the chat they finished eating and they want to pay their bill we let them know at this stage how much it's going to be per guest they decided to pay it together unlike that other table they begin to hand cash over to the waiter who takes it back to get them change thankfully ODU calculated the change for US based on the bills they used at this point the waiter returns to offer them their full receipt over here in two forms both printed and
email awesome what is a good POS system without items to sell like how do we add a product like this bag of chips or perhaps this soda we start by clicking in the top right corner to open the menu and selecting create a product from here you can begin typing up your product's name and to Begin work on the other options as well we're going to add a Pepsi now the first option we have here is the barcode section which allows you to input barcodes using the tablet's camera or a connected device heck you could
even type it in manually you can also track products if you'd like using the check box below if you also happen to have a nice pict picture the item you can use the pencil icon in the top right corner to insert your image here then when you're done with that you can select a posos category for the product to have it show up in those specific drink or food sections that you saw earlier for our example I'm going to place the Pepsi into the drinks category because it is a drinkable item finally once you're all
done you just click out of here and select save and you're ready to go without having to go into Odo inventory couple clicks was all it took nice Jose's beastro is in Santa Cruz California you might be wondering about this screen no not that screen how does a customer leave a tip do we leave a tip tip culture itself is a big question these days one that I do not have a direct stance on if the customer is paying via credit card the tip can be added to the bill afterward which is common in North
America tipping a ODU is simple make sure tips are enabled in the POS settings and tap on the payment button then tap on tip type in a beautiful exorb tip and hit okay and now we're ready to process access our payment the normal way with validating it and we're done good job it's finally that time you've finished your shift or perhaps need to get out of this POS session to do that click the icon in the top right corner and select close register here we are shown a snapshot of today's transactions as well as the
option account cash Odo kept track of every transaction so we didn't have to do much now then let's select close register good job you finished everything now get out of here here well that sure was a lot of helpful visual aids I hope me doing it on the iPad was pretty fruitful for you but how do we make all of this possible well to enable notes things like tips Printing and everything you actually want to go into POS and then select configuration and settings then pick your options there it's really that easy but if you
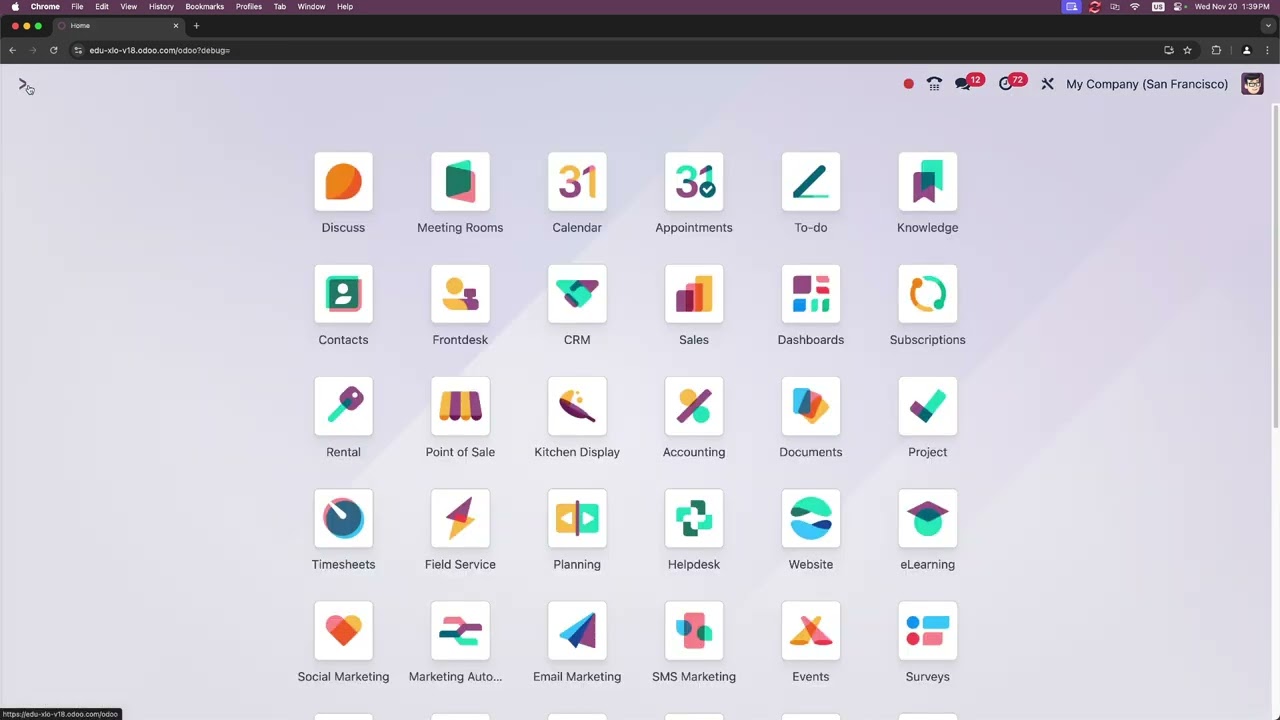
need a little bit more help I'm going to try to leave a better detailed help guide at below and side of the description so be sure to check that out just kidding I'm actually going to cover that right now so back here on odu's Main dashboard let's open up the posos app and then select configuration and settings perfect so inside of here if you happen to see a yellow banner up here at the top like the example that I'm going to show right now on the screen as well as options that you see that are
grayed out you will actually not be able to change them until you finish closing your open register so how do we do that Jose ignasio well you do this by following the steps the previous chapter in this video to close out your session and in this case just close the register so once that you've done that and you're back here we are in the restaurant mode section now make sure you have these boxes that I have checked out so that you could follow along you will see that we have access the changing floor Maps as
well over here on the right and you can see my main floor and my patio that I showed earlier as well as an internal link to go see those floors and do some other edits if you will but let's move a little bit forward because the next section that I wanted to point out is actually right here these payment methods now I didn't cover them in great detail because there is a lot to choose from depending on location and availability changes to this list are going to be reflected directly in the posos payment and order
screen and Below them is also an internal link you can follow to set up more payment methods or edit your existing payment methods and let's actually click on that so I can show you that there you go nice little list back to settings over here using our breadcrumbs which are restaurant breadcrumbs so back over here let's scroll down over to payment terminals because and it's really down here all right so here we are at payment terminals now I wanted to actually talk about this and the connected devices section because if you have a current payment
terminal such as you know stripe then this is the area you're going to want to select it at then finally below this at the section you can actually toggle for things such as a customer display in case that you'd like your customers to follow along with you as you check them out and that can be set up as a posos device as well as iot boxes and printers here and you can even upload your own nice little picture right there just to customize it even further and make it a bit more personal so there's many
options and settings to personalize your own posos experience but I wanted to share the ones that I had on for our example this database itself was created using the ODU Industries link for fine dining so you can actually have a go at a similar experience without having to figure out the setup it was essentially the stock experience with the exception of our Pepsi Edition all right now let's go back to the other Jose ignasio now once that you have all of that set up and you've set up your products your table layout as well and
your printers your customers can start ordering and that's it for today's presentation on JB's Restaurant and the Odo POS planning and inventory application to learn more about these specific applications I encourage you to check out more of our e-learning videos thanks for tuning in O doers I appreciate apprciate you all if no one's told you this today you're doing great you're learning ODU it feels like a lot at first but if I can do it I think you can too