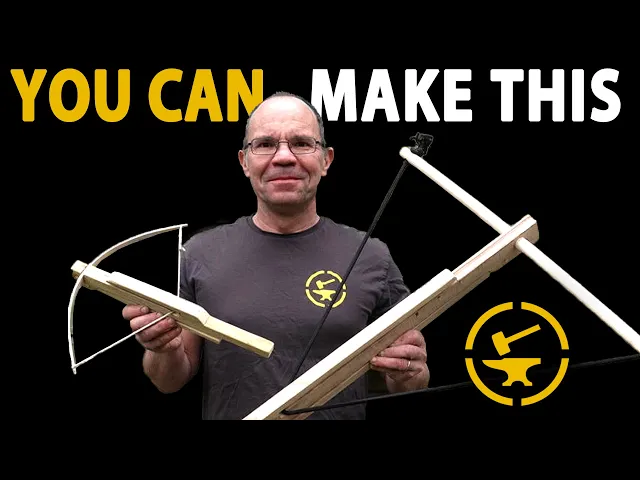
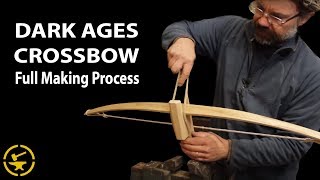
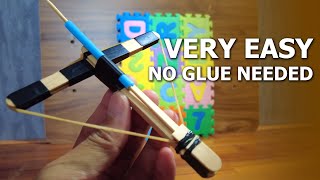
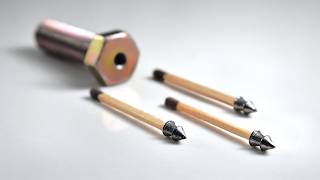
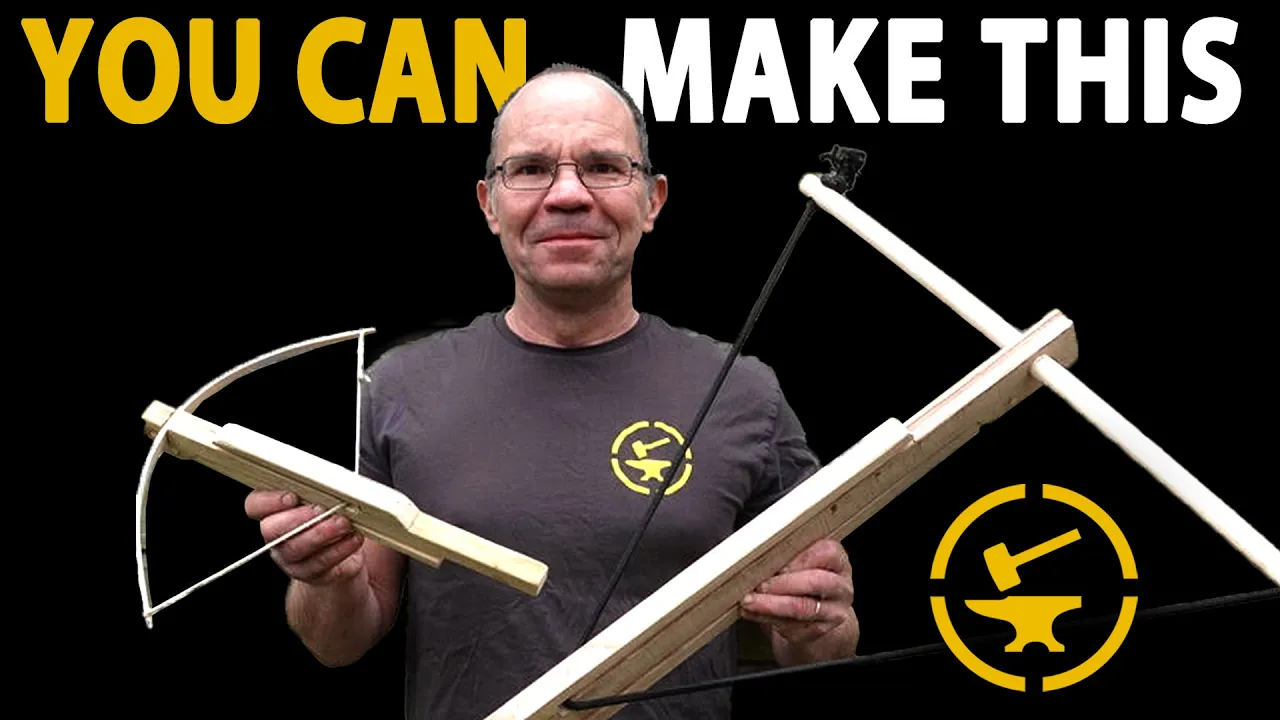
Hi it's Tod at Tod's Workshop and Tod Cutler here and today we are going to make the simplest crossbow ever, based on something called the Skane bow and here is little scale model one good for messing about in the living room and it shoots pens or pencils. So what is the Skane bow? Well the Skane bow does not look like this to be fair, but it's similar, it's very similar.
It's an early 16th century Swedish bow that was recovered from a lake, possibly after a peasants rebellion I believe, but either way it was made to be purely functional and quick and easy and cheap. I've used deliberately the worst bit of timber that I could find around my place, it's a bit of old garden boarding. The only thing that really matters on this is the bow.
I've made the bow here in a very simple way and I'll show you how to do that but you could do this with a bit of garden cane, bamboo, fiber glass fence post, even maybe a bit of U PVC piping if that's what you do. The other thing that you can do is you just put any old bit of wood in here then you put elastic bands or bungee cords on it. You can build it small.
You can build it big. That one's great for shooting a little cardboard men off your cardboard castle on the kitchen table. This one's great for shooting targets in the back garden.
Just go and make one. During the build I've given you some of the dimensions and it should be enough for most of you to be able to build it. If you want exact dimensions and exact set drawings go and follow the link in the description.
First we measure the stock. Now I've done it four centimetres just a simple mark here, I'm just dragging out a straight line. Five centimetres in here and then about two centimeters from here to here so about halfway down.
So now we are going to cut with our saw along that line, that line, and that line there and now becomes the main stock of the bow. Just gonna cut the diagonal now. The next is to cut the trigger piece.
I can use this black line that I've already drawn. We have the stock and the trigger, but I want this trigger to be a little bit shorter, so about here. So I'm just going to cut the end off.
Now we have to allow these two pieces to rotate. So what I need to do is to cut a tenon on here and a mortise on here. So what I mean by that.
Let's cut it like that and then we'll cut a slot on here so the two fit together. We need to cut the mortise into our stock. It's a little bit awkward this sawing and be careful of your hands.
So you can see I have two cuts now. I want to remove this, if you have a chisel it's easy, if you don't have a chisel, we put another cut in. So I need to remove these bits of wood now.
So I have a Stanley knife or craft knife and I'm carefully slipping under, careful of your hands. Now if you have a chisel this is much easier, I'm trying to do it with the least tools possible. So I've removed the wood, and then this, fits in now, so it can move.
Now what we can do is just cut a slight angle on here just so that it fits a little nicer. So just remove those, I'm going to trim very carefully. .
. . .
good enough. And there you can see. So what I need to do now is to drill a hole and make the pin so that these two pieces can pivot.
I'm just going to put it through there. I have now drilled everything in place and I'm going to make a dowel for that. I'm going to cut another piece of wood from here and then we're going to turn that into a square and this will become dowels that we're going to carve.
Then we're going to carve this round. Now we have a rotating trigger. The next task is to put the trigger notch in.
That is 19 centimeters from the front which is just under 8 inches. We want to saw a little notch, maybe six/seven millimeters deep. So just put a little saw in and now I'm just gonna cut the corner off here.
Just trimming it up a little bit. We have to notch, but these little corners here, I'm just going to cut them off with the saw and then clean up with the knife. I've just cleaned off the corners there.
The next thing to do is to drill down straight through this top stock and the trigger with our drill. Now we have a hole through both components and we're going to make a pin for this bottom trigger. Again by carving a piece of wood.
So we have our our peg and it fits into here but it's really tight I can't move anything, so we're going to dismantle this and then fix this pin into place and then carve it. So I can now put that pin back in and I'm going to saw it off at this point here. But our pin does not go into the hole anymore.
So what we need to do is put the trigger and this together and the pin does not need to come any higher than the top of the stock, so I'm just gonna cut it. So we're gonna put it back together again you can see it still does not fit and that's because this is on a curve so we're just gonna elongate that hole. I'm gonna put the drill back in and I'm just gonna do that a little bit with the drill.
I'm going to rock it back and forth and that will open the hole up a bit. Then you can now see. .
. opens and closes. So that is what we're going to use to push the string out of the notch.
If you're very tight with this fitting you don't need the glue; glue always helps. But the problem now is I can open it too much and I don't want to do that, it makes it harder to get in. So I'm going to drill through here again, about there and put another pin in.
But the idea is that that creates a maximum opener so I hold my trigger pretty much so the pin is just below the surface here. About like that and now I'm going to drill a hole in that position and put another pin in. It will all become clear.
Here is the stock now with this extra pin at the front and you can see it no longer opens anymore than that and this stops the hole trigger from opening out too far. We're now going to take these apart again. I have to put the bolt groove in for our arrow.
So I'm just taking my marker again. . .
just drawing two parallel lines. . .
. . and I'm gonna use these to cut along.
I'm going to take a craft knife and I'm gonna cut at a 45 degree angle down there, and there. So I'm doing a not too hard to cut I can do two or three or four passes to get down to the depth I want I don't have to do it all in one go. So in fact I think probably those two passes will be enough and I'm gonna come back and do the other side now.
You can see I've got a groove all the way down the middle. Once you have your V groove you need to smooth it and straighten it so you take a biro which will be our arrow, our bolt and some coarse sandpaper, and just sand it back and forth. Here we have our groove for the bolt and the bolt goes there but what you'll find with this kind of bow, quite often the string will not connect properly with the back of the bolt, so I'm going to put another channel on top of this, just positioned there.
That's gonna be the back and then we're going to go up here. And then we can come up and like that and again we're just going to saw this out and we're going to take our whole component to. .
. . oh I think around about.
. . around about here.
So that is about 19 centimeters long. We have our top guide. We need to again, put our groove into here, exactly same way as before.
And there we have our groove in the top. Our top and bottom grooves want to line up. .
. . perfect!
So what I need to do now is put two wooden pegs through here; so we will glue it and peg it and that will make it strong. I'm going to drill the holes through here. .
. . .
. . .
. and then transfer those holes here. Making sure that I have not drilled all the way through the stock and again we want another peg.
A peg is carved, we're now going to put it into the first of the holes before we transfer the second hole. And we're going to cut that off. Now we're going to drill the second hole making sure that these two pieces are lined up straight.
Just go maybe a centimeter into the wood beneath. . .
. and there we are. So now we have the top rail, top guide, the main stock and the trigger.
So you can see everything is tight and everything is fixed. The only thing that's glued is the trigger at the moment just so that's not going to move. Now we have to make the bow that's gonna go in the front.
I have a piece of thin ash here you could use bamboo cane, glass fiber fencing rod, a steel ruler of the right size anything you can find really but I'm going to turn this into a bow sort of it the easy way. So we're going to find the center line and I'm going to mark 15 millimeters off and then five on each end and I'm gonna draw a line between those and I'm gonna saw very carefully to that line. .
. . .
. and this here will become our bow. We have our bow you see it flexes so we've got to cut some nocks into the end and those are little grooves here sloping back slightly and that is what is going to hold the string.
Being careful, careful, I'm using a short bladed knife here because it gives me a great deal of control. Now I'm very simply gonna tie a knot in the end of this string, nothing clever at all. If you want to splice it, give you a much nicer, much better result, but that's a little bit of a skill in its own right and that's one to have a look on the internet for.
So that's the first one easily done. You can see now that pulls and doesn't slip off that's what you want. We now need to put the knot on the other end so that the bow is flexed a little bit in that position.
So I'm just going to pop it on there. But when we tie that knot don't forget it's gonna effectively make that shorter, so I'm just gonna slip it a tiny bit there, so I'm gonna call that about done. Just pinching it so nothing moves and now I will loosely tie that again.
It's just string you can always have two or three goes at it if you need to. Slipping the string back on. Now I'm putting the heel of this bow just against my hip here pulling up on the middle of the bow, pushing down on the limb tip.
. . .
ah and there we have a nice gentle curve. There is our bow. But we need to mount that now into our stock.
This bow is going to fit about here, so I need to cut a little slot in this stock that the bow can seat into between these two pivots so structurally it's not so important at that point. What I'm gonna do is just cut two little slots down trying to cut them exactly the right width for that bow. The bow is now fitted into the groove that we cut, if it's a little loose just put a layer of tape on it.
But there's one more thing we need to do. I've made this bow to suit by biros to shoot pens or pencils. Now if I put it in there you can see that the back of this pen can go all the way past the trigger, it won't shoot them.
So we need to put a little stop in here that stops the bolt going all the way back over the trigger. And we do that by drilling another hole just there in front of the trigger you can see that's where the trigger is that's where I'm going to drill this hole. And we're going to drill the hole and put another wooden peg in but just deep enough that it stops the bolt sliding back.
Put that in. . .
. drill the hole. .
. . and it's gone into the groove there.
So I'm just gonna put another wooden peg in. You can see here there is that peg that just stops the bolt or the pen or the pencil, going any further down. It can no longer go all the way to the bottom.
Goes here. We'll put that back together and that's why we didn't glue it together before, just to make sure everything works. Now then let's shoot it.
Just a piece of insulation here, an old cardboard box will be fine. Open the trigger up a little, put the butt against your hip and just slide back with both thumbs until it's in the notch. So it shoots very nicely indeed.
At the range. First up the little one. .
. . .
and this I've shot for distance and does about 30 meters 30 yards doubt it will stick in. Nope but you know good enough for your cardboard Knights. Now the big one.
Shot this for distance with a 50 gram bolt, I think it's about two and a half ounces, does about 75 meters, 75 yards. So you can see it's accurate enough and it's fun and it's cheap to make and if you can't get bungie; luggage tie-down straps. So last of them we'll see how we do.
. . .
. . .
and there we are. What's that. .
. . .
so that was a group about that big. You know not bad for a bit of rubbish. Go and make them and if you can't work out the plans, go check in the in the description, you'll find a link to the plans there.
Enjoy Look in the description - you will find a link to the plans there.