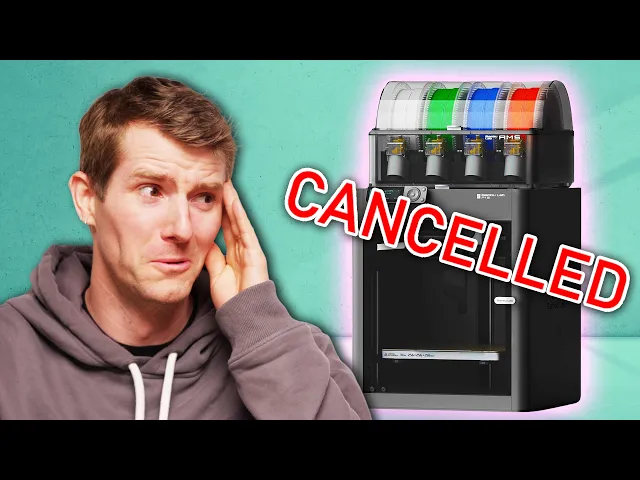
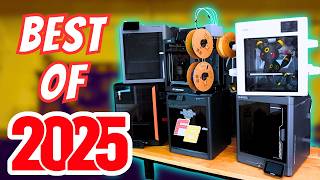
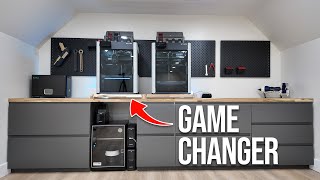
Up until about two weeks ago, my 3D printing setup at home was frankly embarrassing. So I sprang into action. I picked up a rack, I finally treated myself to a filament dryer, and I got everything organized to show it off to you guys, only to have Bambu Labs bamboozle the community by issuing an update that in the name of security significantly harms the functionality of these printers for a lot of their users.
Now, I do still want to talk about what it's been like getting into this hobby a little bit on the later side. Uh, there have been some pitfalls that we've run into, especially in a house where kids are often the users. That's actually one of the big reasons that I chose a Bambu printer in the first place, but now that they're altering the deal, I think we need to expand the scope of this and look at not just my 3D printing setup, but maybe some alternatives from other members of our team if you're looking to get out.
What about getting more business, Dad? If you are still posting your ad on The Wall, then you need to check out sponsor Odoo. They've got so many apps for business, from sales, HR, marketing and more.
I can create email and social campaign all on Odoo. Wow, so cool. Still, the thing that impresses me most about our Bambu setup is the incredible quality of these multicolored prints.
This was a single print, right? Yeah. This- I still haven't printed the wings.
. . .
is amazing. Say what you want about the kind of excessive waste poofs when it changes colors. The AMS system takes something that would have been incredibly complicated years ago and makes it so simple that a child can use it.
I don't know if I agree with Bambu's assertion that setup can be done in 15 minutes, took us a little longer than that, but it definitely took less than an hour. Once you've got it set up, the Bambu app has pretty much everything you need. You've got a live view of the build plate, you can monitor the status of the machine, including usually meaningful error messages.
You can contact support, and what the kids like best is of course the model library, where you can find everything from useful replacement parts, to project inspiration, to what they use it for most, which is a personal toy manufacturing device. (laughs) Now, you guys have recently taken to painting some of your creations. This one was supposed to be AMS, so I swapped all the colors to white and then I painted it how I wanted it.
There's like a couple bad spots on the wings, but other than that it's really nice. Now, the long-term goal for me, of course, is that as their ideas for how they'd like to change the models get bigger, so will their ambition to learn a little bit of modeling themselves, starting with modifying existing ones and then hopefully progressing to creating their own. Or maybe I'm just spending money on toys.
Either way, honestly, they've been pretty stoked on it. Good Christmas. We also use it for useful stuff, printing cute little containers and adorable bookends.
I mean, the sky's the limit. That's the beauty of it, right? And it really is so easy that an eight-year-old can use it.
How do you use the 3D printer? I just open it and take out the stuff and take off their supports if they have them. Okay.
Is it pretty easy? Yeah. Yeah?
Do you have anything in there right now? Yeah. Man, support removal is something that has gotten so much better.
Yeah. It broke. Oh.
We can show the glow in the dark fly. Fine. Okay, little 3D printed jumping frogs.
I don't think they're frogs. Getting to this point where even kids can use 3D printers without usually screwing things up too badly has taken a massive amount of work, and the 3D printing industry broadly deserves a ton of kudos for that, and so does Bambu specifically, even if their reputation's kind of on the rocks right now. But that doesn't mean that I would recommend just running out and buying a 3D printer for your kids to use as a toy factory.
There's a lot that I've learned over the last year. The everyday stuff is negligible. You don't really have to coat the build plate in glue and then clean it off in between prints anymore.
But if you don't like managing desiccant packets in your AMS or in your filament storage, maybe a 3D printer's not for you, because too much moisture from the air in your filament will jam up your system here, here, here, und here. Ask me how I know. Also, Bambu, if you're watching this video, I have some notes.
This needs an access hatch, okay, 'cause these end up with filament fragments in them like freaking all the time. (laughs) It'd be nice to be able to just access them like this instead of taking the whole thing apart. In fairness to Bambu, that doesn't happen that often now that I got my filament dryer though.
This thing's been a lifesaver, because I've had even brand new rolls of filament come out of the vacuum sealed bag, jam up the machine, I throw them in here, and they're good to go. As happy as I am with my setup though, the enthusiasts out there know that the sky is the limit when it comes to 3D printing. So why don't we take a look at some alternative setups from other members of our team, especially now that Bambu Labs has become a little harder to recommend.
Like this one. This is my Prusa MK4S, and it is a fricking rockstar, and I would recommend it. To be honest, actually, they have a new version now that has an enclosure called the Core 1, and it's kind of like the same printer but with an enclosure and it's almost the same price, so maybe buy that one instead.
But I love this thing and I can upgrade it to the Core 1, which is a big thing with Prusas. You might recognize this build plate if you're a Prusa fanboy. See how it says Prusa i3 MK3?
This printer actually started out as a MK3, then got upgraded to a MK3S, then a MK3. 9, then a MK4, and then a MK4S. Not a cost-effective route, but it was something I was able to do.
(laughs) I actually don't think I've had a print fail since the most recent iteration of upgrades. I also have some cool stuff for it, like the MMU3, which is Prusa's multi-material thing. It's not my favorite.
I get why people like the Bambu AMS. It's small, it's compact. It doesn't always work, but assuming that it's working, it's really nice.
This thing requires this monstrosity, which is a buffer, and they use this for when it switches filaments because it has to pull the filament back out of the way of the new filament that's getting inserted. There's cartridges which you stick in here, boom, and then this gives a bunch of space for that filament to get retracted into. It's just a giant void to have like an extra foot of filament go into.
Instead of that, I 3D printed these really cool things. Uh, they're automatic filament rewinders. So as the spool gets pulled, it has a 3D printed spring in there that rewinds the spool.
It's kind of insane, and the dude that engineered this, pfft, some people are very intelligent. One day I wish to be one of those people. I did do some other mods too.
It's got cool little feet. They're called HulaFeet. They're like seismic dampening feet, so they have soft 3D printed inserts out of TPU that allow the printer to like kind of be seismically dampened, like a big building might.
(laughs) And that just kind of removes some of the artifacting that you sometimes see on the sides of 3D prints. It's all models I found online on Printables, and I just wish I didn't have to have like a weed grow tent for an enclosure. So I'll probably get the Core 1.
And there's other things I don't like about this printer, specifically the wifi. I don't know what exactly went wrong, but on the MK4S upgrade, they made these new wifi boards that have a pass-through header for accelerometer, that's like a whole story for another time, but it uses a different WiFi chip, and this WiFi chip sucks. I actually was like, "Maybe I'll just put the old WiFi chip back in and see if that works.
" It immediately like solved all my problems. They even sent me a replacement one to try. Nah, like screw these things.
See you later. (sighs) I also wish that they shipped these printers with hardened nozzles, because the hardened nozzles not only are they good for filaments that need it, like if you're printing carbon fiber filament that destroys brass nozzles, but the hardened nozzles are usually less prone to getting stuff stuck to them, um, unlike the brass nozzles. So if you're printing like PETG for instance, brass nozzles are a nightmare, and the hardened ones, way better.
And actually when you print lots of stuff you usually end up with lots of filament, and this is like half of the filament I have. (laughs) I really need to get rid of some of it, but the biggest thing here is, for newbie 3D printer people out there, get storage containers and get a filament dryer. I use this cheap Creality dry box and cereal containers with some, uh, silica gel, which you can actually reuse, just throw this in the microwave, to heat my filament dry, and that is the easiest thing you can do to make your prints more reliable-.
. . better quality and just have a better 3D printing experience.
Speaking of, uh, liquid, why don't we talk about my resin printer? I haven't done any, like, crazy modifications to this one. It's basically just off the shelf.
This is the Elegoo Saturn 4 Ultra. (tense music) If you're not familiar with resin printers, they're very cool, because they can print incredibly detailed objects. Because look at the bottom there.
You see that right there? That's a UV LCD screen, which means once you fill this vat with UV-activated resin, you can print entire layers in one shot. It'll do the whole layer and then it breaks the seal to let resin flow back underneath, and then it prints a whole other layer and it just repeats and repeats.
This one, I think, is a 12K resolution screen. So at, you know, that size you're talking some insane detail if you wanted, but they also have a 16K version, I think, that's coming out or just came out and, um. .
. I don't even know why you would need that, because, uh, like, this is already so accurate. It's just not as user-friendly, um, especially in the post-processing.
'Cause once something's done in the resin printer, your print is not done. You have more stuff you need to do (laughs) . These are the other steps I'm talking about.
When you're done with a resin print, you have to wash the extra resin off and then you have to finish curing it. This is basically just a fancy platform with UV light in it and it cures resin prints (laughs) . But you have to be careful to, like, not over-cure stuff, 'cause then it becomes super brittle.
You don't wanna under-cure stuff, 'cause it can, like, get goopy or it, it can have, like, weird white spots if it, like, starts to cure in the sun. It's just a whole, it's a whole thing. Especially the cleaning, because if you have normal resin, you have to clean it with isopropyl alcohol, which is what this tank has got inside of it.
This is, like, a washer and it does make it easier, but that's isopropyl alcohol. It's not water. But if you need stuff that's super accurate, for me sometimes the car stuff that I'll 3D print, uh, needs to be, like, dimensionally perfect.
And in that case, this is the only real option for me that's not $10,000 or something like this. These printers are actually pre- pretty affordable. Honestly, having a 3D printer is like a superpower for car nerds and, uh, if you're a nerd of any other category like Warhammer or D&D, maybe you might need one too, like these other creators and their setups.
(energetic music) Hey, Linus Tip Techs. My name's William Osman. My channel is williamosman2.
I'm severely dehydrated. This is my 3D printing setup currently. I've used a lot of printers over the years, starting from a really, really old original Prusa machine that was made out of wood, which made me hate 3D printing.
That was, like, 2013. Things have gotten so much better since. This is the XL.
This is, like, my powerhouse. Multi-material, five heads. You can print all sorts of cool stuff like a replacement vacuum cleaner wheel that I made, and then on the inside, on the hub, I used a carbon fiber filament so that it has more wear resistance, I think.
This is my favorite print I've ever done. It's an apple and a worm. It's actually TPU.
I was able to print with soluble support and then TPU and it did it seamlessly. For single color prints, I've been using the Prusa Mk4. When I need really big stuff, I've used this, uh, CR-10 Max.
I call it the CR-10 Maximum Crap. It's not a good printer, but it can print huge things. I made this hot sauce dispenser on the AnkerMake Pro.
It's got, like, a hundred different hot sauces in it. One of the improvements I made is getting to the back of these machines can be a pain in the butt, so I put 'em on these rolling carts. In the front, there's levelers, and in the back there's castors.
So you just pick up the front and you can slide it out, which lets you get to the back of the machine. And then under the cart, you can keep your filaments, which I put inside of five gallon buckets with dog food lids. So you open this up and you got a bunch of filaments in there and stainless tea bags with a molecular sieve desiccant to keep it dry.
You can see one of them exploded open in there and there's little balls everywhere. My, my little balls. That is gonna be a nightmare to clean up.
I use mostly FDM printing, which is what these machines are, but Formlabs has sent me their new 4L, which I have plans for, but I haven't played with it yet, so I, I can't give you any recommendations on those machines. One thing I really wish the XL had is a dry box, so I'm gonna look for a open source dry box that you can put your filament rolls into that will automatically load them into the machine, because it's a bit of a pain putting new spools on this. You gotta feed it through and then get it into the tool head.
It's like, it, it sometimes can take quite a bit of time, especially with a flexible filament or the PVA. And a camera too. Not having a camera on the Prusa machines is a little frustrating.
I know that the new printer does have one. There have been times where I've started a print from my computer and I come out and it hasn't actually started, and that, that's, you know, that's a little frustrating. But once it's running, mm (smacks lips) , ah, I love you Linus Tip Techs, Mr Tech, Mr Tip.
(upbeat music) I'm Jeff Geerling and I'm from the channel, well, Jeff Geerling. I make videos about single board computers, home labs, and sometimes I even do very important RF safety research with my dad. Will this insulating layer of corn protect the hotdog?
The show is beautiful. Thank you so much, John. Right now I have these three printers, a Prusa Mk4, a Bambu P1S, and a tiny upside down Positron printer, which is currently in a bit of a mess.
Sorry about that. There are so many projects I work on where a little custom case or mount is useful. I also 3D print little fixtures for devices I wanna show in my videos sometimes, like this one I have for small PCI Express cards.
I've also been learning CAD software so I can design my own things like this PIZ dispenser, that instead of PEZ, dispenses Raspberry Pis. I think the most practical things I've built are all kinds of mounts for computers and network equipment for my mini racks. I'm working on moving my entire home lab into a mini rack like this one.
I've used these printers for hundreds of prints now, and every printer I've used has its own little quirks. Like the Prusa here doesn't have an enclosure, so some materials like ABS just don't work on it. And there's no built-in camera, which is a little annoying for me because I like to check on prints remotely.
The Bambu, well, I love the hardware and the speed, plus the AMS up top lets me switch filaments without even having to be at the printer. But Bambu Lab's latest updates are making me nervous, so I set it to LAN only mode and blocked it from accessing the internet. But both of these two printers are my workhorses.
I can turn them on remotely with these smart switches down here and then fire off a print over my network. I've only had, like, one or two print failures on these two ever, and both of those were actually my fault when I was slicing the models. They're reliable and the Prusa is actually pretty quiet.
So if I'm gonna be recording, I'll use it instead of the P1S. I used to have an old Creality printer at home, but I gave that to a friend. I think if I get another home printer, it'll be a Prusa.
They're built like tanks, they're not that loud, and I love the community around them. And the Prusa has a wired ethernet port, which is useful if you're in a house with, like, a thousand wireless smart switches. As for the Positron, well, this thing is the most fun and some people like a smaller size, but I wouldn't recommend you go in on a custom build like this unless you really wanna go full hobbyist and not just print things.
(upbeat music) Hi, I'm Camden Bowen, and a lot of my videos involve me building various types of engines, many of which involve 3D printing in some way or another (tank guns firing) . My setup is currently consisting of a Elegoo Neptune 3 and a Creality CR-10 S4, both of which serve their own purpose in their own way. For all the large components or the less critical ones, I hand those over to the CR-10 S4 because it's got such a large bed size to it.
But for pretty much everything else, I just use the Neptune 3. Because it's got a direct drive extruder, I found that it does a pretty good job with more difficult filaments like nylon and TPU. At least a much better job than what my CR-10 does, as that's only got a boat and tube setup.
Another thing that I really like about the Neptune 3 is that it comes preinstalled with an automatic bed leveler, making the whole printing experience, like, very turnkey. In fact, I liked it so much that I installed one on my CR-10, as trying to level a bed that is almost half a meter in length is a complete pain in the ass. Just because the nature of my content, I'm a lot less concerned with, like, making parts with the highest resolution or the most detail.
Instead, I'm always looking to make parts as strong as possible to serve more of a functional purpose. But with the right filament, these printers actually do a pretty good job. However, there are a few things that I'm not really a big fan of.
Firstly, the CR-10 is slow. Like, really slow. Which sucks, because in times where I can't use the Neptune 3, prints that would otherwise be started and finished on the same day can take up to two days of printing.
I mean, you can make it a little bit faster by adding supports to increase the rigidity, or just adding a direct drive extruder, but I don't have either of those. The only complaint I have about the Neptune 3 is that it's got a very strange problem. I don't know why it does it.
Nobody else knows why it does it. But for whatever reason, every single time you start a new print, the Z-offset value completely changes, making it so the nozzle's either way too high or crashing into the bed. Now, it's really not a big deal since you are able to manually adjust the offset while it is printing.
But it does mean that you have to hover over the printer for at least, like, a minute or so just to make sure that it's working. Now, unless you specifically needed a larger bed, I think the overall versatility and simplicity of the Neptune 3 makes it perfect for most projects. And not to mention, the Neptune 3 is a lot more affordable, being in the same price range as the Creality Ender 3, while also being a printer that you can pretty much have up and running in only, like, half an hour.
And if you ask me, that is perfect for a beginner. So then, having seen all that, is it time for me to rip out my bamboo? Not yet.
But when the time comes, wow, are there ever some inspiring setups to take things to the next level. Just like I'm gonna go to the next level with labs testing. For just a fraction of the cost, I test your stool, X-ray your body, and check your eyesight, OLMG Lab.
This is an extra stream of income I created with our sponsor, Odoo. You see, Odoo is all-in-one business solution. I was able to set up my discount medical testing service in minutes.
How'd you get so many clients? Well, Odoo helped me turn their poop into loots with their marketing app. I can easily create email campaigns and get real-time stats, or even send out campaigns instantly to my customer's pocket with their SMS marketing tool.
Oh, my God. It's only $5 to test today. I even turned this quiet room into a quiet room.
(laughs) (crickets chirping) My customers can book it thanks to Odoo's appointment app. They can cry their lungs out and walk out like nothing happened. Try Odoo for free for 15 days.
We have the link in the description. If you guys enjoyed this video, be sure to check out William's, Jeff's, and Camden's channels, which will be linked down below. And if you're interested in learning about SLS printing, which uses powder and lasers to print stuff, check out our stream about the biggest screwdriver that we ever made.