hello everyone welcome back to my channel my name is PE and this is video number six in the series CK 2024 so a lot of people have reached out to me and asked me this question that which cloud provider will be using for this entire G C Series and my answer to that is none of them because you know there is a process of learning there is a process of doing the prerequisits and then move ahead with the main topic for example before learning kubernetes we learn Docker and containers all the fundamentals now before learning the manage kubernetes service such as AKs eks or gke before learning that we need to learn the kubernetes itself on the local installation this is what will give you the maximum learning maximum Hands-On and you will be able to practice all the concepts by yourself if you go ahead with any of the manage service you know you won't even get access to the control play node and you won't be able to troubleshoot any of the scenarios and there is very minimum learning because most of the part is already managed by the cloud provider itself I hope uh I'm getting somewhere I hope you are able to understand what I'm trying to say so we'll be installing kubernetes on our local system right and we'll be doing that with the help of kind cluster so there are different ways you can install kubernetes on your local machine you can go ahead with Min mini Cube k3s k3d kind and there could be many other as well so kind is kubernetes IND doer which is one of the most popular local installation of kubernetes so this is what we'll be doing in this video we'll be doing the installation will basically set a cluster for the Hands-On that we can do throughout this entire series and we'll also be looking at the some of the important uh things from the exam perspective so without any fur further Ado let's start with the video all right so as I've mentioned we'll be using kind for the local kubernetes installation and this is the page or the reference article that we can follow I'll provide the link in the description and in the GitHub repository so don't worry about that and as it says it's a tool that is used to run local kubernetes cluster using Docker container nodes that means what it will do on the back end for you it will spin up some Docker containers and each of these Docker containers will be treated as a separate node so that you can use those nodes as control plane and worker nodes right so this is pretty neat and it is easier to set up so don't worry we'll see that everything in detail and I will also install that uh along with this particular video so the prerequisite is you should have go 1. 16 installed in your system and either of these things Docker podman nerd CTL if you have you can follow along these commands I already have Docker installed in my system which we did as part of uh one of the previous videos as the prerequisite so if you have followed that and if you already have Docker installed what you can do is you can go to quick start guide from this page let's go over here and the first table of content shows that it has different installation methods you can install it with a package manager you can install it from the release boundaries or you can uh install it from The Source itself right so you can choose whatever is convenient for you we'll go with the first option which is installing with the packet manager and it has different instructions for each of the environments like if you are on Mac you can use Brew install kind if you are on Windows you can install uh using choco install kind uh this particular command chocolate is a Windows packet manager that helps you install software or packages and so on or you can install it from the release binaries and here are the instructions for Linux and for Mac OS for Windows and so on then you have installation from source so feel free to choose whatever you're comfortable with so I'm I'm on Mac so I'm going to go ahead with this installation Brew install kind so on the left side is my Mac terminal window so I'm going to enter Brew install kind okay and it will will download the package it will install it so it is done as simple as that right I'm going to going to clear the screen now we have installed the kind binary now the next part is to create the cluster okay so scroll down to the section where it says creating a cluster it says creating a kubernetes cluster is as simple as kind create cluster so this is the command that you can run now it has some optional flag which says to specify another image use iph image else it will be created with the latest kubernetes image and you can also specify the name of the cluster okay so I'm just going to type kind create cluster hyphen hyphen image as of today like I'm recording this video uh in May so as of May 2024 1. 29 is the version that is available in all of the cka exams right so this is the version that I will be installing if you let's say if you are watching this video 2 months afterward in July or August somewhere or any time after that there could be another version running in CK Labs right make sure you go to the cncf exam guide and see which version of kubernetes they are using it doesn't matter most of the times because there is very minute changes when it comes to cka exam between the versions but it is advisable to use the version that is as similar to the exam version right so for now I'm going to use 1.
29 so for that if you read these lines over here right it says if you need to run a specific version of kubernetes you can check out the release notes over here okay so I'm going to open this in a new tab okay and it says uh the latest version is 130 that is what it'll be using if I don't specify any version right and if we scroll down and here it says images pre-built for this release what I need is 1. 29 so I'm going to copy this particular line so it has the repository details so this is a kubernetes image which is based on a node image and it has 1. 29.
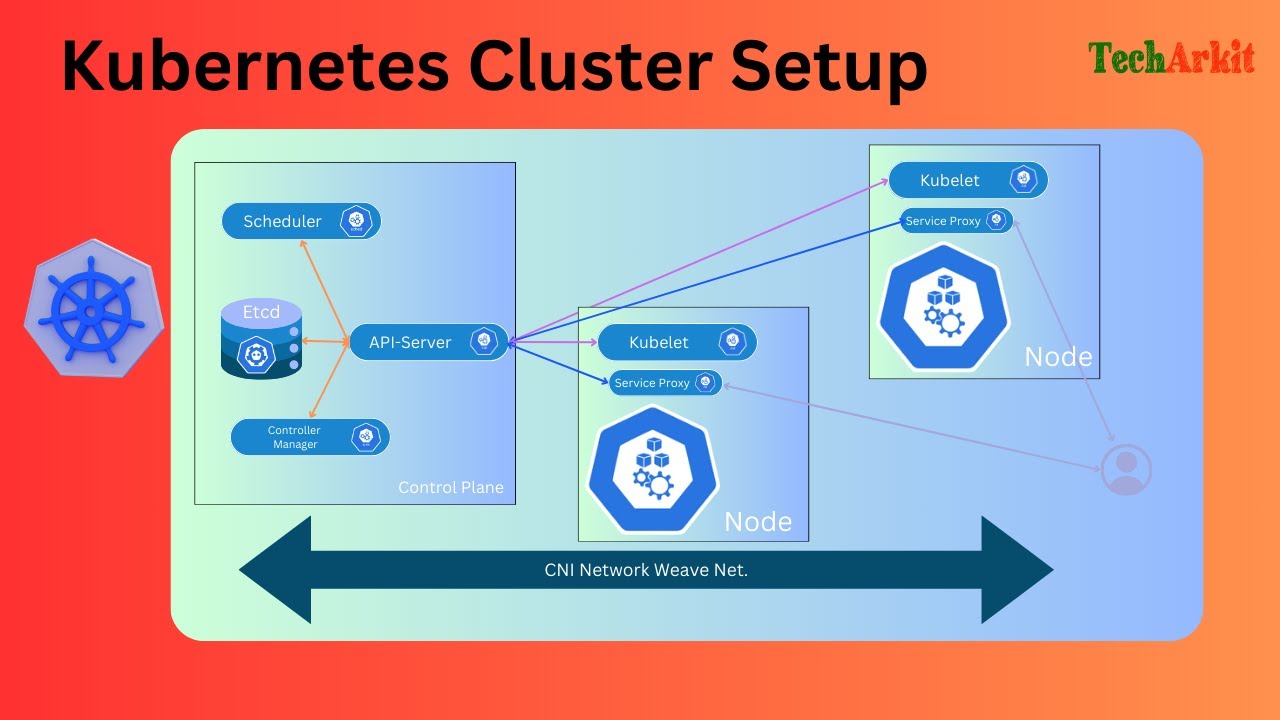
4 version with a particular sha ID right so I'm just going to copy this and I'm go back to this particular uh terminal window and I'll paste this as the image name okay now the next parameter that we can pass is name of the cluster if we leave it default if we don't specify any name it will create the cluster with the name kind so I'm going to write iph iph name and then we'll give it a name cka cluster one right and hit enter okay now let's say it is now pulling the node image which is on this repository kind as node 1. 29. 4 and it is preparing the nodes writing configuration starting control plane all the functions that it is doing we have already seen the control plane what it is so it will have all the different control plane components your API server your uh your scheduler controller manager at CD and so on so now it's it it has been created and now the next part is you need to check if it is working fine or not right it is also uh sending this message like Cube CTL cluster in for context kind cka cluster so this command over here we used to get the details from a particular cluster from the installation like let's say currently I only have one kubernetes cluster so I don't have to even run this command but imagine if I have multiple versions or multiple clusters running then I kind of you know have to run this command so it's like if you are working on multiple branches you need to run get branch and then name of the branch to switch to a particular Branch we're not switching over here we'll be doing that with a different command but over here it will just show you which cluster uh is currently running and where it is right now okay so let's uh just copy this command I'm going to paste this and hit enter now it retrieve the information the because the command has cluster info as the parameter so it Retreat the cluster information from that particular context so it says your control plane is running at 637 87 this is the port then you have code DNS running we'll have a separate video for code DNS don't worry about it for now just think this is a service that is used to that that provides you DNS functionality within kubernetes like a local DNS server so that's all right okay cluster is running now hit clear before running this command make sure you have Cube CTL command line utility install because this is really important and we'll be using this particular CLI for the entire cka series and this is what we use for any of the kubernetes cluster interaction irrespective of where the cluster is hosted right it could be eks AKs gks or even uh your VMware bare metal on premises installation we use this utility right so if you don't have it installed so you can run Cube CTL uh installation okay and go to this particular document it will show you the steps to install Cube CTL so let's say Cube CTL install on Linux go ahead and basically you have to just run a curl command to download the binaries and you know just verify it and install Cube C with this command so uh pretty straightforward instruction like how you install any package on Linux Mac OS or windows so this is the same thing okay so once you have the cube CTL installed you can run this command Cube CTL version hyphen hyen client and it will show you the version of it so currently I'm using client version 1.
2. 28. 2 so this Cube CTL version is different from the kubernetes version like ideally you should use the same version as the kubernetes version because uh the cluster I just installed and this Cube CTL I installed a long time back so that that is why there's a version mismatch between Cube CTL and the kubernetes version okay so we have the cube CDL installed we have kind installed and we have also created a cluster now let's interact with the cluster and let's see what it is there in the cluster at the moment right so I'm going to run Cube CTL get nodes so this command as I've said like all the commands that we are running with the cluster so any interaction that we do with the cluster it will be done with the help of cube cail command line and what it will do if you remember the previous video it will send the instructions or it will reach out to the API server API server does all the validation and then return the results from the at CD database so if we do CBE Cil get notes it will first go to API server validate it authenticate the request and then it will go to at CD database to fetch the results and then it will reply back to you with the nodes that are running right so if I hit enter now it will show me that we have one node running the node name is CK cluster 1 control plane okay status is ready and roll is control plane and age and version version is 1.
29. 4 the version that we have used to install the kubernetes cluster right so we have one node running currently because we are using a single node cluster at this moment it does not have separate node for control plane or for worker node so that is why it only has one node but this is not what we want right we want to have it created in a way that your control plane and worker nodes are kept separately right they should not be inside one single VM or one single node so for that we'll be creating another cluster with multi node support okay so I'm going to go back to my documentation of kind clust over here okay uh we have seen the creating cluster and scroll down okay scroll down to this section where it says configuring your kind cluster right so by default it creates the cluster with a single node control plane and worker node will be inside the same but with this configuration you can create the cluster with multiple nodes okay so I'm going to copy this this is a yaml file uh in the next video we'll we will be discussing all the prerequisites of yl and everything about it but for now consider this as a configuration file I'll just copy this it has a kind which is cluster the object type is cluster it has an API version right so this API version will be used to call the internal API and then we have a field which says nodes so we have three roles created one for control plane one for worker another one for worker right so this will create a multinode cluster with three nodes so what I have to do is I have to go back to my directory in the terminal I'll just open a new file config. yml in the terminal window okay and hit enter and go inside the vi editor with the insert mode by pressing I and then paste the content over here whatever we have just copied from the document okay that's it and then we just close the file with colon WQ exclamation hit enter now our config file is ready now we have to apply these changes so remember the command that we have used earlier to create the cluster let's reuse the same command Okay this command and now just change the name of the cluster to CK cluster 2 okay and we'll be using the same image so you don't have to change the image parameter but over here we'll be using another additional parameter which is referring this configuration file okay so the details are provided over here if you see um like when you create the config file all right over here create the config file this is how you can refer this file in the command itself so over here you provide the details hyphen hyphen config and the name of the config file which is config.
yml or you can like whatever name you have given okay so this is the entire command now and I'll hit enter it will create a new cluster with the name CK cluster 2 and it should have three nodes now one for control plane and two for worker nodes right so let's have a look at this so just give it a second and there are other options which we'll be looking at later on uh like ideally in any production environment uh your control plane nodes should also be in the high availability mode that means instead of having one control plane node you should have multiple control plane node at least three nodes right so that this is what we'll be doing as part of this yaml but uh this is for the later part okay and there are other options so documentation is pretty neat for kind cluster so have a look at that and we'll be referring that from time to time whenever there is a need for now let's see what it did it first it uh used the no node image 1. 29. 4 then it prepar the nodes then it started the control plane it installed cni which is a network plugin it installed the storage class it joined the worker nodes so when you have let's say three nodes created one control plane two worker nodes how do they interact with each other or how do they know that they are part of the same cluster so we have to join the worker nodes to the control plane node we have to set the context between them right so that is how they will be part of one single cluster okay so this is why it is a cluster because it is a group of resources that is there together right and this is what we'll be doing now so again it is showing you the same output that run this command to get the information from this cluster okay let's do a clear screen and if you remember the command that we have uh done earlier CBE CTL get nodes okay so now it is showing because it switched to the cluster already now it is showing we have one control plane and two worker nodes all of them are in ready State all of them just been created and all of them are using version 1.
29. 4 now there is a tricky situation over here now we have two cluster created and which cluster it is using to get the details from like we don't know because now that we have just created a new cluster so it is getting the the details from the newer cluster like what do I do to get the details from the other cluster the previous cluster which has only one node why it does not showing me that so for that we have to use a cube CTL command called set context right so what you need to do is you need to run this command Cube CTL config okay hyphen hyphen set context and then the name of the context so name of the context will be kind CK cluster 1 okay hit enter okay I might have made some mistake and you could also make some mistake while because you don't have to remember all the commands you cannot remember all the commands especially if you are a beginner to kubernetes right so what I will suggest doing is you go to this particular website called kubernetes doio SL dos and hit enter right and over here you search for something called cheat sheet okay and you will see uh kubernetes cheat sheet uh here it is second and third document select any one of those okay let's go with this one okay so this particular page has all the important commands that you can use with running uh for you know that you can use to run the cluster so have a look at that and now we have referred it now we can use it but what do we do in the exam like how do we remember all the commands in the exam so I have a good news for you this CK exam because this is a complete Hands-On exam and the exam will test you on your knowledge on your skills and not on how you remember things or how you remember your commands for that there are two websites first is this one kubernetes doio dooc and all of it sub domain plus there is one more kubernetes doio instead of docs it is blog I guess yeah and all of it subdomain so these two website you can access while giving the exam so this is available for you but make sure you practice all the commands enough so that you don't have to refer it every time because it will just you know waste your time in searching for the things and searching for the content that you are looking for especially the commands so make sure you remember it if the command is too long it is advisable to go to um one of these pages and you know copy the command from there you can copy paste as well right now this particular uh page cheat sheet this is really important make sure you practice this enough make sure you know how do you go to that you know you go to your kubernetes doio do.
![Setup Kubernetes Cluster Using Kubeadm [Multi-node]](https://img.youtube.com/vi/xX52dc3u2HU/maxresdefault.jpg)

![How to Install Kubernetes on Ubuntu 22.04 | Step-by-Step Setup Tutorial [With Examples]](https://img.youtube.com/vi/lede7TJk1PE/maxresdefault.jpg)
![Docker Crash Course for Absolute Beginners [NEW]](https://img.youtube.com/vi/pg19Z8LL06w/maxresdefault.jpg)