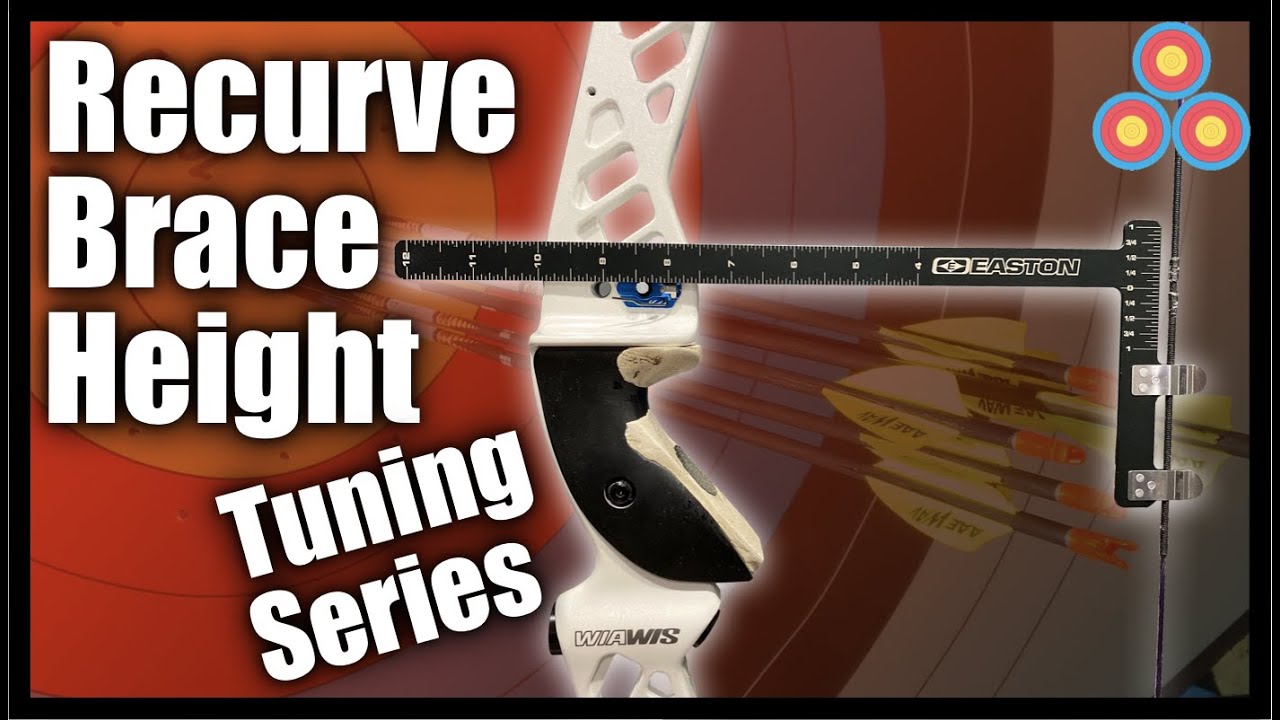
you're watching the Jake Kaminski YouTube channel that's going I'm Jake Kaminski continuing here with this Bo tuning series that I'm working on and today I'm going to be talking about ruff oh wait ruff tiller and then getting into limb alignments what do I mean by ruff bow wait and ruff tiller so as we go further on in the process that I've outlined in the overview video the ruff oh wait I know what I want to shoot roughly okay so I'm talking specifically when I take a bow out of the box and and you may be
already limited to whatever your maximum bow weight can be and you're possibly progressing up to shoot more and more bow way but for me I know what I would like to shoot so if I took my bow fresh out of the box I would adjust and set my bow eight to be 46 pounds when the clicker clicks something like that right so that's what I mean by I've set my rough bow weight because once the bow weight is set then I've got to set my ruff tiller and then you know have a decent brace height
in order to be able to adjust my my limb alignment now what do I mean by ruff tiller ruff tiller basically for me is just get it close get it within that eighth to a quarter shorter on the bottom you know that base to a quarter standard split and then we'll adjust tiller more fine as we go on and we'll talk about that specifically as we get later on in this series but you just want to get your tiller set to what your preference is I know what mine was it was three thirty-seconds of an
inch I know it's a little shorter than an eighth of an inch but that just is what I preferred so we'll get into again why or how to set the final tiller later on and what that affects but for for me I just get it close like I said between that eighth and a quarter now before I get into how to adjust your limbs I just want to remind you guys that this is going to be a series so if you wouldn't mind hit that subscribe button and the notification bell get notified every time a
new episode is uploaded I am also doing a forum series as well we'll talk about mental stuff we'll talk about training as well and other stuff other series and other installments how to pack for the sport what to bring to tournaments what to expect at tournament things like that so there's a lot of stuff in the pipeline and if you hit that notification bell you will get notified every time a new episode is uploaded and if you would share this video to get the word back out there that I am involved in archery again so
I would appreciate that very much so and I appreciate you guys watching this video now so let's get into adjusting the limbs so limo Jessamine is very simple and standard all you do is you adjust so if you can imagine your risers in the center and you had two limbs top and bottom right they can be misaligned to each other but then they can also be offset to one side or the other of the riser so we're going to use the riser and the stabilizer as a reference point to get our limbs to be perfectly
in line and in plane with the riser so that way it's pushing the arrow straight and consistently time and time again if you had the limbs misaligned what that will do is you may have a tendency like say if they're both misaligned to the right they may have a tendency to kick your arrows one direction more so than the other so that might mean that when you make a mistake that would send an arrow to the left if your bow wants to automatically throw the arrow to the left it may be less forgiving and throw
that arrow further to the left than if you made a same mistake where you were to make the arrow go to the right so the whole idea is to get the boat balanced and to work have the top and bottom line' work together with the riser to push and deliver that arrow straight now I like to use my stabilizer as a reference for the centerline of the bow I've had many people say they can use the center of the riser back here doesn't always work some risers have a line milled or machined into the center
of the shelf as a center point as a reference but it's only one line so you can't tell if you're slightly off to one side or the other I have tried aligning limbs where I get my string in the center of the the riser down here and then I look at the top of bottom limb and I find that I can get it close there but then when I put my stabilizer on my stabilizer can still be far off to the left or to the right I see this all the time during the tuning seminars
that my wife and I have been involved in and we've been traveling around the world so by the way if you're interested in a seminar in your area or have noticed that we are in your area don't be hesitant to sign up for those they are available to sign up at je Kaminski comm I'll put a link not only here in the video but also down in the description but basically I've seen people where they say yeah my limbs are aligned they're straight and we'll check and yeah it's definitely in the center of the riser
when when they look in the sanitizer when we put a stabilizer on and it's a confirmed straight stabilizer and they're bushing is not miss machined or or miss installed and and the stabilizers clearly off to one side I adjust and bring the stabilizer back in and then the string still sets in the center of the back of the riser so what I think that's doing is it's just extending instead of seeing something that is well down here it's probably about seven inches or so away from the riser to the string when you extend that another
30 plus inches out here if you're off a little bit at 8 inches it can make a big difference when you have a 30-inch brada on the end of it so if you use a 30 inch rod that you know is straight and use that as a reference it makes everything just fall into place that much sweeter and straighter okay so now you can understand why I use a stabilizer but I want to show you it's important to not check your limb alignment with your full stabilizer setup assembled on the bow the reason is is
that in every single stabilizer there's tolerances and everything there's tolerances so you have your stabilizer end cap that is glued onto the stabilizer itself and then you have a whole that's board inside the center of the end cap and then drilled and or drilled and then tapped and then you have this 5 16 24 set screw basically that is then also locked hided inside of the end cap so everything has tolerances if you had a thousandth or plus or minus on every single piece here you have not only the setscrew itself there's a plus or
minus of a few thousands plus or minus of a few thousandths of the actual surface the flat surface of the stabilizer then the internal bore surface and the thread surface the internal bore of where these the end cap slides on and then the OD of this stabilizer as well not only that there's glue holding everything together and you might have glue on one side over the other so I found all the time that stabilizers can be bent so can extensions extensions and also all the flat mating surfaces all have tolerances so the bushing net is
in your riser there's tolerance is there but then you screw something against it there's another tolerance then there's another connection here at the end where the v bar bracket mounts on there's tolerance is there the quick disconnect the internal quick disconnects surfaces and then the stabilizer connection surfaces so in this particular setup there is one two three four five six connections and six chances for something to be misaligned so when I'm setting my bow up I tend to remove as many outside factors as possible so I will set up my bow with not just my
stabilizer and a straight stabilizer mounted directly into the boat itself okay now I have my entire stabilizer set up off of my bow and I'm just gonna grab a random stabilizer and I'm gonna show you how to check if your stabilizer is straight or not so therefore if it's a good reference or not to use to align your lens if you don't have multiple stabilizers I'm sure you have somebody in your area that also shoots that will loan you a stabilizer for a half hour what or an hour or whatever it takes to align your
bow it's really important and it's not gonna work out this whole system is not gonna work out if you don't have a straight stabilizer so a great way to check if your stabilizer is straight is to screw it into your bow by itself with the weight hanging down against the threads so if I take this stabilizer out I'm doing it down here with the bow clamped in a bow and stabilize on the floor just so I can really exaggerate this but usually I just hold on to the riser and tighten it in by hand so
anyway I screw it in a couple of threads and then I let the stabilizer hang and preload down onto the the stabilizer bushing itself and then you want to hold your bow still as possible and then just simply screw the stabilizer in and pay attention to the end of the stabilizer and you can see as I'm screwing this one in it's not moving really at all it's wiggling because I'm wiggling the whole assembly but again if I'm trying to hold it as still as possible as I'm screwing it it's not moving in any fashion now
if I take one then I know for sure is bent this is a prototype with prototype end caps so it's difficult for me to not have straight stabilizers that are prototypes again the same thing screw it in halfway let it hang down one direction and then now I'm going to screw the stabilizer in and watch the end here and see how it's moving in a circle so that means the stabilizer bent to one side as I'm spinning it in C so this one's that straight this one is so as you can see it's very important
to not only have a straight stabilizer as a reference but to put the stabilizer directly onto the riser itself do not give yourself or your equipment an opportunity to give you false information about your limb alignment so this is a last chance archery boat press it's a power press actually and they have a bow vise here that I use to clamp onto the stabilizer or you could use something like this this October mountain products bow vise which has a really nice adjustable ball head so you can swivel it any direction you want you clamp your
limb in here or there's this nice groove you just slide your stabilizer in there and clamp it down as well so either one of these works really really well this one I just have set up on my press so this is what we're gonna use here you're gonna notice that I am using a bull vise to hold the bow on the stabilizer I prefer to use it that way you can use a top clamp a top tube clamp for a for a bicycle and clamp on to your stabilizer if it goes small enough that would
be a really good tool and I always suggest to use those if you can but the reason that I'm doing it this way is so the limbs are in free space okay if the limb was resting against something like the ground it couldn't actually affect the way you see alignment because it could be bending the limb tip as its resting against a table or something like that so it's always optimal to clamp onto your stabilizer type on your riser support it somewhere so that way the limbs are free floating in space that isn't the optimal
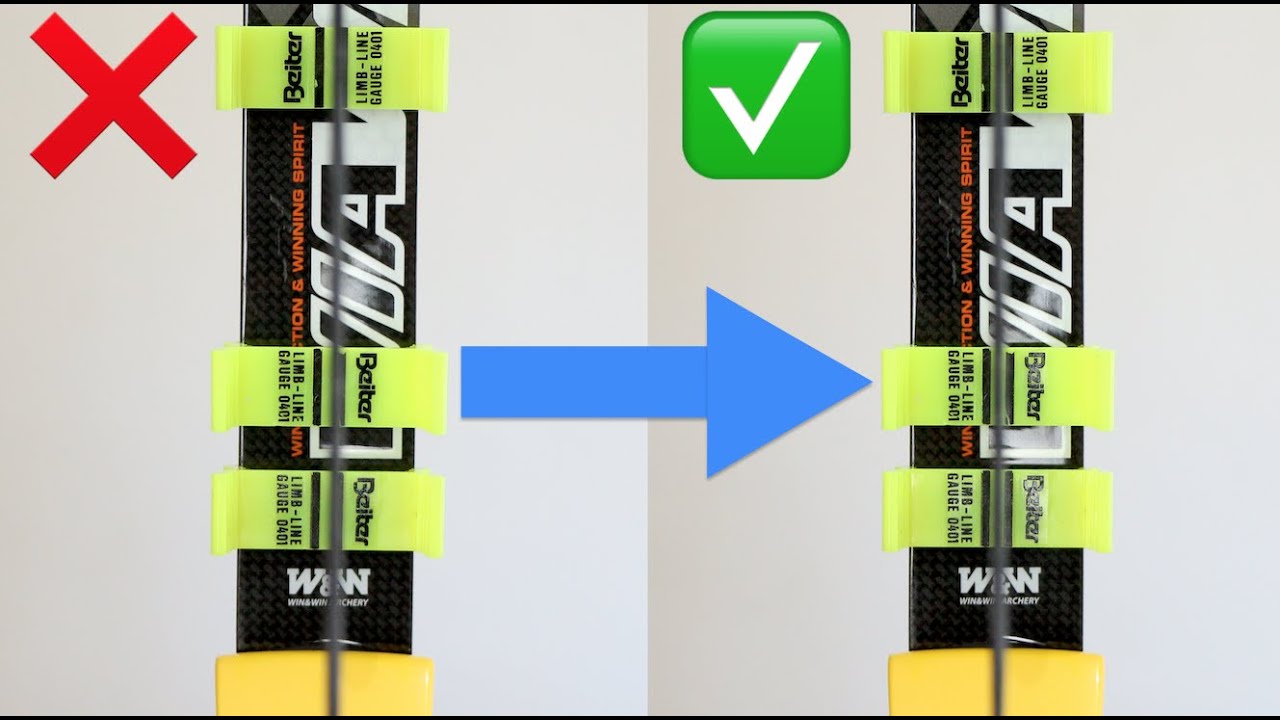
if not you can lean you can set it down on your limb tip but just barely have it leaning against a table or a chair you don't want a lot of side load deflection on the limb tip because then it'll change what it looks like now comes a part that we're actually going to be aligning the limbs these are the tools that I use so I basically just use biter blocks they're very simple they're just two pieces of plastic that you can snap on two limbs you can see how they have these type of serrations
here that basically allows you to snap it on two different limb sizes I prefer to have quite a bit of clamping force to make sure it is centered on the limb so if it's just barely on there and wants to fall off all you got to do like people have a hard time getting it into the next step you just got to squeeze this opposite side like this and it opens this side up so you can set it on the limb and then let it go alright so again I use the biter blocks I prefer
the yellow ones like this there's there is black ones but ideally I feel like I can see my alignment better there's these two black lines and the center of the two black lines is in the center of the block which means it's the center of the limb I've had some people asked me about the I forget the name of it but there's a new one that kind of adds a third dimension it's like tuning forks he had a snap on to the lemon and there's piece that sticks further back I'm gonna show you why I
don't like those I think it's a really really great concept and it would be optimal in a perfect world but we don't live in a perfect world we live in the world we live in so it's gonna change things slightly if you imagine that these are cross-sections of limbs a biter block would clamp and click on to it from this side so it'd have surfaces to touch on either side of the limb they bite our block clamps on this surface and this surface and then comes out like this and it has that flat piece and
these continue and then you see your stripes and you're looking from this direction so there's two mounting surfaces that it touches one on each side that new the new limb alignment tool uses four surfaces because it's shaped like this whoops it's shaped like this where it touches the corners and then it ends up coming together and it has a central point that comes out and actually extends quite a ways it extends maybe three four inches it's quite along well quite a long way so it gives you a third dimension to reference against your your limbs
which is in theory again great but so we're taking instead of two surface areas that we have an opportunity of different amounts of clearcoat to be on different sets of limbs or having more clear coat on this side than this side it happens all the time and I'm going to show you how thick clear coat is and how much it can be different so if we're looking at this section here it's touching four points so now we're instead of just two different options or two different opportunities for different clear coat thicknesses we've got now four
and then we take it and we extend whatever difference that is and extend it out three four inches so if this one's a little bit off its gonna push it this way more and then this is going to go that way so it's going to change a whole lot because of this third dimension whereas this two dimension is just going to be shifting this direction or this way but it's not far away from the limb it's actually very close against the limb so it removes that third dimension which I kind of like because I can
show you with multiple limb blocks I can still show you the third dimension to make sure that the limb is in plane and going to pull back straight this will do that with only one set whereas I use two sets of ITER blocks to align my limbs so I have four total fighter blocks on my limb systems but I don't like the new limb block because of the magnification that can happen from different amounts of clearcoat on different parts of the limb and I'm going to show you here how thick the clear coat is on
some of the limbs out there all right so I want to show you an example of how thick clear coat can be on the limbs and they're sprayed by humans not by machines so it's very easy to have more clear coat on one side than the other this is a set of limbs that I used and I as you can see there's a difference in color between here and here here I scribed a line with a razor blade and then remove the clear coat on this side so it wouldn't wear down and if I take
a micrometer and I zero micrometer and then I use the depth gauge to basically put it near the clear on the area where there's no clear coat and then push down and flat on the clear coat and we can see it's ten thousandths of an inch thick on one side and I mean it's gonna change as I do it a couple times because it's not perfect I'm again doing this by hand that one is uh eleven thousand eleven and a half it's the same spot but anyway this is on the other side see here this
is on the other side and I'm getting I don't know what is that eight thousandths of an inch on this side as opposed to ten thousand 8,000th so again I'm doing this by hand so it's not gonna be perfect but you can still see that I've got about between eight and ten thousandths of an inch of clear coat on this Lin let's check the nut another limb make sure I'm still zeroed I put it on the surface this is 12 thousandths on one side go to the other side 13,000 so it changes again I'm doing
it by hand it's not perfect but you can see on average about ten thousandths of an inch of clear coat on the limb surface so if you're off by just a thousandth here and you extend it over a four inch length if it's off on one side and it's in its pivoting over a four inch length it's gonna change what it what it appears to be because it's very simple you know like I said the same thing if you're checking the riser the string on the riser is your center point but then you have a
30 inch long rod and you use that as the reference if you're just a little bit off here you're off a lot out there so same reason with this if you're off a little bit here you're off a lot where the reference is further out not only can clearcoat be different in different spots but you can have chips and dings in your limbs especially if they're used like these limbs are used and I have got dings up and down the edges of the limb itself so especially on the corners where again those surfaces are from
the the new type of alignment tool so I prefer to keep things super simple another quick thing to take into consideration is there's two main services on a limb that will affect the alignment so it's the contact point back here by the dovetail and the contact point here where the limb bolts it's those are the two spots that make all of the difference and if for example you have something like this where you can see the clear coat has come off if you've if it's come off on one side not the other or differently on
each side it can change the way you're appearing how your limbs look so just keep and keep in mind to keep an eye on the amount of clear coat that is on each side and I mean I'm not going to tell you this but there's a reason that I cut that clear coat off where the mating surface is for the limbo okay so now we're looking at the back side of the riser with the biter block on the top limb here it's very simple as you can see the string here is in the center of
the stabilizer so you want to be able to see your stabilizer while you're doing this some people will stand too far back and then the stabilizer is hidden below the sight window so they can't see it so you got to stand up close enough to the bow so you can see your stabilizer and you want to Center the string on your stabilizer and then look up at your photo I'm going to show you with using the camera on my phone or you know just a regular still camera that takes still pictures I'm going to show
you how I use that as a tool to check my limb alignment and you'll see in the pictures that I'll start putting in front of you now as you can see the string is in the center of the stabilizer and you can see that both limbs are off to one side some people will mount a laser on the bow and use that but I don't necessarily trust that the surfaces on the bow itself where the laser mounts typically they screw to the sight bar or the sight window area and if that's not machined perfectly flat
and plane to the bow itself if the paint is uneven or damaged you're not going to be straight with the the center of the bow so for me I prefer to just take snap pictures and then look at them as well how do you adjust the limb alignment pretty simple especially on this the system that you can just adjust back and forth with Allen wrenches the holes with the shims are a little bit more labor-intensive because generally after stringing on string the bow in order to to access the shin especially on the older models but
it's quite simple so as you can see with the picture there was a gap towards the left side over here so it's really simple all you got to do is move limb to remove the gap so on the bows that you adjust with shims like the Hoyts move the shim towards the gap okay I'll explain that a little bit here but I'm gonna work with this win and win system there's locking bolts that you got to remove first to access the actual adjustments the set screws this is from the William wins again it's again a
collet lock that locks the actual system itself in place so you got to remove these first in order to move the limbs at all it's very simple to adjust the winning wins or any of the ones that have just these set screws now that I've had the lot that have the locks removed all I got to do is put my Allen wrenches in here and there was a gap on this side so all I'm going to do is I'm going to loosen the side that the gap is on and then chase it with the side
that is going to be doing the adjustments you don't want to back both off because then you lose the contact point on the actual pivot block it's or the knuckle pivot block on the block that holds the dovetail itself so as you're pinching the the dovetail block you loosen one side to push it over with the other end but vice-versa so I'm going to loosen the side that the gap is on just a little bit and then tighten and chase the side opposite because as you can see I have the top limit already adjusted now
the bottom one I need to adjust the same so the gap is again on the left side I'm going to loosen the left and chase it with the right and then adjust that until I have both of my limbs and yeah I forgot to mention was I mount my bihter blocks at the base of the limb very close to the riser is it especially important on the heights with the pivoting limb block it's because if you put them very close to the actual adjustment mechanism it removes any sort of influence that the limb may be
off this direction due to that pivot block so with the limb down with the block down here at the base you won't see the misalignment down here because as you go further and further towards the limb tip with the butt of the blocks you'll see more misalignment towards the tip so now my lid are adjusted so I can take these lock screws and put them back in the adjustments and I'll lock them down but before I do that I'm gonna show you how to do the third dimensional plane view and see if your limbs our
are twisted per se not necessarily twisted because again there's a lot of mating surfaces within each bow and a lot of different tolerances and so those can add up to be off one direction or the other and that's where with the Hoyt system you can adjust all that and make sure everything is perfectly straight but as you can see I have a biter block up high here and a biter block down low again like I said when you have one down here it takes out any sort of twist up here you will see all the
twists basically so if you stand back and you again you look you can Center your your string on this block and then check this block and you'll see if it's off one direction or the other this particular limb is straight and with the riser itself and and you can tell because both are in plane you can also verify this using a draw board as you pull the bow back after discovering doing it this way I realized you don't have to do that okay now that we've aligned our winning wind bow and I've shown you how
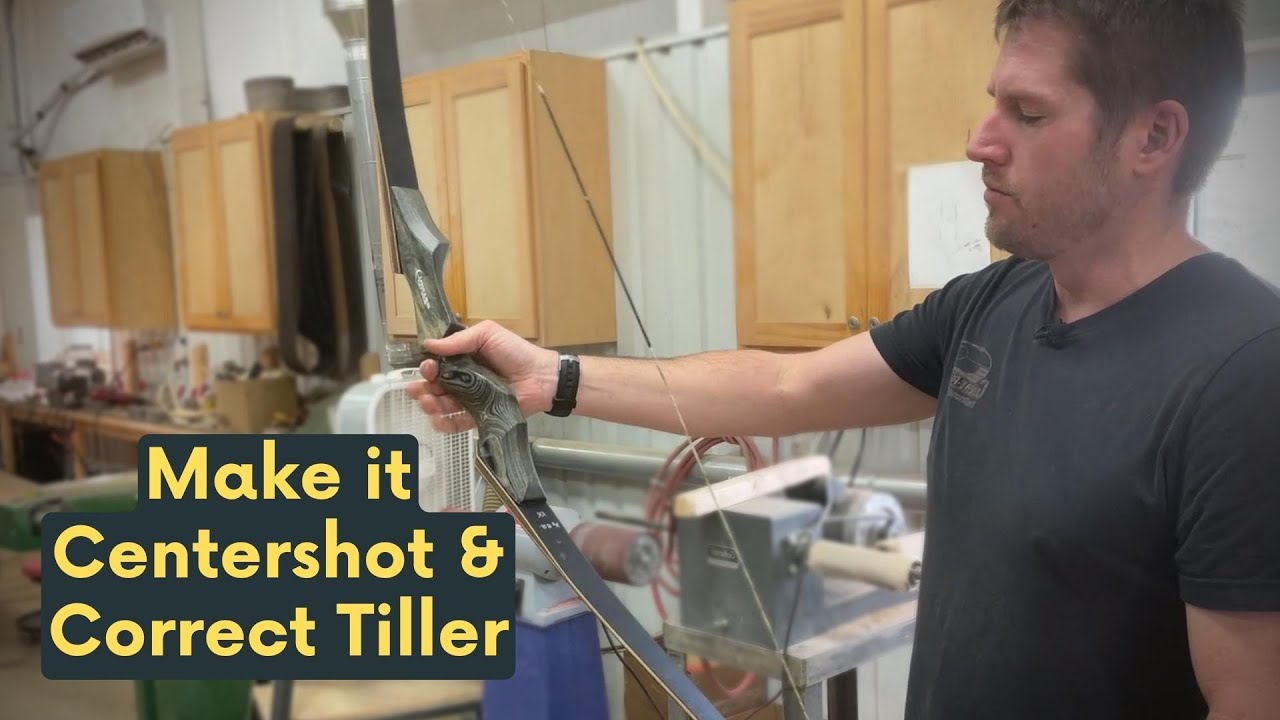
to use their adjustment system we're gonna talk about the height adjustment system both with the shims and the pivot system so the pivot system this way okay this is a bow I shot at the Olympics so it's already set up straight but I'll take it apart and adjust it and show you how changes make a difference so as you can see the limbs are already in line in plane to each other and then they are also in plane the rotational this is your basic Hoyt dowel system you can see it's an actual dowel that goes
in and through the riser and then it has the dovetail machined into it and then on the other side of these two holes there's two blocks that move in and out that can have changed the twist per se of the riser it's or the the it's very simple very straightforward on a right-handed bow if this is the wind sight window side so the open side of the sight window this side the left side on a right-handed bow is the actual adjustment side this is the side that makes all the adjustment this side which has the
floating cap as you can see there's the Allen and then the cap itself as opposed to the cap is solid or in older models there's a side that you can't remove and there's a side you can remove the side you can remove or the floating side is only storing extra shims this side is the side that actually makes adjustments when I and when I'm talking about shifting a shim towards the side that the gap is yeah you don't have to always take one side and put it on the other you can just edge some shims
but it just keeps it easy that they come standard with four shims two on each side that's standard stock location so if you're having a really hard time adjusting your your hoyt go back to stock put two on each side to 10,000 shims two full shims on each side your bow does come with half shims or 5000 gyms if you need just a little bit more and I'll show you how to figure out if you have five thousands or ten thousand shims okay so I have two ten thousandths and one 5,000 shim in my hand
I've show you an easy way to recognize which is which older White's came with brass shims the brass shims are all ten thousandths of an inch thick so that's a quick way to know for sure rations are ten thousands now in the old White's they came with extra shims and bags not in the riser those are definitely five thousand shims but if you have a new height they come with stainless shims in both both the riser and in the bags the ones in the bags are five thousandths of an inch but this is an easy
way to show you the difference between a tenth and a five foul if you don't have a caliper so this is probably a ten thousandth and you'll see it's stiff it won't Bend if I hold one side but if I take the 5,000th and I hold one shut side you'll see it Bend see how much flex and Bend I can give or make it half whereas this one's stiff this is a 10,000 there's a 5000 shim I call this a half a sham I call this a full shim because those are the shims that come
in the risers so now with knowing that when I say two shims one on each side or four shims two on each side that means four total full shims works if you have less than that the dowel the adjustment dial will clamp on itself and will float within the riser you have to have a minimum of four total shims in the entire system for it to sandwich against the riser and align correctly all right so I put a shim in this pivoting system to throw the Lim off right now I've got a total of about
ten thousandths of an inch of shims in there so there's there's one shim basically off and you'll see that the top block is slightly off compared to this bottom block and all that is is there's a twist induced in the system that throws the limb tip off and as you can see the further out you go from the riser the more you can see that influence with these biter blocks so an easy way to tell what direction to adjust this pivot system to make this top block be straight with this bottom block it's really simple
all you have to do is grab the limb and twist it one direction or the other and it's kind of hard to show you here on video but I'm gonna do my best if this stays still you'll see this rotate and change as I'm twisting towards the right now twist towards the left and you can see that top block shifting compared to the string so if it's out right now there's that gap on the left side so if I look at it and I twist it towards if I twist the limb towards the right it
makes it worse if I twist it towards the left it heads the correct direction so if I'm twisting towards the left that's the correct direction so what that mean that means I can push with this side or remove shins on this side I always suggest to start with zero shims on each side stock from the factory that comes with two shims on each side sometimes they're not even tight so from when you get your bow even if it's fresh out of the box I personally would remove all the shims not not in this stuff but
in this stuff start with zero shims and then adjust from there so that way you've only got a couple in case you lose some and who knows you never know I just prefer to start with zero and then so for this one in this scenario because there's a gap on the left of this limb I would push out on the right thanks for watching be sure to subscribe and hit that notification bell so you get notified every time a new video is uploaded for seminar and book code info head to Jay Kaminski comm or click
on the link below and yeah I appreciate you guys watching if you would please share this video and really help get the word back out that I am back out there thanks again take care