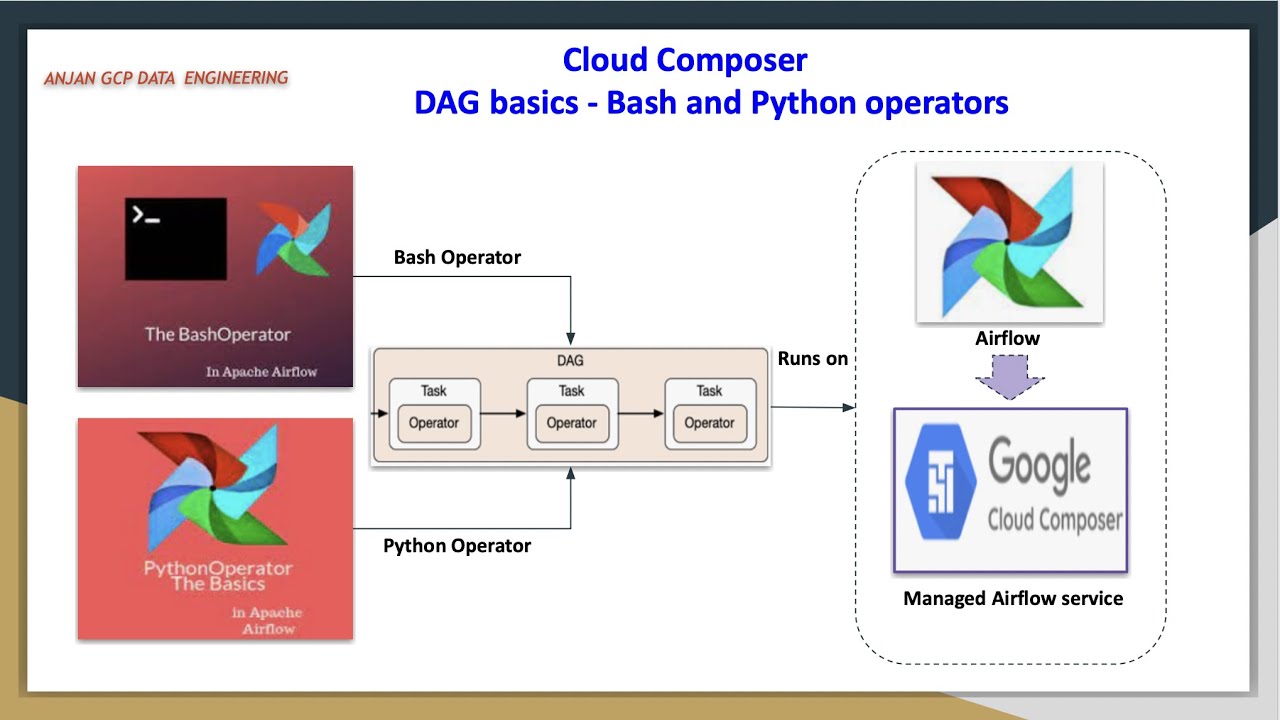
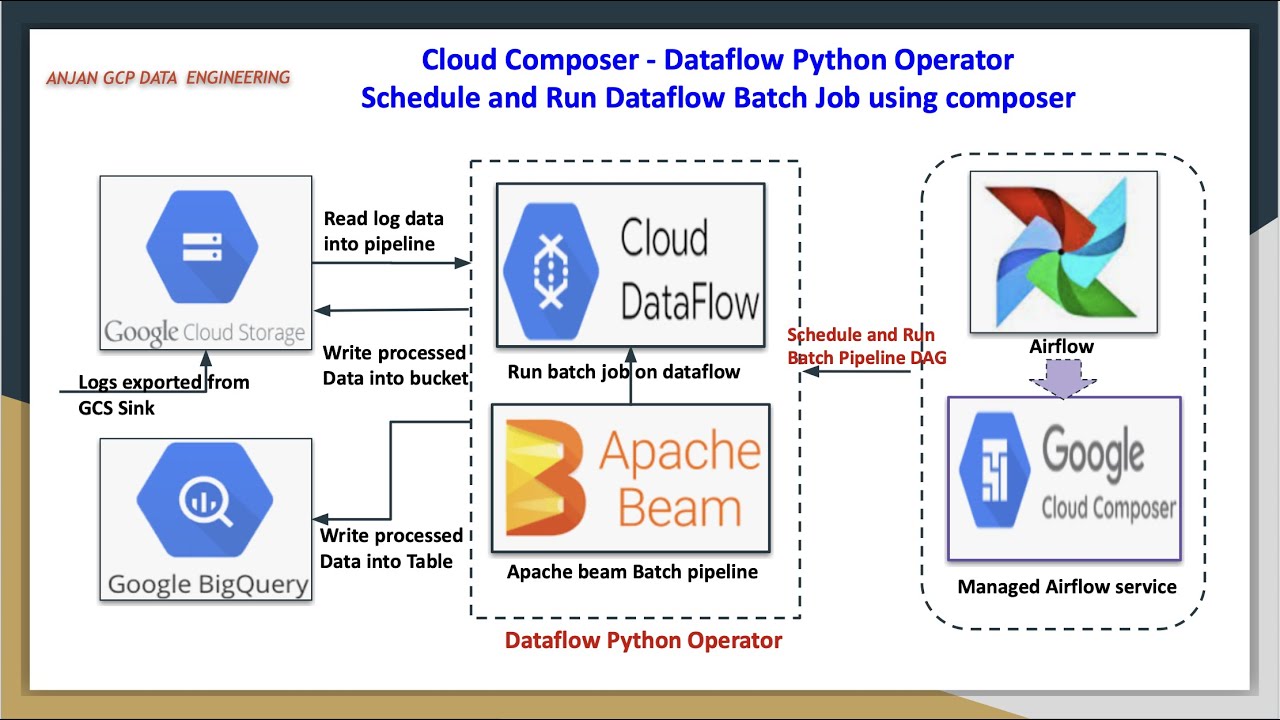
welcome back to my YouTube channel cloud and analytics hope everyone is doing good I'm Vikes and in this video I'm going to explain you one of the most important service in Google Cloud called Cloud composer so this video it is going to be a practical handson where we will be building an ETL pipeline using cloud data flow when I say ETL pipeline we are going to read data from cloud storage process it through cloud data flow basically through Apache beam and load it into big query and this entire ET ETL pipeline it is orchestrated with the help of cloud composer so we are going to write a separate script for building an ETL pipeline that is in Apache beam python SDK and the next one is we are going to write a airflow script to orchestrate this pipeline so we will see what is that in this practical demo and without any further delay let's get started so the first thing is you have to create a composer environment so basically to create a composer environment it will take around 20 to 25 minutes to create a composer environment in Google Cloud I have already created it but I'll show you whatever I did for while I'm creating the cluster or composer environment so first click on this screen I'm using composer one for this particular demo here you can see composer version is 1. 2. 8 and airflow version is 2.
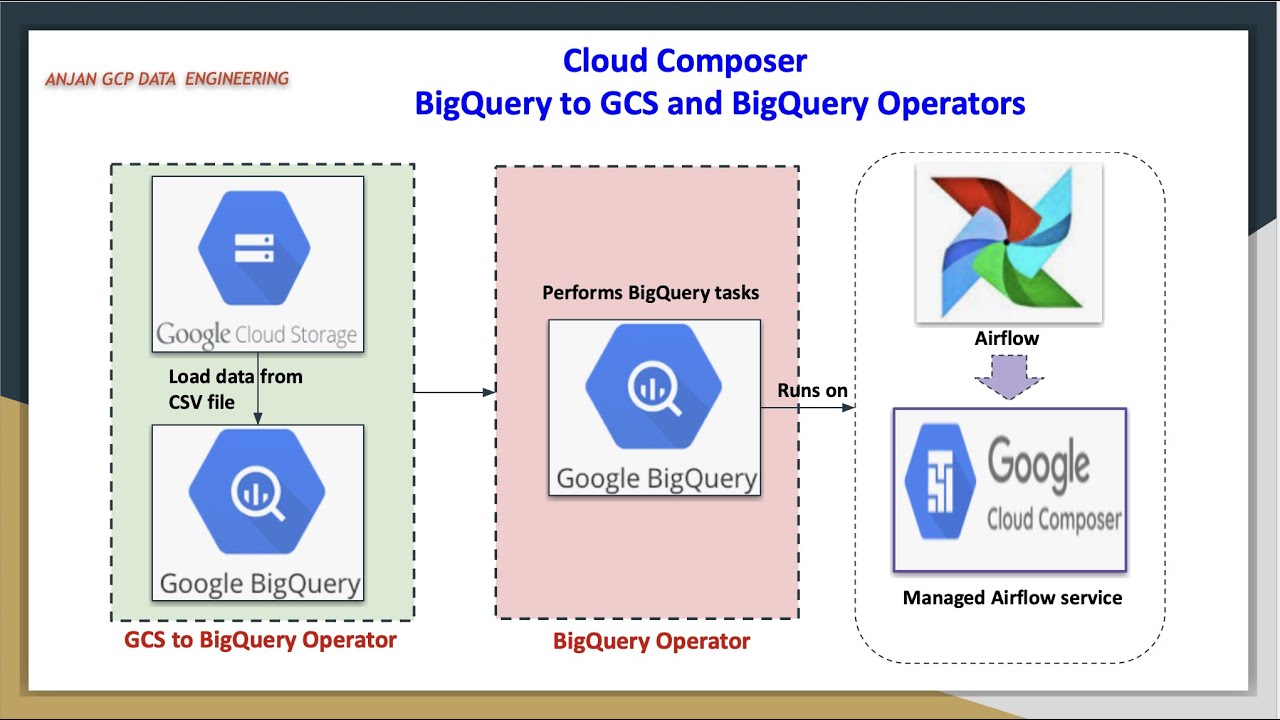
4. 3 so basically the difference between composer 1 and composer 2 is composer one it there will be no Auto scaling and it supports both airflow one and airflow 2 whereas composer 2 is auto scaling and it supports only Al outflow 2 so I'll just click on this composer one and you can enter your composer environment name can just enter your composer environment name the location what is the image version you can for example I'll just add this composer 002 and location let it be a and image version Let It Be 1. and airflow 2 whatever the requirement like I'm going with this one so the node count is three basically I'll explain you in the next video what is the architecture of cloud composer what is airflow I'll be explaining you those things in my next video very detailly but we'll just go with the setup for this particular lab so you can just click all those things let it be default and when you just click on this grate it will take around 20 to 25 minutes to create this particular composer environment the moment I enter into my composer environment you can see the monitoring tool all the monitoring tools you'll be able I have already uh like I have already ran my like few few runs also here you can see all the details here what is the fail task what is the failed diagram what is the successful diagram and what is the environment for now everything is in the healthy the logs all the log details you can find it from your the Dax environment so this is where we are going to upload our airflow script and environment configuration here you can see name location service account Google API Scopes image version python version DC folder airflow web UI loging so all the default things whatever we config you'll be able to see it here and the next thing airflow configuration overage environment variables labels and P P cages so if you wanted to install any python packages you'll be able to install it here and it will be applicable throughout the composer environment itself so you if you wanted to navigate your airflow UI you can just click on this and you'll be able to see a screen like this and the next thing is dag folder this is where inside this dag folder this is where we will be uploading our script file and we will be uploading our uh um main file as well for example I'll show you the code now so this code or U you can see here right I'll just uh I it so here you can see this is the two script files and I'll show you the um demo as well so this is the airflow script which we are going to upload inside DC folder so inside this DC folder we are going to upload this particular piece of code this is what the airflow code which is written in Python so we are importing the packages we are installing we are calling the default arguments and we are import like we are defining the dag variables what is the dag ID what is the default arguments here you can see airflow retries retry delay data flow options like what is the project ID what is the region and what is a runner data flow Runner since we are running it in Google Cloud itself and we are going to schedule it daily whatever the default arguments and the start date is whatever like day before yesterday it will just like just yesterday what it is what the yesterday date is catchup is for and the description the first one is dumy operator then second one is data flow operator like data flow python operator so this is where we will be calling our python script well so basically I have placed this python script well data flow scriptor titanic.
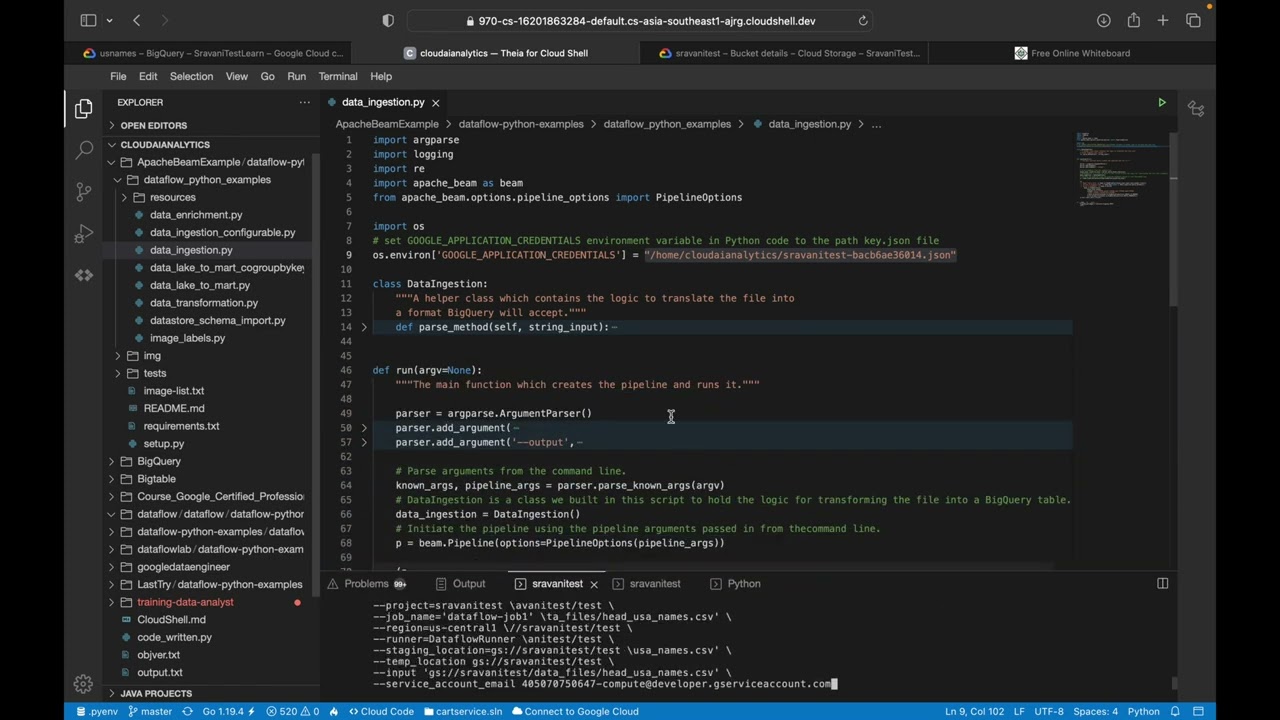
so this is the main script file which I have placed inside this particular demo so here you can see I just came out of this composer bucket so this is my composer bucket under dark this is if you wanted I can go inside this D holder this is where I'll be keeping my airf flow script which has basically the dag concept inside it so here I have upload this data flow script Titanic and this is my CSV file so basically which is in present inside CSV file which is present inside the cloud storage bucket so I'm importing the packages and I'm writing that this is my target table like final Target table project ID data set ID and finally the table name so if I open my big query so I'll make sure that the yeah the data set is present my first data set so this data set is present but this table is going to create at the run time so I'm going to get the input argument alone from the airflow script file so if you see inside airflow script file I am passing the input file input as an option here so this input whatever the Titanic data set this will be passed as an input to this script file data flow Titanic script Titanic so here it takes one argument that is input and we are going to create the pipeline arguments here like beam concept like pipeline P collections those things and we are I'm writing a uh function which removes colum like it will remove the colon and it will just print the row as well and this is where the clean the data is I'm going to do a very minimal transformation first I'm reading the text um from the cloud storage that is the CSV file I'm just ignoring the header line so here you can see I'm just ignoring this first line I'm going to ignore it and then I'm calling this function remore last column and I'm making all those things to lower everything is converted into lower whatever the Cap Caps letter or camel case everything is converted into lower case and then I'm doing one filter option which is going to filter on First Column so what is my first column here you can see passenger ID is my sorry passenger ID is my first column that is zero serid is my second column that is one palal is my third column that is two so Sur I'm going to filter on who all actually sery that is the filter I'm going to do and I'm going to add a new column called uh new value called Titanic server so this is what everything it is stored inside this clean the data basically clean the data is a p collection the next thing is I'm going to take this clean the data and I'm creating one more P collection called Sur data so this is where I'm going to filter so if fo is three it means fourth column so passenger ID Sur to P Class 2 sucess like I'm going to fe uh do filter with female so I just wanted to load a data to my big query where I want how many passengers got surved and out of that I'm going to do a filter whose female like what are the females I'm just going to add that to my bigquery target table so survey data like what is the count delivered what is the delivered map and print delivered column and then we are loading it into bigquery so bigquery client uh first thing is it is going to get the data set obviously the data set is present inside my big query I showed you before if that data set is not present it will going to it will basically create the data set that's it it will create the data set and it everything will be converted into Json from CSV it is converted into Json and then finally we are writing it into bigquery so write deliver write to Big query deliver table specification the first thing is our project ID data set ID and followed by table name and table schema so so everything this is a table schema passenger ID string Ser string and it is going to create if the table is not present and it is going to write upen so whenever I'm uploading like running it the next time second time second day Third Day fourth day basically I'm going to shedule it right like daily so whenever it is running for the next day it is going to just add the data to that particular table that's it it is not going to overrate or it is not going to upset at all it's just going to upen the data and finally the option like finally our script file is done so what I did this I uploaded this Titanic data set. CSP and data flow scriptor titanic. inside my cloud storage bucket so here you can see inside my cloud storage bucket I have uploaded them here those two files I upload like data flow now the main script file so if you see this is my airflow script so this is the uh D script F so here you can see the dag object is present so I'm going to go inside this dag folder just click on this upload files and I'm going to upload this airflow script.
py so this is my main file so once it got refreshed I guess we'll be able to see the file yeah the file is there airflow script. py when it got uploaded all those details you will be able to see it here so the next thing is I'll just close this and I'll just close this as well so I'm going to refresh I'm inside my compos environment I'm I'm going to refresh this so I'll just click on this open airflow UI so this is where you will be able to see the airflow actual airflow UI so here you can see airflow UI Dax data sets browse admin dogs so I'll be explaining you each and every concept like what when can we use this admin variables configuration those things everything I'll be I'll be explaining you in the upcoming videos uh this airflow monitoring it is the default one which is present inside composer and it is maintained by Google Cloud itself to check the healthy environment to check the health of the composer environment so it will basically take one or 2 minutes to reflect whatever the script which we uploaded inside the D folder right under cloud storage it will take one or 2 minutes to get reflect here so you can refresh here or else you can go inside this environment and you will be able to refresh here as well so you have to just refresh and you have to um wait for one or two minutes so basically if there is any error you will be able to see that error message here as well as you'll be able to see that error message here also so what I'm going to do is I'm going to close this and I'm going to my composer environment I'll just refresh here I'll just refresh here once again and I'll just click on this airflow UI so you can click on here as well and you can go inside this composer environment you can just click open ad flow UI D folder this is where we will be uploading our main script file uh data flow Apache beam script file as well as airflow script file airflow script file which has a dag object it should go under dags folder or else it will cause us an issue so if you want you will be able to see everything here we'll see here yeah now the Titanic exp is there so here you can see this is my dag ID Titanic exp and it is scheduled daily so now I'm going inside this Titanic exp and here you can see start Task ID python task data FL and end task ID so here you can see like dag it follows dag concept like dag is directed ay graph so it depend like once after completing this stage it will go into this stage and then it will finally go into this stage so in my next video or in my upcoming video I'll explain you what is dag what is d a cyclic graph so even if this step fails or passes it will move into the next step and ultimately if the entire pipeline is successful you'll be able to see the success or else you'll be able to see the failure so now you can just click on this manual like if you wanted to run it manually you can just click on this trigger dag so when you're doing it for the very first time uh by default it will run but I'm running it for the second time that is why I'm I'm triggering it for the next time manually because once it my actually the schedule interval which I did know it is to run the script file once a day like daily it will run once at the particular time so if you wanted you can schedule the time interval as well so basically that time you can give it as like Crown job you can give it as a crown job so whatever the Crown schedule right like the same thing you will be and it follows UTC time if you wanted to change the UTC time also you will be able to change that so this job you will be able to see it in data flow as well because ultimately it is going to use data flow Runner right so you can just click on this go to data flow and you will be able to see the data flow Runner which is currently learning python task data flow so you can just click on this and sorry you can just click on this and you'll be able to see the structure you'll be able to see the outline so basically read from text remove last column and Lambda the next thing is uh filtering passengers deliver to Json right delivered count delivered deliver whatever the Json whatever the P collection which we defined here right everything you will be able to find it here so the first thing is it is going to read text uh it is going to read all those things if you want you can just give a file like this filtering messages those things also you'll be able to give it and read from text the first thing is read from text and the next thing is remove L column and then next map like everything everything it is converted into lower the fourth thing is like we are splitting the column basically we are going to do uh filter on sured column where we are going to filter on who actually sured that Titanic data and then finally we are filtering on the passengers like this after Titanic Sur we are adding one value Titanic Sur and then we are splitting female passenger filtering on female passenges from here we are doing two things one is this surve data right this survey data we are taking this survey data into two things one is we are going to this what is the count what is the count of this data those things you will be able to see it here and the same surve data that same same Sur data P collection we are taking it here and we are converting that CSV file to Json object and writing that Json object to bigquery this is what we are doing it here to conver Json we are taking that CSP sing and we are splitting with comma separated file like basically CSP is comma separated file we are splitting that with comma and we are assigning that values to this particular and here the table schemas passenger ID string everything is a string I have given everything to a string and then we are calling this to Json method here beam. map to Json beam.
i. r to bigquery this is where the deliver table space you can see this project line number eight uh schema table schema create the potion and right dep position so here you can see the job is currently in the running State and here here you can see what is the job name what is the job ID what is the top time basically we are doing the batch processing job status it is running and appach beam python 3. 8 SDK 2.
4 and new version the job region worker location current worker latest worker status start time elaps time encryption time data flow Prime Time Runner version two data flow Shuffle those things what is the current virtual CPUs total virtual CPU time current memory total memory time current sdd PDD total STD current SSD those detail all those detail you'll be able to see and this is what the pipeline options is like labels project region Runner and the staging location so we are not providing any cloud storage bucket name so what it will do is it will create data uh data flow staging buckets on its own during the runtime itself so in my next video or in my upcoming videos I'll make sure that how to pass or how to submit a data flow job us using gcloud commands using python commands as well so I have already shown you how to run a data flow job using predefined templates if you have not uh gone through that particular video I'll give that link of that video in this uh description session you can take a look at it so here you can see that everything is done still it is right like the delivered it is also succeeded and now it is going to this count deliver deliver map all those things so we can go here and it took around we'll just refresh it here so it took around 4 minute 9 seconds and obviously it will take like around 5 minutes to complete this entire job itself so we will we will wait for it 4 minute it is still in the running State and the same you can find it here as well it is still in the running State and here you can see this is the grid State we are in the grid if you wanted you can see the graph as well so start Task ID is completed python task de it is which is currently running and end task ID the next sters so here you can see deferred failed cued removed restarting running schedule shut these are the different task ID task values so if you go here I have given retry one if the job fails it will retry for next time after 50 seconds so basically if you give zero you are not going to retry if you give two it is going to retry for two more times or two times and then it is still in the running State and schedule daily next run is this and the calendar task duration I'll explain you those things in the upcoming videos and if you wanted you can just click on this code and you'll be able to see the code here like import libraries all those things whatever I have explained you right this is the dag airflow script you'll be able to see the same here and the same logs also you'll be able to find it from here you'll be able to find it from the year or else you can go you can find it from this logs or you can the next thing is you can go here and you'll be able to find the logs here or or else you can go to Cloud loging and you can filter that basically there as well like go to Cloud loging can go to loging and you'll be able to filter records from youro you have to just write a query and you'll be able to like for example you can just click on this data flow step and instead of last for hour like last 5 minutes you will be able to see the log details here as well so the job is done so here you can see see I'll just close refresh it the job is done and here also which I have already you have seen this so here if you see we are reading that text and here you can see it is succeeded map it is also succeeded and yeah here you can see elements added is 89144 uh 44.