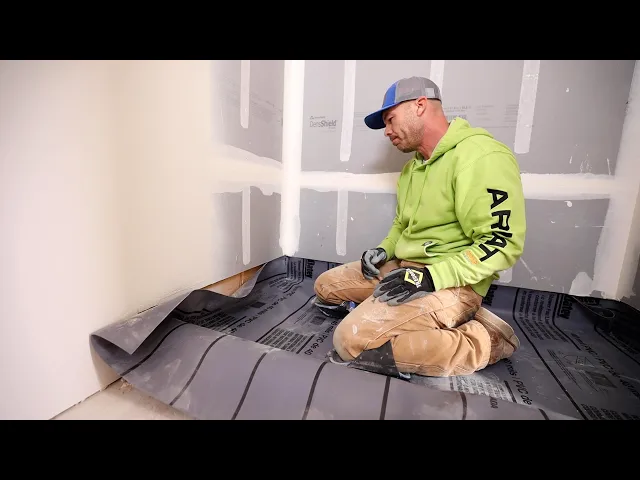
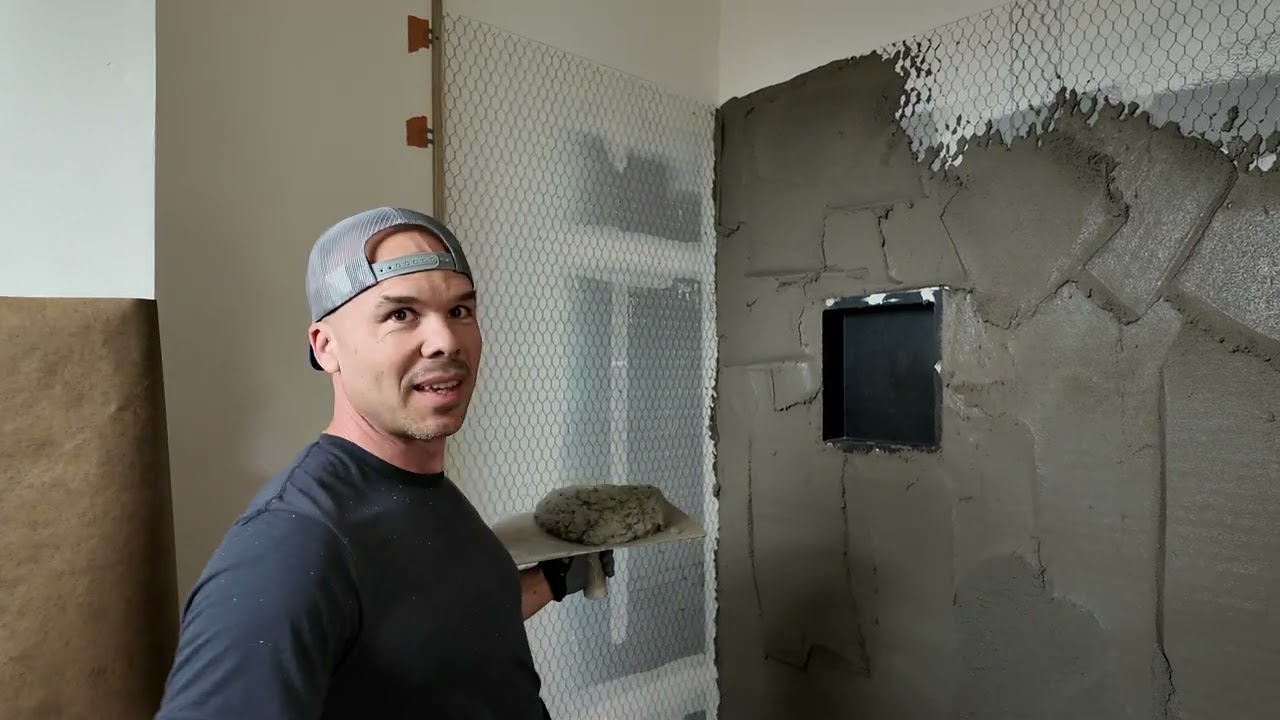
bring it up to 6 in here we'll just fold right over [Music] there have you know this is basically what we have we got a OSB subfloor 2x4 curb and the contractor left the dent Shield up good let me just measure this uh 7 in up off of the subfloor so we're going to wrap up our pan liner and again we got bent shield on the walls we're going to end up floating this so stay tuned there'll be other videos showing how we prep the rest of this stuff but for the pan liner we're going
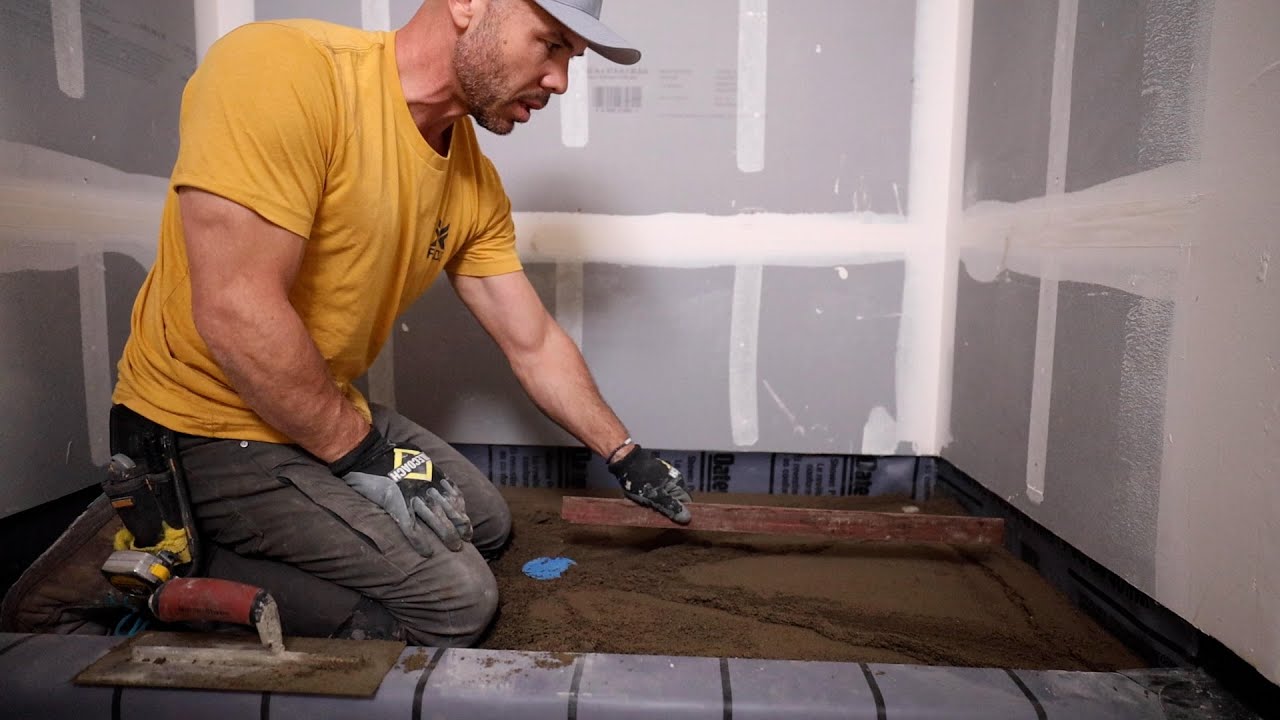
to get ready to go we're going to get our pre-s slope in uh what we're using for our pre-s slope is this fastet morar mix with this rapid set Mor mix it's really good because you can work on it almost right away 15 minutes I'll be able to knock on the stuff here's the tar paper I probably don't need to put this tar paper down it's not waterproofing or anything it's just going to keep the the moisture from sucking into the plywood and also when they tear this thing out in 100 Years it'll be easier
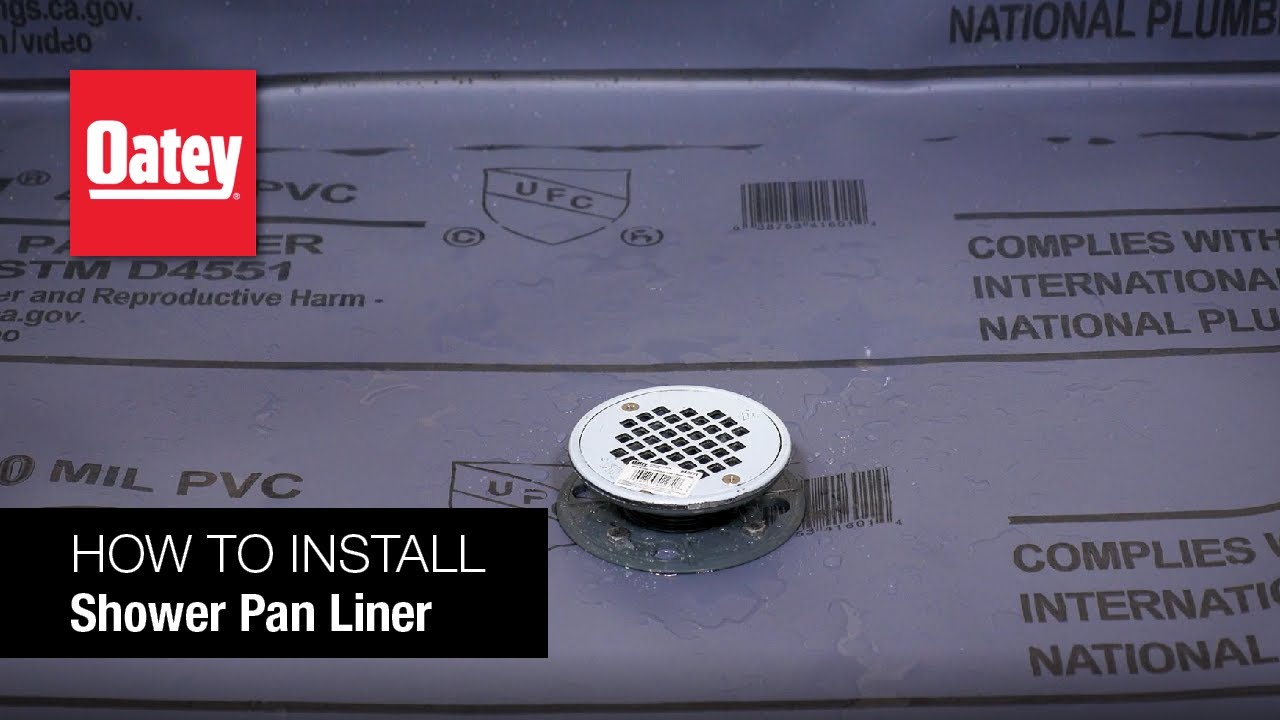
so the purpose of the pre- slope is just so that the pan liner has slope on it it doesn't really need to be like perfect uh but I get it pretty close and I also don't reinforce it I don't put wire or lap into the the pre- slope I just don't want anything to compress or move I don't really need even if it did happen to crack it's not a big deal it's going to be under that pan liner yeah so these These odies caspers are uh two-part drain there's the weep holes it's really important
to make sure that you keep these weep holes clean so there's there's the loopholes right there we'll take really special precaution to keep these clean once we do the the flow put these nails in here just to kind of keep it in place while and you could just use you could just use like plastic sheeting or anything just as like a barrier to keep that mud from bonding to the [Music] wood and this mud is a trip it's it's going to set up really fast so so it's ready this is ready to dump out go
ahead and [Music] so that's probably a little stiff St again you're going to trip out how fast this this mud sets up there you go Zach you can go ahead and get the one going oh sh I was going to say I give it a whip cuz it sat there yeah the next one much looser Zach [Music] please so what I'm doing here with the free slope is I'm using I'm using the bottom 2x4 right here as a guide so that's an inch and a half I need 3/4 so I'm going to make sure that
I'm at least halfway up this 2x4 on the perimeter and it's going going to zero at the bottom plan I can just readed right off of that and so I'm going up just just about halfway maybe a little bit higher than halfway on the bottom plate of that 2x4 and it always seems to work out that that's about two bags of mortar so you could also use Type S mortar just regular Type S you know that stuff goes for about six bucks a bag at Home Depot and you don't have to worry about like the
the time critical factor and all of that stuff um but you would just need to wait till the next day to to get on it reason why we're using this fast setting is we're going to get these P this pan liner in right away I don't want to wait till the next day so again I'm not being super super picky with this float I'm just kind of I I'll use an ed Ed here just to make sure I got good fall going to the [Music] drain [Music] [Music] okay so I got half of it done
I'm ready for the other half it was running when I brought it in here yeah yeah so yeah that's the consistency I like to have [Music] it all right so yeah I got this half done now I just do the same thing on this half and yeah that's that's the consistency I like much easier to to spread around this is just a a a 3ot l Edge and they're nice to have you can buy them in a set maybe I'll try to put a link to something where you can you can buy them they come
in like a 5 and A2 and then a 4 foot and a three foot and a two foot I think there's a 2 and A2 and then an 18 inch but different sizes but you could also just use like you could use a level you could also use a uh you know stick 2x4 but I'm just going to kind of give myself the a little bit of slope here and I probably should have taped over this cuz I just got some mud right over my hole here you can a little bit of mud in that
bolt hole see yeah some blue tape over those holes would have been a good idea that looks pretty good for the initial initial Tri I'm just going to let it set up a little bit more again this side is pretty much set up this side is a little little goopy still yeah so this this part's really important when you when you bring your pre- slope up to the bottom flange you want to make sure that everything is going in a a you know a slope toward WS one of the biggest mistakes when people don't do
a pre- slope is that the the bottom flange is sitting up you know even like an eigh or a/4 inch above the subfloor and then that pan liner comes and then it goes uphill so all of that is just going to sit in water get mold get nasty you know these systems are designed for the water to hit that pan liner and be able to shed down through the weat holes so that took about 15 minutes to get this pre-s slope down I'm going to let it set up here for about 5 minutes uh we'll
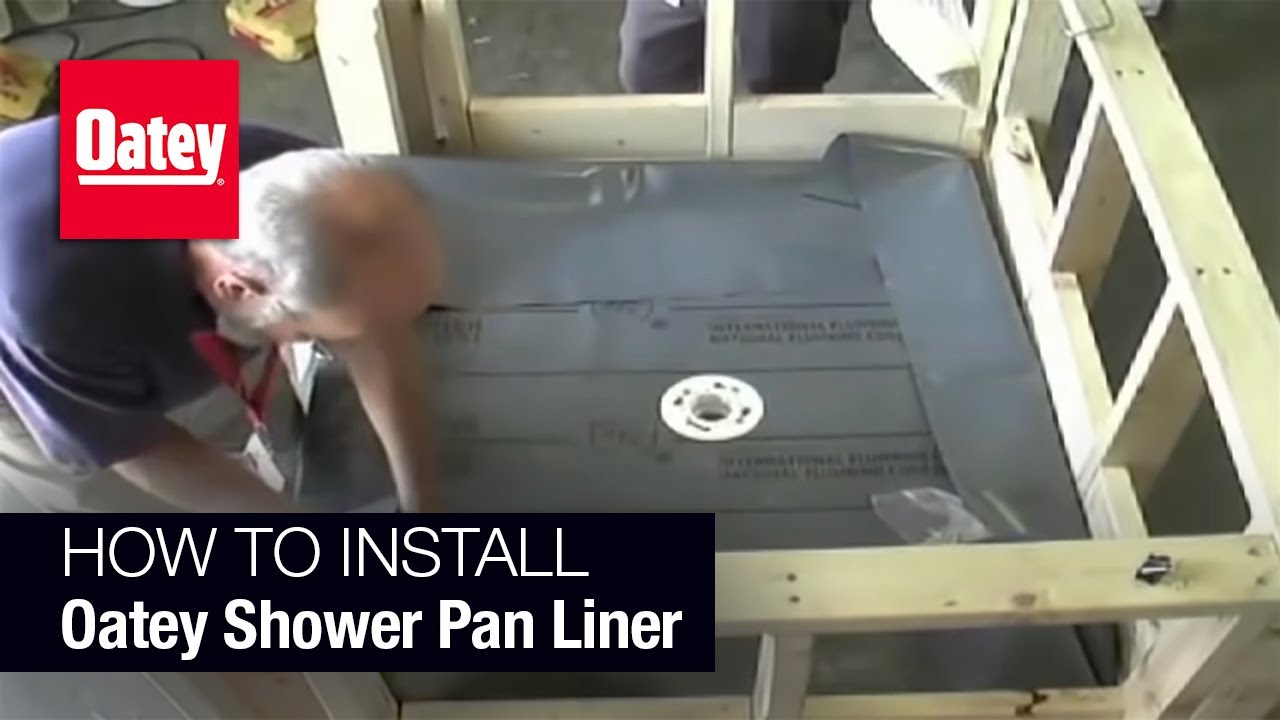
get the pan liner cut and get this pan liner ready to go in while I'm letting this pre- slope set up I'm going to get my measurement for the pan liner so the pan liners usually come in four five and Sixt rolls I might have been able to get away with a four we'll see but I I use the 5ft roll I think it goes for about like $8 a lineal foot foot at Home Depot so anyways the 4T is obviously going to be cheaper than the five or the 6ot Home Depot I only have
4T and 5 foot width rolls so I always get the five and figure the lineal footage going this way so I'm going to take my measurements I'm going to call that 5 1/2 in here I got 32 so that's 37 and2 41 41 3 and 1/2 44 1/2 + 4 is 48 and a half so actually a 4T pan liner would have been just about perfect it would have been a little short yeah so 48 is that way and then lengthwise we're going to be uh 60 in Plus should be 5 and a half and
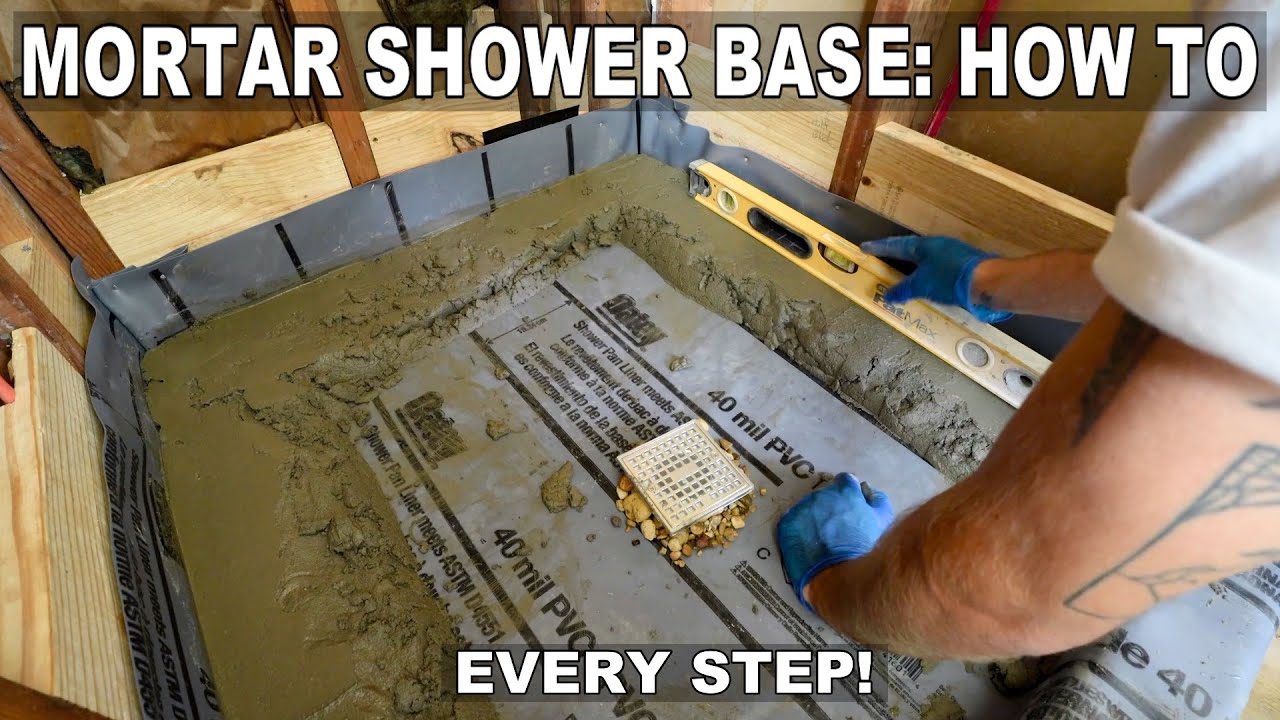
5 and a half yeah so 11 so [Music] 6071 we gave this some time to set up I can walk on this already this is a nice solid pre- slope the first thing we want to do and this is another important step that some people foro is uh we got to get cocking cocking in on the bottom flange here so first thing I'm going to do is I'm going to put these bolts I'm going to thread these bolts back in and you'll see in a second why I am doing this thread your bolts back in
and again this can be a PVC drain the PVC ones or ABS ones they usually have four holes in them the cast irons just have the the three bolts so I'm just getting the bolts threaded in there this Ms polymer sealant this is a rapid set brand it's cheap get it at Home Depot n bucks you so I'm going to put a good a good beat here so I'm actually going to do two I like to do kind of two rings here one on the inside and one on the outside what this what this sealant
is going to do and again some people don't do it but what this does is if if the drain over ever overflows It Won't Back Up and Under the pan liner so it seals the pan liner to the bottom fling now I got my pan liner and what these what these bolts also do what these bolts do is they will tent up the pan liner so as I'm shifting it around it's going to keep it from you know smearing cocking around so that's why I have those bolts intented up and I'll also be able to
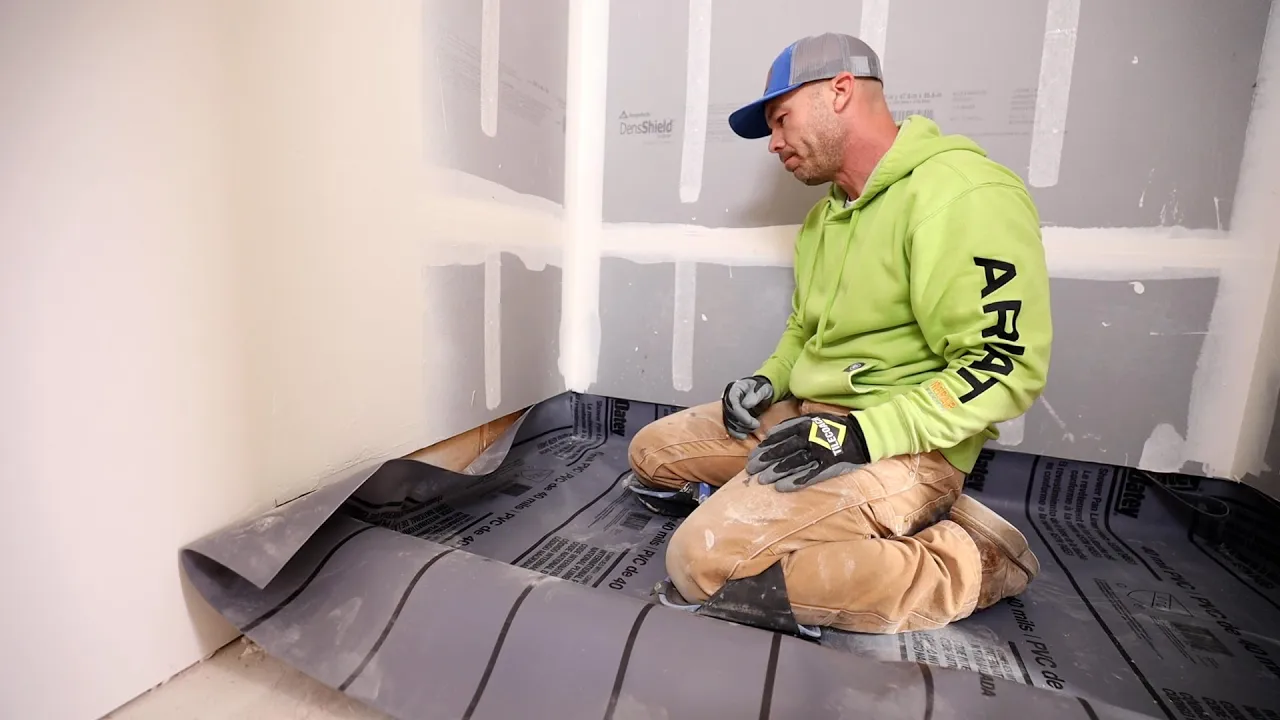
find them [Music] try to get it centered pretty close and then bring it up to 6 in here and now I'm going to step in here and these are just we call them Hospital folds so the pan liner just tucks in on itself to form a nice 90° fold you do not want to cut anything right here and I'm just going to do one temporary staple just to kind of hold this in place CU I I'll I'll pull it back off if I need to adjust come over to this side and do the same thing
we're looking pretty good so I'm going to add a couple more Staples just at the very top yeah so you can see here I have it folded up the wall and I'm just going to tuck tuck it back in behind and crease it so that I have a nice 90° fold just like that so that's the fold this folds back on itself put St right in here f it [Music] up you don't want to do any Staples or Fasteners below 2 in above the curb that's a rule and I know some of you guys are
going to say You're supposed to use screws for the pan liner I mean these are galvanized these are galvanized 3in Staples they sink really deep I mean if I were to try to pull this pan liner off it's actually pretty hard so I um I feel really confident with the Staples I just do and once the wallboard goes on this is all pinned in it's not like it's going to come out but if you wanted to do screws or roofing nails or whatever that's fine yes it really is so before I get too far I'm
going to check this side get this this side stapled [Music] in and we're looking pretty good so I'm feeling good I'm going to start start stapling okay so once I get my my two corners folded and stapled up tacked in uh I don't even have these these outside Folds I don't even have these outside folds done or anything uh since that that sealant in here and I don't want it to cure before I get everything done I can feel these bolts um I can feel these bolts and you can even push on them to see
an indention so I know exactly where that hole is so I'm going to cut um two little two little slits just big enough for that uh pan liner to stretch over over the bolt hole just like that so I'm just cutting a little little cross there so I just cut that cross and the liner will pop right over the bolts so now I can feel that liner squish in to the sealant and I can even cut this out so I can feel with with my knife I can feel where the edge of that metal is
that cast iron or if this was plastic obviously it would be abs and so you'll see I like to make sure I like to cut it so that I can see the sealant actually squished down and now I know I got a really good seal between that bottom flan and the pan liner can take my screws out I can put my holds back on [Music] there [Music] so the bolts go back on and now the drain is is fixed okay so here come here comes the tricky fold this fold is uh I have my way
of doing it I don't know other people probably have their way of doing it I basically start with a hospital fold just like that and then I'm going to cut so I can fold over like that so you see now I have a fold have to cut a little bit off of this cut the extra off here and we have these pre-formed Corners these damn Corners because I've seen a lot of guys they just leave it like this and they leave this part of the the curb unprotected I'm not going to name any names but
you will find videos on YouTube with that feature and code does state that two inches above the dam needs to be waterproofed so I use these these hand liner corners and put them in like that and then I fold it over so it's a little tricky and I don't know if ODI they they're kind of vague in their instructions on how to do this but this is the way I do it so Zach can you hand me the adhesive this is X15 pan liner adhesive and this is what makes you know if you had to
seam together you could seam together one of these these liners but it makes the dam Corners stick to the pan liner material the PVC I'm just going to goop this stuff on [Music] here put it on here as well the adhesive on both sides and then this guy is going to stick right onto here nice and tight and then then I take the fold and put it back on there and try not to get goop all over me but yeah it goes just like that so it kind of goes into the fold stable [Music] and
now I'm going to do the other side here and you can kind of adjust these you know the it takes a while for this glue to set up so you can you can adjust them but they they definitely it will harden up just cut the ex off of there now this side we'll do the same thing see I got got that it's going to go right in there right before the fold if you want these to stick a little sooner you can you can put it on and then peel it off and that kind of
gets some air in it but I kind of like them to have some adjusting time so yeah so now this guy will just fold right over there and going to be able to staple it now I can cut this should have a better plate [Music] here change out my blade tuck this all under here nice and tight a beautiful little corner no Staples or penetrations do not now that this is done do not screw anything into the curb I'm going to show you how how we float the these without putting any penetrations in there but
you notice I still have this little this little deal here of barewood I do want to cover that cut my damn corner like that and just put another one here guy we'll go right in there and I'll do the same thing to this corner and then we're all done all right so there you have it there you got a nice nice pan liner job pretty e economical way of doing things it's not the easiest waterproofing method I think there's other methods out there that are are easier to accomplish but if you're a professional and you've
been doing it a long time this is a good good way to go this is a way I learned how to do shower pans so I'm pretty good at it but if you're watching this video in your DIY uh consider other methods because this this takes a while to learn and get right one little mistake and you're in big trouble I see a lot of failed shower pan installations where people think they can just cover with Red Guard they'll they'll screw into this and causes all kinds of issues so that's just my two cents you
know but you know pan liners when done correctly do perform really well it's just that they're not done correctly that often so um at least at least from do yourselfers and and people with not a lot of experience so I hope you got something out of this video I'm really glad you were here along for the ride with me today and I love you I love being your tile coach we'll see you on the next video