hi I'm John hinchi I originally presented this video on an asmac webinar entitled finale's finale on September 3rd 2004 my plan in sharing this video is to help you build an association in your mind of what are the equivalents between finale and duroro what is the same or very similar once you've defined that you'll find that there are some things that are handled very differently in Doro so you'll have to look at your workflow in a different way so if you'd like a quick tour of the finale to Doro equivalence and an overview of the
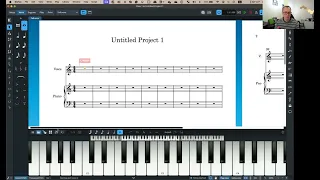
Doro workflow I think you'll find this video very helpful finale is designed around a single workspace that changes its attributes depending on what tool you're using there are pull down menus for various functions but perhaps the most notable is the tool menu when you select a tool the workspace changes characteristics and many tools have a new pull down menu and for some there is a floating panel available Doro is designed around multiple workspaces that change attributes when you move through the workspace with the tabs think of it as moving through a project from left to
right the setup right and engrav workspaces each elicit a pull down menu specifically for that workspace additionally each workspace has a left Zone a right Zone and a lower Zone the right and left zones have panels or toolboxes if you will will that expand when you click on them as they reveal various tools so let's look at the equivalents the finale and Doro menu bars have a very similar set of categories the finale or Doro menu file edit view window and help are all very similar so those functions it's safe to bet you can find
your way around central to Doro design is the concept of workspaces the short description of each is setup is where you set up your players and score right is where you'll spend most of your time putting in your musical content notes text lines and symbols engrave is where you do your layout and presentation of the content play is where you can tweak playback print is for printing and PDF export in the right workspace you create all of your content it's presentation on the staff strictly follows the guidelines defined in various options in the library menu
in the engrav workspace the caveat is you can't change any of the function or value of the musical content for example you can change the position of a dynamic but not its function you can't change a forte to a piano you can't delete or change the pitch or duration of the note you would have to go back to write to do that but you could change the stem length beaming or the size from normal to Q for for example you can change the spacing between notes and engrave as well in the engraved workspace you'll also
notice all these boxes these are frames green for page blue for text and pink for graphics all page text is in frames you define the music is contained in the music frames select which item you are editing in the left Zone notes frames stay spacing and note spacing open the panel on the left and it changes with the functions of each tool but when you think about it in a similar way when you switch to the page layout tool in Finale you're in a similar mode you can't change the function of the musical content you're
moving lines that are boxing in your musical content if you switch to the text tool you create a box on the page that confines a piece of text to that box so engrave mode is a combination of the page layout tool the text tool the graphics tool and the staff spacing function of the staff tool let's look at something that may seem quite different but really it's just a bit of a change of screen geography if we go to the right workspace in Duro and line up the main tool pallet from finale we see quite
a few equivalents clef K signature time signature bars and measures RS and repeats and repeat structures if we open up the left Zone the articulations are found here but also notes and rests that you would find in the simple entry notes and rest pallets so most of the main tool pallet is found in the right workspace in the right Zone the simple entry pallets are in the left Zone which brings up something that is quite different that is the way lines symbols and staff attached text are handled in Doro in Finale the lines are found
in the smart shapes manual or pallet symbols Dynamics and playing techniques text are found in the Expressions tool in Doro lines symbols and text are not categorized as to their graphic representation but as to their function as a musical Direction in right mode open the right Zone Dynamics both text and lines are in the dynamic DCS panel trills Jazz markings and arpeggio lines are in the ornaments panel the repeat structures panel is form repeats but also note repeats which are tremolos bar repeats and Rhythm slashes holes and pauses is where you'll find formadas and curas
in playing techniques the panels are sorted by Common playing techniques and instrument families a mix of text and symbols the lines pallet has the rest of the miscellaneous lines both horizontal and vertical oh and and this one may seem odd at first but give it some thought 8va and 8vb lines are in the clefs panel so put that Post-It note on your computer screen to remind you to start thinking of lines symbols and staff attached text as playing directions and not graphic symbols for chord symbols and lyrics it's over to the right menu create chord
symbols or create Lyrics these both have similar input methods to finale for lyrics select a note and invoke the popover or select the create lyrics from the menu and start typing chord symbols can be typed in or played in from a midi keyboard beyond that Doro handles both very differently I suggest you watch Anthony hughes's great videos on both the these subjects remember the chord symbol and lyric tool equivalents are in the create menu the finale midi audio menu is covered in the play workspace in Doro and then some the Doro play workspace is more
similar to a Daw than any notation program there's a lot here but that's for another time let's talk plugins there have been many very useful plugins for finale created by make music and third parties Doro has a simple scripting interface but not as comprehensive as finale script but many of the tasks handled by plugins in Finale are handled efficiently in other ways natively by Doro also note in the dorco script menu there are commands that allow you to create your own macros it can be very handy a biggie in the finale window menu is the
score manager the file info side is found in the file menu project info of Doro by the way text inserts and finale are called tokens in Doro and function the same way the functions of the instrument list in the score manager are handled in the setup workspace in Doro step time note input there are plenty of videos on that but for finale users know that if you prefer Speedy entry where you specify the pitch before duration you can set that as a default in preferences note input and editing pitch and duration by the way another
change is in Finale the quarter note is five on the keypad and in Doro it's the six key in the numerical Keys across the top of your keyboard Note values moving up or down from there so you'll need to shift your thinking by one number and if you're hardwired to using the keypad fear not in Doro the numbers across the top of the keyboard and the keypad mirror each other press six on either and you'll select a quarter note there are more equivalents to be found but that should give you a good start let's talk
about a few basic concepts first key commands and popovers instead of meta tools dorco uses the concept of popovers the key command for a popover is always the same shift and a letter you'll see all of these in the create menu shift k for key signature shift shift C for clefs ETC the library menu is where you go for all your default settings for well everything let's focus on these engraving options notation options and layout options and for this demonstration I'd like to add the lower Zone to the bottom of this list to complete the
sets to begin with let's define global and local Global changes affect the score and all parts local changes can affect only the score or a part or several parts engraving options affect the appearance of notation think of it as the engraving workpace territory the design and look of notation and their default positions this is global notation options are specific for notes rests clefts time signatures this too is global in layout options you'll see the layouts which are the scores and parts on the right on the left is a list of settings what these settings affect
depend on what you select on the right for example if we want to change the page size of all parts and the score to A4 select all on the right go to the page setup page size select A4 and click apply this is a global change want just a score to be tabloid select just the score on the right click tabloid click a apply this is local let's go macro in the engraved workspace open the lower Zone here you can make all sorts of oneoff changes notice you have the choice to set the properties locally
or globally so if you editing a part and set it to locally the change is in that part only set it globally and it changes in the score and the part there are are many other Doro Concepts you will need to learn along the way like the system track instrument overlay signpost and regions for chord symbols Etc but that is for another day to wrap up here are four tips that I have found helpful with this learning process number one the jump bar type J and the jump bar magically appears command will allow you to
execute commands just type them in go to will take you to a page Bar number rehearsal Mark or flow there are three handy PDFs to download from Steinberg the Doro quick reference card Doro popover lists and Doro tokens print them out or put them on your iPad but keep them handy number three as with any program to speed up your workflow learn your key commands and in the case of Doro the popovers but you can also create custom key commands in the preference menu key commands four if you use a stream deck consider getting a
copy of the notation Express Doro profile and another tip in the Stream deck editor add another page to the Doro profile then add buttons that open your reference PDFs notes or take you to YouTube for your favorite tutorials now it was not my intention to do a deep dive into all the ins and outs of Doro in this video but if this method clicks with you perhaps it will give you a framework to move forward on your own if you feel like you could benefit from more training I am offering one-on-one Consulting and tutoring you
can contact me at the email address in the description below I am also offering an online interactive training course called finale to Doro fundamentals I have found the best way to learn a new software is a project-based approach in this course I will provide a score arrange for vocals a small horn section and Rhythm Section which we will recreate starting from a blank Doro file and going through all the steps to complete the score parts and an audio demo please click on the link below for more information