Today I'm going to be showing you guys how I made this big EMP rifle. >> I'M GOING TO JAIL. >> NOW, as intimidating as this design may look, I built this device strictly for educational and entertainment purposes.
And it's got a pretty limited range. I mean, it definitely couldn't fire a pulse that damages my camera from all the way over here. Some notable features of this device include the emitter coil on the end, the high voltage transformer in the stock, and the voltage control dial.
And on the other side, we have the like and subscribe buttons, which I need you guys to push. This button makes the YouTube algorithm like me a little more. And this button lets you guys know when I build cool stuff.
Now, today, I'm going to be showing you guys how I built this. But first, I want to talk a little bit about the significance and physics behind an EMP. Now, consider this for a moment.
What happens when a sudden surge of electromagnetic energy hits an electronic device? Well, to answer that, let's take a look at a time when a sudden surge of energy similar in nature to an EMP hit the entire planet. On September 1st, 1859, a solar flare sent an exceptionally large coronal mass ejection, a massive magnetized plasma hurtling towards Earth.
After a 150 million km, 17. 6hour trip, the Earth fell under the most massive geomagnetic storm ever recorded. In what is now called the Carrington event, intensely bright auroras, which are usually only visible at the poles of the Earth, were seen near the equator.
In many places, the sky burned with a brightness that could easily be mistaken for distant fire or daybreak. But more significantly for this video, around the world, telegraph systems were failing, delivering electrical shocks to their operators and even bursting into sparks and starting small fires. The geomagnetic disturbance had wre havoc on what was the pinnacle of Earth's electronic communication system at the time.
But despite being the most high-tech form of communication, the telegraph was still a new technology which had not yet expanded to global prominence. Therefore, the failures were a much more mild inconvenience compared to if the Carrington event had happened a little later. But just imagine what would occur if this happened in today's world, having grown so dependent on both physical and digital infrastructure that runs on electricity.
No one can say for sure, but transformers around the globe would likely explode, leading to widespread blackouts. Mobile networks would be rendered unusable. Planes, boats, and other such vehicles, if not entirely disabled, would almost certainly lose communication and GPS.
The damage could cost trillions and take months, if not years, maybe even decades, for the world to bounce back from. And while the Carrington event is the biggest electromagnetic disturbance to interfere with technology, it's not the only one. In 1962, the Starfish Prime nuclear test generated an EMP that knocked out electronics in Hawaii.
In 1989, a geomagnetic storm caused a massive blackout in Quebec. But I've talked about this for long enough that some of you may have forgotten that today's video isn't about preparing ourselves against a potential EMP. It's about making a gun that produces it.
Now, before I get into how I made my own EMP generator, I want to talk a little bit about how an EMP actually works. So, let's take to the internet and look it up. All right, let's see here.
How Oh, this video is probably pretty good. >> [sighs] >> I owe an apology to all 40some thousand people who have seen this video. See, when I first started my channel, I one of my first videos was a leadup to building an EMP.
And in that video, I tried to explain the physics behind how an electromagnetic pulse works. And when I just rewatched this, one thought consistently runs through my head repeatedly. What the hell am I saying?
Okay, I'm currently pursuing a degree in mechanical engineering. I was like 17 or something when I made this. So, I think I know a thing or two more now than I did back then.
So, I'm going to explain to you guys how an EMP works to my understanding now by outlining a lot of the stuff that I seem to be very mistaken about back then. Now, I'm just going to play the best bits for you guys. >> All right.
So, right off the bat in this video, we see here that the first mistake I made was that haircut. And that basically already describes what it is. It's an energy pulse that creates an electromagnetic field so powerful that it can actually disrupt anything.
So far so good. >> Keep in mind anything that runs off electricity creates small electromagnetic forces within its circuits. Therefore, when a powerful enough magnetic field is induced nearby, those magnetic waves are actually going to interfere with the currents that normally occurs within these circuits.
It's almost like the wireless equivalent of trying to plug your cell phone or TV into a voltage and a frequency that they simply weren't meant for. This is exactly what sometimes occurs whenever lightning strikes nearby and your lights begin to flicker or what would Okay, so minor thing that's not entirely true. Now, lightning strikes do create localized EMP blasts, which is actually a fact that's going to be important later on in this video, but it's most likely not the reason that your lights are flickering during a thunderstorm.
as in the EMP blast from the lightning bolt probably isn't directly hitting the light bulb unless it's really freaking close and in that case you might have other problems to worry about. Now, I'm the line man, but I'm pretty sure most of the power issues related to lightning strikes or thunderstorms rather are usually things like wind and physical debris causing faults in the electrical grid. An EMP is what happens when big electromagnetic forces make other electronic circuits a little drunk.
Now, I mentioned high voltages a second ago. In order to create this effect, what we're going to do here is we're going to use high voltage and what's called induction in order to create that large electromagnetic force and destroy the phones of annoying people. Serious note, um, don't do that.
A quick intro or recap of induction. Induction is the tendency of an inductor to resist a change in electrical current. Now, for those of you who have There it is.
Induction is the tendency of an inductor to resist a change in electrical current. Now, for those that's so painful to hear. Now, for those of you who have no idea what I'm talking about, you're right.
I don't have any idea what you're talking about. Okay, if any of you know the basics of circuits, which I was probably like just getting into more at the time, you probably caught what's wrong with that statement. That's not induction.
That's inductance. So, I think what happened was I was researching for this video and I was learning more about inductance and I think I just didn't make the distinction between induction and inductance as two separate things. All right, look, I'm getting a little ahead of myself.
I think it's time to start elaborating more on how an EMP disrupts electronics. And induction is the fundamental principle behind that. To understand why that is, I'm going to have to talk a little bit about the basics of electromagnetism.
So a long time ago, people thought that magnetism and electricity were two separate unrelated occurrences until about the early 1800s. From there, scientists began to realize that the two were in fact related and thus began to conduct their own research and devise their own theories about how that relationship worked. You know, excuse me one second.
It wasn't until 1865 that Scottish physicist James Maxwell built on certain previous works to create Maxwell's equations which forever unified electricity and magnetism as part of the same electromagnetic field. Now to very briefly go through what these equations mean. Don't worry, you don't actually have to understand the math.
Sometimes I'm not sure I do. The first one basically says that moving electric charges create electric fields. The second tells us that you can't have magnetic monopoles.
That is to say, you can't have a magnet with a north pole but no south pole. Now, the last two are what really help us unravel how an EMP works. Starting with Ampierre's law, that basically just says that a moving electric charge will create a magnetic field.
For instance, if I coil some wire and run an electric current through it, the moving electrons will create a small electromagnetic force. I won't get into too much detail about why this happens, but I'll link some videos that explain the concept pretty well if you're curious. And [snorts] because the wire is coiled, the small magnetic forces overlap and add up to a bigger magnetic field going through the center of the coil.
Now, the fourth equation is based on Faraday's law, and it kind of brings the whole thing full circle because what it tells us is that a changing magnetic field will induce an electric charge. So, if I take that same coil and I move a magnetic field within range of it, it'll induce a small voltage, at least for as long as that magnetic field is changing. And that last one was Faraday's law of induction, not inductance, induction.
Electric and magnetic fields are inseparable. One causes the other in both ways. Now, devices that run on electricity have specific limitations to how much their individual components can handle.
For instance, I can't plug 12 volts into a tiny LED that's only rated for one without damaging it. Because of induction, an EMP can sort of apply this effect, but wirelessly. By creating a sufficiently powerful sudden burst of electromagnetic energy around a device, you can induce electrical current within it that can lead to malfunctioning and/or permanent damage.
Now, one defining characteristic of an EMP is the speed at which the electromagnetic field occurs. Hence, the pulse part of EMP. Remember that an electric current can only be induced by a changing magnetic field.
The faster that field builds up, the more devastating potential it has on a circuit. And there are two main reasons for this. The first is shown to us by Faraday's law of induction.
Where you can see that the voltage induced in a coil is related to the rate of change of the magnetic field. The faster that magnetic field changes, the higher the voltage induced. And the second reason is that different circuits are sensitive to different frequencies.
So if we shape the signal of our electromagnetic disturbance into a sharpedged pulse, you can hit a greater range of frequencies. Now, that first aspect is what makes this guy so mistaken about what he's trying to explain. Okay, so I seem to have lost the original footage of me watching the rest of the video.
So, from here on out, I'm just going to commentate on it like this. Okay, so we have our methods. Now, we're going to shove a high voltage current through an inductor.
Now, aside from the fact that high current would very easily kill you and make this project more dangerous than it already is, why this is high voltage and not high current is going to make a little more sense later. Maybe I missed something, but for the rest of this video, I never heard any elaboration on this. I'm really not sure what I was getting at here.
Also, oh my god, I forgot I used to be able to draw a lot better. Now, inductance is typically formulated a little something like this, though there are other variations where n is the number of turns, moo is the magnetic permeability of the core. There's supposed to be a square in that formula, and l is the length of the inductor.
As you can see, it's directly proportional to those first three, but inversely proportional to that last one, length. So therefore, we want a high number of turns, a high area, and a high magnetic permeability in a very short length. And this right here is the biggest problem with this video.
Because I didn't have a full grasp of inductance and induction, I was led to the false conclusion that a higher inductance necessarily produces a more effective EMP. But that isn't so. You can kind of think of inductance as potential energy and induction as kinetic energy.
And with that in mind, more inductance does result in more induction slash a larger magnetic field, which sounds good for an EMP. However, if the inductance is too high, then that magnetic field builds up too slowly to be useful as an EMP. Overall, it seems like I was just misunderstanding the concepts as I was learning them for this video, and that led me to the wrong conclusion about how an EMP works.
Okay, so now that we know how an EMP works, how do we even make one? Well, obviously creating a mini sun and using solar flares is kind of out of the question. But maybe we could go the starfish prime route and use a nuclear explosion.
No, don't. Wait a minute. Now, lightning strikes do create localized EMP blast.
So, after remembering that lightning is also a source of a naturally occurring electromagnetic disturbance, I have decided to build what's called a Marx generator. Now a marks generator is a kind of voltage multiplier which is comprised of several stages each with a capacitor and a spark gap. Now the way it works is that all of these capacitors are charged in parallel through these resistors.
And once all the capacitors are charged if the voltage is enough at the first stage to break down the air at the spark gap, they're all rapidly connected in series which sequentially sums up their voltages to a much more massive spark of electricity at the end. Not unlike a miniature bolt of lightning. I wanted to come back in detail that my plan here was to take the summed up high voltage from the MARXs generator and run it through a coil which would emit the resulting electromagnetic field and induce a voltage in a nearby target device.
And there's a couple reasons I chose to build a MarkX generator to do this. The first is I thought it would look really cool. The second is speed.
See the high voltage signal from the flyback transformer by itself could probably be used to radiate a good electromagnetic field already. But by charging the capacitors in parallel first, you can release that stored up energy as a much faster, more powerful blast. And one more thing, I also want to mention that a MarkX generator is a stupidly dangerous thing to build.
If you have no background in electronics or otherwise don't know what you're doing, please do not attempt to make this. I plan to power my MarkX generator with this flyback transformer driven by a ZVS driver circuit. And I've chosen to build it with 15 kovt high voltage ceramic capacitors.
I've had them for years and they should still work all right. And they're also going to be charged through these 1 megga ohm resistors. The resistor length was pretty important because you don't want arcing across the resistor's body.
At each stage, there will be two 15 kovt capacitors combined in series to form an equivalent 30 kovt capacitor. Okay, after throwing the components together a little bit, we have our assembled MarkX generator. Now powering the whole thing, I have two lipo batteries wired in series.
We have our flyback transformer and we have our actual MarkX generator. I also put in a motor governor to act as a controller. And hopefully I don't electrocute myself.
Three, two, one. And suddenly making a handheld version of this got a lot scarier. Ozone.
So, >> wait. Ozone. >> Now, before building my actual EMP rifle, I tested the idea by putting a copper wire coil in the circuit and then placing a calculator in front of it.
Now, you probably noticed that my marks generator repeats pretty fast. So, what often happens to the target device, depending on the distance of the spark gaps, is you hit it with a rapid fire succession of small EMP blasts. And I'd once again like to note that this device is relatively simple and for demonstrative purposes only.
If I went into this project with the goal of making the most effective electromagnetic disruptor possible, there are a few things I could do differently. Some of which are outside the scope of my abilities. So, if you just wanted to build the most destructive EMP device possible, what you could do differently to improve this is for starters.
Okay, so now that we figured out the MarkX generator circuitry, it's time to actually get to building the final handheld device. Now, you guys probably know how much I utilized 3D printing in my videos. But the truth is, until earlier this year, I actually haven't had much of an option to print conveniently from home since the only printers I had here for the longest time were a couple of old Ender 3s, which are in desperate need of maintenance.
Now, that issue has since been solved by today's video sponsor, Bamboo Lab, who helped me out with this project by providing me with a brand new printer, the A1 Combo. Now, earlier this year, I actually got myself one of their P1S printers, and I have been loving it. Honestly, Bamboo does not need to pay me to glaze them, but they don't need to know that.
And if anything, that probably has to do with the fact that Bamboo Lab is one of the leading hobbyist 3D printing companies right now, and for good reason. Their hardware is top-notch, and their software is pretty intuitive to use. 3D printing is a rapidly growing hobby, and if you're considering getting into it, I honestly couldn't recommend Bamboo Lab enough.
3D printing definitely still has a learning curve if you're a complete beginner, but I have been working with 3D printers for quite a while now. And when I first got my P1S, it was honestly the closest I've ever gotten to just opening the box and pressing print. And the A1 is honestly no different.
More than anything, bamboo lab printers just work. And sometimes that's really what you need, just a tool that works. It's kind of like the difference between having a crappy car and a car that consistently gets you from point A to point B.
The former might have the advantage in the sense that I forgot where I was going with that. Now, let's delve into more detail about the A1. It's a highquality, user-friendly printer stacked with all kinds of bells and whistles to make your 3D printing easier.
Some of its features include, but are not limited to, full autoc calibration, a tool-free quick swap nozzle, active motor noise cancellation for quieter prints, a live feed camera where I can see how my printer is doing anywhere from my phone, and even active flow rate compensation to keep your extrusion consistent to bring you highquality prints. And when I say highquality, I really mean it. Here's an example of one of my favorite mini projects that I've done with my Bamboo A1 so far.
This is an EMP pulse gun, which was kind of sort of a prototype for this project. It's a much simpler and smaller build compared to what I'm making for this video, but my point is that the parts are really nice prints with several of Bamboo's filaments. Some people couldn't even tell that this was 3D printed at first glance, which I think is a good testament to the A1's print quality.
And the A1 combo equipped with the AMS Lite allows you to do beautiful multiolor prints and do easy material changes. If you use filaments directly from Bamboo, which they were kind enough to send me a bunch as well, it'll even recognize the filament, as Bamboo filaments have unique RFID tags that are detected by the AMS system and synced with their software. Once again, I've thoroughly enjoyed my Bamboo A1 Combo, and it's made completing this project a lot easier for me.
It's currently on sale right now, so head on over to Bamboo's website to get yourself one discounted while you still can. Anyways, getting back to making the EMP rifle. The model was created in Fusion and I used several futuristic sci-fi weaponry concepts as inspiration.
During the CAD modeling, I carefully considered where each part of the circuit should go. Mostly the fact that I wanted to keep the flyback transformer, the capacitors, and the high voltage lines as far away from my hand as I could for obvious reasons. I also decided to put the ground wire in a tube that runs on the outside of the device to separate it better from the positive end.
At the top of the device are these slots. Now, what are they for, you might ask? Well, after the whole thing is powered off, the capacitors are still capable of holding a high voltage charge.
So, I place these slots here so that I can stick an insulated screwdriver inside to short the capacitors, safely discharging them after use, and especially if I ever need to disassemble the whole thing. After the parts are modeled, we simply save them as STLs and bring them into the Bamboo Studio software. It's got all sorts of different settings that you can play around with, but it doesn't feel intimidating.
And there's also an online directory to a bunch of cool models that people design, which is also really nice. Anyways, in the slicer, I can change the colors in certain areas of the prints using the materials that are synced to the printer. For this project, I printed most of my parts on 12 mm layer height to get really small layer lines that are barely noticeable.
It took a little extra time, but the results were really clean. And even with the slower times of the higher resolution prints, the Bamboo Lab printers are probably still the fastest FDM printers I've ever used. And by using my A1 along with my P1S, I was able to get the parts for this project printed much faster than I'm used to.
These printers just kept pumping out design after design, maintaining consistently good print quality. As my parts were printed, I began assembling the rifle. The two three cell lithium batteries sit inside the foregrip while wires run down to the handle, going to the safety switch and controller, and then to the trigger, which is a simple spring-loaded mechanism that sits in front of a limit switch.
The flyback transformer along with the ZVS driver sit in the stock of the rifle while the marks generator is at the front. A ground wire runs from the MarkX generator to the outside of the device and then loops around to the coil and large spark gap. The whole thing is held together by a variety of metric screws.
And once it was all done, I was ready to test it. Now, I want to leave a quick disclaimer that in the first test footage clips you're about to see, my EMP rifle is not working at its peak performance, mostly due to sharp points at poorly soldered joints leading to corona discharge. My [music] fault.
But I soon fixed it after and you'll see it working much better shortly. >> Prevail. >> Oh, it went 66.
>> I'm pretty sure I just touched it. >> Oh, maybe. >> You're lame.
You're lame. >> That I definitely did not do. What the [ __ ] What the [ __ ] [laughter] Okay, this is not what I expected to happen.
That's That's not what I was expecting to be honest. Does it make it go up? >> Went down.
Now zero. What the [laughter] back on? >> This is not what I was expecting.
>> What the [ __ ] >> I can't lie. At this point, I was feeling kind of disappointed. My EMP rifle wasn't working much more effectively than my EMP pistol.
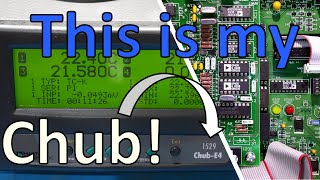
I had basically just made a short-range remote except every button is tied to the trigger and activated at random. But luckily, after adjusting the spark gap distancing and smoothing out points of unwanted corona discharge, I managed to get my EMP rifle to work more effectively again. Now, I didn't have very many interesting electronics to test this on, but something that was really fun to see was how different devices were affected at different ranges.
For instance, this calculator needs to be within 2 in of the coil to see any effects, while the multimeter could get voltage readings from a much greater distance away. and bringing it closer to the multimeter just caused it to reset. And something I discovered by accident was that my PC can actually be affected from more than 4 ft away.
I think it's due to my computer having more low voltage sensitive components and also the EMP just easily passing through the glass on the case. And yeah, I know I probably shouldn't have chanced it after I saw it once, but I just couldn't help the urge to make sure that my eyes weren't deceiving me. Another cool thing that happens with my EMP rifle is that when it's fired in total darkness, the arcs produced at the spark gaps shine through the infill of the rifle, making it momentarily glow and create this cool strobing effect.
So, overall, I'm pretty happy with how this build came out, and I'm really eager to start improving on it. Now, this is actually kind of a special project for me. Or rather, I realized by sheer coincidence that I had unintentionally made it special.
See, when I was 12 years old, my very first project was an attempt at building an EMP generator. Yeah, I know, not exactly a great first project for a 12-year-old. It failed miserably because I gravely misunderstood what I was doing and I eventually got one to work using a disposable camera circuit.
And anyways, that was in December 2015. It is now December 2025 and here I am making another EMP generator to mark 10 years of making things with almost five of those having been on this platform. And I really just want to say thank you to all you guys who have supported me.
And I hope that you'll stay around for the next 10 years of building stuff.