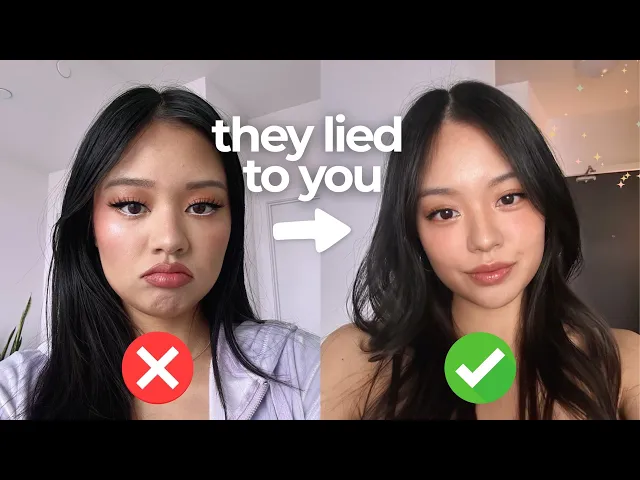
[Applause] [Music] [Applause] I would always do my eyeshadow trying to copy them and I would be like why does my ey shadow look like I'm not like a concealer and mascara and out Theo girl okay the difference is is that I make my makeup look so Flawless and fitting to my face perfectly so I heard you want to improve your makeup skills well look no further I'm going to show you exactly that no BS let's get right into it I'm going to show you the wrong way to do your makeup on this side and the
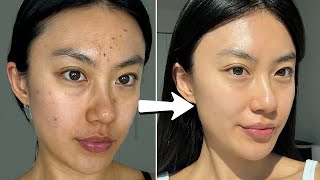
right way on this side okay so I'm only going to moisturize on the right side of my face and once the moisturizer dries a bit you want to go straight in with a moisturizing sunscreen right now I'm using this one by isent treat and again on the left side I'm not going to go in with any skin prep because I know a lot of y'all be doing that and it is not good the first mistake that a lot of people make when it comes to their base makeup is that they go way too heavy on
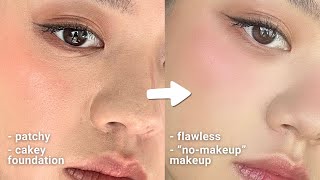
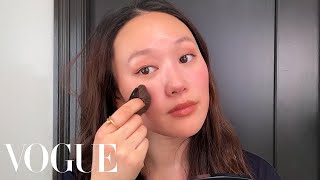
the foundation I'm going to be going in with the Estee Lauder Double Wear and I love this Foundation it's super good for oil skin but it is very full coverage so you want to be careful to not use too much of this if you're using like way too much it doesn't matter how you apply it like a sponge is obviously always the best way because it absorbs some of the product in real life if you just want to look good you don't want all of this because people will be able to see the foundation right
away on the other side I'm just going to go in with just a little bit this much is perfect and I'm using my Real Techniques Beauty blender cuz that's going to give me the most natural finish so next we have concealer so these are the two concealers that I like to use um this is the Maybelline adri W and this is the Maybelline Fit Me both great concealers I don't feel the need to spend a ton of money on high-end concealers because these ones are just like they do a perfect job I'm going to apply
the concealer the exact same way on both sides I go in with the Maybelline Fit Me and I just go over my blemishes with this and honestly I mostly just have blemishes like here cuz I have a lot of acne scarring and I don't even really have any blemishes at all on this side the thing is you want to let your concealer sit for a while before you blend it in so on the incorrect side I'm blending it in right away so that's already Blended but this side I'm going to let it sit and marinate
for a little bit it needs to dry out just a little bit before you blend it so that you can get a good amount of coverage on the areas that you actually put it on otherwise like especially in this super blemish area if I just blended it out right now it would literally lift the coverage of the concealer almost completely and it would be like there was no point of me putting on concealer the thing is I have black hair right but I do not want to go in with a black brow pencil because that's
just going to make my brows way too dark it's going to make your face look heavy it's going to look make you look so intense for me I want to look like I have a softer face and to achieve that I need softer brows so I actually want to go in with a brow pencil Shade that's a few Shades lighter than my hair so on the incorrect side I'm going to go in with the darker brow pencil and just really like draw that in you just don't want to go in with such heavy of a
hand we don't want Sharpie brows like it's not that's not the vibe right now that's the main thing guys like I'm always wearing a full face makeup I'm not like a concealer and mascara and out the door girl okay the difference is is that I make my makeup look so Flawless and fitting to my face perfectly this isn't even a bad eyebrow I'm not saying that like the makeup on this side is bad I'm not trying to like you know color everything in and make it so bad but I'm just showing like real mistakes that
people make I'm just going to go ahead and blend this part in first it's kind of like a hard comparison on camera because one I didn't even really have anything to cover on this side but if I hadn't done this on this side then it definitely would not have covered all the blemishes I have and it still Blends out perfectly and looks very Flawless all right so for the right side of my face I'm going in with the micro brow pencil in the shade ash brown so this one is just a shade lighter than this
one and I'm basically just going to go in with a much lighter hand you want to put more product in the middle and the end and when you get to the front you just want to go in with an even lighter hand and another mistake that people make with their eyebrows is not using an eyebrow mascara or an eyebrow gel so this one that I'm using is from NYX as well it's called the thicket sliet this is also in the shade ash brown so it's a little bit lighter and I just go in and apply
it so it sticks up that's the good side and that's the bad side you can really see the difference for this last step before I go in with a powder and set everything I want to go in with my last wet product we want to do all of the wet products first and then all the powders after we don't want to powder and then go in with another liquid product because it's just going to look way muddier and it's not going to blend as nicely I like to go in with the rare Beauty blush at
the step this is in the shade encourage what I want to do when I do my makeup is I want to draw the attention and the main focus to the center of my face I don't want to draw attention to how wide my face is I don't want to apply blush so far to the side because then that's going to draw attention to this part of my face for the incorrect side I'm going to place the blush up here and for the correct side I'm going to place it in here okay and I'm going to
go in and blend that out focusing it really in the middle but also blending it basically to my under eye so you can really see the difference there and this brings the focus just to the side of my face versus this brings the focus to my actual features in the middle right I'm going in with the Maybelline Fit Me setting powder I'm not going to set the side but I'm going to set here under my eyes around my nose for eyeshadow I'm using this Estee Lauder eyeshadow palette it's called the celestial glow palette it's a
limited edition eyeshadow palette that I just got as a gift but honestly you just need any eyeshadow palette where you have a brown Shade that's like just a couple Shades Darker than your skin tone and and then one that's like darker than that so I'm using these two right here basically the mistake that people make with eyes Shadow is that they don't do the right technique for their eye shap so this was a problem for me growing up because a lot of the big makeup YouTubers that I would watch they all have deep set eyes
and really big double eyelids and so they would all take this light brown Shadow and what they would do is they would go in the crease like that does that look familiar you probably have seen this technique before for ey Shadow and then what they would do is they would go in with a darker shade like this and while this is a great technique with people with deep set eyes it does not flatter my eye shape I would always do my eyeshadow trying to copy them and I would be like why does my ey shadow
look like like why do I not feel pretty even though I followed their tutorial exactly you know and I'm going to show you the right way for someone who has my type of eyes someone who has more hooded eyes I'm going to go in with that light brown shade I'm going to focus it more on my eyelid you see how I'm doing it all over the lid like right here instead of in the crease not swooping up but actually swooping down a little bit here and then I'm going to take that same light brown shade
and I'm going to dust some under my eyes as well and you can do this all across the bottom like that you can already see the difference between the two sides and I'm sure you can see that already this side is much more flattering on my eye than this side next I'm going to go in with a smaller packing brush and go in with that darker brown and I want to put this all over the lid but not any higher than my crease goes okay just the bottom part here and then take a little bit
more and I just want to put this darker brown just at the very end of my eye here and a lot of the girls on this side they would go in with that dark shade and put it all the way across I'm going to go in with this Covergirl eyeshadow stick it's called the clean eye color what I've seen a lot of people do is they take their shimmery shade and they'll do it all over their lid for the correct side all I'm going to be doing is taking it in the inner corner and the
front of my eye like this if you put the shim shimmery shade on like this part of your eye it can actually make your eye look smaller I'm going to take this shimmery shade and actually put it under my eye basically you would want to smile with this little area that puffs up you just want to like color that in with the shimmery shade a lot of people when they draw their eyeliner they go up okay wow I lowkey did that like so perfectly but it's the wrong technique and let me explain why so one
I did the actual line too thick and that closes off my eye more and I also did it an upwards facing Wing which isn't the most flattering on my eye shape because my eyes are already upturned this just makes my eyes look like so upturned and it's not the most flattering okay on this side I'm going to go a little bit thinner with the line and I'm actually going to make it downturned as you can see it's a lot more downturned than this side and this side is also much thicker this side is thinner so
when it comes to curling lashes a lot of people just clamp them down once and that's it right this just is going to create like an L shape and it's also not enough if you have straight lashes like me basically we just want to curl as close to the root as possible you want to just slowly come out and Up release and clamp release and clamp as you're going up so that it can be like a c-shaped curl all right so I just put on mascara on both eyes off camera as you can see the
side is so much more lifted than this side like you can barely even see the lift here the Contour stick I like to use is just the Sephora Contour stick the main problem with contouring is again surprise surprise not contouring for your face shape you might have heard that when you Contour you want to do like a three right if you have like a very V shape then sure not for me they would do kind of like come out here something like that for my face shape what actually works is we actually want to Contour
all of this area because like I told you guys before we're drawing the focus to the inward part of our face like so it's like we're erasing that part of our face and then I just like to Contour my nose so I'm just trying to blend that so this side is kind of Blended out and then I'm just going to blend out this side and you just want to take it all the way down you see how this it doesn't really do much for my face versus this side I look a lot more snatched again
just draws the focus into like this area I'm going in with the second powder blush this is the rare Beauty powder blush in Hope for the side I would be putting it up here where I put the blush previously and here just focusing it more in the middle like so and also I want to put some on my nose as for highlight you don't want it to look like it's just a chunk of glitter sitting on top of your skin I'm going to go in with just this it's a very pretty shade don't get me
wrong it's just very glittery as well and I would put that on my cheekbones here honestly on camera it kind of looks great but in person it definitely just looks more like it looks more like a powder you can see like I can see in the mirror how it is just kind of sitting on top of my skin and it doesn't make it look like it's from me it looks like I put on a powder highlight what I actually use instead of a proper highlighter I've had this for so long the labels literally come off
but this is the Charlotte Tilbury Flawless filter this just serves as the most perfect natural highlight I do some on my nose as well you can do some on your brow bone she looks so good if you can see that like that is what I'm talking about next I'm going to move on to the lips I'm going in with this lip liner from NYX it's in the shade sand beige and it's just a very natural lip liner Shade that's just a couple Shades Darker than my natural lip a big mistake that I see people doing
is basically just overlining their lips way too much there's definitely an art to overlining your lips you can by all means do a little bit but if you want to look good in person like do not Overland too much because like you can totally see it in person even if it looks Flawless on camera because the camera makes you look very 2D but in person you can see everything on the incorrect side I'm just going to overline overline my lip like that versus this side I'm going to not overline like at all on my top
lip and then my bottom lip I'm just going to overline like tiniest bit almost draw up a little bit on the side lift up the corners of your mouth if you are going to use a lipstick over your lip liner make sure you're like dotting it on and not swiping because that just gives off like too much product it's just going to look like cakey and not good this is the Rouge Dior lipstick in the shade 434 it's a gorgeous shade like I honestly love this one but I don't do it like this I've been
using lip tints instead of lipstick because one it stays on longer and two it just looks more natural it's the romand juicy lasting tint in the shade pink pumpkin I literally just I do that much and I just buff it out with my finger I love to finish with a gloss especially over top a lip tint so I'm just going in with this gloss from Tower 28 it's in the shade magic and it's just this glittery clear gloss it's so gorgeous to layer the setting spray that I'm using right now is the until dawn mattifying
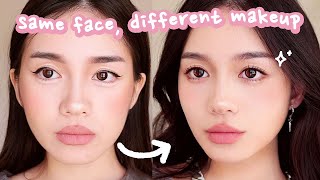
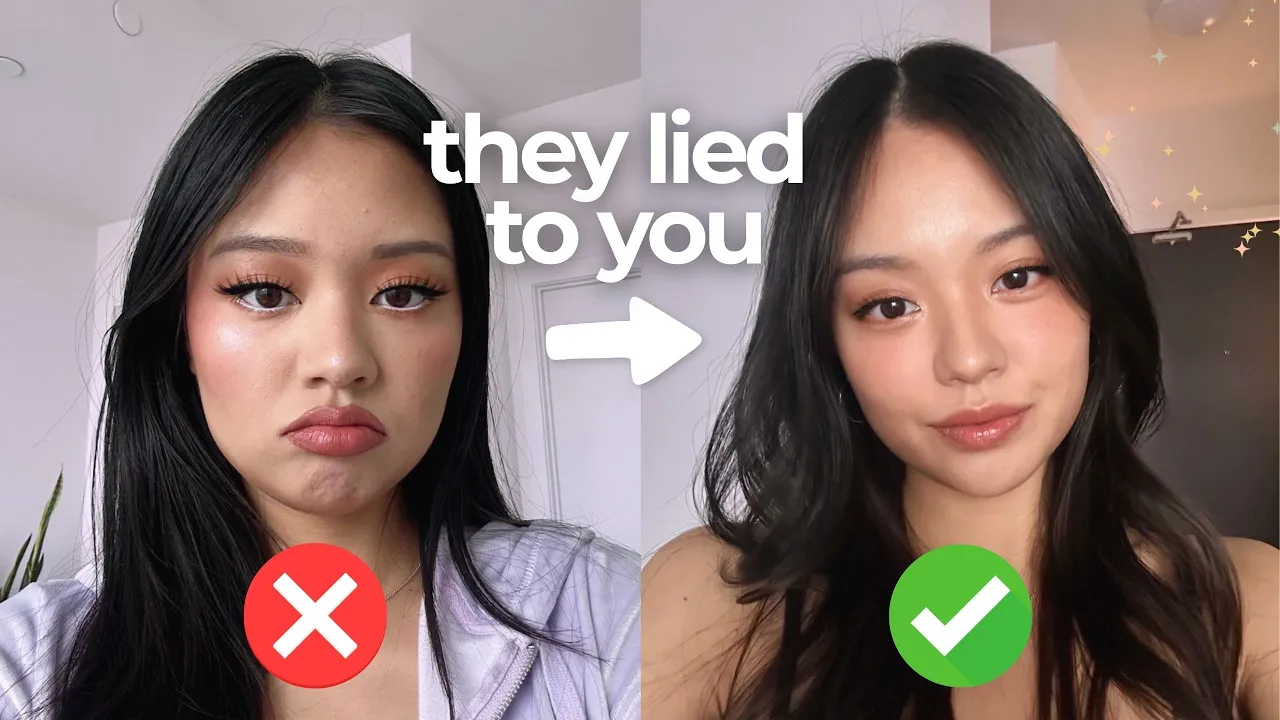
setting spray and this one is super good if you have oily skin like me and that is the finished tutorial you [Applause] [Music] [Applause] [Music] guys and the funny part of this is that this side is actually my good side and it still looks worse I always POS like this in photos but the side just looks so much better makeup wise it really highlights my features perfectly and the side it doesn't suit me it's not the most flattering to bring out my personal features thank you guys so much for watching my video today please leave
a like subscribe and comment down below if any of these tips were new to you or if this video was helpful at all I would also love to know if you have any makeup tips of your own that I forgot to mention if you've stayed this far thank you so much I will see you guys in the next video bye