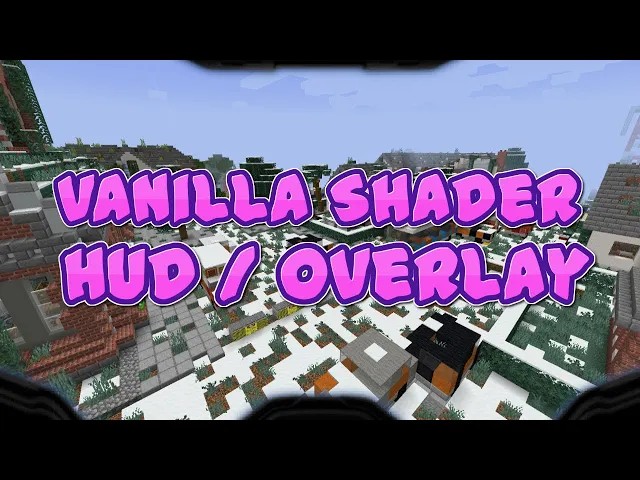
hey guys club here and today i have sort of a interesting shader tutorial again this one is going to be covering how to do overlays it's pretty clear what is going on right here on my screen you can see um that i have this little like helmet overlay almost like i'm wearing some kind of a master chief helmet uh we're just gonna do static overlays today uh which this could be expanded i'll show a little thing at the end a little demonstration but if you have a method for shader selectors then you could expand this to have multiple overlays make it like a real hud that tells you information but that is way too complicated to go over today so we're just going over how to get the overlay in so it's actually not that complicated it stems off of this thing that they added and i don't know how it's used in the actual game so let me just show you where i'm going right here so i go versions then i go 1. 16 then i go to the jar and i open it as a winrar file and then i go into assets minecraft now you have all these things so if you go to textures and you go to effect there is a single thing in this folder and maybe you've seen this before and you wondered what the hell is this for dither. png if you open dether.
png you'll see that it is merely this that's it so what is this for i personally don't even know uh what dither. png is for um it's used in the dither shader but i don't know if dither shaders are used in the game anywhere uh but it does give us an interesting hook in here so if we go to the dither shader it should be um under program and then uh one of these uses it i believe it's the notch if i'm yep all right so the notch let me close on my files so the notch. json and the notch dot fsh and the notch post so what the notch post does and all this stuff and i have test put it in but i don't have a working i don't have a version in right now um to show you what it does you can test it yourself but we can look at what it does with this dither and how it gets the dither into the shader so the json does the notch and it has an aux target so here's the information we need so this aux target grabs something that has an id of dither and essentially if you put whatever words you put in id it looks for a png texture inside the effects folder that matches the id name and then you give it a sampler name and you let it know the width and height of the image as well as bilinear true or false i haven't messed around with the bilinear true you can play around with that see what it does to your image uh then what you do is you run it to the program and i have a separate video if you're getting to this and you don't know a lot about shaders i have a separate video all about like the basics of shaders so i'm going to be kind of brushing over those and kind of just only covering stuff that i think is stuff i haven't covered before or things that are interesting anyways so it passes this to the shader as an aux target the aux target goes into the samplers section we call this a dither sampler so you need the same name as here and then once you get that then inside the actual fsh aka the glsl file the opengl file that is actually doing the shader the heavy work we create a new uniform of a dither sampler and it works similar to a diffuse sampler it's a 2d image you go through the 2d image however you feel so how do we add this to our packs so what we can do is we can i already have this resource pack obviously done but i'm going to take it off and start from scratch so that you know everything that's going on and kind of my thought process and there will be a download in the description uh so let me go to shader over it okay so uh let me call this shader overlay one all right so in shader overlay one what i'm going to go ahead and do is there's already you can just make these folders if you want to follow along or you just want to look at what i'm doing in my download but we have this textures effect folder and that's where we're going to put our overlay i just named it my overlay okay then in shaders for something that is constantly static what we actually need is a fabulous shader uh something on the transparency layer so if we go into shaders and we go into post we have transparency let me go ahead and just uh i will open these files as a reference in case we get lost but i will be exploding them deleting exploding them yes exploding them boom gone all right so we'll work from scratch here all right so we go into post and transparency is our default maybe you already have something that does a little stuff and you just want to add this to it so what transparency does is it throws it to the transparency shader which handles weather like snow and all that stuff and then it copies it from the results of that back on to the main so we go from main to final and then final to main because you can't have the same end target as out target so we're going to hijack it in between here we're going to have our own and we're going to take all this information and instead of running blit we're going to do my overlay okay you can name this anything you want and uh we need to pass it on to a middle man because we can't go from into out so we need to go from main to final final two trans i just like that like a transition and then transition to main so this kind of passes it in that order and i've talked about how this these targets work in a previous video so then we need to add the trans target so now we have to add our texture or our reference to the texture and this is going to be oh when i lost my reference that's okay so this is where we're going to go from the notch and we're going to copy this aux target section and boom so now we have our reference to our texture now we just need to give it our own names here so let's go my overlay sampler and this is the file name of the texture is my underscore overlay you can use anything you want any size will work as far as i know more than 1024 so no that's for later sorry so this image that i've created here is inside assets minecraft textures effect my overlay and it is a file size of 428 by 241.
i just use this because it looked good you can use any ratio that you want by 241 is that really the image size i'm just sorry i'm blanking yeah okay i'm just trying to make sure so i don't screw this up all right uh so then that's all good now we need to pass this to my overlay which we don't have so we're gonna go into minecraft shaders program and what we do typically is blit is our very dum-dum basic thing so we'll copy blit and we'll rename it to my overlay and we'll rename it to my overlay and then inside here we're going to want to give ourselves a my overlay sampler and let me just make sure i name this right i don't need notch anymore boom boom boom good good good because if anything is wrong it's going to be hard to see what went wrong and then we want to make the fragment run my overlay and just leave the vertex to blit that basically means do nothing so then inside here we don't need color modulate we don't really need project matte and matte size that's okay uh so now we have our thing which puts this should just take from the diffuse sampler and throw it on to our gl frag color and we'll go my overlay uh so what we should have now is a shader and when you put it on and put on your fabulous if it closes like that then that means you have an error and we can figure that out by opening up the game output log and it'll tell us in the info section what exactly went wrong so what went wrong here is it failed to load the transparency the reason is going to be down here and then it'll say here it's very it can be a little bit difficult to figure out what it specifically doesn't like um it seems like it's malformed jason so we're missing a comma somewhere maybe one of you spotted it that i didn't uh here so we get that little fix going hit the f3t go ahead and click hit clear and then go back to video set resource packs and throw this guy back on and video settings and that's fabulous okay so once i'm at this stage essentially i have nothing happening but that's good because it loaded right so it loaded and nothing's happening which means my injection either isn't doing anything or it's doing it but it's not doing anything you know what i'm saying like either it's not you test if it's working you can basically just go like this you can say uh gl frag color dot rgb equals 1. 0 so you can just go like that if you want to test if your whatever you're working on is working if you hit f3t it should just make your whole screen at one color or maybe just wouldn't like that because of my ratios gee i wonder oh okay sorry vec you need to make it a vec3 because we're targeting three values so if we go ahead and put that on and put this on we can be happy that this is at least coming to this point in our code so now we have to make the frag color have the overlay so what we can do is we can make a new vec4 which means it has four values on it called overlay which is a texture 2d of my overlay sampler at text cord so this basically just copies whatever coordinates you're at in the draw process are going to be the same coordinates in your texture so this basically means regardless of the size of your texture you're going to be somewhere in that texture space that is relatable to where you were in the regular space uh so there is my overlay oh and then this last line i did nothing yet okay so let's just assume it's working now what we need to do is change our frag color based off of where what the overlay says so we do g underscore frag color is equal to and this is where glsl pops in this was suggested to me by their disco hunt so we use the mix function so the mix function basically lets you take color a color b and change from one color to the other based off of some weighted value and we're going to use the alpha and what this essentially is going to do is we're going to go mix of gl frag color rgb mixed with overlay. rgb and how much we mix it depends on the overlay.
alpha channel and once we do that then the result is we just grab the rgb because we're going from we're just going to edit the rgb value so the frag colors the color of the pixel you're drawing is going to be a mixture of the color your pixel you're drawing and the color of where you are in the overlay and how much it mixes is dependent on the alpha of the overlay and then just make sure that it's you're just grabbing three vectors because mix could be outputting four vectors so once we go ahead and go x escape and then we go to resource packs and we throw this guy back on it's kind of annoying that it keeps popping it off anytime you have an error but it's the best we can do you're gonna see boom uh oh notice a problem yeah that's the problem so our picture is upside down and the reason for that is the way that a picture is scanned in text chord is top left corner to bottom right corner it's basically the opposite of our logic in the y value so to fix that we can just do vect2 and we can break text chord into x component and text chord dot y component and then what we can do to that is throw another repository parentheses and we just do 1.