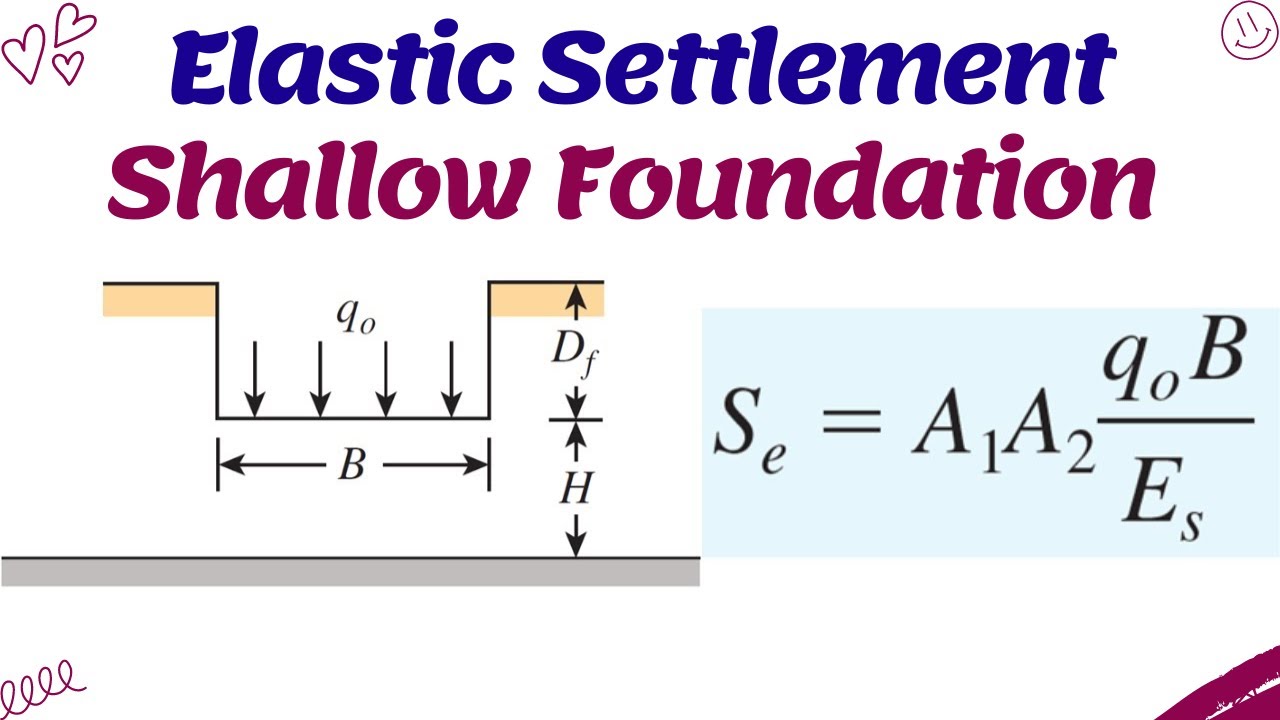
hello in this lecture we're going to learn some of the basics about the settlement and consolidation of soil under an induced stress so in the past few weeks in our 341 class we've discuss we've been discussing a lot about different types of stresses we've introduced the idea of geostatic stresses remember that these are the stresses that the soil is feeling due to its own weight or to the weight of the soil above it we've also introduced the idea of induced stresses induced stresses are the stresses that we add to the soil because we're building something whether a new embankment whether a new dam or Levy or a new building that we're putting on the soil so one of the things that geotechnical Engineers are interested in doing is predicting how the soil is going to deform vertically when we apply these induced stresses when we if we want to predict what these deformations are called these these vertical U deformations are are what we refer to as settlement there are three types of settlement that occur in soil and that we have to consider is geotechnical Engineers the first settlement is what we call elastic or immediate settlement and elastic or immediate settlement is due to the elastic Distortion of the soil particles themselves so we're looking at the solids of the soil and if we load the soil up those solids in the soil are going to deform elastically it's just the exact same concept if I had a steel bar here and I applied some sort of low to the top of the still bar you can imagine then that that still bar is going to have some sort of deformation and that deformation that occurs would be of course the settlement or or the the deformation elastic in the bar um same type of idea was soil now this type of settlement occurs instantaneously uh typically right when we apply the load so usually it occurs during construction and the primary cause for this settlement um or I should say this is the primary mechanism of settlement for coar grain soil that should be an a for coar grain soil so this is like Sands and gravels now the second type of settlement that um I want to introduce has to do more with the void ratio of the soil and this is what we call primary consolidation settlement um designated with this s subc now as we apply a load if um imagine if I had a sponge and if I squeeze the sponge the sponge may be filled with water all the water is sitting in the void space inside that sponge that sponge if it's going to compress at all it has to push some of the water out of it and so it's the same idea if with soil if the soil is going to settle or compress it does so by pushing water out of the Void space And so there's a loss of volume in the soil and the rate that this water gets pushed out depends on the hydraulic conductivity and the thickness of the soil as well as where the drainage layers are located relative to this this soil layer that's consolidating um so depending on these these factors um it could require anywhere between months to years for primary consolidation settlement to occur in a given soil now this is the primary cause of settlement for fine grain soil so um Clays and uh some finer silts the last type of settlement that I want to introduce is called secondary consolidation settlement now this is the settlement that occurs um constantly over time and it's due to the breakdown or the degradation or decomposition of the soil particles themselves and so we get these long-term distortions of the grains and it it has the appearance of like a plastic creep type deformation um and these types of settlements can occur years after primary consolidation is finished and they're particularly um uh common in soils that have high liquid limit and high moisture contents uh as well as soils that are organic so soils like pets or or other organic type soils where there's a lot of um chemical decomposition going on that's changing the structure of the particles themselves so in this uh lecture we're going to talk specifically about these two types of settlements and we're going to save this settlement for uh a later lecture let's talk first about uh immediate settlement like I said before we are likening immediate settlement to the compression of a bar if I press down on the on the axial uh Direction on a bar we expect to see that a portion of this bar is going to squeeze out laterally as the top squeezes down due to our load um this elastic or bulging effect is called the pon effect and it's it's what is typical with immediate settlement so all of this behavior is occurring in the individual soil particles themselves so please understand that immediate settlement has nothing to do with the void space of the soil but it has everything to do with the solids in the soil so think of the solids acting like a steel bar that were compressing or loading there's going to be some amount of elastic deformation and if I let the load go you can imagine that the particles are going to bounce back and rebound to where they were before original size now all soils are subject to elastic settlements but Engineers typically neglect these types of settlements in fine grain soils and only consider them in the coarse grain soils and the question you might ask is well why why do they do that if this occurs in all types of soils why do we only consider it in fine or I'm sorry in coar Grain soils well the main idea is because primary consolidation settlements govern the settlement behavior in fine grain soils typically so uh the the primary consolidation settlement um dwarfs the elastic settlements in Clays and so usually we just kind of lump the elastic settlement into the calculation of primary consolidation settlement but you got to be aware that this is is a sticky issue for a lot of geotechnical Engineers and in my personal practice I have seen geotechnical Engineers estimate elastic settlements from clay type soils and others that say nope I'm only going to estimate it for coar grain soils so my uh the moral of this story is do not be alarmed if in practice you see different types of things being done and estimating settlement you're going to get about the same answer regardless of what is being done uh the point is you want to see at least that fine grain soils are being computed for primary consolidation settlement and um coar grain soils are be computed are being computed for elastic settlement now for the purpose of this class we are only going to consider immediate or elastic settlements in our coar grained soil so our SS in our gravels we're not going to worry about them in fine grain soils how do we calculate immediate settlements well I'm going to introduce two ways to you the first way is to use a theoretical equation that's based on elastic Theory so this equation right here is a popular equation that uh is used or or a lot of different transformations of this equation but they all basically say the same thing this this equation is still based on the idea of um of PL over AE Computing the deoration like in a steel bar it's the same idea we have elastic modulus we have poon's ratio in here we have the load um as well as the effective area that's being loaded and we also have some shape factors that we may want to account for as well as depth factors that will affect the stiffness relas it of the soil um so you'll notice that uh this Young's modulus and the poison ratio they have these little average terms under it what does that mean well that basically means that if I have uh say the ground surface right here and I have my load applied to the ground surface we've learned under induced stresses that there is basically a bulb of stress that extends down beneath the ground and we talked about we're really interested only in the zone of stress that is 20% of our Q up here applied on the ground surface or greater so anything beneath this bulb or outside of this bulb of influence right here we are not really interested in so what does that mean well what that means is if I have multiple soil layers on under here say I have a gravel and say I have a sand and then another gravel or something like that I want to compute the uh the elastic settlement from each of these layers now each of these layers also have Associated thicknesses like H1 H2 and then you know if if this was my stress bulb oops if this was my stress bulb for my uh 20% Then I'm only interested in the thickness of that that last gravel layer that uh still Falls within my zone of significant stress um and then you can imagine that each of these layers also has its own corresponding properties like poon's ratio and Young's modulus uh the sand could have its own properties and this gravel down here could have its own properties so the idea how we compute these average values is we're going to use what's called a geometric mean so how do we compute that well uh for instance the average pans ratio is simply going to be the summation of all of the thicknesses of our soil layers within the zone of significant stress so in this example it would be H1 H2 and then this little H3 portion that's within our zone of significant stress and we're going to divide that by the summation of the ratio of our thickness of each layer divided by its corresponding pans ratio so that's going to give us uh a weighted average Pon ratio to use to plug into this one equation um a similar equation then for Young's modulus is going to be the summation of the thickness of each uh layer divided by the summation of the ratio of the thickness to the Young's modulus for each layer so that's how we're going to compute U our weighted averages to plug into this equation right here a couple of things to point out if you want these shape factors here we can get them from um equation 11. 2 and tables 11. 1 and 11.
3 in our dos textbook okay so this is the first method we can get to compute immediate settlements in Sands or gravels beneath an an induced load now I'm going to introduce the second method but one thing I want to talk about really quickly how in the world do we get these values I mean it's not like we can just go out into the field and magically measure the pon ratio or the young modulus in the soil how do we measure those in the soil the most common method that we use to measure any property in the soil is we use what are called insitute tests insitute tests are tests where we can put instruments down into the ground and measure the properties of the ground right there the field and not take anything back to the lab one of the most popular oh before I do that H I'm sorry I forgot to mention something very important and my animation reminded me of this when you use this theoretical equation please make sure that you use consistent units this equation is dimensionally correct so you got to make sure that your units work out and everything cancels out otherwise wise you're going to end up with some screwy numbers okay back to Institue tests one of the most common and popular tests that we use today is called the standard penetration test or the sptt test in the spt test we drill a hole in the ground just as like is depicted um in this little drawing here then what we do is we lower a rod down into the ground that has a sampler on the end of it now this sampler is basically just a pipe that is about um a foot and a half to 2T long and basically what we do is we drive this pipe into the ground using a 140 lb Hammer that we drop over a distance of 30 in and what we're going to do is as this Hammer falls and hits this Anvil and drives this pipe into the ground we're going to count count how many times the hammer has to hit the Anvil to drive it one foot into the ground so usually what we do is we we count this thing in 6 in increments so we count um how many Hammer blows it takes to get this 6 in and then how many to get this 6 in how many to get this 6 in and if we drive at the full 24 in how many to get that 6 in and then we add together the last uh the blow Counts from the last to 6in sections and that gives us the spt resistance we found that spt resistance correlates pretty well to the relative density of the soil so if I get an spt resistance in the field anywhere between 0 to four I've got a really loose soil has a relative density between 0 to 15% uh conversely if I get uh spt blow counts greater than 50 I have a very dense soil something between 855 to 100% relative density so once we drive this sampler into the ground we retrieve it we pull it out and the cool thing about this sampler is that it actually um can break in half the sampler opens up and that allows you to pull out or retrieve the soil sample that's in the middle or or trapped within that little pipe and so you can take that soil sample back to the laboratory and perform index testing on it like Civ analysis or adberg limits if you have fine grain soil or even some hydrometer test if you'd like um the thing to be careful about though is that that soil is definitely Disturbed so test where you you want undisturbed soil samples you are not going to um use samples obtained from a standard penetration test so anyway you know this little uh Cartoon here showing a guy with a cat head and a rope and a pulley manually making this Hammer go up and down um that's really old school but it it just shows how the test was originally set up if you um type in this address right here you'll be able to go to a video which shows um a live recording of an actual spt test today and they're using a modern Hammer that's called a safe hammer and it's all completely automated so um we can use the spt test to correlate Young's modulus for a soil layer to correlate Pan's ratio for a soil layer and lots of other types of soil properties the problem is because we're not directly measuring these properties there's going to be a lot of scatter in these correlations so you have to be aware of that now the second method that we can use to calculate immediate settlements in coar Grain soils is an empirical method developed by an engineering Legend called mayor Hoff and this uh method is based on the average spt resistance for the the coar grain soil in the zone of significant stress so uh again like we did before the average spt resistance is simply going to equal the thickness of the soil layers in our zone of significant stress divided by the ratio of the thickness of the of each layer divided by its corresponding spt resistance value or average spt value of that layer and that's how we get that average value and we stick that into this equation and we can apply the load for that's uh on our uh footing and we have width remember width is the short end or the short width of our load L is the long width of our load if it's a rectangular load of course B and L will be equal to each other if we have a square load where did this uh method come from well mayor Hoff what he did was he collected hundreds of actual settlements from actual footings where he knew the low that was applied to the footing he knew that there was sand beneath the ground he knew what the spt resistance was of that sand before the footing was constructed and he developed a statistical correlation now you got to be careful right because I mean essentially what he was doing was saying okay here's spt resistance here's settlement the lower the spt resistance the higher the settlement in my footing and so he fit a line through there and and that's what this equation essentially represents but you got to be careful because um there's scatter in this data so I said if I were to look you know the likelihood of the data being around this uh regress line is pretty high but there is a a chance that data can lie far away from this line so anytime you use empirical methods that's something that you have to be aware of one thing that I want to point out that you need to be careful of this is an empirical equation and it is not dimensionally correct that means that when you use this equation Q has to be in units of KSF B the footing width has to be in units of feet not inches feet settlement will be computed in units of inches wait even if I plug feet in for for my footing width you're telling me the number that spits out is going to be inches yeah that's what I'm telling you that's what I mean by this equation is not dimensionally correct so make sure that you use the units that mayor Hoff is assuming here in this equation okay so that wraps things up with um elastic settlement now I want to spend some time and I want to talk about consolidation settlements and Clays and um to introduce this idea I want to go to the Whiteboard and introduce this idea if imagine if we had a piston and in this piston don't want to do that let's see and in this piston imagine we filled it up with a whole bunch of water now you can imagine that um if the this uh piston was truly closed here like this that if there's no way for the water to escape the Piston's not going to move because water is essentially incompressible but what would happen if I took then um and I placed a spring inside this piston but still left the Piston completely sealed and closed now again if I apply any lad to the Piston all of that load applied to the Piston is going to be taken by the water and the spring is not going to deform at all and if the spring doesn't deform that means the spring doesn't take any load if the spring doesn't take any load that means the spring doesn't even feel the low that's being applied to the piston but if I come in and say I poke a little hole right at the bottom of my piston such that water now starts to drip out here we'll erase that water up here there you go now as water starts to drip out of this piston slowly what's going to start happening is that this piston is going to start moving down because water is escaping as the Piston starts moving down that's going to start deforming this spring right here and as we start deforming that spring the spring is going to start pushing back that's what happens when you deform Springs now eventually what's going to happen is that the more this piston goes down the further it goes down because more and more water escapes the spring is going to take more and more and more Force until the force in the spring equals the force that we appli to the piston and then the Piston's going to stop going down at which point the water is going to stop flowing out of the Piston because we have a vacuum effect and it's going to keep all the water inside and everything will be in equilibrium now if I apply an additional load like a a second load I don't know why it keeps uh making a crooked little arrow there but if we apply another load to my piston initially that load is going to be taken by the water because the water is going to try to get squeezed out again but it can't get squeezed out fast enough so the water is going to take that load initially but as the water drips out and the Piston begins to move down some more the spring eventually will take the load that's been applied to the piston and what I'm trying to say is that this analogy this analogy with the piston and the water and the spring is is representative of what goes on in clay or fine grain soil in the ground in this particular case the spring represents the clay particles the water represents the water that's in the void space in the clay the Piston represents the induced load right here that we're apply line to the top of the ground and the little drip of water represents the water that's escaping into the drainage layers that may be bounding or surrounding the clay layer either below it or above it so in other words um we we can look again at these analogies here at time equals z when I apply this Force P to my piston immed mediately or actually this Force right here initially the water is what's going to take that load but as that water slowly starts to escape through the little drip release that I have the water is going to take less and less and less of the load so I have a plot here I have time and here's my applied force p on the Piston now something needs to hold that piston up or the Piston is just going to move down down down down forever something needs to resist it so I'm saying at time equals zero the water is resisting all of that load but as water drips out the water pressure inside of my piston here is going to get smaller and smaller and smaller so something's got to be making up for that and that's going to be the spring so as the water drips out my spring starts taking more and more load from the Piston such that at any given time the summation of the um Force taken by the spring and the summation of the force taken by the water if we add those together it's going to equal my applied force p here's another way to think of this let's just look at a real problem let's imagine here that I have this clay layer and it's bounded by sand on the top it's sand on the bottom and it's saturated and now I'm coming and I'm applying some uniform stress uh an induced stress infinitely across the whole top of the site imagine I'm just dumping a whole new soil layer on top of the ground so what's going on on well um here are some plots on the right the Y AIS here represents this thickness of the clay such that this H here represents the total thickness of my clay when I apply my induced stress that's going to induce a brand new stress a total stress equal to Delta Sigma in my soil some things got to take that load and at time equals zero um when the clay starts to feel compressed the water that's in the void space is going to be the first thing that's going to push back so the poor water pressure is going to increase by an amount equal to the induced stress that I put on my soil and we call that U KN that's the initial increase in poor water pressure in my clay layer and interestingly enough the clay particles themselves are going to feel nothing they're going to feel no increase in stress because the water is taking all of the load we call this no consolidation no consolidation has occurred yet but what do you think is going to happen to the water well this water that's in the pore space wants to get out now it's pressurized and it wants to find an exit so it's going to start draining out into the sand layers both above and below the clay layer and the first water droplets that are going to escape are going to be of course the water that's the closest to the sand such that if I look at any time greater than zero the water that was at the top of my clay layer and the water that was at the bottom of my clay layer got out it's not pressurized anymore because it's not pressurized anymore the poor water pressure at that location is equal to zero but I still have to offset the total stress that I applied through my induced load therefore if the pore pressure went down effective stress had to go up that's remember that's analogus to the spring beginning to deform and beginning to take the load that we applied on our piston so at the edges of my clay layer the effect of stress goes up but notice at some time and greater than zero that I still have a significant amount of pore pressure in the middle of my clay layer and the reason for that is because a drop of water at this point has a really long way to go either up or down before it can get out of the clay so that's why it retains that pressure for a long amount amount of time and that's why I have little effective stress In Those portions of the clay so in this scenario we call this partial consolidation or consolidating the soil is consolidating now if we come back at some time Infinity after all the water has had a chance to drain out we're going to see that there's going to be no more excess has poor water pressure in the clay the only poor water pressure that will be in the clay is the hydrostatic pressure just from the weight of the water itself but the water is no longer carrying any of this induced stress that we put on the soil so what is carrying it the effect of stress the soil particles themselves are now carrying the weight that we just put on there so what is primary consolidation my friends primary consolidation is the mechanism of transferring a newly applied stress from the poor water to the soil skeleton that is primary consolidation and when that happens then we say that full consolidation has occurred so when we want to uh predict the properties of consolidation settlement there's two things we're really interested in we're interested in how much settlement is going to occur and we're interested in how long it's going to take for that settlement to occur so the way that we can predict this is we need to go and obtain a sample of the clay as undisturbed as possible and bring it back to the lab and we're going to simulate loading this thing with an induced stress so we take that clay sample and we stick it inside of a steel ring and then we put the steel ring inside a water bath and we put below it a porous Stone and we put on top of it a porous Stone these porous Stones simulate sand drainage layers so that water that is being squeezed out of our clay sample can get out without a problem on the top of the stone we put this dial here and we're going to measure how much the soil sample consolidates or how much the sample settles when we apply different amounts of load such that if I were to plot uh for one given load time on a log scale versus how much deoration occurred in my soil I would see this type of behavior initially it would start out kind of slow and then it would speed up speed up speed up and then it would slow down again this steep part of this curve is what we call primary consolidation and that's what we're interested in in the next lecture we're going to talk about what to do with this second stage of secondary consolidation so what we want to do is we want to take this soil sample here's the cross-section again of just the soil that's inside of our disc and I want to convert that over to a phase diagram so I have solids right here and I have voids right there and what I want to do is with each load that I apply in my test I want to measure how much deformation is induced in the soil and the more load I put on the soil and allow to consolidate the more or deoration is going to happen because I'm going to squeeze more water out of the voids and the volume of the voids is going to diminish what do I do with this information well I plot what is called a consolidation curve a consolidation curve shows the change in the void ratio of our soil sample with the change in the um effective stress that we're applying to the soil the change actually I'm sorry not the change of the effective the change of the load that we're applying to the soil and so what we can see is that there's some initial void ratio and as we continue to increase the stress we can see that the void ratio eventually starts decreasing substantially because we're squeezing more and more water out of the clay so these equations right here are very useful to go from properties that we can measure in our consolidation test like the height of the solids or the weight of the solids and take it all the way to Computing a void ratio for the soil so these equations will be helpful to you if you need to develop a consolidation curve from a lab test so let's zoom in and look a little closer at what a consolidation curve is there's a few things I want to point out first of all notice that there's this point on the plot where the slope has a really Stark change there's a slope right there there's a slope right there and that stress seems to indicate the load at which we change that rate of void ratio change in our soil we call that stress the preconsolidation pressure or sometimes called the maximum past effective stress we denote it with Sigma Prime P or sometimes Sigma Prime C this stress represents the maximum effective stress that the soil has ever felt in its existence as long as the soil has maintained this soil fabric it is a record of the high highest stress that that soil has ever felt even if it was thousands and thousands of years ago that information is still recorded in the soil okay next we want to look at what we call the over Consolidated portion of the curve over Consolidated means that the current effect of stress is less than Sigma Prime P so if I'm anywhere on this portion of the curve the stress that I'm at currently say right there is less than Sigma Prime P that means that my soil is over Consolidated now what if I'm on this portion of the curve we call this portion the Virgin compression line and this means that say this was my point that I'm at right now this point is higher than my soil's previous preconsolidation pressure which means by definition that the stress that I'm currently at is the largest stress that the soil has ever felt so if my current effective stress is equal to the preconsolidation pressure then the soil is what we call normally Consolidated so I have two types of clay I have overc Consolidated meaning that the soil has felt a larger amount of stress in its past than it's feeling right now or I have normally Consolidated which means the soil is currently feeling the largest amount of vertical stress that's ever felt in its existence now a very useful ratio that we can use um is called the over consolidation ratio or the OCR so again the OCR is equal to the preconsolidation stress divided by the current effective stress in the soil if the current effective stress is less than the preconsolidation pressure then the OCR is going to be greater than one which means the soil is over Consolidated if the current effect of stress is equal to the preconsolidation pressure then the OCR is approximately going to be equal to one and we say the soil is normally Consolidated so let's do a little test if I'm on portion line B of the consolidation curve is the soil over Consolidated or normally Consolidated if you said over Consolidated you're right because our current stress is less than the pre-consolidation stress now in this portion from point B to point C you can see that it's very curvy this is what we call the transition zone from over Consolidated to normal Consolidated Behavior now what's going to happen if I'm on this point between line C and line D am I over Consolidated or am I normally Consolidated if you said normally Consolidated you're right we're on the Virgin compression line which means that our current stress is now the new preconsolidation stress but what would happen if I went down to say Point D and then I started to remove the load in my test such that the soil is now feeling less stress than it had previously well my consolidation curve or my void ratio would follow a plot or a path that looks like this and notice how that path is very similar to the path above that's because now I am in recompression I'm on what's called The Rebound curve am I over Consolidated or normally Consolidated if I'm on that curve if you said over Consolidated you're correct because Point D that stress associated with Point D is now my new preconsolidation stress from my test how do we find the pre-consolidation pressure one of our geotechnical heroes Professor kasag Grande invented a graphical procedure for us to find the preconsolidation stress well why do we need that I mean if I go back to this plot it seems kind of obvious to me that boy my preconsolidation stress is right there it's right where the slope my line changes well here's the bad news folks real consolidation curves from real soils don't look like that they look like this curve right here and it's not so obvious to see where the point of curvature changes or or where that that curviness changes so the slope between the recompression line and the Virgin compression line uh occurs so kasag Grande developed a graphical method that can be used to find that preconsolidation stress step one we're going to find the point on this curve that represents the maximum curvature the maximum curviness so we can see that this line This consolidation curve seems to get the curviest right about at that point and what I'm want to do is I'm going to then draw just eyeballing it and with a straight edge I'm going to draw a tangent line to that point of Maximum curvature step number two I'm then going to draw a horizontal line right through that point of Maximum curvature step number three I'm going to look at this angle between lines one and line two that I drew and I'm going to eyeball a bis sector I'm just going to try to cut that angle right in half wh so I'm going to draw that bis sector step number four I'm going to come down on the Virgin compression line and I'm going to draw a straight line using a straight edge and that straight line is going to extend up up up up up up up just like that step number five and the final step where that virgin compression extension line crosses my bis sector we say that that stress is the preconsolidation stress for the soil so what are the different causes of over Consolidated soil there's lots of different things that can overc consolidate soil overc consolidation occurs when the soil was loaded more in its past than it is currently so one mechanism is erosion uh maybe in the past there was more uh say sand on top of the clay but over time this sand got eroded and taken away by wind or water or whatever so it unloaded the clay and all of a sudden we have Clay that's feeling less stressed than it did and it's passed uh another pretty common um Tech uh method for over consolidating soil is if I have a glacier say I had a really thick Glacier that moved over the soil and loaded it but then climate changed the glacier melted and as a result the soil isn't filling that load from that Glacier anymore a third method is rising groundwater so if I have Rising ground water we learned that because effective stress is total stress minus pore pressure if the groundwater Rises then a little point of soil that's in there is going to fill more pore pressure and if it's filling more pore pressure um that basically means that effective stress has to essentially go down in order for the equilibrium to occur and so if effective stress goes down then the soil can become over Consolidated and last but certainly not least there's a a mechanism called desiccation desiccation is where a soil becomes wet but then it dries out and when the soil dries out the double layers in the clay particles become extremely thin and the soil particles start to get highly attracted to one another such that they bind themselves together really really really tightly so tightly that it can feel like a piece of rock or gravel and so those particles are are so tightly packed because of that that double layer interaction and those stresses that they're feeling enormous amounts of stress and so it's not uncommon that if I were to plot um say with depth if I were to plot over consolidation ratio and say this was the ground surface so I'm just going down it's not uncommon to see this type of Behavior where over consolidation ratio increases the closer I get to the ground surface and the reason that occurs is because the ground closer to the ground surface has desiccated all right so one thing that's really important that we need to understand is what happens when um we have disturbance of the clay samples that we bring back to the lab and we put in a consolidation test well if we disturb the soil fabric then the record of the stresses that's in that soil fabric becomes really difficult to read such that if this line that's shown right here represents a really good sample that's that's not very disturbed you can see wow that's really easy to see that preconsolidation stress okay well if I disturb the so Fabric in any way and I run a test that my consolidation curve might look like that if I really disturb my soil sample then my consolidation curve might look like that and it becomes more and more difficult to interpret and to correctly um interp uh correctly estimate what my pre-consolidation stress of that soil is because my my soil fabric has been so Disturbed and so the trend that we see is that with increasing disturbance of our soil fabric we get smashed and and pretty much garbage consolidation curves so the name of the game folks is to collect as undisturbed soil samples as you possibly can get if you really want bang for your buck and to get high quality consolidation settlement estimates then you need to spend the money to get undisturbed soil samples back to the lab because if you do that you're going to be able to get really nice consolidation curves from which you can get really reliable estimates of your preconsolidation stress without that you are just basically throwing darts at a board in the dark so some Engineers want to try to correct these smooshed consolidation curves and get them back to a an equivalent undisturbed consolidation curve something that they think represents truly undisturbed soil from the field so another geotechnical legend by the name of schurman developed a correction method to to correct these um Disturbed consolidation curves to equivalent field consolidation curves so the method that he recommended is a is basically a four-step approach the first step is say say here's my consolidation curve plotted here um that we got from the lab test the first thing we're going to do is we're going to extend the Virgin compression line down to a void ratio equal to 40% of the initial void ratio so this particular case my initial void ratio is equal to one so I want to extend my void ratio down to 40% of that or 04 so we just extend it down like that step number two we're going to draw a horizontal line from um coordinate remember these are um whoops I'm sorry these are XY coordinates so um in term and this is on a log linear scale here so x coordinate of 0. 01 why not 0 well because there is no zero value on a log scale from 0. 01 in eot to whatever my actual stress is in the ground U that I believe is in the ground so this right there guys that is the geostatic stress of the soil in the ground that's our best estimate of what its actual uh effective stress is in the ground so in this particular case for this little example we're saying I believe that the effective stress of the soil in the ground is equal to 0.