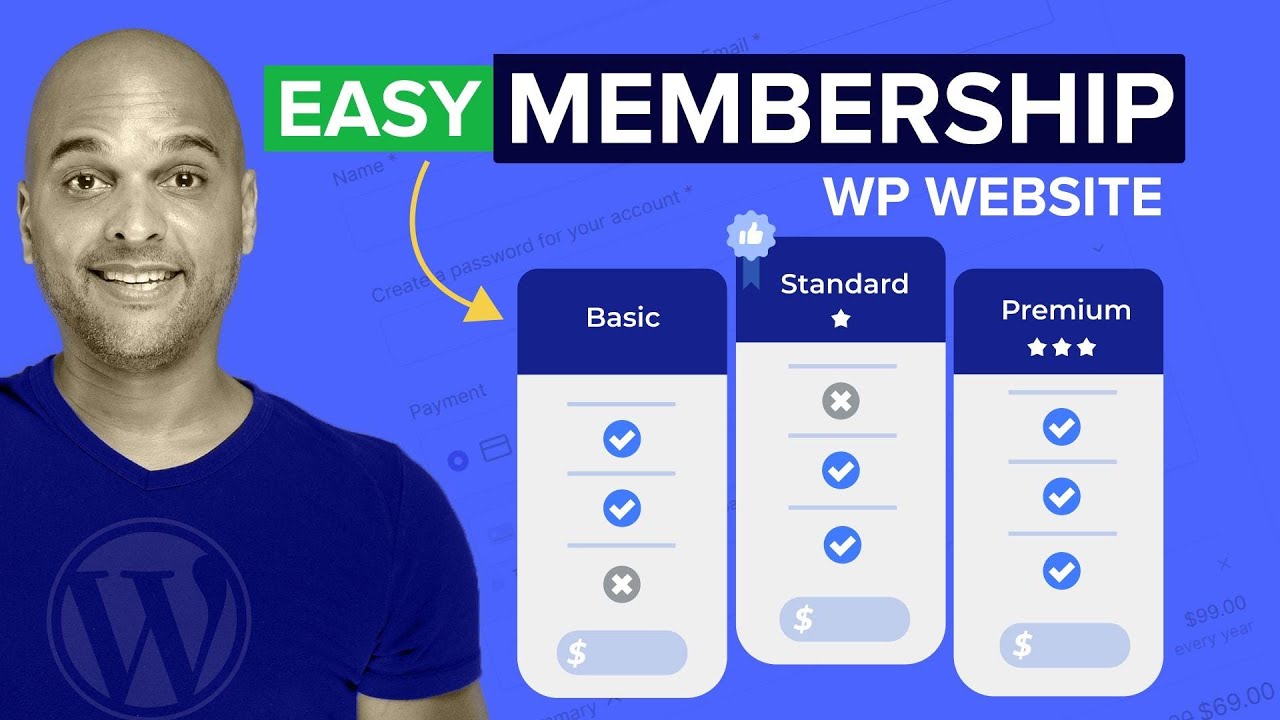
today i'll be moving away from focusing on jet engine and taking a look at how to use jet form builder alongside paypal to make a really simple example of a membership-based type website it is worth noting that even though i'm going to demonstrate the main process using jet form builder you can still achieve a very similar result with jet engine and the forms feature if you'd like to learn how to enable paypal inside jet engines forms there's a link in the description for you right now but before we start building let me just quickly introduce
myself my name is paul c from wp tets and i've teamed up with croco block to create a series of tutorials on using dynamic jet plugins like jet engine jet smart filters and today's focus jet form builder okay let's quickly see what we're going to be working on before we fire up wordpress and get stuck into building our simple membership setup with jet form builder on paypal [Music] so this is just a really simple example of how the process works we've got three simple options where people can choose what membership level they want for example
we'll go for the silver membership because that's what we're going to be creating in this video so hit by membership i'll simply drop my details in hit register on there for the account and that will then take me over into paypal so i can make my payment so then i can go through the checkout process using paypal my account will be set up and activated once the payment is approved and then i'll have access to the various different features that my user level actually allows so let me just quickly demonstrate what we have access to
so this is the normal site that you'd see if you're not logged in or you don't have access you can see we've got the relevant different sections some properties and so on and this is what everybody would see but once i've logged in with a paid membership and the correct access i'll now get access to extra features now for this example it's really simple we've added another section in but you can see there's the featured member properties and this is only going to be available to anybody that has a paid membership of the relevant level
but you can set this up through anywhere on your site you can make it as feature-rich as you want based upon all the different levels of membership you may want to set up now the first step in the process is to enable the paypal feature inside jet form builder so let's quickly hop over and take a look at doing that right now so first on the agenda once you've got everything installed is to set things up to work with paypal itself so what we need to do is head over into jet form builder come into
our settings section and inside there you can see we've got payment gateways you need to make sure you enable both these options this is going to switch it into test mode which obviously i would recommend you run a test before you go ahead and do any live transactions and then once you switch this off you can go to the live transaction side of things and then we need to do is drop in your paypal gateway api details which is your client id and the secret key details on where to find this information will be in
the description below so if you've never set this up or you're just not sure where to find this information it will be in the description so check that out then just hit save and everything is set up ready now you can do this globally or you can actually do this on a form by form basis which is pretty cool let me just quickly demonstrate how easy it is to do that we're going to hop back over into jet form builder and into forms where i can take a look at any forms i currently have created
i've got one example and we're going to open this up and inside here we've got an option on the right hand side called gateway settings inside there we can choose the payment gateway or we can set it to have no payment gateway at all we set it to paper paypal checkout let's hit edit and inside there you can see the first option is to use the global settings so i can use the global api and any of the other settings we set up for all of our forms or i can override that by basically just
putting in the information and setting things up inside you just wanted to show you that for use cases where you might want to use different details now in this step we'll create and configure the user roles for our membership levels now there are plenty of free tools out there that will help you create new user roles in wordpress or if you're comfortable you can manually add the relevant code to your functions file let's keep things really simple by using a very popular free plugin called user role editor so this is user role editor if you've
never used it before it simply does what its name suggests it allows you to edit any of the user roles that are part of wordpress or to create your own custom wordpress user roles for our example for our membership side of things we want to create three different roles i've already gone ahead and done that but let me just quickly show you where it is and how you do it once you've got the plugin installed you're going to have a new section underneath users called user role editor inside there you're going to have a list
of all of the different roles you have including any new ones that you create let me just quickly demonstrate how you create a new role if we take a look at the top we've got all the different roles including my new ones which is the gold the silver and the bronze membership now we're going to use these different membership options to link that up and actually control who can see what and this is why using the user roles is the easiest way and probably one of the most flexible ways you can do this kind of
thing so we can do is we can duplicate a role and then we can adjust what we want or we can create one totally from scratch or we can go back and retrospectively edit one that already exists so creating a user role is very very simple what we need to do is click on add role this allows us then to name it give it the name the system is going to use and if we want to use a starting point for an existing role we can do that so let's just put this in we're going
to say we want to use the name of sample membership we're going to just put an underscore inside there and the display name then we're going to do the same thing again so we're going to just drop in sample membership and we say we're going to make a copy of the bronze member as a starting point so select that option and we'll say add role you can see that now creates the role for us you see sample membership is at the top and if we take a look at any of the options we have for
what this user role can do you can see it's duplicated the read which is exactly the same as we have for our membership setup for our bronze member that's all we need to do if you want to edit those capabilities you can edit them and then just simply hit update but all we want this particular user to do is be able to read content nothing else we can then use the levels that we set up inside you to control what they can see inside our membership setup now again let me just quickly show you where
you'll see this option now all this will become clear because i'll show you how everything is set up when we create the form i just want to make you aware of where these different settings actually go and show up so you can kind of see where i'm going with this let's open up again our test membership that i've already created and if we take a look at the post submit actions which is what happens once this form is submitted we've got the first option which is to register the user we'll look at the other two
a little later on but let's just edit this and you can see one of the things we can do when we're working with setting up our forms with jet form builder is we're going to assign a user role to them so this is set up to work with the bronze membership but if we open that up you can see there's our sample membership the new one that we created so we create these user roles these register users we can assign those roles to them using these forms that we're going to create i hope that kind
of makes it clear where we're going with this i just want to sort of point this out at this point so you kind of see the relevance of creating these membership levels now when you take any kind of orders online you also need to have a custom post type to store the basic order details in now if you're not familiar with creating your own custom post types with jet engine there's a link in the description to a tutorial to help get you started so our orders database our custom post type is really really simple setup
there's nothing complex about this if i commit the jet engine and i hop over into my post types you'll see i've got a new post type called orders if we open that up let me just quickly show you exactly what i've set up now you could get more complex inside you if you wanted to and i would generally recommend you put some more details in this is just set up just to demonstrate how the process works and how we link this through to our form so i've created a custom post type called it orders and
inside there all i've done is i've set up two simple meta fields i've got the buyer which will store the buyers details as you can see it is literally just a text field nothing more than that that's going to store the user's name and the membership level which as this name will suggest is going to store the membership level for that particular member if we take a look inside the advanced settings you can see there's pretty much nothing much set up inside you i want to exclude it from the search because there's no reason to
have this searched on the front end and so on you can set this up however you want but i just basically created a very simple setup that will store all of my orders and if we come in and take a look inside there if there are any orders they'll be listed inside here so if i open this up go and take a look at the orders you can see this will give me a really basic overview you can see i've got the buyer's name and i've got the membership level simple as that all these are
stored inside you so i can see exactly what's going on check any of the orders that i want pretty cool nothing complex about it now if you're new to working with jet engine and creating custom post types there's a link in the description to videos that will help you out to get you up to speed with how that side of the process works it is pretty simple and straightforward but check that out if you're new to it so next on the to-do list is to build our registration form ready to set up all of the
actions we need to apply to it so we're ready to create our form for our next membership level i could duplicate this if i wanted to let's start from scratch just so we can see how everything works so we're going to add a new form in and we're just going to title this one silver membership okay so this is what we start off with and if you've ever used jet form builder or if you've ever used the form builder inside jet engine this is going to be fairly familiar to you most of the same options
if not all of the same options are going to be inside you just going to look a little different because we're now working inside gutenberg and incidentally you can actually do pretty much exactly what we're going to do inside your inside jet engine with a couple of slight differences but what we've got to start off with is two fields we've got the hidden field and we've got the text field so this is just the basic starting point we also have the submit button now the hidden field the post id you could leave this in there
it's not going to be used in this example because we're not updating or anything we're creating a new user and also doing some other things but post id is mostly used when you want to work with editing updating something that already exists so we'll leave that where it is we're just not going to use it so the next thing we need to do is go ahead and update this first field so we don't actually need this to be just a text field we're going to update this we're going to select it we'll choose the options
and over on the right hand side we'll have all the different options associated with this so a text field is perfectly fine we're just going to change the label to user name the text form field we're going to set this to user underscore name now the form field name is what you're going to use to reference things inside working with jet form builder this is kind of the internal name the field label is what people are going to see so you can see if we take a look user name is displayed the user underscore name
the form field name is only used internally if you want to drop a description you can do is purely optional this will just kind of display so we can say insert your preferred username here and you can see that puts it underneath there telling you exactly what to do in this example i don't think we need it but if you need it for a more complicated form you could do that then you have your default value now for the example with a username we don't want to have a default value but you could insert something
inside there or you can actually pull things from a database source so if you use inside jet engine or something you can see we can pull data from things like posts users a url query those kinds of things again for this example we don't need that we're going to leave it as a blank area then you have your field settings what field type is it and you can see we can choose between text email url and so on now this is more case of just checking to see exactly what data has been put in there
that is correct so if you were having a url field or an email field you probably want to set this to be the relevant information in there the same with passwords and telephone numbers just so we can do a little error check to make sure the right data has been inserted if you want to set the minimum and maximum length for this example username you can do that inside you and you can also set up an input mask if you want to make sure that the particular field that you're working with has a set kind
of layout to it great if you want to work with phone numbers credit card details those kinds of things and under advanced if we open that up you can see we can choose to put a placeholder inside there so if you wanted to you could just put in name and you can see that puts it inside this box however it makes no sense because we're putting the label inside there but you can use if you want to and if you're creating a multi-step form for more complex forms you can use the add previous page button
and so on you can also set the field visibility so you can choose between people that are logged in logged out or for everybody for this example because it's something that's going to be a registration we can leave it for all or we could if we wanted to say it's only for logged out users in other words not logged in so if you're logged in you can't register again because you're already registered and then you've got the css class name which just simply allows you to apply a custom css class to it and then if
you wanted to target that to customize it you could do that so that's basically all we need to do there we're just going to recreate now a couple more form entries and then once we've done that we can start to build the form out so to add another one in all we're going to simply do is click to add something so we're going to click the plus we're going to just choose the option for a text field again and there's our text field we'll just click to drop that inside there we'll reposition this because it's
in the wrong place so we'll just pop that underneath our username and this is now we're going to drop in our email so the process is pretty much the same with a couple of slight differences a couple of slight variations so we're going to do is first of all we're just going to give this a label of email underneath we're just going to put in user underscore email and i generally tend to like putting in user underscore something when you're registering a user or something that applies to it because if you're looking at these field
names later on inside working with jet engine and so on it makes it much easier when you can see exactly where it relates to so post underscore something page underscore something user underscore something just makes the whole process just a little simpler again we're going to leave the field description the default value text field is perfectly fine what we're going to do then is we're going to make sure that anybody that uses this is going to put in the right details so text is not what we want we want to set this to be an
email field just to make sure that the error checking now is going to confirm that an email is actually being used inside there we don't need to worry about anything else on this we're going to leave that as it is and we're just going to add in another form element now and we're going to use this to deal with the password side of things so again we're just going to click plus we're going to add a text field in we're going to reposition this in stacking order we're going to just come over and we're going
to change the name of this and we're just going to call this password we're just going to call this underscore so user underscore password field description and everything we're going to leave that as it is change the field type to password so we can confirm and check that minimum length i am going to set a value inside your to 8 so it's going to force anybody that uses the password to use a minimum of eight characters just to help in a little bit more sort of strength when it comes to the password side of things
but you can set that to whatever you want to and again if you want to set an input mask you can do that inside you we don't need to worry about placeholders or anything so that's perfectly fine i'm going to do is we're going to just simply select this and we're going to duplicate it because we want to put in a second field which is the retype password field just so people can confirm their password details are correct so this just helps avoid any problems so we're going to do is we're going to come back
up and we're going to change this to re type password we're going to put in user password underscore check and everything else is perfectly fine inside this we're going to leave those values as they are again password minimum length of eight everything matches up so you can see it's quite quick and easy to start to put these together so i'm going to quickly just run through add a couple more fields in here that we need to put in using a sort of first name and surname and so on and then we're going to take a
look at some of the other hidden fields that are going to be useful inside working with this form okay we're going to add in two hidden form elements now so we're going to do is click the plus option and from there we're just going to do a search for hidden and you see there's our hidden field so we'll click to add that first field in and reposition it above our submit button we're going to do is just set this now to record the membership level that's applied to this particular user so we're going to change
the form field name and we're going to put in user underscore membership and just go level and we're going to do is we're going to set this to be manual input and for this example we're just going to call this silver which is our silver membership so that's the hidden field so that will store that data alongside the user we can do the same thing again so we'll add another hidden field in and this time we're going to use this to store the price for this particular membership so we'll select it and we'll just pop
over we'll give this a name of price and default value and everything is perfectly fine but again we're going to change this manual input and we can set the value for this particular membership so this is going to be 99.99 there we go and that's the basic elements of our form so let's just save this draft and there's a couple of things i want to do some of these fields have to have information in so we're going to set those to be required so we need to do is click on it check the box required
same for email same for password same for retype password and we're going to make sure that they put their first name in even if they don't put their surname in so we've set those to be required fields they have to be submitted and we're going to do is going to change this button so we're going to select it i'm going to change this from submit and we're going to put in register makes a little bit more sense we'll hit save a draft on there form actions make up the core of this stage of the process
and we need to add three different options in we'll link our form to paypal to allow us to take the payment we'll then link it up to the orders post type we created in step two to sort the orders and finally we'll add an email action to notify the admin of a new user being registered okay so we now need to go ahead and set things up for our form let's come over to the right hand side and choose jet form and inside there all the different options that we have to make sure that our
form does exactly what we wanted to do and how it's all going to work so if we take a quick look i'm not going to spend too much time on all these because i don't think we need to form settings you can choose whether you want to have this in column or row layout you can check what you want to display as your required mark we're going to drop in the little asterisks and you can see now anything that's required gets that little symbol and the submit type you can do page reload or ajax i'll
do the ajax option and if you're using a multi-step form you can enable the form progress capture settings if you want to use capture which would probably be recommended to avoid having too much spam junk coming through then you can enable this and link this up with the settings you can set inside the jet form builder settings gateway settings you can see this is what we took a look at earlier on we set up the payment side of things so we need to do is check this to work with paypal then we can come in
and we can edit this if we want to once we've saved things we also need to create and insert an update post before we can actually do anything with this so you can't just enable paypal and expect it to all work you have to actually put in an action that says that this is going to insert or update some details so next up the post submit actions now by default the first thing that comes in there is to send an email because when you're creating a form most people are going to probably want to send
an email from it however we want to change this for the first option we're going to send an email later but we're going to set these up in the order that we want these actions to run so the first thing we want to do is choose the option to register a user we'll select that option and that now sets that action up if we hit the little pencil we can now go ahead and configure exactly how all of this is going to work so what this does is this shows us all of the different form
elements on the left hand side and then we can marry those up with the form names in other words if we take a look at user login we can open that up inside there and we can choose what we want to pull in and this is where we've got the various different fields so user login is going to be username email is going to be email password is password confirm password re-type password and you can see now where we set up two of those fields first name is going to be first name surname is going
to be surname and if you used a user url you can do that inside there i'm gonna leave that out we don't need to worry about that too much then you've got your user role option which is when someone makes the sort of registration process and everything completes the way you want it to what role are they going to be assigned and again this is where i showed you how to use the user role editor all of those are going to be inside you so we're going to choose the silver member and that means now
that we've married up all the relevant fields we've set the user role to be the silver membership and then you've got the user meta details now this might seem a little confusing at first but what we're going to do is just literally link up the user meta fields to the user meta fields that we created inside our form and to make our lives easier pretty much the names are all set outside here for us now we don't need to worry about the post id because we're not updating we're creating and registering a new user so
there is no post id and if you're used to working with wordpress you know that everything including users is basically treated like a post so we're going to do is we're going to simply just going to copy these over one at a time and paste those inside there so i'm going to do that for the key ones that we need we don't need to worry about password and password check we just need to put in the right fields that we want to link up so we've basically done here is just fill out the relevant details
for anything that needs to be stored alongside this user leaving it like i said the username and the password so with that being done we can scroll on down we can see the next set of options we have associated with this so do we want to log the user in after registration for ease of use for a lot of cases that might be exactly what you want but if you didn't want to log them in automatically you could leave that unchecked and then you can see we've got the add user id to form data well
we're not going to worry about anything to do with that we're going to leave that which is basically just saying the registered users id will be added to the form data so it'll pre-fill out any future form data we don't need to worry about that right now then you've got the option to manage any of the message that you have show up when someone creates a new registration you know the details that will pop up underneath whether the passwords don't match if the username has already been taken and so on so you can if you
want to based upon all the different messages that can pop up as part of this form you can customize these to your own liking once you finish though we're going to simply hit update and that's the first part that's our first action created if you want to come in and edit that you can come into the post submit actions hit the pencil next to it and then you can easily come back in and make any updates or changes to this if you want to change anything at all so we're going to say we want to
log the user in after registration we'll hit update on there and i've made a change to it so next on the agenda is now to go ahead and create the action to insert the details of this order into our order custom post time so let's add a new action we're going to change this then from send email and we're going to choose the option for insert update post let's just hit the edit option and now we can go ahead and set things up so the first thing to do is what post type what do we
want to link this action to where we're going to insert or update this data choose the option and we're going to scroll down until we find our orders custom post type and we'll select that inside there then you've got your post status which doesn't really matter in this example because this is an order that's being stored in the database so we're going to set this as publish because it's not something that we have to worry about posting anyway post id like we saw we created the register user is not relevant in this example but most
of the other options are going to be relevant so the first of all we've got the username so we're going to do is we're going to set this up to be post meta and this is going to grab the data then from our form and all we're going to do is copy this user underscore name which is the name of the field that we want and we're going to simply paste that inside there do the same again postmeta same again this is user underscore email so we're going to drop that inside there we're not going
to store the using the password and so on inside there as well we're going to grab the full name and again post meta and we'll just put in the user full name and if you want to you can grab the other options as well it's like postmeta for the surname we can grab that copy that post that inside there user membership level again post meta we're going to grab that data because all this information is being stored inside that form and being pulled in and then stored inside the entry inside our orders list so pretty
cool see how that works and postmate is the final one and we're just going to put inside the price there we go so that's the first set of options done all we need to do now is simply click on update and everything is done so that second action now to insert or update the orders page is going to go into there okay so now we've done that now we've got this insert and update let me just quickly save the draft because when you're working with forms i would recommend saving quite regularly because there's a lot
of steps involved in this and you don't want anything to happen and accidentally lose the work that you've been working on so now we've inserted that insert update action we can now open up the paypal checkout options and make sure that everything is set up the way we want with this particular form so i'm going to do is we're going to hit edit on there and you can see we've got a blank layout let me just quickly go through how all of this works we're going to use the global options that's going to pull in
the relevant information for the client id and so on we're going to set the currency code now again if you don't know what currency code to use there'll be a link in the description that'll take you over to paypal to explain exactly what you have to put inside there now for our example we're going to be using us dollars which is usd okay so that's all pretty simple and straightforward but what are these next set of options and what do they do well this is where you choose what happens in the three key stages of
this form submission and this pay payment option so before the payment in processed do you want to register this user and insert and update the post which is the order on successful payment do you want to do that or unfailed payment do you want to do that so this is where you just choose where and when different things happen so do you want to register the user before the payment is even made in this example we don't want to we want to set the insert the new user to be done on successful payments they have
to complete the payment side of things before that action will complete the same thing goes do you want to insert that order in at the same time as a successful payment well we can just choose that option inside there if you want to so you can just literally come in and set these up as you see fit to make sure that the whole process works in the way that you wanted to whether it's before unsuccessful payment on a failed payment and then you've got the option to do things like create payment order notification so insert
update post post type orders post status publish in other words once this is completed do you want that order to be created well in this example yes we do so we'll just uncheck that insert update post we don't really need that there we're just duplicating the same thing then finally we've got the option for the price amount field where do we want to grab the amount information from so we're going to just open this up and we'll scroll down and choose our price which is our hidden field which contains the price for the silver membership
which in this example was 99.99 okay that's all you need to do there are a couple other things you can drop in if you want to and you can see we've got some of the typical sort of jet engine macros that you can use working inside jet form builder and you've got the gateway amount gateway status and field name so if you wanted to drop those into the success message or the failed message you could drop those in just by simply copying those little short codes those little macros dropping them insert those into your message
for each of those so other than that we're going to simply hit update let me just quickly recap what we've done here we've set this up to work with the global settings for the client id and secret key for the payment gateway we've set the currency code to be working in dollars we've said that on successful payments once the payment is completed the register user process will happen and then finally we've got the create payment order once everything is completed that'll create the post inside the orders custom post type to store the details of this
particular order and we grab the field information for price from our custom hidden field inside our form and set that price inside there let's update this and let's just save our draft so we've got a third and final thing that we need to add into the whole process and that's to just create an email and send that where we need it to go to so to do that we're going to simply come down to the new action again send email is perfectly fine and now we can do is we can come in here we can
edit this and set this up as we want to so now you can go through and pre-fill out any of the details so who do you want to mail this to well for this example we say it's going to go to the admin so they know there's a new user who do you want to reply to you can set this up to be the email form submitted or a custom email address we'll set that to be email form submitted and if you want to drop in a reply to email you can do that and grab
that data from your form now i'm going to quickly fill out the rest of this form so you don't have to watch me doing it there's nothing particularly complex on here it's all pretty self-explanatory there we go everything is now being pre-filled out and as you can see if we take a look at the content at the bottom the little wrench icon in the corner that just gives you all the macros that you can use to customize the email and pull in the data from the form that you have created so really simple and straightforward
how all of that works we'll hit update on there and that's basically the key elements for this form so things done so all that's left to do now is publish this form insert it into our page and test things out so let's just publish this that's that side of things done we can now come back out of here and we can create a page just to test our form side of things there so let's just do that let's add a new page in and let's just call this silver and what we'll do is we'll simply
come down underneath there and we'll just add in the form element so we're going to do a search for form there's our jet form we select that from there and we're going to just choose the form we want to work with which is our silver membership form and there's our form inserted into our design now obviously this looks a little bit ugly let's just test it out make sure it all works and then we can make things look a little prettier so let's go ahead and publish our page and once that's published we can then
test this out okay so i've opened up a completely different browser now we're into safari so i can test this out and let's just try this out sample drop in an email and we'll just put in test email password we'll let that use a strong password on there and we'll just put in my name so now what should happen is a case of we hit register on you and this that should then take us straight over to paypal to make our payment hit register and it takes us over to paypal and we can now complete
our whole payment process side of things now once that's completed you made your payment you can see we've now got my new user is inside here we hop over to the orders we'll see there's the latest order at the top and if we open this up we can take a look and you can see my membership level is silver so all those side of things have been done so the next thing we're going to do is take a look at how we set up the whole membership side of things now we have our simple membership
feature set up and some users added we need to manage exactly what the different levels can see on our website now keep this stage pretty minimal as the process is exactly the same no matter what you want to achieve with the membership feature so let's take this example i've already opened this up now inside elementor this is our home page and if we scroll through we're going to have a section towards the bottom that is for featured members only so you have to have an active membership and we can set the levels we want inside
you so all i need to do to set this up to be displayed only when certain membership levels are met is to select what i want which in this case is the entire section we're going to go to the advanced option and we're going to open up dynamic visibility which is part of the jet engine plugin and all we need to do is enable this once we've done that we can now open up and choose what conditions we want to have met to display or to hide things so you can see we can choose between
show or hide so we're just going to say show this if a condition is met we'll select that then we can set our conditions open this up expand the conditions and you can see we have lots of different options and what we're looking for is that we want to work with the user roles so you can see the user role is or the user role is not so we can say the user role is we'll select that option from there and then we can choose what user roles we want to set this to and click
and all our user roles are inside there including the ones we set up right back at the beginning for our custom user roles so we're going to do for this example is we're going to say for this you need to be at least a silver member so we select that option if we want to add gold in as well we can do that inside there so now we just simply set up for this to check the user roles to make sure that this show this element only if you're a gold or silver member we'll simply
hit update on there and now we can test this out on the front end so let's go ahead and test this out make sure everything is working now i'm logged in as an administrator i don't have gold silver or bronze membership so if i jump over onto the test site you can see i'll refresh this to make sure that it is the most up-to-date version i'll scroll down there's the normal listing and you can see it ends without me seeing that special listing section this time let's test it out with the account that i just
set up so this gives me silver membership so i'm simply going to log into the account we'll log in if we take a look in the top right hand corner you see i'm logged in as paul c which is the account that i just set up and if we scroll down with my silver membership you can see there's my featured member properties and we've got that custom section inside there but only because i'm logged in and i'm registered as a silver member user now let's just say i wasn't feeling quite so flush this year and
i decided to downgrade my role my membership down to bronze membership let's just change that over to bronze and i'll simply come in and refresh update this particular user account so now i've only got bronze membership now jump back over where i'm logged in as that sample account they'll pause the account so i'm into safari you can see there's my account in the corner let's refresh this now just so we've updated this to my new user account so i've no longer got gold or silver membership and you can see i no longer have access to
that section so creating any kind of membership setup is actually pretty simple and straightforward and you could get as creative and as comprehensive as you wanted to with a setup like this you're not limited to just one little section you can build this inside templates and create a full membership based site so now you've seen the basic steps to building a simple membership type feature along with connect and paypal you should have a good idea of what can be achieved with the tools i've covered today if you want to learn more about working with croco
blocks dynamic tools check out this video next and if you enjoyed this video and would like to be notified of all the new releases well why not click that subscribe button now as always all the applicable links are in the description below if you have any comments questions or feedback well why not pop those in the comments section my name is paul c until next time take care